Silvercrest SHBS 1000 A1 User Manual [en, cs, pl, de]
PERSONAL CARE
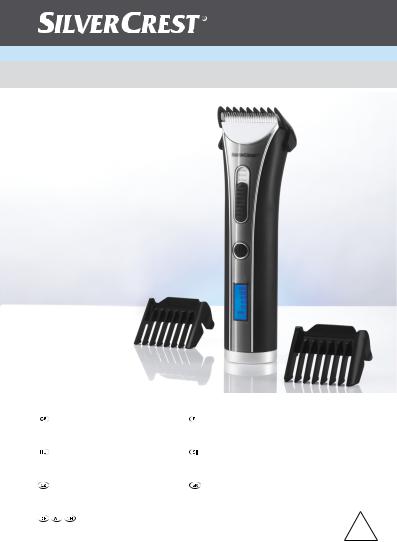
Hair Trimmer SHBS 1000 A1
Hair Trimmer |
Maszynka do strzyżenia włosów |
Operation and Safety Notes |
Wskazówki dotyczące obsługi i bezpieczeństwa |
Hajvágógép |
Aparat za striženje las |
Kezelési és biztonsági utalások |
Navodila za upravljanje in varnostna opozorila |
Strojek na vlasy |
Strojček na strihanie vlasov |
Pokyny pro obsluhu a bezpečnostní pokyny |
Pokyny pre obsluhu a bezpečnostné pokyny |
Haarschneider |
4 |
Bedienungs - und Sicherheitshinweise |
|
|
|
Before reading, unfold both pages containing illustrations and familiarise yourself with all functions of the device.
Przed przeczytaniem proszę rozłożyć obie strony z ilustracjami, a następnie proszę zapoznać się z wszystkimi funkcjami urządzenia.
Olvasás előtt kattintson az ábrákat tartalmazó mindkét oldalra és végezetül ismerje meg a készülék mindegyik funkcióját.
Pred branjem obe strani s slikami odprite navzven in se nato seznanite z vsemi funkcijami naprave.
Před čtením si odklopte obě dvě strany s obrázky a potom se seznamte se všemi funkcemi přístroje.
Pred čítaním si odklopte obidve strany s obrázkami a potom sa oboznámte so všetkými funkciami prístroja.
Klappen Sie vor dem Lesen die beiden Seiten mit den Abbildungen aus und machen Sie sich anschließend mit allen Funktionen des Gerätes vertraut.
|
GB |
Operation and Safety Notes |
Page |
5 |
|
|
PL |
Wskazówki dotyczące obsługi i bezpieczeństwa |
Strona |
23 |
|
|
HU |
Kezelési és biztonsági utalások |
Oldal |
43 |
|
|
SI |
Navodila za upravljanje in varnostna opozorila |
Stran |
61 |
|
|
CZ |
Pokyny pro obsluhu a bezpečnostní pokyny |
Strana |
81 |
|
|
SK |
Pokyny pre obsluhu a bezpečnostné pokyny |
Strana |
99 |
|
|
DE / AT / CH |
Bedienungsund Sicherheitshinweise |
Seite |
117 |
|
|
|
|
|
|
|
1
2
3
4
5
A
|
|
|
|
|
|
|
|
6 |
|
|
6 |
|
|
6 |
|
|
|
|
|
|
|||
|
|
|
|
|
|
|
|
|
|
|
|
|
|
|
|
7

B |
C |
D |
E |
F |
G |

Table of Contents
Introduction |
|
|
Proper use................................................................................ |
Page |
7 |
Included items.......................................................................... |
Page |
8 |
Description of parts................................................................. |
Page |
8 |
Technical data......................................................................... |
Page |
9 |
Safety...................................................................................... |
Page |
9 |
General safety advice............................................................. |
Page 10 |
|
Before first use |
|
|
Charging the batteries............................................................. |
Page 13 |
|
Use |
|
|
Prolonging the life of the rechargeable batteries.................. |
Page 15 |
|
Tips........................................................................................... |
Page 15 |
|
Cutting hair............................................................................... |
Page 16 |
|
Cutting without an attachment................................................ |
Page 17 |
|
Thinning hair............................................................................ |
Page 18 |
|
Cutting to shape the hairline, neck and sideboards.............. |
Page 18 |
|
Trimming and cutting your beard........................................... |
Page 18 |
|
Cleaning and care........................................................ |
Page 18 |
|
Cleaning the housing............................................................... |
Page 19 |
|
Cleaning your hair and beard clippers.................................. |
Page 19 |
|
Disposal................................................................................. |
Page 20 |
|
Warranty and service............................................... |
Page 21 |
|
Conformity.......................................................................... |
Page 22 |
|
|
GB |
5 |
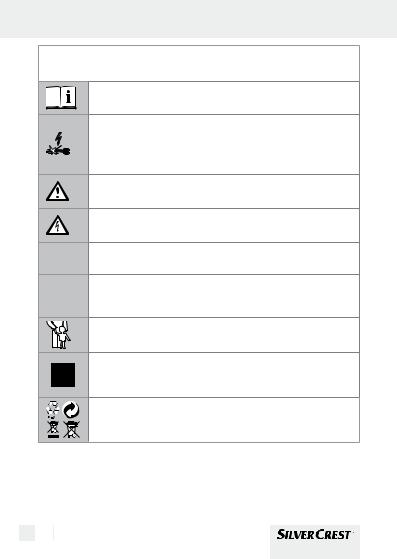
The following icons / symbols are used in this instruction manual:
V
mA / mAh
Read instruction manual!
Damaged appliances, power cables and power plugs mean potentially fatal risks from electric shock. Regularly check the condition of the appliance, the power cables and the power plugs.
Observe caution and safety notes!
Caution – electric shock!
Dangerous electric current – danger to life!
Voltage
Milliamps / Milliamp-hours
Keep children and other unauthorised personnel at a safe distance when using electrical tools.
Safety class II
Dispose of the packaging, device and rechargeable batteries separately and in an environmentally compatible manner.
6 GB
Introduction
Hair Trimmer
Q Introduction
Dear Customer,
We are pleased you chose to purchase this product and hope you enjoy using your new hair and beard clippers.
These hair and beard clippers and their easily fitted cutting length comb attachments 6 can be used to cut different hair lengths and shape perfect hair contours. The clippers also have a sliding switch 2 for fine adjustment of the cutting length. The cutting system consists of a blade set 1 with titanium-coated blade block and ceramic cutting
blade. These materials ensure your clippers cut well and efficiently, whilst being particularly gentle to your skin.
These instructions are intended to familiarise you with your new device and make using it a pleasure. Please read through the instructions for use carefully before using your new device for the first time and keep them in a safe place for future reference.
Q Proper use
The hair and beard clippers are intended for private use only and not for commercial purposes. The device is intended only for cutting natural hair. Use on human hair only – not on artificial or animal hair. The warranty is invalidated if the device is used for any purpose other than those indicated.
GB 7

Introduction
Q Included items
1 Hair and beard clippers
1 Charging station
1 Plug-in adapter
6 Cutting length comb attachments
1 Thinning attachment
1 Cleaning brush
1 Scissors
1 Comb
1 Cutter oil
1 Travel bag
1 Hairdressing cape
1 Instructions for use
Q Description of parts
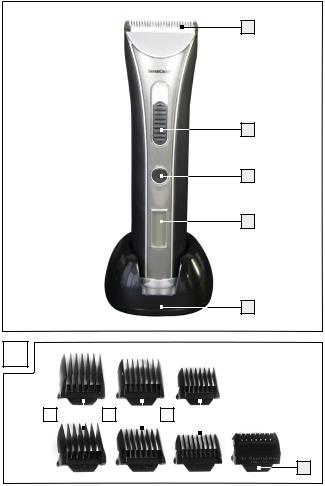
1Blade set with titanium-coated blade block and ceramic cutting blade
2Sliding switch for fine adjustment of cutting length 0.5 mm / 1.2 mm / 1.9 mm / 2.5 mm
3On / Off switch (ON / OFF)
4Charge state indicator (FULL - CHARGE, 100 % / 80 % / 60 % / 40 % / 20 %)
5Charging station / holder with connection socket for plug-in mains adapter
6Cutting length comb attachments 4 - 6 mm / 7 - 9 mm / 10 - 12 mm / 16 - 18 mm / 22 - 24 mm / 28 - 30 mm
7Thinning attachment
8 GB
|
|
|
|
|
Introduction / Safety |
Q Technical data |
|
|
|
|
|
Plug-in mains adapter: |
|
|
|
|
|
Input: |
100 - 240 V ~, 50 / 60 Hz |
||||
Output: |
4.5 V |
|
|
, 1,000 mA |
|
|
|
||||
Protection class: |
|
|
|
|
|
Ambient conditions: |
For indoor use only |
||||
Hair and beard clippers: |
|
|
|
|
|
Model: |
SHBS 1000 A1 |
||||
Article No.: |
9133711 |
||||
Rechargeable batteries: |
2 x NiMH, HR6 (AA) 1,000 mAh |
||||
Input: |
4.5 V |
|
|
, 1,000 mA |
|
|
|||||
Permissible ambient |
|
|
|
|
|
temperature range: |
+10 °C to +40 °C |
||||
Q Safety
Please read carefully through the operating instructions
before using the device for the first time. By strictly observing
 the safety advice you will avoid accidents, injury and damage. The following operating instructions and advice are intended to help make you familiar with the clippers and accessories and how to use them. The product is fitted with safety features. In spite of this you should read through the safety advice carefully and use the product only as described in these instructions. By doing this you will avoid inadvertent injury or damage.
Keep these instructions in a safe place for future reference. If you pass on the product to a third party, please include this documentation as well.
GB 9

Safety
General safety advice
JThis device is not intended to be used by persons (including children) with restricted physical, sensory or mental abilities or with insufficient experience and / or knowledge, unless they are supervised by a person who is responsible for their safety or they have received instruction on how to use the device from such a responsible person. Children should be supervised in order to ensure that they do not play with the device.
JKeep the hair and beard clippers and the adapter
inaccessible for children as they cannot always correctly assess the possible risks connected with the use of
such devices.
JAfter using them, keep the hair and beard clippers and the adapter in a safe place, out of the reach of children.
When unpacking the device, please pay attention to the following:
mDANGER FOR CHILDREN! DANGER TO LIFE FROM SUFFOCATION! Keep the packaging material out of reach of children.
To avoid injury:
JDo not use the device with defective cutting length comb attachments 6 or a defective thinning attachment 7 as they can have sharp edges. Risk of injury!
10 GB
Safety
The device will operate at its best if you observe the following:
JTo ensure optimum performance, operate the device only in accordance with the information on the rating plate.
JDo not expose the hair clippers to temperatures below +10 °C or above +40 °C.
JThoroughly clean the device after each use.
To avoid the danger of loss of life from electric shock:
JDisconnect the mains adapter after use or before cleaning. c CAUTION! DANGER OF ELECTRIC SHOCK! Do not use
while in the bath.
JATTENTION! Keep the device dry.
JNever immerse the device or the lead in water or other liquids.
JOperate the device only in compliance with the rating plate. Never leave the device to operate unattended.
JPull the mains adapter out of the mains socket
-if a fault occurs,
-before you clean the device,
-if you intend leave the device unused for a long period,
-after every use.
When doing this pull directly on the mains adapter and not on the lead.
JStop using the device immediately if the lead, mains adapter, housing or any other part is found to be damaged.
JHave all repairs carried out by a specialist dealer or through our Service Centre (see the warranty sheet).
GB 11
Safety
cCAUTION! DANGER OF ELECTRIC SHOCK! If the device falls into the water, the first thing you must do is pull the mains adapter out of the mains socket before you put your hands into the water.
cCAUTION! DANGER OF ELECTRIC SHOCK! Never touch the mains adapter with wet hands particularly when you insert or pull
out the adapter from the mains socket.
JHandle the mains adapter only by its body when you insert it into the mains socket.
JIncorporation of a residual current device (RCD) with a rated trip current of not more than 30 mA will provide you with additional protection against electric shock. Have this RCD incorporated by an electrician.
JUse only the supplied original mains adapter for mains operation.
JRegularly check the adapter and the hair and beard clippers for any possible mechanical defects.
JReplace defective parts with original replacement parts obtained from a specialist dealer but never attempt to repair the device yourself!
JHave all repairs carried out by a specialist dealer or through our Service Centre (see Service Hotline on the warranty sheet).
JEnsure that the lead does not become trapped in cupboard doors or pass over hot surfaces. Otherwise
you risk damaging the insulation on the lead.
To avoid fire:
JDisconnect the mains adapter after use or before cleaning.
JOperate the device only in compliance with the rating plate. Never leave the device to operate unattended.
12 GB

Safety / Before first use
JPull the mains adapter out of the mains socket
-if a fault occurs,
-before you clean the device,
-if you intend leave the device unused for a long period,
-after every use.
When doing this, pull directly on the mains adapter and not on the lead.
JStop using the device immediately if the lead, mains adapter, housing or any other part is found to be damaged.
JUse only the supplied original mains adapter for mains operation.
JConnect the mains adapter to an easily accessed mains socket only.
JDo not cover the mains adapter, otherwise it may lead to a dangerous build-up of heat.
Q Before first use
The hair and beard clippers can be operated as a cordless device or from the mains adapter.
Q Charging the batteries
The batteries should be charged for at least 3 hours before the hair and beard clippers are used for the first time. For subsequent charging processes, a charging time of 90 minutes is adequate.
Make sure that the device is fully charged before you use it without the plug-in mains adapter.
GB 13
Before first use
The device is fitted with 2 NiMH rechargeable batteries and an overcharge protection system so that the batteries can be topped up without being overcharged.
jConnect the cable of the plug-in mains adapter to the charging
station 5 of the hair and beard clippers.
jAvoid injury and damage to the device! Make sure that the device is switched off before you charge the rechargeable batteries.
jInsert the plug-in mains adapter (wide voltage range 100 - 240 V) into a mains outlet socket that meets the requirements of the device.
jThe charge state indicator 4 on the front of the device illuminates red and shows the battery symbol (the symbol indicating that the device is connected to the mains) and the value indicating the % of the full charge achieved. After a charge state of approx. 20 % has been achieved, the charge state indicator 4 changes colour to blue and the relevant % value for the charge capacity flashes until that charge state is achieved. The rechargeable batteries are fully charged when the 100 % mark stops flashing and is continuously illuminated.
jThe charge state indicator 4 switches off a few seconds after completion of the charging process.
jThe device can operate with fully charged batteries for up to about 60 minutes when disconnected from the mains.
Operation with the plug-in mains adapter:
If your hair and beard clippers stop during use because of discharged or weak rechargeable batteries, you can continue by connecting the plug-in mains adapter.
14 GB
Before first use / Use
jInsert the connector plug of the plug-in mains adapter into the socket on the underside of the hair and beard clippers.
jTo avoid injury and damage to the device, always switch off the device before you connect it to the mains supply.
jInsert the plug-in mains adapter (wide voltage range 100 - 240 V) into a mains outlet socket that meets the requirements of the device.
jAfter 1 - 2 seconds you can switch on the device by pressing the ON / OFF switch 3 . If the device does not start working immediately, switch it off again and wait for about 1 minute before you switch it on again.
jIf you wish to charge the batteries in this way without using the charging station 5 , then do so only with the device switched off.
QUse
QProlonging the life of the rechargeable batteries
For a longer rechargeable battery service life, it is recommended that the batteries are completely discharged before they are recharged. To completely discharge the battery, run the device until it comes to a complete stop.
Q Tips
The hair to be cut should be clean and dry.
jComb your hair through carefully to remove any knots.
jPlace the hairdresser’s cape or a cloth around the throat and neck to prevent hair from dropping into the collar.
GB 15

Use
Q Cutting hair
Tip: Start with a cutting length comb attachment with a longer cutting length than is finally required, then proceed in stages until you achieve the desired length.
Cutting length comb attachments 6 :
jSelect the cutting length comb attachment 6 (4 - 6 mm / 7 - 9 mm / 10 - 12 mm / 16 - 18 mm / 22 - 24 mm / 28 - 30 mm) to suit the desired cutting length.
jPush the selected cutting length comb attachment 6 from the rear on to the blade set 1 . Ensure that the two pins on the attachment engage properly into the recesses in the sides of cutter head mount. Note: By adjusting the setting of the sliding switch 2 you can finely graduate the desired cutting length of the cutting length comb attachments 6 . If you select the cutting length comb attachment 6 for a hair length of 22 - 24 mm and would like to cut your hair to 22 mm, then slide the sliding switch 2 for the fine adjustment of the cutting length as far as it will go upwards (0.5 mm). Stepping the fine adjustment setting switch downwards increases the cutting length to 22.7 mm (with a fine adjustment of 1.2 mm); to 23.4 mm (with a fine adjustment of 1.9 mm) or to 24 mm (with a fine adjustment of 2.5 mm).
|
|
Cutting length comb |
|
Cutting lengths* |
|
|
|||||
|
|
attachment |
6 |
(mm) |
with cutting length fine adjustment (mm) |
|
|||||
|
|
|
|
|
|
|
|
|
|
|
|
|
|
|
|
|
|
0.5 |
1.2 |
1.9 |
|
2.5 |
|
|
|
4 - 6 |
4.0 |
4.7 |
5.4 |
|
6.0 |
|
|||
|
|
7 - 9 |
7.0 |
7.7 |
8.4 |
|
9.0 |
|
|||
|
|
10 - 12 |
10.0 |
10.7 |
11.4 |
12.0 |
|
||||
|
|
16 - 18 |
16.0 |
16.7 |
17.4 |
18.0 |
|
||||
|
|
|
|
|
|
|
|
|
|
|
|
|
16 |
GB |
|
|
|
|
|
|
|||
|
|
|
|
|
|
|
|
|
|
|
|

|
|
|
|
|
|
|
Use |
|
|
|
|
|
|
|
|
|
|
|
Cutting length comb |
|
Cutting lengths* |
|
|
|||
|
attachment |
6 |
(mm) |
with cutting length fine adjustment (mm) |
|
|||
|
|
|
|
|
|
|
|
|
|
|
|
|
0.5 |
1.2 |
1.9 |
2.5 |
|
|
22 - 24 |
22.0 |
22.7 |
23.4 |
24.0 |
|
||
|
28 - 30 |
28.0 |
28.7 |
29.4 |
30.0 |
|
||
*Please note that the actual cutting lengths may deviate from the cutting lengths given here, depending on the cutting angle.
jAlways cut off small amounts at a time.
jGuide the hair and beard clippers slowly through the hair.
jHold the device so that the selected cutting length comb attachment 6 is always lying as flat on the scalp as possible.
jAlways cut from the neck towards the top of the scalp or from the forehead and temples upwards towards the centre of the scalp.
Q Cutting without an attachment
CAUTION! DANGER OF INJURY!
The cutter head is very sharp!
Without a cutting length comb attachment 6 in place, the device can cut hair to a length of between 0.5 mm and 2.5 mm. Slide the sliding switch 2 to finely adjust the cutting length to the desired value.
Note: By varying how and at what angle you hold the hair clippers, you can depart from the cutting lengths indicated in these instructions for use or marked on the attachment / device.
GB 17

Use / Cleaning and care
Q Thinning hair
This attachment allows you to reduce the volume of hair by only picking up and cutting part of the hair.
jPush the thinning attachment 7 on to the blade set 1 from the front to thin out the hair. This attachment reduces the volume of the hair.
QCutting to shape the hairline, neck and sideboards
jTurn the device over so that the back is facing upwards.
jPlace the edge of the blade set 1 without a cutting length comb
attachment 6 at the point where you wish the hairline to start.
jMove the operating hair and beard clippers downwards.
Q |
Trimming and cutting your beard |
||
j |
Select a cutting length to suit your desired length of beard. |
||
j |
Now gradually shorten your beard in steps. |
||
Q |
Cleaning and care |
|
|
|
|
RISK TO LIFE FROM ELECTRIC SHOCK! |
|
|
|
||
|
|
|
|
jBefore you clean the device, pull the mains plug out of the mains socket.
18 GB
Cleaning and care
jNever touch the mains adapter with wet hands when you insert or pull out the adapter from the mains socket.
jAlways keep the mains adapter and connection lead dry.
 Warning! Do not immerse the hair and beard clippers in water or other liquids for cleaning as the device is not waterproof. Failure to observe this advice could damage the electrically conducting parts (rechargeable batteries).
Q Cleaning the housing
jClean the housing using a slightly moist cloth.
Q Cleaning your hair and beard clippers
jSwitch off the hair and beard clippers by pressing the ON / OFF switch 3 .
jDisconnect the lead from the device and pull the plug-in mains adapter out of the mains socket.
jTake any fitted cutting length comb attachment 6 off the device.
jWash the cutting length comb attachments 6 when necessary by holding them under flowing water.
jThen fully dry the attachments.
jUsing your thumb from the front of the device, press against the teeth of the cutter head to release the blade set 1 from its mount (see Fig. B).
jUse the supplied cleaning brush to remove any remaining hair residue from the blade set 1 .
GB 19

Cleaning and care / Disposal
jAfter cleaning, place the locating lug of the blade set 1 back into the locating hole of the cutter head mount (see Fig. C).
jRe-engage the blade set 1 by applying a little light pressure from the rear of the device (see Fig. D).
Tip: To reduce friction apply one or two drops of cutter oil (accessory) from time to time between the blades and spread it out evenly. You may also use any acid-free oil (such as sewing machine oil). Wipe away any excess oil with a cloth.
Q Disposal
This hair and beard clipper contains two NiMH rechargeable batteries.
The batteries should be discharged before disposal.
jDisconnect the device from the power supply.
jSwitch the device on and allow it to continue to operate until it switches itself off.
jPress the release button on the back of the device (bottom) to remove the rechargeable batteries from the device (see Figs. E - G).
Now you can dispose of all the components in accordance with the regulations.
You are not permitted to throw away single-use or rechargeable batteries with household refuse. Please dispose of single-use or rechargeable batteries through a battery return system or a battery collection point run by your dealer or local council.
20 GB

Disposal / Warranty and service
When you decide to discard the device, please do not place it (even without batteries) into the household refuse bin. Contact your local council to find out about environmentally friendly and proper disposal of the device as electrical scrap.
The packaging is composed of natural materials and can be recycled. Dispose of these materials properly in the interests of environmental protection.
Q Warranty and service
For details of the service hotline for your country, please refer to the enclosed warranty documents.
Our device was manufactured with the greatest of care. Nevertheless, in the event of a malfunction we guarantee the quality and function of the product within the scope of our terms of guarantee. The warranty period is 36 months and begins on the date of purchase. Please retain your receipt as proof of the purchase date. The statutory warranty is not restricted by this guarantee.
The guarantee excludes:
-parts subject to regular wear and tear such as all trimming and cutting parts.
-damage to fragile parts.
-damage resulting from unauthorised interference.
-damage resulting from the use of non-original spare parts.
-damage resulting from improper handling.
-damage resulting from force majeure.
-damage resulting from non-compliance with the care instructions.
-batteries.
GB 21

Warranty and service / Conformity
We are furthermore unable to assume liability for the consequences of improper use of the device.
Q Conformity 

The CE marking has been applied to the product in compliance with the following European directives:
EU Low Voltage Directive (2006 / 95 / EC) Electromagnetic Compatibility (EMC) Directive (2004 / 108 / EC)
The Declaration of Conformity is held by the distributor:
LUTTER & PARTNER GmbH
Schleissheimer Strasse 93 a
D-85748 Garching bei München
NOTE:
We reserve the right to make technical and optical modifications to the article and its accessories in the course of product improvement.
22 GB

Spis zawartości
Wstęp |
|
|
Zastosowanie zgodne z przeznaczeniem......................... |
Strona |
25 |
Dostawa............................................................................... |
Strona |
26 |
Opis części........................................................................... |
Strona |
26 |
Dane techniczne.................................................................. |
Strona |
27 |
Bezpieczeństwo......................................................... |
Strona |
27 |
Ogólne wskazówki bezpieczeństwa................................. |
Strona |
28 |
Przed uruchomieniem........................................... |
Strona |
31 |
Ładowanie akumulatora..................................................... |
Strona |
32 |
Obsługa |
|
|
Przedłużenie żywotności akumulatorόw............................ |
Strona |
34 |
Rady..................................................................................... |
Strona |
34 |
Strzyżenie włosόw............................................................... |
Strona |
34 |
Strzyżenie bez nasadki....................................................... |
Strona |
36 |
Przerzedzanie włosόw........................................................ |
Strona |
36 |
Przycinanie konturόw przy nasadzie włosόw, |
|
|
szyi oraz bokobrodόw........................................................ |
Strona |
36 |
Przystrzyganie włosόw i brody........................................... |
Strona |
37 |
Czyszczenie oraz pielęgnacja........................ |
Strona |
37 |
Czyszczenie obudowy........................................................ |
Strona |
38 |
Czyszczenie maszynki do strzyżenia włosόw / i brody.... |
Strona |
38 |
Usunięcie.......................................................................... |
Strona |
39 |
Gwarancja i serwis................................................. |
Strona |
40 |
Zgodność ........................................................................ |
Strona |
41 |
|
PL |
23 |
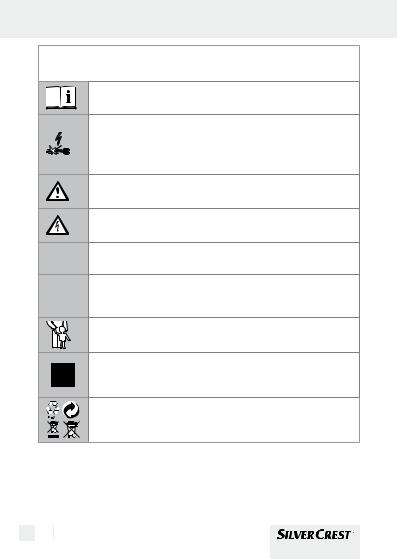
W niniejszej instrukcji obsługi zastosowano następujące znaki / symbole:
V
mA / mAh
Przeczytaj instrukcję obsługi!
Uszkodzenie urządzenia, kabla sieciowego lub wtyczki sieciowej zwiększa ryzyko porażenia prądem elektrycznym. Regularnie sprawdzaj stan urządzenia, kabla sieciowego, wtyczki.
Przestrzegaj wskazówek ostrzegawczych i bezpieczeństwa!
Ostrzeżenie przed porażeniem prądem elektrycznym! Niebezpieczne napięcie elektryczne - zagrożenie dla życia!
Napięcie przemienne
Milliampery / Milliamperogodziny
W czasie użytkowania urządzenia dopilnuj, aby w pobliżu nie przebywały dzieci ani żadne inne osoby.
Elektronarzędzie klasy ochrony II; podwójna izolacja ochronna
Proszę usunąć opakowanie, urządzenie oraz akumulatory oddzielnie oraz zgodnie z wymaganiami środowiska naturalnego!
24 PL
Wstęp
Maszynka do strzyżenia włosów
Q Wstęp
Szanowna klientko, szanowny kliencie,
dziękujemy za państwa zakup oraz życzymy państwu wiele radości z pańską nową maszynką do strzyżenia włosόw / i brody.
Z niniejszą maszynką do strzyżenia włosόw / i brody oraz z jej łatwo wymienialnymi nasadkami do rόżnych długości cięć 6 mogą państwo dokonywać rόżnych długości cięć oraz czystych kontur. Dodatkowo dysponują państwo przełącznikiem przesuwnym 2 do precyzyjnego
nastawienia długości. System cięcia składa się z głowicy tnącej 1 z blokiem ostrzy powlekanych tytanem oraz ceramicznym nożem do krajania. Niniejsze materiały dbają o optymalną, gruntowną wydajność cięcia oraz nie powodują podrażnień skόry.
Niniejsza instrukcja zapozna państwa z nowym urządzeniem oraz ułatwi państwu jego obsługę. Przed pierwszym zastosowaniem państwa nowego urządzenia proszę przeczytać uważnie niniejszą instrukcję obsługi oraz zachować ją starannie na okres pόźniejszy.
Q Zastosowanie zgodne z przeznaczeniem
Maszynka do strzyżenia włosόw / i brody dopuszczona jest do zastosowania jedynie w celach prywatnych, nie wolno jej używać w ramach działalności gospodarczej. Niniejsze urządzenie przeznaczone jest jedynie do cięcia włosόw naturalnych. Może ono być zastosowane jedynie do włosόw ludzkich – nie sztucznych lub sierści zwierząt.
PL 25

Wstęp
W przypadku zastosowania sprzecznym z przeznaczeniem wygasają roszczenia gwarancyjne.
Q Dostawa
1 Maszynka do strzyżenia włosόw / i brody
1 Stacja ładująca
1 Zasilacz
6 Nasadek do rόżnych długości cięcia
1 Nasadka do przerzedzania
1 Szczotka do czyszczenia
1 Nożyczki
1 Grzebień
1 Olejek do smarowania
1 Etui na czas podrόży
1 Peniuar
1 Instrukcja obsługi
QOpis części
1Wsad tnący z blokiem ostrzy powlekanych tytanem oraz ceramicznym nożem do krajania
2Przełącznik przesuwny do precyzyjnego nastawienia długości 0,5 mm / 1,2 mm / 1,9 mm / 2,5 mm
3Przełącznik Zał. / Wył. (ON / OFF)
4Lampka kontrolna ładowania na zasilaczu (FULL - CHARGE, 100 % / 80 % / 60 % / 40 % / 20 %)
5Stacja ładująca / zamocowanie z podłączeniem do zasilacza
26 PL
Wstęp / Bezpieczeństwo
6Nasadki do rόżnych długości cięcia 4 - 6 mm / 7 - 9 mm / 10 - 12 mm / 16 - 18 mm / 22 - 24 mm / 28 - 30 mm
7Nasadka do przerzedzania
Q Dane techniczne
Zasilacz: |
|
|
|
|
|
Wejście: |
100 - 240 V ~, 50 / 60 Hz |
||||
Wyjście: |
4,5 V |
|
|
, 1.000 mA |
|
|
|
||||
Klasa ochrony: |
|
|
|
|
|
Warunki otoczenia: |
dopuszczone jedynie w |
||||
|
pomieszczeniach wewnętrznych |
||||
Maszynka do strzyżenia włosόw- / i brody: |
|||||
Typ: |
SHBS 1000 A1 |
||||
Nr artykułu: |
9133711 |
||||
Akumulatory: |
2 x NiMH, HR6 (AA) 1.000 mAh |
||||
Wejście: |
4,5 V |
|
|
, 1.000 mA |
|
|
|||||
Dop. temperatura otoczenia: |
+10 °C do +40 °C |
||||
Q Bezpieczeństwo
Przed uruchomieniem urządzenia prosimy o staranne zapoznanie się z instrukcją obsługi. Stosować się dokładnie do wskazówek bezpieczeństwa dla uniknięcia wypadku, obra-żeń
i szkód. Poniższe wskazówki obsługi mają na celu zapoznanie Państwa z urządzeniem i ułatwienie jego obsługi. Urządzenie wyposażone jest w zabezpieczenia. Mimo to prosimy o staranne przeczytanie wskazówek bezpieczeństwa i stosowanie urządzenia zgodnie z opisem w niniejszej
PL 27
Bezpieczeństwo
instrukcji tak, aby przez nieuwagę nie spowodować obrażeń czy szkód.
Instrukcję należy zachować do ewentualnej późniejszej lektury.
W przypadku przekazywania urządzenia osobom trzecim prosimy przekazać również niniejszą instrukcję.
Ogólne wskazówki bezpieczeństwa
JUrządzenie nie jest przeznaczone do obsługi przez osoby (także dzieci) o ograniczonych zdolnościach fizycznych, sensorycznych czy intelektualnych, a także bez doświadczenia i / lub wiedzy, chyba że będą to robiły pod nadzorem osoby odpowiedzialnej za ich bezpieczeństwo lub też uzyskają od niej wskazówki jak należy obchodzić się z urządzeniem. Dzieci powinny być pod opieką tak, aby zagwarantować, że nie będą bawiły się urządzeniem.
JMaszynkę i adapter sieciowy należy przechowywać
w miejscu niedostępnym dla dzieci, ponieważ dzieci nie zawsze potrafią poprawnie ocenić potencjalne
zagrożenia.
JPo użyciu maszynkę i adapter sieciowy przechowywać w bezpiecznym miejscu poza zasięgiem dzieci.
Przy rozpakowaniu urządzenia pamiętać o:
mNIEBEZPIECZNE DLA DZIECI! ZAGROŻENIE ŻYCIA PRZEZ UDUSZENIE! Materiał opakowania trzymać z daleka od dzieci.
28 PL
Bezpieczeństwo
Dla uniknięcia obrażeń należy pamiętać:
JProszę nie stosować urządzenia z wadliwymi nasadkami do cięcia 6 lub wadliwymi nasadkami do przerzedzania 7 , mogą one posiadać ostre obrzeża. Istnieje zagrożenie obrażeniem!
Dla zapewnienia właściwej bezawaryjnej eksploatacji należy pamiętać:
JDla umożliwienia optymalnego użytkowania stosować się do informacji podanych na tabliczce identyfikacyjnej.
JMaszynki do strzyżenia nie poddawać działaniu temperatur poniżej +10 °C lub powyżej +40 °C.
JPo każdorazowym użyciu urządzenie gruntownie oczyścić.
Dla uniknięcia niebezpiecznego dla życia porażenia prądem należy pamiętać:
JPo użyciu lub do czyszczenia wyjąć zasilacz.
cUWAGA! NIEBEZPIECZEŃSTWO PORAŻENIA PRĄDEM!
Nie korzystać z urządzenia podczas kąpieli.
JUWAGA! Urządzenie utrzymywać w stanie suchym.
JNigdy nie zanurzać urządzenia oraz kabla ze stacją dokującą w wodzie lub innej cieczy.
JNigdy nie zostawiać urządzenia bez nadzoru. Użytkować jedynie zgodnie z danymi na tabliczce identyfikacyjnej.
PL 29

Bezpieczeństwo
JOdłączyć zasilacz z gniazda elektrycznego
-w przypadku zakłóceń,
-przed czyszczeniem urządzenia,
-jeśli urządzenie nie będzie użytkowane przez dłuższy czas,
-po każdym użyciu.
Wyciągnąć bezpośrednio zasilacz, nie ciągnąć za kabel.
JJeśli na kablu, zasilaczu, na obudowie lub innych częściach stwierdzone zostanie uszkodzenie, wówczas urządzenia nie wolno dalej użytkować.
JNaprawy dokonywane mogą być przez sieć sprzedaży lub centrum serwisowe (patrz dokument gwarancyjny).
cUWAGA! NIEBEZPIECZEŃSTWO PORAŻENIA PRĄDEM!
Jeśli urządzenie wpadnie do wody, wówczas przed wyciągnięciem go z wody bezwarunkowo wyciągnąć zasilacz sieciowy z gniazdka.
cUWAGA! NIEBEZPIECZEŃSTWO PORAŻENIA PRĄDEM!
Nigdy nie dotykać zasilacza wilgotnymi rękoma, w szczególności
przy wkładaniu wzgl. wyciąganiu z gniazdka.
JPrzy wyciąganiu z gniazdka zasilacz chwytać za obudowę.
JZamontowanie urządzenia ochronnego na wypadek przebicia z mierzonym prądem wyzwalającym nie większym niż 30 mA jest dalszym zabezpieczeniem przed porażeniem prądem. Montaż zlecić wyłącznie wykwalifikowanemu elektrykowi.
JStosować wyłącznie oryginalny zasilacz wchodzący w zakres dostawy.
JRegularnym sprawdzaniu adaptera sieciowego i maszynki pod kątem ewentualnych uszkodzeń mechanicznych.
JW razie potrzeby części uszkodzone wymieniać na części oryginalne (dostępne w handlu branżowym), nigdy nie próbować samodzielnej naprawy uszkodzonego urządzenia!
JNaprawę zlecić tylko przez sieć handlową lub nasze centrum serwisowe (patrz service-hotline na dokumencie gwarancyjnym).
30 PL
 Loading...