


Steam Brush SDRB 1000 A1
R
KOMPERNASS GMBH
BURGSTRASSE 21 · D-44867 BOCHUM
www.kompernass.com
ID-Nr.: SDRB 1000 A1-06/11-V2
IAN: 68982
Steam Brush
Operating instructions
Perie cu aburi
Instrucţiunile
Ηλεκτρική βούρτσα ατμού
Οδηγίες χρήσης
Četka na paru
Upute za upotrebu
Парна четка
Ръководство за експлоатация
Dampfbürste
Bedienungsanleitung
SDRB 1000 A1
r
e |
|
|
|
|
|
|
|
|
|
|
|
|
1 |
|
|
|
|
|
|||||||||
w |
|
|
|
|
|
|
|
|
|
||||
|
|
|
|
|
|
|
|
|
|||||
|
|
|
|
|
|
|
|
2 |
|||||
q |
|
|
|
|
|
|
|
|
|
||||
|
|
|
|
|
|
|
|
|
|||||
|
|
|
|
|
|
|
|
|
|
||||
|
|
|
|
|
|||||||||
0 |
|
|
|
|
|
3 |
|||||||
|
|
|
|
|
|||||||||
9
4
8
 5
5
t
6
 7
7

CONTENT |
PAGE |
|
|
Safety instructions |
2 |
|
|
Intended Use |
6 |
|
|
Technical data |
6 |
|
|
Items supplied |
6 |
|
|
Description of the appliance |
6 |
|
|
Before the First Usage |
6 |
|
|
Operation |
7 |
Filling with water . . . . . . . . . . . . . . . . . . . . . . . . . . . . . . . . . . . . . . . . . . . . . . . . . . . . . . . . . . . .7 Attaching/detaching the brush attachment . . . . . . . . . . . . . . . . . . . . . . . . . . . . . . . . . . . . . . .8 Steam brush function . . . . . . . . . . . . . . . . . . . . . . . . . . . . . . . . . . . . . . . . . . . . . . . . . . . . . . . . .8 Clothing care . . . . . . . . . . . . . . . . . . . . . . . . . . . . . . . . . . . . . . . . . . . . . . . . . . . . . . . . . . . . . . .8 Curtain and soft furnishing care . . . . . . . . . . . . . . . . . . . . . . . . . . . . . . . . . . . . . . . . . . . . . . . .9 Fluff brush . . . . . . . . . . . . . . . . . . . . . . . . . . . . . . . . . . . . . . . . . . . . . . . . . . . . . . . . . . . . . . . . .9 Ironing function . . . . . . . . . . . . . . . . . . . . . . . . . . . . . . . . . . . . . . . . . . . . . . . . . . . . . . . . . . . . .9 After using the steam brush . . . . . . . . . . . . . . . . . . . . . . . . . . . . . . . . . . . . . . . . . . . . . . . . . . .10
Cleaning and care |
10 |
Scale removal . . . . . . . . . . . . . . . . . . . . . . . . . . . . . . . . . . . . . . . . . . . . . . . . . . . . . . . . . . . . |
.10 |
Storage |
10 |
Troubleshooting |
10 |
Disposal |
11 |
Warranty & Service |
11 |
Importer |
11 |
Read the operating instructions carefully before using the device for the first time and preserve this booklet for later reference. Pass this manual on to whoever might acquire the device at a future date.
- 1 -

STEAM BRUSH
Safety instructions
 Risk of Burns!
•When the appliance is hot, grasp it only by the handle. •Children should be supervised to ensure that they do not
play with the appliance.
•Never hold your hand over the steam spray or on hot metal parts.
•You should not open the filler opening of the water reservoir while the steam brush is in use. First of all, remove the plug from the mains power socket and allow the appliance to cool down completely.
•Never use the steam brush on clothes while they are being worn!
•Never direct jets of steam at other people or animals. •Under no circumstance should you use the appliance if it
shows visible signs of damage, has fallen or leaks water. Arrange for it to be repaired by qualified specialists.
•The steam brush and its connecting cable must, when the appliance is heating up or cooling down, be kept out of reach of children who are younger than 8 years old.
- 2 -

 Risk of fire! Risk of Injury!
•Never leave unattended a steam brush that is hot, switched on or connected to the mains power supply.
•Put the appliance into storage only when it has cooled down.
•Place the appliance on level and heat resistant surfaces only with the stand folded out. The appliance must be stood securely when it is put down.
•When applying steam, use only the temperatures detailed in the garment care instructions, or those suitable for the material. Otherwise, you could damage the textiles. Should care instructions not be given or known, start with the lowest temperature setting.
•Never permit children to use the steam brush.
 Danger of electrical shocks.
•The rating of the local power supply must tally completely with the details given on the rating plate of the appliance.
•To avoid potential risks, arrange for a defective appliance to be checked and possibly repaired by qualified technicians, or contact our Customer Service Department..
•Arrange for defective power plugs and/or cables to be replaced at once by qualified technicians or our Customer Service Department.
- 3 -

•To disconnect from the power source, pull only on the plug itself, not on the cable.
•Never bend (kink) or crush the power cable. Arrange it in such a way that it cannot come into contact with hot surfaces and so that no-one can step on it or trip over it.
•After every usage, before cleaning the appliance and when refilling with water, remove the plug from the mains power socket.
•Never touch the power cable or the power plug with wet hands.
•Under no circumstances may the appliance be submersed in fluids or fluids be allowed to permeate the housing. Do not expose the appliance to humidity and do not use it outdoors. Should liquids enter the housing, unplug the appliance from the mains power socket immediately and arrange for it to be repaired by a qualified technician.
•NEVER use the appliance adjacent to water contained in a bath, shower, wash basin or other vessels. The proximity of moisture presents a danger, even when the appliance is switched off.
•You may not open the appliance housing. Permit only authorised technicians to repair a defective appliance.
- 4 -

•Under NO circumstance should you use the appliance if it shows visible signs of damage, has fallen or leaks water. Arrange for it to be repaired by qualified specialists.
•Discontinue use of the appliance if the anti-kink protection on the power cable is damaged!
•This appliance may only be used by children aged 8 years or more and by individuals with reduced physical, sensory or mental capabilities or lack of experience and/or knowledge if they are supervised, or have been instructed in the safe use of the appliance and have understood the potential risks. Children may not play with the appliance. Cleaning and user maintenance by children should not be carried out without supervision of them.
- 5 -

 Attention!
•Should the care instructions in the clothing item forbid ironing (Symbol  ), you may not use the steam brush on it. Should you do so, the clothing
item could be permanently damaged.
•The water tank is to be filled exclusively with mains water (or a mix of distilled and mains water). You will otherwise damage the appliance.
•You may not clean the appliance with solvents, alcohol or abrasive cleaning agents. These could cause damage to it.
Intended Use
This Steam Brush is intended exclusively for the smoothing and removal of crinkles, fluff and hairs on home textiles. It may only be used indoors and in a domestic household. All other use is deemed improper use.
Technical data
Rated voltage: |
220-240 V ~ / 50 Hz |
Output: |
1000 W |
Items supplied
Steam Brush
Brush attachment
Measuring beaker
Operating instructions
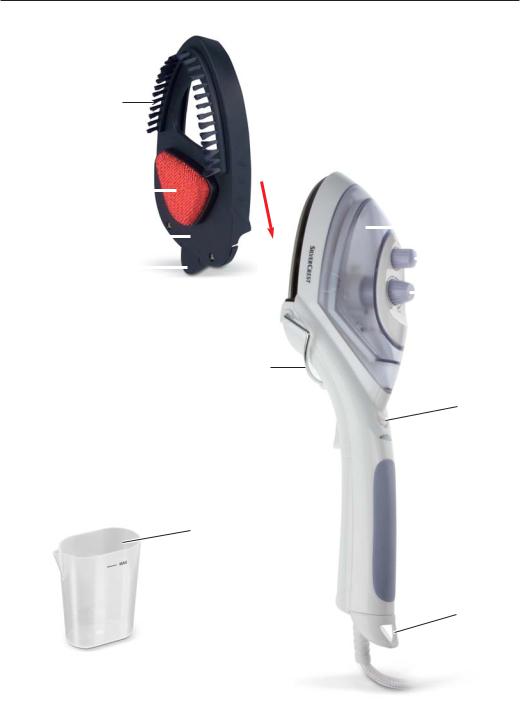
Description of the appliance
1 Water tank
2 Water fill opening
3 Temperature regulator
4 Unlocking device for the water tank
5 Heating-up control lamp
6 Suspension eye
7 Power cable with power plug
8 Steam blast button
9 Stand
0 Sole of the iron
q Unlocking device for brush attachment w Brush attachment
e Fluff brush r Clothes brush
t Measuring beaker
Before the First Usage
•Remove the steam brush from the packaging.
•Remove all possible adhesive tags and protective foils from the steam iron.
•Remove the protective cap from the brush attachment w.
 Attention!
Plastic bags can be dangerous. To avoid fatalities through suffocation, keep plastic bags out of the reach of children.
- 6 -
•Fill the water tank 1 with water (see chapter "Filling with water").
•Insert the power plug 7 into a correctly installed and earthed mains power socket.
•Hold the steam brush horizontally.
•Place the temperature regulator 3 at the position "MAX".
•Heat the steam brush up at the highest setting for a few minutes. By doing this you will clear production residues from the sole 0 of the appliance.
•Activate the steam shot button 8 a few times, so that steam exits from the soleplate 0.
•Then iron a redundant piece of material, this will remove any impurites that may possibly be on the sole of the iron 0.
Note:
On the first heating up of the appliance a small volume of smoke and smell may be generated, caused by production residues. This is completely normal and is not dangerous. Provide for sufficient ventilation, for example, open a window.
Operation
Note:
•Should the care instructions in the clothing item forbid ironing (Symbol  ), you may not use the steam brush on it. If you do so, the clothing
item could be permanently damaged.
•Do NOT use the appliance on leather, velvet, impregnated furniture or steam sensitive materials. If you do, the material/furniture could become damaged.
Filling with water
Attention!
Fill the watertank 1 exclusively with tap water or distilled water mixed with tap water. Never fill watertank 1 with chemical substances, cleaning agents (with the exception of decalcification agents) or other liquids.
Do not use chemically distilled water. This would irreparably damage the appliance.
Should the mains water at your locality be rated as hard, it is recommended that you mix mains water with some distilled water. Otherwise, the jets for the steam blast function could calcify (become blocked) prematurely.
To extend the optimal steam blast function, mix mains water with distilled water according to the table.
Water hardness |
Ratios - distilled |
water to mains water |
|
|
|
very soft / soft |
0 |
|
|
medium |
1: 1 |
|
|
hard |
2: 1 |
|
|
very hard |
3: 1 |
|
|
The water hardness level can be queried at your local water works.
Attention!
Before refilling with water, ALWAYS remove the plug 7 from the mains power socket! There is a risk of electric shock!
•Lift the water tank 1 up vertically, in that you slide the release 4 for the water tank 1 to the rear until the water tank 1 allows itself to be lifted off. Grasp the water tank 1 with your thumb and index finger on the hatched markings to lift it vertically upwards. The temperature controller 3 remains on the appliance and is not lifted off.
•Open the water fill opening 2 to the water tank 1.
•Using the measuring beaker t, fill the water tank 1 with mains water to the "Max" marking, but no further.
- 7 -

•Close the water fill opening 2 to the water tank 1. Ensure that the lug on the water fill opening 2 sits in the indentation on the lid. Only in this way is the water tank 1 properly closed.
•Replace the water tank 1 back onto the appliance. The water tank 1 must audibly engage with the unlocking device for the water tank 4.
Attaching/detaching the brush attachment
Attention!
NEVER attempt to attach or detach the brush attachment w when the appliance is heated up. Risk of Burns!
•To use the steam and brush function, place the brush attachment w onto the steam brush.
•To do this, slide the brush attachment w all the way along the guide to the end. The unlocking device of the brush attachment q must engage audibly.
•To be able to use the ironing function, remove the brush attachment w from the steam brush.
•To do this, press the unlocking device q downwards and, at the same time, pull the brush attachment w away to the front.
Note:
For the steam blast function, set the temperature regulator 3 to at least •••.
At lower settings the temperature is not sufficient to generate a steam blast.
•By pressing the steam blast button 8 you can now produce jets of steam.
Note:
To release the first steam blast after heating the appliance up, it can happen that you may need to press the steam blast button 8 several times in succession.
The appliance is now ready for use.
Attention!
The steam brush can be used with all clothing items. Caution is to be exercised with heat-sensitive materials such as synthetics, polyamides or artificial silk. With these materials you should first check at a concealed part (inside seam) that the hot steam will not cause any damage to the garment. Do not touch these materials directly with the hot sole of the iron 0. Use only the steam blast.
Steam brush function
•Place the brush attachment w onto the appliance. This must engage audibly with the unlocking device on the brush attachment q.
•Insert the power plug 7 into a correctly installed and earthed mains power socket.
•To generate steam, set the temperature regulator 3 to at least ••• or higher. The heating-up control lamp 5 glows. As soon as the set temperature has been reached, the heating-up control lamp 5 goes out.
Clothing care
•Suspend the crumpled garment from a coat hanger.
•With one hand pull the garment flat, then steam it from top to bottom. The combination of steam and clothes brush r will gently remove all creases.
•Use light pressure with the clothes brush r and guide the appliance from top to bottom over the garment. You can thereby press the steam blast button 8 in short intervals.
Note:
You can repeatedly press the steam blast button 8 until the heating-up control lamp 5 glows or water drips from the sole of the iron 0.
Then, wait until the heating-up control lamp 5 extinguishes before activating a further blast of steam.
- 8 -
•Should the heating-up control lamp 5 start to glow during the process, release the steam blast button 8 and wait a few seconds until the heating-up control lamp 5 extinguishes.
Note:
Should you press the steam blast button 8 whilst the heating-up control lamp 5 is glowing the result will be condensed water instead of steam, and water will drip from the sole of the iron 0.
•Leave the garment on the clothes hanger to cool down before putting it on.
Curtain and soft furnishing care
•Creases and wrinkles can be removed from draperies by hanging them over a pole.
•Then simply follow the directions given under “Clothing care”.
•Always carry out a test first at a concealed part.
•If you are using the appliance horizontally, every now and then hold it upright so as to have the maximum steam performance.
Fluff brush
•Threads, fluff and hairs can be easily removed with the red fluff brush e by slowly brushing over the garment with it from left to right.
•You can clean the fluff brush e by brushing with it in the opposite direction (from right to left) over, for example, a remnant of material.
Ironing function
•Dismantle the brush attachment w from the appliance (see “Attaching/detaching the brush attachment”).
•Connect the appliance to a correctly installed and earthed mains power socket.
•Adjust the temperature regulator 3 as per the international point symbols (Care Label) or the type of material. The heating-up control lamp 5 glows. As soon as the set temperature has been reached, the heating-up control lamp 5 goes out .
Washing label Type of material |
Temperature |
|
regulator 3 |
Chemical fibres, |
• |
e.g. viscose, |
(low |
polyester |
temperature) |
|
•• |
Silk, Wool |
(medium |
|
temperature) |
|
••• |
Cotton, Linen |
(high |
|
temperature) |
Note:
If doubt exists, start with a low temperature and gradually increase it to a higher one. With sensitive materials we recommend carrying out an ironing test at a concealed part (inside seam).
•For heavily creased laundry, you can use the steam function by pressing the steam shot button 8. To generate the steam, the temperature regulator 3 must be set to at least ••• or higher.
•Should the heating-up control lamp 5 glow during the process, release the steam blast button 8 and wait for a few moments until the heating-up control lamp 5 extinguishes.
•You can repeatedly press the steam blast button 8 until the heating-up control lamp 5 glows or water drips from the sole of the iron 0. Then, wait until the heating-up control lamp 5 extinguishes before activating a further blast of steam.
Note:
Should you press the steam blast button 8 whilst the heating-up control lamp 5 is glowing the result will be condensed water instead of steam, and water will drip from the sole of the iron 0.
Should the water tank 1 become empty while the appliance is in use, remove the plug 7 from the power socket before refilling it.
- 9 -

•If you want to put the appliance down during use, fold out the stands 9 to the front and place the appliance on them. When you are ready to reuse the appliance, simply fold the stands 9 back to the rear.
After using the steam brush
•Place the temperature regulator 3 at the position "MIN".
•After use, ALWAYS remove the plug 7 from the power socket.
•Pour away any water remaining in the water tank 1 to do this, open, the water fill opening 2 of the water tank 1, turn the appliance upside down and lightly swivel it.
Cleaning and care
 Risk of personal injury!
ALWAYS remove the plug 7 before cleaning the appliance.
There is a risk of electric shock! Allow the appliance to cool down. Risk of Burns!
 Caution!
Never use aggressive cleansers. These can damage the surfaces.
•Clean the housing with a soft, dry cloth only.
•Clean the metal components with a lightly watermoistened cloth and a mild, non-aggressive cleaning agent.
Scale removal
Should the steam output diminish over a period of time, decalcify the steam brush.
•For decalcification use a standard commercial descaling agent based on citric acid. Proceed as detailed in the product instructions.
Storage
Attention!
Remove the plug 7 from the power socket and allow the appliance to cool down before putting it into storage.
Risk of fire!
Store the appliance at a dry location. You can also hang the appliance up by the suspension eye 6.
Troubleshooting
The steam brush ejects no or very little steam:
The supply of water in the steam brush is exhausted. Fill the water tank 1 with water (see "Filling with water").
The steam brush does not heat itself up:
The appliance is not connected to mains power. Insert the plug 7 into a wall power socket and set the desired temperature with the temperature regulator 3.
The steam brush is defective. Arrange for the appliance to be repaired by a qualified specialist.
The power socket is defective. Try another wall socket.
- 10 -
Disposal
Do not dispose of the appliance in your normal domestic waste. This product is subject to the European guideline 2002/96/EC.
Dispose of the appliance through an approved disposal centre or at your community waste facility. Observe the currently applicable regulations.
In case of doubt, please contact your waste disposal centre.
Dispose of all packaging materials in an environmentally responsible manner.
Warranty & Service
The warranty for this appliance is for 3 years from the date of purchase. The appliance has been manufactured with care and meticulously examined before delivery. Please retain your receipt as proof of purchase. In the event of a warranty claim, please make contact by telephone with our Service Department. Only in this way can a post-free despatch for your goods be assured.
The warranty covers only claims for material and manufacturing defects, but not for transport damage, for wearing parts or for damage to fragile components, e.g. buttons or batteries. This product is for private use only and is not intended for commercial use. The warranty is void in the case of abusive and improper handling, use of force and internal tampering not carried out by our authorized service branch. Your statutory rights are not restricted in any way by this warranty.
The warranty period will not be extended by repairs made under warranty. This applies also to replaced and repaired parts. Any damage and defects extant on purchase must be reported immediately after unpacking the appliance, at the latest, two days after the purchase date. Repairs made after the expiration of the warranty period are subject to payment.
Service Great Britain
Tel.: 0871 5000 720 (£ 0.10/Min.) E-Mail: kompernass@lidl.co.uk
IAN 68982
Service Ireland
Tel.: 1890 930 034
(0,08 EUR/Min., (peak))
(0,06 EUR/Min., (off peak)) E-Mail: kompernass@lidl.ie
IAN 68982
Importer
KOMPERNASS GMBH BURGSTRASSE 21
44867 BOCHUM, GERMANY
www.kompernass.de
- 11 -

- 12 -

SADRŽAJ |
STRANA |
|
|
Sigurnosne napomene |
14 |
|
|
Upotreba u skladu sa namjenom |
18 |
|
|
Tehnički podaci |
18 |
|
|
Obim isporuke |
18 |
|
|
Opis uređaja |
18 |
|
|
Prije prve uporabe |
18 |
|
|
Rukovanje |
19 |
Punjenje vode . . . . . . . . . . . . . . . . . . . . . . . . . . . . . . . . . . . . . . . . . . . . . . . . . . . . . . . . . . . . .19 Postavljanje/skidanje nastavka za četkanje . . . . . . . . . . . . . . . . . . . . . . . . . . . . . . . . . . . . . .20 Funkcija četkanja sa parom . . . . . . . . . . . . . . . . . . . . . . . . . . . . . . . . . . . . . . . . . . . . . . . . . .20 Održavanje odjeće . . . . . . . . . . . . . . . . . . . . . . . . . . . . . . . . . . . . . . . . . . . . . . . . . . . . . . . . .20 Njega zavjesa i jastučnih materijala . . . . . . . . . . . . . . . . . . . . . . . . . . . . . . . . . . . . . . . . . . .21 Četka za vlakna . . . . . . . . . . . . . . . . . . . . . . . . . . . . . . . . . . . . . . . . . . . . . . . . . . . . . . . . . . .21 Funkcija glačanja . . . . . . . . . . . . . . . . . . . . . . . . . . . . . . . . . . . . . . . . . . . . . . . . . . . . . . . . . .21 Nakon uporabe parne četke . . . . . . . . . . . . . . . . . . . . . . . . . . . . . . . . . . . . . . . . . . . . . . . . .22
Čišćenje i održavanje |
22 |
Odstranjivanje vapnenih naslaga . . . . . . . . . . . . . . . . . . . . . . . . . . . . . . . . . . . . . . . . . . . . . |
.22 |
Čuvanje uređaja |
22 |
Otklanjanje funkcionalnih smetnji |
22 |
Zbrinjavanje |
23 |
Jamstvo & servis |
23 |
Uvoznik |
23 |
Upute za rukovanje prije prve upotrebe pažljivo pročitajte i sačuvajte ih za kasnije korištenje. Ukoliko uređaj dajete trećim osobama, priložite i ove upute.
- 13 -

ČETKA NA PARU
Sigurnosne napomene
 Opasnost od opeklina!
•Uređaj hvatajte isključivo za rukohvat, kada je vruć.
•Djeca bi trebala biti pod nadzorom, čime treba biti osigurano da se ne mogu igrati ovim uređajem.
•Nikada ruku ne stavite u izlazeću paru i ne prislonite je na vruće metalne dijelove.
•Otvor za punjenja spremnika sa vodom ne smijete otvarati za vrijeme uporabe. Ostavite uređaj da se prvo ohladi, a zatim izvucite mrežni utikač iz mrežne utičnice.
•Odjevne predmete nikada ne četkajte neposredno na tijelu! •Parni mlaz nikada ne usmjerite u pravcu drugih osoba ili
životinja.
•Uređaj niukom slučaju ne koristite, kada ima vidljiva oštećenja, kada je pao ili ako iz njega curi voda. Prvo dajte uređaj kvalificiranom stručnom osoblju na popravak.
•Parna četka i njen priključni vod moraju za vrijeme uključivanja ili hlađenja biti izvan dohvata djece mlađe od 8 godina.
- 14 -

Opasnost od požara! Opasnost od ozljeđivanja!
•Parnu četku koja je vruća, priključena na strujnu mrežu ili uključena nikada ne ostavite bez nadzora.
•Uređaj spremite isključivo u ohlađenom stanju.
•Uređaj odložite isključivo sa isklopljenim stalkom na ravnu podlogu otpornu na visoke temperature. Uređaj mora imati stabilan oslonac, kada ga odlažete.
•Glačajte samo uz temperaturne postavke navedene na uputama za održavanje, koje moraju biti prikladne za dotični materijal. U protivnom možete oštetiti tekstilni materijal. Ukoliko vam nisu poznate upute za održavanje, započnite sa najnižom postavkom temperature.
•Nikada ne dopustite djeci da upotrebljavaju parnu četku.
 Opasnost od strujnog udara!
•Napon izvora struje mora odgovarati podacima na tipskoj ploči uređaja.
•Defektni uređaj u svrhu popravka neizostavno dajte kvalificiranoj stručnoj radionici ili se obratite servisu za kupce, kako bi bile izbjegnute opasnosti.
•Oštećene mrežne utikače ili oštećen mrežni kabel neizostavno dajte zamijeniti od strane autoriziranog stručnog osoblja ili servisa za kupce, kako biste izbjegli nastanak opasnosti.
- 15 -

•Uvijek povlačite samo utičnicu, a nikada kabel.
•Ne savijajte i ne gnječite mrežni kabel i postavite ga tako, da ne može doći u dodir sa vrućim površinama, te da nitko ne može na njega stati ili se preko njega protepsti.
•Prije čišćenja, prilikom punjenja vode i nakon svake uporabe izvucite mrežni utikač iz utičnice.
•Kabel ili mrežni utikač nikada ne dirajte vlažnim rukama. •Uređaj nikako ne smijete uroniti u tekućine, niti smijete dopustiti da tekućina dospije u unutrašnjost kućišta uređaja.
Uređaj ne smijete izložiti vlagi i ne smijete ga koristiti na otvorenom prostoru. Ukoliko ipak tekućina dospije u kućište uređaja, odmah izvucite utikač uređaja iz utičnice, te uređaj odnesite kvalificiranom stručnom osoblju na popravak.
•Uređaj niukom slučaju ne koristite u blizini vode, koja je sadržana u kadama, tuš-kadama, umivaonicima ili drugim posudama. Blizina vode uvijek predstavlja opasnost, i onda kada je uređaj isključen.
•Ne smijete otvarati kućište uređaja. Defektni uređaj na popravak dajte isključivo kvalificiranom stručnom osoblju.
- 16 -

•Uređaj niukom slučaju ne koristite, kada ima vidljiva oštećenja, kada je pao ili ako iz njega curi voda. Prvo dajte uređaj kvalificiranom stručnom osoblju na popravak.
•Uređaj više ne koristite, ako je oštećena zaštita od prijeloma mrežnog kabela!
•Ovaj uređaj može biti korišten od djece stare 8 ili više godina, te od osoba sa smanjenim fizičkim, senzoričnim i mentalnim sposobnostima ili nedostatkom iskustva i/ili znanja, ukoliko ove osobe stoje pod nadzorom treće osobe ili su primile naputke glede sigurne uporabe uređaja i shvatili opasnosti, koje iz ove uporabe proizlaze. Djeca se ne smiju igrati sa uređajem. Čišćenje i održavanje uređaja ne smiju biti vršeni od strane djece bez nadzora.
- 17 -

 Pažnja!
•Ukoliko napuci za održavanje odjeće zabranjuju
glačanje (simbol  ), dotični odjevni predmet ne smijete tretirati sa parnom četkom. U protivnom
možete oštetiti dotičnu odjeću.
•Smijete isključivo vodu iz vodovoda (ili destiliranu vodu pomiješanu sa vodom iz vodovoda) umetnuti u spremnik za vodu. U protivnom ćete oštetiti uređaj.
•Ne smijete čistiti uređaj uz pomoć otapala, alkohola ili ribajućih sredstava za čišćenje. U protivnom biste mogli oštetiti ovaj uređaj.
Upotreba u skladu sa namjenom
Parna četka je namijenjena isključivo za ravnanje i uklanjanje nabora, vlakana i vlasi na kućnim tekstilnim predmetima. Smijete je koristiti isključivo unutar zatvorenih prostorija i u okviru privatnog domaćinstva. Svi drugi načini upotrebe smatraju se protivnim namjeni uređaja.
Tehnički podaci
Nominalni napon: |
220-240 V ~ / 50 Hz |
Snaga: |
1000 W |
Obim isporuke
Četka na paru Nastavak za četkanje Mjerna čašica
Upute za rukovanje
Opis uređaja
1 Spremnik za vodu
2 Otvor za punjenje
3 Regulator temperature
4 Deblokada spremnika za vodu
5 Lampica za kontrolu zagrijavanja
6 Ovjesna omča
7 Mrežni kabel sa mrežnim utikačem
8 Tipka za izbačaj pare
9 Stalak
0 Stopalo za glačanje
q Deblokada za nastavak za četkanje w Nastavak za četkanje
e Četka za vlakna r Četka za odjeću t Mjerna čaša
Prije prve uporabe
Izjava o sukladnosti za ovaj proizvod dostupna je na internet stranici www.lidl.hr.
•Izvadite parnu četku iz pakiranja.
•Odstranite sve naljepnice i dijelove folije sa parne četke.
•Skinite zaštitnu kapu sa nastavka s četkom w.
 Pažnja!
Plastične vrećice mogu predstavljati opasnost. Da biste izbjegli opasnost od gušenja, plastične vrećice držite van dohvata beba i male djece.
•Umetnite vodu u spremnik za vodu 1 (vidi poglavlje "Umetanje vode").
•Utaknite mrežni utikač 7 u propisno instaliranu i uzemljenu mrežnu utičnicu.
•Držite parnu četku u vodoravnom položaju.
- 18 -
•Postavite regulator temperature 3 u poziciju „MAX“.
•Parnu četku zagrijte nekoliko minuta na najvišem stupnju. Na taj način će tvorničke naslage na stopi za glačanje 0 otpustiti.
•Aktivirajte tipku za izbačaj pare 8 nekoliko puta, tako da para izlazi iz stope za glačanje
0.
•Zatim glačajte otpadni komad tkanine, kako biste eventualno prisutne nečistoće sa stope za glačanje 0 odstranili.
Napomena:
Kod prvog zagrijavanja uređaja uslijed postojanja naslaga preostalih od izrade uređaja može doći do nastanka blagog dima i mirisa. To je sasvim normalna i potpuno bezopasna pojava. Osigurajte dostatnu ventilaciju, primjerice možete otvoriti jedan prozor.
Rukovanje
 Napomene
•Ukoliko napuci za održavanje odjeće zabranjuju
glačanje (simbol  ), dotični odjevni predmet ne smijete tretirati sa parnom četkom. U protivnom
možete oštetiti dotičnu odjeću.
•Ne tretirajte kožu, somot, impregnirane površine namještaja ili tkanine osjetljive na paru. U protivnom biste mogli oštetiti tkaninu/element namještaja.
Punjenje vode
Pažnja!
U spremnik za vodu 1 napunite isključivo pitku vodu iz vodovoda ili destiliranu vodu pomiješanu sa vodom iz vodovoda. Spremnik za vodu 1 nikada ne napunite kemijskim tvarima, sredstvima za čišćenje – sa iznimkom sredstava za odstranjivanje vapna – ili drugim tekućinama. Ne upotrebljavajte vodu, koja je kemijskim putem oslobođena sadržaja vapna. To dovodi do nepopravljivih oštećenja uređaja.
Ukoliko je voda u Vašem mjestu previše tvrda, preporučujemo da je pomiješate sa destiliranom vodom. U protivnom se u sapnicama za funkciju izbačaja pare mogu prije vremena stvoriti vapnene naslage.
Za produženje optimalne funkcije izbačaja pare običnu vodu pomiješajte sa destiliranom vodom u skladu sa tablicom.
Stupanj tvrdoće |
Udio destilirane |
|
vode |
vode u običnoj vodi |
|
vrlo |
0 |
|
mekana/mekana |
||
|
||
|
|
|
srednja |
1 : 1 |
|
|
|
|
tvrda |
2 : 1 |
|
|
|
|
vrlo tvrda |
3 : 1 |
|
|
|
Stupanj tvrdoće vode možete saznati kod vodoprivrede, koja Vas snabdijeva vodom.
Pažnja!
Prije punjenja uvijek izvucite mrežni utikač 7 iz mrežne utičnice! Postoji opasnost od strujnog udara!
•Skinite spremnik za vodu 1 povlačenjem okomito prema gore. Učinite to tako, što ćete deblokadu 4 spremnika za vodu 1 gurnuti prema nazad, sve dok spremnik za vodu 1 ne može biti odignut. Obuhvatite spremnik za vodu 1 palcem i kažiprstom na šrafiranim oznakama, kako biste ga okomito odigli prema gore. Regulator temperature 3 ostaje na uređaju i neće biti odignut.
- 19 -
•Otvorite umetni otvor 2 spremnika za vodu 1.
•Napunite pomoću mjerne čaše t vodu iz vodovoda najviše do oznake „Max“ u spremnik za vodu 1.
•Zatvorite umetni otvor 2 spremnika za vodu 1. Obratite pažnju na to, da ispust na umetnom otvoru 2 zahvata utor na poklopcu. Samo na taj način će spremnik za vodu 1 biti ispravno zatvoren.
•Ponovo postavite spremnik za vodu 1 na uređaj. Spremnik za vodu 1 mora čujno na deblokadi spremnika za vodu 4 uleći u ležište.
Postavljanje/skidanje nastavka za četkanje
Pažnja!
Nikada ne skinite nastavak za četkanje w i nikada ga ne postavite na uređaju, kada je ovaj zagrijan. Opasnost od opeklina!
•Da biste koristili parnu funkciju i funkciju četke, molimo postavite nastavak za četkanje w na parnu četku.
•U tu svrhu gurnite nastavak za četkanje w uz vodilicu do graničnika na uređaj. Deblokada nastavka za četkanje q mora čujno uleći.
•Da biste koristili funkciju glačanja, molimo skinite nastavak za četkanje w sa parne četke.
•U tu svrhu pritisnite deblokadu q prema dolje i istovremeno nastavak za četkanje w povlačenjem skinite prema naprijed.
Funkcija četkanja sa parom
•Nataknite nastavak za četkanje w na uređaj. Isti mora čujno na deblokadi nastavka za četkanje q uleći.
•Utaknite mrežni utikač 7 u propisno instaliranu i uzemljenu mrežnu utičnicu.
•Da bi se stvorila para, postavite regulator temperature 3 najmanje na stupanj ••• ili više. Kontrola zagrijavanja 5 svijetli. Čim je podešena temperatura dostignuta, gasi se kontrola zagrijavanja 5.
Napomena:
Za funkciju udara pare postavite regulator temperature 3 najmanje na stupanj •••. Na nižim stupnjevima temperatura nije dostatna za generiranje izbačaja pare.
•Pritiskanjem tipke za izbačaj pare 8 možete sada generirati izbačaj pare.
Napomena:
Za iniciranje prvog udara pare nakon zagrijavanja može biti potrebno da u više navrata uzastopno pritisnete tipku za udar pare 8.
Uređaj je spreman za pogon.
Pažnja!
Parna četka može biti korištena za sve vrste odijevnih predmeta. Oprezni morate biti kod tkanina osjetljivih na visoke temperature poput sintetičkih materijala, polijamida ili umjetne svile. Kod ovih materijala biste prethodno trebali na nevidljivom mjestu (unutrašnja strana šava) provjeriti, da vruća para ne može oštetiti materijal. Ove materijale ne dodirnite neposredno sa vrućom stopom za glačanje 0. Primjenite samo izbačaj pare.
Održavanje odjeće
•Objesite zgužvani odjevni predmet na vješalicu.
•Rukom povlačenjem poravnajte odijevni predmet i tretirajte ga parom sa gornje prema donjoj strani. Kombinacija pare i četke za odjeću r će na blagi način otkloniti sve nabore.
•Blago vršite pritisak sa četkom za odjeću r, te prijeđite sa uređajem sa gornje strane prema dolje preko odijevnog predmeta. Pritom možete tipku za izbačaj pare 8 pritisnuti u kratkim razmacima.
Napomena:
Pritisnite tipku za izbačaj pare 8 samo toliko puta za redom, dok lampica za kontrolu zagrijavanja 5 ne zasvijetli, ili dok voda ne počne kapati iz stope za glačanje 0. Pričekajte, dok se lampica za kontrolu zagrijavanja 5 ne ugasi, prije nego što izvršite još jedan izbačaj pare.
- 20 -
•Ako se lampica za kontrolu zagrijavanja 5 uključi za vrijeme pogona uređaja, otpustite tipku za izbačaj pare 8 i pričekajte nekoliko trenutaka, dok se lampica za kontrolu zagrijavanja 5 ponovo 8 zagasi.
Napomena:
Ako tipka za izbačaj pare 8 pritisnete, dok lampica za kontrolu zagrijavanja 5 svijetli, nastaje kondenzirana voda umjesto pare i voda će kapljati iz stope za glačanje 0.
•Ostavite odijevne predmete da se ohlade na vješalici, prije nego što ih nosite.
Njega zavjesa i jastučnih materijala
•Nabore i zgužvana mjesta možete iz tkanine odstraniti tako, što ćete tekstilne predmete objesiti preko neke šipke.
•Jednostavno slijedite upute navedene u poglavlju "Održavanje odjeće".
•Uvijek prvo izvršite test na nevidljivom mjestu.
•Ako uređaj upotrebljavate u vodoravnom položaju, s vremena na vrijeme ga držite okomito, kako biste postigli maksimalni učinak pare.
Četka za vlakna
•Konci, vlakna i vlasi pomoću crvene četke za vlakna e jednostavno mogu biti odstranjeni tako, što ćete polako četkati sa lijeve na desnu stranu preko odijevnih predmeta.
•Četku za vlakna e možete očistiti tako, što ćete četkati u suprotnom smjeru (sa desne na lijevu stranu), npr. preko otpadnih tkanina.
Funkcija glačanja
•Odstranite nastavak za četkanje w sa uređaja (vidi “Postavljanje/skidanje nastavka za četkanje”).
•Uređaj priključite na propisno instaliranu i uzemljenu mrežnu utičnicu.
•Podesite regulator temperature 3 u skladu sa međunarodnim simbolima sa točkama (etiketa odijevnog predmeta) ili u skladu sa vrstom tkanine. Lampica za kontrolu zagrijavanja 5 svijetli. Čim je podešena temperatura dostignuta, gasi se lampica za kontrolu zagrijavanja 5.
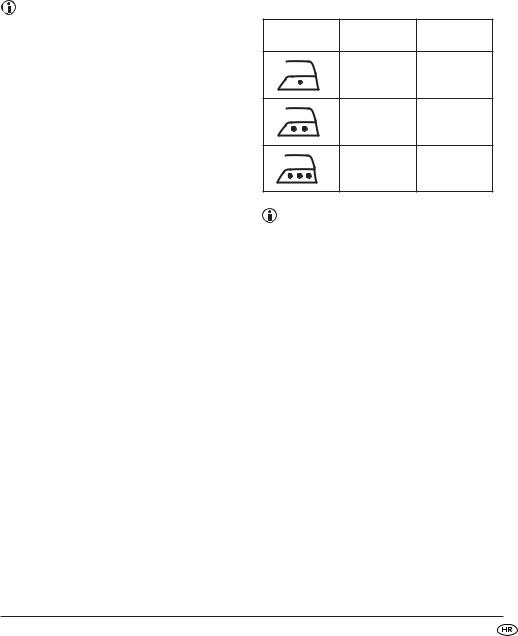
Etiketa rublja |
Vrsta tkanine |
Regulator |
|
|
temperature 3 |
|
Kemijska vlakna, |
• |
|
npr. viskoza, |
(niska |
|
polijester |
temperatura) |
|
|
•• |
|
Svila, vuna |
(srednja |
|
|
temperatura) |
|
|
••• |
|
Pamuk, lan |
(visoka |
|
|
temperatura) |
Napomena:
U slučaju dvojbe započnite sa niskom temperaturom, te istu onda povećavajte. Kod osjetljivih tkanina Vam preporučavamo, da na nevidljivom mjestu (unutrašnja strana šava) izvršite pokusno glačanje.
•Ako je rublje vrlo zgužvano, funkciju pare možete koristiti pritiskanjem tipke za izbačaj pare 8. Da bi se stvorila para, regulator temperature 3 mora stajati najmanje na stupnju ••• ili više.
•Ako se lampica za kontrolu zagrijavanja 5 uključi za vrijeme pogona uređaja, otpustite tipku za izbačaj pare 8 i pričekajte nekoliko trenutaka, dok se lampica za kontrolu zagrijavanja 5 ponovo zagasi.
•Pritisnite tipku za izbačaj pare 8 samo toliko puta za redom, dok lampica za kontrolu zagrijavanja 5 ne zasvijetli, ili dok voda ne počne kapati iz stope za glačanje 0. Pričekajte, dok lampica za kontrolu zagrijavanja 5 ne ugasi, prije nego što izvršite još jedan izbačaj pare.
- 21 -
 Loading...