


SIKP 2000 A1

KITCHEN TOOLS
Induction Hob SIKP 2000 A1
KOMPERNASS GMBH
BURGSTRASSE 21 · D-44867 BOCHUM
www.kompernass.com
ID-Nr.: SIKP2000A1-05/10-V3
3
Induction Hob
Operating instructions
CY
Induktiokeittolevy
Käyttöohje
Induktionskokplatta
Bruksanvisning
Induktionskogeplade
Betjeningsvejledning
Induktionskochplatte
Bedienungsanleitung
SIKP 2000 A1
0
1 2
4
6
7
9
8
3
5

- 1 -
Content Page
Safety instructions 2
Intended use 3
Appliance Overview 3
Technical data 3
Manner of operation 3
Suitable cookware 3
Unpacking 4
Items supplied 4
Placement 4
Utilisation 4
a) Placing cooking vessels...............................................................................................................4
b) Switching on.................................................................................................................................4
c) Switching off ................................................................................................................................4
d) Heating up....................................................................................................................................5
e) Elapsed time (Timer) ....................................................................................................................5
Cleaning and Care 5
Disposal 6
Warranty and Service 6
Importer 6
Read the operating instructions carefully before using the appliance for the first time and preserve this
booklet for later reference. Pass the manual on to whomsoever might acquire the appliance at a later date.
- 2 -
Induction Hob
Safety instructions
To avoid potentially fatal electric
shocks:
Ensure that the appliance, the power cable
and the power plug are NEVER submersed
in water or other fluids.
• Ensure that the power cable never becomes wet
or damp during operation. Lay the cable so that
it cannot be trapped or otherwise damaged.
• If the power cable or the power plug are damaged,
have them replaced by Customer Services before
continuing to use the device.
• Always remove the power plug from the wall
socket after use. Simply switching the appliance
off is not sufficien, as the appliance is under power
for as long as the plug is connected to the socket.
• Protect the cooker from damages: Do not burden
it irregularly and do not allow objects to fall onto
it. The appliance may not be taken into use if eit-
her the hob or the housing is damaged. Immedi-
ately remove the plug from the power socket
and arrange for the appliance to be repaired.
• Arrange for defective power plugs and/or cables
to be replaced at once by qualified technicians
or our Customer Service Department.
To avoid the risks of fire or injury:
• Do not touch the area at which a hot cooking
vessel has just been standing. Directly after
cooking, this area could be very hot.
• Overheated foodstuffs could begin to burn!
Never let the appliance be in use without super-
vision.
• Additionally, NEVER position the appliance be-
low inflammable objects, especially not below
curtains or drapes.
• NEVER heat up a securely closed container.
Through heat expansion it could quickly cause
an explosion.
• NEVER heat up an empty container. This would
very quickly overheat - presenting both the risk
of fire and of serious damage to the hob.
• Do not place any metallic objects on the induc-
tion area, such as kitchen utensils or pieces of
cutlery. They can become very hot in the energy
area.
• This appliance is not intended for use by individuals
(including children) with restricted physical, physio-
logical or intellectual abilities or deficiences in
experience and/or knowledge unless they are
supervised by a person responsible for their safety
or receive from this person instruction in how the
appliance is to be used.
• Children should be supervised to ensure that
they do not play with the appliance.
• Be careful when heating small volumes of coo-
king oils – do not select a high power level.
Should you do so, the oil could begin to burn
and start a conflagration!
• Do not use an external timing switch or a separate
remote control system to operate the appliance.
• NEVER operate the appliance on a metallic table
or other metallic surface. This could heat up, and
thus lead to either the outbreak of a fire or the ap-
pliance being damaged beyond repair.
Attention! Hot surfaces!
This symbol warns you not to touch the
cooking area directly after use. Risk of Burns!
To avoid risks and dangers caused
by electromagnetic fields:
• Maintain a minimum distance of 1 meter to
appliances that are sensitive to electromagnetic
fields (e.g. displays, clocks, magnetic storage
media, electronic devices etc.).
- 3 -
• Medical-technical devices such as heart pace-
makers, hearing aids and other appliances may
possibly need to be kept at a greater distance.
If in doubt, ask the manufacturer of the device!
Intended use
This appliance is ...
• intended for the heating up or keeping warm of
foods in domestic households and ONLY for use
in dry accommodation.
• NOT intended for the warming or heating up
of other materials, for industrial or commercial
applications or for use outdoors.
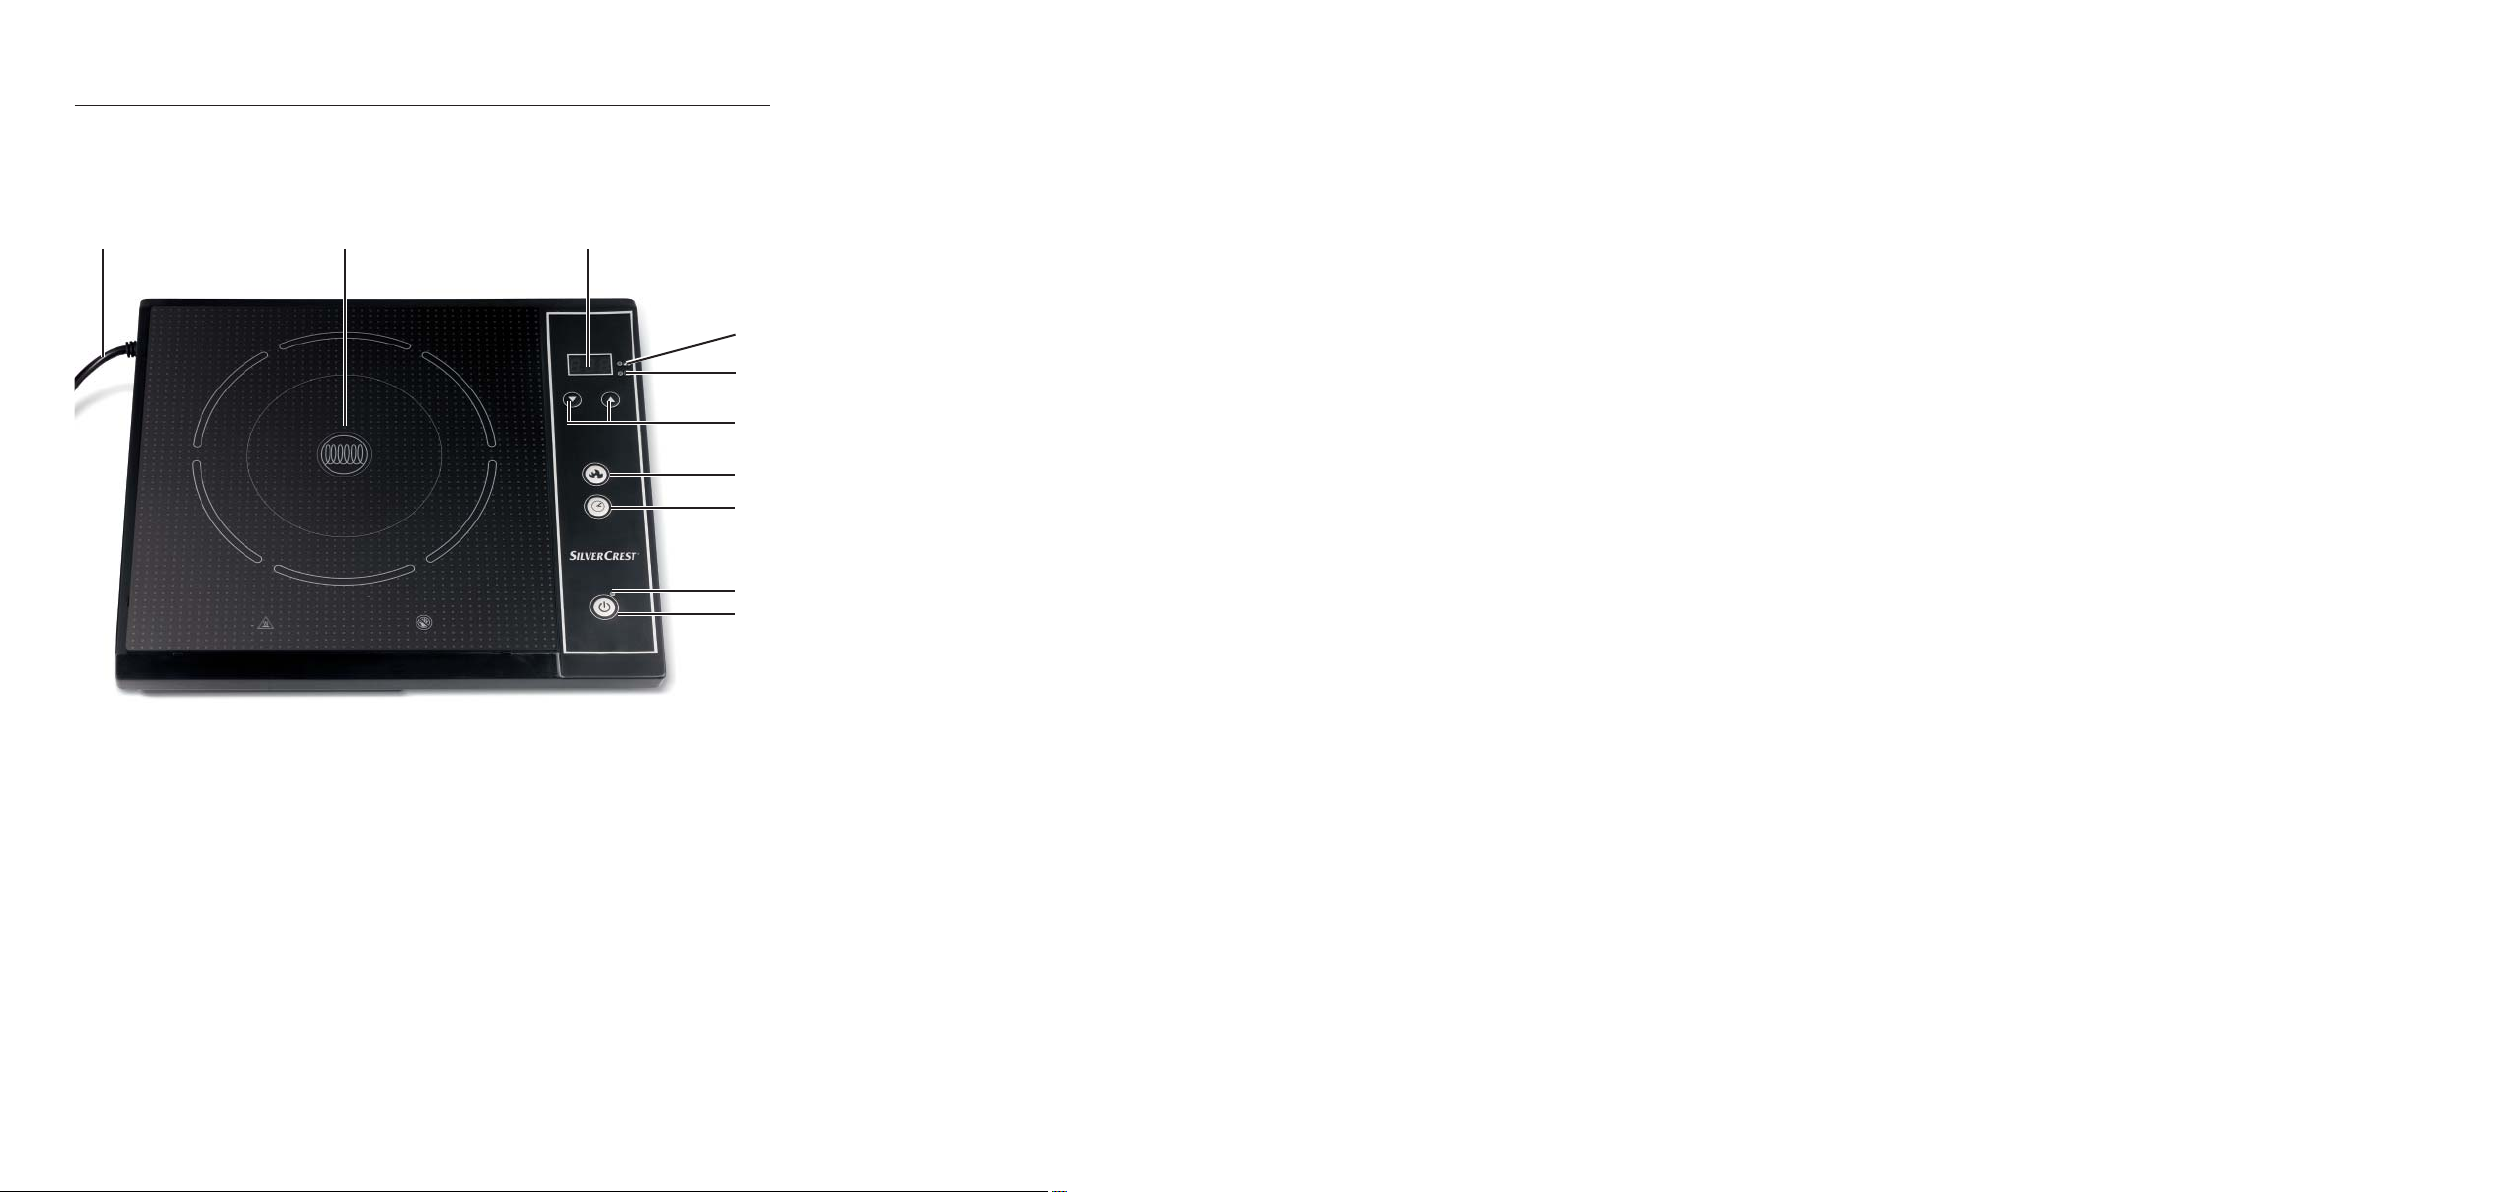
Appliance Overview
1 Hob
2 Display
Details of power level, timer settings or heat indi-
cator ("L" = Low – Temperature <50°C or "H" =
High temperature >50°C)
3 Control Lamp Power Stage
By glowing, it shows that the power stage is
being shown in the display.
4 Control Lamp Timer
By glowing, it shows that the timer is being
shown in the display .
5 ▼ ▲
Raise or reduce the setting for the power level or
the elapsed time (Timer)
6 Button - Power Setting
For setting the power level (L1-L10)
7 Button - Timer
For setting elapsed times of up to 180 mins for
automatic switch off
8 Control lamp
9 On/Off button
Switch the hob on or off, cancel the function
0 Power cable with power plug
Technical data
Voltage : 220-240V
~
50/60Hz
Power consumption : 1800 - 2000 W
The workplace related noise emission of this
appliance is lower than 70 dB(A)
Protection class: II
Manner of operation
Whilst standard hobs become warm themselves, in
an induction cooker the heat is created in the base
of the cookware. The hob 1 itself is not heated up -
at the most, it becomes warmed up by the hot cook-
ware standing on it (reverse heating).
For this, an energy field generates a heat which can
only be created in magnetically conductible materials,
for example, pans made of iron. In other materials,
for example porcelain, glass or ceramic, the energy
field cannot create any heating effect.
Suitable cookware
Use only cookware that is suitable for induction
cookers:
• Suitable are pots and pans with a base made of
steel or cast iron. These are recognisable either
through the markings on the pan or if a magnet
clings to the base of the pan.
• Unsuitable are all types of cookware made of
metals to which a magnet does not cling, for
example aluminium, copper and stainless steel,
as well as those made of porcelain, glass, ceramics
and plastics etc.
• Thin pan bottoms are better suited for induction
cookers than thick sandwich bottoms. The very
short reaction times to setting adjustments (short
pre-warm time; fast metered roasting) are not
possible with thick pan bases.

- 4 -
Only use cookware that is suitable for the size of
the hob 1. The diameter...
• may not exceed 26 cm, so that the pan does not
overhang,
• and may not be less than 16 cm, so that the ener-
gy field can actually work.
• The base of the pan may not be uneven, rather,
it must sit flat and squarely.
Only then can the induction cooker function perfectly.
Unpacking
Before taking the appliance into use check to ensure
that ...
• the appliance is undamaged, and also the power
cable with plug 0.
• all packaging materials are removed from the
appliance. Preserve the packaging so as to be
able to store the appliance under protection or
to transmit it through the post, e.g. for repairs.
Items supplied
After unpacking, check to ensure all items are avai-
lable. Being supplied are:
1 x Induction cooker
1 x Operating instructions
Placement
So as not to overheat, the appliance requires unre-
stricted ventilation. Therefore, position the appliance
such that ...
• there is an all-round free space of minimum
10 cm, e.g. to the nearest wall,
• a free space directly above of minimum 60 cm,
e.g. to a suspended wall cabinet.
For cooling, the appliance draws in air through the
openings on the underside.
• Therefore, place it only on firm and smooth sur-
faces, not on textiles or fluffy surfaces, such as
tablecloths.
• Do not place it adjacent to curtains, drapes or
other textiles that, due to the airflow, could press
themselves against the appliance.
Utilisation
When you have unpacked and positioned the ap-
pliance as described above, it is now ready for use.
a) Placing cooking vessels
• Place the cooking vessel in the middle of the hob 1.
This may ...
- not project over the edge of the hob 1 and ...
- not weigh more than 10 kg (together with its
contents).
b) Switching on
When cookware with content is standing on the
hob 1:
• Insert the plug 0 into the mains power socket. A
signal sounds, the control lamp 8 lights up and
"- L -" appears in the display 2. The appliance is
now ready.
• Press the button On/Off 9. The control lamps
3/4 blink and a signal tone sounds.
The appliance is now ready for use.
c) Switching off
The appliance switches off, ...
• if, within 30 seconds of switching on, you do not
select any further function,
• if you activate the button On/Off 9 once again,
also when it is in actual use.

- 5 -
Note:
In standby mode, that is, after switching off or befo-
re switching on, indicated in the display 2 are eit-
her "- L" or "- H -".
These heat indicators mean:
"- L -" = "Low" - the hob temperature is < 50°C
or
"- H -" = "High" - the hob temperature is > 50°C
For safety reasons, the cookware recognition feature
switches the appliance off automatically when you ...
• remove the cooking vessel from the hob for longer
than 15 seconds, or do not place one there.
• Although the energy field is immediately switched
off with short cookware removals, the selected
function remains active. Around every 3 seconds
a signal tone issues a reminder that in roughly
15 seconds the appliance will switch itself off
automatically.
The hob 1 also switches itself off after 120 minutes
of continuous use should you not have entered in
any new settings in the meantime.
d) Heating up
After you have switched the appliance on ...
• Press the button Power level 6, to adust the power
level in steps (L1 - L10). The higher the power level,
the higher the temperature generated in the coo-
king vessel. Using the button ▼ ▲ 5 you can
adjust this from L1 (lowest power level) through
to L10 (highest power level). The control lamp
Power Stage 3 glows during the adjustment.
Note:
Warming up starts as soon as one of these buttons
is activated. The setting can be adjusted at any time
during the current usage.
e) Elapsed time (Timer)
You can pre-select a time period from 1...180 minutes,
after which the hob 1 should switch itself off.
• First start the warming-up, as described above.
• Press the button Timer 7 to start the stopwatch
function. Serving as a check, a "0" appears in
the display 2 and the control lamp Timer 4
glows.
• With the button ▼ ▲ 5 you can now set the
desired elapse time period from 1...180 minutes ...
- forwards in 5 minute steps,
- backwards in 1 minute steps.
• When you have set the desired time period and
do not press any other buttons, the countdown
starts automatically and the programmed power
level appears in the display 2.
Cleaning and Care
Apart from regular cleaning after use, no maintenance
work of any kind is required on the appliance.
CAUTION!
Before cleaning the appliance:
• First remove the plug 0 from the power socket.
Risk of electric shock! Allow the appliance to
cool down. Risk of Burns!
UNDER NO CIRCUMSTANCES may the ap-
pliance or parts of it be submersed in liquids!
This could result in you receiving a fatal electric
shock and the appliance could be irreparably
damaged.
• Never open the housing of the appliance. You
could receive a potentially fatal electric shock.
• Do not use solvents or abrasive cleaners. These
could damage the hob 1 and the areas made
of synthetic materials.
• Clean all outer surfaces and the power cable 0
only with a lightly moistened cloth. In all cases,
dry the appliance well.
- 6 -
• Burnt-on soiling on the hob 1 can be removed
with a scraper suitable for glass hobs, available
in most household equipment shops.
• Should soiling be visible in the area of the venti-
lation slots, you can attempt to remove this from
outside with a vacuum cleaner.
Disposal
Do not dispose of the appliance in your
normal domestic waste. This product is
subject to the provisions of European
Directive 2002/96/EC.
Dispose of the appliance through an approved
disposal centre or at your community waste facility.
Observe the currently applicable regulations. In
case of doubt, please contact your waste disposal
centre.
Dispose of all packaging materials in an
environmentally friendly manner.
Warranty and Service
The warranty for this appliance is for 3 years from
the date of purchase. The appliance has been ma-
nufactured with care and meticulously examined be-
fore delivery. Please retain your receipt as proof of
purchase. In the event of a warranty claim, please
make contact by telephone with our Service Depart-
ment. Only in this way can a post-free despatch for
your goods be assured.
The warranty covers only claims for material and
maufacturing defects, but not for transport damage,
for wearing parts or for damage to fragile compo-
nents, e.g. buttons or batteries. This product is for
private use only and is not intended for commercial
use. The warranty is void in the case of abusive and
improper handling, use of force and internal tampe-
ring not carried out by our authorized service
branch. Your statutory rights are not restricted in
any way by this warranty.
The warranty period will not be extended by repairs
made under warranty. This applies also to replaced
and repaired parts. Any damage and defects extant
on purchase must be reported immediately after un-
packing the appliance, at the latest, two days after
the purchase date. Repairs made after the expira-
tion of the warranty period are subject to payment.
DES UK LTD
Tel.: 0871 5000 700
(£ 0.10 / minute)
e-mail: support.uk@kompernass.com
Kompernass Service Ireland
Tel.: 1850 930 412 (0,082 EUR/Min.)
Standard call rates apply. Mobile operators may vary.
e-mail: support.ie@kompernass.com
Kompernass Service Cyprus
Tel.: 800 9 44 01
e-mail: support.cy@kompernass.com
Importer
KOMPERNASS GMBH
BURGSTRASSE 21
44867 BOCHUM, GERMANY
www.kompernass.com
CY

- 7 -
Sisällysluettelo Sivu
Turvaohjeet 8
Käyttötarkoitus 9
Yleikatsaus laitteeseen 9
Tekniset tiedot 9
Toimintatapa 9
Soveltuvat keittoastiat 9
Purkaminen pakkauksesta 10
Toimituslaajuus 10
Pystytys 10
Käyttö 10
a) Keittoastian asettaminen ...........................................................................................................10
b) Päälle kytkeminen......................................................................................................................10
c) Sammuttaminen..........................................................................................................................10
d) Kuumentaminen..........................................................................................................................11
e) Käyttöaika (ajastin)....................................................................................................................11
Puhdistus ja hoito 11
Hävittäminen 12
Takuu ja huolto 12
Maahantuoja 12
Säilytä käsikirja myöhempää käyttöä varten. Jos myyt laitteen, anna käsikirja uudelle omistajalle!
- 8 -
Induktiokeittolevy
Turvaohjeet
Hengenvaarallisen sähköiskun
välttämiseksi:
Varmista, ettei laitetta, virtajohtoa tai verkkopisto-
ketta koskaan kasteta veteen tai muihin nesteisiin.
• Pidä huolta siitä, ettei virtajohto kastu konetta
käytettäessä. Vedä virtajohto siten, ettei se tartu,
puristu tai vaurioidu muulla tavalla.
• Jos virtajohto tai verkkopistoke vahingoittuu,
anna asiakaspalvelun vaihtaa se ennen kuin
käytät laitetta uudelleen.
• Vedä käytön jälkeen verkkopistoke aina pisto-
rasiasta. Pelkästään virran katkaiseminen ei riitä,
koska laitteessa on virta niin kauan, kunnes pistoke
irrotetaan pistorasiasta.
• Suojaa keittotasoa vaurioiden varalta: Älä kuormita
sitä epätasaisesti äläkä päästä sille putoamaan
mitään. Laitetta ei saa enää käyttää, jos keittotaso
tai kotelo on vaurioitunut. Irrota johto silloin heti
seinästä ja korjauta laite ensin.
• Anna vaurioitunut verkkopistoke tai virtajohto
heti valtuutetun ammattihenkilöstön tai huoltopal-
velun vaihdettavaksi vaarojen välttämiseksi.
Palo- ja loukkaantumisvaarojen
välttämiseksi:
• Älä koske pintaa, jolla on seissyt aikaisemmin
kuuma keittoastia. Heti sen jälkeen pinta voi olla
erittäin kuuma.
• Ylikuumennetut valmistusaineet saattavat syttyä
palamaan! Älä koskaan jätä laitetta vartioimatta
sen ollessa toiminnassa.
• Älä siksi koskaan aseta sitä palavien esineiden
alapuolelle, erityisesti verhojen alle.
• Älä koskaan kuumenna tiiviisti suljettua astiaa.
Lämpölaajeneminen saattaa nopeasti aiheuttaa
räjähdyksen.
• Älä koskaan kuumenna tyhjää astiaa. Se ylikuu-
mennee nopeasti - ja aiheuttaa siten palamisvaaran
ja vahingoittaa keittotasoa.
• Älä aseta induktiotasolle metallisia esineitä,
kuten keittiö- tai ruokailuvälineitä. Nämä voivat
kuumentua energiatasolla erityisen paljon.
• Tätä laitetta ei ole tarkoitettu sellaisten henkilöiden
(mukaan lukien lapset) käyttöön, joiden rajoitetut,
fyysiset, aistilliset tai henkiset kyvyt tai kokemuksen
ja/tai tiedon puute estävät käytön, lukuun otta-
matta tilanteita, joissa heitä valvoo turvallisuudesta
vastaava henkilö tai joissa he ovat saaneet tältä
ohjeita laitteen käytöstä.
• Lapsia on valvottava ja on varmistettava, etteivät
he leiki laitteella.
• Ole varovainen kuumentaessasi pieniä määriä
öljyä – älä säädä tehoa suureksi. Muutoin öljy
saattaa palaa ja roihahtaa liekkeihin!
• Älä käytä laitetta ulkoisen ajastimen tai erillisen
kauko-ohjatun järjestelmän avulla.
• Älä koskaan käytä laitetta metallipöydällä tai
muulla metallisella alustalla. Alusta voi kuumen-
tua ja aiheuttaa näin tulipalon, tai laite voi vahin-
goittua korjauskelvottomaan kuntoon.
Tämä symboli laitteessa varoittaa kuumien
pintojen aiheuttamasta palamisvaarasta.
Tämä symboli varoittaa koskemasta keittotasoon
heti käytön jälkeen. Palovamman vaara!
Sähkömagneettisten kenttien
aiheuttamien vaarojen välttäminen:
• Säilytä vähintään 1 metrin etäisyys laitteisiin,
jotka ovat herkkiä sähkömagneettisille kentille
(esim. kuvaruudut, kellot, magneettiset tallennus-
välineet, elektroniikkalaitteet jne.).
• Lääkinnälliset laitteet, kuten esim. sydämentahdistin,
kuulolaitteet tai muut laitteet saattavat mahdollisesti
tarvita suurempaa etäisyyttä. Kysy asiaa lääkinnälli-
sen laitteen valmistajalta!
- 9 -
Käyttötarkoitus
Tämä laite ...
• on tarkoitettu elintarvikkeiden kuumentamiseen
tai lämpimänä pitämiseen yksityisessä kotitalous-
käytössä ja ainoastaan kuivissa tiloissa käytettä-
väksi.
• ei ole tarkoitettu muiden materiaalien lämmittämi-
seen tai kuumentamiseen, ei ammatti- tai teolli-
suustarkoituksiin eikä ulkona käytettäväksi.
Yleikatsaus laitteeseen
1 Keittotaso
2 Näyttö
Tehotason, ajastinasetuksen tai kuumuusnäytön näyt-
tö ("L" = Low - lämpötila < 50 °C tai "H" = High -
lämpötila > 50 °C)
3 Tehotason merkkivalo
Näyttää palamisellaan, että tehotaso näkyy
näytössä.
4 Ajastimen merkkivalo
Näyttää palamisellaan, että ajastin näkyy näytössä.
5 ▼ ▲
Tehotason tai käyntiajan (ajastimen) asetusarvojen
suurentaminen tai pienentäminen
6 Tehotaso-painike
Tehotason (L1-L10) asettaminen
7 Ajastin-painike
Käyttöajan asettaminen jopa 180 minuuttiin
automaattista sammutusta varten
8 Virran merkkivalo
9 Virtapainike
Keittotason kytkeminen päälle/pois päältä,
toiminnon keskeyttäminen
0 Virtajohto ja verkkopistoke
Tekniset tiedot
Jännite: 220-240V
~
50/60Hz
Tehontarve: 1800 - 2000 W
Melutaso: <70 dB(A)
Suojausluokka: II
Toimintatapa
Siinä missä tavanomaiset keittolevyt kuumenevat
itse, induktiokeittotasolla lämpö syntyy keittoastian
pohjassa. Keittotasoa 1 itseään ei kuumenneta - se
lämpenee korkeintaan silloin, kun sille asetetaan ku-
uma kattila (paluulämpö).
Tästä huolehtii energiakenttä, joka luo lämpöä aino-
astaan magneettisesti johtavissa materiaaleissa,
esim. rautakattiloissa. Muissa materiaaleissa, kuten
esim. posliinissa, lasissa tai keramiikassa ei ener-
giakenttä kykene luomaan lämpövaikutusta.
Soveltuvat keittoastiat
Käytä ainoastaan induktiokeittotasoille soveltuvia
keittoastioita:
• Sopivia ovat kattilat ja pannut, joiden pohja on
terästä tai valurautaa. Ne tunnistat joko kattilassa
olevasta merkistä tai siitä, että magneetti tarttuu
kattilan pohjaan.
• Sopimattomia ovat kaikki metallit, joihin magneetti
ei tartu, esim. alumiini, kupari, ruostumaton teräs,
sekä muut kuin metalliset astiat, esim. posliinista,
lasista, keramiikasta, muovista jne.
• Ohuet kattilanpohjat sopivat induktiokeittämiseen
paremmin kuin paksut kerrospohjat. Erittäin lyhyet
reaktioajat asetusten muutoksiin (lyhyt esilämmitys-
aika, nopea, annosteltava paistaminen) ei ole
mahdollista paksupohjaisilla astioilla.
 Loading...