


RECHARGEABLE HAND-HELD AND UPRIGHT VACUUM CLEANER SHSS 12 A1
RECHARGEABLE HAND-HELD AND |
HÅNDOG GULVSTØVSUGER |
UPRIGHT VACUUM CLEANER |
MED GENOPLADELIGT BATTERI |
Operating instructions |
Betjeningsvejledning |
ASPIRATEUR POLYVALENT |
ACCU HANDEN VLOERZUIGER |
Mode d'emploi |
Gebruiksaanwijzing |
AKKU-HAND- UND |
|
-BODENSTAUBSAUGER |
|
Bedienungsanleitung |
|
IAN 90876
Before reading, unfold the page containing the illustrations and familiarise yourself with all functions of the device.
Før du læser, vend siden med billeder frem og bliv bekendt med alle apparatets funktioner.
Avant de lire le mode d'emploi, ouvrez la page contenant les illustrations et familiarisez-vous ensuite avec toutes les fonctions de l'appareil.
Vouw vóór het lezen de pagina met de afbeeldingen open en maak u vertrouwd met alle functies van het apparaat.
Klappen Sie vor dem Lesen die Seite mit den Abbildungen aus und machen Sie sich anschließend mit allen Funktionen des Gerätes vertraut.
GB / IE |
Operating instructions |
Page |
1 |
DK |
Betjeningsvejledning |
Side |
11 |
FR / BE |
Mode d'emploi |
Page |
21 |
NL / BE |
Gebruiksaanwijzing |
Pagina |
31 |
DE / AT / CH |
Bedienungsanleitung |
Seite |
41 |

A B C

Contents
Introduction. . . . . . . . . . . . . . . . . . . . . . . . . . . . . . . . . . . . . . . . . . . . . . . . . . . . . . . . . . . 2
Proper use . . . . . . . . . . . . . . . . . . . . . . . . . . . . . . . . . . . . . . . . . . . . . . . . . . . . . . . . . . . . 2
Package contents . . . . . . . . . . . . . . . . . . . . . . . . . . . . . . . . . . . . . . . . . . . . . . . . . . . . . . 2
Appliance description. . . . . . . . . . . . . . . . . . . . . . . . . . . . . . . . . . . . . . . . . . . . . . . . . . . 2
Technical details . . . . . . . . . . . . . . . . . . . . . . . . . . . . . . . . . . . . . . . . . . . . . . . . . . . . . . . 2
Safety instructions . . . . . . . . . . . . . . . . . . . . . . . . . . . . . . . . . . . . . . . . . . . . . . . . . . . . . 3
Before first use . . . . . . . . . . . . . . . . . . . . . . . . . . . . . . . . . . . . . . . . . . . . . . . . . . . . . . . . 4
Information about the batteries . . . . . . . . . . . . . . . . . . . . . . . . . . . . . . . . . . . . . . . . . . 4
Charging the appliance . . . . . . . . . . . . . . . . . . . . . . . . . . . . . . . . . . . . . . . . . . . . . . . . . 4
Assembly/disassembly . . . . . . . . . . . . . . . . . . . . . . . . . . . . . . . . . . . . . . . . . . . . . . . . . 5
Floor nozzle. . . . . . . . . . . . . . . . . . . . . . . . . . . . . . . . . . . . . . . . . . . . . . . . . . . . . . . . . . . . . . . . . . . . . . . 5 Connecting the hand element to the handle/removal from handle . . . . . . . . . . . . . . . . . . . . . . . . . . . . . 5
Operation . . . . . . . . . . . . . . . . . . . . . . . . . . . . . . . . . . . . . . . . . . . . . . . . . . . . . . . . . . . . 5
Using the hand element with the handle . . . . . . . . . . . . . . . . . . . . . . . . . . . . . . . . . . . . . . . . . . . . . . . . . 5 Using the hand element . . . . . . . . . . . . . . . . . . . . . . . . . . . . . . . . . . . . . . . . . . . . . . . . . . . . . . . . . . . . . . 6
Cleaning and care. . . . . . . . . . . . . . . . . . . . . . . . . . . . . . . . . . . . . . . . . . . . . . . . . . . . . . 6
Emptying the dirt container . . . . . . . . . . . . . . . . . . . . . . . . . . . . . . . . . . . . . . . . . . . . . . . . . . . . . . . . . . . 6 Cleaning the appliance . . . . . . . . . . . . . . . . . . . . . . . . . . . . . . . . . . . . . . . . . . . . . . . . . . . . . . . . . . . . . . 6 Cleaning the rotary brush . . . . . . . . . . . . . . . . . . . . . . . . . . . . . . . . . . . . . . . . . . . . . . . . . . . . . . . . . . . . 7
Storage . . . . . . . . . . . . . . . . . . . . . . . . . . . . . . . . . . . . . . . . . . . . . . . . . . . . . . . . . . . . . . 7
Troubleshooting . . . . . . . . . . . . . . . . . . . . . . . . . . . . . . . . . . . . . . . . . . . . . . . . . . . . . . . 7
Warranty and Service . . . . . . . . . . . . . . . . . . . . . . . . . . . . . . . . . . . . . . . . . . . . . . . . . . 8
Disposal . . . . . . . . . . . . . . . . . . . . . . . . . . . . . . . . . . . . . . . . . . . . . . . . . . . . . . . . . . . . . . 8
Disposal of the appliance . . . . . . . . . . . . . . . . . . . . . . . . . . . . . . . . . . . . . . . . . . . . . . . . . . . . . . . . . . . . 8 Disposal of batteries . . . . . . . . . . . . . . . . . . . . . . . . . . . . . . . . . . . . . . . . . . . . . . . . . . . . . . . . . . . . . . . . 8
Importer . . . . . . . . . . . . . . . . . . . . . . . . . . . . . . . . . . . . . . . . . . . . . . . . . . . . . . . . . . . . . 9
GB
IE
SHSS 12 A1 |
1 |

GB
IE
RECHARGEABLE HAND-HELD AND UPRIGHT VACUUM CLEANER SHSS 12 A1
Introduction
Congratulations on the purchase of your new appliance.
You have selected a high-quality product. The operating instructions are part of this product. They contain important information on safety, use and disposal. Before using the product, familiarise yourself with all operating and safety instructions. Use this product only as described and only for the specified areas of application. Please also pass these operating instructions on to any future owner(s).
Proper use
This appliance has been designed exclusively for vacuum cleaning dry surfaces and dry residues. This appliance is intended exclusively for use in domestic households. People or animals may not be vacuumed with this appliance. Any other usage of or modification to the appliance is deemed to be improper usage and carries the risk of serious personal injury. The manufacturer accepts no liability for damages that result from improper use of the appliance or are caused by the incorrect operation of it.
The appliance is not intended for commercial use.
Package contents
Hand vacuum cleaner
Floor nozzle
Crevice tool
Extension handle
Operating instructions
Check the delivery contents for completeness directly after unpacking.
Appliance description
1Grip, hand element
2On/O switch
3Charge indicator lamp
4Charging socket
5Hand element
6PUSH button
7Dust filter
8Coarse filter
9Dirt container
0 Grip
q “Grip” release
w “Hand element” release
e Opening for barrel jack of the charger r Hand element recess
t Rotary brush z Operating lamp
u Connection plug for floor nozzle i Connection socket
oCrevice tool
pCharger
a Charger barrel jack
Technical details
Charger
Input: 100–240 V ~50/60 Hz 250 mA Output: 16 V  200 mA
Manufacturer: Dongguan City Rongrun
Industry Co., Ltd.
Type designation: RS006AV1600020 Protection class: II / 
Appliance
Input voltage/current: 16 V  200 mA Battery working voltage 12 V
Batteries: NiMH 1300 mAh
Operating time with full battery charge (depending on floor covering): approx. 15 min.
Charging time with empty battery: 10 - 16 hours
2 |
SHSS 12 A1 |

Safety instructions
 DANGER – ELECTRIC SHOCK!
►Do not charge or use the appliance outdoors.
►Never use the hand vacuum cleaner if the cable, plug or casing are damaged.
►To avoid risks, arrange for damaged power cables and/or plugs to be replaced as soon as possible by a qualified specialist or by our Customer Services.
►Arrange for repairs to be carried out only by specialist workshops. Under no circumstances should you open the appliance yourself. Interferences that are not carried out by a specialist workshop could lead to physical injuries.
►Before switching the hand vacuum cleaner on, ensure that the mains voltage corresponds to the voltage indicated in the technical data for the appliance.
►Never touch the mains adapter/charger or the appliance with wet or damp hands.
►Do not use the mains adapter/charger with an extension cable; connect the mains adapter directly to a power socket.
 WARNING! RISK OF INJURY!
►Do not change any accessories while the appliance is switched on.
►Do not use the hand vacuum cleaner for vacuuming up water or other liquids.
►Do not use the hand vacuum for vacuuming up sharp objects or glass shards.
►Never vacuum up burning matches, glowing ashes or cigarette butts.
WARNING! RISK OF INJURY! |
|
GB |
► Do not use the hand vacuum for vacuuming |
IE |
|
up chemical products, stone dust, gypsum, |
|
|
|
||
cement or similar particles. |
|
|
►This appliance is not suitable for use with inflammable and explosive substances or chemical and aggressive liquids.
►Always store the appliance indoors. To prevent accidents, keep the appliance in a dry location when not in use.
►Under extreme conditions, leaks in the battery cells may occur. In the event that battery fluid comes into contact with skin or eyes, the a ected area must be rinsed o with water immediately. Contact a physician.
►This appliance is not intended for use by persons (including children) with limited physical, physiological or intellectual abilities or lack of experience and/or knowledge unless they are supervised by a person who is responsible for their safety, or receive instructions from this person on how to use the appliance. Children should be supervised to ensure that they do not play with the appliance.
►Use only accessories recommended by the manufacturer.
►The mains adapter may not be used for other purposes. Never carry the wall holder or
the mains adapter by the cable. Do not pull on the cable when you want to move the appliance.
►Always grip the power plug to disconnect the appliance from the power supply.
►Always be sure to keep the hand vacuum away from heating elements, ovens or other heated appliances and surfaces.
SHSS 12 A1 |
3 |

GB |
|
|
WARNING! RISK OF INJURY! |
IE |
|
► |
Always make certain that the ventilation slits |
|
|
|
are not obstructed. A blocked ventilation |
|
|
|
|
|
|
|
circuit can result in overheating and damage |
|
|
|
to the appliance. |
|
|
► Take special care when using the hand |
|
|
|
|
vacuum on stairs. |
|
|
► This product contains rechargeable batteries. |
|
|
|
|
Do not throw the appliance into a fire and do |
|
|
|
not subject it to high temperatures. There is |
|
|
|
the risk of an explosion! |
|
|
► |
Always remove the floor nozzle from the |
|
|
|
handle before cleaning the rotary brush to |
|
|
|
avoid accidental stating of the rotary brush. |
|
|
|
|
ATTENTION! DAMAGE TO PROPERTY!
►Do not use the hand vacuum cleaner without the dust filter inserted.
►Do not use the mains adapter for a di erent product and do not attempt to charge this appliance with a di erent charging station. Use only the charging station supplied with this appliance.
►Never charge non-rechargeable batteries!
Before first use
NOTE
►This appliance is supplied with non-charged batteries. The batteries must be charged for 16 hours before the first use.
■Remove all packaging materials from the appliance.
Information about the batteries
■This hand vacuum cleaner is operated by rechargeable batteries.
Before using the hand vacuum cleaner for the first time, the batteries must be charged for at least 16 hours.
■The batteries reach their full capacity after a charging time of 16 hours. For care of the batteries, we recommend the following: As soon as the batteries are charged, disconnect the charger p from the mains. Do not reconnect the charger p with the mains until the suction power of the hand vacuum cleaner has become noticeably weaker.
■Never vacuum until the batteries are completely discharged and the appliance no longer sucks. This can reduce the operating life of the batteries.
Charging the appliance
NOTE
►Ensure that the appliance is switched o before starting to charge the batteries.
■To charge the appliance, connect the charger p to a mains socket and insert the barrel jack a into the charging socket 4 on the hand element 5.
The red charge indicator lamp 3 flashes. When the appliance is fully charged, the charge indicator lamp 3 lights up green permanently.
NOTE
►You can also charge the appliance while it is attached to the handle. In the recess on the hand element r there is an opening e that allows access to the charging socket 4.
►Do not recharge the batteries until the suction power of the hand vacuum cleaner has become noticeably weaker.
4 |
SHSS 12 A1 |
Assembly/disassembly
Floor nozzle
■Attach the floor nozzle to the handle so that the connection plug of the floor nozzle u engages with the connection socket i on the handle.
■To remove the floor nozzle, simply pull it from the handle.
Connecting the hand element to the handle/removal from handle
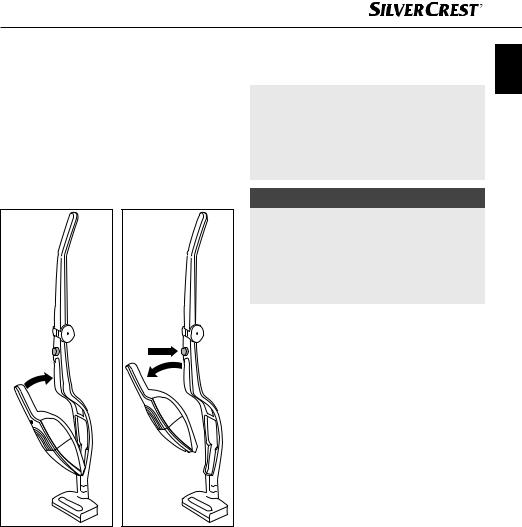
Fig. 1 |
Fig. 2 |
■To connect the hand element 5 to the handle, push the tip of the hand element 5 into the opening in the hand element recess r.
■Then press the grip 1 of the hand element 5 into the handle so that the hand element 5 clicks firmly into position (Fig.1).
■To remove the hand element 5 from the handle, press the “Hand element” release w.
■Then pull the hand element 5 upwards and forwards out of the hand element recess r (Fig. 2).
Operation |
GB |
|
|
ATTENTION! DAMAGE TO PROPERTY! |
IE |
►The suction opening must always be open and unblocked. Blockages lead to overheating and damage to the motor.
►Do not vacuum shag pile carpet with the floor nozzle. The rotary brush t can get caught in the carpet and block!
NOTE
►Make certain that the dust filter 7 and the coarse filter 8 are always inserted before using the appliance.
►As soon as the suction power of the appliance begins to diminish noticeably, connect the appliance to the charger p.
Using the hand element with the handle
1)Insert the hand element 5 into the hand element recess r as described in the chapter “Assembly/disassembly”.
2)Fold out the grip 0 by pressing the “Grip” release q and at the same time pulling the grip 0 upwards. You have the choice of two positions into which the grip 0 will click into place.
3)Attach the floor nozzle.
4)Switch on the appliance using the on/o switch 2. The operating light z on the floor nozzle will light up and the rotary brush t starts turning.
5)Guide the floor nozzle over the area to be vacuumed. Hold the grip 0 so that the floor nozzle moves smoothly over the floor.
6)Set the on/o switch 2 to “O” when you have finished vacuuming. The rotary brush t stops turning and the operating light z goes out.
SHSS 12 A1 |
5 |
GB
IE
Using the hand element
1)Remove the hand element 5 from the hand element recess r as described in the chapter “Assembly/disassembly”.
2)If required, you can attach the crevice tool o.
3)Set the on/o switch 2 to “I” to start vacuuming to the desired areas.
4)When you are finished vacuuming, set the on/ o switch 2 to “O”.
Cleaning and care
 WARNING! RISK OF INJURY!
►Always disconnect the charger p from the mains socket and remove the barrel jack a from the charging socket 4on the hand element 5 before cleaning the appliance.
►Always remove the hand element 5 from the hand element recess r on the handle before cleaning the handle or rotary brush t.
►Always pull the floor nozzle o the handle before cleaning or maintaining it and the rotary brush t.
To achieve the best results, empty the dirt container 9 and clean the dust filter 7 after every use.
ATTENTION! DAMAGE TO PROPERTY!
►Do not use abrasive or aggressive cleaning materials. These could damage the surfaces!
Emptying the dirt container
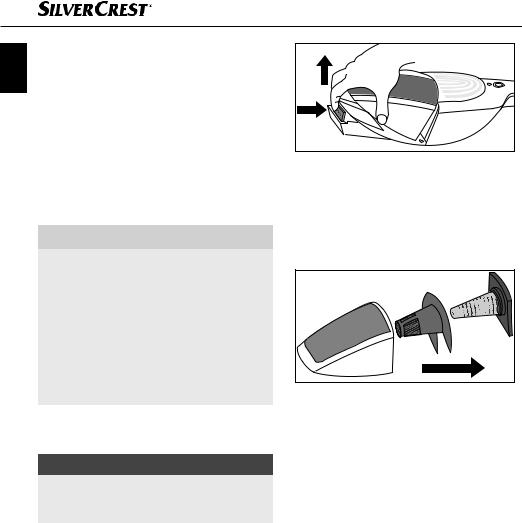
1)To open the dirt container 9, remove the hand element 5 from the hand element recess r.
2)Press the PUSH 6 button and, at the same time, pull the dirt container 9 upwards. You can now lift this o upwards/forwards (Fig. 3).
Fig. 3
3)Remove the dust filter 7 by pulling it out with your fingers. Rinse the dust filter 7 in clear water and let it air dry. Do not use hot air to dry the dust filter 7.
4)Then remove the coarse filter 8 also by simply pulling it out.
Fig. 4
5)Empty the dirt container 9.
6)Now you can re-insert first the coarse filter 8 and then the dust filter 7.
7)Replace the dirt container 9 by first inserting the plastic clip in the notch in the hand element 5 and then pushing the front part of the dirt container 9 downwards hard so that the dirt container 9 clicks firmly into place.
Cleaning the appliance
Wipe the appliance with a damp cloth. For stubborn residues use a mild detergent on the cloth. Ensure that the appliance is completely dry before the next use.
6 |
SHSS 12 A1 |

Cleaning the rotary brush
The rotary brush t can become covered in residues, such as hair, after a while. To remove this dirt, you can remove the rotary brush t (Fig. 5).
1)Remove the floor nozzle from the handle.
2)Undo the screw on the underside of the floor nozzle.
3)Remove the cover plate.
4)Press the holding pin to one side, for instance with a screw driver, and lift out the rotary brush t.
5)To replace the rotary brush t, first push the broad end onto the drive shaft so that the rotary brush t hooks into place.
6)Then push in the other end so that the rotary brush t clicks into place under the holding pin.
7)Replace the cover plate and screw it down firmly.
Fig. 5
Storage
GB
■ When not in use, set the handle in an upright IE position with the hand element 5 inserted and
the floor nozzle attached. The handle will lock into place and stand upright on the floor nozzle.
■For space-saving storage, you can fold the grip 0 by pressing the “Grip” release q.
■Store the appliance in a dust-free and dry location.
Troubleshooting
The appliance is not working.
■ The battery is not charged.
♦Connect the appliance to the charger p. ■ The appliance is defective.
♦In this case, contact the Customer Service.
The appliance is running but hardly sucking up any dirt.
■ The battery is not su ciently charged.
♦Connect the appliance to the charger p. ■ The dirt container 9 is full.
♦Empty the dirt container 9.
■The dust filter 7 is blocked.
♦Clean the dust filter 7.
The appliance will not charge.
■The charger p is not correctly connected to the socket/mains plug.
♦Check the connections of the charger p.
■The charger p is defective.
♦In this case, contact the Customer Service.
SHSS 12 A1 |
7 |
GB
IE
Warranty and Service
The warranty provided for this appliance is 3 years from the date of purchase. This appliance has been manufactured with care and inspected meticulously prior to delivery. Please retain your receipt as proof of purchase. In the event of a warranty claim, please contact your Customer Service by telephone. This is the only way to guarantee free return of your goods.
The warranty covers only claims for material and manufacturing defects, not for transport damage, wearing parts or for damage to fragile components, e.g. switches or batteries. This appliance is intended solely for private use and not for commercial purposes. The warranty is deemed void if this product has been subjected to improper or
inappropriate handling, abuse or modifications that were not carried out by one of our authorised service centres. Your statutory rights are not restricted in any way by this warranty.
The warranty period is not prolonged by repairs made under the warranty. This also applies to replaced and repaired parts. Damage and defects present at the time of purchase must be reported immediately after unpacking, or no later than two days after the date of purchase. Repairs made after expiry of the warranty period are chargeable.
 Service Great Britain
Tel.: 0871 5000 720 (£ 0.10/Min.) E-Mail: kompernass@lidl.co.uk
IAN 90876
 Service Ireland
Tel.: 1890 930 034 (0,08 EUR/Min., (peak))
(0,06 EUR/Min., (o peak)) E-Mail: kompernass@lidl.ie
IAN 90876
Hotline availability: Monday to Friday 08:00 - 20:00 (CET)
Disposal
Disposal of the appliance
Under no circumstance, should you dispose of the appliance in the normal domestic waste. This product is subject to the provisions of European Directive 2012/19/EU.
Dispose of the appliance through an approved disposal centre or at your community waste facility. Please observe the currently applicable regulations. Please contact your waste disposal centre if you are in any doubt.
Disposal of batteries
Used batteries may not be disposed of in household waste.
All consumers are statutorily required to dispose of batteries at a collection point provided by their local community or at a retail store.
The purpose of this obligation is to ensure that batteries are disposed of in a non-polluting manner. Only dispose of batteries when they are fully discharged.
ATTENTION! DAMAGE TO PROPERTY!
►If you open the housing and dispose of the batteries, the appliance will be irreparably damaged!
1)Undo the 5 screws on the rear of the hand element 5 and pull the two halves of the housing apart.
2)Remove the motor with the batteries from the housing half.
3)Use snippers to cut the cable that leads to the green batteries.
4)Remove the batteries and dispose of them in an environmentally friendly manner.
The packaging is made from environmentally friendly material and can be disposed of at your local recycling plant.
8 |
SHSS 12 A1 |

Importer |
GB |
|
KOMPERNASS HANDELS GMBH |
||
IE |
||
BURGSTRASSE 21 |
||
|
||
|
||
44867 BOCHUM |
|
|
GERMANY |
|
|
www.kompernass.com |
|
SHSS 12 A1 |
9 |

10 |
SHSS 12 A1 |

Indholdsfortegnelse
Indledning . . . . . . . . . . . . . . . . . . . . . . . . . . . . . . . . . . . . . . . . . . . . . . . . . . . . . . . . . . . 12
. . . . . . . . . . . . . . . . . . . . . . . . . . . . . . . . . . . . . . . . . . . . . . . . . .Anvendelsesområde |
12 |
DK |
Pakkens indhold . . . . . . . . . . . . . . . . . . . . . . . . . . . . . . . . . . . . . . . . . . . . . . . . . . . . . . 12
Beskrivelse af produktet . . . . . . . . . . . . . . . . . . . . . . . . . . . . . . . . . . . . . . . . . . . . . . . 12
Tekniske data . . . . . . . . . . . . . . . . . . . . . . . . . . . . . . . . . . . . . . . . . . . . . . . . . . . . . . . . 12
Sikkerhedsanvisninger . . . . . . . . . . . . . . . . . . . . . . . . . . . . . . . . . . . . . . . . . . . . . . . . 13
Før produktet bruges første gang. . . . . . . . . . . . . . . . . . . . . . . . . . . . . . . . . . . . . . . . 14
Info om genopladelige batterier. . . . . . . . . . . . . . . . . . . . . . . . . . . . . . . . . . . . . . . . . 14
Opladning af produktet . . . . . . . . . . . . . . . . . . . . . . . . . . . . . . . . . . . . . . . . . . . . . . . . 14
Montering/afmontering. . . . . . . . . . . . . . . . . . . . . . . . . . . . . . . . . . . . . . . . . . . . . . . . 15
Gulvmundstykke . . . . . . . . . . . . . . . . . . . . . . . . . . . . . . . . . . . . . . . . . . . . . . . . . . . . . . . . . . . . . . . . . . 15 Sæt skaftet på / tag skaftet af motordelen . . . . . . . . . . . . . . . . . . . . . . . . . . . . . . . . . . . . . . . . . . . . . . 15
Betjening . . . . . . . . . . . . . . . . . . . . . . . . . . . . . . . . . . . . . . . . . . . . . . . . . . . . . . . . . . . . 15
Anvendelse af motordelen med skaft. . . . . . . . . . . . . . . . . . . . . . . . . . . . . . . . . . . . . . . . . . . . . . . . . . . 15 Anvendelse af motordelen . . . . . . . . . . . . . . . . . . . . . . . . . . . . . . . . . . . . . . . . . . . . . . . . . . . . . . . . . . . 16
Rengøring og vedligeholdelse. . . . . . . . . . . . . . . . . . . . . . . . . . . . . . . . . . . . . . . . . . . 16
Tømning af støvbeholderen . . . . . . . . . . . . . . . . . . . . . . . . . . . . . . . . . . . . . . . . . . . . . . . . . . . . . . . . . . 16 Rengøring af håndstøvsugeren . . . . . . . . . . . . . . . . . . . . . . . . . . . . . . . . . . . . . . . . . . . . . . . . . . . . . . . 16 Rengøring af børsterullen . . . . . . . . . . . . . . . . . . . . . . . . . . . . . . . . . . . . . . . . . . . . . . . . . . . . . . . . . . . 17
Opbevaring . . . . . . . . . . . . . . . . . . . . . . . . . . . . . . . . . . . . . . . . . . . . . . . . . . . . . . . . . . 17
Afhjælpning af fejl . . . . . . . . . . . . . . . . . . . . . . . . . . . . . . . . . . . . . . . . . . . . . . . . . . . . 17
Garanti og service . . . . . . . . . . . . . . . . . . . . . . . . . . . . . . . . . . . . . . . . . . . . . . . . . . . . 18
Bortska else . . . . . . . . . . . . . . . . . . . . . . . . . . . . . . . . . . . . . . . . . . . . . . . . . . . . . . . . . 18
Bortska else af produktet . . . . . . . . . . . . . . . . . . . . . . . . . . . . . . . . . . . . . . . . . . . . . . . . . . . . . . . . . . . 18 Bortska else af batterier/genopladelige batterier . . . . . . . . . . . . . . . . . . . . . . . . . . . . . . . . . . . . . . . . 18
Importør . . . . . . . . . . . . . . . . . . . . . . . . . . . . . . . . . . . . . . . . . . . . . . . . . . . . . . . . . . . . 19
SHSS 12 A1 |
11 |

HÅNDOG GULVSTØVSUGERMED GENOPLADELIGT BATTERI SHSS 12 A1
DK Indledning
Tillykke med købet af dit nye produkt.
Du har dermed valgt et produkt af høj kvalitet. Betjeningsvejledningen er en del af dette produkt. Den indeholder vigtige informationer om sikkerhed, anvendelse og bortska else. Du bedes sætte dig ind i alle produktets betjeningsog sikkerhedsanvisninger før brug. Brug kun produktet som beskrevet og kun til de angivne anvendelsesområder. Lad vejledningen følge med produktet, hvis du giver det videre til andre.
Anvendelsesområde
Dette produkt må udelukkende bruges til støvsugning af tørre overflader eller tørt materiale. Dette produkt er udelukkende beregnet til anvendelse i private husholdninger. Der må ikke suges på mennesker eller dyr med dette produkt. Enhver anden form for anvendelse eller ændring af produktet anses for at være uden for anvendelsesområdet og indebærer betydelige farer for uheld. Producenten er ikke ansvarlig for skader, der skyldes anvendelse til andre formål end anvendelsesområdet eller forkert betjening.
Håndstøvsugeren må ikke anvendes til erhvervsmæssig brug.
Pakkens indhold
Håndstøvsuger
Gulvmundstykke
Fugemundstykke
Forlængerskaft
Betjeningsvejledning
Kontrollér lige efter udpakning, at alle delene er leveret med.
Beskrivelse af produktet
1Håndtag til motordel
2Tænd-/slukknap
3Ladeindikator
4Ladestik
5Motordel
6Knap PUSH
7Støvfilter
8Grovfilter
9Støvbeholder
0 Håndtag
q Aktivering "håndtag"
w Aktivering "motordel"
e Udskæring til hulstik til ladeapparat r Fordybning til motordelen
t Børsterulle z Kontrollampe
u Forbindelsesstik gulvmundstykke i Forbindelsesstik
oFugemundstykke
pOplader
a Hulstik oplader
Tekniske data
Oplader
Indgang: 100 - 240 V ~, 50 / 60 Hz, 250 mA Udgang: 16 V  200 mA
Producent: Dongguan City Rongrun
Industry Co., Ltd.
Typebetegnelse: RS006AV1600020
Beskyttelsesklasse: II / 


Håndstøvsuger
Indgangsspænding/-strøm: 16 V  200 mA
Genopladeligt batteri - arbejdsspænding 12 V
Genopladelige batterier: NiMH 1300 mAh
Driftstid ved fuldt opladet batteri (afhængigt af gulvbelægningen): ca. 15 min.
Ladetid ved tomt batteri: 10 - 16 timer
12 |
SHSS 12 A1 |

Sikkerhedsanvisninger
 FARE - ELEKTRISK STØD!
►Oplad og brug ikke denne håndstøvsuger udendørs.
►Brug aldrig håndstøvsugeren, hvis ledningen, stikket eller kabinettet er beskadiget.
►Hvis strømstikket eller ledningen er beskadiget, skal det/den straks udskiftes af en autoriseret reparatør, så farlige situationer undgås.
►Lad kun reparationer udføre af et specialværksted. Åbn aldrig selv håndstøvsugeren. Indgreb, som ikke er udført af et specialværksted, kan føre til personskader.
►Kontrollér, at spændingen, som er angivet i de tekniske data til håndstøvsugeren, er i overensstemmelse med netspændingen, før du tænder for håndstøvsugeren.
►Rør ikke ved strømforsyningen/opladeren eller støvsugeren med våde eller fugtige hænder.
►Brug ikke strømforsyningen/opladeren sammen med en forlængerledning, men sæt strømforsyningen direkte i en stikkontakt.
 ADVARSEL!
FARE FOR PERSONSKADER!
►Udskift ikke tilbehørsdele mens håndstøvsugeren er i brug.
►Brug ikke håndstøvsugeren til opsugning af væsker.
►Brug ikke håndstøvsugeren til opsugning af spidse genstande eller glasskår.
►Sug aldrig brændende tændstikker, aske med gløder eller cigaretskod op.
 ADVARSEL!
FARE FOR PERSONSKADER!
► Brug ikke håndstøvsugeren til opsugning af |
|
kemiske produkter, stenstøv, gips, cement eller |
DK |
andre lignende partikler. |
►Produktet er ikke egnet til brændbare og eksplosive sto er eller kemiske og aggressive væsker.
►Opbevar altid produktet i lukkede rum. Opbevar produktet et tørt sted efter brug for at undgå uheld.
►Under ekstreme forhold kan batterierne lække. Hvis væsken fra batterierne kommer i kontakt med huden eller øjnene, skal det pågældende sted straks skylles af med rent vand. Opsøg læge.
►Dette produkt må ikke benyttes af personer (inklusive børn) med begrænsede fysiske, sensoriske eller psykiske evner eller med manglende erfaringer og/eller manglende viden, medmindre en ansvarlig person holder opsyn med dem og giver dem anvisninger til, hvordan produktet skal benyttes. Børn skal være under opsyn, så det sikres, at de ikke leger med produktet.
►Brug kun tilbehørsdele, som anbefales af producenten.
►Strømforsyningen må ikke bruges til andre formål. Bær aldrig vægholderen eller strømforsyningen i ledningen. Træk ikke i ledningen, hvis du vil indstille håndstøvsugeren.
►Hold altid på stikket og ikke i ledningen, når du vil trække stikket ud af stikkontakten.
►Sørg altid for, at du ikke stiller håndstøvsugeren ved siden af radiatorer, bageovne eller andre opvarmede apparater eller overflader.
SHSS 12 A1 |
13 |
 Loading...