


SHDP 5.1 A1
KOMPERNASS GMBH
BURGSTRASSE 21 · D-44867 BOCHUM
www.kompernass.com
ID-Nr.: SHDP 5.1 A1-01/11-V3
IAN: 64329/64330
HOME TECH
DVD Player SHDP 5.1 A1
6
DVD Player
Operating instructions
A
iqwer uyt
a
SHDP 5.1 A1
gh jkl
;
2)2#2$
B
s
df
2!2@
C
q
d
a
i
l
o
;
2*
2@
2!
f
3#
3$
3@
2&
2(
s
2)
j
k
2$
2#
g
h
2^
2%
y
u
3)
e
r
t
w
3!
o

- 1 -
INDEX PAGE
1. Technical Data 2
2. Intended use 2
3. Package contents 2
4. Operating components 2
5. Setting up of the DVD player 3
6. Safety instructions 3
7. Remote control 4
7.1 Inserting the batteries . . . . . . . . . . . . . . . . . . . . . . . . . . . . . . . . . . . . . . . . . . . . . . . . . . . . . . . . . . . . . . . . . . . . . . . . . . . . . . . . . . . . . . . . . .4
7.2 Using the remote control . . . . . . . . . . . . . . . . . . . . . . . . . . . . . . . . . . . . . . . . . . . . . . . . . . . . . . . . . . . . . . . . . . . . . . . . . . . . . . . . . . . . . . .4
7.3 Replacing the batteries . . . . . . . . . . . . . . . . . . . . . . . . . . . . . . . . . . . . . . . . . . . . . . . . . . . . . . . . . . . . . . . . . . . . . . . . . . . . . . . . . . . . . . . . .4
8. Connecting the DVD player to a television 4
8.1 Connecting to a television via ScartCable/RGB . . . . . . . . . . . . . . . . . . . . . . . . . . . . . . . . . . . . . . . . . . . . . . . . . . . . . . . . . . . . . . . . . . . . .5
8.2 Connecting to a television via S-Video . . . . . . . . . . . . . . . . . . . . . . . . . . . . . . . . . . . . . . . . . . . . . . . . . . . . . . . . . . . . . . . . . . . . . . . . . . . .5
8.3 Connection to a television via video input (Composite Video) . . . . . . . . . . . . . . . . . . . . . . . . . . . . . . . . . . . . . . . . . . . . . . . . . . . . . . . . . .5
8.4 Connecting via component signal (YPbPr/YUV) . . . . . . . . . . . . . . . . . . . . . . . . . . . . . . . . . . . . . . . . . . . . . . . . . . . . . . . . . . . . . . . . . . . . .5
8.5 Connecting to a television via HDMI . . . . . . . . . . . . . . . . . . . . . . . . . . . . . . . . . . . . . . . . . . . . . . . . . . . . . . . . . . . . . . . . . . . . . . . . . . . . .6
9. Connecting audio components to the DVD player 6
9.1 Requirements for the connection of a HiFi system . . . . . . . . . . . . . . . . . . . . . . . . . . . . . . . . . . . . . . . . . . . . . . . . . . . . . . . . . . . . . . . . . . . .6
9.2 Connecting digital audio components via digital cables . . . . . . . . . . . . . . . . . . . . . . . . . . . . . . . . . . . . . . . . . . . . . . . . . . . . . . . . . . . . . .6
9.3 Connecting audio components via an analogue cable . . . . . . . . . . . . . . . . . . . . . . . . . . . . . . . . . . . . . . . . . . . . . . . . . . . . . . . . . . . . . . .7
9.4 Connecting the headphones . . . . . . . . . . . . . . . . . . . . . . . . . . . . . . . . . . . . . . . . . . . . . . . . . . . . . . . . . . . . . . . . . . . . . . . . . . . . . . . . . . . .7
10. OSD menu settings 8
10.1 Using the OSD Menu . . . . . . . . . . . . . . . . . . . . . . . . . . . . . . . . . . . . . . . . . . . . . . . . . . . . . . . . . . . . . . . . . . . . . . . . . . . . . . . . . . . . . . . .8
10.2 Setup menu GENERAL . . . . . . . . . . . . . . . . . . . . . . . . . . . . . . . . . . . . . . . . . . . . . . . . . . . . . . . . . . . . . . . . . . . . . . . . . . . . . . . . . . . . . . . .8
10.3 Setup menu AUDIO . . . . . . . . . . . . . . . . . . . . . . . . . . . . . . . . . . . . . . . . . . . . . . . . . . . . . . . . . . . . . . . . . . . . . . . . . . . . . . . . . . . . . . . . . .9
10.4 Setup menu DOLBY . . . . . . . . . . . . . . . . . . . . . . . . . . . . . . . . . . . . . . . . . . . . . . . . . . . . . . . . . . . . . . . . . . . . . . . . . . . . . . . . . . . . . . . . .10
10.5 Setup menu VIDEO . . . . . . . . . . . . . . . . . . . . . . . . . . . . . . . . . . . . . . . . . . . . . . . . . . . . . . . . . . . . . . . . . . . . . . . . . . . . . . . . . . . . . . . . .10
10.6 Setup menu PREFERENCE . . . . . . . . . . . . . . . . . . . . . . . . . . . . . . . . . . . . . . . . . . . . . . . . . . . . . . . . . . . . . . . . . . . . . . . . . . . . . . . . . . . .11
11. Initial operation of the DVD player 12
11.1 Switching the DVD player on/off . . . . . . . . . . . . . . . . . . . . . . . . . . . . . . . . . . . . . . . . . . . . . . . . . . . . . . . . . . . . . . . . . . . . . . . . . . . . . .12
11.2 Inserting the DVD . . . . . . . . . . . . . . . . . . . . . . . . . . . . . . . . . . . . . . . . . . . . . . . . . . . . . . . . . . . . . . . . . . . . . . . . . . . . . . . . . . . . . . . . . . .12
11.3 Inserting memory cards/USB memory sticks with MP3/WMA/ MPEG4/JPEG data. . . . . . . . . . . . . . . . . . . . . . . . . . . . . . . . . . . . . .12
11.4 Removing memory cards/USB memory sticks . . . . . . . . . . . . . . . . . . . . . . . . . . . . . . . . . . . . . . . . . . . . . . . . . . . . . . . . . . . . . . . . . . . .13
12. Playing back DVDs, VCDs or S-VCDs 13
12.1 Features during playback of a DVD, VCD or S-VCD . . . . . . . . . . . . . . . . . . . . . . . . . . . . . . . . . . . . . . . . . . . . . . . . . . . . . . . . . . . . . . .14
13. Playback of JPEG-Photo CD/WMA/MP3/MPEG4 18
14. CD Ripping function 19
15. Cleaning of the DVD player 19
16. Disposal 19
17. Troubleshooting 20
18. Glossary / Key Word Index 21
19. Warranty and Service 22
20. Importer 22
Read these operating instructions carefully before using the device for the first time and preserve this manual for later reference.
Pass this manual on to whoever might acquire the device at a future date.

- 2 -
DVD PLAYER
This documentation is copyright protected.
Any duplication and/or reproduction, wholly or partially including extracts
as well as the reproducing of illustrations also in modified form is only permit-
ted with written agreement from the manufacturer.
1. Technical Data
This device conforms regarding compliance to the basic requirements and
other relevent provisions of the low-voltage directive 2006/95/EC, the
EMV directive 2004/108/EC as well as the Ecological design directive
2009/125/EC (Ordinance 1275/2008) Supplement II, Number 1).
Power supply: AC 220 V - 240 V
~
50 Hz
Power consumption: max. 20 Watt
Power consumption:
Standby: < 1 W
Protection class: II /
TV standard: PAL/NTSC
Operating temperature: +5
~
+40°C
Humidity: 5
~
90% (no condensation)
Measurements
(W x H x D): 43 x 4.3 x 21.6 cm
Weight : 1.65 kg approx.
Laser class: 1
Video Output
Format: 4:3 / 16:9
Decoder: MPEG 2
D/A converter: 12 Bit
Audio Output
Decoder: MPEG Dolby Digital (AC-3)
DTS only possible with additional external decoder
D/A converter: 24 Bit / 96 kHz
USB port
Readable
USB memory sticks: USB1.1.1 and 2.0 up to a capacity of 8GB
Max. current output: 100 mA
Memory card slot
Readable memory cards: SD, MS/MSPro, MMC up to 32 GB (if available)
Headphones output
Jackplug: 3,5 mm
Maximum
output voltage: 125 mV
Playable mediums/formats
Video: DVD, DVD+R, DVD+RW, DVD-R, DVD-RW,
DVD-R DL, DVD+R DL, VCD, S-VCD
Audio: CD, CD-R, CD-RW, Audio-DVD, MP3, WMA,
OGG Vorbis
Additional formats: AVI, MPEG 4, Xvid, JPEG (Foto-CD)
Regional code: or
2. Intended use
The SilverCrest SHDP 5.1 A1 DVD player is intended exclusively for stationary
use in enclosed spaces. The device is intended exclusively for private,
non-commercial use.
The device is intended for use as an electronic entertainment device whose
purpose is to display and playback images, music and video files.
No liability/warranty will be accepted for damages that result from improper
use of the device or from unauthorised reconstruction!
3. Package contents
- DVD Player
- Infrared remote control
- 2 Batteries for remote control, type AAA/ (Micro cells)
- RGB Scart cable
- Audio/Video RCA Cinch cable
- HDMI cable
- Operating manual
4. Operating components
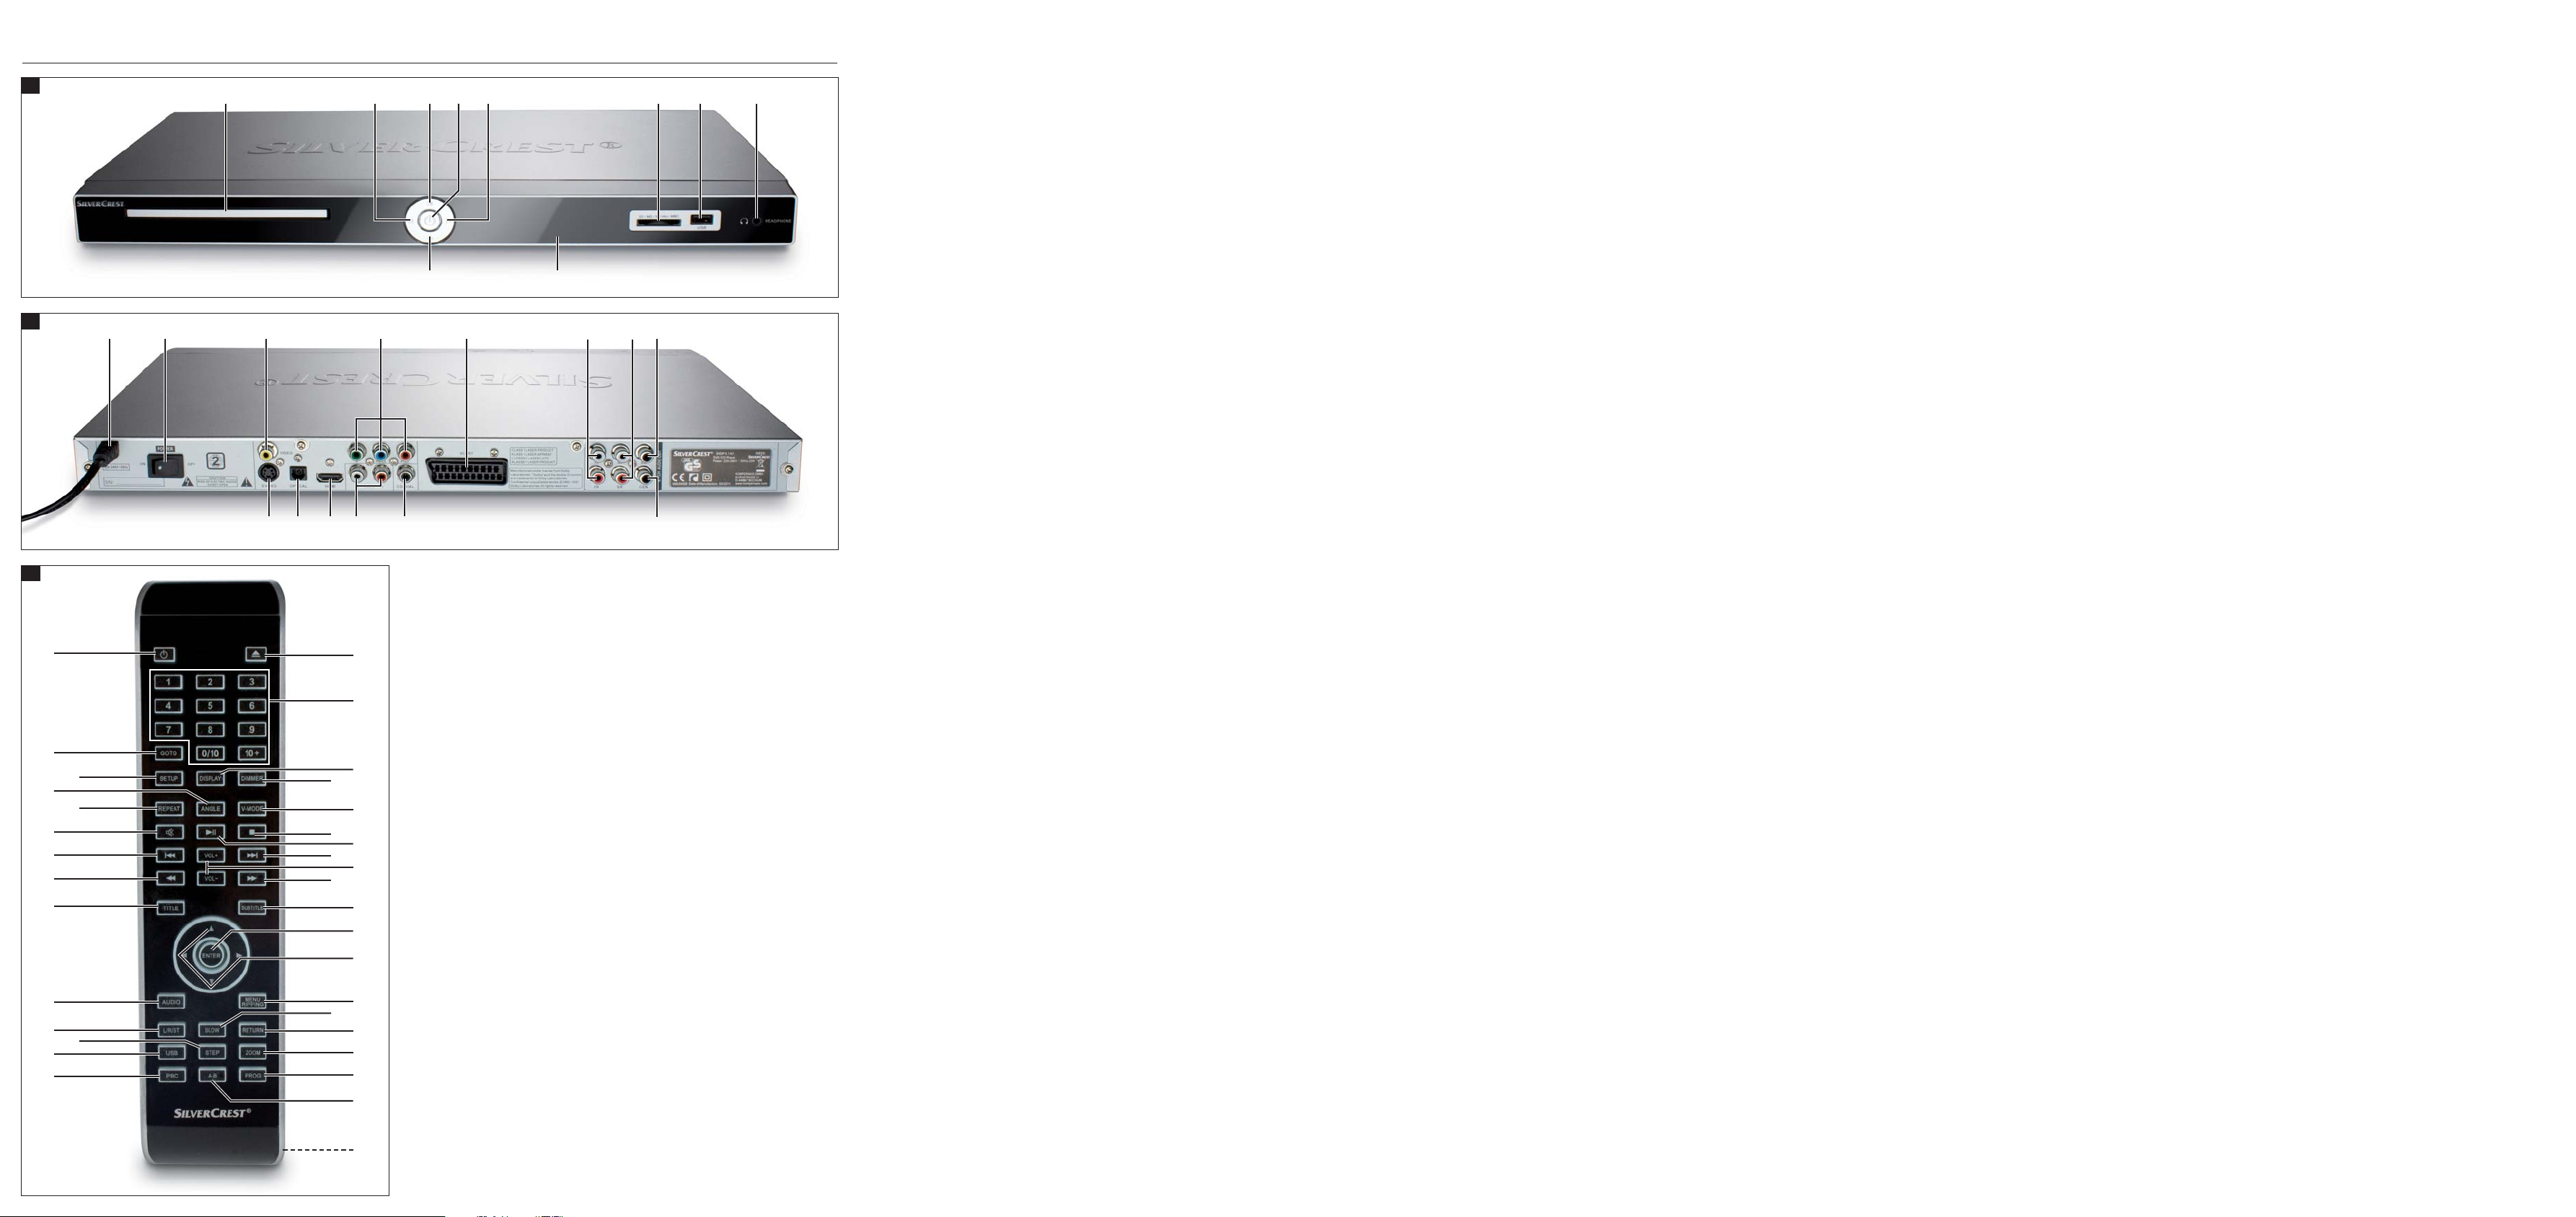
A. DVD player front panel
q
Disc compartment
w
FAST RWD button: Fast search backwards
e
PLAY/PAUSE button
r
STANDBY button
t
FAST FWD button: Fast search forward
y
Memory card slot for SD/MMC/MS and MSPro cards
u
USB port
i
Headphones output for 3.5 mm jackplug
o
Display (with standby LED and IR sensor for the remote control)
a
OPEN/CLOSE button
B. DVD player rear panel
s
Power cable
d
POWER switch
f
VIDEO: Composite video output
g
Y, Pb/Cb, Pr/Cr: Component video outputs
h
SCART: Scart/RGB output
j
FL/FR: Output for front, left and right audio channels
k
SL/SR: Output for rear, left and right audio channels
l
SW: Output for bass audio channel
;
CEN: Output for front and centre audio channels
2)
COAXIAL: Coaxial audio output
2!
AUDIO L/R: Left and right audio outputs
2@
HDMI: HDMI output
2#
OPTICAL: optical digital audio output
2$
S-VIDEO: S Video output

- 3 -
C. Remote control
q
OPEN/CLOSE : Open/Close the disc tray
w
Number buttons
e
DISPLAY: Superimpose disc information
r
DIMMER: Adjust the display brightness
t
V-MODE: Set the video output
y
STOP: Stop playback
u
PLAY/PAUSE : Start/Suspend playback
i
SKIP FWD
Chapter skip forwards
o
VOL +/- : Raise/lower the sound level
a
FAST FWD: Fast search forward
s
SUBTITLE: Set the subtitle
d
ENTER: Confirm input
f
Control buttons
g
MENU/RIPPING: Access disc menu/ripping function
h
SLOW: Slow motion function
j
RETURN: access disc menu/return to playback
k
ZOOM: Set the image enlargement
l
PROG: Access the programme function
;
A-B: Repeat sequence
2)
Battery compartment (on the rear panel)
2!
PBC: PBC function activate/deactivate (VCD, SVCD only)
2@
USB: Change between disc playback and USB/card playback
2#
STEP: Individual frame playback
2$
L/R/ST: Set the audio channel
2%
AUDIO: Set the audio language
2^
TITLE: Access the title menu
2&
FAST RWD: Fast search backwards
2*
SKIP BWD
Chapter skip backwards
2(
MUTE : Switch the sound on/off
3)
REPEAT: Set the repeat function
3!
ANGLE: Change the camera perspective
3@
SETUP: Access the OSD menu
3#
GOTO:Access titles, chapters and time direct select menus
3$
STANDBY : Switch the device to standby mode
5. Setting up of the DVD player
1. Carefully remove the DVD player and the supplied accessories from
the packing.
2. Remove the protective foil from the display.
3. Place the DVD player on a flat, even and firm base. Do not subject the
device to any external heat or moisture source. Make sure that the device
has sufficient ventilation on all sides. Do not place any television directly
on top of the DVD player.
Attention!
Do not plug the DVD player into an electrical outlet at this time.
Wait until you have connected the DVD player to a television set.
In the event that you wish to change the type of video or audio connection
you must first pull the power plug from the power socket! Otherwise the
DVD player and possibly equipment connected to it could become
irreparably damaged through voltage peak strikes!
6. Safety instructions
• This device is not intended for use by individuals (including children)
with restricted physical, physiological or intellectual abilities or deficiences
in experience and/or knowledge unless they are supervised by a person
responsible for their safety or receive from this person instruction in how
the device is to be used.
• Children should be supervised to ensure that they do not play with the
device.
• To avoid unintentionally switching on the device pull the power cord
from the mains supply after use and before cleaning.
• Check the device and all parts for visible damages. The safety concept
can work only if the device is in a faultless condition.
• The power plug must always be easily accessible, so that the device can
be quickly disconnected from the mains in the event of an emergency.
Risk of electrical shocks!
• Connect the device only to correctly installed and earthed mains sockets.
Ensure that the rating of the local power supply tallies completely with
the details given on the rating plate of the device.
• Arrange for defective power plugs and/or cables to be replaced at
once by qualified technicians or our Customer Service Department.
• Arrange for customer service to repair or replace connecting cables
and/or devices that are not functioning properly or have been damaged.
• Never immerse the device in water. Wipe it only with a slightly damp
cloth.
• Do not expose the device to rain and never use it in a humid or wet
environment.
• Ensure that the power cable never becomes wet during operation.
• You must not open the housing or repair the device yourself.
Should you do so, device safety can no longer be assured and the
warranty will become void.
• Protect the device against drip and spray water. Do not place any
water-filled vessels (e.g. flower vases) on the device.
Risk of fire!
• Do not use the device in the vicinity of hot surfaces.
• Do not locate the device in places exposed to direct sunlight.
If you do, it may overheat and become irreparably damaged.
• Do not leave the device unattended when in use.
• Never cover the ventilation slots of the device while it is being used.
• Do not place any open sources of fire, like candles, on the device.
Injury hazard!
• Keep children away from the connecting cable and the device.
Children frequently underestimate the dangers of electrical equipment.
• Ensure that the device stands with a safe and secure positioning.
• Do not operate the device if it has sustained a fall or is damaged.
Arrange for the device to be checked and/or repaired by qualified
technicians.
• Batteries/ battery cells are potentially fatal if swallowed. Store batteries
out of the reach of children. If a battery is swallowed medical assistance
must be sought immediately.
• Also, store the packaging foils well away from children. There is a risk
of suffocation.

- 4 -
Danger! Laser radiation!
This device is fitted with a „Class 1 Laser“.
• Never open the device.
• Never attempt to repair the device.
• There is invisible laser radiation inside the device.
Do not expose yourself to the laser beam.
Note:
Some aggressive furniture finishes can have a destructive influence on the
device's rubber feet. If necessary, place the device on a nonslip pad.
Thunderstorms!
Equipment connected to a power supply can be damaged during a
thunderstorm. You should therefore always pull the power plug from the
power socket when there is a storm.
Notice regarding electrical power surges
(EFT / electrical fast transient) and electrostatic discharges:
In the case of malfunction due to an electrical fast transient (power surge)
and/or electrostatic discharge, the device must be returned to default
settings in order to re-establish normal operation. The power supply may
have to be disconnected and then reconnected. The batteries (if present)
must be removed and then reinserted.
Notice regarding disconnection from mains-power
The POWER switch does not completely disconnect the device from
the power network. Additionally, the device consumes power when in
standby-mode. To completely disconnect the device from mains-power,
the power plug MUST be removed from the wall socket.
Information regarding the handling of batteries
The remote control is operated by batteries.
For the safe handling of batteries please observe the following safety
information:
Danger exists from uses other than those intended!
• Do not throw the batteries into a fire.
• Do not short circuit the batteries.
• Do not attempt to recharge the batteries.
• Regularly check the condition of the battery. Leaking battery acid can
cause permanent damage to the device. When handling a damaged or
leaking battery special care should be taken. Danger from acid burns!
Wear protective gloves.
• Clean the battery compartment and the battery contacts with a dry cloth.
• Store batteries out of reach of children. When swallowed seek immediate
medical attention.
• Remove the batteries from the device if you do not intend to use the device
for an extended period of time.
• Never open batteries, never solder or weld batteries.
The risk of explosions and injuries exists!
Attention!
No liability/warranty will be considered for damage to the DVD player
caused by the effects of moisture, water penetration or overheating!
7. Remote control
7.1 Inserting the batteries
1. Open the battery compartment on the rear of the remote control.
2. Place the two supplied batteries type AAA (micro cells) into the battery
compartment. Make sure that the batteries are inserted in accordance
with the correct polarity.
3. Replace the battery compartment cover.
7.2 Using the remote control
In order to guarantee faultless operation when using the remote control…
• Always point the remote control, during use, directely at the DVD player
• Make sure that there are no obstructions between the remote control
and the DVD player that will hinder reception.
• When using the remote control place yourself not more than 5 metres
from the DVD player
otherwise interferences can occur during operation of the DVD player functions
with the remote control.
7.3 Replacing the batteries
If the operation of the DVD player via the remote control does not function
properly or does not function at all the batteries must be replaced
• Always renew all batteries in order to return the remote control to its full
performance ability.
8. Connecting the DVD player to a television
After setting up the DVD player, you can now connect it to a television.
The DVD player can be connected to televisions which operate with the PAL
and NTSC standards.
If you want to use the DVD player on a television with the NTSC standard
you must change the video setting in the DVD players "OSD menu". There
PAL is set as the television standard at the factory. Depending on the televisions
equipment there are different methods of connecting the DVD player to it,
these are explained as follows.
• For playback select the matching channel on your television Check with
the television's instruction manual on how you can set the AV channel.
• In the OSD menu select the menu option VIDEO/VIDEO OUTPUT/
S-VIDEO .
The menu option VIDEO OUTPUT is only selectable when the HDMI output
is deactivated. On this subject see also chapter 10 "Settings in the OSD
menu".
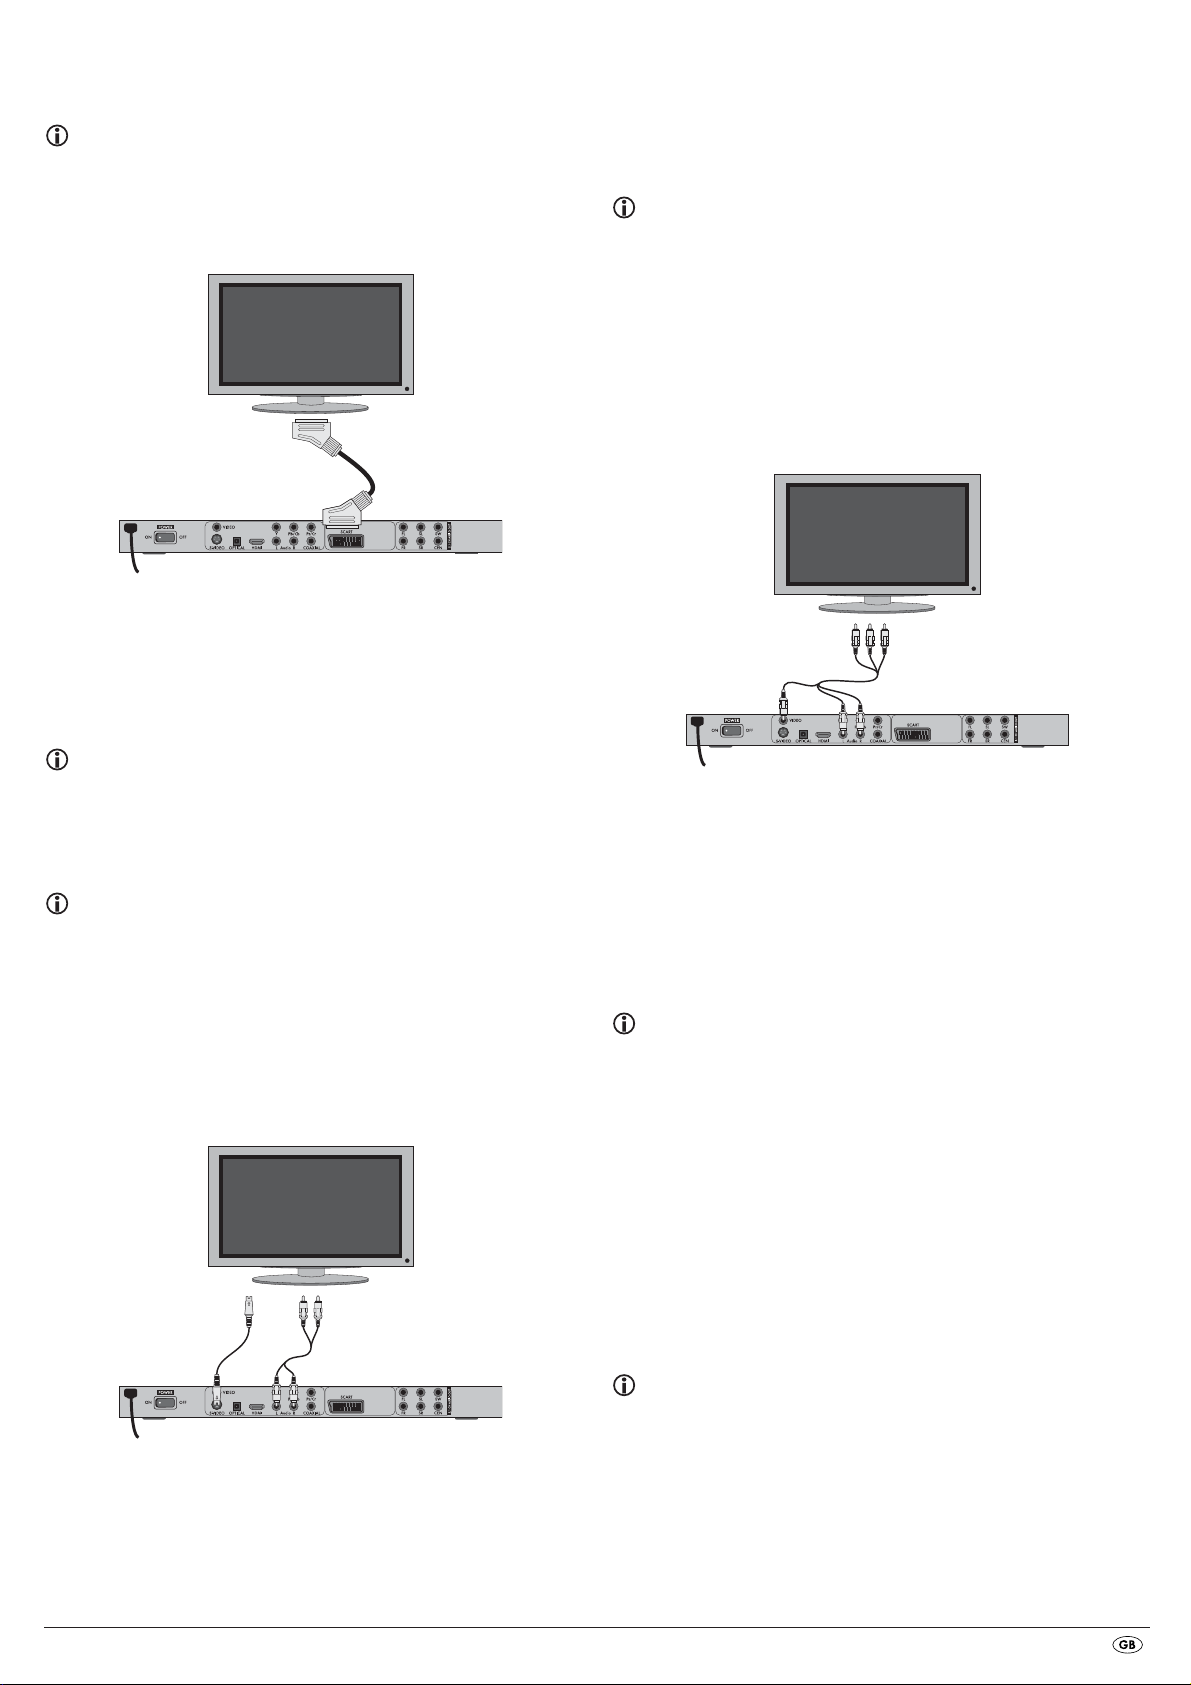
8.3 Connection to a television via video input
(Composite Video)
For this connection variant the television must be equipped with Audio/Video
cinch sockets (Composite Video).
In order to connect the DVD player to a television via Composite Video you
will need
• an audio/video RCA cinch cable (supplied)
• Connect the yellow marked video socket with the yellow
VIDEO socket on
the television.
• Connect the audio output sockets
AUDIO L/R on the rear panel of the DVD
player to the corresponding audio inputs on the television. Make sure
that the colour markings yellow, red and white correspond.
• For playback select the matching channel on your television Check with
the television's instruction manual on how you can set the AV channel.
• In the OSD menu select the menu option VIDEO/VIDEO OUTPUT/
S-VIDEO.
The menu option VIDEO OUTPUT is only selectable when the HDMI output
is deactivated. On this subject see also chapter 10 "Settings in the OSD
menu".
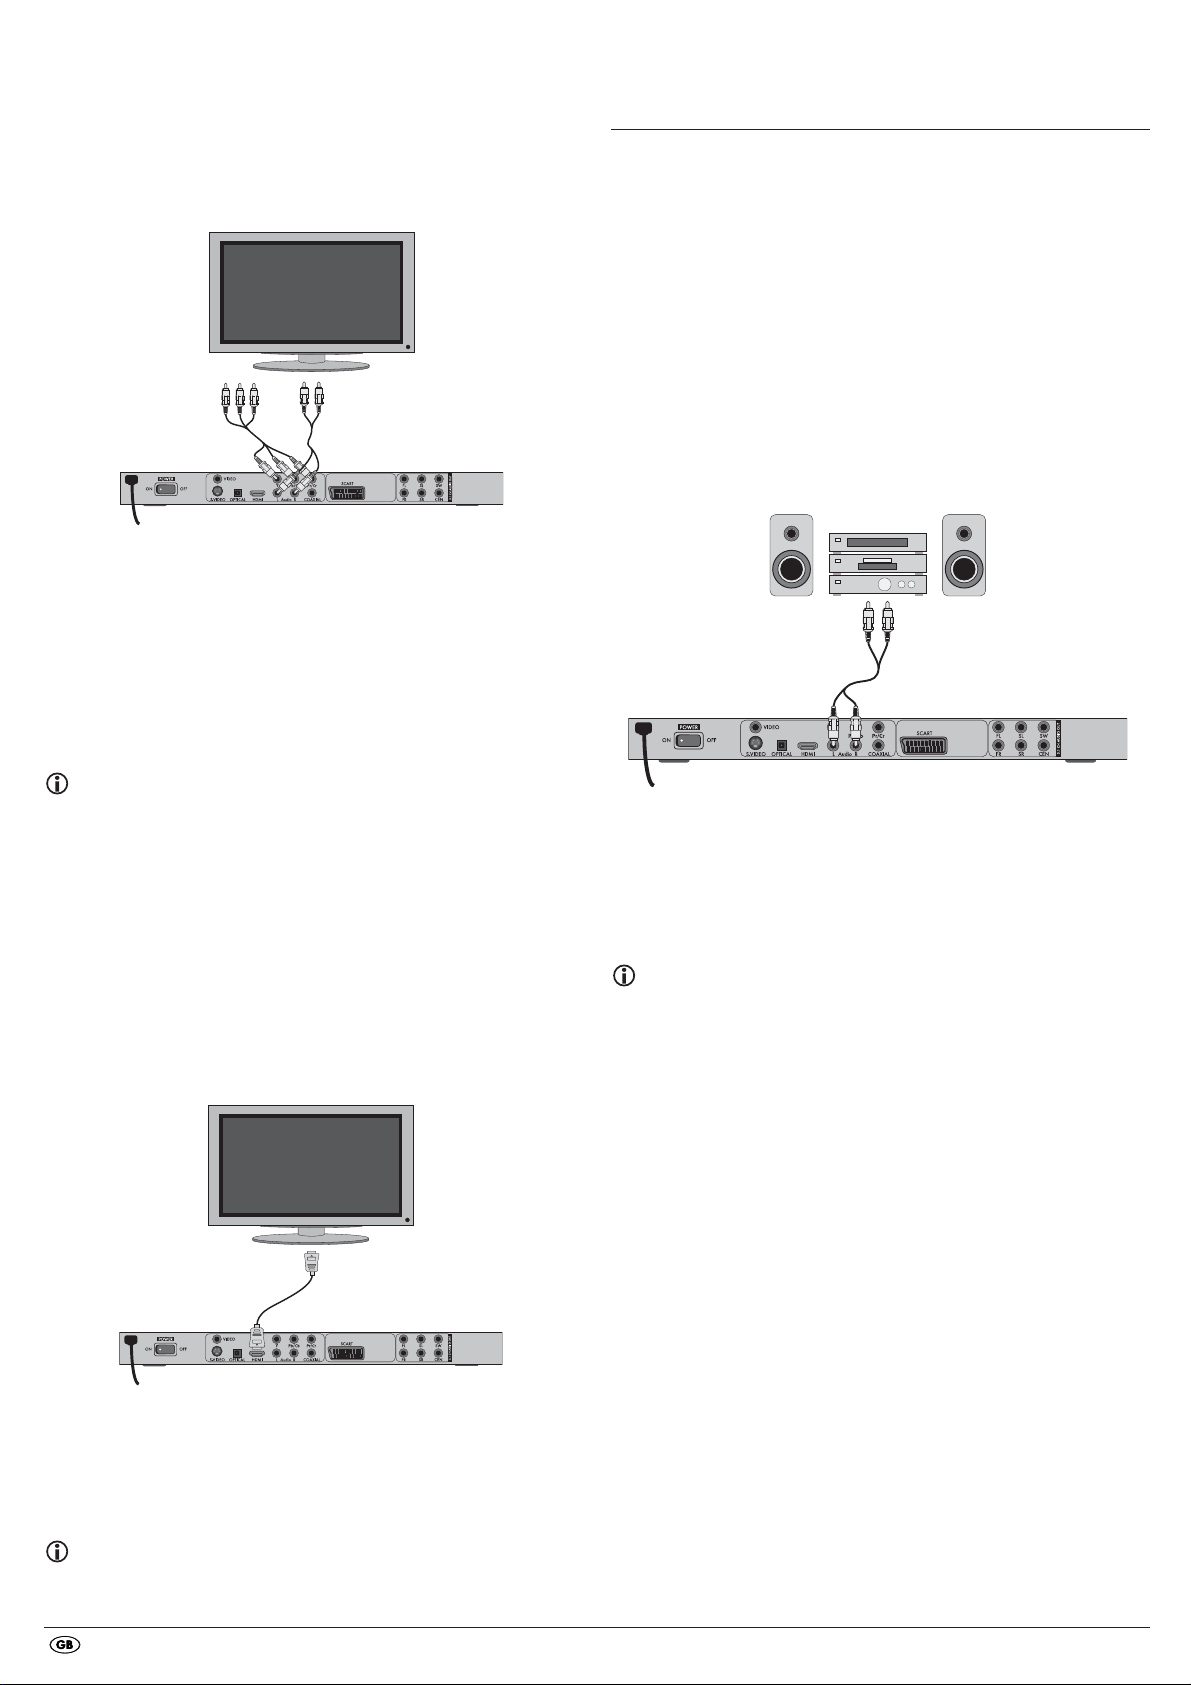
8.4 Connecting via component signal (YPbPr/YUV)
This connection variant is only possible with very high grade televisions,
LCD/Plasma screens or Video projectors.
Check with the instruction manual of the corresponding playback device to
see if this connections variant is available. It is possible that additional playback
device settings may have to be implemented.
The so called "Component signal" is put out via the YPbPr socket of the DVD
player. Component signals are available in the form of the so called "YUV"
signal (Half image) as well as in the form of the so called "YPbPr" signal
(Full image/Progressive scan).
On this topic, please refer to Section 18. "Glossary / KeyWord Index".
The cable connections are the same in both cases; YPbPr-signal for Progressive
Scan however can only be used if the television (or Video projector), to which
you want to connect the DVD player, is capable of Progressive Scan. If you
are not sure whether the television (or Video projector), to which you want to
connect the DVD player is capable of Progressive Scan and has cinch sockets
available then you can check this by consulting the television's (or Video
projectors's) instruction manual.
- 5 -
8.1 Connecting to a television via ScartCable/RGB
Note:
Connecting the DVD player to a television with a Scart cable via the RGB input
offers a high quality connection. Select this connection variation in the case of
televisions equipped with an RGB input. If you are not sure if the television is
equipped with an RGB input then you can check this by consulting the television's
instruction manual.
• Connect the jack inscribed with
SCART to a television Scart socket by
using the supplied Scart cable.
• For playback select the matching channel on your television Check with
the television's instruction manual on how you can set the AV channel.
• In the OSD menu select under the VIDEO/VIDEO OUTPUT/RGB or
S-VIDEO menus.
The menu option VIDEO OUTPUT is only selectable when the HDMI output
is deactivated. On this subject see also chapter 10 "Settings in the OSD
menu".
8.2 Connecting to a television via S-Video
Note:
For this type of connection the television must have available an S-Video input
and two audio "IN" cinch sockets. If you are not sure if the television is equipped
with S-Video and/or cinch sockets you can check this by consulting the television's
instruction manual.
For this connection variant you will need:
• an audio cinch cable (not supplied)
• an S-video cable (not supplied) These can be obtained from your dealer.
To connect the DVD player to a television via S-Video:
• Connect the jack inscribed with S-VIDEO to a television S-Video socket
using an S-Video cable.
• Connect the audio output sockets
AUDIO L/R on the rear panel of the DVD
player via an audio cinch cable to the corresponding audio inputs on
the television. Make sure that the red and white colour markings
correspond.
- 6 -
For both variations – "YPbPr" and "YUV"– you will need
• an audio cinch cable (not supplied)
• an YUV cable (not supplied) These can be obtained from your dealer.
On the rear panel of the DVD player you will find the connection sockets
Y, Pb/Cb and Pr/Cr.
Connecting the DVD player via component signal:
• Connect the sockets Y (green), Pb/Cb (blue) and Pr/Cr (red) with the cor-
responding sockets on the television.
• Connect the audio output sockets
AUDIO L/R on the rear panel of the DVD
player to the corresponding audio inputs on the television with an audio
cinch cable.
Make sure that the red and white colour markings correspond.
• For playback select the matching channel on your television Check with
the television's instruction manual on how you can set the AV channel.
• In the OSD menu select the menu option VIDEO/VIDEO OUTPUT/YUV.
The menu option VIDEO OUTPUT is only selectable when the HDMI output
is deactivated. On this subject see also chapter 10 "Settings in the OSD
menu".
8.5 Connecting to a television via HDMI
This connection variant is only possible with very high grade televisions,
LCD/Plasma screens or Video projectors
Check with the instruction manual of the corresponding playback device to
see if this connections variant is available. It is possible that additional play-
back device settings may have to be implemented. For this type of connection
you will need the HDMI cable (supplied);
Connecting the DVD player via HDMI:
• Connect the jack inscribed with HDMI using a HDMI cable to the
corresponding socket on the television.
• For playback select the matching channel on your television Check with
the television's instruction manual on how you can set the AV channel.
• In the OSD menu select the menu option VIDEO/HDMI Setup/ON.
On this subject see also chapter 10 "Settings in the OSD menu".
9. Connecting audio components to the
DVD player
Besides sound playback of DVDs, VCDs/S-VCDs and audio and MP3-CDs
via the speaker of the television, to which the DVD player is connected,
sound can also be played back via external audio components such as
a HiFi system, Dolby digital/DTS receiver or a surround sound system.
9.1 Requirements for the connection of a HiFi system
In order to enjoy a full sound experience when playing DVDs with the DVD
player you can connect a HiFi system to the player. Before connecting check
with the HiFi system's instruction manual to verify...
• if the HiFi system is suitable for connection to a DVD player.
• if the HiFi system is equipped with cinch sockets; if yes, you can connect
the HiFi system to the DVD player via cinch cables.
Connecting a HiFi system:
• Connect the audio output sockets AUDIO L/R on the rear panel of the DVD
player to the corresponding audio inputs on the HiFi system with an audio
cinch cable. Make sure that the red and white colour markings correspond.
• Check with the instruction manual which settings on the HiFi system may
be necessary in order to reproduce sound via the HiFi system during the
playback of a DVD, VCD/S-VCD, audio or MP3-CD from the DVD player.
Note:
For an optimal sound experience place your HiFi system's loud speakers to
the left and to the right of the television, on which you connected the DVD
player.
If you connected the DVD player to the television via a Scart cable the audio
signal will be transmitted via the cinch cable to your HiFi system as well as
via the Scart cable to the television. In this case, set the volume of the television
to the lowest value.
9.2 Connecting digital audio components via digital cables
In order to enjoy sound playback throughout the room from correspondingly
equipped DVDs (recognizable by the Dolby Digital or DTS logos), you can
connect the DVD player to a digital audio component, for example, a Dolby
Digital or DTS receiver or a suitable surround sound system.
The cables necessary for the following described connection variations can
be obtained from your dealer.
 Loading...