


CERAMIC TOWER HEATER SHT 2000 A1
CERAMIC TOWER HEATER |
KERAAMINEN LÄMMITIN |
Operating instructions |
Käyttöohje |
KERAMISK VÄRMEFLÄKT, STÅENDE |
KERAMIK-VARMETÅRN |
Bruksanvisning |
Betjeningsvejledning |
CHAUFFAGE CÉRAMIQUE COLONNE |
KERAMISCHE VERWARMINGSTOREN |
Mode d’emploi |
Gebruiksaanwijzing |
KERAMIK-HEIZTOWER |
|
Bedienungsanleitung |
|
IAN 91004
RP91004_Keramikheizluefter_Cover_LB3.indd 2 |
|
|
30.04.13 17:57 |
|
|
||
|
|
|
|
RP91004 Heiztower mit FB LB3 Seite 1 Freitag, 24. Mai 2013 4:06 16
English . . . . . . . . . . . . . . . . . . . . . . . . . . . . . . . . . . . . . . . . . . 3
Be sure to note the fold-out page.
Suomi . . . . . . . . . . . . . . . . . . . . . . . . . . . . . . . . . . . . . . . . . |
15 |
Huomioi taittosivu |
|
Svenska . . . . . . . . . . . . . . . . . . . . . . . . . . . . . . . . . . . . . . . |
27 |
Beakta utvikssidan |
|
Dansk . . . . . . . . . . . . . . . . . . . . . . . . . . . . . . . . . . . . . . . . . |
38 |
Læs den udklappelige side |
|
Français . . . . . . . . . . . . . . . . . . . . . . . . . . . . . . . . . . . . . . . |
49 |
Veuillez tenir compte des informations fournies sur le rabat |
|
Nederlands . . . . . . . . . . . . . . . . . . . . . . . . . . . . . . . . . . . . |
62 |
Neem a.u.b. ook de uitklappagina in acht. |
|
Deutsch . . . . . . . . . . . . . . . . . . . . . . . . . . . . . . . . . . . . . . . . |
75 |
Bitte beachten Sie die Ausklappseite |
|
SHT 2000 A1_13_V1.2_GB_FI_SE_DK_DE

RP91004 Heiztower mit FB LB3 Seite 1 Freitag, 24. Mai 2013 4:06 16
22
21
20
19
18
17
12
3 |
|
7 |
|
8
9
4
5
6
10
23
11 12 13 14 15
16
RP91004 Heiztower mit FB LB3 Seite 2 Freitag, 24. Mai 2013 4:06 16
RP91004 Heiztower mit FB LB3 Seite 3 Freitag, 24. Mai 2013 4:06 16
Contents
1. Description . . . . . . . . . . . . . . . . . . . . . . . . . . . . . . . . . . . . . . . . . . . . . . . . . . . . . . . . . . . . 3 2. Names of parts (see fold-out page) . . . . . . . . . . . . . . . . . . . . . . . . . . . . . . . . . . . . . . . . . . . 4 3. Technical data . . . . . . . . . . . . . . . . . . . . . . . . . . . . . . . . . . . . . . . . . . . . . . . . . . . . . . . . . . 4 4. Safety information . . . . . . . . . . . . . . . . . . . . . . . . . . . . . . . . . . . . . . . . . . . . . . . . . . . . . . 4 5. Unpacking, setting up and inserting the battery. . . . . . . . . . . . . . . . . . . . . . . . . . . . . . . . . . 7 6. Operation . . . . . . . . . . . . . . . . . . . . . . . . . . . . . . . . . . . . . . . . . . . . . . . . . . . . . . . . . . . . . 8 7. Cleaning . . . . . . . . . . . . . . . . . . . . . . . . . . . . . . . . . . . . . . . . . . . . . . . . . . . . . . . . . . . . . 11 8. Troubleshooting . . . . . . . . . . . . . . . . . . . . . . . . . . . . . . . . . . . . . . . . . . . . . . . . . . . . . . . 11 9. Disposal . . . . . . . . . . . . . . . . . . . . . . . . . . . . . . . . . . . . . . . . . . . . . . . . . . . . . . . . . . . . . 12
10. HOYER Handel GmbH Warranty . . . . . . . . . . . . . . . . . . . . . . . . . . . . . . . . . . . . . . . . . . . . 12
Congratulations on the purchase of your new product.
You have selected a high-quality product. The operating instructions are a constituent part of this product. They contain important information about safety, use and disposal.
Familiarize yourself with all the operating and safety instructions before using the product. Use the product only as described and for the stated spheres of application.
If you pass the product on to a third party, always pass on all the documentation as well.
1. Description
1.1 Intended purpose
This SilverCrest SHT 2000 A1 ceramic tower heater may be used to heat dry rooms.
This appliance is intended for private use and is not suitable for commercial purposes. The appliance is suitable for providing auxiliary heating. It is less suitable for use on its own to heat large spaces.
The appliance is floor standing only.
1.2 Scope of supply
•1 fan heater
•1 remote control
•2 type AAA batteries
•1 set of operating instructions
1.3 Symbols on the appliance
The adjacent symbol 1 warns against covering the appliance as this could cause a build up of heat leading to damage and the risk of fire.
SHT 2000 A1 |
3 |
RP91004 Heiztower mit FB LB3 Seite 4 Freitag, 24. Mai 2013 4:06 16
2. Names of parts (see fold-out page)
1 |
Warning symbol - “Do not cover” |
13 Swivel function |
2 |
Control panel |
14 Increase temperature |
3 |
Infrared receiver |
15 Reduce temperature |
4 |
Air outlet grille |
16 On/Off switch |
5 |
Main switch ON/OFF |
17 Reduce temperature |
6 |
Base |
18 Increase temperature |
7 |
Handle |
19 Timer |
8 |
Compartment for remote control |
20 Swivel function |
9 |
Air intake grille |
21 Function selector |
10 Display |
22 On/Off switch |
|
11 Function selector |
23 Remote control |
|
12 Timer
|
3. Technical data |
||
|
|
|
|
Power supply: |
220 - 240 V~/50 Hz |
||
Output: |
1,000/2,000 watts |
||
Protection class: |
II |
|
|
Batteries for remote control: 2x type AAA/1.5 V
4. Safety information
4.1 Terms used
The following signalling terms are found in these Operating Instructions:
Warning!
High risk. Disregarding the warning may cause injury to life
and limb.
Caution!
Medium risk. Disregarding the warning may cause damage to property.
Note:
Low risk. Circumstances that should be taken into account when dealing with this appliance.
4.2 General information
•Before using the appliance, be sure to read these Operating Instructions carefully. They are a component part of the appliance and must be available at all times.
•Use the appliance only for the purpose described (see “1.1 Intended purpose” on page 3).
•Check whether the mains voltage (see type plate on the appliance) agrees with your mains voltage.
•This device is not intended to be used by individuals (including children) with
4
RP91004 Heiztower mit FB LB3 Seite 5 Freitag, 24. Mai 2013 4:06 16
limited physical, sensory or mental capabilities or with a lack of experience and/or lack of knowledge, unless supervised by a person responsible for their safety or they have received instructions from such a person as to how to use the device. Children should always be supervised to ensure that they do not play with the device.
•If there should be any malfunctions, the appliance may only be repaired by our Service Centre.
•The appliance must only be set up on a firm, level, dry and non-flammable surface.
•Check that the power socket is easily accessible so that you can pull out the mains plug quickly if necessary.
4.3 Protection against electric shock
Warning! The following safety information is intended to protect you against electric shock.
•Only plug the appliance into a correctly installed, earthed wall socket.
•Do not use the appliance if it has fallen on the floor, received a hard blow or fallen into water. In this case, please contact our Service Centre. The contact data can be found in “Service Centre” on page 14.
•The appliance must not under any circumstances be used if it is damaged. Have the device repaired in such cases by a qualified specialist. The contact data can be found in “Service Centre” on page 14.
•If the mains cable for this appliance is damaged, it must be replaced by the manufacturer or a person with similar qualifications in order to avoid a hazard.
•Never use the appliance in the immediate vicinity of a sink, bath tub, shower or swimming pool as splashes might enter the appliance.
•Water or other liquids must never be allowed to enter the appliance. For this reason:
–never use outdoors;
–never place containers filled with liquid, such as drinking glasses, vases etc. on the appliance;
–never use in a very damp environment such as a bathroom.
If nonetheless liquid does enter the appliance, unplug the mains plug immediately and have the appliance repaired by a qualified specialist. The contact data can be found in “Service Centre” on page 14.
•Never insert fingers or any objects through the protective guards into the inside of the appliance.
•Never touch the appliance, the mains cord or the mains plug with moist hands.
•Always pull the mains cord out by the plug. Never pull it by the cord itself.
•Ensure that the mains cable is not kinked, twisted or crushed.
•Ensure that the mains cable is not damaged on sharp edges.
•Keep the mains cord away from hot surfaces (such as stove eyes).
•If you are not using the appliance for a prolonged period of time, remove the plug from the wall socket. Only then is the appliance completely free of current.
•You should avoid using extension cords. This is only allowed under very particular conditions:
–The extension cord has to be suited for the appliance's amperage.
–The extension cord must not be installed "loose": it must not be
SHT 2000 A1 |
5 |
RP91004 Heiztower mit FB LB3 Seite 6 Freitag, 24. Mai 2013 4:06 16
possible to trip over it or within the reach of children.
–The extension cord must not by any means be damaged.
–No other devices other than this appliance must be connected to the mains socket, as otherwise overloading of the power supply network could occur (multiple sockets are not allowed!).
•The appliance must not be operated with an external time switch or separate remote control system, such as a wireless remote control socket.
4.4 Protection against the danger of fire
Warning! As the appliance works at high temperatures, please observe the following safety information to prevent fire.
•While the appliance is operating, there must be no flammable objects (e.g. curtains, paper) in the immediate vicinity of the appliance.
•Never use the appliance to dry textiles or other items on, over or in front of the appliance.
•To avoid overheating, the appliance must never be covered.
•When setting up the appliance, maintain a minimum distance of 1.5 m from other appliances and the wall.
•Never operate the appliance in rooms where there is a risk of explosion or in the vicinity of flammable gases or liquids.
•The appliance must never be placed immediately beneath a wall socket, as the heat it generates could damage the electrical installation.
•Always check that air can freely enter and escape. Heat might otherwise build up inside the appliance.
•Never leave the appliance running when it is unattended. The presence of odour is almost always an indication of damage. If you notice any such odour, unplug the mains plug immediately and have the appliance inspected. The contact data can be found in “Service Centre” on page 14.
4.5 Protection against injury
Warning! To avoid injury, please observe the following information.
•Ensure that it is not possible for anyone to trip over or to get caught up in or step on the mainscable.
•Stay sufficiently far from the appliance to ensure that the fan cannot suck hair or items of clothing into the appliance.
•Once hot, if you wish to transport the appliance, switch it off, pull out the mains plug, and wait until the appliance has cooled down. Otherwise you could burn yourself on the hot surface.
4.6 For the safety of your child
Warning! Children often cannot assess dangers correctly and are injured as a result. Please therefore observe the following:
•This appliance may only be used under adult supervision to ensure that children do not play with the appliance.
•Always take care to ensure the appliance is kept out of the reach of children at all times.
•The remote control contains batteries. Ensure that they are kept out of the reach of children at all times and are not swallowed.
6
RP91004 Heiztower mit FB LB3 Seite 7 Freitag, 24. Mai 2013 4:06 16
Ingested batteries can be highly dangerous. Obtain medical assistance immediately if the battery is swallowed.
•Ensure that the packing foil does not become a deadly trap for a child. Packing foils are not toys.
4.7 Handling batteries
Warning!
To prevent a risk of explosion, normal batteries must not be charged, heated or disposed of by burning.
•Never try to open the battery.
To prevent injury, if battery acid has leaked avoid contact with skin, eyes and mucous membranes. In the event of
contact with the acid, rinse the affected areas immediately with plenty of clean water and contact a doctor at once.
Caution! To avoid damaging the product and ensure it functions correctly, please note:
• Use only type AAA batteries.
4.8 Material damage
Caution! To avoid material damage, please observe the following requirements.
•Never try to revolve the appliance manually as this might damage the motor.
•Remove the battery from the remote control if you are not using it for a prolonged period of time. A leaking battery could damage the remote control.
5. Unpacking, setting up and inserting the battery
5.1 Setting up the appliance
Note! As the appliance and heating coils are supplied with a thin film of grease, there might be a small amount of smoke and odour the first time the appliance is used. This is not harmful and will stop after a short while. Ensure meanwhile that there is sufficient ventilation.
1.Unpack the appliance from the packaging.
2.Remove the transport packaging.
3.Check that the appliance shows no signs of damage.
Warning! Ensure that there is sufficient distance from the wall, fixtures and other appliances. The distance must be at least 1.5 m to exclude the risk of fire.
4.Select a location that complies with the safety information (see “4.2 General information” on page 4).
5.Select a location where the flow of hot air is not directly aimed at people, animals or plants.
6.Plug the mains plug into a wall socket that complies with the technical data.
Note: The appliance consumes up to 10 amperes of current (2,000 watts). If you have plugged other power consumers into the same circuit, check
SHT 2000 A1 |
7 |
RP91004 Heiztower mit FB LB3 Seite 8 Freitag, 24. Mai 2013 4:06 16
that the maximum load for the installed fuse is not exceeded, as otherwise the fuse will trip.
5.2 Insert batteries
If the appliance is new or the batteries in the remote control are flat, new type AAA batteries must be inserted.
1.Open the battery compartment of the remote control by sliding the battery compartment lid down.
2.Remove the old batteries if present.
Note: Please observe the instructions for disposal (see “9.2 Disposable/ rechargeable batteries” on page 12).
3.Insert new batteries.
Note: Ensure the correct polarity (+/–) when inserting the batteries. The correct polarity is marked on the battery compartment.
4.Slide the lid back onto the battery compartment.
6. Operation
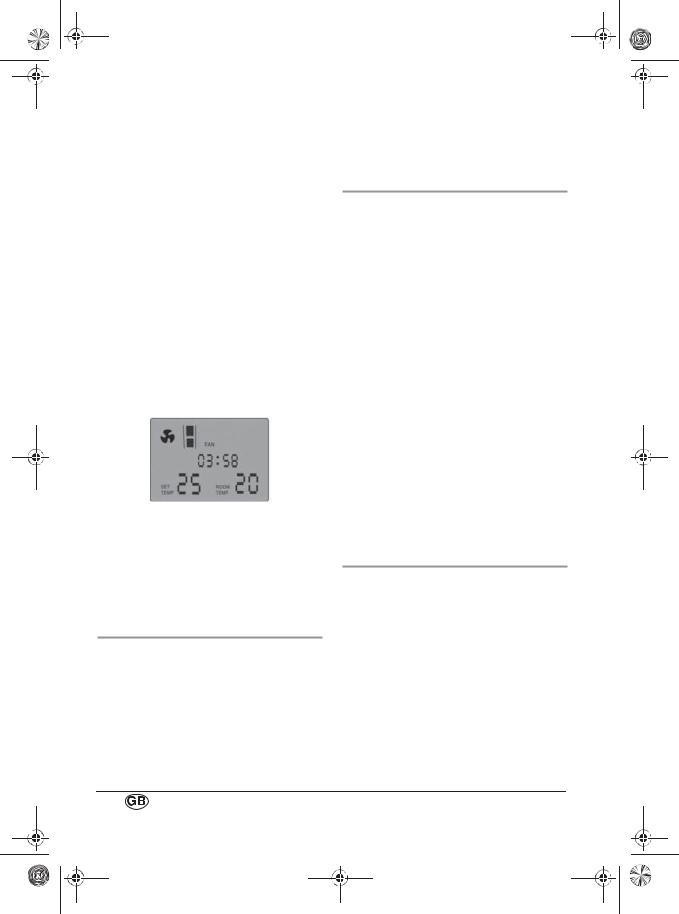
6.1 Displays
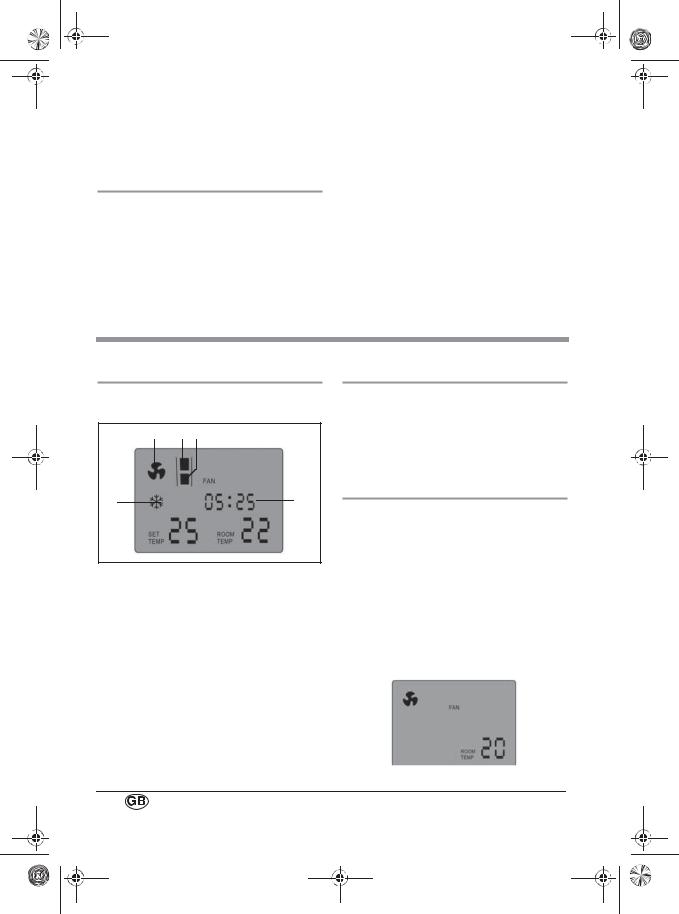
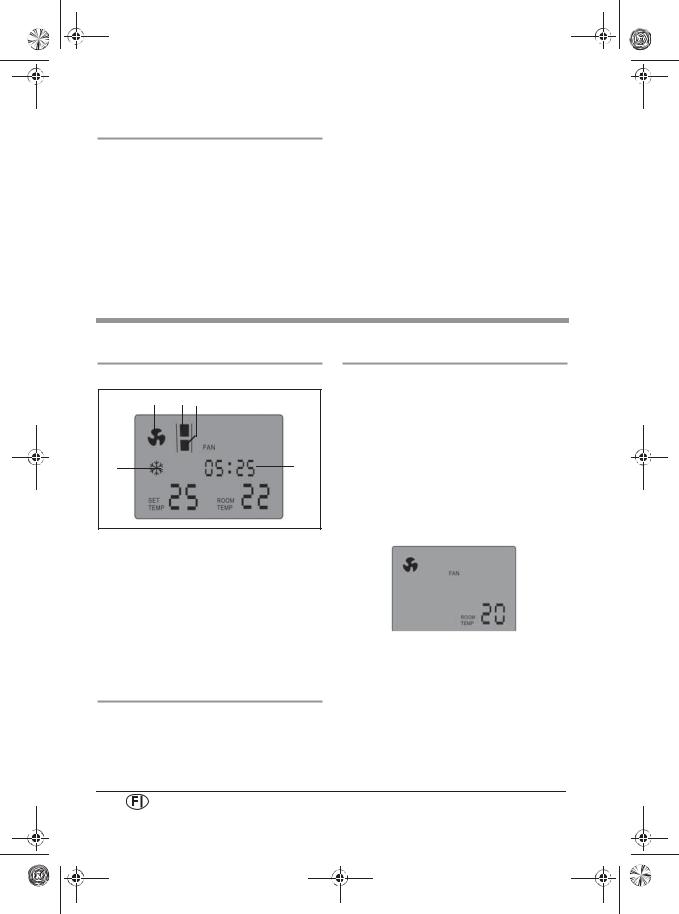
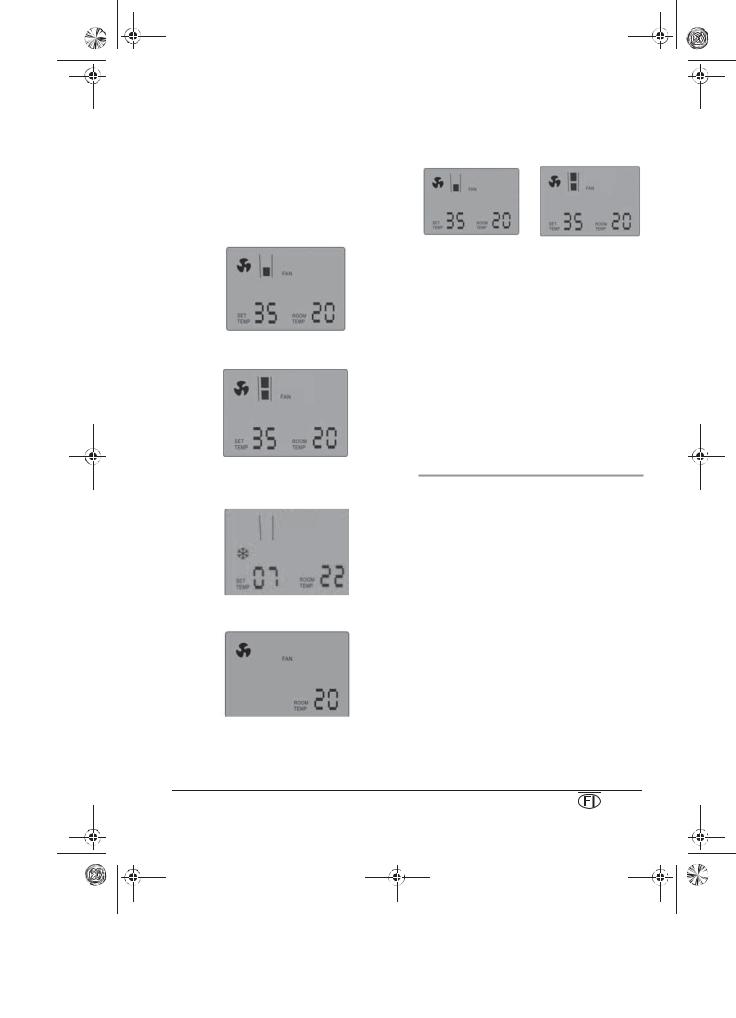
The selected function is shown in the display 10.
AB C
G D F 
 E
E
A Fan running
BHigh heat. The appliance operates at 2,000 watts
CLow heat. The appliance operates at 1,000 watts
D Timer operating time
E Display of room temperature
F Display of set required temperature G Frost protection is activated
6.2 Remote control
The appliance can be operated using the control panel 2 or the remote control 23. The numbers in the text below refer to the control panel 2 and/or the remote control 23.
6.3 Switching the appliance on and off
1.Insert the mains plug into a wall socket that complies with the technical data (see “3. Technical data” on page 4).
2.Switch the mains switch 5 to “ON” to switch on the power supply.
The mains switch 5 lights up.
3.To switch the appliance on, press the On/Off button 16 or 22.
The display 10 shows the current room temperature.
8
RP91004 Heiztower mit FB LB3 Seite 9 Freitag, 24. Mai 2013 4:06 16
4.To switch the appliance off, press the On/Off button 16 or 22.
The appliance will continue to run for a short period and then switch off.
5.To switch the power supply off completely, set the mains switch 5 to
“OFF”.
Any values you have set will be lost when doing so.
6.4 Setting the heat output
1.To select a heating setting, press the function selector 11 or 21 repeatedly until the required heat setting appears in the display 10:
–Low heat: The appliance operates at 1,000 watts
–High heat: The appliance operates at 2,000 watts
–Frost protection mode: The appliance will prevent the room temperature from dropping below the frost line.
–Fan mode: Fan without heater.
6.5Selecting the temperature
1.Select one of the two heating settings.
2.Use the button “+” 14 or 18 to increase the set temperature up to a maximum of 35 °C.
3.Use the button “-” 15 or 17 to reduce the set temperature down to a minimum of 5 °C.
The set temperature is shown in the display 10.
The heater switches off as soon as the room reaches the set temperature. The fan continues to run for several seconds to prevent a build-up of heat.
If the room temperature falls below the set temperature, the heater and fan switch on again automatically.
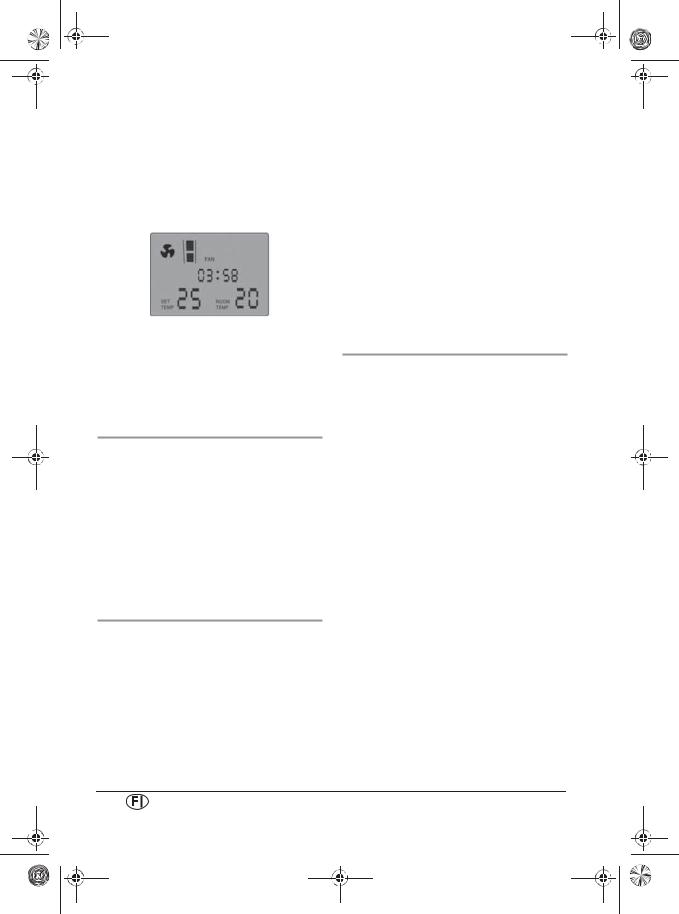
6.6 Setting the operating time
The appliance has a timer with which you can set the required operating time. The maximum operating time is 23 hours ans 59 minutes. The appliance switches off automatically once the operating time has expired.
SHT 2000 A1 |
9 |
RP91004 Heiztower mit FB LB3 Seite 10 Freitag, 24. Mai 2013 4:06 16
1.To switch on the timer, press the timer button 12 or 19.
The display shows 00:00 and the hours flash.
2.Press the “+” button 14 or 18 to increase the hours.
3.Press the “-” button 15 or 17 to reduce the hours.
4.Press the timer button 12 or 19 again. The minutes flash.
5.Press the “+” button 14 or 18 to increase the minutes.
6.Press the “-” button 15 or 17 to reduce the minutes.
7.Press the timer button 12 or 19 again to activate the timer.
The selected operating time is shown in the display 10.
As soon as the set operating time has expired, the appliance switches off automatically.
8.To switch off the appliance while the timer is active, press the On/Off button
16 or 22.
6.7Swivel function
The appliance has a swivel function.
This causes the appliance to swivel to and fro, distributing the exiting air more evenly through the room:
1.To switch the swivel function on, press the swivel function button 13 or 20.
2.To switch the swivel function off, press the swivel function button 13 or 20 again.
6.8 Thermal cut-out
For your safety the appliance has a thermal cut-out.
If the temperature inside the appliance becomes too high, the appliance switches off automatically:
1.Switch the mains switch 5 to “OFF” to switch off the appliance.
2.Check whether the air inlet or outlet is obstructed and remove the cause.
If you cannot establish a cause and the fault occurs repeatedly, have the appliance repaired or else take it out of use.
3.Wait for the appliance to cool down.
4.You can then continue to operate it normally.
If the room temperature exceeds 50 °C, the thermal cut-out also switches the appliance off automatically. The appliance can then only be switched on again once the room temperature has dropped below 50 °C.
6.9 Safety switch
The appliance is protected against accidental damage by a safety switch.
The safety switch is located on the bottom of the appliance and switches the appliance off immediately should it fall over:
1.Return the appliance to an upright position.
2.Select the required function again (see “6.1 Displays” on page 8).
10
RP91004 Heiztower mit FB LB3 Seite 11 Freitag, 24. Mai 2013 4:06 16
7. Cleaning
To ensure your appliance gives you lasting service, you should clean it regularly.
Warning! To avoid the danger of an electric shock or burning:
– remove the mains plug before each clean;
–allow the appliance to cool down;
–never immerse the appliance in water;
–never allow water or cleaning agent to run into the appliance.
1.Carefully remove major dust deposits in the air outlet grille 4 with a vacuum cleaner.
2.Remove any remaining dirt with a soft brush.
Take care not to let any dust fall inside the appliance.
3.Take off the air intake grille 9.
4.Clean the dust off the air intake grille 9 and the filter grille located behind it.
5.Clean the outside of the appliance with a damp cloth. You could also use a little washing-up liquid.
Caution! Never use caustic or abrasive cleaning agents, as this could damage your appliance.
6.Wipe the appliance with a cloth moistened with clear water.
7.Do not use the appliance again until it has dried completely.
8. Troubleshooting
|
Fault |
Cause |
Remedy |
|
|
|
||||
|
|
|
|
|
|
|
|
|
|
|
|
Appliance cannot be |
Faulty fuse or wall socket |
Select another wall socket |
|
|
|
||||
|
switched on |
|
|
|
|
|
|
|
|
|
|
Faulty appliance |
Have repairs carried out at a specialist |
|
|
|
|||||
|
|
|
|
|
||||||
|
|
|
|
|
|
workshop or dispose of the appliance. |
|
|
|
|
|
|
|
|
|
|
You will find the service address in |
|
|
|
|
|
|
|
|
|
|
“Service Centre” on page 14. |
|
|
|
|
|
|
|
|
|
|
|
|
|
|
|
|
Appliance cannot be |
Faulty electronic components |
Have repairs carried out at a specialist |
|
|
|
||||
|
switched off |
|
|
|
|
workshop or dispose of the appliance. |
|
|
|
|
|
|
|
|
|
|
You will find the service address in |
|
|
|
|
|
|
|
|
|
|
“Service Centre” on page 14. |
|
|
|
|
|
|
|
|
|
|
|
|
|
|
|
|
Appliance switches |
Safety switch has triggered |
Set the appliance upright (see |
|
|
|
||||
|
off automatically |
|
|
|
|
“6.9 Safety switch” on page 10) |
|
|
|
|
|
|
|
|
|
|
|
|
|
|
|
|
|
Thermal cut-out has |
Allow the appliance to cool down (see |
|
|
|
||||
|
|
triggered |
“6.8 Thermal cut-out” on page 10) |
|
|
|
||||
|
|
|
|
|
|
|
|
|
|
|
|
|
|
|
|
|
Clean the appliance (see |
|
|
|
|
|
|
|
|
|
|
“7. Cleaning” on page 11) |
|
|
|
|
|
|
|
|
|
|
|
|
|
|
|
|
|
|
|
|
|
|
|
|
|
|
|
SHT 2000 A1 |
|
|
|
|
11 |
|
|
|
|
|
|
|
|
|
|
|
|
|
|
|
|
|
|
|
|
|
|
|
|
|
|
|
|
|
|
|
|
|
|
|
|
|
RP91004 Heiztower mit FB LB3 Seite 12 Freitag, 24. Mai 2013 4:06 16
9. Disposal
9.1 Appliance
The symbol with the crossedout rubbish bin on wheels means that within the European Union, the product must be disposed of to a sorted rubbish collection. This applies to the
product and all accessories which are marked with this symbol. Marked products must not be disposed of via the regular domestic waste but must be handed in to a recycling centre for electrical or electronic devices. Recycling helps to reduce the use of raw materials and to relieve the environment. It is therefore imperative that you follow the disposal regulations applicable in your country.
9.2 Disposable/rechargeable batteries
Batteries must not be disposed of with normal household waste. Flat batteries must be disposed of properly. Special containers for battery disposal are provided for this purpose at the shop where you bought the batteries or at a municipal collection point. Batteries and rechargeable batteries on which the following letters are printed contain harmful substances as follows: Cd (cadmium), Hg
(mercury), Pb (lead).
9.3 Packaging
If you would like to dispose of the packaging, please observe the corresponding environmental regulations in your country.
10. HOYER Handel GmbH Warranty
Dear Customer,
You have a warranty on this product which is valid for 3 years from the date of purchase. In the event of this product being defective, you have statutory rights against the seller of the product. These statutory rights are not limited by our warranty as set out below.
Warranty conditions
The warranty period begins with the date of purchase. Please keep the original till receipt in a safe place. This is required as your proof of purchase.
If a defect in materials or workmanship occurs within three years of the date your product was purchased, we will repair or replace the product at our discretion at no charge to you. This service under warranty assumes that the defective product and the proof of purchase (till receipt) are submitted within the three-year period and that a brief description in writing is provided of what the defect is and when it occurred.
If the defect is covered by our warranty, the repaired product or a new one will be sent back to you. There is no new warranty period following repair or replacement of the product.
12

RP91004 Heiztower mit FB LB3 Seite 13 Freitag, 24. Mai 2013 4:06 16
Warranty period and statutory claims relating to defects
The warranty period is not extended when a service is provided under warranty. This also applies to replaced and repaired parts. Any damage or defects present at purchase must be reported immediately the product is unpacked. Repairs incurred once the warranty period has expired are chargeable.
Scope of warranty
The product has been carefully manufactured in accordance with strict quality guidelines and was thoroughly checked before being delivered.
The warranty applies to defective materials or workmanship. This warranty does not extend to product parts exposed to normal wear and tear (and which can therefore be considered wear parts) or to damage to fragile parts such as switches, batteries or parts made of glass.
This warranty is void if the product is damaged or if it is not used or maintained properly. All the information in the operating instructions should be observed precisely to ensure that the product is used properly.
It is essential to avoid intended uses and actions which are discouraged or warned against in the operating instructions.
The product is intended for only private use and not for commercial purposes.
The warranty is void in the event of misuse, incorrect treatment, use of force or interference by anyone other than our authorized service centre.
Warranty process
Please follow the instructions below to ensure that your claim is processed quickly.
• In case of any enquiry, please keep the article number (for this product: IAN 91004) and the till receipt as proof of purchase.
•The article number can be found on the rating plate, as an engraving, on the cover sheet of your instructions (bottom left) or as a label on the back or underside of your appliance.
•If malfunctions or any other defects should occur, in the first instance contact the Service Centre mentioned below by telephone or e-mail.
•Once a product has been recorded as defective, you can then send it Freepost to the service address you are given, enclosing the proof of purchase (till receipt) and quoting what the defect is and when it occurred.
You can download these instructions and many other manuals, product videos and software from www.lidl-service.com.
SHT 2000 A1 |
13 |
RP91004 Heiztower mit FB LB3 Seite 14 Freitag, 24. Mai 2013 4:06 16
 Service Centre
 Service Great Britain
Tel.: 0871 5000 720 (£ 0.10/Min.) E-Mail: hoyer@lidl.co.uk
IR Service Ireland Tel.: 1890 930 034 (0,08 EUR/Min., (peak))
(0,06 EUR/Min., (off peak)) E-Mail: hoyer@lidl.ie
CY Service Cyprus
Tel.: 8009 4409
E-Mail: hoyer@lidl.com.cy
MT Service Malta
Tel.: 80062230
E-Mail: hoyer@lidl.com.mt
IAN: 91004
 Supplier
Please note that the address below is not a service address. In the first instance, contact the service centre mentioned above.
HOYER Handel GmbH
Kühnehöfe 5
D-22761 Hamburg
Germany
14

RP91004 Heiztower mit FB LB3 Seite 15 Freitag, 24. Mai 2013 4:06 16
Sisältö
1. Laiteseloste . . . . . . . . . . . . . . . . . . . . . . . . . . . . . . . . . . . . . . . . . . . . . . . . . . . . . . . . . . 15 2. Osien nimet (ks. taitelehti) . . . . . . . . . . . . . . . . . . . . . . . . . . . . . . . . . . . . . . . . . . . . . . . 16 3. Tekniset tiedot . . . . . . . . . . . . . . . . . . . . . . . . . . . . . . . . . . . . . . . . . . . . . . . . . . . . . . . . 16 4. Turvaohjeet. . . . . . . . . . . . . . . . . . . . . . . . . . . . . . . . . . . . . . . . . . . . . . . . . . . . . . . . . . . 16 5. Laitteen pystytys, paristojen sisäänpano . . . . . . . . . . . . . . . . . . . . . . . . . . . . . . . . . . . . . . 19 6. Käyttö . . . . . . . . . . . . . . . . . . . . . . . . . . . . . . . . . . . . . . . . . . . . . . . . . . . . . . . . . . . . . . 20 7. Puhdistus . . . . . . . . . . . . . . . . . . . . . . . . . . . . . . . . . . . . . . . . . . . . . . . . . . . . . . . . . . . . 23 8. Häiriönpoisto . . . . . . . . . . . . . . . . . . . . . . . . . . . . . . . . . . . . . . . . . . . . . . . . . . . . . . . . . 23 9. Käytetyn laitteen hävittäminen. . . . . . . . . . . . . . . . . . . . . . . . . . . . . . . . . . . . . . . . . . . . . 24
10. HOYER Handel GmbH -yhtiön myöntämä takuu . . . . . . . . . . . . . . . . . . . . . . . . . . . . . . . . . 24
Onnittelemme uuden laitteen hankinnasta.
Olet valinnut korkealaatuisen tuotteen. Käyttöohje on tämän tuotteen osa. Se sisältää turvallisuuteen, käyttöön ja hävittämiseen liittyviä tärkeitä ohjeita.
Tutustu kaikkiin käyttöja turvallisuusohjeisiin ennen kuin käytät tuotetta. Käytä tuotetta vain kuvatulla tavalla ja ilmoitettuun käyttötarkoitukseen.
Jos luovutat laitteen muiden käyttöön, anna kaikki asiakirjat sen mukana.
1. Laiteseloste
1.1 Käyttökohde
Lämmitystorni SilverCrest SHT 2000 A1 on suunniteltu kuivien asuintilojen lämmitykseen. Laite on suunniteltu käytettäväksi kotitalouksissa; se ei sovellu kaupalliseen käyttöön.
Laite on suunniteltu lisälämmitykseksi. Se ei riitä yksinään lämmittämään suuria huonetiloja.
Laite on periaatteessa aina asetettava lattialle.
1.2 Toimituksen laajuus
•1 lämpötuuletin
•1 kaukosäädin
•2 tyypin AAA paristoa
•1 käyttöohje
1.3 Laitteessa olevat tunnisteet
Viereisellä tunnuksella 1 varoitetaan peittämästä laitetta, koska silloin lämpö kasaantuu ja saattaa aiheuttaa laitevaurioita tai tulipalon vaaran.
SHT 2000 A1 |
15 |
RP91004 Heiztower mit FB LB3 Seite 16 Freitag, 24. Mai 2013 4:06 16
2. Osien nimet (ks. taitelehti)
1 |
Varoitussymboli EI SAA PEITTÄÄ |
13 Kääntötoiminto |
2 |
Käyttöpaneeli |
14 Lämpö suuremmalle |
3 |
Infrapunavastaanotin |
15 Lämpö pienemmälle |
4 |
Ilman ulostulosäleikkö |
16 ON-/OFF-painike |
5 |
Pääkytkin ON/OFF |
17 Lämpö pienemmälle |
6 |
Jalusta |
18 Lämpö suuremmalle |
7 |
Kahva |
19 Ajastin |
8 |
Säilytystasku kaukosäätimelle |
20 Kääntötoiminto |
9 |
Ilman sisäänmenosäleikkö |
21 Toimintovalitsin |
10 Näyttö |
22 ON-/OFF-painike |
|
11 Toimintovalitsin |
23 Kaukosäädin |
|
12 Ajastin
|
3. Tekniset tiedot |
||
|
|
|
|
Jännitteensyöttö: |
220 - 240 V~/50 Hz |
||
Teho: |
1.000/2.000 W |
||
Suojausluokka: |
II |
|
|
Kaukosäätimen paristo: |
2x tyyppi AAA/1,5 V |
||
4. Turvaohjeet
4.1 Käsitteiden selitys
Tämä käyttöohje sisältää seuraavia signaalisanoja:
Varoitus!
Suuri riski. Varoituksen huomioimatta jättäminen voi aiheuttaa vakavia vammoja tai
hengenvaaran.
Varo!
Kohtalainen riski. Varoituksen huomioimatta jättäminen voi aiheuttaa aineellisia vahinkoja.
Huomautus:
Pieni riski. Laitteen käytössä huomioitavat seikat.
4.2 Yleistä
•Lue tämä käyttöohje huolellisesti ennen laitteen käyttöä. Se on osa laitetta ja oltava aina käytettävissä.
•Laitetta saa käyttää ainoastaan sille suunniteltuun tarkoitukseen (katso "1.1 Käyttökohde" sivulla 15).
•Tarkasta, että laitteen vaatima verkkojännite (katso laitteen tyyppikilpeä) vastaa kodissasi käytettyä verkkojännitettä.
16
RP91004 Heiztower mit FB LB3 Seite 17 Freitag, 24. Mai 2013 4:06 16
•Tämä laite ei ole tarkoitettu sellaisten henkilöiden (mukaan lukien lapset) käytettäväksi, joilla on fyysisiä, aisteihin tai henkisiin ominaisuuksiin liittyviä rajoitteita tai joilta puuttuu käyttöön tarvittava kokemus ja/tai tieto, paitsi jos heidän turvallisuudestaan vastava henkilö valvoo ja antaa heille ohjeita, kuinka laitetta on käytettävä. Lasten ei saa antaa leikkiä tällä laitteella.
•Lämpötuuletin on asetettava tukevalle ja tasaiselle alustalle, jonka on oltava kuiva ja ei palavasta materiaalista.
•Huolehdi, ettei kukaan voi kompastua verkkojohtoon, jäädä siihen kiinni tai astua sen päälle.
•Katso, että pistorasia, johon lämmitin liitetään, on hyvin tavoitettavissa sen varalta, että pistoke on vedettävä hätätilassa irti.
4.3 Suojaus sähköiskun varalta
Varoitus! Seuraavat turvaohjeet on laadittu suojaamaan käyttäjää sähköiskuilta.
•Liitä laite aina vain määräysten mukaisesti asennettuun maadoitettuun pistorasiaan.
•Jos laitteeseen on osunut kova isku tai jos se on päässyt putoamaan lattialle tai veteen, laitetta ei enää saa käyttää. Käänny siinä tapauksessa Service- Center-huoltopalvelumme puoleen. Yhteystiedot ks. "Service-Center" sivulla 26.
•Mikäli laite on vioittunut, sitä ei missään tapauksessa saa käyttää. Silloin laite on vietävä kunnostettavaksi alan liikkeeseen. Yhteystiedot ks. "ServiceCenter" sivulla 26.
•Jos laitteen liitäntäjohto on vioittunut, se on riskien välttämiseksi annettava uusia joko valmistajan tai muun vastaavan
pätevyyden omaavan henkilön tai liikkeen toimesta.
•Laitetta ei koskaan pidä käyttää välittömästi pesualtaan, kylpyammeen, suihkun, uima-altaan tms. vieressä, koska laitteeseen voi silloin päästä roiskevettä.
•Laitteen sisään ei saa päästää vettä tai muita nesteitä. Em. syistä
–laitetta ei koskaan saa käyttää ulkotiloissa,
–sen päälle ei saa asettaa kukkamaljakkoa, juomalasia tai muuta astiaa, jossa on nestettä,
–ei missään tapauksessa kosteassa tilassa, esim. kylpyhuoneessa.
Jos laitteen sisään kaikesta huolimatta pääsee vettä, vedä verkkojohto heti irti pistorasiasta ja vie laite korjattavaksi. Yhteystiedot ks. "Service-Center" sivulla 26.
•Sormia tai esim. työkaluja ei saa työntää suojasäleikön läpi laitteen sisäpuolelle.
•Älä koskaan koske laitteeseen, verkkojohtoon tai -pistokkeeseen kostein käsin.
•Irrota verkkojohto pistorasiasta vetämällä pistokkeesta. Älä koskaan vedä johdosta.
•Pidä huoli siitä, että verkkojohto ei taitu eikä jää puristuksiin.
•Varmista, ettei verkkojohto voi vaurioitua terävistä reunoista.
•Pidä verkkojohto loitolla kuumista pinnoista (esim. keittolevy).
•Jos laite ei pitempään aikaan ole käytössä, sen verkkojohto on vedettävä irti pistorasiasta. Vain silloin on taattu, ettei laite saa virtaa.
•Jatkojohtojen käyttöä tulisi välttää. Niiden käyttö on sallittua vain seuraavin ehdoin:
–jatkojohdon on sovelluttava laitteen virran voimakkuuteen;
SHT 2000 A1 |
17 |
RP91004 Heiztower mit FB LB3 Seite 18 Freitag, 24. Mai 2013 4:06 16
–jatkojohtoa ei saa sijoittaa "riippumaan", vaan sijoitettava lasten ulottumattomille ja siten, ettei siihen voi kompastua;
–jatkojohdossa ei missään tapauksessa saa olla vaurioita;
–pistorasiaan ei saa liittää tämän laitteen lisäksi muita laitteita, koska virtaverkko voi muutoin ylikuormittua (monipistorasioiden käyttö kielletty!).
•Laitetta ei saa käyttää erillisellä ajastimella tai erillisellä kaukokäyttöjärjestelmällä (esim. langaton pistorasia).
4.4 Palontorjunta
Varoitus! Koska lämpötila laitteen sisällä nousee korkeaksi, on otettava huomioon seuraavat turvaohjeet, jotka liittyvät palontorjuntaan.
•Kun lämpötuuletin on käynnissä, sen välittömässä läheisyydessä ei saa olla palavia esineitä tai materiaalia (esim. verhot, paperia jne.).
•Lämpötuuletinta ei koskaan saa käyttää esim. tekstiilien tai muun materiaalin kuivaukseen.
•Ylikuumenemisen välttämiseksi laitetta ei saa koskaan peittää.
•Katso, että laite tulee paikkaan, jossa sen ympärillä on vähintään 1,5 m:n vapaa tila muihin laitteisiin, seinään tms.
•Laitetta ei koskaan saa käyttää räjähdysvaarallisissa tiloissa tai palavien kaasujen tai nesteiden lähellä.
•Laitetta ei koskaan saa asettaa suoraan seinässä olevan pistorasian alle, koska laitteen kehittämä lämpö saattaa vaurioittaa muiden sähkölaitteiden osia.
•Huolehdi siitä, että ilma voi virrata vapaasti laitteen sisään ja siitä ulos.
Muutoin lämpö saattaa kasautua laitteen sisään.
•Laitetta ei saa jättää päälle ilman valvontaa. Lähes aina jonkin vian sattuessa on ensimmäinen merkki siitä voimakas palaneen haju. Silloin verkkojohto on heti vedettävä irti pistorasiasta, ja laitteen kunto on annettava tarkastaa. Yhteystiedot ks. "Service-Center" sivulla 26.
4.5 Tapaturmien ehkäisy
Varoitus! Noudata seuraavia ohjeita, niin vältetään tapaturmat.
•Pidä huoli siitä, että kukaan ei voi kompastua tai takertua verkkojohtoon eikä astua sen päälle.
•Kun lämpötuuletin on käynnissä, on varottava menemästä liian lähelle sitä, tuulettimen imu voi vetää hiukset tai vaatetuksen mukanaan.
•Laitetta ei pidä siirtää toiseen paikkaan kuumana, katkaise ensin virta, vedä verkkojohto irti ja odota, kunnes laite on jäähtynyt. Laitteen kuumia pintoja kosketettaessa on muutoin olemassa palovammojen vaara.
4.6 Lasten turvallisuus
Varoitus! Lapset eivät useinkaan osaa arvioida riskitilanteita oikein, mikä saattaa johtaa tapaturmiin. Muista siksi ottaa huomioon:
•Tämä tuote ei ole leikkikalu, joten lapset saavat käyttää sitä ainoastaan aikuisen henkilön valvonnassa.
•Pidä aina huoli siitä, ettei laite jää lasten ulottuville.
•Kaukosäädin toimii paristot. Katso, ettei se joudu lasten käsiin, pikkulapsi voi vahingossa jopa nielaista pariston.
18
RP91004 Heiztower mit FB LB3 Seite 19 Freitag, 24. Mai 2013 4:06 16
Siitä aiheutuu hengenvaara. Jos paristo on nielaistu, on käännyttävä välittömästi lääkärin puoleen.
•Varmista, ettei pakkauskalvosta tule lasten kuolemanloukku. Pakkausmuovit eivät sovellu lasten leikkeihin.
4.7 Paristojen käsittely
Varoitus!
Tavanomaisia paristoja ei koskaan saa ladata, kuumentaa tai heittää tuleen, niistä koituu silloin räjähdysvaara.
•Paristoja ei myöskään pidä yrittää avata.
Jos paristohappoa on vuotanut ulos, on varottava, ettei sitä pääse iholle, silmiin tai limakalvoille, mistä voi olla
seurauksena tapaturma. Hapon kanssa kosketuksiin päässyt kohde on
huuhdeltava heti runsaalla, puhtaalla vedellä ja käännyttävä sen jälkeen välittömästi lääkärin puoleen.
Varo! Laitevaurioiden välttämiseksi ja toimintavarmuuden takaamiseksi on muistettava seuraavaa:
• Käytä ainoastaan tyypin AAA paristoja.
4.8 Aineelliset vahingot
Varo! Aineellisten vaurioiden välttämiseksi pyydämme noudattamaan seuraavia määräyksiä.
•Laitetta ei pidä yrittää pyörittää käsin, silloin sen moottori voi vioittua.
•Ota paristot pois kaukosäätimestä, jos sitä ei tarvita pitempään aikaan. Jos paristot pääsevät vuotamaan, kaukosäädin voi vioittua.
5. Laitteen pystytys, paristojen sisäänpano
5.1 Laitteen pystytys
Huom.: Koska laite ja sen lämmityskierukat toimitetaan kevyesti rasvattuina, ensimmäisen käyttökerran yhteydessä voi esiintyä lievää savun ja hajun muodostusta. Tämä ei ole haitallista ja se loppuu pian itsestään. Huolehdi tänä aikana riittävästä tuuletuksesta.
1.Ota laite pois pakkauksesta.
2.Aseta pakkausmateriaali sivuun.
3.Tarkista, ettei laitteessa näy vaurioita.
Varoitus! Katso, että laitteen ympärillä on tarpeeksi tilaa seinään, huonekaluihin tai muihin laitteisiin päin. Palovaaran ehkäisemiseksi etäisyyden tulisi olla vähintään 1,5 m kauttaaltaan.
4.Valitse paikka, joka täyttää turvaohjeiden vaatimukset (katso "4.2 Yleistä" sivulla 16).
5.Paras paikka on siellä, missä kuuma ilmavirta ei osu välittömästi ihmisiin, eläimiin tai huonekasveihin.
6.Työnnä verkkopistoke pistorasiaan (liitännän on vastattava teknisiä tietoja).
Huom.: Laite ottaa suurimmillaan 10 ampeeria virtaa (2.000 W). Jos samaan virtapiiriin on liitetty muita sähkölaitteita, on katsottava, ettei virtapiirin sulake ylikuormitu, jolloin se laukeaa ja katkaisee virran kokonaan.
SHT 2000 A1 |
19 |
RP91004 Heiztower mit FB LB3 Seite 20 Freitag, 24. Mai 2013 4:06 16
5.2 Paristojen asentaminen
Jos laite on uusi tai kaukosäätimet paristot ovat tyhjät, vaihda tilalle kaksi uutta tyypin AAA paristoa.
1.Avaa kaukosäätimen paristokotelo työntämällä paristokotelon kansi alas.
2.Ota vanhat paristot pois (jos varusteena).
Huomio: Noudata jätteiden hävittämisestä annettuja määräyksiä (katso "9.2 Paristot/akut" sivulla 24).
3.Aseta uudet paristot paikoilleen.
Huomio: Katso, että paristot tulevat sisään navat oikein päin (+/-). Oikean napaisuuden voi tarkastaa paristokotelossa olevasta kuvituksesta.
4.Työnnä kansi takaisin paristokotelon päälle.
6. Käyttö
6.1 Näytöt
Valitun toiminnon näkee näytöstä 10.
AB C
G D F 
 E
E
A Tuuletin käy
BKorkea lämmitysteho: laite toimii 2000 watilla
CAlhainen lämmitysteho: laite toimii 1000 watilla
D Ajastimen aika
E Huonelämpötilan näyttö
F Asetetun ohjelämpötilan näyttö G Jäätymissuoja on aktivoitu
6.2 Kaukosäädin
Laitetta voi käyttää sen käyttöpaneelista 2 käsin tai kaukosäätimellä 23. Tekstissä olevat osien numerot koskevat käyttöpaneelia 2 ja kaukosäädintä 23.
6.3 Laitteen kytkeminen päälle ja pois
1.Työnnä verkkopistoke pistorasiaan (liitännän on vastattava teknisiä tietoja (katso "3. Tekniset tiedot" sivulla 16)).
2.Kytke laitteen virransyöttö päälle asettamalla pääkytkin 5 asentoon "ON".
Pääkytkimeen 5 syttyy valo.
3.Kytke laite päälle painamalla ON/OFFpainiketta 16 tai 22
Näyttöön 10 tulee tämänhetkinen huonelämpötila.
4.Kytke laite pois päältä painamalla uudelleen ON/OFF-painiketta 16 tai 22
Laite käy vielä hetken aikaa ja kytkeytyy sitten pois päältä.
5.Laitteen virta katkaistaan kokonaan asettamalla pääkytkin 5 asentoon "OFF".
Mahdollisesti asetetut arvot menetetään.
20
RP91004 Heiztower mit FB LB3 Seite 21 Freitag, 24. Mai 2013 4:06 16
6.4 Lämmitystehon asetus |
|
6.5 Lämpötilan valinta |
1.Valitse lämmitysteho painamalla toimintovalitsinta 11 tai 21, kunnes halutun lämmitystehon tunnus tulee näyttöön 10:
–Alhainen lämmitysteho: laite toimii 1000 watilla
–Korkea lämmitysteho: laite toimii 2000 watilla
– Jäätymissuoja: |
Laite |
estää |
huonelämpötilan |
|
laskemisen |
jäätymisrajan alapuolelle. |
|
|
–Tuuletinkäyttö: Tuuletin käy ilman lämmitystoimintoa
1.Valitse jompi kumpi lämmitysteho.
2.Painikkeella "+" 14 tai 18 voidaan lisätä ohjelämpötilaa, maksimi 35 °C.
3.Painikkeella "-" 15 tai 17 voidaan alentaa ohjelämpötilaa, minimi 5 °C.
Valittu ohjelämpötila näkyy näytössä 10. Heti kun huonelämpötila on saavuttanut ohjelämpötilan, laite kytkee lämmityksen pois päältä. Tuulettimen toiminta jatkuu vielä muutaman sekunnin ajan, jotta lämpö pääsee poistumaan.
Kun huonelämpötila laskee alle asetetun ohjelämpötilan, lämmitys käynnistyy jälleen automaattisesti.
6.6 Käyntiajan asetus
Laitteeseen kuuluu ajastin, jolla voidaan asettaa haluttu käyntiaika. Enimmäiskesto on 23 tuntia ja 59 minuuttia. Kun asetettu käyntiaika on ummessa, laite kytkeytyy automaattisesti pois päältä.
1.Ajastin kytketään päälle painamalla ajastinpainiketta 12 tai 19.
Näyttöön ilmestyy 00:00 ja tuntilukema vilkkuu.
2.Painikkeella "+" 14 tai 18 tuntilukema suurenee.
3.Painikkeella "-" 15 tai 17 tuntilukema pienenee.
4. Paina uudelleen ajastinpainiketta 12 tai 19.
Minuuttilukema vilkkuu.
SHT 2000 A1 |
21 |
RP91004 Heiztower mit FB LB3 Seite 22 Freitag, 24. Mai 2013 4:06 16
5.Painikkeella "+" 14 tai 18 minuuttilukema suurenee.
6.Painikkeella "-" 13 tai 17 minuuttilukema pienenee.
7.Aktivoi ajastin painamalla uudelleen ajastinpainiketta 3 tai 19.
Valitun käyntiajan näkee näytöstä 10.
Kun asetettu käyntiaika on kulunut, laite kytkeytyy automaattisesti pois päältä.
8.Jos haluat kytkeä laitteen pois päältä, vaikka ajastin on aktivoituna, paina ON/OFF-painiketta 16 tai 22.
6.7 Kääntötoiminto
Tuuletin on varustettu kääntötoiminnolla. Kun se on päällä, tuuletin kääntyy sivusuunnassa edestakaisin, jolloin ilmavirta jakaantuu huoneeseen tasaisemmin.
1.Kääntötoiminto kytketään päälle sen valintapainikkeella 13 tai 20.
2.Kääntötoiminto pysäytetään painamalla sen valintapainiketta 13 tai 20 toistamiseen.
6.8 Ylikuumenemissuoja
Turvallisuussyistä laite on varustettu ylikuumenemissuojalla.
Jos lämpötila laitteen sisällä nousee liian korkeaksi, laite kytkeytyy automaattisesti pois päältä:
1.Katkaise virta laitteesta asettamalla sen pääkytkin 5 asentoon "OFF".
2.Tarkasta, pääseekö ilma virtaamaan vapaasti laitteen sisään ja ulos, jollei, poista esteet.
Jos syytä häiriöön ei löydy ja sama vika toistuu uudelleen, vie laite korjattavaksi tai ota se kokonaan pois käytöstä.
3.Odota, kunnes laite on ehtinyt jäähtyä.
4.Sen jälkeen laitteen voi käynnistää uudelleen.
Jos huonelämpötila nousee yli 50 °C:een, ylikuumenemissuoja kytkee laitteen pois päältä. Sen käyttöä voidaan jatkaa vasta, kun huonelämpötila laskee alle 50 °C:een.
6.9 Turvakytkin
Lämpötuulettimessa on turvakytkin, joka katkaisee virran heti, jos tuuletin kaatuu. Turvakytkin on laitteen alapinnalla, se reagoi heti katkaisemalla virran, jos tuuletin pääsee kaatumaan:
1.Nosta lämpötuuletin ylös ja aseta se lattialle.
2.Valitse sitten uudelleen haluttu toiminto (katso "6.1 Näytöt" sivulla 20).
22
RP91004 Heiztower mit FB LB3 Seite 23 Freitag, 24. Mai 2013 4:06 16
7. Puhdistus
Lämpötuuletin kestää käytössä pitkään, kun se puhdistetaan säännöllisesti.
Varoitus! Sähköiskujen tai palovammojen välttämiseksi on muistettava seuraavaa:
–Ennen laitteen puhdistusta verkkopistoke on vedettävä irti,
–laitteen on annettava jäähtyä,
–laitetta ei saa upottaa veteen,
–eikä sen sisään saa laskea vettä tai puhdistusainetta.
1.Imuroi ensin ilman ulostulosäleikköön 4 tarttunut pahin pöly varoen pölynimurilla.
2.Puhdista loppu lika pois pehmeällä harjalla.
Varo, ettei pölyä tipu puhdistuksen aikana tuulettimen sisään.
3.Irrota ilman sisäänmenosäleikkö 9.
4.Puhdista ilman sisäänmenosäleikkö 9 sekä sen takana oleva suodatinsäleikkö pölystä.
5.Laitteen pinnan voi pyyhkiä puhtaaksi kostealla rievulla. Puhdistusaineeksi sopii astianpesuneste.
Varo! Voimakkaita tai hankaavia puhdistusaineita ei saa käyttää, ne voivat vioittaa laitepintoja.
6.Pyyhi laite puhtaaksi liinalla, joka on kostutettu puhtaalla vedellä.
7.Anna laitteen kuivua täysin ennen käyttöä.
8. Häiriönpoisto
|
Häiriö |
Syy |
Apukeino |
|
||
|
|
|
|
|
||
|
Laite ei käynnisty |
Sulake tai pistorasia on vialli- |
Valitse toinen pistorasia |
|
||
|
|
nen |
|
|
|
|
|
|
|
|
|
||
|
|
Laite on mennyt epäkuntoon |
Vie laite kunnostettavaksi tai hävitä se |
|
||
|
|
|
asianmukaisesti. Huoltopalvelun osoit- |
|
||
|
|
|
teen voi katsoa kohdasta "Service-Cen- |
|
||
|
|
|
ter" sivulla 26. |
|
||
|
|
|
|
|
||
|
Laitetta ei voi kytkeä |
Elektroniikkakomponent- |
Vie laite kunnostettavaksi tai hävitä se |
|
||
|
pois päältä |
eissa on vika |
asianmukaisesti. Huoltopalvelun osoite |
|
||
|
|
|
on kohdassa "Service-Center" |
|
||
|
|
|
sivulla 26. |
|
||
|
|
|
|
|
|
|
|
|
|
|
|
|
|
|
|
|
|
|
|
|
|
|
|
|
|
|
|
SHT 2000 A1 |
23 |
RP91004 Heiztower mit FB LB3 Seite 24 Freitag, 24. Mai 2013 4:06 16
Häiriö |
Syy |
Apukeino |
|
|
|
Laite kytkeytyy |
Turvakytkin on lauennut |
Nosta laite pystyyn (katso "6.9 Tur- |
itsestään pois päältä |
|
vakytkin" sivulla 22) |
|
|
|
|
Ylikuumenemissuoja on |
Anna laitteen jäähtyä (katso "6.8 Yliku- |
|
lauennut |
umenemissuoja" sivulla 22) |
|
|
|
|
|
Puhdista laite (katso "7. Puhdistus" |
|
|
sivulla 23) |
|
|
|
9. Käytetyn laitteen hävittäminen
9.1 Laite
Symboli, jossa pyörillä varustetun roskasäiliön yli on vedetty viivat, tarkoittaa, että tuote täytyy Euroopan Unionin alueella viedä erilliseen jätekeräykseen. Tämä koskee
tuotetta ja kaikkia tällä symbolilla merkittyjä lisäosia. Näin merkittyjä tuotteita ei saa hävittää tavallisen kotitalousjätteen seassa, vaan ne on vietävä sähkölaitteiden ja elektronisten laitteiden kierrätyspisteeseen. Kierrätys auttaa raaka-aineiden kulutuksen vähentämisessä ja vähentää ympäristökuormitusta. Noudata siis ehdottomasti maassasi voimassa olevia hävitystä koskevia määräyksiä.
9.2 Paristot/akut
Paristoja ei saa heittää talousjätteen joukkoon. Käytetyt paristot on hävitettävä määräyksiä noudattaen.
Ne voi viedä joko paristoja myyvien liikkeiden jäteparistolaatikkoon tai virallisten keräilypisteiden jätelaatikkoon. Paristot ja akut, joissa on alla mainitut tunnuskirjaimet, voivat sisältää mm. seuraavia haitta-aineita: Cd (kadmium), Hg (elohopea), Pb (lyijy).
9.3 Pakkaus
Pakkauksen hävityksessä on noudatettava käyttömaassa voimassa olevia ympäristönsuojelumääräyksiä.
10. HOYER Handel GmbH -yhtiön myöntämä takuu
Arvoisa asiakas,
saat tälle laitteelle 3 vuoden takuun ostopäivästä alkaen. Jos tuotteessa on puutteita, ostajalla on myyjää kohtaan lakisääteisiä oikeuksia. Seuraavassa ilmoitetut takuuehdot eivät rajoita näitä lakisääteisiä oikeuksia.
Takuuehdot
Takuuaika alkaa ostopäivästä. Säilytä alkuperäinen kassakuitti hyvin. Tätä asiakirjaa tarvitaan tositteeksi ostosta.
24
RP91004 Heiztower mit FB LB3 Seite 25 Freitag, 24. Mai 2013 4:06 16
Mikäli tässä tuotteessa ilmenee materiaalitai valmistusvirhe kolmen vuoden kuluessa ostopäivästä alkaen, korjaamme tai vaihdamme sen – valintamme mukaan – maksutta. Tämä takuusuoritus edellyttää, että viallinen laite ja sen ostokuitti (kassakuitti) toimitetaan meille kolmen vuoden määräajan kuluessa ja sen mukana toimitetaan lyhyt kirjallinen kuvaus siitä, millainen vika laitteessa on ja milloin se on ilmaantunut.
Jos takuu kattaa vian, saat korjatun tuotteen takaisin tai tilalle uuden tuotteen. Takuuaika ei ala alusta tuotteen korjauksen tai vaihdon jälkeen.
Takuuaika ja lakisääteinen virhevastuu
Virhevastuu ei pidennä takuuaikaa. Tämä koskee myös vaihdettuja ja korjattuja osia. Mahdollisesti jo ostohetkellä olemassa olevista vioista ja puutteista on ilmoitettava välittömästi, kun tuote on purettu pakkauksesta. Takuuajan päätyttyä suoritettavat korjaukset ovat maksullisia.
Takuun laajuus
Laite on valmistettu huolellisesti tiukkoja laatuvaatimuksia noudattaen ja se on läpäissyt tehtaalla suoritetun perusteellisen lopputarkastuksen.
Takuu koskee materiaalija valmistusvirheitä. Tämä takuu ei koske tuotteen sellaisia osia, jotka ovat alttiina normaalille kulumiselle ja joiden siksi katsotaan olevan kuluvia osia, eikä helposti rikkoutuvien osien kuten kytkimien, akkujen tai lasista valmistettujen osien vaurioita.
Takuu raukeaa, jos tuotetta on vahingoitettu tai sitä ei ole käytetty tai huollettu asianmukaisesti. Tuotteen asianmukainen käyttö edellyttää, että kaikkia käyttöohjeessa annettuja määräyksiä on noudatettava tarkkaan.
On ehdottomasti vältettävä sellaisia käyttötarkoituksia ja toimenpiteitä, joita käyttöohjeessa kehotetaan välttämään tai joista varoitetaan.
Tuote on suunniteltu ainoastaan yksityiseen käyttöön, ei ammattikäyttöön.
Väärä tai epäasianmukainen käsittely, liiallinen voimankäyttö ja muun kuin valtuutetun huoltopalvelun (Service-Center) suorittamat toimenpiteet aiheuttavat takuun raukeamisen.
Takuutapauksien käsittely
Jotta asian käsittely sujuu mahdollisimman nopeasti, noudata seuraavia ohjeita:
•Pidä tiedusteluja varten saatavilla laitteen tuotenumero (tällä laitteella: IAN 91004) sekä kassakuitti tositteena ostosta.
•Tuotenumeron löydät laitteen tyyppikilvestä, kaiverruksesta, käyttöohjeen kansilehdeltä (alhaalla vasemmalla) tai laitteen takana tai alla olevasta tarrasta.
•Mikäli ilmaantuu toimintahäiriöitä tai muita puutteita, ota ensin puhelimitse tai sähköpostilla yhteyttä seuraavassa mainittuun huoltopalveluun (ServiceCenter).
•Tämän jälkeen voit lähettää vialliseksi todetun tuotteen ilmoitettuun huoltopalveluun maksutta. Toimita sen mukana ostokuitti (kassakuitti) sekä kuvaus siitä, millainen vika laitteessa on ja milloin se on ilmaantunut.
Sivustolta www.lidl-service.com voit ladata tämän ja monia muita käsikirjoja, tuotevideoita ja ohjelmistoja.
SHT 2000 A1 |
25 |
 Loading...