


SEAD 1800 A1
KITCHEN TOOLS
4
Electric Fruit Preserver & Jam Maker
SEAD 1800 A1
Electric Fruit Preserver &
Jam Maker
Operating instructions
Automat do pasteryzacji
Instrukcja obsługi
KOMPERNASS GMBH
BURGSTRASSE 21 · D-44867 BOCHUM
www.kompernass.com
ID-Nr.: SEAD 1800 A1-09/11-V2
IAN: 71772
Befőzőautomata
Használati utasítás
Zavařovací automat
Návod k obsluze
Einkochautomat
Bedienungsanleitung
Avtomat za vkuhavanje
Navodila za uporabo
Automat na zaváranie
Návod na obsluhu

SEAD 1800 A1
1
2
q
0
9
8
2
3
7
56
4

Index
Introduction . . . . . . . . . . . . . . . . . . . . . . . . . . . . . . . . . . . . . . . . . . . . . . . . . . . 2
Information for these operating instructions . . . . . . . . . . . . . . . . . . . . . . . . . . . . . . . . . . . . . 2
Copyright . . . . . . . . . . . . . . . . . . . . . . . . . . . . . . . . . . . . . . . . . . . . . . . . . . . . . . . . . . . . . . . 2
Proper use . . . . . . . . . . . . . . . . . . . . . . . . . . . . . . . . . . . . . . . . . . . . . . . . . . . . . . . . . . . . . . 2
Warnings . . . . . . . . . . . . . . . . . . . . . . . . . . . . . . . . . . . . . . . . . . . . . . . . . . . . . . . . . . . . . . . 3
Safety instructions . . . . . . . . . . . . . . . . . . . . . . . . . . . . . . . . . . . . . . . . . . . . . 4
Items supplied . . . . . . . . . . . . . . . . . . . . . . . . . . . . . . . . . . . . . . . . . . . . . . . . . 6
Operating elements . . . . . . . . . . . . . . . . . . . . . . . . . . . . . . . . . . . . . . . . . . . . 6
Setting up and connecting to the mains power supply . . . . . . . . . . . . . . . . 7
Unpacking . . . . . . . . . . . . . . . . . . . . . . . . . . . . . . . . . . . . . . . . . . . . . . . . . . . . . . . . . . . . . . 7
Disposal of the packaging . . . . . . . . . . . . . . . . . . . . . . . . . . . . . . . . . . . . . . . . . . . . . . . . . . 7
Appliance set up and making ready for use . . . . . . . . . . . . . . . . . . . . . . . . . . . . . . . . . . . . 7
Using the appliance . . . . . . . . . . . . . . . . . . . . . . . . . . . . . . . . . . . . . . . . . . . . 8
Switching the appliance on and off . . . . . . . . . . . . . . . . . . . . . . . . . . . . . . . . . . . . . . . . . . . 8
Preserving . . . . . . . . . . . . . . . . . . . . . . . . . . . . . . . . . . . . . . . . . . . . . . . . . . . . . . . . . . . . . . 9
Heating and keeping liquids warm . . . . . . . . . . . . . . . . . . . . . . . . . . . . . . . . . . . . . . . . . . 11
Overheating protection . . . . . . . . . . . . . . . . . . . . . . . . . . . . . . . . . . . . . . . . 12
Cleaning and Care . . . . . . . . . . . . . . . . . . . . . . . . . . . . . . . . . . . . . . . . . . . . 13
Cleaning the pouring tap . . . . . . . . . . . . . . . . . . . . . . . . . . . . . . . . . . . . . . . . . . . . . . . . . . 14
Scale removal . . . . . . . . . . . . . . . . . . . . . . . . . . . . . . . . . . . . . . . . . . . . . . . . . . . . . . . . . . 14
GB
Storage . . . . . . . . . . . . . . . . . . . . . . . . . . . . . . . . . . . . . . . . . . . . . . . . . . . . .15
Recipes . . . . . . . . . . . . . . . . . . . . . . . . . . . . . . . . . . . . . . . . . . . . . . . . . . . . . . 15
Coarse liver sausage . . . . . . . . . . . . . . . . . . . . . . . . . . . . . . . . . . . . . . . . . . . . . . . . . . . . . 15
Pumpkin, sweet and sour . . . . . . . . . . . . . . . . . . . . . . . . . . . . . . . . . . . . . . . . . . . . . . . . . . 16
Caramel Pears . . . . . . . . . . . . . . . . . . . . . . . . . . . . . . . . . . . . . . . . . . . . . . . . . . . . . . . . . . 17
Strawberry Jam . . . . . . . . . . . . . . . . . . . . . . . . . . . . . . . . . . . . . . . . . . . . . . . . . . . . . . . . . 17
Disposing of the appliance . . . . . . . . . . . . . . . . . . . . . . . . . . . . . . . . . . . . . . 17
Technical data . . . . . . . . . . . . . . . . . . . . . . . . . . . . . . . . . . . . . . . . . . . . . . . . 18
Notes on the EC Declaration of Conformity . . . . . . . . . . . . . . . . . . . . . . . . . . . . . . . . . . . 18
Importer . . . . . . . . . . . . . . . . . . . . . . . . . . . . . . . . . . . . . . . . . . . . . . . . . . . . . 18
Warranty . . . . . . . . . . . . . . . . . . . . . . . . . . . . . . . . . . . . . . . . . . . . . . . . . . . . 19
Service . . . . . . . . . . . . . . . . . . . . . . . . . . . . . . . . . . . . . . . . . . . . . . . . . . . . . . 19
SEAD 1800 A1
1

GB
Introduction
Information for these operating instructions
These operating instructions are a component of the Electric Fruit Preserver &
Jam Maker SEAD 1800 A1 (henceforth designated as the appliance) and they
provide you with important information about the intended use, safety and connection as well as operation of the appliance.
The operating instructions must be constantly kept available close to the appliance. They are to be read and applied by everyone assigned to operate and
troubleshoot the appliance.
Retain these operating instructions and pass them on, together with the
appliance, to any future owners.
Copyright
This documentation is copyright protected.
Any copying or reproduction, including as extracts, as well as the reproduction of
images, also in an altered state, is only permitted with the written authorisation of
the manufacturer.
Proper use
This Preserving Boiler is suitable for:
- Preserving
- Heating and keeping drinks warm, and for their pouring
- Heating and keeping boiled sausages, or their like, warm
- Heating and keeping soups warm
The appliance is intended for domestic use only, it is not suitable for commercial
or industrial applications.
WARNING
Risks from unintended use!
Risks can be caused by the appliance if it used for unintended purposes and/
or other types of use.
Use the appliance exclusively its for intended purposes. ►
Observe the procedures described in these operating instructions. ►
Claims of any kind resulting from damage caused by improper use, incompetent
r
epairs, unauthoriz
not be acknowledged.
The operator alone bears liability.
2
ed modifi cations or the use of non-approved spare parts will
SEAD 1800 A1
Warnings
In these operating instructions the following warnings are used:
DANGER
A warning at this danger level indicates a threatening dangerous
situation.
If the dangerous situation is not avoided, it could r
physical injury.
Follow the instructions given in this warning notice to avoid the risks of ►
death or serious injury to people.
WARNING
A warning at this danger level signifi es a possible dangerous
situation.
If the dangerous situation is not avoided it could lead to physical injuries.
Observe the directives given in this warning to avoid personal injuries. ►
IMPORTANT
A warning at this danger level signifi es possible proper
damage.
If the situation is not avoided it could lead to property damage.
Observe the directives given in this warning to avoid property damage. ►
esult in death or serious
ty
GB
SEAD 1800 A1
NOTICE
A notice signifi es additional information that can assist you in the handling ►
of the appliance.
3

GB
Safety instructions
In this chapter you receive important safety information regarding the handling of
the appliance.
This appliance complies with the statutory safety regulations. Incorrect usage
can, however, lead to personal injury and property damage.
For safe handling of the appliance observe the following safety information:
RISK - ELECTRIC SHOCK!
Before taking it into use, check the appliance for signs of visible external ►
damage. Do not take into operation an appliance that is damaged or has
been dropped.
o avoid risks, arrange for defective plugs and/or power cables to be ►
T
replaced at once by qualifi ed technicians or our Customer Service
Department.
Repairs should only be carried out by authorized specialist companies or ►
by the Customer Service Department. Incorrect and/or incompetent repairs
can result in signifi
become void.
Ensure that the base with the electrical connections NEVER comes into ►
contact with water! If it has unintentionally come into contact with water,
fi rst allow it to dry out completely before taking it into use.
Ensure that the power cable NEVER becomes wet or damp during operation. ►
Lay the cable so that it cannot become trapped or damaged in any way.
Always remove the plug from the mains power socket after use. Simply ►
switching the appliance off is not suffi cient, because the appliance r
under power for as long as the plug is connected to the mains power socket.
Ensure that the power cable does not come into contact with parts of the ►
appliance that are hot.
cant risks for the user. In addition, warranty claims will
emains
4
SEAD 1800 A1

WARNING - RISK OF INJURY!
This appliance is not intended for use by individuals (including children) ►
with restricted physical, physiological or intellectual abilities or defi ciences
in experience and/or knowledge unless the
responsible for their safety or receive from this person instruction in how the
appliance is to be used.
Children should be supervised to ensure that they do not play with the ►
appliance.
Hot steam clouds may be released. Additionally
very hot during use. You should wear oven mitts.
Ensure that the appliance is standing both fi rmly and upright BEFORE ►
switching it on.
Do NOT mov
WARNING - PROPERTY DAMAGE!
Defective components may only be replaced with original replacement ►
parts. Only by using original replacement parts can it be assured that the
safety requir
Ensure that the appliance, the power cable and the plug cannot come into ►
contact with sources of heat such as hot plates or open fl ames.
Do not use an external timing switch or a separ
operate the appliance.
Never leave the appliance unattended while it is being used. ►
e the Preserving Boiler after it has heated up! ►
ements are being complied with.
y are supervised by a person
, the appliance becomes ►
ate remote control system to ►
GB
SEAD 1800 A1
NOTICE
A repair to the appliance during the warranty period may only be carried ►
out by a customer service department authorised by the manufacturer,
non-compliance will mean that successional warrant
damages cannot be considered.
y claims for subsequent
5

GB
Items supplied
The appliance is delivered with the following components as standard:
Electric Fruit Preserver & Jam Maker ▯
Preserving grill ▯
Lid ▯
Operating instructions ▯
NOTICE
Check the contents to make sure everything is there and for visible damage. ►
If the contents are incomplete or have been damaged due to defective ►
packaging or through transportation, contact the Service Hotline (see
chapter Service).
Operating elements
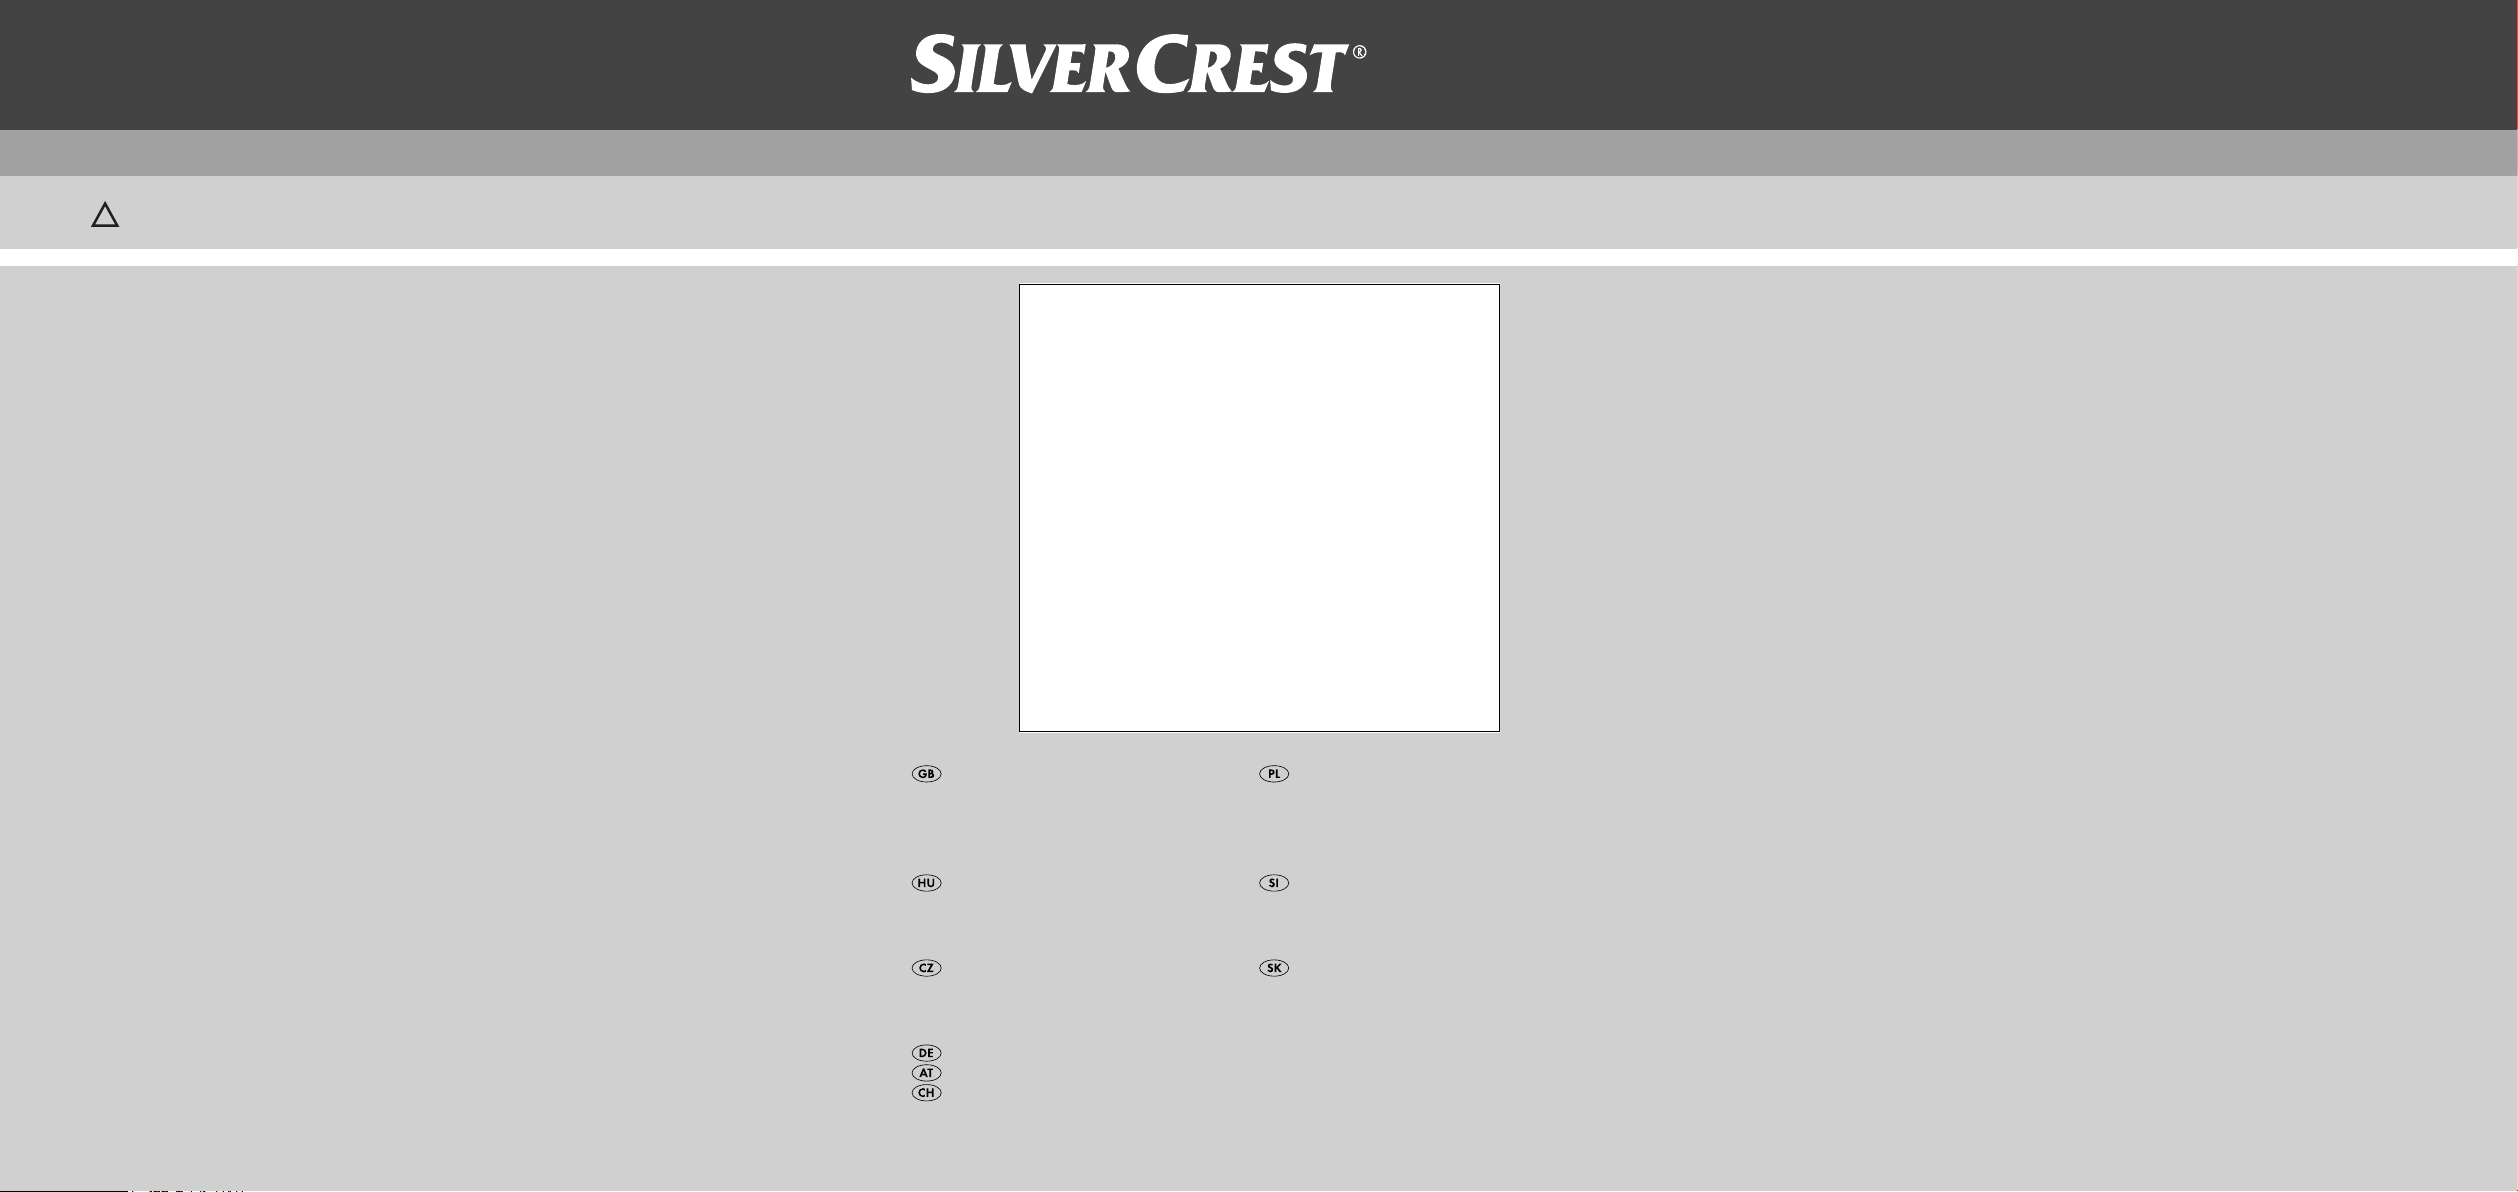
1 Lid
2 Heat insulated handles
3 Control dial for “Minutes “ and, at the same time, TIMER button
4 Preserving grill
5 Display indicator “Minutes”
6 Display indicator “Current Temperature”
7 Display indicator “Set Temperature”
8 Cable storage
9 Control dial for “Temperature” and, at the same time, START/STOP button
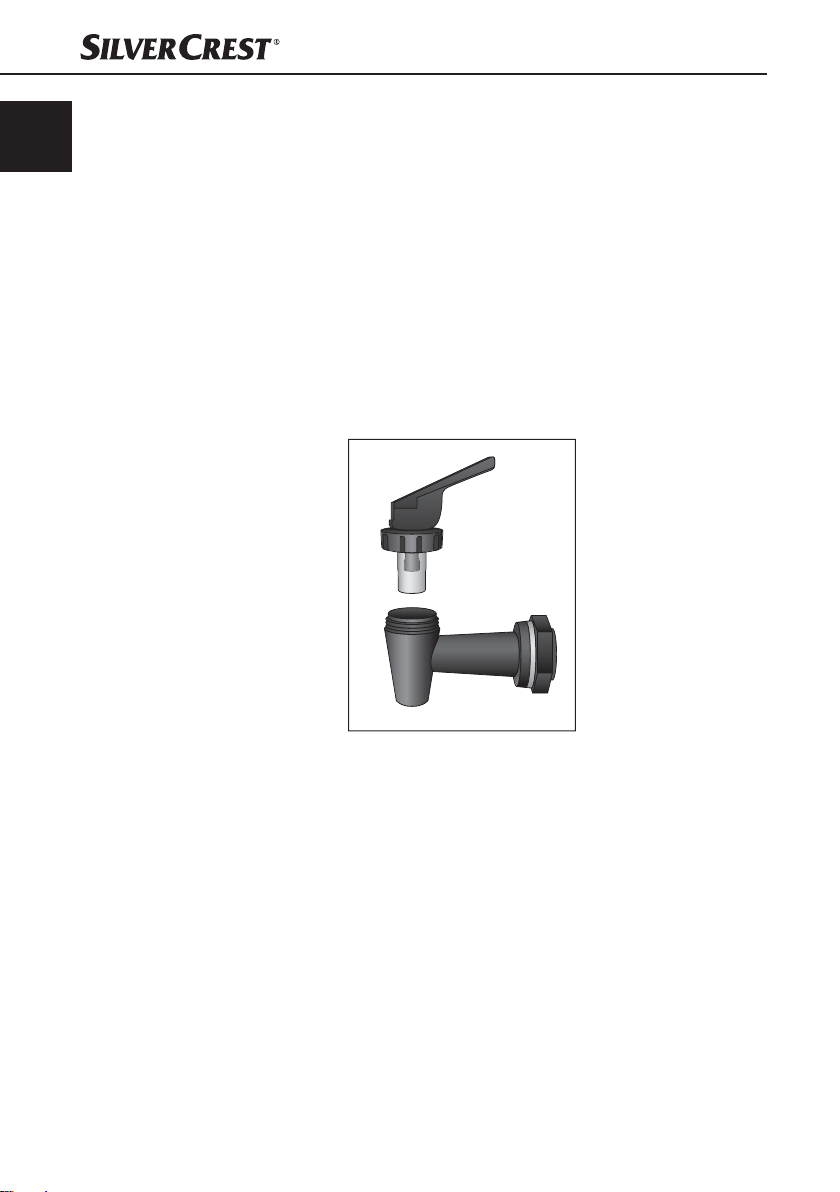
0 Pouring tap
q Tap lever
6
SEAD 1800 A1
Setting up and connecting to the mains
power supply
Unpacking
Remove all parts of the appliance and the operating instructions from the ♦
packaging.
Remove all packing material. ♦
Disposal of the packaging
The packaging protects the appliance from transport damage. The packaging
materials are selected from the point of view of their environmental friendliness
and disposal technology and are therefore recyclable.
The return of packaging into the material circuit saves on raw materials and
reduces the amount of generated waste. Dispose of the packaging material that
is no longer needed as per the locally established regulations.
NOTICE
If possible retain the appliance's original packaging during the warranty ►
period, so that, in the event of a warranty claim, you can ideally pack the
appliance for its return.
Appliance set up and making ready for use
Completely unwind the power cable from the cable storage ■ 8.
Place the appliance on a level and slip-free surface. Ensure that a mains ■
power socket is easily accessible.
Clean the appliance as described in the chapter “Cleaning and Care”.
■
Insert the plug into a mains power socket. The display lights up, a signal tone ■
is heard.
GB
SEAD 1800 A1
WARNING - PROPERTY DAMAGE!
NEVER operate the appliance in a no-load condition! The appliance ►
could be irreparably damaged!
WARNING - RISK OF INJURY!
When it is hot, take hold of the appliance ONLY by means of the heat ►
insulated handles 2. Risk of Burns!
Fill the appliance with about 5 liters of w
minutes (see the section “ Switching the appliance on and off ”). After it has
boiled, pour this water away
.
ater and allow it to boil for 20 ■
7
GB
NOTICE
On the fi rst use the generation of a slight smell may occur, this is due ►
to residues from the production. It is completely harmless and disperses
after a short time. Pr
window.
ovide for suffi cient ventilation, for example, open a
Using the appliance
Switching the appliance on and off
Using the control dial “Temperature” 1) 9, set the desired temperature. You
can set the temperature in 1°C steps. A signal tone sounds for every 5°C.
The set temperature appears in the display indicator “Set Temperature” 7.
Using the control dial “Minutes” 2) 3 set the desired cooking time in minutes.
You can set the time in 1 minute steps. A signal tone sounds for every
5 minutes. The set time appears in the display indicator “Minutes” 5.
Press the START/STOP 3) 9 heating button. The heating begins. The heating
progress in indicated through the continous beam “
heating temperature is shown in the display indicator “ Current Temperature“
6. Once the heating up is complete, signal tones sound, “
the display and the time set in the display indicator “Minutes” 5 begins to
count down.
NOTICE
The backlight of the display switches itself off automatically about 5 minutes ►
after the last activation of a control knob. The display switches itself back
on upon the activation of a control knob.
As soon as the set time period has e
switches itself off . „
“ and „ “ extinguish in the display.
xpired, signal tones sound. The appliance
”. The momentary
” appears in
NOTICE
To stop a heating process or a boiling process, press the heating START/ ►
STOP 9 button.
When the appliance is not in use, ALWA
power socket.
8
YS remove the plug from the mains 4)
SEAD 1800 A1
Preserving
NOTICE
NOTICE
NOTICE
To be understood under the term preserving is the conservation of food- ►
stuff s by, amongst others, the eff ects of heat. Dependent upon the type and
mass of the items to be preserv
processes of sterilisation and pasteurisation. In sterilisation, the items to be
preserved are heated to a temperature of at least 100°C.
With pasteurisation, the heating temperature lies at around 80°C.
For domestic purposes, pasteurisation is suffi cient.
For this, one needs the appropriate preserving jars, with screw-tops or lids
with rubber rings.
Preserve only fresh foods. Overripe fruits or vegetables are not suitable for ►
preserving.
Pay heed to the cleanliness of the jars! Ideally
minutes before fi lling them with foodstuff s. This will ensure all germs and
bacteria have been killed.
Place the preser
Place the fi lled and tightly sealed jars on the preserving grill 2) 4.
A maximum of 14 1-liter preserving jars (diameter 11.5 cm / Height ►
13.2 cm) in two layers, one above the other, can be pasteurised/sterilised.
ving grill 1) 4 in the preserving boiler.
ed, a diff erentiation is made between the
, boil the jars for around 5-7 ►
GB
SEAD 1800 A1
Fill the preser
submersed to at least 3/4 of their height. Ensure that the preserving jars in
the lower layer are fi rmly sealed, so that water cannot infi ltrate them.
Close the preserving boiler with the lid 4) 1.
WARNING - RISK OF INJURY!
When it is hot, take hold of the appliance ONLY by means of the heat ►
insulated handles 2. Risk of Burns!
Using the control dial “T
Use the following tables when selecting a temperature setting:
ving boiler with suffi cent water to ensure that the upper jars are 3)
emperature” 5) 9, set the desired temperature.
9
GB
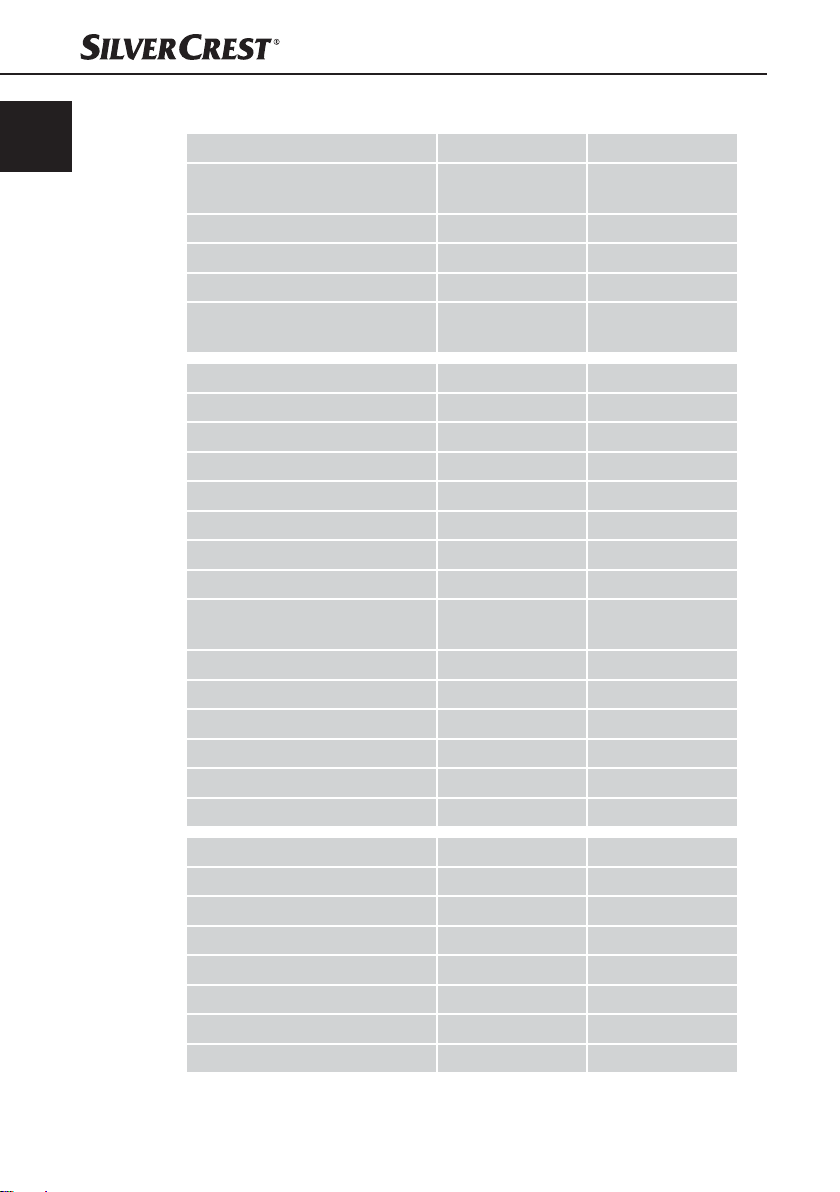
Meat Temperature in °C Time in minutes
Roast meat, in pieces, (cooked
well)
Broth 100 (MAX) 60
Game / Poultry (cooked well) 100 (MAX) 75
Goulash ( cooked well) 100 (MAX) 75
Minced meat, Sausage meat
(raw)
Fruit Temperature in °C Time in minutes
Apples soft/hard 85 30/40
Apple sauce 90 30
Cherries 80 30
Pears hard/soft 90 30/80
Strawberries/Blackberies 80 25
Rhubarb 95 30
Raspberries/Gooseberries 80 30
Red- and Blackcurrants/
Cranberries
Apricot 85 30
Mirabelle/Greengages 85 30
Peach 85 30
Plums/Damsons 90 30
Quince 95 30
Blueberries 85 25
100 (MAX) 85
100 (MAX) 110
90 25
10
Vegetables Temperature in °C Time in minutes
Caulifl ower 100 (MAX) 90
Asparagus 100 (MAX) 120
Peas 100 (MAX) 120
Pickled gherkin 85 30
Carrots/Baby carrots 100 (MAX) 90
Pumpkin 90 30
Kohlrabi 100 (MAX) 95
SEAD 1800 A1
Celeriac 100 (MAX) 110
Brussel sprouts/Red cabbage 100 (MAX) 110
Mushrooms 100 (MAX) 110
Beans 100 (MAX) 120
Tomatoes/Tomato puree 90 30
NOTICE
The time periods specifi ed in the tables refer to the actual cooking time. ►
The time period begins therefore fi rst when the preserving boiler has
reached the set temperatur
take up to 90 minutes!
Using the control dial “Minutes” 6) 3, set the cooking time specifi ed in the
table.
Start the appliance by pressing the heating START/STOP 7) 9 button. Signal
tones sound and the heating begins. Once the heating up is complete, signal
tones sound, “
indicator “Minutes” 5 begins to count down. As soon as the set time period
has expired, signal tones sound. The appliance switches itself off . “
“ ” extinguish in the display.
Position a heat resistent container under the pouring tap 8) 0 and press the
pouring lever q down. The water drains itself.
When the water has drained away allow the preserving jars to cool down.9)
” appears in the display and the time set in the display
e. With a completely full appliance this can
GB
” and
Heating and keeping liquids warm
WARNING - PROPERTY DAMAGE!
Fill it with liquids to NO FURTHER that the MAX level marking! Other- ►
wise, the liquid could overfl ow!
Pour the liquid (for ex
boiler.
Place the lid 2) 1 onto the preserving boiler.
WARNING - RISK OF INJURY!
When it is hot, take hold of the appliance ONLY by means of the heat ►
insulated handles 2. Risk of Burns!
Using the control dial “
Press the button TIMER 4) 3. “
sary to set a cooking time. The appliance heats up continuously until it is
switched off .
SEAD 1800 A1
ample, mulled wine or cocoa) into the preserving 1)
Temperature” 3) 9, set the desired temperature.
” appears in the display. It now not neces-
11
GB
Regularly stir the liquid so that the heat is evenly distributed.5)
When the desired temperature has been reached, signal tones will sound. 6)
You can drain off liquids without solid particles through the tap 0:
WARNING - PROPERTY DAMAGE!
Do not pour off liquids with solid constituents, for example, soups. ►
The solids will block the pouring tap 0!
To do so, hold a cup or similar under the tap 1) 0 and pr
lever q downwards.
When the desired amount of liquid is in the cup, release the dispensing lever 2)
q.
NOTICE
Should you wish to pour off a large volume of liquid, pull the pouring lever ►
q upwards until it stays in position. Then you do not have to hold the pouring
er q.
lev
NOTICE
You can also keep stews warm in the preserving boiler. They do however ►
need to be stirred regularly to prevent them sticking to the bottom of the
appliance.
Overheating protection
ess the dispensing
12
This appliance is fi tted with an overheating protector.
Overheating may occur if there is too little or no liquid in the preserving boiler.
In this case, signal tones sound and the symbol “
case, immediately pour some liquid into the appliance.
If no liquid is added, the appliance switches itself off after 5 minutes. Once you
have topped it up with liquid you can restart the appliance.
” blinks in the display. In this
SEAD 1800 A1

Cleaning and Care
WARNING - RISK OF INJURY!
Before cleaning, ALWAYS remove the plug from the mains power socket! ►
Otherwise, there is the risk of receiving an electric shock!
►
Let the appliance cool down before cleaning it. Risk of Burns!
WARNING - PROPERTY DAMAGE!
NEVER submerse the appliance in water or other liquids!
The appliance could be irreparably damaged!
WARNING - PROPERTY DAMAGE!
Do not use abrasive or aggressive cleaning materials. These could attack ►
the upper surfaces and irreparably damage the appliance.
■
Clean the appliance with a lightly moist cloth. For stubborn soiling use a mild
detergent on the cloth.
Clean the display with a soft, lint-free cloth. ■
Clean the preserving grill ■ 4 in a mild soap
ater.
clear w
GB
y solution and rinse it well with
SEAD 1800 A1
13
GB
Cleaning the pouring tap
To clean the pouring tap 0 thoroughly, you can unscrew the pouring lever q.
Dismantle the pouring lever 1) q.
Place the pouring lever 2) q in a mild soapy solution and swirl it back and
forth.
Rinse it off with clear water.3)
To clean the pouring tap 4) 0 allow a mild soapy solution to fl ow through it.
Should there be stubborn soiling on the inside of the pouring tap 0 use a
pipe cleaner or similar to remove it.
Afterwards, rinse the pouring tap 5) 0 through with clear water.
Re-assemble the pouring lever 6) q back on to the pouring tap 0.
Scale removal
Deposits of scale on the bottom of the appliance lead to increased energy
consumption and reduce the service life of the appliance.
Descale the appliance as soon as scale deposits become apparent.
14
Use a standard commercial descaling product. Proceed as described in the 1)
instructions for usage of the descaler.
After descaling, rinse the appliance with lots of clean and clear water.2)
SEAD 1800 A1

Storage
Wind the cable around the cable retainer 8 and insert the plug into the plug
holder in the middle of the appliance base.
Store the preserving boiler at a cool and dry location.
Recipes
Coarse liver sausage
2 kg Bellypork with rind
500 g Pig liver
500 g Onions
100 g Pork dripping
2 Tsp crushed Allspice
1 Tbsp Thyme and Marjoram, dried
1 Tsp white Pepper
1 Tbsp Salt
Preparation
Boil the bellypork for 1.5 hours in salt water and then allow it all to cool.
Subsequently, turn it through a mediem meat grinder disc. Turn the liver through
a fi ne hole grinder disc.
Dice the onions and cook them in dripping until glassy. Add the meat, liver,
spices and a 1/4 liter of the pork belly broth and then stir it all vigorously.
Immediately fi ll the mixture into prepared jars. Fill the jars only to 1/3!
Boil the jars for about 2 hours at about 98°C.
This recipe can be varied in diff erent ways: for example, add various herbs,
garlic or cubed bacon.
GB
SEAD 1800 A1
15

GB
Pumpkin, sweet and sour
2 kg Pumpkin
1/2 l Vinegar
1 l Water
1/4 l Wine vinegar
1 kg Sugar
Juice and rind of one Lemon
a Ginger root ( fresh ginger cut into slices)
a stick of Cinnamon
a few Cloves
Preparation
Halve the pumpkin and remove the pith. Peel the pumpkin and cut it into small
cubes. Weigh the pumpkin cubes and wash them. Cover them in a bowl with a
diluted vinegar solution (use a 1/2 liter of vinegar and 1 liter of water for 2 kg of
pumpkin fl esh). Let the pumpkin cubes stand in it for 12 hours. On the next day,
pour the solution away and leave the pumpkin cubes to drain well.
Prepare the decoction out of:
1/4 liter wine vinegar, 1 kilogram of sugar, the juice and rind of 1 lemon, 1
sliced fresh ginger root - as a substitute, 1/2 teaspoon ginger powder, 1 stick
of cinnamon, some cloves (about a tablespoon full, as a substitute, ground).
Boil the decoction up and cook the pumpkin cubes in it until glassy.
Fill the pumpkin cubes into preserving jars. Bring the decoction to the boil and
then thicken it. Pour it over the pumpkin cubes and seal the preserving jars.
The preserving jars may only be fi lled to 1/3!
Let the pumpkins cook at 90°C for about 30 minutes in the preserving boiler.
16
SEAD 1800 A1
Caramel Pears
1.5 kg pears (fi rm/ripe)
150 g sugar
750 ml water
Preparation
Peel the pears. Quarter them and remove the cores. Caramelise the sugar in a
pan.
Pour the water into the pan and boil it until the sugar is dissolved. Place the pears
into the pre-prepared glasses.
Pour the caramel juice into the glasses so that the pears are covered. Leave some
space to the top edge of the glass jars and seal them well.
Let the pears boil in the preserver at 90 ° C for about 30 minutes.
Strawberry Jam
Remove the stalks and wash the strawberries. Puree the strawberries. Sprinkle
them with preserving sugar at a ratio of 1:1 (1000 g of strawberries to 1000 g
of sugar). Let it stand overnight and stir it occasionally.
Fill the strawberries into preserving jars (fi ll them to only only 2/3 full) and seal
the jars well.
Let the strawberries cook at 80°C for about 25 minutes in the preserving boiler.
GB
Disposing of the appliance
Do not dispose of the appliance in your normal domestic waste.
This product is subject to the provisions of European Directive
2002/96/EC.
Dispose of the appliance via an approved waste disposal company or via your
communal waste disposal facility. Observe the currently applicable regulations.
In case of doubt, please contact your local waste disposal centre.
SEAD 1800 A1
17

GB
Technical data
Power supply 220 - 240 V ~ 50 Hz
Nominal power 1800 W
Capacity ca. 27 Liter
Temperature range 30 - 100°C
Protection type IPX3 (protection against water spray)
Notes on the EC Declaration of Conformity
With regard to conformity, this appliance complies with the
essential requirements and other relevant provisions of the
EMC Directive 2004/108/EC and the Low Voltage Directive
2006/95/EC.
The complete original declaration of conformity can be
obtained from the importer.
Importer
KOMPERNASS GMBH
BURGSTRASSE 21
44867 BOCHUM, GERMANY
www.kompernass.com
18
SEAD 1800 A1
Warranty
You receive a 3-year warranty for this appliance as of the purchase date. The
appliance has been manufactured with care and meticulously examined before
delivery.
Please retain your receipt as proof of purchase. In the case of a warranty claim,
please make contact by telephone with our Service Department. Only in this way
can a post-free despatch for your goods be assured.
NOTICE
This product is for domestic use only and is not intended for commercial applications. If this pr
abuse, or modifi cations not carried out by one of our authorised service centres,
the warranty will be considered void.
Your statutory rights are not restricted in any way by this warranty. The warranty
period is not extended by repairs made under the warranty. This applies also to
replaced and repaired parts.
Damages or defects discovered after purchase are to be reported directly after
unpacking, at the latest two days by after the purchase date.
Repairs carried out after the lapse of the warranty period are subject to charge.
Service
GB
The warranty is valid only for material or manufacturing defects not, however, ►
for transport damage, wear and tear or for damage to breakable parts, i.e.
switches.
oduct has been subjected to improper or inappropriate handling,
Service Great Britain
Tel.: 0871 5000 720 (£ 0.10/Min.)
E-Mail: kompernass@lidl.co.uk
SEAD 1800 A1
IAN 71772
19

20
SEAD 1800 A1

Spis treści
Wprowadzenie . . . . . . . . . . . . . . . . . . . . . . . . . . . . . . . . . . . . . . . . . . . . . . .22
Informacje o niniejszej instrukcji obsługi . . . . . . . . . . . . . . . . . . . . . . . . . . . . . . . . . . . . . . 22
Prawo autorskie . . . . . . . . . . . . . . . . . . . . . . . . . . . . . . . . . . . . . . . . . . . . . . . . . . . . . . . . . 22
Użycie zgodne z przeznaczeniem . . . . . . . . . . . . . . . . . . . . . . . . . . . . . . . . . . . . . . . . . . 22
Wskazówki ostrzegawcze . . . . . . . . . . . . . . . . . . . . . . . . . . . . . . . . . . . . . . . . . . . . . . . . . 23
Zasady bezpieczeństwa . . . . . . . . . . . . . . . . . . . . . . . . . . . . . . . . . . . . . . . .24
Zakres dostawy . . . . . . . . . . . . . . . . . . . . . . . . . . . . . . . . . . . . . . . . . . . . . . 26
Elementy obsługowe . . . . . . . . . . . . . . . . . . . . . . . . . . . . . . . . . . . . . . . . . . 26
Ustawianie i podłączanie . . . . . . . . . . . . . . . . . . . . . . . . . . . . . . . . . . . . . . 27
Rozpakowanie . . . . . . . . . . . . . . . . . . . . . . . . . . . . . . . . . . . . . . . . . . . . . . . . . . . . . . . . . . 27
Utylizacja opakowania . . . . . . . . . . . . . . . . . . . . . . . . . . . . . . . . . . . . . . . . . . . . . . . . . . . 27
Ustawianie urządzenia i przygotowywanie do pracy . . . . . . . . . . . . . . . . . . . . . . . . . . . . 27
Używanie urządzenia . . . . . . . . . . . . . . . . . . . . . . . . . . . . . . . . . . . . . . . . .28
Włączenie i wyłączenie urządzenia . . . . . . . . . . . . . . . . . . . . . . . . . . . . . . . . . . . . . . . . . 28
Wygotowywanie . . . . . . . . . . . . . . . . . . . . . . . . . . . . . . . . . . . . . . . . . . . . . . . . . . . . . . . . 29
Podgrzewanie / utrzymywanie ciepłoty płynów . . . . . . . . . . . . . . . . . . . . . . . . . . . . . . . . 31
Ochrona przed przegrzaniem . . . . . . . . . . . . . . . . . . . . . . . . . . . . . . . . . . . 32
Czyszczenie i konserwacja. . . . . . . . . . . . . . . . . . . . . . . . . . . . . . . . . . . . . . 33
Czyszczenie zawodu spustowego . . . . . . . . . . . . . . . . . . . . . . . . . . . . . . . . . . . . . . . . . . . 34
Usuwanie kamienia . . . . . . . . . . . . . . . . . . . . . . . . . . . . . . . . . . . . . . . . . . . . . . . . . . . . . . 34
PL
Przechowywanie . . . . . . . . . . . . . . . . . . . . . . . . . . . . . . . . . . . . . . . . . . . . . 35
Przepisy . . . . . . . . . . . . . . . . . . . . . . . . . . . . . . . . . . . . . . . . . . . . . . . . . . . . . 35
Pasztetówka grubozmielona . . . . . . . . . . . . . . . . . . . . . . . . . . . . . . . . . . . . . . . . . . . . . . . 35
Dynia słodko-kwaśna . . . . . . . . . . . . . . . . . . . . . . . . . . . . . . . . . . . . . . . . . . . . . . . . . . . . . 36
Gruszki w karmelu . . . . . . . . . . . . . . . . . . . . . . . . . . . . . . . . . . . . . . . . . . . . . . . . . . . . . . . 37
Konfi tura truskawkowa . . . . . . . . . . . . . . . . . . . . . . . . . . . . . . . . . . . . . . . . . . . . . . . . . . . . 37
Utylizacja urządzenia . . . . . . . . . . . . . . . . . . . . . . . . . . . . . . . . . . . . . . . . . 37
Dane techniczne . . . . . . . . . . . . . . . . . . . . . . . . . . . . . . . . . . . . . . . . . . . . . .38
Informacje o deklaracji zgodności WE . . . . . . . . . . . . . . . . . . . . . . . . . . . . . . . . . . . . . . . 38
Importer . . . . . . . . . . . . . . . . . . . . . . . . . . . . . . . . . . . . . . . . . . . . . . . . . . . . . 38
Gwarancja . . . . . . . . . . . . . . . . . . . . . . . . . . . . . . . . . . . . . . . . . . . . . . . . . . . 39
Serwis . . . . . . . . . . . . . . . . . . . . . . . . . . . . . . . . . . . . . . . . . . . . . . . . . . . . . . 39
SEAD 1800 A1
21
PL
Wprowadzenie
Informacje o niniejszej instrukcji obsługi
Niniejsza instrukcja obsługi stanowi część automatu do gotowania słoików i weków
SEAD 1800 A1 (zwanego dalej urządzeniem) i przekazuje ważne wskazówki
dotyczące użytkowania zgodnego z przeznaczeniem, bezpieczeństwa, montażu
i podłączania oraz obsługi urządzenia.
Instrukcję obsługi należy przechowywać stale w pobliżu urządzenia. Musi ją
przeczytać, a także jej przestrzegać każdy, kto podejmuje się montażu, obsługi
i usuwania usterek w urządzeniu.
Przechowuj instrukcję obsługi i w razie odsprzedaży urządzenia przekaż ją
nowemu właścicielowi.
Prawo autorskie
Niniejsza dokumentacja jest prawnie chroniona. Wszelkie powielanie lub przedruk,
także we fragmentach, oraz przekazywanie ilustracji, również po ich modyfi kacji,
jest dozwolone wyłącznie po uzyskaniu pisemnej zgody producenta.
Użycie zgodne z przeznaczeniem
Do czego można wykorzystywać garnek elektryczny:
- wygotowywanie,
- podgrzewanie i utrzymywanie ciepłoty napojów i ich nalewanie,
- podgrzewanie i utrzymywanie ciepłoty kiełbasek i innych,
- podgrzewanie i utrzymywanie ciepłoty zup.
Urządzenie jest przeznaczone wyłącznie do użytku w warunkach domowych
z wyłączeniem celów komercyjnych i przemysłowych.
22
OSTRZEŻENIE
Niebezpieczeństwo spowodowane użytkowaniem niezgodnie
z przeznaczeniem!
Użytkowanie urządzenia niezgodnie z jego przeznaczeniem i/lub inne
wykorzystanie urządzenia może wiązać się z różnymi zagrożeniami.
Urządzenie należy użytkować wyłącznie zgodnie z jego przeznaczeniem. ►
Należy przestrzegać opisanych w niniejszej instrukcji obsługi metod ►
postępowania.
Wyklucza się możliwość wnosz
spowodowanych zastosowaniem niezgodnie z przeznaczeniem, nieprawidłowymi
naprawami, niedozwolonymi zmianami lub użyciem niedopuszczalnych części
zamiennych.
Wszelkie ryzyko ponosi wyłącznie użytkownik.
enia jakichkolwiek roszczeń z tytułu uszkodzeń
SEAD 1800 A1
Wskazówki ostrzegawcze
W niniejszej instrukcji obsługi zastosowano następujące wskazówki ostrzegawcze:
NIEBEZPIECZEŃSTWO
Wskazówka ostrzegawcza tego stopnia zagrożenia oznacza
grożącą sytuac
Nieunikanie niebezpiecznej sytuacji może doprowadzić do śmierci lub
odniesienia poważnych obrażeń.
Przestrzegać instrukcji z tego ostrzeżenia aby zapobiec niebezpieczeństwu ►
śmierci lub ciężkich obrażeń osób.
OSTRZEŻENIE
Wskazówka ostrzegawcza tego stopnia zagrożenia oznacza
możliwą do wystąpienia sytuację niebezpieczną.
W razie braku możliwości uniknięcia niebezpiecznej sytuacji, może to
doprowadzić do odniesienia obrażeń.
Instrukcje w niniejszej wskazówce ostrzegawczej stosuje się, by uniknąć ►
odniesienia obrażeń osób.
UWAGA
Wskazówka ostrzegawcza tego stopnia zagrożenia oznacza
możliwą szkodę materialna.
W r
azie braku możliwości uniknięcia niebezpiecznej sytuacji, może to
doprowadzić do szkód materialnych.
Instrukcje w niniejszej wskazówce ostrzegawczej stosuje się, by uniknąć ►
szkód materialnych.
ję niebezpieczną.
PL
SEAD 1800 A1
WSKAZÓWKA
Wskazówka oznacza dodatkowe informacje, ułatwiające korzystanie ►
z urządzenia.
23

PL
Zasady bezpieczeństwa
W tym rozdziale znajdziesz ważne wskazówki bezpieczeństwa związane
z użytkowaniem urządzenia.
Niniejsze urządzenie jest zgodne z odpowiednimi przepisami bezpieczeństwa.
Nieprawidłowe użycie może prowadzić do szkód osobowych i materialnych.
Mając na uwadze bezpieczne użytkowanie urządzenia, przestrzegaj następujących wskazówek bezpieczeństwa:
NIEBEZPIECZEŃSTWO -
PORAŻENIE PRĄDEM ELEKTRYCZNYM!
Przed przystąpieniem do użytkowania sprawdź, czy urządzenie nie jest ►
nigdzie uszkodzone. Nie uruchamiaj uszkodzonego ani upuszczonego
urządzenia.
Naprawę uszkodzonej wtyczki lub kabla sieciowego zleć niezwłocznie ►
wykwalifi kowanemu personelowi lub serwisowi.
Naprawy urządzenia zlecaj wyłącznie autoryzowanym serwisom lub ►
obsłudze klienta. Nieprawidłowo wykonane naprawy mogą powodować
zagrożenie dla użytk
Upewnij się, że podstawa z przyłączami elektrycznymi nie ma styku ►
z wodą! W wypadku przypadkowego zamoczenia podstawy należy ją
najpierw dokładnie osuszyć.
Uważaj, aby w trakcie użytkowania nie zamoczyć przewodu zasilającego. ►
Przewód układaj w taki sposób, aby nie został on zakleszczony lub
uszkodzony w inny sposób.
Po zakończeniu używania zawsze wyciągaj wtyk z gniazda. Samo ►
wyłączenie urządzenia nie wystarczy, gdyż jest ono nadal podłączone
do napięcia sieci, dopóki wtyk sieciowy znajduje się w gnieździe.
wnij się, że kabel sieciowy nie dotyka gorących elementów urządzenia. ►
Upe
ownika. Do tego można stracić gwarancję.
24
SEAD 1800 A1

OSTRZEŻENIE – NIEBEZPIECZEŃSTWO OBRAŻEŃ!
Urządzenie nie jest przeznaczone do użytkowania przez osoby (w tym ►
dzieci) z ograniczoną sprawnością fi zyczną, ruchową bądź umysłową
lub nieposiadające odpowiedniego doświadczenia lub wiedzy
że będą one przebywały pod opieką osoby odpowiedzialnej za ich
bezpieczeństwo lub uzyskają od niej wskazówki dotyczące właściwego
używania urządzenia.
Nie można pozwolić dzieciom na zabawę urządzeniem. ►
Z urządzenia może wydobywać się gorąca para. Pojemnik podczas pracy ►
jest bardzo gorący. Należy stosować rękawice kuchenne.
Przed włącz
podłożu.
Nie przestawiaj w inne miejsce r
UWAGA – SZKODY RZECZOWE!
Uszkodzone elementy wymieniaj zawsze na oryginalne części zamienne. ►
Tylko te części gwarantują odpowiednie bezpieczeństwo użytkowania
urządzenia.
Upe
z gorącymi elementami jak płyty kuchenki czy nie zostaną ujęte przez
płomienie.
Do stero
zegarów sterujących ani żadnego innego systemu zdalnego sterowania.
W trakcie używania nigdy nie zostawiać urządzenia bez nadzoru. ►
eniem upewnij się, że urządzenie stoi prosto na stabilnym ►
ozgrzanego garnka elektrycznego! ►
wnij się, że urządzenie, przewód lub wtyk sieciowy nie zetkną się ►
wania pracą urządzenia nie próbuj używać żadnych zewnętrznych ►
, chyba
PL
SEAD 1800 A1
WSKAZÓWKA
Naprawy urządzenia w okresie trwania gwarancji zlecaj wyłącznie ►
autoryzowanym serwisom, ponieważ w przeciwnym razie może dojść do
utraty gw
arancji.
25

PL
Zakres dostawy
Urządzenie jest wyposażone standardowo w następujące elementy:
garnek elektryczny ▯
kratka ▯
pokrywa ▯
instrukcja obsługi ▯
WSKAZÓWKA
Po rozpakowaniu nowego urządzenia sprawdź, czy w środku są wszystkie ►
części.
W przypadku stwier
uszkodzeń spowodowanych nieprawidłowym opakowaniem lub transportem, skontaktuj się z infolinią obsługi klienta (patrz rozdział Serwis).
dzenia niekompletnej zawartości opakowania lub ►
Elementy obsługowe
1 Pokrywa
2 Uchwyty chroniące przed oparzeniem
3 Pokrętło regulacyjne „minuty” oraz przycisk TIMER (zegara sterującego)
4 Kratka do gotowania
5 Pozycja na wyświetlaczu „minuty”
6 Pozycja na wyświetlaczu „aktualna temperatura”
7 Pozycja na wyświetlaczu „ustawiona temperatura”
8 Uchwyt na kabel
9 Pokrętło regulacyjne „temperatury” oraz przycisk START/STOP
0 Zawór
q Dźwignia zaworu
26
SEAD 1800 A1
Ustawianie i podłączanie
Rozpakowanie
Wyjmij wszystkie części urządzenia i instrukcję obsługi z kartonu. ♦
Usuń wszystkie materiały opakowaniowe. ♦
Utylizacja opakowania
Opakowanie chroni urządzenie przed uszkodzeniami podczas transportu.
W trosce o ochronę środowiska, wszystkie zastosowane elementy opakowania
nadają się do ponownego przetworzenia.
Zwracanie opakowania do obiegu materiałów oszczędza surowce naturalne
i zmniejsza zanieczyszczenie odpadami. Zbędne materiały opakowania utylizuj
zgodnie z obowiązującymi przepisami.
WSKAZÓWKA
W miarę możliwości zachowaj oryginalne opakowanie na czas trwania ►
gwarancji, by w razie odsyłania urządzenia móc je prawidłowo zapakować.
Ustawianie urządzenia i przygotowywanie do pracy
Całkowicie rozwń przewód z uchwytu ■ 8.
Postaw urządzenie na płaskiej i szorstkiej powierzchni. Zwróć uwagę, aby ■
gniazdko było łatwo dostępne.
Najpierw wy
Podłącz wtyczkę do gniazdka sieciowego. Zaświeca wyświetlacz i roz- ■
brzmiewa sygnał.
czyść urządzenie, patrz rozdział „Czyszczenie i konserwacja”. ■
PL
SEAD 1800 A1
UWAGA – SZKODY RZECZOWE!
Nigdy nie używaj urządzenia bez produktów w środku! Może dojść do ►
uszkodzenia urządzenia!
OSTRZEŻENIE – NIEBEZPIECZEŃSTWO OBRAŻEŃ!
Gorące urządzenie chwytaj zawsze za uchwyty ► 2.
Niebezpieczeństwo popar
Nalej ok. 5 l wody do urządzenia i gotuj ją przez 20 minut (patrz rozdział ■
„Włączanie i wyłączanie urządzenia”). Po zagotowaniu wylej wodę.
zenia!
27
PL
WSKAZÓWKA
Przy pierwszym uruchomieniu może być wyczuwalny zapach spalenizny. ►
Jest to spowodowane wypalaniem się pozostałości środków zastosowanych
przy produk
zniknie. Pamiętaj o zapewnieniu odpowiedniej wentylacji w pomieszczeniu,
np. poprzez otwarcie okna.
cji urządzenia. Jest to zjawisko całkowicie normalne i z czasem
Używanie urządzenia
Włączenie i wyłączenie urządzenia
Za pomocą pokrętła regulacyjnego „temperatury” 1) 9 ustaw odpowiednią
temperaturę. Temperaturę można ustawiać w krokach po 1 °C. Co 5 °C
rozbrzmiewa sygnał. Ustawiona temperatura pojawia się na wyświetlaczu
„Ustawiona temperatura” 7.
Za pomocą pokrętła regulacyjnego „minuty” 2) 3 ustaw wymagany czas
gotowania. Czas można ustawiać w krokach po 1 minucie. Co 5 minut rozbrzmiewa sygnał. Ustawiony czas pojawia się na wyświetlaczu „Minuty” 5.
Naciśnij przycisk START/STOP ogrzewania 3) 9. Rozpoczyna się nagrzewanie. Nagrzewanie jest sygnalizowane paskami „
temperatura” 6 wyświetlacza pokazywana jest bieżąca temperatura
nagrzewania. Po zakończeniu nagrzewania rozbrzmiewa kilka sygnałów
dźwiękowych, a na wyświetlaczu pojawia się „
wiony czas w oknie „minuty” 5 wyświetlacza.
”. W oknie „aktualna
” i zaczyna migać usta-
28
WSKAZÓWKA
Podświetlenie tła wyświetlacza jest wyłączane automatycznie po upływie ►
ok. 5 minut od ostatniego naciśnięcia jednego z pokręteł. Aktywacja
jednego z pokręteł ponownie włącza wy
Po upływie zaprogramowanego czasu rozbrzmiewają sygnały akustyczne.
Urządzenie wyłącza się. Na wyświetlaczu znika „
WSKAZÓWKA
Aby przerwać proces nagrzewania lub gotowania naciśnij przycisk ►
START/STOP ogrzewania 9.
Na czas dłuższych prz
wtyczkę z gniazdka.
erw w użytkowaniu urządzenia zawsze wyciągać 4)
świetlacz.
” i „ ”.
SEAD 1800 A1
 Loading...