


ELECTRIC OVEN & GRILL SGBR 1500 A1
ELECTRIC OVEN & GRILL
Operating instructions
PEČICA S FUNKCIJO ŽARA
Navodila za uporabo
AUTOMAT NA GRILOVANIE A PEČENIE
Návod na obsluhu
GRILLSÜTŐ
Használati utasítás
TROUBA NA GRILOVÁNÍ A PEČENÍ
Návod k obsluze
GRILLUND BACKAUTOMAT
Bedienungsanleitung
IAN 102464

Before reading, unfold the page containing the illustrations and familiarise yourself with all functions of the device.
Olvasás előtt kattintson az ábrát tartalmazó oldalra és végezetül ismerje meg a készülék mindegyik funkcióját.
Pred branjem odprite stran s slikami in se nato seznanite z vsemi funkcijami naprave.
Před čtením si otevřete stranu s obrázky a potom se seznamte se všemi funkcemi přístroje.
Pred čítaním si odklopte stranu s obrázkami a potom sa oboznámte so všetkými funkciami prístroja.
Klappen Sie vor dem Lesen die Seite mit den Abbildungen aus und machen Sie sich anschließend mit allen Funktionen des Gerätes vertraut.
GB |
Operating instructions |
Page |
1 |
HU |
Használati utasítás |
Oldal |
15 |
SI |
Navodila za uporabo |
Stran |
29 |
CZ |
Návod k obsluze |
Strana |
43 |
SK |
Návod na obsluhu |
Strana |
57 |
DE / AT / CH |
Bedienungsanleitung |
Seite |
71 |

A |
9 |
1 |
|
8
7
6
B |
0 |
|
q |
w
e
2
3
4
5
z |
t r |
|

Contents
GB
Introduction. . . . . . . . . . . . . . . . . . . . . . . . . . . . . . . . . . . . . . . . . . . . . . . . . . . . . . . . . . . .2
Proper use . . . . . . . . . . . . . . . . . . . . . . . . . . . . . . . . . . . . . . . . . . . . . . . . . . . . . . . . . . . . .2
Package contents . . . . . . . . . . . . . . . . . . . . . . . . . . . . . . . . . . . . . . . . . . . . . . . . . . . . . . .2
Appliance description. . . . . . . . . . . . . . . . . . . . . . . . . . . . . . . . . . . . . . . . . . . . . . . . . . . .2
Technical data . . . . . . . . . . . . . . . . . . . . . . . . . . . . . . . . . . . . . . . . . . . . . . . . . . . . . . . . . .2
Safety instructions . . . . . . . . . . . . . . . . . . . . . . . . . . . . . . . . . . . . . . . . . . . . . . . . . . . . . .3
Setting up . . . . . . . . . . . . . . . . . . . . . . . . . . . . . . . . . . . . . . . . . . . . . . . . . . . . . . . . . . . . .6
Using the appliance . . . . . . . . . . . . . . . . . . . . . . . . . . . . . . . . . . . . . . . . . . . . . . . . . . . . .6
Glass door. . . . . . . . . . . . . . . . . . . . . . . . . . . . . . . . . . . . . . . . . . . . . . . . . . . . . . . . . . . . . . . . . . . . . . . . . 6 Inserting the crumb tray . . . . . . . . . . . . . . . . . . . . . . . . . . . . . . . . . . . . . . . . . . . . . . . . . . . . . . . . . . . . . . . 6 Using the rotisserie. . . . . . . . . . . . . . . . . . . . . . . . . . . . . . . . . . . . . . . . . . . . . . . . . . . . . . . . . . . . . . . . . . . 7 Using the baking tray/rack . . . . . . . . . . . . . . . . . . . . . . . . . . . . . . . . . . . . . . . . . . . . . . . . . . . . . . . . . . . . 8
Before first use . . . . . . . . . . . . . . . . . . . . . . . . . . . . . . . . . . . . . . . . . . . . . . . . . . . . . . . . .8
Operating the appliance . . . . . . . . . . . . . . . . . . . . . . . . . . . . . . . . . . . . . . . . . . . . . . . . .9
Function switch. . . . . . . . . . . . . . . . . . . . . . . . . . . . . . . . . . . . . . . . . . . . . . . . . . . . . . . . . . . . . . . . . . . . . . 9 Temperature control . . . . . . . . . . . . . . . . . . . . . . . . . . . . . . . . . . . . . . . . . . . . . . . . . . . . . . . . . . . . . . . . . . 9 Timer . . . . . . . . . . . . . . . . . . . . . . . . . . . . . . . . . . . . . . . . . . . . . . . . . . . . . . . . . . . . . . . . . . . . . . . . . . . . . 9
Grilling and baking . . . . . . . . . . . . . . . . . . . . . . . . . . . . . . . . . . . . . . . . . . . . . . . . . . . . .9
Grilling with the rotisserie . . . . . . . . . . . . . . . . . . . . . . . . . . . . . . . . . . . . . . . . . . . . . . .10
Cleaning and care. . . . . . . . . . . . . . . . . . . . . . . . . . . . . . . . . . . . . . . . . . . . . . . . . . . . . .12
Storage . . . . . . . . . . . . . . . . . . . . . . . . . . . . . . . . . . . . . . . . . . . . . . . . . . . . . . . . . . . . . .12
Troubleshooting . . . . . . . . . . . . . . . . . . . . . . . . . . . . . . . . . . . . . . . . . . . . . . . . . . . . . . .13
Warranty and service . . . . . . . . . . . . . . . . . . . . . . . . . . . . . . . . . . . . . . . . . . . . . . . . . .14
Disposal . . . . . . . . . . . . . . . . . . . . . . . . . . . . . . . . . . . . . . . . . . . . . . . . . . . . . . . . . . . . . .14
Importer . . . . . . . . . . . . . . . . . . . . . . . . . . . . . . . . . . . . . . . . . . . . . . . . . . . . . . . . . . . . .14
SGBR 1500 A1 |
1 |

Introduction
GB Congratulations on the purchase of your new appliance.
You have selected a high-quality product.
The operating instructions are part of this product. They contain important information on safety, usage and disposal. Before using the product, familiarise yourself with all handling and safety guidelines.
Use the product only as described and for the range of applications specified. Please also pass these operating instructions on to any future owner(s).
Proper use
The automatic oven and grill is intended for the heating, cooking and grilling of food.
This appliance is intended solely for use in private homes. Do not use it for commercial applications.
All other uses are deemed to be improper and may result in property damage or even in personal injury.
Package contents
♦Electric Oven & Grill
♦1 baking tray
♦1 rack
♦2 tongs
♦Rotisserie with 2 clamps
♦1 crumb tray
♦Operating instructions
NOTE
Check contents for completeness and damage immediately after unpacking. Contact Customer Services if necessary.
Appliance description
Figure A:
1Drive
2Temperature control
3Function switch
4Timer
5Control lamp
6Glass door
7Crumb tray
8Lower heating element
9Spit fitting
Figure B:
0 Tongs (baking tray or rack) q Baking tray
w Tongs (for spit) e rack
r Restrainer
t Skewer clamps z Rotisserie
Technical data
Rated voltage: |
220 - 240 V ~, |
|
50/60 Hz |
Max. power consumption: 1500 W
2 |
SGBR 1500 A1 |

Safety instructions
GB
DANGER – RISK OF ELECTRIC SHOCK!
►Do not open the housing of the appliance or attempt to repair it. Doing so can lead to risks and also invalidates the warranty. Defective appliances should be repaired by the retailer or authorized personnel only.
►Arrange for defective power plugs and/or cables to be replaced as soon as possible by a qualified technician or by our Customer Service Department to avoid the risk of injury.
►Do not allow any liquids to penetrate the housing. Do not expose the appliance to moisture and do not use it outdoors. Additionally, do not place fluid-filled receptacles such as flower vases on the appliance. This increases the risk of fire and of receiving an electric shock! If liquids permeate into the housing, unplug the appliance immediately and arrange for it to be repaired by a qualified technician.
►Never touch the appliance, power cable or power plug with wet hands. There is a risk of electric shock!
 NEVER immerse the appliance in water or other liquids!
Risk of electrocution if residual liquids come into contact with live components during operation.
SGBR 1500 A1 |
3 |

WARNING – RISK OF INJURY!
GB
►This appliance may be used by children of the age of 8 years or more and by persons with reduced physical, sensory or mental capabilities or lack of experience and/or knowledge if they are being supervised or have been instructed with regard to the safe use of the appliance and have understood the potential risks.
►Children must not use the appliance as a plaything.
►Cleaning and user maintenance must not be performed by children unless they are older than 8 years of age and are supervised.
►Children younger than 8 years of age must be kept away from the appliance and the power cable.
►Route the power cable in such a way that no one can tread on it or trip over it.
►Never touch the glass door or the housing during use, these can get very hot. Use oven gloves or something similar to open the glass door to avoid being burnt!
►Never touch the heating elements or the viewing window when the appliance is in use, or before it has cooled down completely. Do not reach into the cooking chamber when the appliance is in use. Wait until the appliance has cooled down. Otherwise, you could be burnt.
►Allow the appliance to cool down after use before transporting it.
►Always use oven gloves or a pot holder if you need to take hold of the appliance.
Caution! Hot surface!
4 |
SGBR 1500 A1 |

CAUTION – PROPERTY DAMAGE!
GB
► Do not use an external timer switch or a separate remote control system to operate the appliance.
► Never leave the appliance unattended during operation.
► Ensure that the appliance, the power cable and the plug do not come into contact with heat sources such as hotplates or naked flames.
► Only operate the appliance with the original accessories supplied. ► Do not kink or crush the mains cable.
► To disconnect, always remove the plug itself from the mains power socket, do not pull on the power cable.
► When the appliance is in use, ensure that there are no easily inflammable materials in the immediate vicinity (e.g. dishcloths, oven cloths, etc.).
► Never dry textiles or other objects on or above the appliance. This increases the risk of fire!
SGBR 1500 A1 |
5 |

Setting up
GB
WARNING! RISK OF FIRE!
►Never place the appliance beneath wall cupboards or next to curtains, cupboard walls or other flammable objects.
►Always ensure a minimum distance between the appliance and hanging cupboards, ceilings, walls or similar of at least 10 cm above the appliance and 5 cm at the sides. For this reason the appliance may not be used, for example, in cupboards or similar. Otherwise there is likely to be insu cient ventilation for the appliance, which could cause a fire or damage.
►Always place the appliance on a heat-resistant surface. Failure to do so increases the risk of fire or of it being damaged. The area under the bottom can discolour and be damaged. Additionally, if placed on a soft upper surface, the appliance could cause permanent damage to it due to pressure indentations.
 DANGER – ELECTRIC SHOCK!
►Do not place the appliance immediately adjacent to sources of water, e.g. sinks or basins, or in damp cellar areas. Otherwise, there is a risk of receiving an electric shock.
■Place the appliance on a solid, level and heatresistant surface (e.g. stainless steel worktops or natural stone worktops such as granite). Ensure there is su cient ventilation around the appliance.
■Clean all components as described in the section “Cleaning and care”.
Using the appliance
Glass door
ATTENTION! DAMAGE TO PROPERTY!
►Do not lean on the glass door 6. Do not place any objects on the glass door 6. This can cause damage to the hinges.
■If you are cooking especially fatty foodstu s, this can result in increased smoke production. In this case, do not close the glass door 6 completely; instead, leave it slightly open:
The glass door 6 has a latching position so that it remains open a little: if you carefully push the glass door 6 closed, it clicks into this position shortly before closing completely.
Inserting the crumb tray
■Push the crumb tray 7 under the lower heating element 8 so that it rests flat on the bottom of the appliance.
6 |
SGBR 1500 A1 |
Using the rotisserie
 WARNING! RISK OF INJURY!
►Always use the tongs w to insert the hot rotisserie z into the appliance or to remove it.
■You can use the two skewer clamps t to fix the food onto the rotisserie z. Loosen the restrainer r on the skewer clamps t, push them so that the food is fixed firmly in between the clamps and then screw the restrainer r tight again.
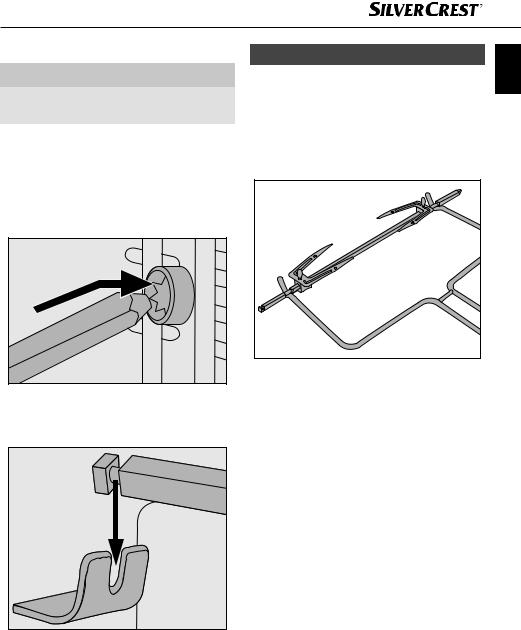
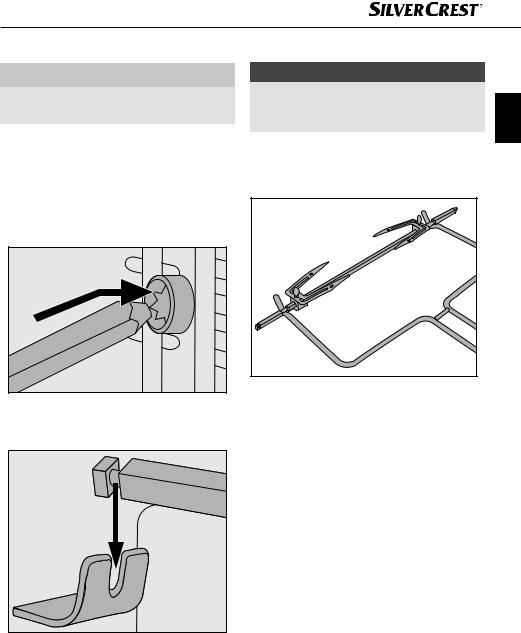
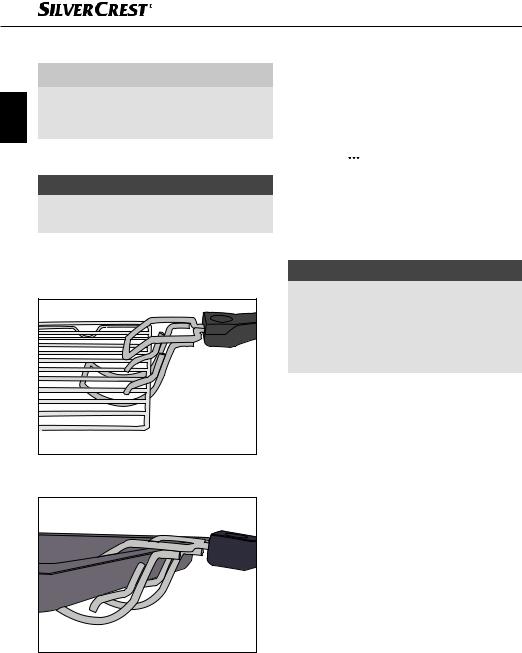
■First push the end of the rotisserie z without the notch into the drive 1 (Figure 1):
Fig. 1: Push the rotisserie z into the drive 1.
■Then insert the other end of the rotisserie z with the deep groove in the spit fitting 9 (Figure 2):
Fig. 2: Insert the rotisserie z in the spit fitting 9.
NOTE
► Always slide the baking tray q into the lower |
GB |
|
|
rail when you use the rotisserie z. |
|
This will collect any drips. |
|
|
|
■To remove the hot rotisserie z, grip with the hooks at the end of the tongs w into the recesses on the rotisserie z (Figure 3):
Fig. 3: Hooking the tongs w onto the rotisserie z
■First lift the left-hand side of the rotisserie z out of the spit fitting 9 and then pull the rotisserie z from the drive 1.
SGBR 1500 A1 |
7 |
Using the baking tray/rack
GB
WARNING! RISK OF INJURY!
►Always use the tongs 0 to insert the hot baking tray q/the hot rack e into the appliance or to remove it.
■Push the baking tray q/the rack e into one of the 3 rails in the cooking chamber of the appliance.
ATTENTION! DAMAGE TO PROPERTY!
►Never place the baking tray q/the rack e directly onto the heating elements 8.
■To remove the hot baking tray q or the rack e, hook the tongs 0 onto them as follows:
Fig. 4: Hooking the tongs 0 onto the rack e
Fig. 5: Hooking the tongs 0 onto the baking tray q
Before first use
1)Insert the plug into a mains power socket.
2)Turn the temperature control 2 clockwise to the maximum temperature (to the stop).
3)Turn the function switch 3 to “upper and lower heat”  .
.
4)Open the glass door 6 leave this open for this operation.
5)Remove any installed accessories from the cooking chamber.
6)Turn the timer 4 to 20 minutes.
NOTE
►The first time the appliance heats up, a small amount of smoke and odour may be
generated due to production-related residue. This is normal and is completely harmless. Provide su cient ventilation by opening a window, for example.
The appliance switches o automatically after 20 minutes.
If you want to interrupt the heating process prematurely, turn the temperature control 2 counter-clockwise to the stop and set the timer 4 to “OFF - 0”.
7)Allow the appliance to cool down, then clean the appliance as described in the chapter “Cleaning and care”.
The appliance is now ready for use.
8 |
SGBR 1500 A1 |
Operating the appliance
Function switch
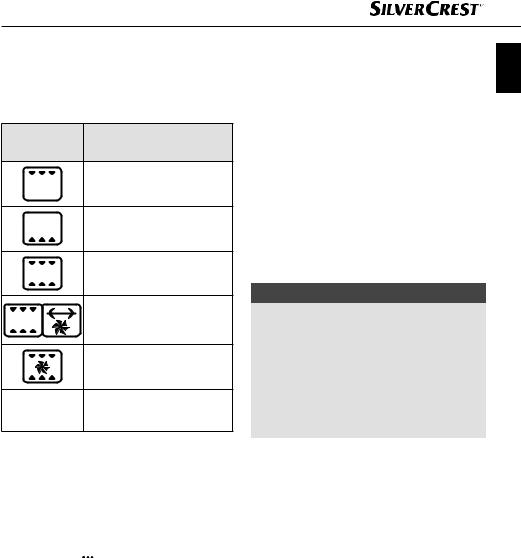
You can switch on the appliance with the function switch 3, and also set 5 di erent functions:
Symbol |
Meaning |
"Upper heat" e.g. to gratinate
"Lower heat" e.g. for baking
"Upper & lower heat" e.g. for baking a pizza
"Upper & lower heat/hot air/ rotisserie"
e.g. to roast poultry
"Upper & lower heat/hot air" e.g. to reheat rolls
OFF
"OFF" the appliance is switched o .
Temperature control
Use the temperature control 2 to set the desired temperature.
■If you set the temperature for the functions
“Upper heat”  , “Lower heat”
  or “Upper & lower heat”
  use the scale marked with “
 ”.
”.
■If you set the temperature for the functions
“Upper & lower heat/hot air/rotisserie” 

 or “Upper & lower heat/hot air”
  use the scale marked with “
 ”.
”.
Timer
User the timer 4 to set the cooking time. GB
■Set the timer 4 to the desired cooking time. After expiry of the set time a signal tone sounds and the appliance stops heating.
If the function “Upper & lower heat/hot air/ rotisserie” 

 is selected, the rotisserie z will also stop turning.
Grilling and baking
1)Put the crumb tray 7 into the appliance.
2)Remove the rack e and baking tray q from the appliance. If required, cover these with baking paper or lightly grease the baking tray q with suitable baking fat.
NOTE
►Depending on the meal, the oven must be preheated. Refer to the guidelines in the respective recipe. Preheating is useful for:
–very short baking times,
–crisp crusts,
–sensitive meals that require a constant temperature, such as sou és.
►If no preheating is required, skip step 3).
3)Allow the appliance to heat up for approx. 10 minutes (depending on the temperature setting) to the required temperature:
–Select the required temperature using the temperature control 2. Ensure that you use the correct scale (see chapter “Temperature control”).
–Select the required function with the function switch 3.
SGBR 1500 A1 |
9 |

NOTE
GB |
► As a general rule, if you are baking or grilling |
|
|
|
with hot air you can dispense with a preheating |
|
of the grilling/cooking space. |
|
|
–Use the timer 4 to set the preheat time (approx. 10 minutes).
–Close the glass door 6.
4)Once the warm-up period is finished, place the foodstu s on the rack e or the baking tray q and slide it in on one of the rails.
Ensure that there is su cient space between the foodstu s and the inner walls/heating elements of the appliance.
NOTE
►If you wish to prepare food on the rack e that drips excessively, then slide the baking tray q onto the bottom rail. By doing this, dripping fat for example will be caught and the appliance is then easier to clean.
5)Close the glass door 6 before starting the grilling or baking process.
6)Use the timer 4 to set the required grilling or baking time. The maximum grilling or baking time is 120 minutes.
NOTE
►If the cooking time for the food is less than 20 minutes, first set the timer 4 to 40 minutes and then turn it back to the required grilling or baking time.
The control lamp 5 indicates that the appliance is now switched on. The switch of the timer 4 now rotates itself anti-clockwise to “OFF - 0”.
The appliance switches o automatically after the set period, there is a beep and the control lamp 5 switches o .
NOTE
If you want to interrupt the heating process prematurely, turn the temperature control 2 counter-clockwise to the stop and set the timer 4 to "OFF - 0".
7)After cooking, remove the rack e or the baking tray q using the tongs 0.
8)Set the function switch 3 to “OFF”.
Grilling with the rotisserie
1)Put the crumb tray 7 into the appliance.
2)If inserted, remove the rotisserie z from the appliance.
3)Push the baking tray q onto the lower rail.
4)Fix the food to be grilled with the skewer clamps t. Ensure that the food in the cooking chamber can turn freely without touching the sides. The rotisserie z may change its direction of rotation if the food strikes against a resistance. The two depressions on the rotisserie z must remain freely accessible, otherwise you will not be able to grasp the rotisserie z with the tongs w.
5)Fit the rotisserie z in the cooking chamber (see chapter “Using the rotisserie”)
6)Close the glass door 6.
10 |
SGBR 1500 A1 |

NOTE
If you want to interrupt the heating process prematurely, turn the temperature control 2 counterclockwise to the stop and set the timer 4 to "OFF - 0".
7)Adjust the temperature control 2 to the desired temperature.
8)Set the function switch 3 to “Upper & lower heat/hot air/rotisserie” 

 . Set the timer 4 to the desired grill time.
The appliance starts the grilling process and the rotisserie z starts turning.
The control lamp 5 indicates that the appliance is now switched on. The switch of the timer 4 now rotates itself anti-clockwise to “OFF - 0”.
The appliance switches o automatically after the set period, there is a beep and the control lamp 5 switches o .
NOTE
If you want to interrupt the heating process prematurely, turn the temperature control 2 counterclockwise to the stop and set the timer 4 to "OFF - 0".
9)After the grilling process is completed remove the rotisserie z with the help of the tongs w.
10)Set the function switch 3 to “OFF”.
EXAMPLE: GRILLED CHICKEN
Ingredients |
GB |
|
♦Grilling chicken (approx. 1.3 kg, guts removed)
♦Spices (salt, paprika)
♦Cooking oil
1)Season the chicken on the inside and outside with salt and paprika powder. Brush it from the outside with heat resistant cooking oil.
2)Push the chicken onto the spit and fix it in place with the skewer clamps t. Ensure that the notches on the rotisserie z remain free so that you can remove the rotisserie z with the help of the tongs w. Depending on the shape of the chicken, it may be necessary
to fasten the wings and legs with a fireproof string to stop them impacting the sides when turning.
3)Push the baking tray q onto the lower rail.
4)Preheat the appliance for about 10 minutes using the function "Upper & lower heat/hot air"  to 210°C.
5)Put the chicken on the rotisserie into the appliance using the tongs w.
6)Set the function switch to "Upper & lower
heat/hot air/rotisserie" 

 and close the door.
7)Set the timer 4 approx. 90 minutes. The cooking time can vary depending on the size and nature of the chicken.
8)Brush the chicken every now and again with some cooking oil. This will make it crispy.
9)Once the set time is up, carefully remove the rotisserie with the chicken using the tongs w. Loosen the skewer clamps t and pull the chicken o the rotisserie z.
SGBR 1500 A1 |
11 |

Cleaning and care
GB
DANGER – ELECTRIC SHOCK!
►Before cleaning the appliance, disconnect the plug from the mains power socket!
Risk of electric shock!
NEVER immerse the appliance in water or any other liquid!
 WARNING! RISK OF INJURY!
►Always allow the appliance to cool down before cleaning it. Otherwise there is a risk of burns!
■It is best to clean the appliance and accessories as soon as they have cooled down. This makes food residues easier to remove.
ATTENTION! DAMAGE TO PROPERTY!
►Do not use abrasive or aggressive cleaning materials. These could damage the surface of the appliance!
►Do not clean the components of the appliance in a dishwasher!
►Do not clean the cooking chamber with an oven spray as this may make residues on the heating elements impossible to remove.
■Wipe the appliance with a damp cloth. If necessary, put a little mild detergent on the cloth and wipe this o afterwards with a cloth dampened with clean water. Dry everything properly.
■Clean the cooking chamber and the glass door 6 with a moist cloth. If necessary, put a little mild detergent on the cloth and wipe this o afterwards with a cloth dampened with clean water. Dry everything properly.
■Clean the tongs 0/w, the rotisserie z, the skewer clamps t, the restrainer r, the baking tray q, the rack e and the crumb tray 7 in warm soapy water. Dry all parts properly after cleaning.
Storage
■Store the cleaned appliance and its accessories in a clean, dust-free and dry location.
12 |
SGBR 1500 A1 |

Troubleshooting
|
|
|
GB |
|
Fault |
Cause |
Solution |
||
|
||||
|
|
|
|
|
|
The mains plug is not connected to the |
Insert the plug into a mains power |
|
|
|
mains power. |
socket. |
|
|
The appliance is not |
|
|
|
|
The mains power socket is defective. |
Use a di erent mains power |
|
||
working. |
socket. |
|
||
|
|
|||
|
|
|
|
|
|
The appliance is defective. |
Contact Customer Services. |
|
|
|
|
|
|
|
The control lamp 5 |
|
|
|
|
comes on and but the |
The function switch 3 is set to OFF. |
Turn the function switch 3 to the |
|
|
appliance does not |
desired function. |
|
||
|
|
|||
heat up. |
|
|
|
|
|
|
|
|
|
The cooking time of |
The glass door 6 has been opened often |
Do not open the glass door 6 |
|
|
any more often than is absolutely |
|
|||
to check the cooking progress. |
|
|||
the food seems very |
necessary. |
|
||
|
|
|||
long |
The wrong temperature level has been set. |
Check the temperature settings. |
|
|
|
|
|||
|
|
|
|
|
|
|
Remove the food from the ap- |
|
|
Smoke and smells |
There is detergent or food residue on the |
pliance and continue cooking |
|
|
develop during use. |
heating elements. |
process with the glass door 6 |
|
|
|
|
open until the smoke stops. |
|
If the malfunction cannot be corrected with the above suggestions, or if you have found some other kind of malfunction, please contact our Customer Service.
SGBR 1500 A1 |
13 |
Warranty and service
GB The warranty provided for this appliance is
3 years from the date of purchase. This appliance has been manufactured with care and inspected meticulously prior to delivery. Please retain your receipt as proof of purchase. In the event of a warranty claim, please contact your Customer Service unit by telephone. This is the only way to guarantee free return of your goods.
The warranty only covers claims for material and manufacturing defects, not for transport damage, wearing parts or for damage to fragile components such as switches or batteries. This appliance is intended solely for private use and not for commercial purposes.
The warranty shall be deemed void in the case of misuse or improper handling, use of force and interventions which have not been carried out by one of our authorised Service centres.
Your statutory rights are not restricted by this warranty. The warranty period is not prolonged by repairs e ected under the warranty. This also applies to replaced and repaired components. Any damage and defects present at the time of purchase must be reported immediately after unpacking, but no later than two days after the date of purchase. Repairs made after expiry of the warranty period are chargeable.
 Service Great Britain
Tel.: 0871 5000 720 (£ 0.10/Min.)
E-Mail: kompernass@lidl.co.uk
IAN 102464
Hotline availability:
Monday to Friday 08:00 - 20:00 (CET)
Disposal
Under no circumstance should the appliance be disposed of as standard domestic waste. This product is subject to the provisions of European Directive 2012/19/EU.
Dispose of the appliance via an approved waste disposal company or your municipal waste disposal facility. Please observe applicable regulations. Please contact your waste disposal facility
if you are in any doubt.
The packaging is made of environmentally friendly materials which you can dispose of at your local recycling centre.
Importer
KOMPERNASS HANDELS GMBH
BURGSTRASSE 21
44867 BOCHUM
GERMANY
www.kompernass.com
14 |
SGBR 1500 A1 |

Tartalomjegyzék
Bevezető . . . . . . . . . . . . . . . . . . . . . . . . . . . . . . . . . . . . . . . . . . . . . . . . . . . . . . . . . . . . .16
. . . . . . . . . . . . . . . . . . . . . . . . . . . . . . . . . . . . . . . . . . . . . .Rendeltetésszerű használat |
16 |
HU |
A csomag tartalma . . . . . . . . . . . . . . . . . . . . . . . . . . . . . . . . . . . . . . . . . . . . . . . . . . . . .16
A készülék leírása . . . . . . . . . . . . . . . . . . . . . . . . . . . . . . . . . . . . . . . . . . . . . . . . . . . . .16
Műszaki adatok . . . . . . . . . . . . . . . . . . . . . . . . . . . . . . . . . . . . . . . . . . . . . . . . . . . . . . .16
Biztonsági utasítások . . . . . . . . . . . . . . . . . . . . . . . . . . . . . . . . . . . . . . . . . . . . . . . . . . .17
A készülék felállítása . . . . . . . . . . . . . . . . . . . . . . . . . . . . . . . . . . . . . . . . . . . . . . . . . . .20
A készülék használata . . . . . . . . . . . . . . . . . . . . . . . . . . . . . . . . . . . . . . . . . . . . . . . . . .20
Üvegajtó . . . . . . . . . . . . . . . . . . . . . . . . . . . . . . . . . . . . . . . . . . . . . . . . . . . . . . . . . . . . . . . . . . . . . . . . . 20 Morzsatálca behelyezése . . . . . . . . . . . . . . . . . . . . . . . . . . . . . . . . . . . . . . . . . . . . . . . . . . . . . . . . . . . . 20 Nyárs használata . . . . . . . . . . . . . . . . . . . . . . . . . . . . . . . . . . . . . . . . . . . . . . . . . . . . . . . . . . . . . . . . . . 21 Sütőlemez/sütőrács használata . . . . . . . . . . . . . . . . . . . . . . . . . . . . . . . . . . . . . . . . . . . . . . . . . . . . . . . 22
Az első használat előtt . . . . . . . . . . . . . . . . . . . . . . . . . . . . . . . . . . . . . . . . . . . . . . . . . .22
A készülék használata . . . . . . . . . . . . . . . . . . . . . . . . . . . . . . . . . . . . . . . . . . . . . . . . . .23
Funkciókapcsoló . . . . . . . . . . . . . . . . . . . . . . . . . . . . . . . . . . . . . . . . . . . . . . . . . . . . . . . . . . . . . . . . . . . 23
Hőmérséklet-szabályozó . . . . . . . . . . . . . . . . . . . . . . . . . . . . . . . . . . . . . . . . . . . . . . . . . . . . . . . . . . . . . 23
Időzítő . . . . . . . . . . . . . . . . . . . . . . . . . . . . . . . . . . . . . . . . . . . . . . . . . . . . . . . . . . . . . . . . . . . . . . . . . . . 23
Grillezés és sütés . . . . . . . . . . . . . . . . . . . . . . . . . . . . . . . . . . . . . . . . . . . . . . . . . . . . . .23
Grillezés nyárssal . . . . . . . . . . . . . . . . . . . . . . . . . . . . . . . . . . . . . . . . . . . . . . . . . . . . . .24
Tisztítás és ápolás. . . . . . . . . . . . . . . . . . . . . . . . . . . . . . . . . . . . . . . . . . . . . . . . . . . . . .26
Tárolás . . . . . . . . . . . . . . . . . . . . . . . . . . . . . . . . . . . . . . . . . . . . . . . . . . . . . . . . . . . . . . .26
Hibaelhárítás . . . . . . . . . . . . . . . . . . . . . . . . . . . . . . . . . . . . . . . . . . . . . . . . . . . . . . . . .27
Garancia és szerviz . . . . . . . . . . . . . . . . . . . . . . . . . . . . . . . . . . . . . . . . . . . . . . . . . . . .28
Ártalmatlanítás. . . . . . . . . . . . . . . . . . . . . . . . . . . . . . . . . . . . . . . . . . . . . . . . . . . . . . . .28
Gyártja . . . . . . . . . . . . . . . . . . . . . . . . . . . . . . . . . . . . . . . . . . . . . . . . . . . . . . . . . . . . . .28
SGBR 1500 A1 |
15 |

Bevezető
Gratulálunk új készüléke megvásárlásához!
Vásárlásával kiváló minőségű termék mellett döntött. A használati utasítás a termék része. Fontos tud-
HU nivalókat tartalmaz a biztonságra, használatra és ártalmatlanításra vonatkozóan. A termék használata előtt ismerkedjen meg valamennyi használati útmutatóval és biztonsági figyelmeztetéssel. Csak a leírtak szerint és a megadott célokra használja a készüléket. A készülék harmadik személynek történő továbbadása esetén adja át a készülékhez tartozó valamennyi leírást is.
Rendeltetésszerű használat
A grillezőés sütőautomata kizárólag ételek melegítésére, sütésére és grillezésére szolgál.
A készülék kizárólag magánháztartásokban használható. Ne használja kereskedelmi célra.
Minden egyéb felhasználás rendeltetésellenesnek minősül és anyagi károkat vagy személyi sérülést idézhet elő
A csomag tartalma
♦Grillsütő
♦1 sütőlemez
♦1 sütőrács
♦2 fogó
♦nyárs 2 kapoccsal
♦1 morzsatálca
♦használati útmutató
TUDNIVALÓ
Közvetlenül kicsomagolás után ellenőrizze a csomag tartalmának teljességét és sértetlenségét. Szükség esetén forduljon a szervizhez.
A készülék leírása
„A“ ábra:
1hajtómű
2hőmérséklet-szabályozó
3funkciókapcsoló
4időzítő
5működésjelző lámpa
6üvegajtó
7behelyezett morzsatálca
8alsó fűtőszálak
9nyárstartó
„B“ ábra:
0 fogó (sütőlemezhez vagy sütőrácshoz) q sütőlemez
w fogó (nyárshoz) e sütőrács
r rögzítő
t nyárskapcsok z nyárs
Műszaki adatok
Névleges feszültség: |
220 - 240 V ~, |
|
50/60 Hz |
Maximális |
|
teljesítményfelvétel |
1500 W |
16 |
SGBR 1500 A1 |

Biztonsági utasítások
 VESZÉLY – ÁRAMÜTÉS!
► Tilos a készülékház felnyitása vagy a készülék javítása. Ez nem
biztonságos és a garancia is érvényét veszti. A meghibásodott |
HU |
|
|
készüléket a kereskedő, vagy felhatalmazott szakember segítsé- |
|
gével kell kijavíttatni. |
|
►A veszélyek elkerülése érdekében a sérült hálózati csatlakozót vagy vezetéket azonnal cseréltesse ki erre feljogosított szakemberrel vagy az ügyfélszolgálattal.
►A készülékházba nem kerülhet folyadék. Védje a készüléket a nedvességtől és ne használja a szabadban. Ezen kívül nem
szabad folyadékkal töltött tárgyakat, mint pl. vázát a készülékre állítani. Tűzveszély és elektromos áramütés veszélye áll fenn! Ha mégis folyadék kerül a készülékházba, azonnal húzza ki
a készülék hálózati dugóját a hálózati csatlakozóaljzatból és javíttassa meg a készüléket.
►Soha ne fogja meg nedves kézzel a készüléket, a hálózati kábelt és a csatlakozódugót. Ekkor elektromos áramütés veszélye áll fenn.
Soha ne merítse a készüléket vízbe vagy más folyadékba!  Ilyen esetben áramütés miatt életveszély alakul ki, ha működés
közben folyadék kerül a feszültség alatt álló részekre.
SGBR 1500 A1 |
17 |
 FIGYELMEZTETÉS – SÉRÜLÉSVESZÉLY!
►A készüléket 8 éves kor feletti gyermekek, valamint csökkent fizikai, érzékszervi vagy mentális képességű vagy tapasztalattal és/
HU |
vagy tudással nem rendelkező személyek csak felügyelet mellett |
|
használhatják, vagy ha megtanították őket a készülék biztonságos |
|
használatára és megértették az ebből eredő veszélyeket. |
►Gyermekek nem játszhatnak a készülékkel.
►Tisztítást és a felhasználói karbantartást 8 évesnél fiatalabb vagy felügyelet nélküli gyermekek nem végezhetnek.
►Ne engedjen 8 évesnél fiatalabb gyerekeket a készülék és a csatlakozóvezeték közelébe.
►Úgy helyezze el a hálózati kábelt, hogy arra senki ne léphessen rá és senki ne botolhasson meg benne.
►Használat közben ne érjen hozzá az üvegajtóhoz vagy a burkolathoz, mert ezek felforrósodnak. Az üvegajtó kinyitásához edényfogót használjon, nehogy megégesse magát!
►Soha ne érjen a fűtőszálakhoz vagy a kémlelő ablakhoz a készülék működése közben vagy a készülék lehűlése előtt. Működés közben ne nyúljon a sütőtérbe. Várjon amíg a készülék lehűl. Egyébként megégetheti magát.
►Használat után hagyja lehűlni a készüléket, mielőtt azt elszállítaná!
►A forró készüléket edényfogó kesztyűvel vagy edényfogó kendővel fogja meg!
Vigyázat! Forró felület!
18 |
SGBR 1500 A1 |

FIGYELEM – ANYAGI KÁR!
►A készülék üzemeltetéséhez ne használjon külső időkapcsolót vagy külön távműködtető rendszert.
► Üzemeltetés közben soha se hagyja a készüléket felügyelet nélkül. |
HU |
►Ügyeljen arra, hogy a készülék, a hálózati kábel és a csatlakozó ne érjen forró felülethez (pl. főzőlap), illetve azokat ne érje nyílt láng.
►Csak a mellékelt eredeti tartozékokkal üzemeltesse a készüléket.
►Ne törje meg és ne szorítsa be a hálózati kábelt.
►A csatlakozót soha ne a kábelnél fogva húzza ki, mindig a csatlakozóvéget fogja meg.
►Működés közben nem szabad semmilyen gyúlékony anyagot a grillezőés sütőautomata közvetlen közelében tárolni
(pl. edénytörlő, edényfogó kendő stb.).
►Soha ne szárítson textíliákat vagy egyéb tárgyakat a készüléken, a készülék fölött vagy a készülék belsejében. Ez tűzveszélyes.
SGBR 1500 A1 |
19 |

A készülék felállítása
 FIGYELMEZTETÉS! TŰZVESZÉLY!
► Soha ne állítsa a készüléket fali szekrény HU alá vagy függöny, szekrénysor, illetve más
gyúlékony tárgyak mellé.
►A készülék és a faliszekrények, mennyezet, fal, stb. között felfelé legalább 10 cm, oldalirányban pedig 5-5 cm távolságnak kell lennie Ezért nem szabad a készüléket
pl. szekrénybe vagy hasonló helyekre állítani. Ellenkező esetben a készülék megfelelő szellőzése nem biztosított és tüzet okozhat vagy megrongálódhat.
►A készüléket csak hőálló felületre helyezze! Ellenkező esetben tűzveszély fenyeget és
a készülék megrongálódhat. A készülék alatti terület elszíneződhet és megsérülhet. Ezenkívül, puha felület esetén maradandó nyomok keletkezhetnek a felületen.
 VESZÉLY - ELEKTROMOS ÁRAMÜTÉS!
►Ne állítsa a készüléket víz közvetlen közelébe, pl. mosogató, mosdókagyló mellé, vagy nedves pincehelyiségekbe. Ellenkező esetben áramütés veszélye áll fenn.
■A készüléket stabil, sík és hőálló felületre állítsa (pl. rozsdamentes acél munkalapra vagy természetes kőből pl. gránitból készült munkalapra).
Gondoskodjon a készülék körüli megfelelő szellőzésről.
■Tisztítson meg minden alkatrészt a „Tisztítás és ápolás“ részben leírtak alapján.
A készülék használata
Üvegajtó
FIGYELEM! ANYAGI KÁR VESZÉLYE!
►Ne támaszkodjon az üvegajtóra 6. Ne tegyen tárgyakat az üvegajtóra 6. Ezáltal megsérülhetnek a csuklópántok.
■Ha különösen magas zsírtartalmú ételt készít, akkor nagyobb füst képződhet. Ebben az esetben ne csukja be teljesen az üvegajtót 6, hanem hagyja résnyire nyitva:
Az üvegajtó 6ütköző pozícióval rendelkezik, így csak résnyire marad nyitva: Ha az üvegajtót 6 óvatosan csukja be, akkor kevéssel a bezáródás előtt ebben a helyzetben marad.
Morzsatálca behelyezése
■Tolja be a morzsatálcát 7 az alsó fűtőszálak 8 alá oly módon, hogy egyenletesen feküdjön a készülék alján.
20 |
SGBR 1500 A1 |
Nyárs használata
 FIGYELMEZTETÉS! SÉRÜLÉSVESZÉLY!
►A forró nyárs z készülékbe helyezéséhez és kiemeléséhez mindig használja a fogót w.
■A grillezni kívánt élelmiszert a két nyárskapoccsal t rögzítheti a nyársra z. Oldja ki a nyárskapcsok t rögzítőit r, majd tolja el ezeket oly módon, hogy a grillezni kívánt élelmiszert megfelelően tartsák, végül szorítsa meg ismét a rögzítőket r.
■Először a nyárs z horony nélküli végét tolja be a hajtóműbe 1 (1. ábra):
1. ábra: Nyárs z betolása a hajtóműbe 1.
■Ezután a nyárs z horonnyal ellátott másik végét helyezze be a nyárstartóba 9 (2. ábra):
TUDNIVALÓ |
|
► Nyárs z használata esetén a sütőlemezt q |
|
mindig az alsó sínre kell helyezni. A tepsi |
HU |
ilyenkor felfogja a lecsepegő folyadékot. |
|
■ A forró nyárs z kiemeléséhez helyezze a fogó |
|
w végén lévő kampót a nyárs z végén lévő |
|
mélyedésekbe (3. ábra): |
|
3. ábra: A fogó w beakasztása a nyársba z |
|
■Először a nyárs z bal oldalát emelje ki a nyárstartóból 9, majd a nyársat z húzza ki a hajtóműből 1.
2. ábra: Nyárs z behelyezése a nyárstartóba 9
SGBR 1500 A1 |
21 |
Sütőlemez/sütőrács használata
 FIGYELMEZTETÉS! SÉRÜLÉSVESZÉLY!
► A forró sütőlemez q/forró sütőrács e ké- HU szülékbe való behelyezéséhez, vagy kiemelé-
séhez használja mindig a fogót 0.
■A sütőlemezt q/sütőrácsot e tolja be a készülék sütőterében lévő 3 sín egyikére.
FIGYELEM! ANYAGI KÁR VESZÉLYE!
►A sütőlemezt q/sütőrácsot e soha ne tolja közvetlenül a fűtőszálakra 8.
■A forró sütőlemez q vagy a sütőrács e kiemeléséhez a fogót 0 az alábbiak szerint kell beakasztani:
4. ábra: A fogó 0 beakasztása a sütőrácsba e
5. ábra: A fogó 0 beakasztása a sütőlemezbe q.
Az első használat előtt
1)Csatlakoztassa a hálózati csatlakozót egy aljzatba.
2)Forgassa a hőmérséklet-szabályozót 2 az óramutató járásával megegyező irányba ütközésig, a legmagasabb hőmérsékletre.
3)A funkciókapcsolót 3 tekerje „felső és alsó sütésre“  .
.
4)Nyissa ki az üvegajtót 6 és a művelet közben hagyja nyitva.
5)Vegye ki az esetlegesen a sütőtérbe helyezett tartozékokat.
6)Állítsa be az időzítőt 4 20 percre.
TUDNIVALÓ
►A készülék első felmelegedése során a gyártásból visszamaradt anyagok miatt enyhe füstöt és szagot érezhet. Ez teljesen normális és veszélytelen.
Gondoskodjon elegendő szellőzésről, nyisson ki például egy ablakot.
A készülék 20 perc múlva magától kikapcsol.
A sütési folyamat idő előtti megszakításához forgassa el a hőmérséklet-szabályozót 2 az óramutató járásával ellentétes irányba, egészen ütközésig, és állítsa az időzítőt 4 „OFF - 0” állásba.
7)Hagyja lehűlni a készüléket és tisztítsa meg a “Tisztítás és ápolás” részben leírtak szerint.
A készülék ezzel üzemkész.
22 |
SGBR 1500 A1 |

A készülék használata
Funkciókapcsoló
A funkciókapcsoló 3 segítségével bekapcsolhatja a készüléket, és 5 különféle funkciót állíthat be:
Jelzések |
Jelentés |
„Felső sütés" pl. átsütéshez
„Alsó sütés"
pl. sütemény sütéséhez
„Felső & alsó sütés“ pl. pizza sütéséhez
„Felső & alsó sütés/légkeverés/nyárs“
pl. szárnyas grillezéséhez
„Felső & alsó sütés/légkeverés“
pl. zsemle átsütéséhez
OFF
„OFF“ a készülék ki van kapcsolva
Hőmérséklet-szabályozó
A hőmérséklet-szabályzóval 2 beállíthatja a kívánt hőmérsékletet.
■A „felső sütés“  , „alsó sütés“
  vagy „felső & alsó sütés“
  megfelelő hőmérsékletét a
„ “ jelzésű skála segítségével állíthatja be.
■A „felső & alsó sütés/légkeverés/nyárs“ 

 vagy „felső & alsó sütés/légkeverés“
  megfelelő hőmérsékletét a „
 “ jelzésű skála segítségével állíthatja be.
Időzítő
Az időzítő 4 segítségégével a sütési időt állíthatja be:
■ Állítsa az időzítőt 4 a kívánt sütési időre. |
|
A beállított idő elteltével hangjelzés hangzik fel, |
HU |
és a készülék felfűtése leáll. |
|
A „felső & alsó sütés/légkeverés/nyárs“ |
|
funkció kiválasztása esetén megáll a nyárs z |
|
forgatása. |
|
Grillezés és sütés
1)Helyezze be a morzsatálcát 7 a készülékbe.
2)Vegye ki a sütőrácsot e és a sütőlemezt q a készülékből. Szükség esetén bélelje ki sütőpapírral a sütőlemezt q, illetve kenje be sütéshez alkalmas zsiradékkal.
TUDNIVALÓ
►Az ételtől függően a sütő előmelegítést igényel. Tartsa magát az adott receptben foglaltakhoz. Az előmelegítés az alábbi esetekben jelent megoldást:
–nagyon rövid sütési idő,
–ropogós kéreg,
–állandó hőmérsékletet igénylő, érzékeny ételek, például szuflék.
►Ha nem szükséges előmelegítés, akkor hagyja ki a 3. lépést).
3)Fűtse fel a készüléket kb. 10 percen keresztül (hőmérséklet-beállítástól függően) a kívánt hőmérsékletre:
–Válassza ki a kívánt hőmérsékletet a hőmér- séklet-szabályozóval 2. Ügyeljen a megfelelő skála használatára (lásd: „Hőmérsékletszabályozó“.)
–Ezt követően, válassza ki a kívánt funkciót a funkciókapcsolóval 3.
SGBR 1500 A1 |
23 |

TUDNIVALÓ
►A légkeverés használata esetén elhagyhatja a sütőés grillezőtér előmelegítését.
HU |
– Állítsa be az előmelegítési időt (kb. 10 perc) |
|
az időzítővel 4. |
||
|
–Csukja be az üvegajtót 6.
4)Az idő lejártát követően, helyezze a grillezni, illetve sütni kívánt élelmiszert a sütőrácsra e, illetve a sütőlapra q, majd tolja be a sínek egyikére. Ügyeljen arra, hogy a grillezni, illetve sütni kívánt élelmiszer megfelelő távolságra legyen a készülék belső falaitól és a fűtőszálaktól.
TUDNIVALÓ
►Ha a sütőrácson e erősen csöpögő grillételt készít, tolja a sütőlemezt q a legalsó sínre. Így felfogható a lecsöpögő zsiradék és a készülék a későbbikben könnyebben tisztítható.
5)A grillezés/sütés megkezdése előtt csukja be az üvegajtót 6.
6)Állítsa be a kívánt grillezési, illetve sütési időt az időzítővel 4. A maximális grillezési, illetve sütési idő 120 perc.
TUDNIVALÓ
►Amennyiben az étel grillezési/sütési ideje nem éri el a 20 percet, akkor az időzítőt 4 először állítsa 40 percre, majd állítsa vissza a kívánt grillezési/sütési időre.
A működésjelző lámpa 5 jelzi a készülék bekapcsolt állapotát. Az időzítő 4 kapcsolója az óramutató járásával ellentétesen, az „OFF - 0“ felé forog.
A beállított idő elteltével a készülék automatikusan kikapcsol, hangjelzés hallatszik fel, és a működésjelző lámpa 5 kialszik.
TUDNIVALÓ
A sütési folyamat idő előtti megszakításához forgassa el a hőmérséklet-szabályozót 2 az óramutató járásával ellentétes irányba, egészen ütközésig, és állítsa az időzítőt 4 „OFF - 0" állásba.
7)A sütést követően vegye ki a sütőrácsot, e, illetve a sütőlemezt q a fogó 0 segítségével.
8)Állítsa a funkciókapcsolót 3 „OFF" állásba.
Grillezés nyárssal
1)Helyezze be a morzsatálcát 7 a készülékbe.
2)Ha esetleg be van helyezve, vegye ki a nyársat z a készülékből.
3)Csúsztassa a sütőlemezt q a legalsó sínre.
4)Rögzítse a grillezni kívánt élelmiszert a nyárskapcsok t segítségével. Ügyeljen arra, hogy a grillezni kívánt élelmiszer a sütőtér-fal érintése nélkül, szabadon tudjon forogni a sütőtérben. A nyárs z forgásiránya könnyen megváltozhat akkor, ha ellenállásba ütközik a grillétel. A nyárson z lévő két mélyedésnek szabadon kell maradnia, ellenkező esetben a nyársat z nem lehet megfogni a fogóval w.
5)Rögzítse a nyársat z a sütőtérben (lásd a „Nyárs használata“ fejezetet).
6)Csukja be az üvegajtót 6.
24 |
SGBR 1500 A1 |
 Loading...