


PROFESSIONAL FOOD PROCESSOR SKMP 1200 A2
PROFESSIONAL FOOD PROCESSOR |
PROFESJONALNY |
Operating instructions
ROBOT KUCHENNY
PROFI KONYHAI ROBOTGÉP |
Instrukcja obsługi |
|
|
||
Kezelési útmutató |
PROFESIONALNI KUHINJSKI |
|
KUCHYNSKÝ ROBOT |
APARAT |
|
Navodilo za uporabo |
||
Návod k obsluze |
||
|
||
PROFI-KÜCHENMASCHINE |
PROFESIONÁLNY KUCHYNSKÝ |
|
STROJ |
||
Bedienungsanleitung |
||
|
Návod na obsluhu |
|
IAN 100104/IAN 105590 |
||
RP100104_RP105590_Kuechenmaschine_Cover_LB4.indd 2 |
06.06.14 14:07 |
|

RP100104-105590 Küchenmaschine LB4 Seite 1 Donnerstag, 12. Juni 2014 12:50 12
English . . . . . . . . . . . . . . . . . . . . . . . . . . . . . . . . . . . . . . . . . . 2
Be sure to note the fold-out page.
Polski . . . . . . . . . . . . . . . . . . . . . . . . . . . . . . . . . . . . . . . . . |
18 |
Proszę zwrócić uwagę na informacje umieszczone na wewnętrznej stronie okładki
Magyar . . . . . . . . . . . . . . . . . . . . . . . . . . . . . . . . . . . . . . . . 36
Kérjük, figyeljen a kinyitható oldalra
Slovensko . . . . . . . . . . . . . . . . . . . . . . . . . . . . . . . . . . . . . |
. 54 |
Prosimo, upoštevajte tekst na zavihani strani. |
|
Česky . . . . . . . . . . . . . . . . . . . . . . . . . . . . . . . . . . . . . . . . |
. 70 |
Povšimněte si vyklápěcí strany |
|
Slovensky . . . . . . . . . . . . . . . . . . . . . . . . . . . . . . . . . . . . . . |
86 |
Prosím, všimnite si vyklápaciu stranu. |
|
Deutsch . . . . . . . . . . . . . . . . . . . . . . . . . . . . . . . . . . . . . . . |
103 |
Bitte beachten Sie die Ausklappseite |
|
SKMP 1200 A2_14_V1.4_GB_PL_HU_SI_CZ_SK_DE
RP100104-105590 Küchenmaschine LB4 Seite 1 Donnerstag, 12. Juni 2014 12:50 12
1 |
2 |
3 |
4
5
16
6
7
8
9
10 11
15 |
14 |
13 |
12 |

RP100104-105590 Küchenmaschine LB4 Seite 2 Donnerstag, 12. Juni 2014 12:50 12
Contents
1. Device description . . . . . . . . . . . . . . . . . . . . . . . . . . . . . . . . . . . . . . . . . . . . . . . . . . . . . . . 2 2. Names of parts (see fold-out page). . . . . . . . . . . . . . . . . . . . . . . . . . . . . . . . . . . . . . . . . . . 3 3. Technical data . . . . . . . . . . . . . . . . . . . . . . . . . . . . . . . . . . . . . . . . . . . . . . . . . . . . . . . . . . 3 4. Safety information . . . . . . . . . . . . . . . . . . . . . . . . . . . . . . . . . . . . . . . . . . . . . . . . . . . . . . 3 5. Unpacking and setting up . . . . . . . . . . . . . . . . . . . . . . . . . . . . . . . . . . . . . . . . . . . . . . . . . 6 6. Operating the appliance . . . . . . . . . . . . . . . . . . . . . . . . . . . . . . . . . . . . . . . . . . . . . . . . . . 6 7. Recipes. . . . . . . . . . . . . . . . . . . . . . . . . . . . . . . . . . . . . . . . . . . . . . . . . . . . . . . . . . . . . . 10 8. Cleaning the appliance . . . . . . . . . . . . . . . . . . . . . . . . . . . . . . . . . . . . . . . . . . . . . . . . . . 15 9. Disposal . . . . . . . . . . . . . . . . . . . . . . . . . . . . . . . . . . . . . . . . . . . . . . . . . . . . . . . . . . . . . 16
10. HOYER Handel GmbH Warranty . . . . . . . . . . . . . . . . . . . . . . . . . . . . . . . . . . . . . . . . . . . . 16
Congratulations on the purchase of your new product.
You have selected a high-quality product. The operating instructions are a constituent part of this product. They contain important information about safety, use and disposal.
Familiarize yourself with all the operating and safety instructions before using the product. Use the product only as described and for the stated spheres of application.
If you pass the product on to a third party, always pass on all the documentation as well.
1. Device description
1.1 Intended purpose
The SilverCrest SKMP 1200 A2 food processor is used to mix, beat, knead,, whip and blend food and produce.
This appliance should only be used in dry rooms. It must not be used out in the open or in humid rooms.
This appliance is intended for use in private households and is not suitable for commercial purposes.
The appliance is likewise suitable for:
•use in staff kitchens in shops, offices and other commercial areas,
•use in agricultural settings,
•customers in hotels, motels and other accommodations,
•bed-and-breakfast establishments.
1.2 Scope of supply
•1 food processor, base unit
•1 splash guard
•1 blender jug
•1 dough hook
•1 balloon whisk
•1 beater
•1 copy of the user instructions
2

RP100104-105590 Küchenmaschine LB4 Seite 3 Donnerstag, 12. Juni 2014 12:50 12
1.3 Variants
The appliance is available in two versions:
•RP100104: red
•RP105590: crème
Operation is identical for both colour variants.
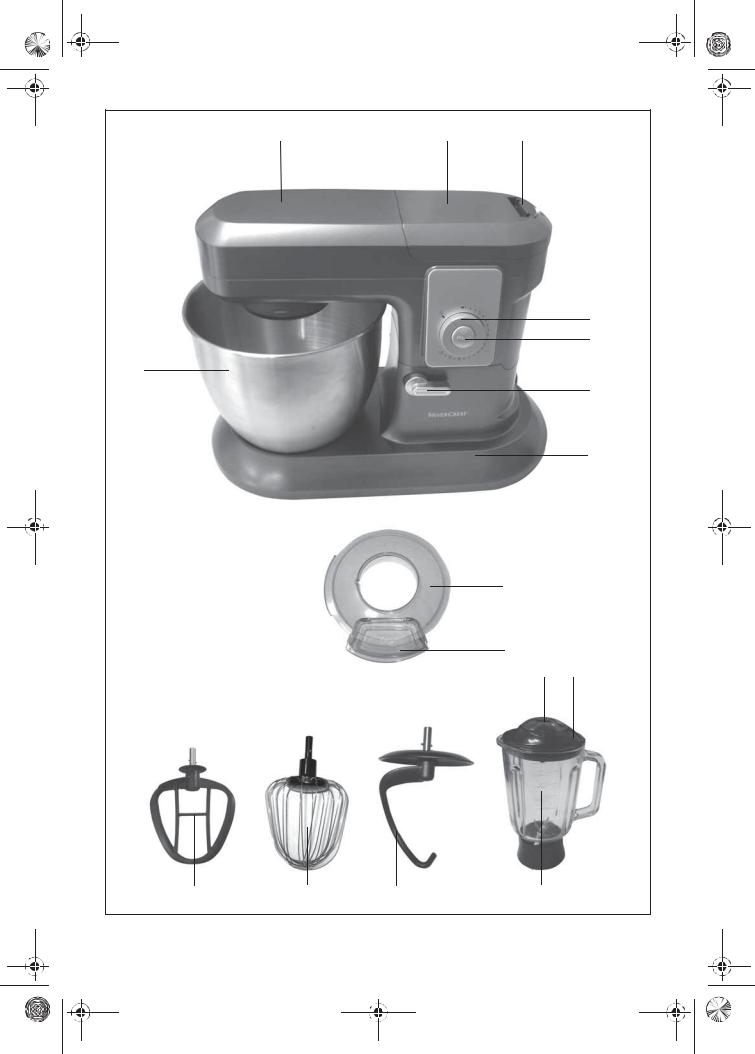
2. Names of parts (see fold-out page)
1 |
Drive arm |
9 Filling opening with flap |
2 |
Cover |
10 Lid fastening |
3 |
Unlock button for cover |
11 Lid of blender jug |
4 |
Speed controller with on/off function |
12 Blender jug with lid and lid fastening |
5 |
Pulse button |
13 Dough hook |
6 |
Unlock lever |
14 Balloon whisk |
7 |
Base unit |
15 Beater |
8 |
Splash guard |
16 Mixing bowl |
3. Technical data
Power supply: |
220 - 240 V~ /50 Hz |
|
||||
Output: |
1,200 W |
|
||||
Protection class: |
II |
|
|
|
|
|
|
|
|
|
|
||
Short-time operation / food processor: |
10 minutes |
|
|
|
|
|
|
||||||
|
|
|
|
|
||
Short-time operation / blender jug: |
3 minutes |
|
||||
Short-time operation: indicates how long the appliance may run without interruption.
4. Safety information
4.1 Explanation of terms
The following keywords are used in these user instructions:
Warning!
High risk: ignoring this warning could result in a risk to life and limb.
Caution!
Medium risk: ignoring this warning may result in damage.
Note:
Low risk: points to be noted when handling the appliance.
SKMP 1200 A2 |
3 |
RP100104-105590 Küchenmaschine LB4 Seite 4 Donnerstag, 12. Juni 2014 12:50 12
4.2Special information about this appliance
Warning! To avoid injury or damage, please observe the following information.
•This appliance can be used by persons who have reduced physical, sensory or mental ability or lack experience and/or knowledge, provided they are supervised or instructed in the safe use of the appliance and have understood its associated hazards.
•The appliance may not be used by children.
•Keep the appliance and its mains power cable away from children.
•Do not allow children to play with the appliance.
•While it is not under supervision and before it is assembled, disassembled or cleaned, the appliance should always be disconnected from the power supply.
•Never immerse the base unit 7 in water.
•Never use scouring, corrosive or abrasive cleaning materials as these might damage the appliance.
4.3 General information
•Please read these user instructions carefully before use. They are a constituent part of the appliance and must be kept to hand at all times.
•Use the appliance only for the purpose described (see “1.1 Intended purpose” on page 2).
•To prevent damage, check that the mains voltage required (see type plate on the appliance) is compatible with your mains voltage.
•Please note that any claim under the warranty or for liability will be invalid if accessories are used that are not recommended in these user instructions, or if original spare parts are not used for repairs. This also applies to repairs undertaken by unqualified persons. You will find the service address in “Service Centre” on page 17.
•If the appliance should develop a fault during the warranty period, it may only
be repaired by our Service Centre. Otherwise all claims under warranty are null and void. You will find the service address in “Service Centre” on page 17.
4.4 Protection against electric shock
Warning! The following safety information is intended to protect you against electric shock.
•The appliance must not under any circumstances be used if it is damaged. Have the device repaired in such cases by a qualified specialist. The contact data can be found in “Service Centre” on page 17.
•If the mains cable for this appliance is damaged, it must be replaced by the manufacturer or a person with similar qualifications in order to avoid a hazard.
•Under no circumstances should water or other liquids get into the base unit 7. For this reason:
–never use it outdoors
–never immerse the base unit 7 in water
–never place containers filled with liquid, such as drinking glasses, vases etc. on the appliance
–never use in very humid environments
–never use in the immediate vicinity of a kitchen sink, bath, shower or a
4
RP100104-105590 Küchenmaschine LB4 Seite 5 Donnerstag, 12. Juni 2014 12:50 12
swimming pool, as water may splash into the appliance.
If liquid should enter the appliance, unplug the mains plug immediately and have the appliance repaired by a qualified technician. The contact data can be found in “Service Centre” on page 17.
•Never touch the appliance, the mains cable or the mains plug with wet hands.
•Always unplug it by pulling out the plug, never pull on the cable itself.
•Ensure that the mains cable is not kinked, twisted or crushed.
•Keep the mains cable away from hot surfaces, such as the top of a stove.
•If you are not going to use the appliance for a while, remove the plug from the wall socket. Only then is the appliance completely free of current.
•Avoid using extension cables. These may only be used under very specific conditions:
–the extension cable must be able to handle the amount of current drawn by the appliance,
–the extension cable must not be "suspended". Keep children away from it and ensure that it does not present a trip hazard,
–under no circumstances use a damaged extension cable,
–do not connect any other appliances to the mains socket, since it could cause an overload (do not use multiple sockets of any kind).
4.5 Preventing injury
Warning! To avoid injury, please observe the following information.
•Make sure that the mains cable never becomes a trip hazard, that no-one can get tangled in it or tread on it.
•During operation, avoid contact with the moving parts of the appliance such as the blades of the blender jug 12, the dough hook 13, balloon whisk 14 or beater 15. Your hands or hair could be drawn into the appliance, leading to injuries. Only ever switch the appliance on if you have correctly fitted the splash guard 8 when using the mixing bowl 16 or the lid 11 when using the blender jug 12.
•Always remove the power supply plug from the mains socket before cleaning the appliance or changing the attachments.
•Remember that the blades of the blender jug 12 are extremely sharp. Never touch the blades with bare fingers to avoid cutting yourself.
•Always first switch off the appliance using the speed controller 4 before removing the power supply plug. Otherwise the appliance might start up when you insert the power supply plug in a mains socket again.
•If you are not using the blender jug 12, the cover 2 must be fitted. Otherwise the appliance will not work so as to protect the user from injury.
SKMP 1200 A2 |
5 |
RP100104-105590 Küchenmaschine LB4 Seite 6 Donnerstag, 12. Juni 2014 12:50 12
4.6 For the safety of your child
Warning! Children are often unaware of danger and are injured as a result. Please note therefore:
•Ensure that the packing foil does not become a deadly trap for a child. Packing foils are not toys.
4.7 Material damage
Warning! Follow the instructions given below to prevent material damage.
•Only place the appliance on a level, dry, non-slip surface to stop the appliance falling over or sliding off.
•Do not place the appliance on top of a hot stove.
•Do not use the blender jug 12 and the mixing bowl 16 at the same time. This might overload the appliance.
•Never use the mixer and the blender jug 12 when empty. This might cause the motor to overheat.
•The mixer should only ever be operated for max. 10 minutes at a time, and the blender for 3 minutes. Afterwards the appliance must be first allowed to cool down to roomtemperature again.
•Only ever use the blender jug 12 with the lid in place 11 as liquid might otherwise be ejected.
•Do not move the appliance if food or pastry is still inside.
•Only use the blender jug 12 to mix drinks or make dressings.
•Do not overfill the mixing bowl 16 or blender jug 12 as the contents might otherwise be ejected.
•Never add hot or boiling food to the blender jug 12.
5. Unpacking and setting up
1.Remove the individual parts from the packaging.
2.Check that the individual parts are complete (see “1.2 Scope of supply” on page 2) and are undamaged.
3.Clean the appliance thoroughly before
using it for |
the |
first time |
(see |
“8. Cleaning |
the |
appliance” |
on |
page 15). |
|
|
|
4.Place the appliance on a level, dry, nonslip surface so that the appliance can neither fall over nor slide off.
5.Check that the speed controller 4 is set to "0".
6.Put the plug in a suitable socket (see “3. Technical data” on page 3).
The appliance is now ready to use.
6. Operating the appliance
6.1 Assembling the appliance
1.Press the unlock lever 6 and swing up the drive arm 1.
Note: Press the unlock lever 6 round fully and hold until the drive arm 1 is right down. Then swing the unlock lever 6 back again.
6
RP100104-105590 Küchenmaschine LB4 Seite 7 Donnerstag, 12. Juni 2014 12:50 12
2.To fit the mixing bowl 16, insert it in the base unit 7.
3.Lock the mixing bowl by rotating it slightly anti-clockwise until it engages.
Caution!
Never use the mixing bowl 16 without the splash guard 8 in position. Otherwise food might be ejected.
4.Fit the splash guard 8 onto the drive arm 1 from below. The filling opening with flap 9 should point towards the speed controller 4 .
5.Press on the splash guard 8 until it engages.
6.Select the appropriate attachment:
Dough hook 13: For heavy dough, e.g. bread dough
Balloon whisk 14: For whipping cream, beating egg whites, etc.
Beater 15: For medium to light dough/ batter, e.g. batter for (pan)cakes.
7.Fit the attachment into the appropriate opening in the drive arm 1 from below.
When doing so, make sure that the little lugs on the shaft of the attachment are inserted into the crosswise slot of the opening.
8.Press the attachment lightly in and turn clockwise until it engages.
9.Press the unlock lever 6 and swing the drive arm 1 down into the working position.
Note: Press the unlock lever 6 round fully and hold until the drive arm 1 is right down. Then swing the unlock lever 6 back again.
The appliance is now ready to use.
Fitting the blender jug 12 :
Caution!
•Do not use the blender jug 12 and the mixing bowl at the same time 16. This might overload the appliance.
1.Press the unlock button 3 for the lid 2 to the left.
2.Take the lid 2 off.
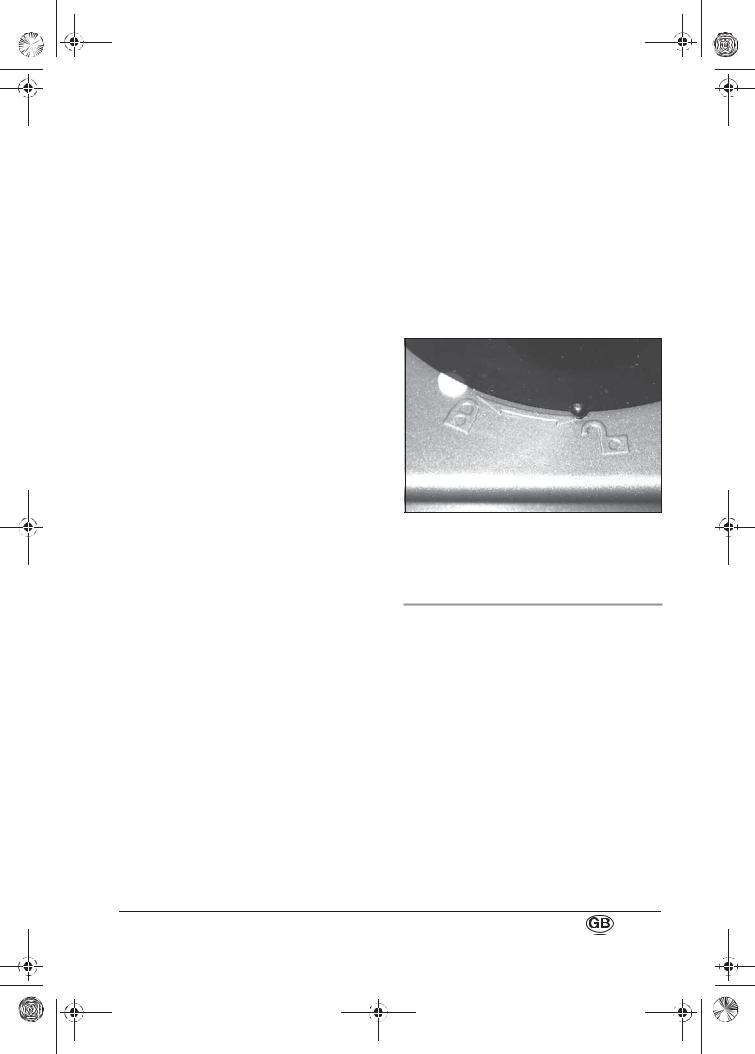
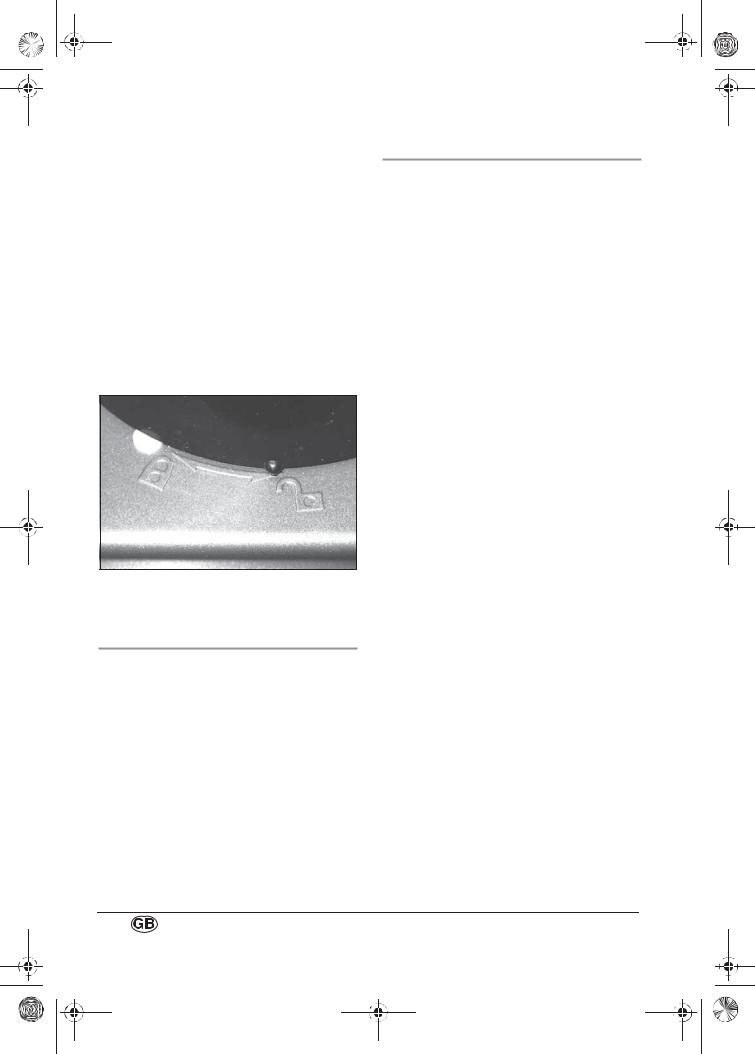
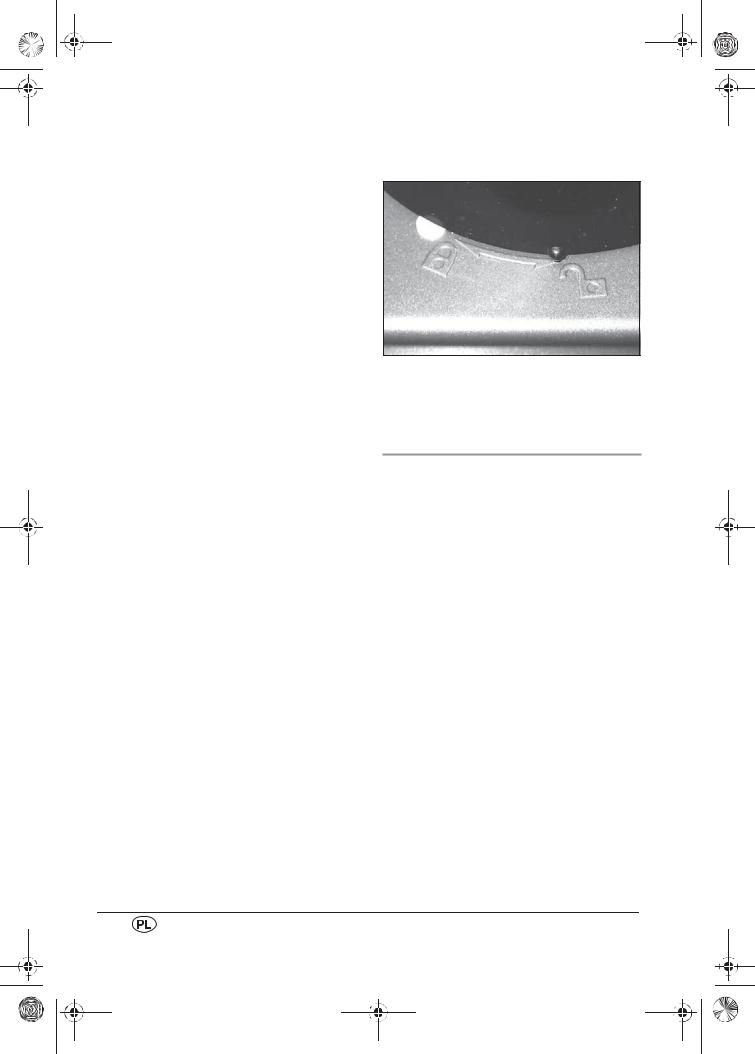
3.Position the blender jug 12 so that the little nib points to the open padlock symbol.
4.Turn the blender jug 12 clockwise until it engages. The little nib is now pointing to the closed padlock symbol.
6.2 Dismantle appliance
1.Press the unlock lever 6 and swing up the drive arm 1.
Note: Press the unlock lever 6 round fully and hold until the drive arm 1 is right down. Then swing the unlock lever 6 back again.
2.To remove an attachment, press lightly in again and unlock by turning anticlockwise slightly.
3.Remove the attachment.
4.To remove the splash guard 8, pull it downwards. When doing so, first pull the splash guard 8 down at the back slightly.
SKMP 1200 A2 |
7 |
RP100104-105590 Küchenmaschine LB4 Seite 8 Donnerstag, 12. Juni 2014 12:50 12
5.Unlock the mixing bowl 16 by rotating slightly in a clockwise direction.
6.Remove the mixing bowl 16.
7.Press the unlock lever 6 and swing the drive arm 1 down into the working position.
Note: Press the unlock lever 6 round fully and hold until the drive arm 1 is right down. Then swing the unlock lever 6 back again.
Removing the blender jug12 :
1.Turn the blender jug 12 anti-clockwise until that the little nib points to the open padlock symbol.
2.Remove the blender jug 12.
3.Put the lid 2 back on.
6.3 Using the splash guard
You can add ingredients during mixing:
1.Reduce the speed to 1 - 2.
2.Lift the flap over the filling opening 9.
3.Add ingredients.
4.Close the flap over the filling opening 9 again.
6.4 Using the blender jug 12
Caution!
•Never allow the blender to run for more than 3 minutes at a time. It then has to cool down again first to prevent the appliance overheating.
1.Always put the liquid ingredients in the blender jug first, followed by the solid components 12.
2.Chop up the solid ingredients beforehand to stop any lumps jamming the blades.
3. Make sure you always replace the lid 11 on the blender jug 12 before starting the blender as the contents might otherwise be ejected.
4.If you wish to add other ingredients during blending, open the fastening 10 in the lid 11 of the blender jug 12 by turning clockwise.
5.Select the desired speed on the speed controller 4 .
Note: The ideal speed mainly depends on the consistency of the food to be blended. The more liquid it is, the faster blending can be carried out.
6.Alternatively, you can press the pulse button 5 here. Blending will take place at maximum speed as long as the pulse button 5 is held down.
Note: The pulse button 5 only functions when at least level 1 is set on the speed controller 4.
8
RP100104-105590 Küchenmaschine LB4 Seite 9 Donnerstag, 12. Juni 2014 12:50 12
6.5 Regulating speed, switching on and off
1.Switch the appliance on by turning the speed controller 4 to the right.
2.Start off at a slightly slower speed when blending or mixing and then increase.
Note: The pulse button 5 only functions when at least level 1 is set on the speed controller 4.
Recommendations for speed levels
Speed |
Attachment |
|
Description |
1 - 2 |
All |
- |
Starting position for all blending / mixing opera- |
|
|
|
tions. |
|
|
- When adding ingredients |
|
|
|
|
|
|
Dough hook 13 or |
- Kneading and mixing firm dough or ingredients |
|
|
beater 15 |
|
|
|
|
|
|
2 - 3 |
Beater 15 |
- Mixing thick dough/batter |
|
|
|
- |
Mixing butter and flour |
|
|
- Mixing yeast dough |
|
|
|
|
|
|
Dough hook 13 |
- Kneading yeast dough |
|
|
|
- Kneading thick dough |
|
|
|
|
|
4 - 6 |
Beater 15 |
- Cake batter |
|
|
|
- |
Beating butter with sugar |
|
|
- |
Biscuit dough |
|
|
|
|
7 - 10 |
Balloon whisk 14 |
- Whipping cream |
|
|
|
- |
Egg whites |
|
|
- Mayonnaise |
|
|
|
- |
Beating butter until fluffy |
|
|
|
|
Pulse button 5 |
Blender jug 12 |
- |
Blending and liquidising soft or liquid ingredients. |
|
|
- |
The pulse button 5 only functions when at least |
|
|
|
level 1 is set on the speed controller 4. |
|
|
|
|
Move the speed controller 4 to "0" to switch the appliance off.
6.6 Thermal cut-out
The appliance has a thermal cut-out. If the motor gets too hot, the appliance will switch off automatically:
1.Switch the appliance off.
2.Remove the power supply plug.
3.Allow the appliance to cool down to room temperature.
SKMP 1200 A2 |
9 |

RP100104-105590 Küchenmaschine LB4 Seite 10 Donnerstag, 12. Juni 2014 12:50 12
7. Recipes
7.1 White bread
Ingredients
•1 kg plain flour (type 405, cake flour)
•4 tsp salt
•4 packs of dried yeast (approx. 25 - 30 g)
•650 ml lukewarm water
Preparation
1. Put the ingredients in the mixing bowl 16.
2.Fit the splash guard 8 and dough hook 13.
3.Knead for 10 minutes on level 3.
4.Remove and cover mixing bowl.
5.Allow dough to stand for around 1 - 2 hours in a warm place.
6.Shape into a loaf or place dough in a loaf pan.
7.Preheat oven to 220 °C.
8.Bake bread on middle shelf for 35 - 40 minutes.
7.2 Pizza dough
Note: Pizza dough is particularly good when prepared at least 24 hours in advance and then allowed to rest in the fridge. The following recipe should give you pizza dough "just like Mamma used to make".
Ingredients for 4 people
•500 g type 00 flour
•300 ml water
•max. 1/5 of a block of yeast
•20 g salt
Preparation
1.Place 300 g of the flour in the mixing bowl 16.
2.Fit the splash guard 8 and beater 15.
3.Set to level 2.
4.Slowly pour 300 ml water through the filling opening 9.
5.Add the yeast.
6.Add the salt.
7.Mix at level 4 - 5 until smooth.
8.Cover the bowl and allow the dough to
rise at room temperature for about
20minutes.
9.Mix the dough again at level 4 for about 3 minutes.
10.Remove the beater 15 and insert the dough hook 13.
11.Knead the dough at level 3.
12.Now gradually add the remaining flour using the filling opening 9.
Note: The amount of flour is exactly right when the dough can be lifted from the surface and forms a ball when kneading.
13.To finish, knead the dough one more time at level 2 for about 3 minutes.
Note: The pizza dough has exactly the right consistency when it briefly holds a ball shape but loses its shape and flattens out over a longer time (roughly
30minutes).
14.Allow the pizza dough to rest in the
covered mixing bowl for a further
20 minutes.
15.Turn the bowl upside down and let the dough fall onto a well-floured board.
16.Dust the surface of the dough well with flour.
10

RP100104-105590 Küchenmaschine LB4 Seite 11 Donnerstag, 12. Juni 2014 12:50 12
17.Briefly knead the dough and form into a ball.
18.Put the dough ball into a lidded container and place in the fridge for 24 hours.
19.Take the dough out of the fridge and place it on a baking sheet dusted with flour.
20.Dust the dough well with flour and briefly knead to form a nice ball of dough.
21.The dough is now ready and can be made into pizza bases and the toppings added.
Notes.
•The yeast does not need to be first dissolved in water.
•Much less yeast is required as is recommended on the yeast packaging. Only use as much yeast as required for about 200 - 250 g flour according to the packaging instructions.
•If your pizza dough tastes of yeast, reduce the amount of yeast further. The long rising time compensates for the reduced amount of yeast.
•For more aromatic dough, add sea salt.
•When tasting just after adding the salt, the dough should initially taste slightly salty. If you can clearly taste the flour or yeast, add another pinch of salt. The salty taste becomes milder when the rest of the flour is added.
•Do not place the dough near an additional heat source to rise. You may save time, but the flavour will suffer as a result.
•The resting time of 24 hours is extremely important if your pizza dough is to be nice and tasty.
•Pizza dough prepared in this way can be stored in the fridge for several days.
7.3 Pound cake with fruit
Ingredients
• 1 tub of yoghurt (150 ml)
• 1 tub of cooking oil or soft butter (150 g)
•2 tubs of sugar (300 g)
•3 tubs of flour (320 g)
•1 sachet of baking powder
•4 egg yolks
•4 egg whites
•1 tin of fruit of your choice or fresh fruit (around 500 g)
Preparation:
1. Put the egg whites in the mixing bowl 16.
2.Fit the splash guard 8 and the balloon whisk 14.
3.Beat the egg whites at level 9 for 1 - 2 minutes until stiff.
4.Take the stiffly-beaten egg whites out of the bowl and put to one side.
5.Add the yoghurt to the mixing bowl.
6.Rinse out the empty yoghurt tub and measure out the other ingredients with it or use a measuring beaker to determine quantities.
7.Add 1 tub of oil (150 ml) or soft butter (150 g).
8.Add 2 tubs of sugar (300 ml).
9.Add 4 egg yolks.
10.Beat the ingredients at level 6 or 7 for around 2 minutes until smooth.
11.Add 3 tubs of flour (450 ml or 320 g) and the baking powder.
12.Remove the balloon whisk 14 and fit the beater 15.
13.Mix the ingredients at level 4 for around 5 minutes.
SKMP 1200 A2 |
11 |

RP100104-105590 Küchenmaschine LB4 Seite 12 Donnerstag, 12. Juni 2014 12:50 12
14.Stop the food processor.
15.Add the stiffly-beaten egg whites.
16.Drain fruit, cut into pieces if required and add to bowl.
17.Mix fruit and stiffly-beaten egg whites at level 2 for around 10 - 30 seconds.
18.Place mixture in a cake tin.
19.Bake at 200 °C for around 50 minutes.
7.4 Sand cake
Ingredients
•250 g butter
•250 g sugar
•6 eggs
•250 g cornflour
•75 g plain flour
•1 sachet of baking powder (20 g)
•1 untreated lemon
•1 sachet of vanilla sugar (2 tsp)
Preparation
1.Sieve cornflour and flour into a bowl, add baking powder and mix well.
2.Fit the splash guard 8 and beater 15.
3.Add the butter, sugar and vanilla sugar to the mixing bowl 16.
4.Select level 3 to product a loose batter.
5.Gradually beat in the eggs one by one.
6.Grate the lemon rind and add.
7.Spoon in the flour mixture and stir.
8.Once all ingredients are stirred in, beat at level 6 for 3 minutes.
9.Place mixture in a greased cake tin.
10.Bake for around 60 minutes at 180 °C (top and bottom heat) or 160 °C (fan oven).
11.Once the cake is cool, ice or decorate with icing sugar. The lemon juice can be added to the icing.
7.5 Waffles
Ingredients
•6 eggs
•1 sachet of vanilla sugar
•1/2 sachet of baking powder
•250 g sugar
•200 g butter or margarine
•500 g plain flour
•300 ml milk
•125 ml carbonated mineral water
Preparation
1. Separate the eggs.
2. Put the egg whites in the mixing bowl 16.
3.Fit the splash guard 8 and the balloon whisk 14.
4.Beat the egg whites at level 9 for 1 - 2 minutes until stiff.
5.Stop the food processor.
6.Take the stiffly-beaten egg whites out of the bowl and put to one side.
7.Remove the balloon whisk 14 and insert the beater 15.
8.Cream butter and sugar at level 5 - 6.
9.Set to level 4.
10.Gradually add the egg yolks, milk, mineral water and vanilla sugar.
11.Mix the flour and baking powder and spoon in.
12.Stop the food processor briefly and add the stiffly-beaten egg whites to the bowl.
13.Fold in the stiffly-beaten egg whites at level 2 for around 10 - 30 seconds.
14.Leave the batter to stand for approx. 30 minutes.
15.Then cook the waffles.
12

RP100104-105590 Küchenmaschine LB4 Seite 13 Donnerstag, 12. Juni 2014 12:50 12
7.6 Chocolate cupcakes
Ingredients
•100 g butter
•150 g sugar
•2 eggs
•100 g plain flour
•½ tsp baking powder
•¼ tsp bicarbonate of soda
•¼ tsp salt
•75 g cocoa powder
•130 ml milk, possibly more
•1 tsp vanilla extract or vanilla paste
Preparation
1.Sieve flour and cocoa powder into a bowl, add baking powder, bicarbonate of soda and salt through the sieve and mix well.
2.Fit the splash guard 8 and beater 15.
3.Add the butter, sugar and vanilla to the mixing bowl 16.
4.Select level 3 to product a loose batter.
5.Beat in the eggs one at a time.
6.Mix in the flour mixture and about 130 ml of milk alternately to form a smooth mixture.
7.If the mixture is too dry, add a little milk at a time until it becomes looser.
8.Add the mixture to a cupcake maker or grease ovenproof cups to act as baking tins. You can also use suitably shaped pans or moulds.
9.Bake for around 20 minutes at 190 °C.
7.7 Piped biscuits
Ingredients
•230 g plain flour
•150 g butter, cold and cut into thin slices
•100 g sugar
•1 egg
•1 sachet of vanilla sugar
•1 pinch of salt
Preparation
1. Put the ingredients in the mixing bowl 16.
2.Fit the splash guard 8 and the dough hook 13.
3.Mix for around 5 minutes at level 2 - 3.
4.Add the mixture to a piping bag and pipe out.
5.Place the strands on a baking sheet in an S-shape, in straight lines or in circles.
6.Bake at 180 °C for 10 minutes.
Notes:
•You can garnish the biscuits with chopped nuts or almonds before baking.
•Once the biscuits have cooled after baking, they can be iced.
7.8 Strawberry shake with buttermilk
Ingredients
•1/2 l cold milk
•1/2 l cold buttermilk
•250 g fresh strawberries
•4 tbsp strawberry jam
•4 tbsp honey
•1 tbsp lemon juice
•1 pinch of salt
•sugar or sweetener to taste
Preparation
1.Remove the lid 11 from the blender jug 12.
2.Add the milk, buttermilk, honey, strawberry jam, lemon juice and a pinch of salt.
3. Replace the lid 11 on the blender jug 12.
4. Place the jug 12 on the appliance.
SKMP 1200 A2 |
13 |

RP100104-105590 Küchenmaschine LB4 Seite 14 Donnerstag, 12. Juni 2014 12:50 12
5. Mix the |
ingredients |
for |
around |
30 seconds |
either using |
the |
pulse |
button 5 or at speed level 10. |
|
||
Note: The pulse button 5 only functions when at least level 1 is set on the speed controller 4.
6.Release the pulse button or reduce the speed to level 1.
7.Open the fastening 10 in the lid 11 of the blender jug 12 by turning clockwise.
8.Add the strawberries.
9.If you would like the shake to be sweeter, add extra sugar to taste.
10.Mix for 2 minutes at the highest speed setting (pulse button or speed level 10).
11.Pour into glasses and garnish with fresh strawberries.
7.9 Banana shake
Ingredients
•2 very ripe bananas
•1/2 l cold milk
•4 tbsp vanilla ice cream
•chocolate sprinkles
Preparation
1.Peel bananas and cut into pieces.
2.Remove the lid 11 from the blender jug 12.
3.Put all ingredients in the jug 12.
4. Replace the lid 11 on the blender jug 12.
5.Place the jug 12 on the appliance.
6.Mix the ingredients for around 60 seconds either using the pulse button 5 or at speed level 10.
Note: The pulse button 5 only functions when at least level 1 is set on the speed controller 4.
7.Pour into glasses and decorate with chocolate sprinkles.
7.10 Sour cherry smoothie
Ingredients
•250 g jar of pitted sour cherries
•150 g yoghurt
•sugar to taste
Preparation
1.Remove the lid 11 from the blender jug 12.
2.Put the sour cherries plus juice in the blender jug 12.
3. Replace the lid 11 on the blender jug 12.
4.Place the jug 12 on the appliance.
5.Blend the sour cherries using the pulse button 5 for 15 seconds.
Note: The pulse button 5 only functions when at least level 1 is set on the speed controller 4.
6.Add the yoghurt and sugar.
7.Mix the ingredients either using the pulse
button 5 or at speed level 10 (max. 2 minutes) until the mixture is smooth and thick.
14

RP100104-105590 Küchenmaschine LB4 Seite 15 Donnerstag, 12. Juni 2014 12:50 12
8. Cleaning the appliance
Warning! To prevent the risk of electric shock, injury or damage:
– Disconnect the power supply plug from the mains socket before cleaning.
–Never immerse the base unit 7 in water.
Caution! Never use scouring, corrosive or abrasive cleaning materials as these could damage the appliance.
8.1 Cleaning the base unit (7)
1.Clean the base unit 7 with a damp cloth. A little detergent may also be used.
2.Wipe over with clean water.
3.Do not use the base unit 7 again until it is completely dry.
8.2Cleaning the splash guard (8), dough hook (13), balloon whisk (14) and beater (15)
Caution!The splash guard 8 is not dishwasher-safe.
The dough hook 13, balloon whisk 14 and beater 15 can also be washed in the dishwasher.
1.Put the parts in cold or lukewarm water to soften dough residues.
Note You can also add a little detergent to the water.
2.Remove softened dough residues with a washing-up brush.
3.Rinse off with clean water.
4.Allow parts to dry completely before using them again.
8.3 Cleaning the mixing bowl (16)
The mixing bowl 16 is made of stainless steel and can be cleaned in the sink or dishwasher.
8.4 Cleaning the blender jug (12)
Note: The blender jug 12 and the lid 11 are dishwasher-proof.
1.Place the blender jug 12 on the appliance.
2.Fill up around halfway with warm water containing detergent.
3.Put on lid 11.
4.Check that the speed controller 4 is set to "0".
5.Put the power supply plug in a mains socket (see “3. Technical data” on page 3).
6.Press the pulse button 5 briefly several times.
Note: The pulse button 5 only functions when at least level 1 is set on the speed controller 4.
7.Take the jug 12 off the appliance .
8.Pour out the detergent solution.
9.Rinse out blender jug 12 with clean water.
10.Allow the jug 12 to dry completely before using again.
SKMP 1200 A2 |
15 |
RP100104-105590 Küchenmaschine LB4 Seite 16 Donnerstag, 12. Juni 2014 12:50 12
9. Disposal
9.1 Appliance
The symbol with the crossedout rubbish bin on wheels means that within the European Union, the product must be disposed of to a sorted rubbish
collection. This applies to the product and all accessories which are marked with this symbol. Marked products must not be disposed of via the regular domestic waste but must be handed in to a recycling centre
for electrical or electronic devices. Recycling helps to reduce the use of raw materials and to relieve the environment. It is therefore imperative that you follow the disposal regulations applicable in your country.
9.2 Packaging
If you wish to discard the packaging, please observe the applicable environmental regulations in your country.
10. HOYER Handel GmbH Warranty
Dear Customer,
You have a warranty on this product which is valid for 3 years from the date of purchase. In the event of this product being defective, you have statutory rights against the seller of the product. These statutory rights are not limited by our warranty as set out below.
Warranty conditions
The warranty period begins with the date of purchase. Please keep the original till receipt in a safe place. This is required as your proof of purchase.
If a defect in materials or workmanship occurs within three years of the date your product was purchased, we will repair or replace the product at our discretion at no charge to you. This service under warranty assumes that the defective product and the proof of purchase (till receipt) are submitted within the three-year period and that a brief description in writing is provided of what the defect is and when it occurred.
If the defect is covered by our warranty, the repaired product or a new one will be sent back to you. There is no new warranty period following repair or replacement of the product.
Warranty period and statutory claims relating to defects
The warranty period is not extended when a service is provided under warranty. This also applies to replaced and repaired parts. Any damage or defects present at purchase must be reported immediately the product is unpacked. Repairs incurred once the warranty period has expired are chargeable.
Scope of warranty
The product has been carefully manufactured in accordance with strict quality guidelines and was thoroughly checked before being delivered.
16

RP100104-105590 Küchenmaschine LB4 Seite 17 Donnerstag, 12. Juni 2014 12:50 12
The warranty applies to defective materials or workmanship. This warranty does not extend to product parts exposed to normal wear and tear (and which can therefore be considered wear parts) or to damage to fragile parts such as switches, batteries or parts made of glass.
This warranty is void if the product is damaged or if it is not used or maintained properly. All the information in the operating instructions should be observed precisely to ensure that the product is used properly.
It is essential to avoid intended uses and actions which are discouraged or warned against in the operating instructions.
The product is intended for only private use and not for commercial purposes.
The warranty is void in the event of misuse, incorrect treatment, use of force or interference by anyone other than our authorized service centre.
Warranty process
Please follow the instructions below to ensure that your claim is processed quickly.
•In case of any enquiry, please keep the article number (for this product: IAN 100104: red/105590: crème) and the till receipt as proof of purchase.
•The article number can be found on the rating plate, as an engraving, on the cover sheet of your instructions (bottom left) or as a label on the back or underside of your appliance.
•If malfunctions or any other defects should occur, in the first instance contact the Service Centre mentioned below by telephone or e-mail.
•Once a product has been recorded as defective, you can then send it Freepost to the service address you are given, enclosing the proof of purchase (till
receipt) and quoting what the defect is and when it occurred.
You can download these instructions and many other manuals, product videos and software from www.lidl-service.com.
 Service Centre
 Service Great Britain
Tel.: 0871 5000 720 (£ 0.10/Min.) E-Mail: hoyer@lidl.co.uk
IR Service Ireland
Tel.: 1890 930 034 (0,08 EUR/Min., (peak))
(0,06 EUR/Min., (off peak)) E-Mail: hoyer@lidl.ie
CY Service Cyprus
Tel.: 8009 4409
E-Mail: hoyer@lidl.com.cy
MT Service Malta
Tel.: 80062230
E-Mail: hoyer@lidl.com.mt
IAN: 100104: red/105590: crème
 Supplier
Please note that the address below is not a service address. In the first instance, contact the service centre mentioned above.
HOYER Handel GmbH
Kühnehöfe 5
22761 Hamburg
Germany
SKMP 1200 A2 |
17 |

RP100104-105590 Küchenmaschine LB4 Seite 18 Donnerstag, 12. Juni 2014 12:50 12
Spis treści
1. Opis urządzenia . . . . . . . . . . . . . . . . . . . . . . . . . . . . . . . . . . . . . . . . . . . . . . . . . . . . . . . 18 2. Nazwa części (patrz strona rozkładana) . . . . . . . . . . . . . . . . . . . . . . . . . . . . . . . . . . . . . . 19 3. Dane techniczne . . . . . . . . . . . . . . . . . . . . . . . . . . . . . . . . . . . . . . . . . . . . . . . . . . . . . . . 19 4. Zasady bezpieczeństwa . . . . . . . . . . . . . . . . . . . . . . . . . . . . . . . . . . . . . . . . . . . . . . . . . . 20 5. Rozpakowywanie i ustawianie . . . . . . . . . . . . . . . . . . . . . . . . . . . . . . . . . . . . . . . . . . . . . 23 6. Obsługa urządzenia . . . . . . . . . . . . . . . . . . . . . . . . . . . . . . . . . . . . . . . . . . . . . . . . . . . . 23 7. Przepisy . . . . . . . . . . . . . . . . . . . . . . . . . . . . . . . . . . . . . . . . . . . . . . . . . . . . . . . . . . . . . 27 8. Czyszczenie urządzenia . . . . . . . . . . . . . . . . . . . . . . . . . . . . . . . . . . . . . . . . . . . . . . . . . . 32 9. Utylizacja . . . . . . . . . . . . . . . . . . . . . . . . . . . . . . . . . . . . . . . . . . . . . . . . . . . . . . . . . . . . 33
10. Gwarancja firmy HOYER Handel GmbH. . . . . . . . . . . . . . . . . . . . . . . . . . . . . . . . . . . . . . . 33
Gratulujemy zakupu nowego urządzenia.
Jest to wysokiej jakości produkt. Instrukcja obsługi jest integralną częścią tego produktu. Zawiera ona ważne wskazówki dotyczące bezpieczeństwa, użytkowania i utylizacji.
Przed rozpoczęciem użytkowania produktu należy się zapoznać z wszystkimi instrukcjami dotyczącymi obsługi oraz bezpieczeństwa. Produktu należy używać tylko w opisany sposób i do opisanych celów.
Przekazując produkt innym osobom, należy razem z nimi przekazać całą jego dokumentację.
1. Opis urządzenia
1.1 Zastosowanie
Robot kuchenny SilverCrest SKMP 1200 A2
służy do |
miksowania, |
roztrzepywania, |
ugniatania, |
ubijania i mieszania żywności |
|
i artykułów spożywczych. |
||
Urządzenie |
można |
użytkować tylko |
w suchych pomieszczeniach. Użytkowanie urządzenia na dworze lub w wilgotnych pomieszczeniach jest niedozwolone.
Urządzenie przeznaczone jest do użytku
prywatnego, |
nie |
do |
stosowania |
w działalności gospodarczej. |
|
||
Urządzenie nadaje się również do:
•używania w kuchniach pracowniczych w sklepach, biurach i innych pomieszczeniach pracowniczych,
•używania w gospodarstwach rolnych,
•używania przez klientów w hotelach, motelach i innych kompleksach mieszkalnych,
•używania w pensjonatach podających śniadania.
18
RP100104-105590 Küchenmaschine LB4 Seite 19 Donnerstag, 12. Juni 2014 12:50 12
1.2 Skład zestawu |
|
1.3 Warianty |
||
• 1 robot kuchenny, urządzenie |
|
Urządzenie dostarczane jest w dwóch |
||
|
podstawowe |
|
wersjach: |
|
• |
1 osłona przeciwbryzgowa |
|
• |
RP100104: kolor czerwony |
• 1 pojemnik do miksowania |
|
• |
RP105590: kolor kremowy |
|
• 1 hak do ugniatania |
|
Instrukcja jest identyczna dla obu wersji |
||
• |
1 trzepaczka |
|
kolorystycznych. |
|
•1 końcówka do mieszania
•1 instrukcja obsługi
2. Nazwa części (patrz strona rozkładana)
1 |
Ramię napędowe |
9 Otwór do napełniania z klapką |
2 |
Osłona |
10 Zamknięcie pokrywy |
3 |
Zwalniacz osłony |
11 Pokrywa pojemnika do miksowania |
4 |
Regulator prędkości z funkcją |
12 Pojemnik do miksowania z pokrywą |
|
włącznika/wyłącznika |
i zamknięciem pokrywy |
5 |
Przycisk impulsowy |
13 Hak do ugniatania |
6 |
Dźwignia do zwolnienia blokady |
14 Trzepaczka |
7 |
Urządzenie podstawowe |
15 Końcówka do mieszania |
8 |
Osłona przeciwbryzgowa |
16 Miska |
|
3. Dane techniczne |
||||||
|
|
|
|
|
|
|
|
Zasilanie: |
220–240 V~ / 50 Hz |
||||||
Moc: |
1200 W |
||||||
Klasa ochronności: |
II |
|
|
|
|
||
|
|
|
|
|
|
||
Czas pracy ciągłej robota kuchennego:10 minut |
|
|
|
|
|
|
|
|
|
|
|
|
|
||
Czas pracy ciągłej pojemnika do miksowania: 3 minuty |
|||||||
Czas pracy ciągłej: |
czas, przez jaki urządzenie może nieprzerwanie pracować. |
||||||
SKMP 1200 A2 |
19 |
RP100104-105590 Küchenmaschine LB4 Seite 20 Donnerstag, 12. Juni 2014 12:50 12
4. Zasady bezpieczeństwa
4.1 Objaśnienie pojęć
Instrukcja obsługi zawiera następujące hasła ostrzegawcze:
Ostrzeżenie!
Wysokie ryzyko: Nieprzestrzeganie tego ostrzeżenia grozi utratą zdrowia
lub życia.
Ostrożnie!
Średnie ryzyko: Nieprzestrzeganie tego ostrzeżenia może spowodować szkody materialne.
Wskazówka:
Niskie ryzyko: Kwestie, które należy uwzględnić przy użytkowaniu urządzenia.
4.2Specjalne wskazówki dotyczące tego urządzenia
|
Ostrzeżenie! |
Aby |
uniknąć |
|
zranień lub |
uszkodzeń, |
należy |
|
przestrzegać |
następujących |
|
wskazówek. |
|
|
|
• Osoby o ograniczonej sprawności fizycznej,
sensorycznej |
i umysłowej |
oraz |
osoby |
nieposiadające |
dostatecznej |
wiedzy |
albo |
wystarczającego |
doświadczenia |
mogą |
używać |
tego urządzenia tylko pod opieką lub pod warunkiem, że zostały poinstruowane o bezpiecznym sposobie korzystania z urządzenia i zrozumiały zagrożenia związane z jego używaniem.
•Urządzenia nie mogą używać dzieci.
•Urządzenie i jego przewód sieciowy należy przechowywać poza zasięgiem dzieci.
•Dzieciom nie wolno bawić się urządzeniem.
• Urządzenie należy zawsze odłączyć od zasilania, jeśli nie jest nadzorowane oraz przed rozpoczęciem składania, rozkładania
i czyszczenia.
•Nie należy zanurzać urządzenia podstawowego 7 w wodzie.
•Pod żadnym pozorem nie wolno stosować środków do szorowania ani żrących lub rysujących środków czyszczących. Można w ten sposób uszkodzić urządzenie.
4.3 Wskazówki ogólne
•Przed użyciem należy zapoznać się dokładnie z niniejszą instrukcją obsługi. Stanowi ona integralną część urządzenia i powinna być zawsze dostępna.
•Urządzenie można stosować tylko
zgodnie z opisanym przeznaczeniem (patrz "1.1 Zastosowanie" na stronie 18).
•Sprawdzić, czy wymagane napięcie sieciowe (patrz tabliczka znamionowa urządzenia) zgodne jest z faktycznym napięciem w sieci.
•Należy pamiętać, że stosowanie akcesoriów niezalecanych w niniejszej instrukcji obsługi lub dokonywanie napraw przy użyciu nieoryginalnych części zamiennych spowoduje utratę wszelkich roszczeń z tytułu gwarancji i rękojmi oraz wygaśnięcie wszelkiej odpowiedzialności. Dotyczy to również napraw przeprowadzanych przez niewykwalifikowane osoby. Dane kontaktowe zostały podane w "Centrum serwisowe" na stronie 35.
•W razie usterek podczas okresu gwarancji do dokonania naprawy
20
RP100104-105590 Küchenmaschine LB4 Seite 21 Donnerstag, 12. Juni 2014 12:50 12
uprawnione jest wyłącznie nasze centrum serwisowe. W przeciwnym wypadku wygasają wszelkie uprawnienia gwarancyjne.
4.4Ochrona przed porażeniem prądem elektrycznym
Ostrzeżenie! Poniższe zasady bezpieczeństwa mają chronić użytkowników przed porażeniem prądem.
•W razie uszkodzenia urządzenia nie należy w żadnym wypadku używać go. Należy wówczas oddać je do naprawy wykwalifikowanemu fachowcowi. Dane kontaktowe zostały podane w "Centrum serwisowe" na stronie 35.
•Uszkodzone złącze sieciowe urządzenia powinny zostać wymienione przez producenta lub osobę posiadającą podobne kwalifikacje – tylko w ten sposób można wykluczyć zagrożenia.
•Nie wolno dopuścić do przedostania się wody lub innych cieczy do wnętrza urządzenia podstawowego 7. Dlatego nie należy nigdy:
–używać urządzenia na zewnątrz;
–zanurzać urządzenia podstawowego 7 w wodzie;
–stawiać na urządzeniu naczyń z płynem, np. szklanek, wazonów itp.;
–używać urządzenia w wilgotnym otoczeniu;
–używać urządzenia w bezpośredniej bliskości zlewozmywaka, wanny, prysznica lub basenu, ponieważ mogłaby się do niego dostać rozpryskiwana woda.
Jeżeli do urządzenia przedostaną się płyny, należy natychmiast wyjąć wtyczkę z gniazda sieciowego i oddać urządzenie do naprawy
wykwalifikowanemu personelowi. Dane kontaktowe zostały podane w "Centrum serwisowe" na stronie 35.
•Nie wolno nigdy chwytać urządzenia, przewodu sieciowego ani wtyczki mokrymi dłońmi.
•Przewód sieciowy należy zawsze odłączać, trzymając za wtyczkę. Nie wolno nigdy ciągnąć za sam przewód sieciowy.
•Nie należy załamywać i nie przygniatać przewodu sieciowego.
•Nie należy dopuszczać do kontaktu przewodu sieciowego z gorącymi powierzchniami (np. płytą kuchenną).
•Jeżeli urządzenie nie będzie używane przez dłuższy czas, należy odłączyć wtyczkę sieciową od gniazda sieciowego. Tylko wtedy urządzenie jest całkowicie pozbawione napięcia.
•Należy unikać stosowania przedłużaczy z urządzeniem. Jest to dopuszczalne wyłącznie w określonych warunkach:
–Przedłużacz powinien być przystosowany do natężenia prądu pobieranego przez urządzenie.
–Przedłużacz nie może swobodnie zwisać: nie może on stanowić przeszkody, o którą można by się potknąć, ponadto powinien być niedostępny dla dzieci.
–Przedłużacz w żadnym wypadku nie może być uszkodzony.
–Do gniazda sieciowego nie można podłączać żadnych innych urządzeń, gdyż może to spowodować przeciążenie instalacji elektrycznej (zakaz stosowania rozgałęźników!).
SKMP 1200 A2 |
21 |
RP100104-105590 Küchenmaschine LB4 Seite 22 Donnerstag, 12. Juni 2014 12:50 12
4.5 Ochrona przed obrażeniami
Ostrzeżenie! Należy przestrzegać podanych niżej wskazówek, aby uniknąć obrażenia.
•Należy uważać, by kabel sieciowy przebiegał w sposób uniemożliwiający potknięcie się, zaplątanie się w nim lub deptanie po nim.
•Podczas użytkowania urządzenia należy unikać kontaktu z jego ruchomymi częściami, takimi jak zestaw noży pojemnika do miksowania 12, hak do ugniatania 13, trzepaczka 14 lub końcówka do mieszania 15. Ręce lub włosy mogłyby zostać pochwycone przez urządzenie, co stwarza ryzyko obrażeń. Urządzenie można włączać tylko wtedy, gdy osłona
przeciwbryzgowa 8 przy zastosowaniu miski 16 lub pokrywa 11 przy zastosowaniu pojemnika do miksowania 12 jest prawidłowo nasadzona.
•Przed rozpoczęciem czyszczenia lub przed każdą wymianą nasadek należy zawsze odłączać wtyczkę sieciową od gniazda sieciowego.
•Należy pamiętać o tym, że ostrza pojemnika do miksowania 12 są bardzo ostre. Aby uniknąć ran ciętych, nie należy nigdy dotykać ostrzy gołymi rękami.
•Przed wyciągnięciem wtyczki sieciowej należy zawsze najpierw wyłączać urządzenie za pomocą regulatora prędkości 4. W przeciwnym wypadku urządzenie mogłoby włączyć się, gdy wtyczka zostanie z powrotem włożona do gniazda sieciowego.
•Jeśli pojemnik do miksowania 12 nie został nasadzony, należy nałożyć osłonę 2. W przeciwnym wypadku
zabraknie ochrony przed obrażeniami podczas pracy urządzenia.
4.6Zapewnienie bezpieczeństwa dziecka
Ostrzeżenie! Dzieci często nie są w stanie prawidłowo ocenić zagrożenia i mogą się przez to zranić. Dlatego należy pamiętać o następujących zasadach:
•Należy uważać, aby folia opakowaniowa nie stanowiła śmiertelnego zagrożenia dla dziecka. Folia opakowaniowa nie jest zabawką.
4.7 Szkody materialne
Uwaga! Aby uniknąć szkód materialnych, należy przestrzegać podanych niżej wskazówek.
•Urządzenie należy stawiać wyłącznie na równej, suchej i przeciwpoślizgowej powierzchni, aby nie mogło się przewrócić lub zsunąć.
•Nie wolno nigdy stawiać urządzenia na gorącej płycie palnikowej.
•Nie należy używać jednocześnie
pojemnika |
do |
miksowania |
12 |
i miski 16. |
Można |
w ten |
sposób |
przeciążyć urządzenie. |
|
||
•Nigdy nie należy użytkować pustego mieszacza ani pustego pojemnika do miksowania 12. Można w ten sposób przegrzać silnik.
•Mieszacz może nieprzerwanie pracować maksymalnie przez 10 minut, mikser maksymalnie przez 3 minuty. Potem należy zaczekać na ochłodzenie się urządzenia do temperatury pokojowej.
•Pojemnika do miksowania 12 należy
używać |
wyłącznie |
z nasadzoną |
22
RP100104-105590 Küchenmaschine LB4 Seite 23 Donnerstag, 12. Juni 2014 12:50 12
pokrywą 11, ponieważ w przeciwnym razie płyn mógłby się z niego wydostać.
•Nie należy przestawiać urządzenia, jeśli znajdują się w nim jeszcze potrawy lub ciasto.
•Pojemnik do miksowania 12 należy stosować wyłącznie do przygotowywania miksowanych napojów lub dressingów.
•Nie należy przepełniać miski 16 ani pojemnika do miksowania 12, ponieważ w przeciwnym przypadku zawartość może się z nich wydostać.
•Nie należy nigdy wkładać gorących ani gotujących się produktów do pojemnika do miksowania 12.
5. Rozpakowywanie i ustawianie
1.Wyjmij części z opakowania.
2.Sprawdź, czy wszystkie części są kompletne (patrz "1.2 Skład zestawu" na stronie 19) i nie mają uszkodzeń.
3.Przed pierwszym użyciem dokładnie
wyczyść |
urządzenie |
(patrz |
|
"8. Czyszczenie |
urządzenia" |
na |
|
stronie 32). |
|
|
|
4.Urządzenie należy stawiać na równej, suchej i przeciwpoślizgowej powierzchni, aby nie mogło się przewrócić lub zsunąć.
5.Sprawdź, czy regulator prędkości 4 jest ustawiony na „0”.
6.Podłącz wtyczkę sieciową do odpowiedniego gniazda sieciowego
(patrz "3. Dane techniczne" na stronie 19).
Urządzenie jest teraz gotowe do pracy.
6. Obsługa urządzenia
6.1 Montaż urządzenia
1.Uruchom dźwignię do zwolnienia blokady 6 i rozłóż w górę ramię napędowe 1.
Wskazówka: |
całkowicie |
przełóż |
|||
dźwignię |
do zwolnienia blokady |
6 |
|||
i przytrzymaj ją do momentu, aż ramię |
|||||
napędowe |
1 znajdzie |
się |
całkowicie |
||
u góry. Następnie z powrotem odchyl |
|||||
dźwignię do zwolnienia blokady 6. |
|
||||
2. Aby założyć |
miskę |
16, |
włóż |
ją |
|
w urządzenie podstawowe 7.
3.Zablokuj miskę, przekręcając ją nieco w kierunku przeciwnym do ruchu wskazówek zegara tak długo, aż zatrzaśnie się.
Uwaga!
Nie wolno nigdy użytkować miski 16 bez nasadzonej osłony przeciwbryzgowej 8. W przeciwnym przypadku miksowane produkty mogłyby się z niej wydostać.
4. Nasadź osłonę przeciwbryzgową 8 od dołu na ramię napędowe 1. Otwór do napełniania z klapką 9 powinien być skierowany w kierunku regulatora prędkości 4.
5.Lekko dociśnij osłonę przeciwbryzgową 8, aż zatrzaśnie się.
SKMP 1200 A2 |
23 |
RP100104-105590 Küchenmaschine LB4 Seite 24 Donnerstag, 12. Juni 2014 12:50 12
6.Wybierz odpowiednią nasadkę:
hak do ugniatania 13: do ciężkich ciast, np. ciasta na chleb;
trzepaczka 14: do ubijania śmietany, białek jajek itd.;
końcówka do mieszania 15: do średnio ciężkich i lekkich ciast, np. ciasta na wypieki lub ciasta naleśnikowego.
7. |
Nasadź |
nasadkę |
|
od |
dołu |
|
|
na odpowiedni |
uchwyt |
w ramieniu |
|||
|
napędowym 1. |
|
|
|
|
|
|
Upewnij się, że małe zabieraki |
|||||
|
znajdujące się na trzonie nasadki |
|||||
|
zostały |
wprowadzone |
w poprzeczną |
|||
|
szczelinę uchwytu. |
|
|
|
||
8. |
Lekko wciśnij |
nasadkę |
i przekręć ją |
|||
|
w kierunku ruchu wskazówek zegara do |
|||||
|
momentu, aż zatrzaśnie się. |
|
|
|||
9. |
Uruchom |
dźwignię do |
zwolnienia |
|||
|
blokady |
6 |
i złóż |
w dół |
ramię |
|
napędowe 1 do pozycji roboczej.
Wskazówka: całkowicie przełóż dźwignię do zwolnienia blokady 6 i przytrzymaj ją do momentu, aż ramię napędowe 1 znajdzie się całkowicie u dołu. Następnie z powrotem odchyl dźwignię do zwolnienia blokady 6.
Urządzenie jest teraz gotowe do pracy.
Nasadź pojemnik do miksowania 12:
Uwaga!
• Nie należy używać jednocześnie pojemnika do miksowania 12 i miski 16. Można w ten sposób przeciążyć urządzenie.
1.Wciśnij zwalniacz 3 osłony 2 w lewo.
2.Zdejmij osłonę 2.
3.Nasadź pojemnik do miksowania 12 w taki sposób, aby wypustka wskazywała na symbol otwartej kłódki.
4. Obróć pojemnik do miksowania 12 w kierunku ruchu wskazówek zegara, aż zatrzaśnie się. Wypustka wskazuje teraz na symbol zamkniętej kłódki.
6.2 Rozkładanie urządzenia
1.Uruchom dźwignię do zwolnienia blokady 6 i rozłóż w górę ramię napędowe 1.
Wskazówka: całkowicie przełóż dźwignię do zwolnienia blokady 6 i przytrzymaj ją do momentu, aż ramię napędowe 1 znajdzie się całkowicie u góry. Następnie z powrotem odchyl dźwignię do zwolnienia blokady 6.
2. Aby zdjąć nasadkę, delikatnie wciśnij ją i odblokuj, obracając ją lekko w kierunku przeciwnym do ruchu wskazówek zegara.
3.Wyjmij nasadkę.
4.Aby zdjąć osłonę przeciwbryzgową 8, wyciągnij ją do dołu. Najpierw pociągnij lekko w dół tylną część osłony przeciwbryzgowej 8.
5.Odblokuj miskę 16, przekręcając ją lekko w kierunku ruchu wskazówek zegara.
6.Zdejmij miskę 16.
7.Uruchom dźwignię do zwolnienia
blokady 6 i złóż w dół ramię napędowe 1 do pozycji roboczej.
24
RP100104-105590 Küchenmaschine LB4 Seite 25 Donnerstag, 12. Juni 2014 12:50 12
Wskazówka: |
całkowicie |
przełóż |
|
dźwignię |
do zwolnienia blokady 6 |
||
i przytrzymaj ją do momentu, aż ramię |
|||
napędowe |
1 znajdzie się |
całkowicie |
|
u dołu. Następnie |
z powrotem odchyl |
||
dźwignię do zwolnienia blokady 6. |
|||
Zdejmowanie pojemnika do miksowania 12:
1. Obróć pojemnik do miksowania 12 w kierunku przeciwnym do ruchu wskazówek zegara, tak aby wypustka wskazywała symbol otwartej kłódki.
2.Zdejmij pojemnik do miksowania 12.
3.Z powrotem nasadź osłonę 2.
6.3Użytkowanie osłony przeciwbryzgowej
Podczas mieszania można dodawać składniki:
1.Obniż prędkość do 1–2.
2.Rozłóż klapkę nad otworem do napełniania 9 w górę.
3.Włóż składniki.
4.Z powrotem zamknij klapkę nad otworem do napełniania 9.
6.4Użytkowanie pojemnika do miksowania 12
Uwaga!
•Nie należy nigdy uruchamiać miksera na dłużej niż 3 minuty bez przerwy. Po tym czasie powinien on z powrotem ochłodzić się, aby urządzenie nie przegrzało się.
1.Zawsze należy najpierw wlewać płynne, a dopiero potem dodawać składniki o stałej konsystencji do pojemnika do miksowania 12.
2.Składniki o stałej konsystencji należy najpierw drobno pokroić, aby kawałki nie zakleszczyły się w nożach.
3.Przed rozpoczęciem miksowania należy koniecznie nasadzić pokrywę 11 na pojemnik do miksowania 12, ponieważ w przeciwnym przypadku zawartość może się z niego wydostać.
4.Jeśli podczas miksowania zajdzie potrzeba dodania jeszcze jakiegoś składnika, należy otworzyć zamknięcie
pokrywy 10 w pokrywie 11 pojemnika do miksowania 12, przekręcając je w kierunku ruchu wskazówek zegara.
5.Wybierz żądaną prędkość na regulatorze prędkości 4.
Wskazówka: idealna prędkość zależy przede wszystkim od konsystencji miksowanych produktów. Im bardziej płynna zawartość, tym szybciej można miksować.
6.Ewentualnie można także wcisnąć
przycisk |
impulsowy 5. |
Miksowanie |
będzie odbywało się |
z maksymalną |
|
prędkością, |
dopóki |
przycisk |
impulsowy 5 nie zostanie zwolniony.
Wskazówka: przycisk impulsowy 5 działa tylko wtedy, gdy na regulatorze prędkości 4 ustawiono co najmniej poziom 1.
SKMP 1200 A2 |
25 |
RP100104-105590 Küchenmaschine LB4 Seite 26 Donnerstag, 12. Juni 2014 12:50 12
6.5 Regulacja prędkości, włączanie i wyłączanie
1. |
Włącz |
urządzenie, |
przekręcając |
|
w prawo regulator prędkości 4. |
||
2. |
Miksowanie i mieszanie |
rozpocznij |
|
|
z trochę niższą prędkością i zwiększ ją |
||
|
dopiero później. |
|
|
Wskazówka: przycisk impulsowy 5 działa tylko wtedy, gdy na regulatorze prędkości 4 ustawiono co najmniej poziom 1.
Zalecane prędkości
Prędkość |
Nasadka |
|
Opis |
1–2 |
Wszystkie |
- Ustawienie startowe we wszystkich procesach |
|
|
|
|
miksowania i mieszania. |
|
|
- Przy dodawaniu składników |
|
|
|
|
|
|
Hak do ugniatania 13 |
- |
Ugniatanie i mieszanie stałego ciasta lub stałych |
|
lub końcówka do |
|
składników |
|
mieszania 15 |
|
|
|
|
|
|
2–3 |
Końcówka do |
- Mieszanie gęstego ciasta na babkę |
|
|
mieszania 15 |
- Mieszanie masła i mąki |
|
|
|
- Mieszanie ciasta drożdżowego |
|
|
Hak do ugniatania 13 |
- Ugniatanie ciasta drożdżowego |
|
|
|
- Ugniatanie gęstego ciasta na babkę |
|
|
|
|
|
4–6 |
Końcówka do |
- Ciasto na wypieki |
|
|
mieszania 15 |
- Ucieranie masła z cukrem |
|
|
|
- |
Ciasto na ciastka |
7–10 |
Trzepaczka 14 |
- |
Bita śmietana |
|
|
- |
Białko jajka |
|
|
- Majonez |
|
|
|
- Ubijanie masła do kremowej konsystencji |
|
|
|
|
|
Przycisk |
Pojemnik do |
- Miksowanie i rozdrabnianie miękkich i płynnych |
|
impulsowy 5 |
miksowania 12 |
|
składników. |
|
|
- Aby przycisk impulsowy 5 działał, należy |
|
|
|
|
ustawić co najmniej poziom prędkości 1. |
|
|
|
|
Aby wyłączyć urządzenie, należy przekręcić regulator prędkości 4 do pozycji „0”.
6.6 Zabezpieczenie przed przegrzaniem
Urządzenie |
wyposażone |
jest |
w zabezpieczenie |
przed przegrzaniem. |
|
Jeśli silnik za bardzo się nagrzeje, urządzenie automatycznie wyłączy się:
1.Wyłącz urządzenie.
2.Wyjmij wtyczkę sieciową.
3.Zaczekaj, aż urządzenie ostygnie do temperatury pokojowej.
26

RP100104-105590 Küchenmaschine LB4 Seite 27 Donnerstag, 12. Juni 2014 12:50 12
7. Przepisy
7.1 Chleb pszenny
Sposób przygotowania:
1. Do miski 16 wsyp 300 g mąki.
Składniki:
•1 kg mąki pszennej typu 405 (mąka tortowa)
•4 łyżeczki soli
•4 opakowania suszonych drożdży (ok. 25–30 g)
•650 ml letniej wody
Sposób przygotowania:
1.Przełóż składniki do miski 16.
2.Załóż osłonę przeciwbryzgową 8 i hak do ugniatania 13.
3.Ugniataj ciasto przez 10 minut na poziomie 3.
4.Zdejmij miskę i przykryj ciasto.
5.Odstaw ciasto w ciepłym miejscu na 1–2 godziny, aby wyrosło.
6.Uformuj bochenek chleba lub przełóż ciasto do prostokątnej foremki.
7.Rozgrzej piekarnik do 220°C.
8.Piecz chleb na środkowym poziomie przez 35–40 minut.
7.2 Ciasto na pizzę
Wskazówka: ciasto na pizzę wychodzi bardzo dobrze, jeśli zostanie przygotowane co najmniej 24 godziny przed pieczeniem i odstawione do lodówki. Poniższy przepis pomoże uzyskać taką pizzę, jak w dobrej włoskiej restauracji.
Składniki na 4 osoby:
•500 g mąki typu 405
•300 ml wody z kranu
•maksymalnie 1/5 kostki drożdży do pieczenia
•20 g soli
2. Załóż osłonę przeciwbryzgową 8
i końcówkę do mieszania 15.
3.Ustaw poziom 2.
4.Powoli dolej 300 ml wody z kranu przez otwór do napełniania 9.
5.Dodaj drożdże do pieczenia.
6.Dodaj sól.
7.Mieszaj na poziomie 4–5 do uzyskania gładkiej masy.
8. Przykryj miskę |
i pozostaw |
ciasto |
w temperaturze |
pokojowej na |
około |
20 minut, aby wyrosło. |
|
|
9.Ponownie mieszaj ciasto przez ok. 3 minuty na poziomie 4.
10. Zdejmij końcówkę do mieszania 15 i załóż hak do ugniatania 13.
11.Ugniataj ciasto na poziomie 3.
12.Stopniowo dodawaj pozostałą mąkę przez otwór do napełniania 9.
Wskazówka: gdy ciasto na pizzę podczas ugniatania zacznie odchodzić od dna i utworzy kulę, ilość mąki jest wystarczająca.
13.Na koniec ugniataj ciasto jeszcze przez ok. 3 minuty na poziomie 2.
Wskazówka: ciasto na pizzę ma odpowiednią konsystencję, jeśli przez krótki czas zachowuje kulistą formę, ale po dłuższym czasie (po ok. 30 minutach) traci kształt i rozpływa się.
14.Ponownie odstaw ciasto na pizzę na 20 minut w przykrytej misce.
15.Zdejmij miskę i ułóż ciasto na stolnicy posypanej mąką.
16.Dobrze posyp powierzchnię ciasta mąką.
17. Krótko zagniataj ciasto, formując z niego kulę.
SKMP 1200 A2 |
27 |

RP100104-105590 Küchenmaschine LB4 Seite 28 Donnerstag, 12. Juni 2014 12:50 12
18. Przełóż kulę ciasta do zamykanego pojemnika i wstaw je do lodówki na
24 godziny.
19.Wyjmij ciasto z lodówki i z powrotem ułóż je na stolnicy posypanej mąką.
20.Dobrze posyp ciasto mąką i krótko zagniataj je, aby uformować ładną kulę.
21.Ciasto jest teraz gotowe i można stworzyć z niego teraz spody pod pizzę, na których należy ułożyć dodatki.
Wskazówki:
•drożdży nie trzeba koniecznie rozpuszczać wcześniej w wodzie.
•Dodaje się znacznie mniej drożdży, niż wskazuje na to informacja na opakowaniu. Należy dodać tylko tyle, ile według informacji na opakowaniu przeznaczone jest na ok. 200–250 g mąki.
•Jeśli w cieście na pizzę smak drożdży
jest wyraźnie wyczuwalny, należy zmniejszyć ich ilość. Obniżona ilość
drożdży |
zostanie |
z powrotem |
wyrównana |
poprzez |
długi czas |
wyrastania. |
|
|
•Sól morska sprawia, że ciasto jest bardziej aromatyczne.
•Bezpośrednio po dodaniu soli do ciasta jej smak powinien być najpierw delikatnie wyczuwalny. Jeśli ciasto ma wyraźny smak mąki lub drożdży, brakuje jeszcze trochę soli. Późniejsze dodanie reszty mąki powoduje ponowny zanik smaku soli.
•Nie należy ustawiać ciasta do
wyrośnięcia przy dodatkowym źródle
ciepła. |
W ten |
sposób |
można |
wprawdzie przyspieszyć proces, ale niestety ciasto traci walory smakowe.
•24-godzinny czas odpoczynku jest niezwykle ważnym etapem przygotowywania smacznego ciasta na pizzę.
• Przygotowane w ten sposób ciasto na pizzę można przechowywać w lodówce przez kilka dni.
7.3 Babka z owocami
Składniki:
•1 kubeczek jogurtu (150 ml)
•1 kubeczek oleju lub miękkie masło
(150 g)
•2 kubeczki cukru (300 g)
•3 kubeczki mąki (320 g)
•1 opakowanie proszku do pieczenia
•4 żółtka jajka
•4 białka jajka
•1 puszka owoców do smaku lub świeże owoce (ok. 500 g)
Sposób przygotowania:
1. Włóż białka do miski 16.
2. Załóż osłonę przeciwbryzgową 8 i trzepaczkę 14.
3.Ubijaj białka na sztywno na poziomie 9 przez 1–2 minuty.
4.Wyjmij pianę z miski i odstaw ją na bok.
5.Do miski wlej jogurt.
6. Wypłucz pusty kubeczek po jogurcie i używaj go do dalszego odmierzania składników. Można w tym celu wykorzystać również miarkę kuchenną.
7.Dodaj 1 kubeczek oleju (150 ml) lub miękkie masło (150 g).
8.Dodaj 2 kubeczki cukru (300 ml).
9.Dodaj 4 żółtka.
10.Mieszaj składniki na poziomie 6 lub 7 przez ok. 2 minuty do momentu uzyskania kremowej konsystencji.
11.Dodaj 3 kubeczki mąki (450 ml lub 320 g) i proszek do pieczenia.
12.Zdejmij trzepaczkę 14 i załóż końcówkę do mieszania 15.
13.Mieszaj składniki na poziomie 4 przez ok. 5 minut.
14.Zatrzymaj robot kuchenny.
28
 Loading...