Rockwell Automation 1770-SC User Manual

|
Installation Data |
|
Allen-Bradley |
|
Data Highway/Data Highway Plus |
|
Station Connector |
|
(Cat. No. 1770-SC) |
|
|
To the Installer |
This publication describes the Data Highway Station Connector and the installation |
|
procedures for connecting the station connector to a Data Highway or Data Highway |
|
Plus trunkline cable. |
|
The station connector simplifies Data Highway connections made between the |
|
trunkline and individual droplines, and protects the connections from the industrial |
|
environment. One station connector is required for each dropline. The Station |
|
connector replaces the 1770-XG Data Highway Cable Connector Kit. |
|
|
What the Station |
Each station connector includes the following: |
Connector Includes |
• Junction box with removable cover, and terminal block wired with the following: |
|
|
|
- 0.05 mfd 500V DC capacitor (terminals 4 and 5) |
|
- Jumper (terminals 7 and 9) |
|
- Ground wire (terminal 10) and earth ground wire with lug |
|
• Packet containing: |
|
-D-shell cable connector hood |
|
- 15-pin female connector |
|
- Packet of assembly hardware for the cable connector |
|
- Terminator resistor (150ohm, 1/4 watt) |
|
- Shrink tubing |
|
- Cable plug |
|
• A copy of this publication |
|
Be sure each station connector you receive has these parts. |
Wiring
Recommendations
Installing the
Station Connector
Dropline
Preparation
To make reliable connections, you should observe the following wiring recommendations:
•Use Twinaxial Cable (cat. no. 1770-CD, Belden 9463 or equivalent) for the trunkline and droplines.
•Be sure to connect the ground wire from the station connector to the earth ground.
•Route the twinaxial cable away from sources of electrical interference.
•Make trunkline connections to the upper side of the station connector; dropline and earth ground connections to the lower side.
By observing these recommendations and those in the Data Highway Cable Assembly and Installation Manual (publication 1770-6.2.1), you will reduce electrical noise interference which can be induced into the trunkline and droplines.
Use the following procedures to properly install each station connector. Read the entire section before performing the procedures.
1. Cut the dropline cable to your required length.
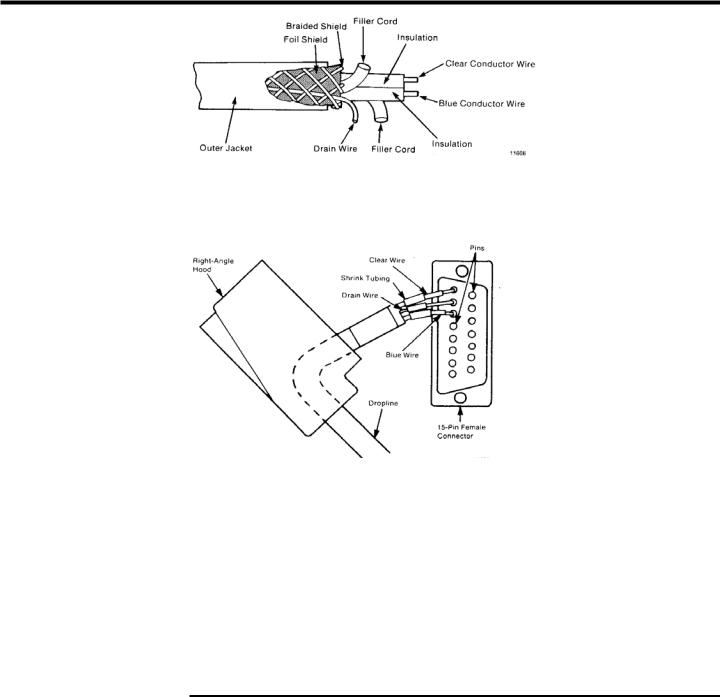
2. Prepare the dropline cable for assembly. First carefully remove about one inch of insulation, foil, braided shield, and filler cord from one end of the cable, freeing the shield drain wire, clear, and blue insulated wires. Strip about 1/8 inch of insulation from the ends of the insulated wires.
Publication 1770C-IN002A-EN-P — October 2006
Supersedes Publication 1770-2.20C — February, 1990

Data Highway/Data Highway Plus
Station Connector
Dropline Preparation
(continued)
3. Insert the prepared cable end through the circular hole in the hood of the D-shell connector. Insert about 1/2 inch of shrink tubing over the ends of the three conductors.
4.Solder the blue, clear, and drain wires into their corresponding connector pins in the back of the 15 pin female connector. Connect the blue wire to pin 6, drain wire to pin 7, and clear wire to pin 8.
5.Slide the shrink tubing forward over the soldered connections and shrink the tubing with a heat gun.
6.Assemble the 15-pin connector to the D-shell hood.
7.At the other end of the dropline cable, carefully remove about three inches of insulation, foil, braided shield, and filler cord, freeing the drain wire, clear and blue insulated wires. Strip about 1/4 inch of insulation from the ends of the insulated wires.
Trunkline Preparation 1. Remove the cover and the terminal blocks from the enclosure and mount the enclosure at the point where you want to add the dropline.
Important: Removing the terminal block allows you to make connections to the screw-clamp terminals more easily.
2.Cut the trunkline cable. Feed the incoming and outgoing trunkline cable through their respective cable clamps at the top of the enclosure.
3.Carefully remove about three inches of cable insulation, foil, braided shield, and filler cord, freeing the drain wire, clear and blue insulated wires. Strip about 1/4 inch of insulation from the ends of the insulated wires.
 Loading...