


PHKSU 710 A1

CIRCULAR SAW PHKSU 710 A1
CIRCULAR SAW
Translation of original operation manual
UNIVERZALNA ROČNA KROŽNA
ŽAGA
Prevod originalnega navodila za uporabo
UNIVERSAL-HANDKREISSÄGE
Originalbetriebsanleitung
IAN 90882
UNIVERZÁLIS KÉZI KÖRFŰRÉSZ
Az originál használati utasítás fordítása
RUČNÍ OKRUŽNÍ PILA
Překlad originálního provozního návodu

Before reading, unfold the page containing the illustrations and familiarise yourself with all functions of
the device.
Olvasás előtt kattintson az ábrát tartalmazó oldalra és végezetül ismerje meg a készülék mindegyik
funkcióját.
Pred branjem odprite stran s slikami in se nato seznanite z vsemi funkcijami naprave.
Před čtením si otevřete stranu s obrázky a potom se seznamte se všemi funkcemi přístroje.
Klappen Sie vor dem Lesen die Seite mit den Abbildungen aus und machen Sie sich anschließend mit allen
Funktionen des Gerätes vertraut.
GB Translation of original operation manual Page 1
HU Az originál használati utasítás fordítása Oldal 13
SI Prevod originalnega navodila za uporabo Stran 25
CZ Překlad originálního provozního návodu Strana 37
DE / AT / CH Originalbetriebsanleitung Seite 49
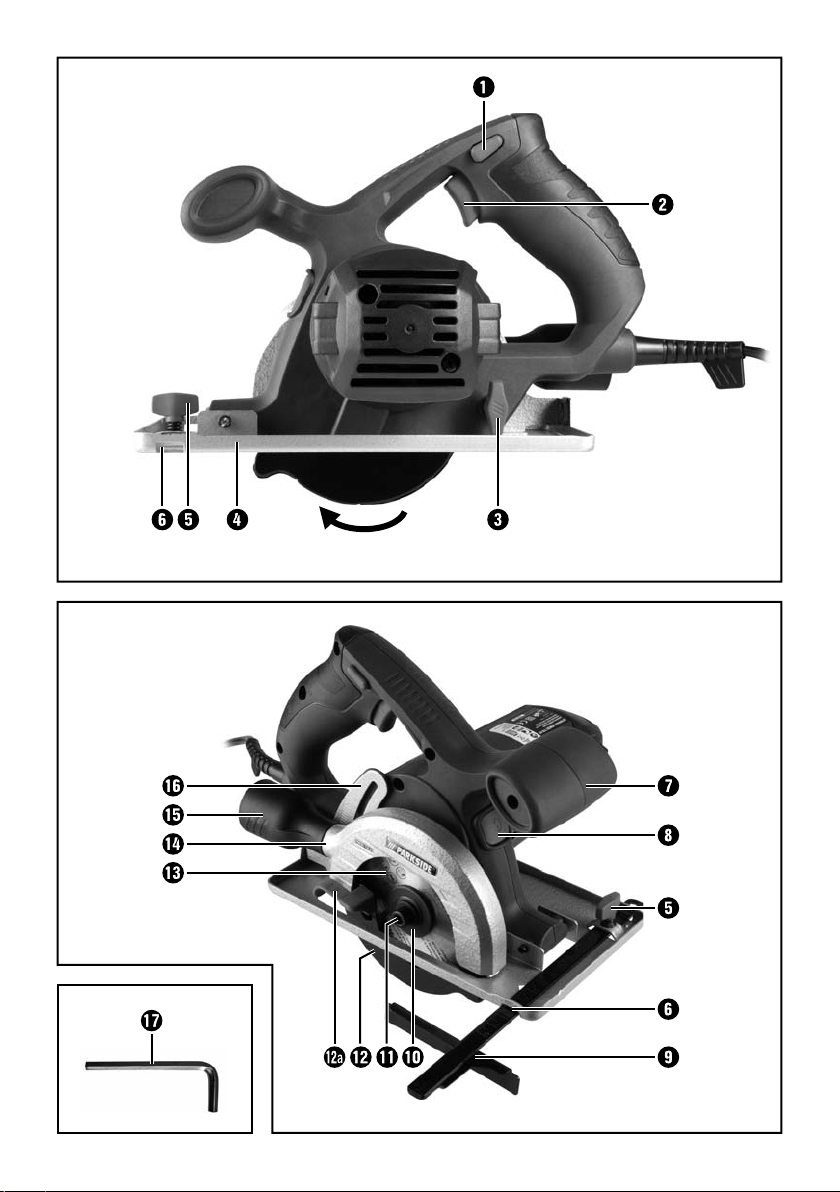

Table of Contents
Introduction . . . . . . . . . . . . . . . . . . . . . . . . . . . . . . . . . . . . . . . . . . . . . . . . . . . . . . 2
Proper use . . . . . . . . . . . . . . . . . . . . . . . . . . . . . . . . . . . . . . . . . . . . . . . . . . . . . . . . . . . . . . . . . 2
Depicted components . . . . . . . . . . . . . . . . . . . . . . . . . . . . . . . . . . . . . . . . . . . . . . . . . . . . . . . . . 2
Package contents . . . . . . . . . . . . . . . . . . . . . . . . . . . . . . . . . . . . . . . . . . . . . . . . . . . . . . . . . . . . 2
Technical details . . . . . . . . . . . . . . . . . . . . . . . . . . . . . . . . . . . . . . . . . . . . . . . . . . . . . . . . . . . . . 2
General Safety Instructions for Electric Tools . . . . . . . . . . . . . . . . . . . . . . . . . . . 3
1. Workplace safety . . . . . . . . . . . . . . . . . . . . . . . . . . . . . . . . . . . . . . . . . . . . . . . . . . . . . . . . . . 3
2. Electrical safety . . . . . . . . . . . . . . . . . . . . . . . . . . . . . . . . . . . . . . . . . . . . . . . . . . . . . . . . . . . 3
3. Personal safety . . . . . . . . . . . . . . . . . . . . . . . . . . . . . . . . . . . . . . . . . . . . . . . . . . . . . . . . . . . . 4
4. Use and handling of the electric tool . . . . . . . . . . . . . . . . . . . . . . . . . . . . . . . . . . . . . . . . . . . . . . .4
5. Service . . . . . . . . . . . . . . . . . . . . . . . . . . . . . . . . . . . . . . . . . . . . . . . . . . . . . . . . . . . . . . . . . . 4
Device-specifi c safety instructions for circular saws . . . . . . . . . . . . . . . . . . . . . . . . . . . . . . . . . . 5
Original accessories / additional equipment . . . . . . . . . . . . . . . . . . . . . . . . . . . . . . . . . . . . . . . 6
Initial Operation . . . . . . . . . . . . . . . . . . . . . . . . . . . . . . . . . . . . . . . . . . . . . . . . . . 6
Fitting / changing the saw blade . . . . . . . . . . . . . . . . . . . . . . . . . . . . . . . . . . . . . . . . . . . . . . . . 6
Fitting the guide fence . . . . . . . . . . . . . . . . . . . . . . . . . . . . . . . . . . . . . . . . . . . . . . . . . . . . . . . . 7
Connecting the sawdust extraction device . . . . . . . . . . . . . . . . . . . . . . . . . . . . . . . . . . . . . . . . . 7
Operation . . . . . . . . . . . . . . . . . . . . . . . . . . . . . . . . . . . . . . . . . . . . . . . . . . . . . . . 7
Switching on and off . . . . . . . . . . . . . . . . . . . . . . . . . . . . . . . . . . . . . . . . . . . . . . . . . . . . . . . . . 7
Setting the cutting depth . . . . . . . . . . . . . . . . . . . . . . . . . . . . . . . . . . . . . . . . . . . . . . . . . . . . . . . 7
Working with the circular saw . . . . . . . . . . . . . . . . . . . . . . . . . . . . . . . . . . . . . . . . . . . . . . . . . . 7
Tips and tricks . . . . . . . . . . . . . . . . . . . . . . . . . . . . . . . . . . . . . . . . . . . . . . . . . . . . . . . . . . . . . . . 8
GB
Maintenance and Cleaning . . . . . . . . . . . . . . . . . . . . . . . . . . . . . . . . . . . . . . . . . 8
Warranty and Service . . . . . . . . . . . . . . . . . . . . . . . . . . . . . . . . . . . . . . . . . . . . . 8
Importer . . . . . . . . . . . . . . . . . . . . . . . . . . . . . . . . . . . . . . . . . . . . . . . . . . . . . . . . 8
Disposal . . . . . . . . . . . . . . . . . . . . . . . . . . . . . . . . . . . . . . . . . . . . . . . . . . . . . . . . . 8
Declaration of Conformity / Manufacturer . . . . . . . . . . . . . . . . . . . . . . . . . . . . . 9
PHKSU 710 A1
1

CIRCULAR SAW PHKSU 710 A1
GB
Introduction
Congratulations on the purchase of your
new product. You have decided to
purchase a high-quality product.
The operating instructions are part of this product.
They contain important information on safety, use
and disposal. Before using the product, familiarise
yourself with all operating and safety instructions.
Use this device only as described and only for the
specifi ed areas of application. Please also pass these
operating instructions on to any future owner(s).
Proper use
The circular saw (hereinafter “device”) is designed
for longitudinal, cross and mitre cuts in fi rmly
supported solid wood, chip board, plastics and
lightweight construction materials. It is also for
sawing lightweight and non-ferrous metals such as
copper piping or aluminium profi le. Please note that
the pre-assembled saw blade with its fl at teeth and
alternating chamfer makes it possible to achieve
a rough sectional cut at high resistance levels.
Any other uses or modifi cations to the device are
deemed to be improper usage and may result in
serious physical injury. Not for commercial use.
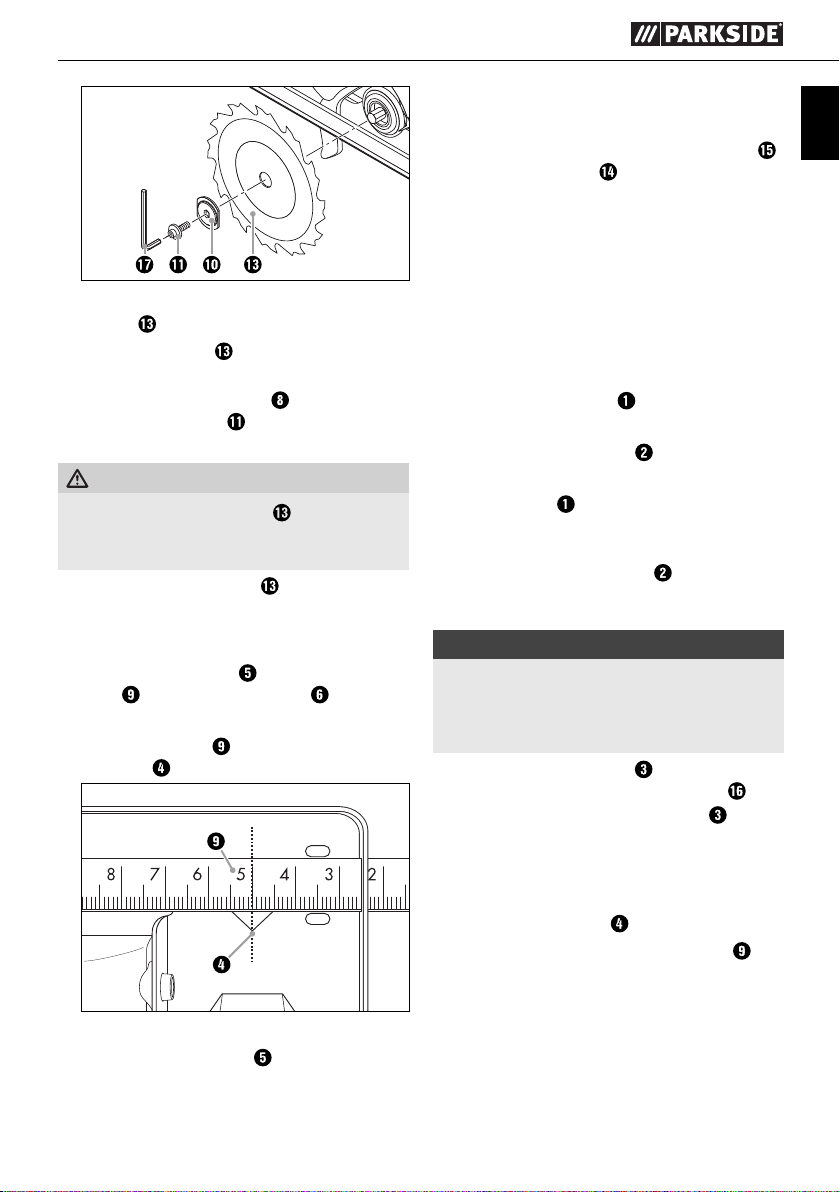
Depicted components
Safety lock-out
ON/OFF switch
Locking screw
Base plate
Wing screw
Guide fence slot
Auxiliary handle
Spindle lock button
Guide fence
Clamping fl ange
Clamping screw / plain washer
Lower blade guard
Release lever
Saw blade
Chip ejector
Vacuum adapter for dust extraction
Cutting depth scale
Allen key
Package contents
1 Circular saw
1 Guide fence
1 Vacuum adapter for dust extraction
1 Allen key
1 operating manual
Technical details
Nominal power input: 710 W
Rated voltage: 230 V ∼ 50 Hz
Idle speed: n
= 4.300 min
0
Saw blade: Ø 110 mm x 1.65 mm x
Ø 20 mm, 24 teeth
Max. cutting depth: Wood 35 mm, plastic
35mm, exclusively lightweight metal/non-ferrous
metal such as copper pipe
or aluminium profi le up to
max. 8 mm
Protection class: II /
Noise and vibration information:
Noise measurement determined in accordance
with EN 60745 The A-rated noise level of the
electric tool is typically:
Sound pressure level: 90.09 dB(A)
Sound power level: 101.09 dB(A)
Uncertainty K: 3 dB
Wear ear protection!
Evaluated acceleration, typically:
Hand/arm vibration a
Uncertainty K = 1.5 m/s
= 3.808 m/s
h
2
-1
2
2
PHKSU 710 A1

WARNING!
► The vibration level specifi ed in these instruc-
tions has been measured in accordance
with the standardised measuring procedure
specifi ed in EN 60745 and can be used to
make equipment comparisons. The specifi ed
vibration emission value can also be used to
make an initial exposure estimate. The vibration level varies in accordance with the use of
the electric tool and may be higher than the
value specifi ed in these instructions in some
cases. The vibration load could be underestimated if the electric tool is regularly used in
such a way.
NOTE
For an accurate estimate of the vibration
►
load during a certain working period, the
times during which the device is switched
off or is running but not actually being used
must also be taken into consideration. This
can signifi cantly reduce the vibration load
over the total working period.
General Safety Instruc-
tions for Electric Tools
WARNING!
► Please read all of the safety instructions.
Failure to follow the safety instructions listed
below can result in electric shock, fi re and/or
serious injuries.
Keep all safety instructions and other
instructions for future use.
The term “electric tool” used in the safety instructions
relates to mains-operated electric tools (with power
cable) and battery-operated electric tools (without
power cable).
1. Workplace safety
a) Keep your workplace clean and well-lit.
Untidy and poorly-lit working areas can lead
to accidents.
b) Do not work with the electric tool in potentially
explosive areas in which fl ammable liquids,
gases or dust are located. Electric tools produce
sparks which could ignite the dust or vapours.
c) Keep children and other persons a safe
distance away when using electric tools.
If you get distracted, you could lose control
over the device.
2. Electrical safety
a) The plug on the device must fi t into the mains
socket. The plug may not be altered in any
way. Do not use adapter plugs together with
earthed devices. Unmodifi ed plugs and suitable
wall sockets reduce the risk of electric shock.
b) Avoid bodily contact with earthed surfaces,
such as pipes, radiators, ovens and refrigerators. There is an increased risk of electric
shock if your body is earthed.
c) Keep electric tools away from rain and mois-
ture. If water or moisture penetrates an electric
tool the risk of electric shock increases.
d) Do not misuse the electrical cable, e.g. to carry
the device, hang it up or to pull the plug from
the socket. Keep the cable away from heat, oil,
sharp edges and moving device components.
Damaged or tangled cords and defective plugs
increase the risk of electric shock.
e) If you are working with an electric tool out-
doors, use only extension cables that are
also approved for use outdoors. The use of
an extension cord certifi ed for outdoor use
reduces the risk of electric shock.
f) If use of the electric tool in a humid environ-
ment is unavoidable, use a residual current
device (RCD). The use of a residual current
circuit-breaker system reduces the risk of electric
shock.
GB
PHKSU 710 A1
3

3. Personal safety
a) Be alert at all times, pay attention to what
GB
you are doing and act sensibly when you are
using an electric tool. Do not use an electric
tool if you are tired or under the infl uence of
drugs, alcohol or medication. Even a simple
lapse of attention while using an electrical hand
tool can lead to serious injuries.
b) Wear personal protection equipment, and
always wear a pair of protective goggles.
Wearing personal protective equipment, such
as a dust mask, non-slip safety shoes, protective
gloves, helmet or ear protectors (depending on
the type and use of the electric tool), reduces
the risk of injuries.
c) Avoid unintentional operation of the device.
Ensure that the electric tool is switched off
before connecting it to the power supply, picking it up or carrying it. Carrying the electric
tool with your fi nger on the ON/OFF switch or
connecting the device to the mains supply whilst
it is switched on can lead to serious accidents.
d) Remove any adjusting tools or spanners before
switching on the device. A tool or wrench
attached to a rotating device component can
cause serious injuries.
e) Avoid adopting an unusual posture. Ensure
you are standing fi rmly and keep your balance
at all times. This gives you much better control
over the electric tool, especially in unexpected
situations.
f) Wear suitable clothing. Do not wear loose
clothing or jewellery. Keep hair, clothing and
gloves away from moving parts. Loose cloth-
ing, jewellery and long hair can be caught in
moving parts.
g) If dust extraction and collecting equipment
can be fi tted, ensure that it is attached and
used properly. The use of an extraction system
can reduce hazards caused by dust.
4. Use and handling of the electric tool
a) Do not overload the device. Use the appropri-
ate electric tool for the job at hand. Using
the correct electric tool, will allow you to work
better and more safely within the specifi ed
performance range.
b) Never use an electric tool with a defective
switch. An electric tool that can no longer be
switched on or off is dangerous and must be
repaired.
c) Remove the plug from the socket before
making adjustments to the device, changing
accessories or putting the device into storage.
These precautionary measures prevent accidental starting of the device.
d) Store unused electric tools out of the reach
of children Do not allow persons who are not
familiar with the device or who have not read
these instructions to operate the device.
Electric tools are dangerous if used by people
who are inexperienced.
e) Look after electric tools with care. Check to
see whether moving parts are functioning correctly and are not jamming, whether parts are
broken or damaged and that the functioning
of the electric tool is not impaired. Arrange for
damaged components to be repaired before
using the device. Many accidents are caused by
poorly maintained electric tools.
f) Keep cutting tools sharp and clean. Care-
fully maintained cutting tools with sharp cutting
edges jam less often and are easier to control.
g) Use the electric tool, accessories, insertion
tools, etc. in accordance with these instructions. Take heed of the operating conditions
and the activities to be performed. The use
of electric tools for purposes other than their
intended purposes can result in dangerous
situations.
5. Service
a) Your electric tool should only be repaired
by qualifi ed specialists using original spare
parts. This ensures that your electric tool
remains safe.
4
PHKSU 710 A1

Device-specifi c safety instructions for
circular saws
Safety instructions for all saws
Sawing method
a) DANGER! Keeps your hands clear
of the sawing area and the saw
blade. Hold the auxiliary handle or
motor housing with your other hand. When
both hands are being used to hold the saw,
neither can be injured by the saw blade.
b) Do not grip the underside of the workpiece.
The blade guard cannot protect from the saw
blade underneath the workpiece.
c) Set the cutting depth to match the thickness
of the workpiece. The blade should not extend
more than one full tooth depth under the workpiece.
d) Never hold the workpiece to be sawn in your
hand or over your leg. Fasten the workpiece
on a stable working surface. It is important to
fasten the workpiece securely to minimise the
danger of bodily contact, jamming of the saw
blade or loss of control.
e) Hold the device by the insulated handles when
you are carrying out work during which the
cutting edge may come into contact with concealed power cables or the tool’s own power
cable. Contact with a live wire will cause the
metal parts of the tool to become live which can
lead to an electric shock.
f) When making longitudinal cuts, always use
a guide rail or a straight edge guide. This will
improve the accuracy of your cut and reduce the
likelihood of the saw blade jamming.
g) Always use saw blades of the correct size
and with an appropriate central fi xing bore
(e.g. star-shaped or round). Saw blades that
do not fi t the mounting components in the saw
will not run true and could lead to a loss of
control.
h) Never use damaged or incorrect saw blade
washers or screws. The saw blade washers
and screws have been specially designed to
provide optimum performance and operational
safety for your saw.
Further safety instructions for all saws
Kickback – causes and corresponding safety
instructions
▯ A kickback is a sudden reaction caused as a
result of the saw blade catching, jamming or
being falsely aligned that cause the saw to
jump up uncontrollably and out of the workpiece in the direction of the operator;
▯ if the saw blade catches or jams in a narrowing
saw cut, the blade can no longer rotate and the
power of the motor throws the device back in
the direction of the operator;
▯ if the saw blade twists in the saw cut or becomes
misaligned, the teeth at the rear edge of the saw
blade can become caught in the surface of the
workpiece causing the saw blade to jump out
of the cut and the saw to jump backwards in the
direction of the operator.
A kickback is caused by incorrect use or misuse of
the saw. It can be avoided by observing the following safety precautions.
a) Hold the saw fi rmly in both hands and position
your arms such that they can absorb the force
of a kickback. Always stand to the side of the
saw blade and never in line with it. If a kickback
occurs, the circular saw may jump backwards.
However, by using observing appropriate precautions, the operator can control the kickback
forces.
b) If the saw blade jams or you stop working,
switch the saw off and hold it steadily in the
workpiece until the saw blade has completely
stopped turning. Never attempt to remove the
saw from the workpiece or pull it backwards
while the saw blade is still moving as this
could lead to a kickback. Find out why the saw
blade has jammed and remove the problem.
c) If you want to restart a saw that is still in the
workpiece, centre the saw blade in the cut
and check to ensure that the teeth are not
caught anywhere in the workpiece. If the saw
blade catches it can jump backwards out of the
workpiece or cause a kickback when the saw
is restarted.
GB
PHKSU 710 A1
5

d) Support large panels or boards to reduce
GB
the risk of the saw blade jamming and causing a kickback. Large panels or boards can
bend under their own weight. Panels/boards
must be supported on both sides: both in the
vicinity of the saw cut and also at the edge.
e) Do not use damaged or blunt saw blades. Saw
blades with blunt or misaligned teeth may cause
excessive friction in the saw cut and cause a saw
blade jam and kickback.
f) Before sawing, ensure that the fastenings
for the cut depth and cut angle settings are
tightened. If the settings change during sawing,
the saw blade can jam and cause a kickback.
g) Be particularly careful when sawing in existing
walls or other obscured areas. The saw blade
could get caught on a hidden object and cause
a kickback.
Function of the lower blade guard
a) Before every use, check to ensure that the
lower blade guard closes properly. Do not
use the saw if the lower blade guard cannot
move freely and does not close itself immediately. Never jam or fasten the lower blade
guard open. If the saw accidentally falls to the
fl oor, the lower blade guard may be bent or
damaged. Open the blade guard using the
release lever and ensure that it moves freely
and does not touch the saw blade or other
parts at any cutting angles or depths.
b) Check that the spring for the lower blade
guard is functioning correctly. Have the device
serviced before using it if the lower blade
guard and spring are not working properly.
Damaged parts, sticky deposits or accumulations
of chippings can cause the lower blade guard
to operate to slowly.
c) Open the lower blade guard by hand only
for certain cuts such as plunge or angle cuts.
Use the release lever to open the lower blade
guard and let go of this as soon as the saw
blade penetrates the workpiece. During all
other types of sawing work, the lower blade
guard should function automatically.
d) Do not leave the saw on the work bench
or the fl oor if the lower blade guard is not
fully covering the saw blade. An unprotected,
still-spinning saw blade moves the saw in the
opposite direction to the cutting direction and
saws anything in its path. Always, take into
account that the saw blade takes some time to
stop spinning.
Supplementary notes
■ Do not use any grinding discs.
■ Use only saw blade with diameters correspond-
ing to the label on the saw.
■ When sawing wood or other materials which
may create dusts that are hazardous to health,
always connect a suitable, certifi ed vacuum
extractor device.
■ Wear a dust mask when sawing wood.
■ Use only the recommended saw blades.
■ Always wear ear protectors.
■ Do not allow the teeth of the saw blade to overheat.
■ When sawing plastic, avoid melting the plastic.
Original accessories / additional
equipment
■ Only use accessories and additional equipment
that are specifi ed in the operating instructions
and are compatible with the device.
Initial Operation
Fitting / changing the saw blade
Always pull out the plug from the mains before
changing the saw blade !
1. Set the cutting depth (using locking screw for
cutting depth scale
position, 0 mm.
2. Swing the lower blade guard
the release lever and put the device down.
3. Press the spindle lock button
and use the Allen key to release the clamping
screw/washer
screw/washer
(see also Fig. A).
) to the minimum
back using
(until it engages)
. Now remove the clamping
and the clamping fl ange
6
PHKSU 710 A1
Connecting the sawdust extraction
device
♦ Push the vacuum adapter for dust extraction
onto the chip ejector and turn it clockwise
to fi x it.
♦ Connect an approved dust and chip extraction
device.
GB
Fig. A: Changing the saw blade
4. Remove
5. Fitting a saw blade
reverse order.
6. Press the spindle lock button
and use the Allen key to tighten the clamping
screw/washer.
WARNING!
► The arrow on the saw blade must correspond
to the arrow showing the direction of rotation
(running direction shown on the device).
■ Ensure that the saw blade is suitable for the
rotational speed of the tool.
saw blade.
is carried out in the
(until it engages)
Fitting the guide fence
♦ Loosen the wing screw and insert the guide
fence
♦ Adjust the required cutting width using the scale
on the guide fence and the aperture in the
baseplate (see also Fig. B).
Fig. B: Cutting width 5 cm
♦ Retighten the wing screw .
into the guide fence slot .
Operation
Switching on and off
Switching on:
♦ Push the safety lock-out to the left or right
and keep it pressed.
♦ Press the ON/OFF switch .
♦ Once the saw is running you can release the
safety lock-out .
Switching off :
♦ Release the ON/OFF switch .
Setting the cutting depth
NOTE
We generally recommend setting the cutting
►
depth to approx. 3 mm more than the thickness
of the material. This ensures that you achieve a
clean cut.
♦ Release the locking screw , set the desired
cutting depth on the cutting depth scale
and then re-tighten the locking screw
Working with the circular saw
1. Switch on the device – as described in “Switching on and off ” – and then place it with the front
edge of the base plate on the material.
2. Align the machine using the guide fence
or by using a marked line.
3. Hold the machine in both hands using the
handles and saw by exerting an even pressure.
.
PHKSU 710 A1
7
Tips and tricks
GB
■ Avoid damaging the cutting edge of sensitive
materials, e.g. coated chip boards or doors,
by sticking masking tape along the cutting line.
Another benefi t of this is that it is easier to mark
a line on the tape than on a shiny surface. An
even more eff ective method of protecting the
cutting edges is to clamp a thin piece of wood
along the cutting line (this wood is also sawn).
Maintenance and Cleaning
WARNING! RISK OF INJURY! Switch
the device off and remove the power
plug before starting any work.
■ The device must always be clean, dry and free
from oil or grease.
■ To clean the casing, use a soft dry cloth.
WARNING!
■ If the connecting cable needs to be replaced,
this must be carried out by the manufacturer
or his representative in order to avoid hazardous situations.
Warranty and Service
The warranty provided for this device is 3years
from the date of purchase. This device has
been manufactured with care and inspected
meticulously prior to delivery. Please retain
your receipt as proof of purchase. In the event
of a warranty claim, please contact Customer
Service by telephone. This is the only way to
guarantee free return of your goods.
The warranty covers only claims for material and
manufacturing defects, not for transport damages,
worn parts or for damage to fragile components,
e.g. switches or batteries. This device is intended
solely for private use and not for commercial
purposes.
The warranty is deemed void if this product has
been subjected to improper or inappropriate handling, abuse or modifi cations that were not carried
out by one of our authorised service centres. Your
statutory rights are not restricted in any way by this
warranty.
The warranty period is not prolonged by repairs
made under the warranty. This also applies to
replaced and repaired parts. Damage and defects
present at the time of purchase must be reported
immediately after unpacking, or no later than two
days after the date of purchase. Repairs made
after expiry of the warranty period are chargeable.
Service Great Britain
Tel.: 0871 5000 720 (£ 0.10/Min.)
E-Mail: kompernass@lidl.co.uk
IAN 90882
Hotline availability:
Monday to Friday 08:00 - 20:00 (CET)
Importer
KOMPERNASS HANDELS GMBH
BURGSTRASSE 21
44867 BOCHUM
GERMANY
www.kompernass.com
Disposal
The packaging consists of environmentally
friendly material. It can be disposed of in
the local recycling containers.
Do not dispose of electric tools in
your normal domestic waste!
As required by European Directive 2002/96/EC,
worn-out electric tools must be collected separately
and fed into an environmentally compatible recycling process.
Your local communal or municipal authorities can
provide information on how to dispose of the wornout device.
8
PHKSU 710 A1

Declaration of Conformity /
Manufacturer
We, KOMPERNASS HANDELS GMBH, Custodian
of Documents: Mr. Semi Uguzlu, BURGSTR. 21,
44867 BOCHUM, GERMANY, hereby declare that
this product complies with the following standards,
normative documents and the EC directives:
Machinery Directive
(2006 / 42 / EC)
EU Low Voltage Regulations
(2006 / 95 / EC)
EMC (Electromagnetic Compatibility)
(2004 / 108 / EC)
RoHS Directive
(2011 / 65 / EU)
Related harmonised standards:
EN 60745-1:2009 + A11
EN 60745-2-5:2010
EN 55014-1:2006 + A1 + A2
EN 55014-2:1997 + A1 + A2
EN 61000-3-2:2006 + A1 + A2
EN 61000-3-3:2008
Type designation of machine:
Circular Saw PHKSU 710 A1
GB
Year of manufacture: 06 - 2013
Serial number: IAN 90882
Bochum, 30/06/2013
Semi Uguzlu
- Quality Manager -
Subject to technical changes in the course of
further developments.
PHKSU 710 A1
9

GB
10
PHKSU 710 A1

www.kompernass.com
£
£ 8,70
£ 5,70
Postage and packaging
+
PAYMENT METHOD
£
=
Bank Transfer
NAME OF ARTICLE COST P. UNIT TOTAL SUM
ORDER CARD PHKSU 710 A1
QUANTITY ORDERED
(max. 3 sets per order)
Saw blade set for PHKSU 710 A1 consisting of:
1 x universal saw blade Ø 110 mm +
1 x wood saw blade Ø 110 mm
(Location, Date) (Signature)
► Please affi x suffi cient postage to the letter.
► Write your name as the sender on the envelope.
IMPORTANT
1) Enter under “Sender/orderer”your name, address and telephone number (for possible
■ On your transfer, please provide the article(s) you ordered as well as your complete
name and address. Then post your completed order card to our postal address below.
Our postal address:
Sort Code: 40-62-01
Account No: 30453170
Kompernaß Handelsgesellschaft mbH
Burgstrasse 21
44867 Bochum
Germany
Account Name: Kompernass Handelsgesellschaft mbH
2) Please transfer the complete amount to our account below:
queries) in block capitals.
Commerzbank AG, London
ORDER CARD PHKSU 710 A1
Order also comfortable online at
www.kompernass.com
(Telephone)
(Post code, town)
(Street)
(Surname, fi rst name)
(please complete in block captals)
SENDER / ORDERER
www.kompernass.com

Tartalomjegyzék
Bevezető . . . . . . . . . . . . . . . . . . . . . . . . . . . . . . . . . . . . . . . . . . . . . . . . . . . . . . . 14
Rendeltetésszerű használat . . . . . . . . . . . . . . . . . . . . . . . . . . . . . . . . . . . . . . . . . . . . . . . . . . . 14
Ábrázolt összetevők . . . . . . . . . . . . . . . . . . . . . . . . . . . . . . . . . . . . . . . . . . . . . . . . . . . . . . . . . 14
A csomag tartalma . . . . . . . . . . . . . . . . . . . . . . . . . . . . . . . . . . . . . . . . . . . . . . . . . . . . . . . . . . 14
Műszaki adatok . . . . . . . . . . . . . . . . . . . . . . . . . . . . . . . . . . . . . . . . . . . . . . . . . . . . . . . . . . . . 14
Általános biztonsági utasítások elektromos kéziszerszámokhoz . . . . . . . . . 15
1. Munkahelyi biztonság . . . . . . . . . . . . . . . . . . . . . . . . . . . . . . . . . . . . . . . . . . . . . . . . . . . . . 15
2. Elektromos biztonság . . . . . . . . . . . . . . . . . . . . . . . . . . . . . . . . . . . . . . . . . . . . . . . . . . . . . . 15
3. Személyi biztonság . . . . . . . . . . . . . . . . . . . . . . . . . . . . . . . . . . . . . . . . . . . . . . . . . . . . . . . 16
4. Az elektromos kéziszerszám használata és kezelése . . . . . . . . . . . . . . . . . . . . . . . . . . . . . 16
5. Szerviz . . . . . . . . . . . . . . . . . . . . . . . . . . . . . . . . . . . . . . . . . . . . . . . . . . . . . . . . . . . . . . . . . 17
Kézi körfűrész készülékspecifi kus biztonsági utasítása . . . . . . . . . . . . . . . . . . . . . . . . . . . . . . . 17
Eredeti tartozék / eredeti kiegészítő készülékek . . . . . . . . . . . . . . . . . . . . . . . . . . . . . . . . . . . . 18
Üzembevétel . . . . . . . . . . . . . . . . . . . . . . . . . . . . . . . . . . . . . . . . . . . . . . . . . . . . 19
Fűrészlap szerelése / cseréje . . . . . . . . . . . . . . . . . . . . . . . . . . . . . . . . . . . . . . . . . . . . . . . . . . 19
Párhuzamos ütköző szerelése/beállítása . . . . . . . . . . . . . . . . . . . . . . . . . . . . . . . . . . . . . . . . . 19
Forgácselszívó csatlakoztatása . . . . . . . . . . . . . . . . . . . . . . . . . . . . . . . . . . . . . . . . . . . . . . . . 19
Kezelés . . . . . . . . . . . . . . . . . . . . . . . . . . . . . . . . . . . . . . . . . . . . . . . . . . . . . . . . 19
Be- és kikapcsolás . . . . . . . . . . . . . . . . . . . . . . . . . . . . . . . . . . . . . . . . . . . . . . . . . . . . . . . . . . 19
Vágásmélység beállítása . . . . . . . . . . . . . . . . . . . . . . . . . . . . . . . . . . . . . . . . . . . . . . . . . . . . . 20
A kézi körfűrész kezelése . . . . . . . . . . . . . . . . . . . . . . . . . . . . . . . . . . . . . . . . . . . . . . . . . . . . . 20
Ötletek és fogások . . . . . . . . . . . . . . . . . . . . . . . . . . . . . . . . . . . . . . . . . . . . . . . . . . . . . . . . . . 20
HU
Karbantartás és tisztítás . . . . . . . . . . . . . . . . . . . . . . . . . . . . . . . . . . . . . . . . . .20
Garancia és szerviz . . . . . . . . . . . . . . . . . . . . . . . . . . . . . . . . . . . . . . . . . . . . . . 20
Gyártja . . . . . . . . . . . . . . . . . . . . . . . . . . . . . . . . . . . . . . . . . . . . . . . . . . . . . . . . 20
Ártalmatlanítás . . . . . . . . . . . . . . . . . . . . . . . . . . . . . . . . . . . . . . . . . . . . . . . . . . 21
Megfelelőségi nyilatkozat /Gyártó . . . . . . . . . . . . . . . . . . . . . . . . . . . . . . . . . . 21
PHKSU 710 A1
13
UNIVERZÁLIS KÉZI KÖRFŰRÉSZ
PHKSU 710 A1
Bevezető
Gratulálunk új készüléke megvásárlásához!
HU
Vásárlásával kiváló minőségű termék mellett
döntött. A használati utasítás a termék
része. Fontos tudnivalókat tartalmaz a biztonságra,
használatra és ártalmatlanításra vonatkozóan. A
termék használata előtt ismerkedjen meg valamenynyi használati és biztonsági utasítással. Csak a
leírtak szerint és a megadott célokra használja a
készüléket. A készülék harmadik személynek történő
továbbadásakor adja a készülékhez valamennyi
leírást is.
Rendeltetésszerű használat
Az univerzális kézi körfűrész (a továbbiakban:
„készülék“) tömör fában, faforgácslemezben,
műanyag és könnyűszerkezetű anyagban szilárd
alátámasztás esetén hosszanti és keresztvágásra,
gérvágásra készült. Emellett könnyűfémek és
színesfémek, így rézcsövek, ill. alumíniumprofi lok
fűrészelésére is alkalmas. Vegye fi gyelembe, hogy
az előre szerelt laposfogú, váltakozóan rézsútos
metszésű fűrészlap durva vágásképet tesz lehetővé
nagy ellenállóerő mellett. Minden egyéb felhasználási mód vagy a gép megváltoztatása rendeltetésellenesnek minősül és jelentős balesetveszélyt rejt
magában. A gép nem üzleti használatra készült.
Ábrázolt összetevők
bekapcsolási zár
BE/KI kapcsoló
rögzítőcsavar
alaplemez
szárnyascsavar
párhuzamos ütköző fogadó
pótfogantyú
orsórögzítés
párhuzamos ütköző
befogóperem
szorítócsavar / alátét
alsó védőbúra
visszahúzó kar
fűrészlap
forgácskivető
adapter porelszíváshoz
vágásmélység skála
imbuszkulcs
A csomag tartalma
1 univerzális kézi körfűrész
1 párhuzamos ütköző
1 adapter porelszíváshoz
1 imbuszkulcs
1 üzemeltetési útmutató
Műszaki adatok
Névleges
teljesítményfelvétel: 710 W
Névleges feszültség: 230 V ∼ 50 Hz
Üresjárati fordulatszám: n
4.300 min
0
Fűrészlap: Ø 110 mm x 1,65 mm x
Ø 20 mm, 24 fog
Max. vágásmélység: fa 35 mm, műanyag 35 mm,
max. 8 mm-ig kizárólag
színesfém / könnyűfém, így
rézcső ill. alumíniumprofi l
Védelmi osztály: II /
Zaj- és rezgésinformációk:
A zaj mérési értékét az EN 60745 szerint határoztuk meg. Az elektromos kéziszerszám A-súlyozott
zajszintjének jellemző értéke:
Hangnyomásszint: 90,09 dB(A)
Zajszint: 101,09 dB(A)
Bizonytalansági érték K: 3 dB
Fülvédő viselése kötelező!
Kiértékelt gyorsulás, jellemzően:
Kéz / kar vibráció a
= 3,808 m/s
h
Bizonytalansági érték K = 1,5 m/s
-1
2
2
14
PHKSU 710 A1
FIGYELMEZTETÉS!
► Az ezekben az útmutatókban megadott zaj-
szint mérése az EN 60745 szerint szabványos
mérési eljárással történt és az felhasználható
a készülék összehasonlítására. A megadott
rezgés kibocsátási érték a kihagyás bevezető
megbecsüléséhez is felhasználható. A rezgésszint az elektromos kéziszerszám alkalmazásától függően változik és az egyes esetekben
az ezekben az útmutatókban megadott érték
felett lehet. A rezgésterhelés alulbecsülhető
lehetne, ha az elektromos kéziszerszám rendszeresen ilyen módon van használatban.
TUDNIVALÓ
A rezgésterhelés adott munkaidőszakon belüli
►
pontos becsléséhez azokat az időket is fi gyelembe kell venni, amelyekben a készülék ki
van kapcsolva, vagy bár forog, de ténylegesen nincs használatban. Ez a teljes munkaidőtartamra nézve jelentősen csökkentheti a
rezgésterhelést.
Általános biztonsági
utasítások elektromos
kéziszerszámokhoz
FIGYELMEZTETÉS!
► Olvassa el asz összes biztonsági útmutatót és
utasítást. A biztonsági utasítások betartásának mulasztásai elektromos áramütést, tüzet
és / vagy súlyos sérüléseket okozhatnak.
Őrizze meg az összes biztonsági útmutatót
és utasítást későbbi használatra.
A biztonsági utasításokban felhasznált „elektromos
kéziszerszám“ fogalma hálózatról (hálózati kábelen
át) üzemeltetett elektromos kéziszerszámokra és akkumulátoros elektromos kéziszerszámokra (hálózati
kábel nélkül) vonatkozik.
1. Munkahelyi biztonság
a) Tartsa tisztán és jól megvilágítva a munkate-
rületét. A rendetlenség és a rosszul megvilágított
munkaterület balesetet okozhat.
b) Ne dolgozzon a készülékkel olyan robba-
násveszélyes környezetben, ahol gyúlékony
folyadékok, gázok vagy porok vannak. Az
elektromos kéziszerszámok szikrát szórnak,
melyek meggyújthatják a port vagy gőzöket.
c) Az elektromos kéziszerszám használata
közben tartsa távol a gyermekeket és más
személyeket. Ha valami eltereli a fi gyelmét,
elvesztheti az uralmát a készülék felett.
2. Elektromos biztonság
a) A készülék csatlakozódugaszának illenie kell a
dugaszaljzatba. A dugaszt semmilyen módon
nem szabad megváltoztatni. Ne használjon
adapterdugaszt a védőföldelt elektromos kéziszerszámmal együtt. Ha nem változtatja meg
a dugaszt és a dugaszaljzatot, ezzel csökkenti
az elektromos áramütés veszélyét.
b) Kerülje a testi érintkezést az olyan földelt fe-
lületekkel, mint például csövek, fűtés, tűzhely
vagy hűtőszekrény felületével. Ha az Ön teste
földelve van, nagyobb a kockázata az elektromos áramütésnek.
c) Óvja az elektromos kéziszerszámot esőtől
vagy nedves környezettől. Megnöveli az elektromos áramütés kockázatát, ha víz hatol be az
elektromos készülékbe.
d) Ne használja a vezetéket rendeltetésellenes
célra, például arra, hogy azt megfogva vigye
a készüléket, hogy felakassza rá vagy hogy
annál fogva húzza ki a dugaszt a dugaszaljzatból. Tartsa távol a vezetéket hőtől, olajtól,
éles szegélyektől vagy mozgó készülékrészektől. A sérült vagy összecsavarodott vezeték
megnöveli az elektromos áramütés kockázatát.
e) Ha a szabadban dolgozik az elektromos
kéziszerszámmal, akkor csak olyan
hosszabbítókábelt használjon, ami kültérre
is engedélyezett. A kültérre engedélyezett
hosszabbítókábel alkalmazása csökkenti az
elektromos áramütés veszélyének kockázatát.
f) Ha az elektromos kéziszerszám üzemelte-
tése párás környezetben nem kerülhető el,
használjon hibaáram-védőkapcsolót. A hiba-
áram-védőkapcsoló alkalmazása csökkenti az
elektromos áramütés veszélyének kockázatát.
HU
PHKSU 710 A1
15

3. Személyi biztonság
a) Legyen mindig fi gyelmes, fi gyeljen arra, amit
tesz és hozzáértéssel végezze a munkát az
elektromos kéziszerszámmal. Ne használjon
HU
elektromos kéziszerszámot, ha fáradt, vagy
ha kábítószer, alkohol vagy gyógyszer befolyása alatt van. Az elektromos kéziszerszám
használatakor már egy pillanatnyi fi gyelmetlenség is komoly sérüléseket okozhat.
b) Viseljen személyes védőfelszerelést és mindig
vegyen fel védőszemüveget. A személyes
védőfelszerelés, mint a pormaszk, csúszásmentes biztonsági cipő, védősisak vagy fülvédő
viselése az elektromos kéziszerszám jellegétől
alkalmazásától függően csökkenti a balesetek
kockázatát.
c) Kerülje el a készülék véletlen bekapcsolását.
Győződjön meg arról, hogy az elektromos
kéziszerszám ki van kapcsolva, mielőtt azt az
áramellátásra csatlakoztatja, felveszi vagy
viszi. Balesetet okozhat, ha a készülék hordozá-
sa közben az ujja a KI/BE kapcsolón van rajta
vagy a készülék már bekapcsolt állapotban
van, amikor csatlakoztatja az áramellátásra.
d) Távolítsa el a beállító szerszámokat vagy csa-
varkulcsokat, mielőtt bekapcsolná a készüléket. A készülék forgó részébe kerülő szerszám
vagy kulcs sérülést okozhat.
e) Kerülje a normálistól eltérő testtartást.
Gondoskodjon arról, hogy biztosan álljon
és mindig tartsa az egyensúlyát. Ily módon
váratlan helyzetekben is jobban úrrá tud lenni
a készüléken.
f) Viseljen alkalmas ruházatot. Ne viseljen bő
ruházatot vagy ékszert. Tartsa távol a haját,
ruháját és kesztyűjét a mozgó részektől.
A mozgó részek beránthatják a laza, nem testre
simuló ruházatot, ékszert vagy hosszú hajat.
g) Amennyiben felszerelhető porelszívó és felfogó
berendezés, akkor győződjön meg arról,
hogy az csatlakoztatva van és használata
helyesen történik. A porelszívó alkalmazása
csökkentheti a por általi veszélyeztetést.
4. Az elektromos kéziszerszám
használata és kezelése
a) Ne terhelje túl a készüléket. A munkájának
megfelelő elektromos kéziszerszámot használja. A megfelelő elektromos kéziszerszámmal
jobban és biztonságosabban tud dolgozni az
adott területen.
b) Ne használjon olyan villamos szerszámot,
amelyiknek hibás a kapcsolója. A nem be- és
kikapcsolható elektromos kéziszerszám veszélyes és meg kell javíttatni.
c) Húzza ki a dugaszt a dugaszaljzatból, mielőtt
módosítaná a készülék beállításait, cserélné
a tartozékokat vagy eltenné a készüléket.
Ezzel az óvintézkedéssel megakadályozható
a készülék véletlenszerű bekapcsolása.
d) A nem használt elektromos kéziszerszámot
gyermekektől távol tárolja. Ne engedje, hogy
olyan személyek használják a készüléket,
akik nem ismerik a használatát, vagy nem
olvasták el a használati útmutatóját. Az
elektromos szerszámok veszélyt jelenthetnek, ha
tapasztalatlan személyek használják őket.
e) Gondosan ápolja az elektromos kéziszer-
számokat. Ellenőrizze, hogy a mozgó részek
tökéletesen működnek-e és nincsenek-e beszorulva, egyes részek nincsenek-e letörve vagy
olyannyira megsérülve, hogy az befolyásolná
a készülék működését. A készülék használata előtt javíttassa meg a sérült részeket. A
rosszul karbantartott elektromos kéziszerszám
sok baleset okozója.
f) A vágószerszámokat élesen és tisztán tartsa.
A gondosan ápolt éles vágóélű vágószerszámok kevésbé ragadnak be és könnyebben
irányíthatóak.
g) Az elektromos kéziszerszámot, a tartozéko-
kat, az alkalmazott szerszámokat stb. ezen
útmutató szerint használja. Vegye eközben
fi gyelembe a munkafeltételeket és az elvégzendő tevékenységet. Az elektromos kéziszer-
számok az előirányzottól eltérő használata
veszélyes helyzeteket teremthet.
16
PHKSU 710 A1
5. Szerviz
a) Az elektromos kéziszerszámot csak szakkép-
zett szakemberrel és csak eredeti alkatrészekkel javíttassa. Ezzel garantálható a készülék
hosszan tartó biztonsága.
Kézi körfűrész készülékspecifi kus
biztonsági utasítása
Biztonsági utasítás minden fűrészre
Fűrészelési művelet
a) VESZÉLY! Ne nyúljon bele kezével a
fűrészelő részbe és a fűrészlaphoz.
Másik kezével tartsa a pótfogantyút
vagy a motorházat. Ha mindkét kezével fogja
a fűrészt, akkor a fűrészlap nem sértheti meg a
kezét.
b) Ne nyúljon a munkadarab alá. A védőbúra
nem képes Önt a munkadarab alatt a fűrészlaptól megóvni.
c) A vágásmélységet illessze a munkadarab
vastagságához. Kevesebb mint egy teljes fogmagasság legyen látható a munkadarab alatt.
d) Sohasem tartsa kezében, vagy lába fölött
a fűrészelendő munkadarabot. Biztosítsa a
munkadarabot stabil befogással. Fontos, hogy a
munkadarabot gondosan rögzítse, nehogy hozzáérjen a testéhez, nehogy beszoruljon a fűrlszlap,
vagy hogy ne veszítse el uralmát a gép felett.
e) Az elektromos kéziszerszámot csak a szigetelt
fogófelületeknél fogja meg, ha olyan munkát
végez, ahol az alkalmazott szerszám rejtett
áramvezetéket vagy saját hálózati kábelt
találhatja el. A feszültség alatt álló vezetékkel
való kapcsolat az elektromos kéziszerszám fémrészeit is feszültség alá helyezi és elektromos
áramütéshez vezet.
f) A hosszanti vágásnál mindig alkalmazzon
ütközőt vagy egyenes élvezetőt. Ez növeli
a vágáspontosságot és csökkenti a fűrészlap
beszorulásának lehetőségét.
g) Mindig megfelelő méretű fűrészlapot használ-
jon alkalmas befogófurattal (pl. csillag vagy
kerek alakút). Ha a fűrészlap nem illik a fűrész
szerelési elemeihez, akkor egyenetlenül forog
és Ön elveszítheti uralmát a gép felett.
h) Sohase használjon sérült vagy hibás fűrész-
lap-alátétet vagy -csavart. A fűrészlap-alátétet
és -csavart speciálisan az Ön fűrészéhez tervezték az optimális teljesítmény és üzembiztonság
elérésére érdekében.
HU
További biztonsági utasítások minden fűrészre
Visszacsapódás - okok és megfelelő biztonsági
utasítások
▯ A visszacsapódás hirtelen reakció beakadt,
beszorult vagy hibásan beállított fűrészlap
miatt, aminek következtében az elszabadult
fűrész felemelkedik és a munkadarabból kifelé,
a kezelőszemély irányába mozog;
▯ ha a fűrészlap a záródó fűrésznyomba beakad
vagy beszorul, blokkolja azt és a motor ereje a
készüléket a kezelőszemély irányába visszaüti;
▯ ha a fűrészlap a fűrésznyomban megcsavarodik
vagy hibás lesz a beállítása, akkor a hátsó
fűrészlapél fogai beakadnak a munkadarab
felületébe, így a fűrészlap kijön a fűrésznyomból és a fűrész a kezelőszemély irányába
visszaugrik.
A visszacsapódás a fűrész téves vagy hibás használatának a következménye. A következőkben leírt
alkalmas elővigyázatossági intézkedésekkel a
visszacsapódás elkerülhető.
a) Tartsa szorosan a fűrészt mindkét kezével és
olyan helyzetben tartsa karját, amivel a viszszacsapó erőket fel tudja fogni. Mindig oldalt
álljon a fűrészlaphoz képest, sohasem vigye
a fűrészlapot egy vonalba testével. Visszacsa-
pódás esetén a körfűrész visszafelé ugorhat, de
a kezelőszemély megfelelő óvintézkedésekkel
uralhatja a visszacsapó erőket.
b) Ha a fűrészlap beszorul, vagy Ön megsza-
kítja a munkát, akkor kapcsolja ki a fűrészt
és tartsa meg nyugodtan az anyagban, amíg
a fűrészlap nyugalmi állapotba nem kerül.
Sohasem kísérelje meg a fűrész eltávolítását
a munkadarabból, vagy annak visszafelé
húzását, amíg a fűrészlap mozog, különben
visszacsapódás léphet fel. Keresse meg a fűrész-
lap beszorulásának okát, majd szüntesse meg.
PHKSU 710 A1
17
 Loading...