


COMBINATION CUTTER PSFS 250 A1
COMBINATION CUTTER |
KOMBI MARÓ |
|||
Operation and Safety Notes |
Kezelési és biztonsági utalások |
|||
Translation |
of original operation manual |
Az originál használati utasítás fordítása |
||
KOMBINOVANÁ FRÉZA |
KOMBINOVANÁ FRÉZA |
|||
Pokyny pro obsluhu a bezpečnostní pokyny |
Pokyny pre obsluhu a bezpečnostné pokyny |
|||
Překlad |
originálního provozního návodu |
Preklad |
originálneho návodu na obsluhu |
|
KOMBI-FRÄSER
Bedienungs - und Sicherheitshinweise
Originalbetriebsanleitung
IAN 102813

Before reading, unfold the page containing the illustrations and familiarise yourself with all functions of the device.
Olvasás előtt kattintson az ábrát tartalmazó oldalra és végezetül ismerje meg a készülék mindegyik funkcióját.
Před čtením si otevřete stranu s obrázky a potom se seznamte se všemi funkcemi přístroje.
Pred čítaním si odklopte stranu s obrázkami a potom sa oboznámte so všetkými funkciami prístroja.
Klappen Sie vor dem Lesen die Seite mit den Abbildungen aus und machen Sie sich anschließend mit allen Funktionen des Gerätes vertraut.
GB |
Operation and Safety Notes |
Page |
5 |
HU |
Kezelési és biztonsági utalások |
Oldal |
13 |
CZ |
Pokyny pro obsluhu a bezpečnostní pokyny |
Strana |
23 |
SK |
Pokyny pre obsluhu a bezpečnostné pokyny |
Strana |
31 |
DE / AT / CH |
Bedienungsund Sicherheitshinweise |
Seite |
41 |

13 |
|
1 |
|
2 |
|
3 |
|
|
|
|
|
|
|
|
|
12
|
4 |
12 |
|
11 |
5 |
10 |
|
9 |
6 |
8 
 7
7
A 

4
D 
 19
19 
 14
14 
 15
15
18
|
17 |
|
|
16 |
|
|
G

B |
2 |
E |
5 |
H |
8 |
10 |
C |
|
11 |
|
10 |
|
7 |
|
F |
|
13 |
|
I |
|
|
19 |

Table of contents
Introduction |
|
|
Intended use........................................................................................................................................ |
Page |
6 |
Features................................................................................................................................................ |
Page |
6 |
Scope of delivery................................................................................................................................ |
Page |
6 |
Technical Data..................................................................................................................................... |
Page |
6 |
General power tool safety warnings |
|
|
1. Work area safety............................................................................................................................ |
Page |
7 |
2. Electrical safety............................................................................................................................... |
Page |
7 |
3. Personal safety................................................................................................................................ |
Page |
7 |
4. Power tool use and care................................................................................................................ |
Page |
8 |
5. Service............................................................................................................................................. |
Page |
8 |
Additional safety information for grinders and polishers.................. |
Page |
8 |
Additional safety information for routers......................................................... |
Page |
8 |
Operation |
|
|
Switching ON / OFF........................................................................................................................... |
Page |
9 |
Setting the speed................................................................................................................................ |
Page |
9 |
Changing tools.................................................................................................................................... |
Page |
9 |
Installing sanding belts....................................................................................................................... |
Page |
9 |
Setting the working depth.................................................................................................................. |
Page |
9 |
Milling direction for edges................................................................................................................. |
Page |
10 |
Plunge cutting...................................................................................................................................... |
Page 10 |
|
Pivot handle......................................................................................................................................... |
Page 10 |
|
Using the rip fence.............................................................................................................................. |
Page 10 |
|
Cutting circles...................................................................................................................................... |
Page |
10 |
Dust extraction..................................................................................................................................... |
Page |
11 |
Continuous tool operation.................................................................................................................. |
Page |
11 |
Maintenance and Cleaning.............................................................................................. |
Page 11 |
|
Service............................................................................................................................................... |
Page 11 |
|
Warranty......................................................................................................................................... |
Page 11 |
|
Disposal............................................................................................................................................ |
Page 11 |
|
Translation of the original declaration of conformity / |
|
|
Manufacturer............................................................................................................................... |
Page 12 |
|
GB 5

Introduction
Combination Cutter PSFS 250 A1
Introduction
Congratulations on your new product. You have selected a high quality product. The instructions for use are a part of this product. They contain important information about safety, use and disposal. Before using the product, please familiarise yourself with all the operating and safety instructions. Only use the product as described and for the indicated purpose. When passing this product on to others please be sure to also include all of its documentation.
Intended use
This device - used with the recommended tools and accessories - is designed to deal with materials such as wood, plastic, fibre boards, wall tiles aluminium and iron sheets. It is also suitable for grinding using various cylindrical grinders and for milling using milling bits with a shank diameter of 4.8 mm. Any other use or modifying the device is considered improper use and involves considerable accident risks. The manufacturer is not liable for damage caused by improper use. Not intended for commercial use.
Features
1Locking switch
2Variable speed control
3Mains lead
4ON / OFF switch
5Wing setscrew
6Dust extraction nozzle
7Base plate
8Collet
9Wing bolt (base plate) 10 Clamping nut
11 Spindle lock button
12 Louvres
13 Stop plate
14 Open-ended spanner
15 Circle / parallel cutting guide
6 GB
16Sanding belts
17Slot cutter (HSS)
18Multi-purpose cutter (HSS)
19Adapter (dust extraction nozzle)
Scope of delivery
1 Combination cutter PSFS 250 A1
1 Parallel fence with circle cutting function
1 Dust extraction adapter
1 Open-ended spanner
1 Multi-purpose cutter (HSS)
1 Slot cutter (HSS)
1 Sanding belt tensioning arbor
6 Sanding belts
1 Operating instructions
Technical Data
Rated power input: |
250 W |
Voltage: |
230 V , 50 Hz |
Idle speed (n0): |
10,000–28,000 rpm |
Collet capacity: |
4.8 mm |
Protection class: |
II / |
Noise and vibration data:
Noise value determined according to EN 60745. The A-rated noise level of the electric tool is typically:
Sound pressure level: |
75 dB(A) |
Sound power level: |
86 dB(A) |
Uncertainty K: |
3 dB(A) |
Wear hearing protection!
Evaluated acceleration, typically:
Hand- / arm vibration ah < 2.5 m / s2 Uncertainty K = 1.5 m / s2

 The vibration level specified in these instructions was measured in accordance with an EN 60745 standardised measurement process and can be used to compare equipment. The vibration emission value specified can also serve as a preliminary assessment of the exposure.
The vibration level will change according to the application of the electrical tool and in some cases,

Introduction / General power tool safety warnings
may exceed the value specified in these instructions. Regularly using the electric tool in such a way may make it easy to underestimate the vibration.
Note: If you wish to make an accurate assessment of the vibration loads experienced during a particular period of work, you should also take into account the intervening periods of time when the device is switched off or is running but is not actually in use. This can result in a much lower vibration load over the whole of the work period.
General power tool safety warnings

 Read all safety
warnings and all instructions.
Failure to follow the warnings and instructions may result in electric shock, fire and / or serious injury.
Save all warnings and instructions for future reference.
The term “power tool” in the warnings refers to your mains-operated (corded) power tool or battery-op- erated (cordless) power tool.
1. Work area safety
a)Keep work area clean and well lit.
Cluttered or dark areas invite accidents.
b)Do not operate power tools in explosive atmospheres, such as in the presence of flammable liquids, gases or dust.
Power tools create sparks which may ignite the dust or fumes.
c)Keep children and bystanders away while operating a power tool. Distractions can cause you to lose control.
2. Electrical safety
a)Power tool plugs must match the outlet. Never modify the plug in any way. Do
not use any adapter plugs with earthed (grounded) power tools. Unmodified plugs and matching outlets will reduce risk of electric shock.
b)Avoid body contact with earthed or grounded surfaces, such as pipes, radiators, ranges and refrigerators.
There is an increased risk of electric shock if your body is earthed or grounded.
c)Do not expose power tools to rain or wet conditions. Water entering a power tool will increase the risk of electric shock.
d)Do not abuse the cord. Never use the cord for carrying, pulling or unplugging the power tool. Keep cord away from heat, oil, sharp edges or moving parts.
Damaged or entangled cords increase the risk of electric shock.
e)When operating a power tool outdoors, use an extension cord suitable for outdoor use. Use of a cord suitable for outdoor use reduces the risk of electric shock.
f)If operating a power tool in a damp location is unavoidable, use a residual current device (RCD) protected supply.
Use of an RCD reduces the risk of electric shock.
3. Personal safety
a)Stay alert, watch what you are doing and use common sense when operating a power tool. Do not use a power tool while you are tired or under the influence of drugs, alcohol or medication. A moment of inattention while operating power tools may result in serious personal injury.
b)Use personal protective equipment. Always wear eye protection. Protective equipment such as dust mask, non-skid safety shoes, hard hat, or hearing protection used for appropriate conditions will reduce personal injuries.
c)Prevent unintentional starting. Ensure the switch is in the off-position before connecting to power source and / or battery pack, picking up or carrying the tool. Carrying power tools with your finger
GB 7

General power tool … / Additional … / Additional safety information for routers
on the switch or energising power tools that have the switch on invites accidents.
d)Remove any adjusting key or wrench before turning the power tool on. A wrench or a key left attached to a rotating part of the power tool may result in personal injury.
e)Do not overreach. Keep proper footing and balance at all times. This enables better control of the power tool in unexpected situations.
f)Dress properly. Do not wear loose clothing or jewellery. Keep your hair, clothing and gloves away from moving parts. Loose clothes, jewellery or long hair can be caught in moving parts.
g)If devices are provided for the connection of dust extraction and collection facilities, ensure these are connected and properly used. Use of dust collection can reduce dust-related hazards.
4. Power tool use and care
a)Do not force the power tool. Use the correct power tool for your application.
The correct power tool will do the job better and safer at the rate for which it was designed.
b)Do not use the power tool if the switch does not turn it on and off. Any power tool that cannot be controlled with the switch is dangerous and must be repaired.
c)Disconnect the plug from the power source and / or the battery pack from the power tool before making any adjustments, changing accessories, or storing power tools. Such preventive safety measures reduce the risk of starting the power tool accidentally.
d)Store idle power tools out of the reach of children and do not allow persons unfamiliar with the power tool or these instructions to operate the power tool.
Power tools are dangerous in the hands of untrained users.
e)Maintain power tools. Check for misalignment or binding of moving parts, breakage of parts and any other con-
8 GB
dition that may affect the power tool’s operation. If damaged, have the power tool repaired before use. Many accidents are caused by poorly maintained power tools.
f)Keep cutting tools sharp and clean.
Properly maintained cutting tools with sharp cutting edges are less likely to bind and are easier to control.
g)Use the power tool, accessories and tool bits etc. in accordance with these instructions, taking into account the working conditions and the work to be performed. Use of the power tool for operations different from those intended could result in a hazardous situation.
5. Service
a)Have your power tool serviced by a qualified repair person using only identical replacement parts. This will ensure that the safety of the power tool is maintained.
Additional safety information for grinders and polishers
POISONOUS DUSTS! The working of materials that can produce harmful / toxic dusts presents a health risk for the operator and for people located in the close vicinity.
Avoid sanding of paints containing lead or other material detrimental to your health.
Do not work on materials containing asbestos. Asbestos is considered carcinogenic.
Wear safety glasses and a dust protection mask!
Additional safety information for routers
Hold the device by the insulated handle surfaces as there is a danger of the cutter striking the device’s mains lead.
Contact with a live wire could cause metal parts of the device to become live and lead to electric shock.

Additional safety information for routers / Operation
Only use cutting bits with the correct size shaft diameter suitable for the speed of the electric tool.
Fix and secure the work piece to a stable surface using clamps or other means. If you only hold the work piece with your hand or against your body, it will remain unstable which could lead to a loss of control.
Operation
Never use the device for any purpose other than the intended purpose and only use it with the original parts and accessories. The use of parts or accessories other than those recommended in the operating instructions could lead to you suffering an injury. Use only an extension cable that has been completely unrolled and is undamaged with a capacity of at least 5 A.
WARNING: Do not use this tool for the creation of notches in the vicinity of installations or openings with live electric cables or in walls behind which live electric cables could potentially be laid. The bit could conduct electricity into the tool and this could involve the risk of electric shock to the operator.
Trigger the circuit breaker or remove the fuse in order to disconnect the relevant electric circuit.
Attention: Always hold the tool on the plastic housing and always wear safety goggles when working with the tool.
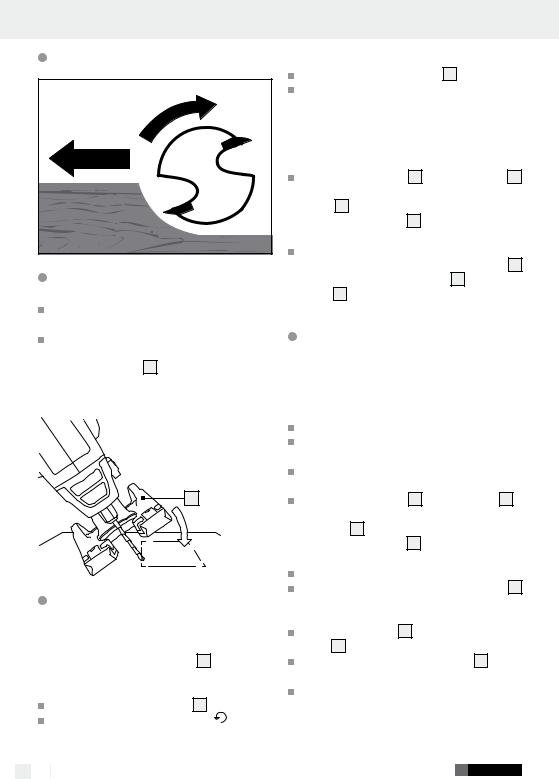
Changing tools (see Fig. C)
Note: Only use combination cutter accessory parts with a shaft diameter of ø 4.8 mm.
Hold the spindle lock button 11 pressed down. Loosen the clamping nut 10 with the wrench 14 by turning in an anticlockwise direction.
Change the tool.
Block the spindle lock, tighten the clamping nut 10 using the open-ended spanner 14 .
Bits:
The bits included are intended for the following applications (see Fig. D).
Multi-purpose cutter (HSS) 18 :
Application: wood, particle board, plastic, aluminium and iron sheets
Slot cutter (HSS) 17 :
Application: wood, particle board, plastic
Sanding belts 16 :
Application: sanding wood
Note: Please use suitable accessories available from your speciality retailer to cut wall tiles and / or edit sheets of metal / light metal.
Installing sanding belts
Install the sanding belts 16 as shown in Figure C.
Switching ON / OFF (see Fig. A)
Switching on:
Press the ON / OFF switch 4 .
Switching off:
Release the ON / OFF switch 4 .
Setting the speed (see Fig. B)
Turn the speed controller 2 in a clockwise direction to increase the speed.
Turn the speed controller 2 in an anticlockwise direction to reduce the speed.
Setting the working depth (see Fig. E)
Loosen the wing bolt 5 .
Slide the base plate 7 to the desired working depth (to cut through completely set approx. 3.2 mm deeper than the material thickness). The recommended maximum cutting depth for wood is 13 mm *(only applies to multipurpose cutter (HSS) 18 ).
Retighten the wing bolt 5 .
GB 9
Operation
Milling direction for edges
Pivot to vertical
Press and hold the bevel stop 13 .
Turn the handle clockwise from horizontal to vertical until the bevel stop locks in.
Plunge cutting
Insert the bit into the work piece at an angle of 45°.
Slowly straighten the bit to an angle of 90° to begin the cut.
Note: The base plate 7 must be flush with the material surface.
7
Pivot handle (see Fig. F)
Note: Turning the grip during the start up operations is forbidden. Remove the plug from the socket and make sure that the swivel lock 13 is engaged.
Pivot to horizontal |
|
Press and hold the bevel stop 13 . |
|
Turn the handle counter-clockwise |
from ver- |
tical to horizontal until the bevel stop locks in.
10 GB
 Using the rip fence (see Fig. G)
Loosen the wing bolts 9 on the base plate 7 and slide the guide bar for the circle- / rip fence 15 through the two openings in the bottom of the base plate 7 , with the rip fence facing down.
Position the tool the desired distance from the edge of the work piece. Tighten the wing bolts 9 to secure the circle- / ripe fence 15 to the foot plate 7 .
Cutting circles (see Fig. H)
Note: The position of the guide hole depends on the desired result, either inside or outside of the edge of the circle: inside for holes, outside for discs. The radius can be set from ca. 5 to 16 cm.
Make a circle on the work piece.
Mark the centre and drill a hole into the hole (plunge cut).
Drill a guide hole on the edge of the circle (plunge cut) (guide hole diameter 3 mm).
Loosen the wing bolts 9 in the foot plate 7 and slide the guide rod for the circle- / rip fence set 15 through the two holes in the bottom of the base plate 7 , with the centring tip facing down.
Insert the centring tip in the middle of the circle.
Adjust the distance of the circle- / rip fence set 15 so as to plunge the bit into the guide hole at the edge of the circle.
Lock the base plate 7 by tightening the wing bolts 9 .
Press and hold the ON / OFF switch 4 to power on the unit.
Slowly push the unit forward.
Operation / Maintenance and Cleaning / Service / Warranty / Disposal
Dust extraction (see Fig. I) |
Warranty |
The tool features a dust extraction nozzle 6 to vacuum off dust.
Insert the adapter 19 in the extraction nozzle 6 .
Connect a vacuum cleaner to the adapter 19 .
Continuous tool operation
Locking the ON / OFF switch 4 :
Activate the ON / OFF switch 4 .
Press the locking switch 1 and release the ON / OFF switch 4 .
Unlocking the ON / OFF switch 4 :
Activate the ON / OFF switch 4 and release.
Maintenance and Cleaning
The device requires no maintenance.  Clean the unit promptly after use.
Clean the device with a dry cloth, never use petrol, solvents or cleaning agents harmful to plastic.
Always keep the vents clear.
Remove dust clinging to the sander with a brush.
Service

 Always have your device repaired by qualified specialist personnel using only original manufacturer parts. This will maintain the safety of the device.

 If the plug or mains lead needs to be replaced, always have the work performed by the manufacturer or its service centre. This will maintain the safety of the device.
Note: Spare parts not listed (e.g. carbon brushes, switches) can be ordered through our call centre.
The warranty for this appliance is for 3 years from the date of purchase. The appliance has been manufactured with care and meticulously examined before delivery. Please retain your receipt as proof of purchase. In the event of a warranty claim, please make contact by telephone with our Service Department. Only in this way can a post-free despatch for your goods be assured.
The warranty covers only claims for material and maufacturing defects, but not for transport damage, for wearing parts or for damage to fragile components, e.g. buttons or batteries. This product is for private use only and is not intended for commercial use.
The warranty is void in the case of abusive and improper handling, use of force and internal tampering not carried out by our authorized service branch. Your statutory rights are not restricted in any way by this warranty.
The warranty period will not be extended by repairs made unter warranty. This applies also to replaced and repaired parts. Any damage and defects extant on purchase must be reported immediately after unpacking the appliance, at the latest, two days after the purchase date. Repairs made after the expiration of the warranty period are subject to payment.
GB
Service Great Britain Tel.: 0871 5000 720
(0.10 GBP/Min.) e-mail: kompernass@lidl.co.uk
IAN 102813
Disposal
The packaging is made of environmentally friendly materials, which may be disposed through your local recycling facilities.
GB 11

Disposal / Translation of the original declaration of conformity / Manufacturer
Do not dispose of electrical power tools with household rubbish!
In accordance with European Directive 2012 / 19 / EU on waste electrical and electronic equipment and its implementation into national legislation, worn out electrical power tools must be collected separately and recycled in an environmentally friendly fashion.
Contact your local refuse disposal authority for more details on the disposal of worn out electrical devices.
12 GB
Translation of the original declaration of conformity / Manufacturer 

We, KOMPERNASS HANDELS GMBH, the person responsible for documents: Mr Semi Uguzlu, BURG STRASSE 21, 44867 BOCHUM, GERMANY, hereby declare that this product complies with the following standards, normative documents and EU directives:
Machinery Directive (2006 / 42 / EC)
EC Low Voltage Directive (2006 / 95 / EC)
Electromagnetic Compatibility (2004 / 108 / EC)
RoHS Directive (2011 / 65 / EU)
harmonised standards applied:
EN 60745-1/A11:2010
EN 60745-2-4/A11:2011
EN 60745-2-17:2010, EN 62233:2008
EN 55014-1/A2:2011, EN 55014-2/A2:2008 EN 61000-3-2/A2:2009
EN 61000-3-3:2008
Type / Description of product:
Combination Cutter PSFS 250 A1
Date of manufacture: 08–2014
Serial number: IAN 102813
Bochum, 31.08.2014
Semi Uguzlu
- Quality Manager -
We reserve the right to make technical modifications in the interest of product advancement.

Tartalomjegyzék
Bevezetés |
|
|
Rendeltetésszerű használat............................................................................................................... |
Oldal |
14 |
Felszereltség....................................................................................................................................... |
Oldal |
14 |
A szállítmány tartalma....................................................................................................................... |
Oldal |
14 |
Műszaki adatok................................................................................................................................. |
Oldal 14 |
|
Elektromos szerszámokra vonatkozó általános biztonsági |
|
|
tudnivalók |
|
|
1. A munkahely biztonsága.............................................................................................................. |
Oldal 15 |
|
2. Elektromos biztonsága.................................................................................................................. |
Oldal |
15 |
3. Személyek biztonsága.................................................................................................................. |
Oldal |
16 |
4. Az elektromos szerszámokkal való gondos járás és azok gondos használata...................... |
Oldal |
16 |
5. Szervíz............................................................................................................................................ |
Oldal |
17 |
Kiegészítő biztonsági mutatók csiszolóhoz és polírozóhoz.............. |
Oldal 17 |
|
Kiegészítő biztonsági utasítások felsőmarókhoz...................................... |
Oldal 17 |
|
Használat |
|
|
Be- / kikapcsolás................................................................................................................................. |
Oldal |
17 |
Fordulatszám beállítása..................................................................................................................... |
Oldal |
17 |
Szerszám cseréje................................................................................................................................ |
Oldal |
18 |
Csiszolószalag felszerelése.............................................................................................................. |
Oldal |
18 |
Vágómélység beállítása.................................................................................................................... |
Oldal |
18 |
Marásirány a sarkokon...................................................................................................................... |
Oldal 18 |
|
Merülővágás ejtése........................................................................................................................... |
Oldal |
18 |
A fogantyú forgatása........................................................................................................................ |
Oldal |
18 |
Párhuzamos vezető használata........................................................................................................ |
Oldal 19 |
|
Kör fűrészelése................................................................................................................................... |
Oldal |
19 |
Por-elszívás......................................................................................................................................... |
Oldal |
19 |
A szerszám tartós üzemmódban történő használata..................................................................... |
Oldal |
19 |
Karbantartás és tisztítás................................................................................................... |
Oldal 19 |
|
Szerviz.............................................................................................................................................. |
Oldal 19 |
|
Garancia......................................................................................................................................... |
Oldal 20 |
|
Mentesítés...................................................................................................................................... |
Oldal 20 |
|
Az eredeti EU-Megfelelőségi Nyilatkozat fordítása / Gyártó......... |
Oldal 20 |
|
HU 13

Bevezetés
Kombi maró PSFS 250 A1
Bevezetés
Gratulálunk új készülékének vásárlása alkalmából. Ezzel a döntésével vállalatunk értékes terméke mellett döntött. A használati utasítás ezen termék része. A biztonságra, a használatára és a megsemmisítésre vonatkozó fontos tudnivalókat tartalmazza. A termék használata előtt ismerje meg az összes használati és biztonsági tudnivalót. A terméket csak a leírtak szerint és a megadott felhasználási területeken alkalmazza. A termék harmadik személy számára való továbbadása esetén kézbesítse vele annak a teljes dokumentációját is.
Rendeltetésszerű használat
Ez a készülék - az ajánlott szerszámokkal és tartozékokkal - fa, műanyag,farostlemez, fali csempe, járólap, alumínium és vaslemez megmunkálására alkalmas. Különböző íves csiszolókkal történő csiszolásra és 4,8 mm-es foglalattal rendelkező marófejekkel történő marásra is alkalmas. A gép minden más irányú alkalmazása vagy megváltoztatása nem rendeltetésszerűnek számit és jelentős balesetveszélyeket rejt magában. A rendeletetésétől eltérő használatból eredő károkért a gyártó nem felel. Nem közületi felhasználásra készült.
Felszereltség
1Reteszkapcsoló
2Fokozatmentes fordulatszám-szabályozó
3Hálózati vezeték
4BE- / KI-kapcsoló
5Szárny-állítócsavar
6Elszívócsonk
7Talplemez
8Szorító befogó
9Szárnyas csavar (talplemez)
10Feszítő-anya
11Orsó-reteszgomb
12Szellőzőnyílás
13Ingászár
14 HU
14Villáskulcs
15Kör- / párhuzamos vágóelőtét
16Csiszolószalagok
17Horonymaró (HSS)
18Többfunkciós maró (HSS)
19Adapter (elszívócsonk)
A szállítmány tartalma
1 kombi maró PSFS 250 A1
1 párhuzamos ütköző körvágó funkcióval
1 porszívó-adapter
1 villáskulcs
1 többfunkciós maró (HSS)
1 horonymaró (HSS)
1 felfeszítő-tüske
6 csiszolószalag
1 Használati útmutató
Műszaki adatok
Névleges teljesítményfelvétel: |
250 W |
Feszültség: |
230 V , 50 Hz |
Üresjárati fordulatszám (n0): |
10.000-28.000 / min-1 |
Szerszámbefogó-hez: |
4,8 mm |
Védelmi osztály: |
II / |
Zajés rezgés információk:
Zajszint mért értékei az EN 60745 szabványnak megfelelően megállapítva. Az elektromos szerszám A-értékelésű zajszint értéke jellemzően: hangnyomásszint: 75 dB(A) hangteljesítményszint: 86 dB(A) Bizonytalansági tényező K: 3 dB
Viseljen hallásvédőt!
Értékelt gyorsulás, tipikus:
Kéz- / karvibráció ah < 2,5 m / s² Bizonytalanság K = 1,5 m / s²

 Az ebben az utasításban megadott rezgésszintet egy az EN 60745-ben megszabott mérési eljárásnak megfelelően mérték és az a készülékek összehasonlítására felhasználható. A megadott rezgés -kibocsátás értéke a veszélyez-

Bevezetés / Elektromos szerszámokra vonatkozó általános biztonsági tudnivalók
tetettség mértékének bevezető becslésére is használható.
A rezgésszint az elektromos készülék felhasználásának a módjától függően változhat és az értéke egyes esetekben az ebben az utasításban megadott értékeket túllépheti. A rezgésterhelést alá lehet becsülni, ha az elektromos szerszámot rendszeresen ilyen módon használják.
Utalás: A rezgésterhelésnek egy bizonyos munkaidőszak időtartama alatti pontos felbecsülésére azokat az időket is figyelembe kell venni, amelyek alatt a készülék ki van kapcsolva, vagy habár jár, valójában nem használják. Ez a teljes munkaidőszak alatti rezgésterhelést jelentősen lecsökkentheti.
Elektromos szerszámokra vonatkozó általános biztonsági tudnivalók

 Olvassa el
az összes biztonsági tudnivalókat és utasításokat! A biztonsági tudni-
valók és utasítások betartásánál elkövetett mulasztások áramütéseket, tűz kitörését és / vagy súlyos sérüléseket okozhatnak.
Őrizze meg a jövő számára a biztonsági tudnivalókat és utasításokat!
A biztonsági tudnivalókban alkalmazott „elektromos szerszám“ fogalom a hálózatról üzemeltetett elektromos szerszámokra (hálózati kábellel) és Akkukkal üzemeltetett elektromos szerszámokra (hálózati kábelek nélküli) vonatkozik.
1. A munkahely biztonsága
a)Tartsa a munka környékét tisztán és jól megvilágítva. Rendetlenség és kivilágítatlan munkakörnyezet balesetekhez vezethet.
b)Ne dolgozzon a készülékkel robbanásveszélyes környezetben, amelyben gyúlékony folyadékok, gázak vagy porok találhatók. Az elektromos készülé-
kek szikrákat hoznak létre, amelyek a porokat vagy a gőzöket meggyújthatják.
c)Tartsa a gyerekeket és más személyeket is az elektromos szerszámok használata közben távol. Ha a figyelme elterelődik elveszítheti a készülék feletti uralmát.
2. Elektromos biztonsága
a)A készülék csatlakozó dugójának találni kell a dugaljzatba. A dugót semmilyen módon sem szabad megváltoztatni. Ne alkalmazzon adapterdugót védőföldeléses készülékekkel együtt. Változatlan és találó dugaljzatok csökkentik az áramütés veszélyét.
b)Kerülje el a testrészeinek a földelt felületekkel, mint pld. csövekkel, fűtőtestekkel, tűzhelyekkel és hűtőszekrényekkel való érintkezését. Az áramütés veszélye nagyobb, ha a teste földelve van.
c)Tartsa a készüléket esőtől vagy nedvességtől távol. Víznek a készülékbe való behatolása megnöveli az áramütés kockázatát.
d)Ne használja a készülék kábelét a rendeltetésétől eltérően a készülék hordozására, felakasztására, vagy a hálózati dugónak a dugaljzatból való kihúzására. Tartsa a kábelt hőtől, olajtól, éles szélektől, vagy mozgásban levő készülékrészektől távol. Sérült, vagy összekuszálodott kábelek növelik az áramütés kockázatát.
e)Ha egy ekektromos készülékkel a szabadban dolgozik, csak olyan hos - szabbító kábeleket használjon, amelyek külterületre is engedélyezettek.
A külterületre engedélyezett kábel alkalmazása csökkenti az áramütés kockázatát.
f)Ha az elektromos szerszámnak nedves környezetben való üzemeltetése nem kerülhető el, alkalmazzon hibaáram védőkapcsolót. A hibaáram védőkapcsoló alkalmazása csökkenti az áramütés kockázatát.
HU 15
 Loading...