


LASER DISTANCE MEASURER PLEM 50 A1
LASER DISTANCE MEASURER |
DALMIERZ LASEROWY |
Operating instructions |
Instrukcja obsługi |
LASEROVÝ MĚŘIČ VZDÁLENOSTI |
LASEROVÝ MERAČ VZDIALENOSTI |
Návod k obsluze |
Návod na obsluhu |
LASER-ENTFERNUNGSMESS- |
|
GERÄT |
|
Bedienungsanleitung |
|
IAN 100719
Before reading, unfold the page containing the illustrations and familiarise yourself with all functions of the device.
Przed przeczytaniem proszę rozłożyć stronę z ilustracjami, a następnie proszę zapoznać się z wszystkimi funkcjami urządzenia.
Před čtením si otevřete stranu s obrázky a potom se seznamte se všemi funkcemi přístroje.
Pred čítaním si odklopte stranu s obrázkami a potom sa oboznámte so všetkými funkciami prístroja.
Klappen Sie vor dem Lesen die Seite mit den Abbildungen aus und machen Sie sich anschließend mit allen Funktionen des Gerätes vertraut.
GB |
Operating instructions |
Page |
1 |
PL |
Instrukcja obsługi |
Strona |
23 |
CZ |
Návod k obsluze |
Strana |
45 |
SK |
Návod na obsluhu |
Strana |
67 |
DE / AT / CH |
Bedienungsanleitung |
Seite |
89 |

A

Contents
Introduction . . . . . . . . . . . . . . . . . . . . . . . . . . . . . . . . . . . 2 GB Intended use. . . . . . . . . . . . . . . . . . . . . . . . . . . . . . . . . . . . . . . . . . .2 Components . . . . . . . . . . . . . . . . . . . . . . . . . . . . . . . . . . . . . . . . . . .2 Package contents . . . . . . . . . . . . . . . . . . . . . . . . . . . . . . . . . . . . . . .3 Technical data . . . . . . . . . . . . . . . . . . . . . . . . . . . . . . . . . . . . . . . . .4
Safety guidelines . . . . . . . . . . . . . . . . . . . . . . . . . . . . . . 5
Risk of injury if batteries are improperly handled . . . . . . . . . . . . . . .7
Initial operation. . . . . . . . . . . . . . . . . . . . . . . . . . . . . . . . 8
Attaching the wrist strap . . . . . . . . . . . . . . . . . . . . . . . . . . . . . . . . . .8 Inserting/replacing the batteries . . . . . . . . . . . . . . . . . . . . . . . . . . .8 Acoustic signal . . . . . . . . . . . . . . . . . . . . . . . . . . . . . . . . . . . . . . . . .9 Switching on and o . . . . . . . . . . . . . . . . . . . . . . . . . . . . . . . . . . . .9 Display illumination . . . . . . . . . . . . . . . . . . . . . . . . . . . . . . . . . . . . .9
Handling and operation . . . . . . . . . . . . . . . . . . . . . . . . 10
Selecting the length unit . . . . . . . . . . . . . . . . . . . . . . . . . . . . . . . . .10 Selection of the reference plane. . . . . . . . . . . . . . . . . . . . . . . . . . .10 Angle stop . . . . . . . . . . . . . . . . . . . . . . . . . . . . . . . . . . . . . . . . . . .11 Measuring lengths . . . . . . . . . . . . . . . . . . . . . . . . . . . . . . . . . . . . .11 Measurement value functions . . . . . . . . . . . . . . . . . . . . . . . . . . . . .12 Measured value memory/Calling up a saved measurement . . . . .16 Clear button . . . . . . . . . . . . . . . . . . . . . . . . . . . . . . . . . . . . . . . . . .17
Belt pouch . . . . . . . . . . . . . . . . . . . . . . . . . . . . . . . . . . . . . . . . . . .17 Faults . . . . . . . . . . . . . . . . . . . . . . . . . . . . . . . . . . . . . . . . . . . . . . .17
Maintenance and Cleaning. . . . . . . . . . . . . . . . . . . . . . 19
Storage . . . . . . . . . . . . . . . . . . . . . . . . . . . . . . . . . . . . . 19
Disposal . . . . . . . . . . . . . . . . . . . . . . . . . . . . . . . . . . . . . 20
Disposal of the device . . . . . . . . . . . . . . . . . . . . . . . . . . . . . . . . . .20 Disposing of the batteries . . . . . . . . . . . . . . . . . . . . . . . . . . . . . . . .20
Warranty . . . . . . . . . . . . . . . . . . . . . . . . . . . . . . . . . . . . 21
Service . . . . . . . . . . . . . . . . . . . . . . . . . . . . . . . . . . . . . . 22
Importer. . . . . . . . . . . . . . . . . . . . . . . . . . . . . . . . . . . . . 22
PLEM 50 A1 |
1 |
LASER DISTANCE MEASURER PLEM 50 A1
GB
Introduction
Congratulations on the purchase of your new device. You have selected a high-quality product. The operating
instructions are part of this product. They contain important information on safety, usage and disposal. Before using the product, familiarise yourself with all handling and safety guidelines. Use the product only as described and for the range of applications specified. Please also pass these operating instructions on to any future owner(s).
Intended use
The PLEM 50 A1 laser distance measurer (hereinafter device) is suitable for:
measuring distances, lengths, heights, gaps and for calculating areas and volumes in indoor spaces.
Any other usage of or modification to the device is deemed to be improper usage and carries the risk of serious personal injury. The manufacturer accepts no responsibility for damage(s) arising out of usage contrary to the instructions specified below.
The device is not meant for commercial use.
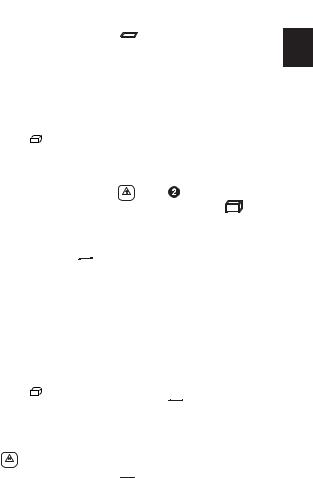
Components
 Display
ON button


 button

 button
C button
OFF
 Angle stop (fold-out)
button
UNIT

 button
2 |
PLEM 50 A1 |
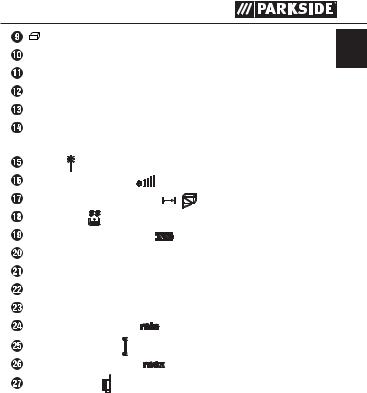
FUNC button |
GB |
|
Battery compartment cover |
||
|
||
Receiver lens |
|
|
Laser beam output opening |
|
|
Belt pouch |
|
|
Wrist strap |
|
|
Figure A (display) |
|
|
Laser on |
|
|
Laser reception strength |
|
|
Measurement value functions |
|
|
Data storage |
|
|
Battery charge level display |
|
|
Measurement value 3 |
|
|
Measurement value 2 |
|
|
Length unit |
|
|
Single measurement value (result) |
|
|
Min. measurement value |
|
|
Hardware error icon |
|
|
Max. measurement value |
|
|
Reference plane |
|
Package contents
The device is supplied with the following components as standard:
Laser distance measurer PLEM 50 A1 |
|
2 x 1.5 V LR03 batteries (AAA) |
|
Belt pouch |
|
Wrist strap |
|
Operating instructions |
|
PLEM 50 A1 |
3 |

WARNING!
GB
■Packaging material must not be used as a plaything.
Risk of su ocation.
NOTE
►Check the consignment for completeness and for signs of visible damage.
►If the consignment is incomplete or damaged due to defective packaging or carriage, contact the Service hotline
(see the chapter Service).
Technical data
Measurement range: |
0.05–50 m A) |
Measuring accuracy (typical): |
± 2.0 mm B) |
Smallest display unit: |
1 mm |
Operating temperature: |
0°–40°C |
Relative humidity max.: |
≤ 75% |
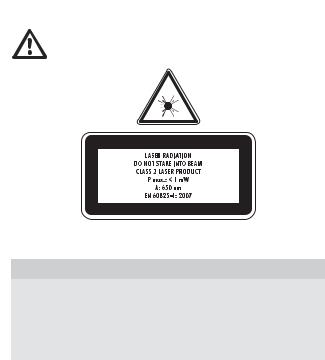
Laser category: |
2 |
Wavelength (λ): |
650 nm |
Maximum power P max: |
< 1 mW |
Batteries: |
2 x 1.5 V LR03 (AAA) |
Weight: |
88 g |
Dimensions: |
11.3 x 4.9 x 2.6 cm |
A) The range improves the better the laser light is returned from the surface of the target (dispersing, not reflecting) and the brighter the laser is compared to the ambient light (interior rooms, twilight).
4 |
PLEM 50 A1 |

B) In unfavourable conditions such as strong sunlight or poorly
reflective surfaces, the maximum deviation is ± 10 mm at 50 m. In GB favourable conditions, a deviation influence of ± 0.05 mm/m must
be taken into account.
Safety guidelines
■Do not use the device in locations where there is a risk of fire or explosion, e.g. in the vicinity of inflammable liquids or gases.
■This device may be used by children of the age of 8 years or more and by persons with reduced physical, sensory or mental capabilities or lack of experience and/or knowledge if they are being supervised or have been instructed with regard to the safe use of the device and have understood the potential risks. Children must not use the device as a plaything. Cleaning and user maintenance should not be performed by children unless they are under supervision.
■Do not leave the device unattended when switched on, and switch o the device directly after use. Other people could be blinded by the laser beam.
■Protect the device from wetness or direct sunlight.
■Do not expose the device to any extremes of temperature or temperature fluctuations. For example, do not leave it in a car for extended periods. After exposure to large temperature fluctuations, allow the device to acclimatise before using it again. The precision of the device can be adversely a ected by extreme temperatures or temperature fluctuations.
■Avoid hefty knocks or dropping the measuring tool.
PLEM 50 A1 |
5 |
|
|
|
|
|
|
|
|
|
|
|
|
|
|
WARNING! Protect yourself from laser radiation! |
|||
GB |
|
||||
|
|
|
|
|
|
■Never look directly into the laser beam or into the opening from which it emerges.
 WARNING!
►Looking at a laser beam through optical instruments (e.g. magnifying glasses etc.) can cause eye injuries.
►Attention! If operating and adjustment equipment is used or procedures other than those specified here are carried out, this may result in hazardous radiation exposure.
■Never aim the laser beam at reflective surfaces, people or animals. Even brief visual contact with a laser beam can result in eye injuries.
6 |
PLEM 50 A1 |

Risk of injury if batteries are improperly handled
GB
■ Keep batteries out of the reach of children. Children might put batteries into their mouth and swallow them. If a battery has been swallowed, seek medical assistance immediately.
■ Do not throw batteries into a fire. Never subject batteries to high temperatures.
■ Risk of explosion! Do not charge batteries unless they are explicitly labelled as "rechargeable".
■ Do not open the batteries or short-circuit them.
■ Do not mix di erent types of batteries.
Due to increased risk of leakage, empty batteries should be removed. The batteries should also be removed from the device if it is not being used for long periods.
■ Battery acid leaking from a battery can cause skin irritation. In event of contact with the skin, rinse with copious amounts of
water. If the liquid comes into contact with your eyes, rinse thoroughly with water, do not rub and immediately consult a doctor.
■ The chapter entitled Inserting/replacing the batteries describes how to correctly insert and remove batteries.
PLEM 50 A1 |
7 |
Initial operation
GB
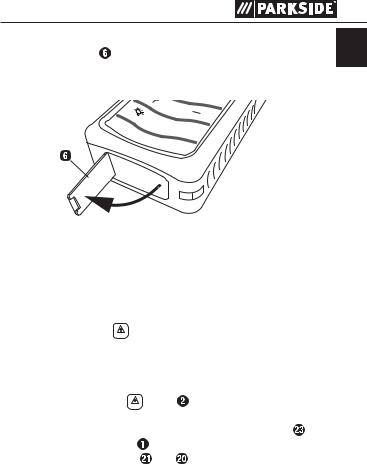
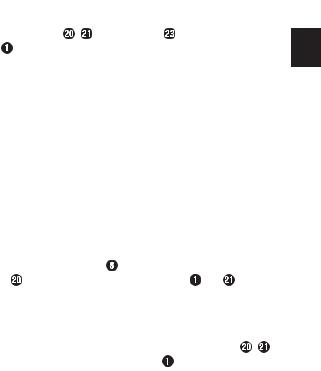
Attaching the wrist strap
♦ Attach the wrist strap to the hole provided as shown in Figure 1.
Fig. 1
Inserting/replacing the batteries
♦Open the battery compartment cover  .
.
♦Insert the batteries. Ensure correct polarity as shown on the diagram inside the battery compartment.
When the low battery icon 


 appears in the display, you can still make measurements.
As soon as the battery icon starts flashing, however, you must replace the batteries. Measurements are no longer possible. Always replace all batteries at the same time. Always use batteries from the same manufacturer and of the same type.
NOTE
►If you do not intend to use the device for a long time, remove the batteries. During extended periods of storage, the batteries can corrode and discharge themselves.
8 |
PLEM 50 A1 |
Acoustic signal
Each press of a button and every error-free function that is carried |
GB |
|
|
out is confirmed by a short beep. |
|
A longer beep is only heard in the event of a fault and when switching o . |
|
Switching on and o
♦ |
To switch the device on, press the ON ON button . |
|
When the device is switched on, the laser beam is not yet |
|
activated. |
♦ |
To switch the device o , press and hold the OFF C button . |
|
OFF |
If no button is pressed for about 3 minutes, the device turns o automatically to save the batteries.
If measured values have been saved, they are retained in the case of automatic shut-o .
Display illumination
To improve readability, the display  is equipped with a backlight. By pressing the

 button , the display backlight can be switched
UNIT
on and o .
PLEM 50 A1 |
9 |
Handling and operation
GB
Selecting the length unit
The length unit  used after switch-on is the last-used unit.
♦Press and hold the button UNIT  to select another unit. You can set the following length units in this order:
Length |
Area |
Volumes |
|
|
|
0.000 m |
0.000 m2 |
0.000 m3 |
0.000 ft |
0.000 ft2 |
0.00 ft3 |
0' 0" 1/16 in |
0.00 ft2 |
0.00 ft3 |
0' 0" 1/16 |
0.00 ft2 |
0.00 ft3 |
Selection of the reference plane
The lower reference plane 

 (base) or the angle stop


 or the upper reference plane
 (cover side) of the device can be used as the contact surface for a measurement.
The reference plane is to be set before measurement otherwise the measurement result di ers from the actual value.
The reference plane 

 (base) is set when the device is switched on.
♦You can change the reference plane by pressing the 
 button
  briefly.
The selected reference plane 


 is shown on the display
  .
.
10 |
PLEM 50 A1 |
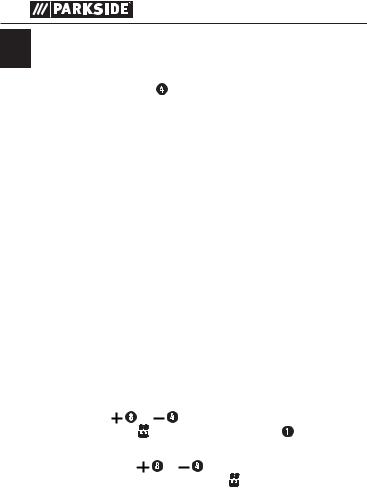
Angle stop
Use the angle stop |
if you are measuring from corners (room |
GB |
|
diagonal) or di cult-to-reach places.
♦ Fold out the angle stop  as shown in Figure 2.
UNIT
C OFF
Fig. 2
Measuring lengths
Single measurements
♦Place or hold the reference plane of the device on or against the desired base surface from which you want to determine a distance.
♦ Briefly press the ON button  to activate the laser.
Once the laser is switched on, this is indicated on the display  by the
  icon
icon  .
.
♦ Now aim the laser at the target point.
♦ Briefly pressing the ON |
button |
again will cause the meas- |
|
urement to be taken. |
|
|
|
If the measurement is successful, the measurement result |
is |
||
shown on the display . |
|
|
|
The previous readings |
and |
are pushed upwards. |
|
PLEM 50 A1 |
11 |
GB |
Continuous measurement |
||
Continuous measurement involves taking series of measurements |
|||
|
|||
|
from which the maximum ( |
) and minimum values ( ) |
|
are displayed. To do this, move the device along a base surface or an edge from which you want to the measure the distances. You can, for example, measure how parallel two opposite walls are or measure the maximum values while using a function.
♦ Start the continuous measurement by pressing the ON button  for more than one second.
Each measured value is shown on the display  .
.
♦ Stop the measurement by pressing the ON button  .
.
The display  now shows the maximum value (
 )
)  and the minimum value (

 )
)  of the measurement series and the last measured value
  .
.
Measurement value functions
To make it easier to process measurement results, the device o ers a number of integrated functions.
♦By pressing the FUNC button  repeatedly, you can activate the following functions one after the other:
area, volume, simple Pythagoras, double Pythagoras.
The desired function must be selected before the measurement. After taking a measurement in the selected function, the last selected function is reactivated.
Area
♦Press the FUNC button  once. The
  icon appears on the display
  .
.
♦Now measure the length and width of the area to be meas-
ured by pressing the ON button |
(see also Chapter Single |
measurements). |
|
12 |
PLEM 50 A1 |
|
|
|
|
|
|
|
|
|
|
|
|
The corresponding line of the |
icon flashes for the indi- |
||||
vidual measurement values. |
|
|
|
|
GB |
Directly after the second measurement, the calculated area is shown on the display  and the
  icon stops flashing. The individual values
  ,
,  and the results
  are shown on the display
  .
.
Volumes
♦Press the FUNC button  twice. The
  icon appears on the display
  .
.
♦Now measure the length, width and height of the volume to
be measured by pressing the ON button |
(see also Chapter |
|
Single measurements). The corresponding line of the |
icon |
|
flashes for the individual measurement values.
Directly after the third measurement, the calculated volume is shown on the display  and the
  icon stops flashing.
Simple Pythagoras
Pythagoras' Theorem describes the dependence of the lengths of the sides in a right-angled triangle as follows: a2 + b2 = c2, where a and b are the legs and c the hypotenuse of the triangle.
Using the "simple Pythagoras" function, it is possible to calculate the length of one of the legs. This feature is particularly useful for poorly accessible measurement points.
♦Press the FUNC button  three times. The
  icon appears on the display
  .
.
♦Now measure the hypotenuse (largest distance) and one of the
legs (shortest distance to the measurement surface) by pressing the ON button  (see also Chapter Single measurements). The corresponding line of the
 icon flashes for the individual measurement values.
PLEM 50 A1 |
13 |
Directly after the second measurement, the calculated length is GB shown on the display  and the
  icon stops flashing.
The individual values  ,
,  and the results
  are shown on the display
  .
.
■Please note that angular error (no right angles) will lead to incorrect results. Ensure that the measured distances lie on a plane (alignment).
■To ensure the greatest possible accuracy, you can the calculate the distance of the leg (shortest distance) by means of continuous measurement. The minimum determined value is automatically used for the Pythagoras calculation.
■The measurement can also be greater than 50 m in length, but will be shown as a two-digit number.
Double Pythagoras
In this function, Pythagoras' Theorem is applied to two right triangles that have a common leg.
This makes it possible to calculate the length of the base side of any triangle. This function calculates the distance between two arbitrary points and is especially useful for inaccessible measurement points.
♦Press the FUNC button  four times. The
 icon appears on the display
  .
.
♦Now measure the left hypotenuse (largest distance to the left) and then one leg (shortest distance to the measurement sur-
face) and finally the right hypotenuse (largest distance to the right) by pressing the ON button  (see also Chapter Single measurements).
The corresponding line of the 
 icon flashes for the individual measurement values.
Directly after the third measurement, the calculated length is shown on the display  and the
 icon stops flashing.
14 |
PLEM 50 A1 |
|
|
|
|
|
|
|
|
|
|
|
|
|
|
The individual values , |
and the results |
are shown on the |
||||
display . |
|
|
|
|
|
GB |
■Please note that angular error (no right angles) will lead to incorrect results. Ensure that the measured distances lie on a plane (alignment).
■To ensure the greatest possible accuracy, you can calculate the distance of the leg (shortest distance) by means of continuous measurement. The minimum determined value is automatically used for the Pythagoras calculation.
■The measurement can also be greater than 50 m in length, but will be shown as a two-digit number.
Addition (Plus)
♦To add two individual values, take a measurement (length, area, volume) so that the display  is showing a value.
♦ Then press the |
|
|
button |
to start the Addition (Plus) function. |
||
|
|
|||||
The |
reading now appears on the display , the |
reading |
||||
shows "+ - - - - - -". |
|
|
||||
♦Now take a second measurement (length, area, volume). The reading is shown on the display
 as "+ nnnn".
Directly after the second measurement, the individual values , and the result are shown on the display .
The addition can be carried out with all units (length, area, volume). You can also include the measurement results of functions (area, volume, Pythagoras) in the addition.
Only values in the same units can be added. The first measured value sets the unit to be used.
If the result of an addition is saved in the measured value memory, the individual values of the sum are also saved.
PLEM 50 A1 |
15 |
Subtraction (Minus)
GB |
The subtraction of measurements is carried out in the same way as |
|||
|
||||
|
the addition. |
|
|
|
|
♦ Press the |
|
button |
to start the subtraction. |
|
|
|||
The  reading now appears on the display
  , the
, the  reading shows "− - - - - - -" and subtracts the individual values of the measurement from each other. The result can also be a negative number.
Measured value memory/Calling up a saved measurement
All measured and calculated values can be stored in the memory. The values are saved with their unit (length, area or volume). Calculated values are stored together with the respective individual values.
There are a total of 50 memory locations available. As soon as all 50 memory locations are occupied, the oldest measurement is
deleted. The new measurement result is then stored on location 50.
Saving a measurement
The last 50 measurement results are automatically stored in the memory.
Calling up measurement values from the cache
The cache allows quick access to a single memory value. If a value is used multiple times, the cache is the ideal solution.
♦ |
Press the |
or |
|
buttons to display the values stored in |
|
the cache. The |
|
icon appears on the display along with |
|
|
the number of the memory location. |
|||
♦ |
By pressing the |
|
or |
buttons you can navigate through |
|
the memory locations 1 to 50. The icon shows the active |
|||
|
memory location. |
|
|
|
16 |
|
|
|
PLEM 50 A1 |

Clear button
♦ |
By briefly pressing the C |
button you can reset the most |
GB |
||
|
|||||
|
recent action. |
OFF |
|
|
|
|
|
|
|
|
|
♦ |
Repeatedly pressing the C |
button will delete the content of |
|
||
|
the display |
OFF |
|
. |
|
|
in the following order: |
|
|||
Belt pouch
Use the supplied belt pouch to protect the device when not in use.
Faults
If a measurement or a result is faulty, this is indicated by "Er nnn"  in the display and a long beep. The possible causes for this are:
Faults |
Possible cause |
Rectification |
|
101 |
Batteries are weak |
Replace the batteries |
|
|
|
|
|
104 |
Calculation error |
Repeat the process |
|
|
|
|
|
152 |
Operating tempera- |
|
|
ture too high |
Please note the correct operating |
||
|
|||
153 |
Operating tempera- |
temperature |
|
ture too low |
|
||
|
|
||
|
|
|
|
|
Measurement out- |
Keep within the maximum measur- |
|
154 |
side the measure- |
||
ing range of the device |
|||
|
ment range |
||
|
|
||
|
|
Avoid non-reflective or poorly |
|
155 |
Received signal too |
reflecting surfaces |
|
weak |
Find a measurement point that is |
||
|
|||
|
|
more reflective |
PLEM 50 A1 |
17 |
|
|
|
|
|
|
|
|
|
|
|
|
|
|
|
|
|
|
|
|
|
|
|
|
|
|
|
GB |
|
Faults |
Possible cause |
Rectification |
|
|||
|
|
|
|
|
|
Avoid highly reflective or mirrored |
|
|
|
|
|
|
|
|
|
|
|
|
|
156 |
Received signal too |
surfaces |
|
|||
|
|
strong |
Find a measurement point that is |
|
||||
|
|
|
|
|||||
|
|
|
|
|
|
|
less reflective |
|
|
|
|
|
|
|
|||
|
|
|
Measurement er- |
Darken the measuring surface or |
|
|||
|
|
157 |
rors or surface too |
|
||||
|
|
find another surface |
|
|||||
|
|
|
bright |
|
||||
|
|
|
|
|
||||
|
|
|
|
|
|
|||
|
|
160 |
Vibrations too |
Hold the device still |
|
|||
|
|
strong |
|
|||||
|
|
|
|
|
||||
|
|
|
|
|
|
|
|
|
|
|
|
|
|
|
|
If the icon appears despite repeat- |
|
|
|
|
Hardware failure |
ed switching on and o , contact |
|
|||
|
|
|
|
|
|
|
the Customer Service Hotline. |
|
|
|
|
|
|
|
|
|
|
NOTE
►If you cannot solve the problem with the aforementioned solutions, please contact the Service Hotline (see chapter Service).
18 |
PLEM 50 A1 |

Maintenance and Cleaning
■ The device is maintenance-free. |
GB |
|
 CAUTION!
■NEVER submerse the device in water or other liquids. Do not allow any moisture to penetrate into the device during cleaning.
■Keep the device the device clean to ensure fault-free operation.
■To clean the casing, use a soft dry cloth.
■Clean the laser outlet  and the receiver lens
  with a gentle air stream. In the case of more serious contamination, remove the dirt with a damp cotton swab. Do not exert any strong pressure!
 WARNING!
■The device should only be opened by a qualified person for repairs.
Storage
If you decide not to use the device for a long period, remove the batteries and store it in the belt pouch  in a clean, dry place away from direct sunlight.
PLEM 50 A1 |
19 |
Disposal
GB
Disposal of the device
The packaging is made from environmentally friendly material and can be disposed of at your local recycling plant.
Do not dispose of power tools in your normal domestic waste!
European Directive 2012/19/EU requires that worn-out power tools are collected separately and fed into an environmentally compatible recycling process.
Your local community or municipal authorities can provide information on how to dispose of the worn-out device.
Disposing of the batteries
Do not dispose of the batteries in the domestic waste. Consumers are legally obliged to dispose of used batteries at a collection point in their town/district or at a retail store.
This obligation is intended to ensure that batteries are disposed of in an environmentally responsible manner. Dispose of batteries only when they are fully discharged.
20 |
PLEM 50 A1 |

Warranty
GB
You are provided a 3-year warranty on this device, valid from the date of purchase. This device has been manufactured with care and inspected meticulously prior to delivery.
Please retain your receipt as proof of purchase. In the event of a warranty claim, please contact your Customer Service unit by telephone. This is the only way to guarantee free return of your goods.
NOTE
►The warranty only covers claims for material and manufacturing defects, not for transport damage, worn parts or damage to fragile components such as buttons or batteries.
This device is intended solely for private use and not for commercial purposes. The warranty shall be deemed void in the case of misuse or improper handling, use of force and interventions which have not been carried out by one of our authorised Service centres.
Your statutory rights are not restricted by this warranty. The warranty period is not prolonged by repairs e ected under the warranty. This also applies to replaced and repaired components.
Any damage and defects present at the time of purchase must be reported immediately after unpacking, but no later than two days after the date of purchase.
Repairs e ected after expiry of the warranty period shall be subject to charge.
PLEM 50 A1 |
21 |

Service
GB
Service Great Britain
Tel.: 0871 5000 720 (£ 0.10/Min.)
E-Mail: kompernass@lidl.co.uk
IAN 100719
Hotline availability: Monday to Friday 08:00 - 20:00 (CET)
Importer
KOMPERNASS HANDELS GMBH BURGSTRASSE 21
44867 BOCHUM GERMANY www.kompernass.com
22 |
PLEM 50 A1 |

Spis treści
Wstęp . . . . . . . . . . . . . . . . . . . . . . . . . . . . . . . . . . . . . . . 24 PL Użytkowanie zgodne z przeznaczeniem . . . . . . . . . . . . . . . . . . . .24
Opis części. . . . . . . . . . . . . . . . . . . . . . . . . . . . . . . . . . . . . . . . . . .24 Zakres dostawy . . . . . . . . . . . . . . . . . . . . . . . . . . . . . . . . . . . . . . .25 Dane techniczne. . . . . . . . . . . . . . . . . . . . . . . . . . . . . . . . . . . . . . .26
Wskazówki bezpieczeństwa . . . . . . . . . . . . . . . . . . . . 27
Niebezpieczeństwo obrażeń na skutek niewłaściwego obchodzenia się z bateriami . . . . . . . . . . . . . . . . . . . . . . . . . . . . .29
Uruchomienie . . . . . . . . . . . . . . . . . . . . . . . . . . . . . . . . 30
Montaż pętli na rękę . . . . . . . . . . . . . . . . . . . . . . . . . . . . . . . . . . .30 Wkładanie / wymiana baterii . . . . . . . . . . . . . . . . . . . . . . . . . . . .30 Sygnały akustyczne . . . . . . . . . . . . . . . . . . . . . . . . . . . . . . . . . . . .31 Włączanie/wyłączanie . . . . . . . . . . . . . . . . . . . . . . . . . . . . . . . . .31 Podświetlenie wyświetlacza . . . . . . . . . . . . . . . . . . . . . . . . . . . . . .31
Obsługa i praca. . . . . . . . . . . . . . . . . . . . . . . . . . . . . . . 32
Wybór jednostki długości. . . . . . . . . . . . . . . . . . . . . . . . . . . . . . . .32 Wybór powierzchni odniesienia . . . . . . . . . . . . . . . . . . . . . . . . . .32 Ogranicznik kątowy . . . . . . . . . . . . . . . . . . . . . . . . . . . . . . . . . . . .33 Pomiar długości . . . . . . . . . . . . . . . . . . . . . . . . . . . . . . . . . . . . . . .33 Funkcje pomiarowe. . . . . . . . . . . . . . . . . . . . . . . . . . . . . . . . . . . . .34 Pamięć wartości pomiarowych / wywoływanie . . . . . . . . . . . . . .38 Przycisk Clear. . . . . . . . . . . . . . . . . . . . . . . . . . . . . . . . . . . . . . . . .39
Pokrowiec przypinany do paska . . . . . . . . . . . . . . . . . . . . . . . . . .39 Błąd . . . . . . . . . . . . . . . . . . . . . . . . . . . . . . . . . . . . . . . . . . . . . . . .40
Konserwacja i czyszczenie . . . . . . . . . . . . . . . . . . . . . . 41
Składowanie . . . . . . . . . . . . . . . . . . . . . . . . . . . . . . . . . 42
Usuwanie . . . . . . . . . . . . . . . . . . . . . . . . . . . . . . . . . . . . 42
Utylizacja urządzenia . . . . . . . . . . . . . . . . . . . . . . . . . . . . . . . . . .42 Utylizacja baterii . . . . . . . . . . . . . . . . . . . . . . . . . . . . . . . . . . . . . .42
Gwarancja . . . . . . . . . . . . . . . . . . . . . . . . . . . . . . . . . . . 43
Serwis . . . . . . . . . . . . . . . . . . . . . . . . . . . . . . . . . . . . . . 44
Importer. . . . . . . . . . . . . . . . . . . . . . . . . . . . . . . . . . . . . 44
PLEM 50 A1 |
23 |
DALMIERZ LASEROWY PLEM 50 A1
PL
Wstęp
Gratulujemy zakupu nowego urządzenia. Wybrany produkt charakteryzuje się wysoką jakością. Instrukcja obsługi stanowi
część niniejszego produktu. Zawiera ona ważne informacje na temat bezpieczeństwa, użytkowania i usuwania. Przed rozpoczęciem użytkowania produktu należy zapoznać się ze wszystkimi informacjami dotyczącymi obsługi i bezpieczeństwa. Produkt należy użytkować wyłącznie zgodnie z zamieszczonym tu opisem oraz w podanym zakresie zastosowań. W przypadku przekazania urządzenia innej osobie należy dołączyć również instrukcję obsługi.
Użytkowanie zgodne z przeznaczeniem
Dalmierz laserowy PLEM 50 A1 (w dalszej części nazywany „urządzeniem”) przeznaczony jest do:
pomiaru odległości, długości, wysokości, odstępów oraz do obliczania powierzchni i kubatury wewnątrz pomieszczeń.
Jakiekolwiek inne użycie lub modyfikacje urządzenia uważane są za niezgodne z przeznaczeniem i kryją w sobie poważne niebezpieczeństwo wypadku.
Producent nie ponosi żadnej odpowiedzialności za szkody powstałe w wyniku użycia urządzenia w sposób niezgodny z jego przeznaczeniem.
Urządzenie nie nadaje się do zastosowań przemysłowych.
Opis części
 Wyświetlacz
 Przycisk ON
 Przycisk

 Przycisk
Przycisk C
OFF
 Ogranicznik kątowy (rozkładany)
Przycisk
UNIT
24 |
PLEM 50 A1 |

Przycisk |
PL |
|
Przycisk |
||
|
||
FUNC |
|
|
Pokrywa wnęki baterii |
|
|
Soczewka odbiorcza |
|
|
Otwór wylotowy promienia lasera |
|
|
Pokrowiec przypinany do paska |
|
|
Pętla do noszenia na ręku |
|
|
Rysunek A (wyświetlacz) |
|
|
Laser włączony |
|
|
Siła odbioru lasera |
|
|
Funkcje pomiarowe |
|
|
Pamięć danych |
|
|
Wskaźnik stanu baterii |
|
|
Wartość pomiarowa 3 |
|
|
Wartość pomiarowa 2 |
|
|
Jednostka długości |
|
|
Jednostkowa wartość pomiarowa (wynik) |
|
|
Min. wartość pomiarowa |
|
|
Symbol usterki sprzętowej |
|
|
Maks. wartość pomiarowa |
|
|
Płaszczyzna odniesienia |
|
|
Zakres dostawy |
|
Urządzenie dostarczane jest standardowo z następującymi elementami: Dalmierz laserowy PLEM 50 A1
2 x baterie 1,5 V typu LR03 (AAA) |
|
Pokrowiec przypinany do paska |
|
Pętla do noszenia na ręku |
|
Instrukcja obsługi |
|
PLEM 50 A1 |
25 |

OSTRZEŻENIE!
PL
■Elementów opakowania nie udostępniać dzieciom do zabawy. Istnieje niebezpieczeństwo uduszenia.
WSKAZÓWKA
►Po rozpakowaniu nowego urządzenia sprawdź, czy w środku znajdują się wszystkie części i czy nie ma żadnych widocznych uszkodzeń.
►W przypadku niekompletnej dostawy, bądź wystąpienia uszkodzeń wskutek wadliwego opakowania lub transportu skontaktuj się z infolinią serwisową (patrz rozdział Serwis).
Dane techniczne
Zakres pomiarowy: |
0,05 - 50 m A) |
Dokładność pomiaru (typowa): |
± 2,0 mm B) |
Najmniejsza jednostka na wyświetlaczu: |
1 mm |
Temperatura robocza: |
0° - 40°C |
Maks. wilgotność względna powietrza: |
≤ 75% |
Klasa lasera: |
2 |
Długość fal (λ): |
650 nm |
Maksymalna moc P maks.: |
<1 mW |
Baterie: |
2 x 1,5 V LR03 (AAA) |
Masa: |
88 g |
Wymiary: |
11,3 x 4,9 x 2,6 cm |
A) Zasięg jest tym większy, im lepiej promień lasera jest odbijany od powierzchni celu (z rozproszeniem, nie jak od lustra) i im jaśniejszy jest punkt lasera w stosunku do jasności w otoczeniu (pomieszczenia, zmierzch).
26 |
PLEM 50 A1 |

B) W niekorzystnych warunkach oświetlenia, jak np. przy silnym nasłonecznieniu lub przy powierzchniach źle odbijających światło PL maksymalne odchylenie wynosi ± 10 mm na 50 m. W korzystnych warunkach nalezy liczyć się z oddziaływaniem o wartości ± 0,05
mm/m.
Wskazówki bezpieczeństwa
■Nie używaj nigdy urządzenia w miejscach, w których występuje zagrożenie pożaru lub wybuchu, np. w pobliżu łatwopalnych cieczy lub gazów.
■To urządzenie może być używane przez dzieci od 8 roku życia oraz przez osoby o zmniejszonych zdolnościach fizycznych, sensorycznych lub umysłowych lub też osoby nieposiadające odpowiedniego doświadczenia i/lub wiedzy, wyłącznie pod nadzorem lub po przeszkoleniu w zakresie bezpiecznego używania urządzenia oraz wynikających z niego zagrożeń. Dzieci nie mogą bawić się urządzeniem. Czyszczenie i konserwacja przez użytkownika nie mogą być wykonywane przez dzieci, chyba że pod odpowiednim nadzorem.
■Nie zostawiaj włączonego urządzenia bez nadzoru i wyłączaj je po użyciu. W przeciwnym razie inne osoby mogłyby zostać oślepione przez promień lasera.
■Urządzenie należy chronić przed wilgocią i bezpośrednim nasłonecznieniem.
■Urządzenia nie wolno wystawiać na działanie wysokiej temperatury ani silnych wahań temperatury. Nie należy go np. zostawiać na dłuższy czas w samochodzie. W przypadku większych wahań temperatury, przed uruchomieniem należy odczekać, aż urządzenie osiągnie temperaturę otoczenia. Skrajnie wysokie temperatury lub silne wahania temperatury mogą niekorzystnie wpłynąć na dokładność urządzenia.
■Należy unikać silnych uderzeń i upadku narzędzia pomiarowego.
PLEM 50 A1 |
27 |
 Loading...