


CABLE WINCH PSZ 250 B2
CABLE WINCH |
WCIĄGARKA LINOWA |
|||
Operation and Safety Notes |
Wskazówki dotyczące obsługi i bezpieczeństwa |
|||
Translation |
of original operation manual |
Tłumaczenie oryginalnej instrukcji obsługi |
||
DVIGALO Z VLEČNO ŽIČNO VRVJO |
LANOVÝ NAVIJÁK |
|||
Navodila za upravljanje in varnostna opozorila |
Pokyny pre obsluhu a bezpečnostné pokyny |
|||
Prevod |
originalnega navodila za uporabo |
Preklad |
originálneho návodu na obsluhu |
|
ELEKTRISCHE KABELTAKEL |
SEILHEBEZUG |
|||
Bedienings - en veiligheidsinstructies |
Bedienungs - und Sicherheitshinweise |
|||
Vertaling van de originele gebruiksaanwijzing |
Originalbetriebsanleitung |
|||
IAN 100684
100684_par_Seilhebelzug_cover_PL_SI_SK_NL.indd 3 |
|
|
18.06.14 15:42 |
|
|

Before reading, unfold both pages containing illustrations and familiarise yourself with all functions of the device.
Przed przeczytaniem proszę rozłożyć obie strony z ilustracjami, a następnie proszę zapoznać się z wszystkimi funkcjami urządzenia.
Pred branjem obe strani s slikami odprite navzven in se nato seznanite z vsemi funkcijami naprave.
Pred čítaním si odklopte obidve strany s obrázkami a potom sa oboznámte so všetkými funkciami prístroja.
Vouw vóór het lezen de beide pagina‘s met de afbeeldingen open en maak u vertrouwd met alle functies van het apparaat.
Klappen Sie vor dem Lesen die beiden Seiten mit den Abbildungen aus und machen Sie sich anschließend mit allen Funktionen des Gerätes vertraut.
GB |
Operation and Safety Notes |
Page |
5 |
PL |
Wskazówki dotyczące obsługi i bezpieczeństwa |
Strona |
13 |
SI |
Navodila za upravljanje in varnostna opozorila |
Stran |
21 |
SK |
Pokyny pre obsluhu a bezpečnostné pokyny |
Strana |
29 |
NL |
Bedieningsen veiligheidsinstructies |
Pagina |
37 |
DE / AT / CH |
Bedienungsund Sicherheitshinweise |
Seite |
45 |
|
|
|
|
|
100684_par_Seilhebelzug_cover_PL_SI_SK_NL.indd 4 |
|
|
18.06.14 15:42 |
|
|
|
|
|
|
|
||
|
|
|
|
|
|
|
||
|
|
|
|
|
|
|
||
|
|
|
|
|
|
|
|
|
1 |
1 |
14 |
3 |
|
|
|
4 |
|
5 |
13 |
6 |
|
7 |
|
8 |
9 |
|
10 |
|
11 |
|
12 |
|
B |
|
100684_par_Seilhebelzug_cover_PL_SI_SK_NL.indd |
5 |
2
A 

|
15 |
|
|
16 |
|
C |
1 |
|
|
|
|
|
1 |
|
|
18.06.14 |
15:42 |

D |
6 |
15 |
|
|
|
16 |
|
F |
|
|
15 |
|
|
|
6 |
|
|
|
16 |
H |
|
|
|
|
|
|
9 |
|
|
|
10 |
|
|
|
11 |
100684_par_Seilhebelzug_cover_PL_SI_SK_NL.indd |
8 |
||
E |
|
|
15 |
|
6 |
|
16 |
G |
2 |
4 |
8 |
|
|
|
5 |
|
7 |
15 |
|
16 |
|
I |
|
18.06.14 15:43

Table of contents
Introduction |
|
|
Intended use......................................................................................................................................... |
Page |
6 |
Parts description................................................................................................................................... |
Page |
6 |
Scope of delivery................................................................................................................................. |
Page |
6 |
Technical Data..................................................................................................................................... |
Page |
6 |
Important safety instructions.......................................................................................... |
Page |
7 |
Safety notices specific to the device.......................................................................... |
Page |
7 |
Before using |
|
|
Mounting.............................................................................................................................................. |
Page |
8 |
Setting up the pulley function.............................................................................................................. |
Page |
8 |
Operation |
|
|
Putting the cable hoist into service...................................................................................................... |
Page |
8 |
Operating the cable hoist................................................................................................................... |
Page |
8 |
Cleaning, maintenance and ordering spare parts |
|
|
Cleaning............................................................................................................................................... |
Page |
9 |
Maintenance........................................................................................................................................ |
Page |
9 |
Disposal............................................................................................................................................. |
Page |
9 |
Warranty / Service centre |
|
|
Ordering spare parts........................................................................................................................... |
Page 10 |
|
Declaration of conformity.................................................................................................. |
Page 10 |
|
GB 5
100684_par_Seilhebelzug_content_PL_SI_SK_NL.indd 5 |
|
|
02.07.14 12:41 |
|
|
Introduction
Cable winch PSZ 250 B2 |
|
Deflection pulley |
||||
|
15 |
|||||
|
|
|
|
16 |
Additional hook |
|
Introduction |
|
|
|
|
Scope of delivery |
|
|
Please familiarise yourself with the appli- |
|
|
|
||
|
|
|
|
|
||
|
|
|
|
|
||
|
ance before preparing it for use and using |
1 |
Cable hoist |
|||
|
it for the first time. To do so, please care- 2 |
Mounting bracket with mounting materials (Fig. C) |
||||
|
||||||
fully read the following operating instructions and |
1 |
Deflection pulley with additional hook and moun- |
||||
the important safety information. Use the product |
|
|
ting materials (see Fig. D) |
|||
only as described and for the indicated purpose. |
1 |
Set of instructions for use |
||||
Keep these instructions in a safe place. If you pass |
|
|
|
|
||
the device on to anyone else, please ensure that |
|
|
|
Technical Data |
||
you also pass on all the documentation. |
|
|
|
|||
Intended use
The cable hoist is used to hoist and lower loads in indoor spaces in accordance with the equipment power. Only use the device as described. Any other use is not intended. The user / operator, not the manufacturer, is liable for damages or any type of injury resulting from any other use. Please note that our devices were not constructed for commercial, manual, or industrial use. We do not accept any warranty liability if the device is used for commercial, manual, or industrial operations, or activities similar to these.
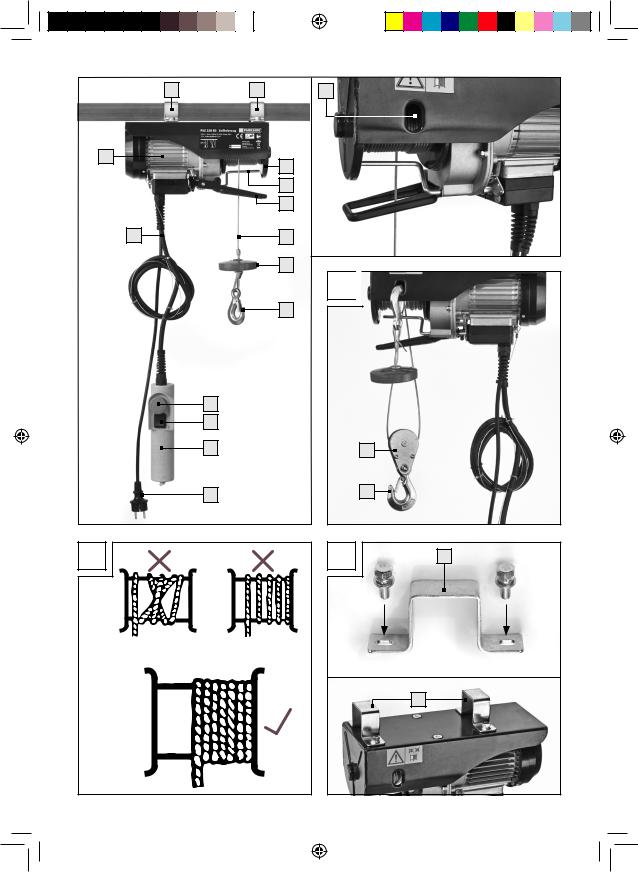
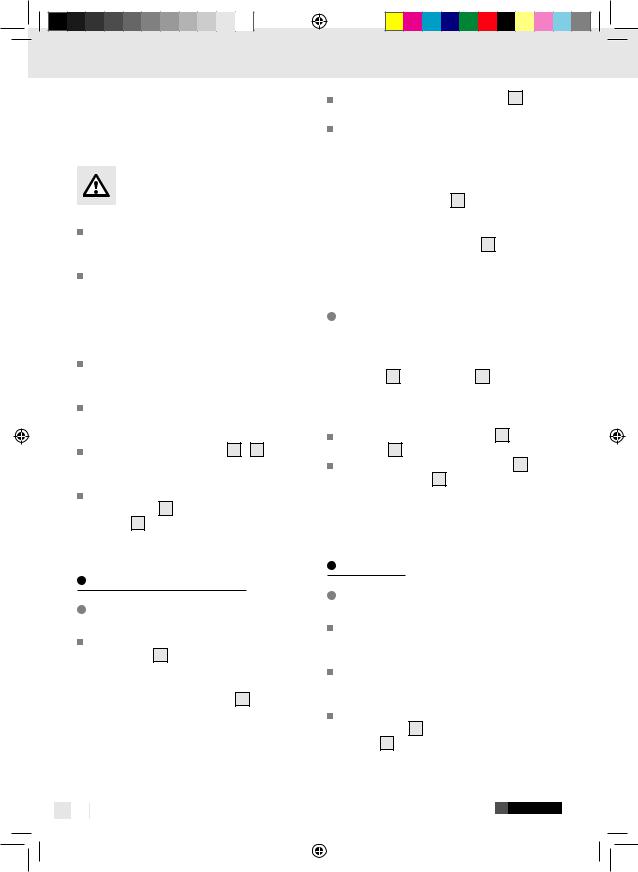
Parts description
1Mounting bracket
2Mounting opening for hook in deflection operation
3Hoisting drum
4Maximum cable length lever
5Auto-stop mechanism lever
6Steel cable
7Shut-off weight
8Hook
9Emergency stop switch
10Push button
11Remote control unit
12Mains lead
13Control lead
14Motor
Voltage: |
230 V~ 50 Hz |
Rated current: |
2.2 A |
Power input: |
500 W |
Duty type: |
S3 20 % 10 min |
Rated load: |
125 / 250 kg (without / with |
|
deflection pulley) |
Hoisting height: |
11.5 / 5.7 m (without / with |
|
deflection pulley) |
Rated speed: |
8 / 4 m / min (without / with |
|
deflection pulley) |
Steel cable |
|
diameter: |
3.0 mm |
Steel cable |
|
tensile strength: |
1870 N / mm2 |
Insulating level: |
B |
Degree of |
|
protection: |
IP54 |
Power unit class: |
M1 |
Net weight: |
9.3 kg |
Gross weight: |
10.5 kg |
Duty type 3–20 % - 10 min: S3 = Intermittent duty without the effect of starting. During a 10 min period the max. operating time is 20 % (2 min).
Mechanical group M1.
The rated power of the device does not vary with the position of the load.
The value of the A-rated noise emission in the operator position is less than 70 dB.
The cable hoist must be operated at ambient temperatures from 0 °C to 40 °C and a relative humidity below 85 %. Height above sea level: max. 1000 m.
6 GB
100684_par_Seilhebelzug_content_PL_SI_SK_NL.indd 6 |
|
|
02.07.14 12:41 |
|
|
Introduction / Important safety instructions / Safety notices specific to the device
During transport and storage the temperature may be between -25 °C and 55 °C. The maximum permissible temperature is 70 °C.
Important safety instructions

 Please read all safety information and instructions. Failure to observe the safety information and instructions can result in electric shock, fire and / or serious injury. Keep all safety instructions and directions for future use!
Always verify the mains voltage matches the voltage on the nameplate. If the mains voltage is not suitable, abnormal device operation and personal injury may result.
The power supply must have earthing and be protected by an earth leakage circuit breaker. Hoisting loads exceeding the rated load is prohibited.
Only use the device for the intended purpose. Never hoist persons with the cable hoist.
Do not unplug from the socket by the cable. Keep the cable away from heat, oil, and sharp edges.
Never attempt to hoist fixed or blocked loads. Remove the mains plug from the socket after every use.
Keep children and other unauthorised persons away from the device.
Pulling loads sideways or from one side is prohibited. Prevent the load from swinging. Ensure the hook 8 moves in the direction shown on the push button 10 .
Regularly check the cable hoist for damage. The push button 10 must be in good condition. Always have repairs and maintenance performed by an electrician at an authorised specialist workshop. repairs must be performed by an electrician to prevent operator accidents. Avoid rapid start-up and powering off (inching mode).
Always be attentive whilst operating the cable hoist.
Never stand or work below the hoisted load.
Hoisting stuck or jammed loads is prohibited. Always pull the mains plug before executing settings on the device.
The cable hoist is not suitable for transporting hot and / or molten materials; the cable hoist is further not suitable for use in low temperatures or in environments with severe weather (see Technical Data).
The service life of the cable hoist is approx. 8000 cycles (excl. wear parts). Once the hoist has reached 8000 cycles all mechanical parts must be inspected and overhauled.
Read and understand the operating instructions before using the cable hoist.
Ensure the operator is familiar with the functionality of the device and how it should be operated. The user must always operate the device in accordance with the operating instructions. The hoist is not intended for continuous operation. The duty type is:
Intermittent duty without the effect of starting. After opening the packaging, please inspect the device, the steel cable, the hooks, the maximum cable length lever and the auto-stop mechanism lever for transport damage.
Safety notices specific to the device
The user must hoist the load from the ground at the slowest possible speed. The cable must be tightened when the load is being hoisted.
The electric cable hoist is not equipped with a rated power limit. Therefore do not continue
attempting to hoist the load if the overheat protection limits operation. In this event the load exceeds the rated power of the cable hoist. Do not leave suspended loads unattended without taking the appropriate safety precautions. Secure the device with a 10 A fuse or a 10 A earth leakage circuit breaker to protect the electric circuit.
Do not use the lever 4 / 5 as a routine stop. These are only intended as emergency stopping devices.
GB 7
100684_par_Seilhebelzug_content_PL_SI_SK_NL.indd 7 |
|
|
02.07.14 12:41 |
|
|

Safety notices specific to the device / Before using / Operation
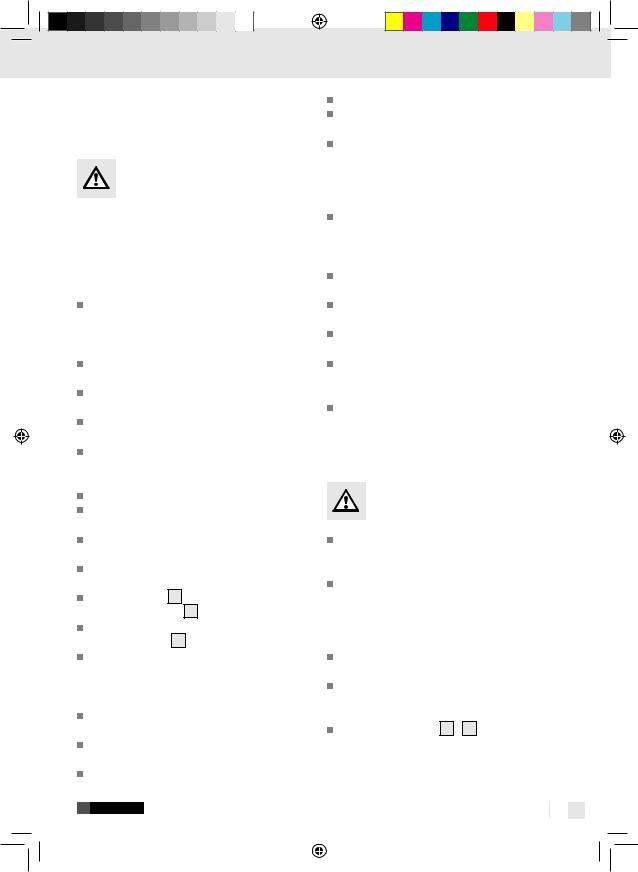
Before beginning, verify the steel cable 6 is wound around the drum 3 correctly and the clearance between the turns is smaller than the steel cable (Fig. B).
Before using
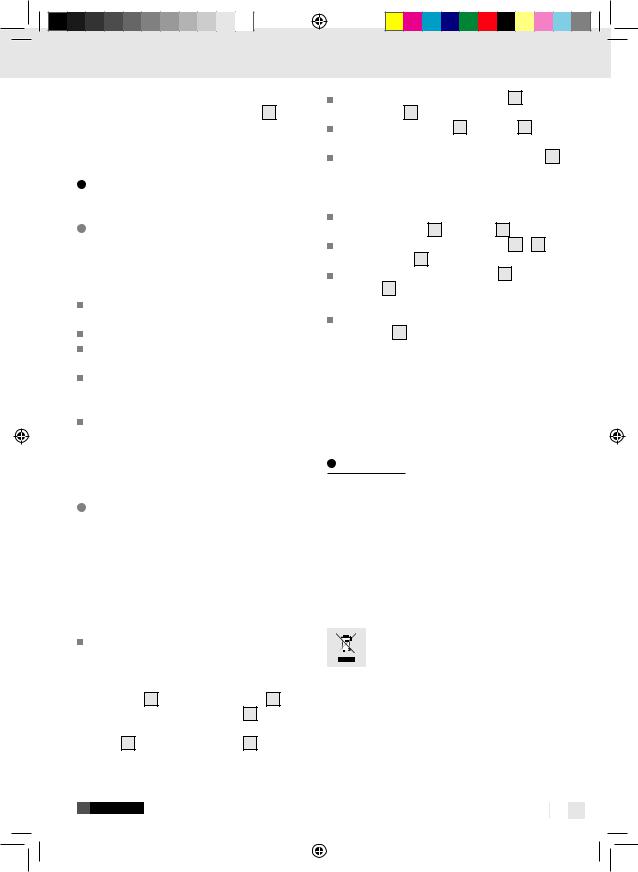
Mounting (see Fig. C)
Secure the cable hoist to a square pipe / boom using the 2 mounting brackets 1 . The dimensions of the square pipe / boom must correspond with the size of the mounting bracket 1 and must be able to bear double the rated load. Note: We recommend contact a qualified technician for this purpose.
Screw the mounting brackets 1 to the cable hoist (also see Fig. C).
Tighten all screws.
Note: A qualified technician should inspect the anchor of the square tube / boom before putting the device into service.
Note: The cable hoist motor 14 is equipped with a thermostat switch. The motor 14 may therefore stop whilst operating the cable hoist; it will automatically restart once it has cooled down.
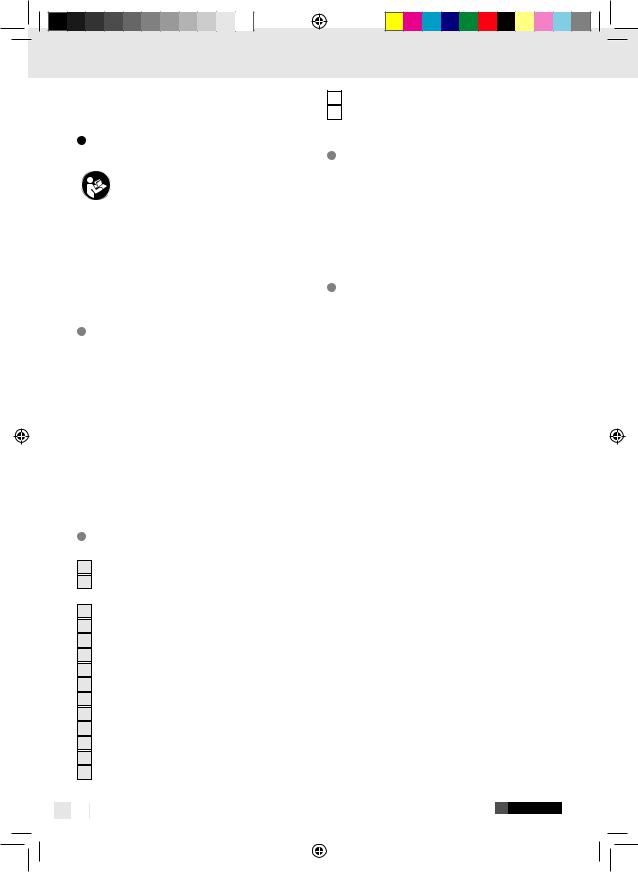
Setting up the pulley function (see Fig. D–G)
The cable hoist is equipped with a pulley 15 and an additional hook 16 . When used correctly, the cable hoist can lift double the load.
Install the pulley 15 and additional hook 16 as shown in figures D–G.
Hook the fixed hook 8 into the fixing opening 2 (see Fig. G). The load will now be lifted with two steel cables and the cable hoist can therefore lift double the load.
Operation
Putting the cable hoist into service
The user must hoist the load from the ground at the slowest possible speed. The cable must be tightened when the load is being hoisted.
Secure the device with a 10 A fuse or a 10 A earth leakage circuit breaker to protect the electric circuit.
Before beginning, verify the steel cable 6 is wound around the drum 3 correctly and the clearance between the turns is smaller than the steel cable (Fig. B).
Remove the adhesive tape from the cable drum 3 prior to first use.
Ensure the load is properly secured to the hook 8 or, for pulley operation, the additional hook 16 , and always maintain a distance to the load and the steel cable 6 .
Operating the cable hoist
Check if the emergency stop switch 9 is pressed.
Turn the emergency stop switch 9 clockwise to release.
Press the push button ▲ 10 to hoist the load (see Fig. H).
Press the push button ▼ 10 to lower the load (see Fig. H).
Auto-stop mechanism lever 5
When the maximum hoisting height has been reached, the shut-off weight 7 will push the lever 5 upward. This engages a limit switch and the load can no longer be hoisted.
Maximum cable length lever 4
When the load reaches the lowest possible position, an end switch is activated, preventing the load from being lowered further. This end switch also prevents the cable hoist from being operated in the wrong direction (hook moving opposite of the direction indicated on the push button 10 ).
8 GB
100684_par_Seilhebelzug_content_PL_SI_SK_NL.indd 8 |
|
|
02.07.14 12:41 |
|
|
Operation / Cleaning, maintenance and ordering spare parts / Disposal
ATTENTION! In the event of an emergency, immediately activate the emergency stop switch 9 to stop the cable hoist. The cable hoist cannot be operated if the emergency stop switch has been activated.
Cleaning, maintenance and ordering spare parts
Cleaning
ATTENTION! Unplug the mains plug from the socket before cleaning.
Do not use cleaners or solvents; these could affect the plastic parts of the device. Ensure water cannot penetrate the housing.
Keep safety devices, venting slots and the motor housing as dust and dirt free as possible.
Rub the device down with a clean cloth or blow out with compressed air at a low pressure setting.
Regularly clean the device with a damp cloth and a little soft soap.
Note: We recommend cleaning the device immediately after every use.
Maintenance
ATTENTION! Verify the device is not connected to the mains when performing care.
Below: A cycle corresponds to moving a load up and down once.
Periodic inspection corresponds to an inspection after 100 cycles.
Periodically check the end switches on the cable hoist are working properly (check without load). Test as follows: When the cable reaches the maximum hoisting height the auto-stop mechanism lever 5 is activated. The motor 14 must now stop. When the steel cable 6 is unwound as far as possible, the maximum cable length lever 4 is activated. The motor 14 must now stop.
Periodically check the power cable 12 and the control lead 13 .
Lubricate the steel cable 6 and pulley 15 every 200 cycles.
Every 30 cycles verify the entire steel cable 6 is in good working order in accordance with Figure I. If damaged, it must be replaced with a steel cable corresponding with the technical data. Every 1000 cycles check the screws on the mounting bracket 1 and pulley 15 are tight. Every 1000 cycles verify the hooks 8 / 16 and the pulley 15 are in good condition. Verify the emergency stop switch 9 and push buttons 10 are in good condition before every use.
Check the brake system every 1000 cycles. If the motor 14 emits unusual noises or is unable to hoist the rated load, the brake system may need to be overhauled:
-Replace damaged or worn parts and keep the associated maintenance documentation.
-Please contact an authorised service centre for unscheduled maintenance work.
Disposal
The device is packaged to protect it from transport damage. This packaging is a raw material and therefore reusable or may be recycled. The device and its accessories are made from various materials, e.g. metal and plastics.
Dispose of defective components through toxic waste disposal. Contact the speciality retailer or your municipal government for information!
Do not dispose of power tools in household waste!
In accordance with European Directive 2012 / 19 / EU on waste electrical and electronic equipment and its implementation into national legislation, worn out power tools must be collected separately and recycled in an environmentally friendly fashion.
GB 9
100684_par_Seilhebelzug_content_PL_SI_SK_NL.indd 9 |
|
|
02.07.14 12:41 |
|
|

Disposal / Warranty / Service centre / Declaration of conformity
Alternate recycling option for return request:
The owner of the electrical equipment is alternatively obligated to contribute to proper recycling in place of a return in the case of abandonment. For this purpose the used equipment may also be taken to a collection site disposing within the terms of the national Closed Substance Cycle Waste Management Act. This does not apply to accessories attached to the used equipment and implements without electrical components.
Unit 55 Romsey Industrial Estate, Romsey
GB - Hampshire SO51 OHR
T: +44 845 0766158
F: +44 1794 514882
IAN 100684
Please have your receipt and the article number (e.g. IAN 12345) ready as your proof of purchase when enquiring about your product.
Warranty / Service centre |
Ordering spare parts |
We provide a 3-year warranty covering faults in materials or manufacture of the device from the purchase date.
The warranty does not cover:
·Damage from improper use.
·Wear parts.
·Defects the customer was aware of at the time of purchase.
·Damage caused by the customer.
This warranty does not affect the customer‘s legal rights. The customer must provide proof of purchase in order for any warranty claims within the warranty period to be honoured. Warranty claims must be filed within 3 years from the date of purchase.
In the event of a warranty claim, the customer has the right to have the goods repaired by our own workshop or a workshop authorised by us. The device must not be opened for any reason. Opening or modifying the device invalidates the warranty. This warranty does not grant any additional rights to the customer (based on the warranty). Complaints are often initiated by difficulties encountered during use. Many of these complaints can be resolved by telephone or email. Please contact our Service Hotline in the first instance, before you return the device to the manufacturer.
When ordering replacement parts you should give the following information:
-Device model
-Device item number
-device ID number
Declaration of conformity 

We, MATRIX GMBH, officer responsible for documentation: Mr. Joachim Lichtl, POSTAUER STR. 26, 84109 WÖRTH / ISAR, GERMANY, hereby declare this product to comply with the following standards, normative documents and EC directives:
2006 / 42 / EC
2006 / 95 / EC
2004 / 108 / EC
2011 / 65 / EU
applicable harmonised standards
EN 14492-2+A1 EN 60204-32 EN 55014-1
EN 55014-2
EN 61000-3-2
EN 61000-3-3
Type / Description of product:
Cable winch PSZ 250 B2
10 GB
100684_par_Seilhebelzug_content_PL_SI_SK_NL.indd 10 |
|
|
02.07.14 12:41 |
|
|
Declaration of conformity
Year of manufacture: 2014
Wörth / Isar, 31.05.2014
Joachim Lichtl
- Managing Director -
We reserve the right to make technical modifications in the course of product development.
GB 11
100684_par_Seilhebelzug_content_PL_SI_SK_NL.indd 11 |
|
|
02.07.14 12:41 |
|
|

12
100684_par_Seilhebelzug_content_PL_SI_SK_NL.indd 12 |
|
|
02.07.14 12:41 |
|
|

Spis zawartości
Instrukcja
Przeznaczenie produktu................................................................................................................... |
Strona |
14 |
Opis części........................................................................................................................................ |
Strona |
14 |
Zawartość......................................................................................................................................... |
Strona |
14 |
Dane techniczne............................................................................................................................... |
Strona |
14 |
Istotne wskazówki dotyczące bezpieczeństwa.......................................... |
Strona 15 |
Wskazówki dotyczące bezpieczeństwa podczas używania |
|
urządzenia.................................................................................................................................. |
Strona 16 |
Przed uruchomieniem |
|
Montaż.............................................................................................................................................. |
Strona 16 |
Dostosowanie funkcji wielkrążka.................................................................................................... |
Strona 16 |
Obsługa |
|
Uruchamianie wciągarki linowej..................................................................................................... |
Strona 16 |
Obsługa wciągarki........................................................................................................................... |
Strona 17 |
Czyszczenie, konserwacja i zamawianie części zamiennych |
|
Czyszczenie...................................................................................................................................... |
Strona 17 |
Konserwacja..................................................................................................................................... |
Strona 17 |
Utylizacja...................................................................................................................................... |
Strona 18 |
Gwarancja / Serwis.............................................................................................................. |
Strona 18 |
Zamawianie części zamiennych...................................................................................................... |
Strona 19 |
Deklaracja zgodności......................................................................................................... |
Strona 19 |
PL 13
100684_par_Seilhebelzug_content_PL_SI_SK_NL.indd 13 |
|
|
02.07.14 12:41 |
|
|

Instrukcja
Wciągarka linowa PSZ 250 B2
Instrukcja
Przed uruchomieniem i pierwszym zastosowaniem należy się zapoznać z
działaniem urządzenia. W tym celu należy uważnie przeczytać niniejszą instrukcję obsługi oraz ważne wskazówki dotyczące bezpieczeństwa. Urządzenie stosować wyłącznie zgodnie z opisem i przeznaczeniem. Niniejszą instrukcję należy zachować. Przekazując produkt innej osobie, należy załączyć do niego wszystkie dokumenty.
Przeznaczenie produktu
Wciągarka linowa służy do podnoszenia i opuszczania ciężarów w zamkniętych pomieszczeniach odpowiednio do mocy urządzenia. Urządzenia należy używać wyłącznie w sposób zgodny z opisem. Korzystanie z maszyny w innym celu nie jest zgodne z jej przeznaczeniem. Za szkody powstałe wskutek użycia niezgodnego z przeznaczeniem odpowiada użytkownik/obsługa maszyny, nie producent. Należy zwrócić uwagę, że nasze urządzenia zgodnie z ich przeznaczeniem nie zostały skonstruowane do użytku przemysłowego, gospodarczego lub przemysłowego. Nie przejmujemy gwarancji za urządzenie, jeżeli urządzenie zastosowane zostało w przedsiębiorstwach produkcyjnych, zakładach rzemieślniczych lub przemysłowych lub podobnych czynnościach.
Opis części
1Pałąk mocujący
2Otwór mocujący na hak przy przekładni kątowej
3Bęben linowy
4Dźwignia do maksymalnej długości liny
5Dźwignia mechanizmu automatycznego zatrzymywania
6Linka stalowa
7Waga wyłączeniowa
8Hak
9Wyłącznik awaryjny
14 PL
10Włącznik przyciskowy
11Pilot
12Kabel sieciowy
13Przewód od pilota
14Silnik
15Krążek prowadzący
16Haki dodatkowe
Zawartość
1 Wciągarka linowa
2 Pałąki mocujące z materiałem montażowym (rys. C)
1 Krążek prowadzący z hakami dodatkowymi i materiał montażowy (patrz rys. D)
1 Instrukcja obsługi
Dane techniczne
Napięcie: |
230 V 50 Hz |
Prąd znamionowy: |
2,2 A |
Pobór mocy: |
500 W |
Rodzaj eksploatacji: |
S3 20 % 10 min |
Obciążenie znamionowe: |
125 / 250 kg (bez / |
|
z krążkiem |
|
prowadzącym) |
Wysokość podnoszenia: |
11,5 / 5,7 m (bez / |
|
z krążkiem |
|
prowadzącym) |
Prędkość znamionowa: |
8 / 4 m / min (bez / |
|
z krążkiem |
|
prowadzącym) |
Średnica |
|
linki stalowej: |
3,0 mm |
Wytrzymałość |
|
na rozciąganie linki stalowej: 1870 N / mm2 |
|
Klasa izolacji: |
B |
Rodzaj ochrony: |
IP54 |
Klasa silnika: |
M1 |
Waga netto: |
9,3 kg |
Bruttogewicht: |
10,5 kg |
Rodzaj pracy 3–20 % - 10 min: S3 = Praca przerywana bez wpływu na przebieg rozbiegu. W czasie 10 min maksymalny czas pracy może wynosić 20 % 2 min.
100684_par_Seilhebelzug_content_PL_SI_SK_NL.indd 14 |
|
|
02.07.14 12:41 |
|
|

Instrukcja / Istotne wskazówki dotyczące bezpieczeństwa
Grupa mechaniczna to M1.
Moc znamionowa urządzenia nie zmienia się wraz z pozycją ładunku.
Wartość emicji hałasu oceniona jako A przy pozycji operatora jest niższa niż 70 dB.
Należy używać wciągarki w temperaturze otoczenia między 0 °C und 40 °C i względnej wilgotności powietrza poniżej 85 %. Wysokość nad poziomem morza: maks. 1000 m.
Do transportu i przechowywania temperatura może wynosić między -25 °C a 55 °C. Najwyższa dopuszczalna temperatura wynosi 70 °C.
Istotne wskazówki dotyczące bezpieczeństwa

 Należy przeczytać wszystkie wskazówki dotyczące bezpieczeństwa i instrukcje. Zaniedbania w przestrzeganiu wskazówek bezpieczeństwa i instrukcji mogą spowodować porażenie prądem elektrycznym, pożar i / lub ciężkie obrażenia ciała. Należy zachować wszystkie wskazówki dotyczące bezpieczeństwa oraz instrukcje!
Zawsze należy kontrolować, czy napięcie sieciowe odpowiada napięciu na tabliczce znamionowej. W przypadku, jeśli napięcie sieciowe będzie nieodpowiednie, może prowadzić to do nienormalnej pracy urządzenia i szkód osobowych.
Zasilanie musi posiadać uziemienie i być zabezpieczone wyłącznikiem różnicowoprądowym. Zabrania się podnoszenia ciężarów, które przekraczają obciążenie znamionowe. Urządzenia należy używać wyłącznie do przewidzianego celu. Wciągarką linową nigdy nie należy podnosić osób.
Nie należy stosować kabla do wyjmowania wtyczki z gniazdka. Trzymaj kabel z daleka od gorąca, oleju, ostrych krawędzi.
Nigdy nie próbować podnosić ciężarów zablokowanych lub przymocowanych.
Po każdym użyciu wtyczkę należy wyjąć z gniazdka sieciowego.
W czasie użytkowania urządzenia należy dopilnować, aby w pobliżu nie przebywały dzieci ani żadne inne nieuprawnione osoby.
Zabrania się ciągnięcia ładunków z boku lub z jednej strony. Należy unikać kołysania ładunkiem. Upewnić się, że hak 8 porusza się w tym samym kierunku, jaki pokazany jest na włączniku przyciskowym 10 .
Przed użyciem należy regularnie kontrolować wciągarkę pod kątem uszkodzeń. Włącznik przyciskowy 10 musi być w dobrym stanie. Naprawy i przeglądy zlecać tylko wykwalifikowanemu elektrykowi w autoryzowanych warsztatach. Napraw powinien dokonywać jedynie wykwalifikowany elektryk, w przeciwnym wypadku może powstać niebezpieczeństwo dla użytkownika.
Unikać szybkiego włączania i wyłączania (tryb tipp).
Zawsze trzeba być ostrożnym w czasie obsługi wciągarki.
Nie należy stać ani pracować pod podniesionym ładunkiem.
Niedopuszalne jest podnoszenie przymocowanych na stałe lub zakleszczonych ładunków. Przed zmianą ustawień w urządzeniu należy zawsze wyciągnąć wtyczkę z sieci. Wciągarka nie nadaje się do transportu gorących i / lub stopionych mas, ponadto wciągarka nie daje się do zastosowania w niskich temperaturach i intensywnych warunkach pogodowych (patrz Dane techniczne).
Okres użytkowania wyciągarki wynosi ok. 8000 cykli (wyłączając części zużywające się). Jeśli zostało wykonanych 8000 cykli, wszystkie części urządzenia muszą być skontrolowane i wymienione.
Przed użyciem urządzenia należy przeczytać ze zrozumieniem instrukcję obsługi wciągarki linowej.
Należy upewnić się, że operator wie, w jaki sposób funkcjonuje urządzenie i jak należy go używać.
Użytkownik powinien zawsze działać zgodnie z instrukcją obsługi.
Wciągarka nie jest przeznaczona do długotrwałego używania. Rodzaj pracy: Praca przerywana bez wpływu na przebieg rozbiegu.
Po otworzeniu opakowania sprawdzić urządzenie, linkę stalową, haki, dźwignię do
PL 15
100684_par_Seilhebelzug_content_PL_SI_SK_NL.indd 15 |
|
|
02.07.14 12:41 |
|
|
… / Wskazówki dotyczące bezpieczeństwa … / Przed uruchomieniem / Obsługa
maksymalnej długości linki i dźwignię mechanizmu automatycznego wyłączania i pod kątem możliwych uszkodzeń.
Wskazówki dotyczące bezpieczeństwa podczas używania urządzenia
Użytkownik powinien podnosić ciężar z podłoża z możliwie jak najmniejszą prędkością. Przy podnoszeniu ciężaru linka powinna być napięta. Elektryczna wciągarka linowa nie jest wyposażona w ogranicznik ciężaru znamionowego. Dlatego, nie należy próbować podnosić powtórnie ciężaru po wyłączeniu przez termowyłącznik. Ciężar przekracza w takim przypadku obciążenie znamionowe wciągarki.
Nie pozostawiać żadnych wiszących ładunków bez nadzoru, bez zastosowania odpowiednich środków zabezpieczających.
Urządzenie należy zabezpieczyć bezpiecznikiem 10 A lub wyłącznikiem różnicowym 10 A, aby chronić obwód prądu.
Nie należy używać dźwigni 4 / 5 jako rutynowego wyłącznika. Służą one wyłącznie jako wyłącznik awaryjny.
Przed rozpoczęciem należy upewnić się, że linka stalowa 6 jest właściwie zawinięta na bębnie 3 , a odstęp między zwojami jest mniejszy niż linka (rys. B).
Należy przykręcić pałąk mocujący 1 do wciągarki (patrz także rys. C).
Wszystkie śruby mocno dokręcić. Wskazówka: Przed uruchomieniem mocowanie rury czworokątnej/ramienia wychylnego powinno zostać sprawdzone przez wykwalifikowanego technika.
Wskazówka: Silnik 14 wciągarki linowej wyposażony jest w termowłącznik. Podczas pracy wciągarki linowej może dojść dlatego do zatrzymania pracy silnika 14 , który zostanie automatycznie uruchomiony ponownie po schłodzeniu się.
Dostosowanie funkcji wielkrążka (patrz rys. D–G)
Wciągarka linowa wyposażona jest w rolkę prowadzącą 15 i hak dodatkowy 16 . Przy właściwym zastosowaniu wciągarka linowa może podnieść podwójny ciężar.
Zamontować rolkę prowadzącą 15 i hak dodatkowy 16 jak pokazano na rysunkach D–G. Powiesić na stałe zamontowany hak 8 w otworze mocującym 2 (patrz rys. G). Teraz ładunek podnoszony jest za pomocą dwóch linek stalowych, wciągarka może w ten sposób podnieść podwójny ciężar.
Przed uruchomieniem
Montaż (patrz rys. C)
Zamocować wciągarkę za pomocą 2 pałąków mocujących 1 na rurze czworokątnej / ramieniu wychylnym. Wymiary rury czworokątnej / ramienia wychylnego muszą być zgodne z wymiarami pałąków mocujących 1 i musi ona / ono wytrzymywać dwukrotnie większe obciążenie znamionowe.
Wskazówka: Zalecamy zwrócenie się w tym celu do wykwalifikowanego technika.
Obsługa
Uruchamianie wciągarki linowej
Użytkownik powinien podnosić ciężar z podłoża z możliwie jak najmniejszą prędkością. Przy podnoszeniu ciężaru linka powinna być napięta. Urządzenie należy zabezpieczyć bezpiecznikiem 10 A lub wyłącznikiem różnicowym 10 A, aby chronić obwód prądu.
Przed rozpoczęciem należy upewnić się, że linka stalowa 6 jest właściwie zawinięta na bębnie 3 , a odstęp między zwojami jest mniejszy niż linka (rys. B).
16 PL
100684_par_Seilhebelzug_content_PL_SI_SK_NL.indd 16 |
|
|
02.07.14 12:41 |
|
|
 Loading...