


Anleitung_LB4_2255122:_ 01.06.2011 14:13 Uhr Seite 1
PSZ 250 A2
|
|
|
|
|
|
CABLE HOIST |
ELEKTROMOS CSÖRLŐ |
||
|
Operation and Safety Notes |
Kezelési és biztonsági utalások |
||
|
Original operating instructions |
Eredeti használati utasítás |
||
|
|
|
|
|
|
DVIGALO Z VLEČNO ŽIČNO VRVJO |
LANOVÝ NAVIJÁK |
||
|
Navodila za upravljanje in varnostna opozorila |
Pokyny pro obsluhu a bezpečnostní pokyny |
||
|
Originalna navodila za uporabo |
Originální návod k obsluze |
||
|
|
|
|
|
|
LANOVÝ NAVIJÁK |
WCIĄGARKA LINOWA |
||
|
Pokyny pre obsluhu a bezpečnostné pokyny |
Wskazówki dotyczące obsługi i bezpieczeństwa |
||
|
Originálny návod na obsluhu |
Instrukcją oryginalną |
||
|
|
|
4 |
|
|
SEILHEBEZUG |
|||
|
Bedienungsund Sicherheitshinweise |
|||
|
Originalbetriebsanleitung |
|||
|
|
|
|
|
|
|
|
|
|
|
|
|
|
|
Anleitung_LB4_2255122:_ 01.06.2011 14:13 Uhr Seite 2
Before reading, unfold the page containing the illustrations and familiarise yourself with all functions of the device.
Olvasás előtt kattintson az ábrát tartalmazó oldalra és végezetül ismerje meg a készülék mindegyik funkcióját.
Pred branjem stran s slikami odprite navzven in se nato seznanite z vsemi funkcijami naprave.
Před čtením si otevřete stranu s obrázky a potom se seznamte se všemi funkcemi přístroje.
Pred čítaním si odklopte stranu s obrázkami a potom sa oboznámte so všetkými funkciami prístroja.
Przed przeczytaniem proszę rozłożyć stronę z ilustracjami, a następnie proszę zapoznać się z wszystkimi funkcjami urządzenia.
Klappen Sie vor dem Lesen die Seite mit den Abbildungen aus und machen Sie sich anschließend mit allen Funktionen des Gerätes vertraut.
GB |
Operation and Safety Notes |
Page |
6 |
HU |
Kezelési és biztonsági utalások |
Oldal |
14 |
SI |
Navodila za upravljanje in varnostna opozorila |
Stran |
22 |
CZ |
Pokyny pro obsluhu a bezpečnostní pokyny |
Strana |
30 |
SK |
Pokyny pre obsluhu a bezpečnostné pokyny |
Strana |
38 |
PL |
Wskazówki dotyczące obsługi i bezpieczeństwa |
Strona |
46 |
DE/AT/CH |
Bedienungsund Sicherheitshinweise |
Seite |
54 |
2
Anleitung_LB4_2255122:_ 01.06.2011 14:13 Uhr Seite 3
1 |
1 |
1 |
2 |
|
|
|
|
|
14 |
|
3 |
|
|
|
|
|
|
|
4 |
|
|
|
5 |
|
|
|
6 |
|
13 |
|
|
|
|
|
7 |
|
|
|
8 |
|
|
9 |
|
|
|
10 |
|
|
|
11 |
|
|
|
12 |
|
2 |
|
3 |
|
|
15 |
|
|
|
16 |
|
|
|
|
|
3 |

Anleitung_LB4_2255122:_ 01.06.2011 14:14 Uhr Seite 4
4
6 |
6 |
|
15 |
|
16 |
8 |
15 |
|
6 |
16
4
5 |
|
1 |
1 |
7 |
|
|
15 |
6 |
|
16 |
|
9 |
2 |
|
|
|
8 |
4 |
|
5 |
7 |
15 |
|
16 |
|
Anleitung_LB4_2255122:_ 01.06.2011 14:14 Uhr Seite 5
10
9
10
11
5

Anleitung_LB4_2255122:_ 01.06.2011 14:14 Uhr Seite 6
GB |
|
|
Table of contents: |
Page |
|
1. |
Introduction ............................................................................. |
7 |
2. |
Safety information................................................................... |
7 |
3. |
Layout and items supplied ..................................................... |
7 |
4. |
Proper use .............................................................................. |
8 |
5. |
Technical data ........................................................................ |
8 |
6. |
Before starting the equipment................................................. |
8-9 |
7. |
Operation ............................................................................... |
9-10 |
8. |
Cleaning, maintenance and ordering of spare parts............... |
10 |
9. |
Disposal and recycling............................................................ |
10-11 |
10. Declaration of conformity ........................................................ |
12 |
|
11. Guarantee Certificate ............................................................. |
13 |
|
The reprinting or reproduction by any other |
|
means, in whole or in part, of documentation |
|
and papers accompanying products is |
|
permitted only with the express consent of ISC |
Technical changes subject to change |
GmbH. |
|
6 |
|

Anleitung_LB4_2255122:_ 01.06.2011 14:14 Uhr Seite 7
1. Introduction
Important!
When using equipment, a few safety precautions must be observed to avoid injuries and damage. Please read the complete operating manual with due care. Keep this manual in a safe place, so that the information is available at all times. If you give the equipment to any other person, give them these operating instructions as well.
We accept no liability for damage or accidents which arise due to non-observance of these instructions and the safety information.
2. Safety information
CAUTION!
Read all safety regulations and instructions.
Any errors made in following the safety regulations and instructions may result in an electric shock, fire and/or serious injury.
Keep all safety regulations and instructions in a safe place for future use.
Always check that the mains voltage is identical to the voltage quoted on the rating plate. In the event that the mains voltage is not suitable, it may cause the machine to work abnormally and thus result in personal injury.
The power supply must be earthed and be secured by a residual current operated circuit breaker (RCCB).
Do not attempt to lift loads that exceed the rated load.
Use the machine only for the purpose for which it is designed. Never lift personnel using the cable hoist.
Do not pull the power cable in order to pull out the plug. Protect the power cable from heat, oil and sharp edges.
Never attempt to raise fixed or jammed loads.
Pull out the plug when the cable hoist is not in use.
GB
Keep children and other unauthorized persons away from the machine.
Do not pull loads sideways or from one side. Do not allow the load to swing.
Ensure that the hook moves in the same direction as shown on the pushbutton.
Check the cable hoist at regular intervals for signs of damage. The pushbutton must be in good condition.
Have repair and servicing work carried out only by authorized workshops by a trained electrician. Repair work must only be carried out by a trained electrician, otherwise the machine may cause accidents.
Do not switch the machine on and off quickly (inching mode).
Always concentrate fully when operating the cable hoist.
Do not stand or work under the raised load.
It is not permitted to lift fixed or jammed loads.
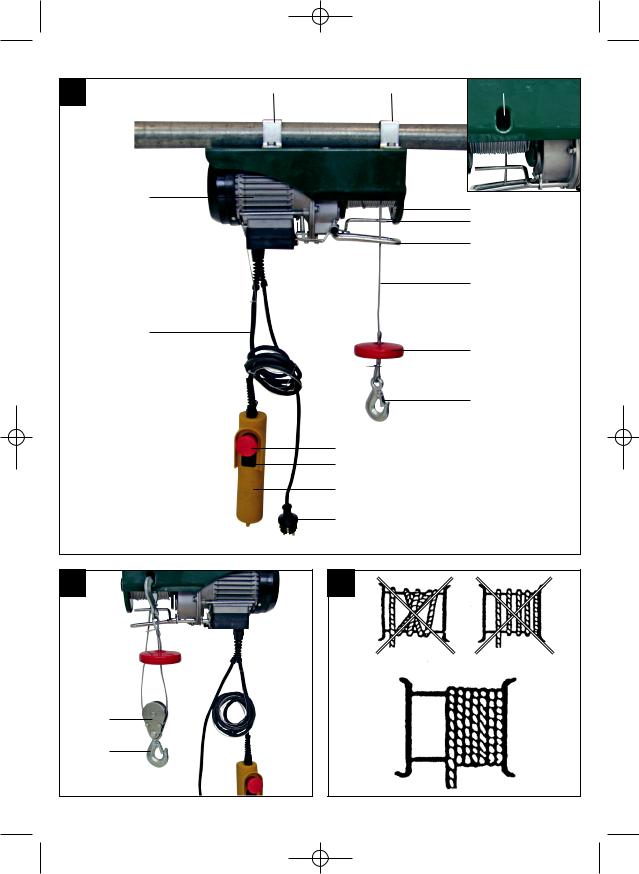
3.Layout and items supplied (Fig. 1-2)
1.Fastening bar
2.Fastening hole for hook
3.Drum
4.Lever for maximum cable length
5.Automatic stop mechanism lever
6.Steel cable
7.Cut-out weight
8.Hook
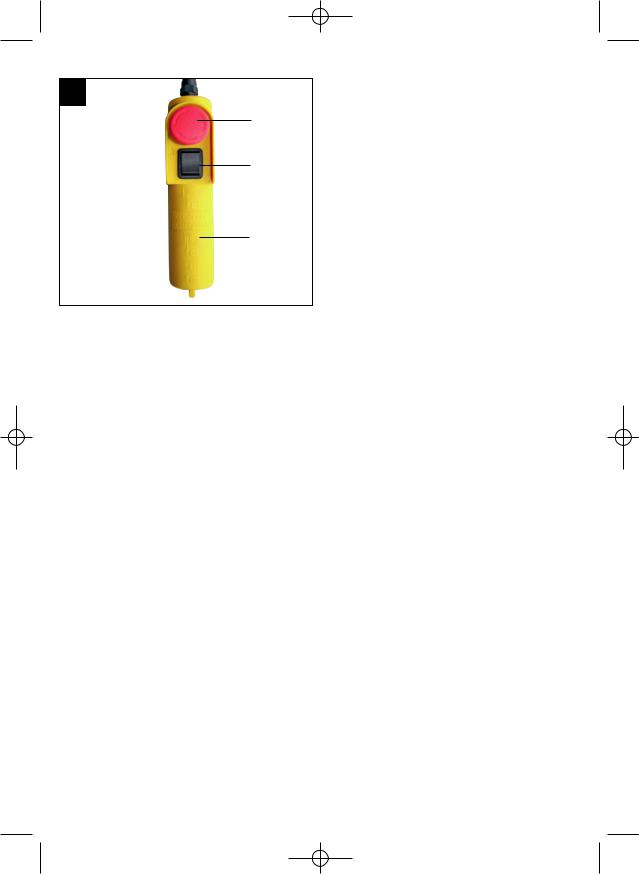
9.Emergency Stop switch
10.Pushbutton
11.Remote control
12.Power cable
13.Control cable
14.Motor
15.Return roller
16.Additional hook
7

Anleitung_LB4_2255122:_ 01.06.2011 14:14 Uhr Seite 8
GB
4. Proper use |
6. Before starting the equipment |
The cable hoist is designed for lifting and lowering loads in enclosed areas commensurate with the machineʼs capacity.
The equipment is to be used only for its prescribed purpose. Any other use is deemed to be a case of misuse. The user / operator and not the manufacturer will be liable for any damage or injuries of any kind caused as a result of this.
Please note that our equipment has not been designed for use in commercial, trade or industrial applications. Our warranty will be voided if the machine is used in commercial, trade or industrial businesses or for equivalent purposes.
5. Technical data
Voltage (V) |
230 V ~ 50 Hz |
Rated current (A) |
2.2 |
|
|
Power consumption (W) |
500 |
|
|
Operating mode |
S3 20%:10 min |
|
|
Rated load (kg) |
125 / 250 |
|
|
Lifting height (m) |
11.5 / 5.7 |
|
|
Rated speed (m/min) |
8 / 4 |
|
|
Diameter of steel cable (mm) |
3.0 |
|
|
Tensile strength of the steel cable |
|
(N/mm²) |
1870 |
|
|
Insulation class |
B |
|
|
Protection class |
IP24 |
|
|
Drive unit class |
M1 |
|
|
Net weight (kg) |
10.5 |
|
|
Operating mode S3 – 20% - 10 minutes: S3 = Intermittent mode without influencing the starting process. This means that the maximum operating period over a time of 10 minutes is 20% (2 minutes).
Before you connect the equipment to the mains supply make sure that the data on the rating plate are identical to the mains data.
Always pull out the power plug before making adjustments to the equipment.
The cable hoist is not suitable for transporting hot and/or molten materials nor is it suitable for use at low temperatures or in environments subject to intensive weathering.
It is in mechanical group M1.
The service life of the cable hoist is approximately 8000 cycles (excluding wearing parts). When the hoist has completed 8000 cycles, all its mechanical parts must be checked and overhauled.
Read and absorb the operating instructions before you use the cable hoist.
Ensure that the operator knows how the machine works and how it should be operated.
The user must always operate the equipment as set out in the operating instructions.
The cable hoist is not designed for continuous operation. Its mode of operation is: Intermittent mode without influencing the starting process.
The rated capacity of the machine does not vary due to the position of the load.
6.1 Unpacking
After opening the packaging, inspect the equipment, the steel cable, the hook, the lever for maximum cable length and the automatic stop mechanism lever for signs of possible transit damage.
6.2 Assembly (Fig. 5)
The cable hoist is fitted with two fastening bars
(1) with which it has to be fastened to a rectangular tube / swing arm. The dimensions of the rectangular tube / swing arm must conform with the size of the fastening bars (1) and must be capable of supporting twice the rated load. We recommend that you seek
8

Anleitung_LB4_2255122:_ 01.06.2011 14:14 Uhr Seite 9
advice from a qualified technician. All screws must be tightened correctly. A qualified technician should check the anchoring of the rectangular tube / swing arm before the machine is started.
6.3 Block and tackle function (Fig. 6 – 9)
The cable hoist is fitted with a return roller (15) and an additional hook (16). If these parts are used correctly, the cable hoist can lift twice its rated load.
Fit the return roller (15) and additional hook (16) as shown in Figure 6 – 8. The permanent hook (8) must be attached to the fastening hole
(2) (Fig. 9).
The load is now raised by two steel cables, which means that the cable hoist can lift twice its rated load.
GB
operation. In this case the load exceeds the rated capacity of the cable hoist.
Do not leave any suspended loads unsupervised without first taking the appropriate safety precautions.
Fit the machine with a 10 A fuse or a 10 A residual current operated circuit breaker (RCCB) to protect the circuit
Do not use the lever (4/5) as a routine stopping device. It should only be used to stop the machine in an emergency.
Before you start, ensure that the steel cable
(6)is correctly wound around the drum (3)
and that the spacing between the windings is smaller than the steel cable (Fig. 3)
Ensure that the load is correctly secured to the hook (8) or, if you are using the block and tackle, the additional hook (16) and always maintain a safe distance from the load and the steel cable (6).
7. Operation
7.1 Starting up
Remove the adhesive tape from the drum
(3) before using the hoist for the first time.
The value of the A-rated noise emissions at the operatorʼs position is less than 70 dB.
Supply voltage: 230 V ± 10%, 50 Hz ± 1%.
The cable hoist must be operated in ambient temperatures of between 0°C and 40°C with a relative humidity of less than 85%. Height above sea level: max. 1,000 m.
The temperature for transport and storage may be between -25°C and 55°C. The maximum temperature must not exceed 70°C.
The user should lift the load off the ground at the slowest possible speed. The cable should be taut when the load is raised.
The motor (14) for the cable hoist is fitted with a thermostat switch. Whilst the cable hoist is operating, the motor (14) may therefore stop. It will restart automatically when it has cooled down.
The electric cable hoist is not fitted with a rated power limiter. You should therefore not repeat attempts to lift a load if the overload trip is limiting the hoistʼs
7.2 Operation (Fig. 9-10)
Check whether the Emergency Stop switch
(9) is pressed. Turn the Emergency Stop
switch clockwise to release it.
Press the pushbutton ▲ (10) to raise the load.
Press the pushbutton ▼ (10) to lower the load.
Automatic stop mechanism lever (5): When the maximum lifting height has been reached, the cut-out weight (7) presses the lever (5) upwards. This trips a limit switch after which the load cannot be raised any further.
Lever for maximum cable length (4): When the load has reached its lowest possible position, a limit switch is tripped which makes it impossible to lower the load any further. This limit switch also prevents the cable hoist operating in the wrong direction (hook moving in the opposite direction to the arrow shown on the pushbutton).
The cable hoist will stop if the Emergency Stop switch (9) is pressed.
In an emergency, immediately press the Emergency Stop switch (9) to stop the cable hoist. The cable hoist cannot be operated if the Emergency Stop switch has
9

Anleitung_LB4_2255122:_ 01.06.2011 14:14 Uhr Seite 10
GB
been pressed.
8.Cleaning, maintenance and ordering of spare parts
Always pull out the mains power plug before starting any cleaning work.
8.1 Cleaning
Keep all safety devices, air vents and the motor housing free of dirt and dust as far as possible. Wipe the equipment with a clean cloth or blow it with compressed air at low pressure.
Clean the equipment immediately after you use it.
Clean the equipment regularly with a moist cloth and some soft soap. Do not use cleaning agents or solvents; these could attack the plastic parts of the equipment. Ensure that no water can seep
into the device.
8.2 Servicing
Important. Always ensure that the machine is not connected to the mains supply before you start any servicing work.
In the following: One cycle means one raising and lowering movement of a load. Periodic inspection means an inspection after 100 cycles.
Test periodically that the limit switches on the cable hoist are in correct working order. (Test without a load) Conduct this test as follows: When the cable has reached the maximum height, the lever on the automatic stopping mechanism (5) will be actuated. The motor (14) must then stop. When the steel cable (6) has been unwound as far as possible, the lever for the maximum cable length (4) will be actuated. The motor (14) must then stop.
Inspect the mains cable (12) and the control cable (13) periodically.
The steel cable (6) and return roller (15) must be greased every 200 cycles.
A check must be made every 30 cycles, as shown in Fig. 4, to find whether the entire
10
steel cable (6) is in good condition. If it is damaged, it must be replaced by a steel cable of the type specified in the technical data.
Check every 1000 cycles whether the screws for the fastening bars (1) and return roller (15) are properly tightened.
Check every 1000 cycles whether the hooks (8/16) and return roller (15) are in good condition.
Check before using the cable hoist whether the Emergency Stop switch (9) and pushbuttons (10) are in perfect working order.
Check the braking system every 1000 cycles. If the motor (14) makes any unusual noises or cannot raise the rated load, it is possible that the braking system requires an overhaul:
-Replace damaged or worn parts and keep the service documentation relating to this in a safe place.
-Please contact an authorized service center for any unscheduled maintenance work.
8.3 Ordering replacement parts:
Please quote the following data when ordering replacement parts:
Type of machine
Article number of the machine
Identification number of the machine
For our latest prices and information please go to www.isc-gmbh.info
9. Disposal and recycling
The unit is supplied in packaging to prevent its being damaged in transit. This packaging is raw material and can therefore be reused or can be returned to the raw material system. The unit and its accessories are made of various types of material, such as metal and plastic. Defective components must be disposed of as special waste. Ask your dealer or your local council.
Anleitung_LB4_2255122:_ 01.06.2011 14:14 Uhr Seite 11
GB
For EU countries only
Never place any electric tools in your household refuse.
To comply with European Directive 2002/96/EC concerning old electric and electronic equipment and its implementation in national laws, old electric tools have to be separated from other waste and be disposed of in an environment-friendly fashion, e.g. by taking to a recycling depot.
Recycling alternative to returning the electrical equipment:
The owner of the electrical equipment is obligated to arrange for its proper disposal if he no longer wants to keep the equipment in his possession and does not want to return it. In this case the old equipment can be taken to a recycling depot where it is disposed of in accordance with national recycling and waste disposal laws. This does not apply to accessory parts and aids which supplement the old equipment and contain no electrical parts
11

Anleitung_LB4_2255122:_ 01.06.2011 14:14 Uhr Seite 12
GB
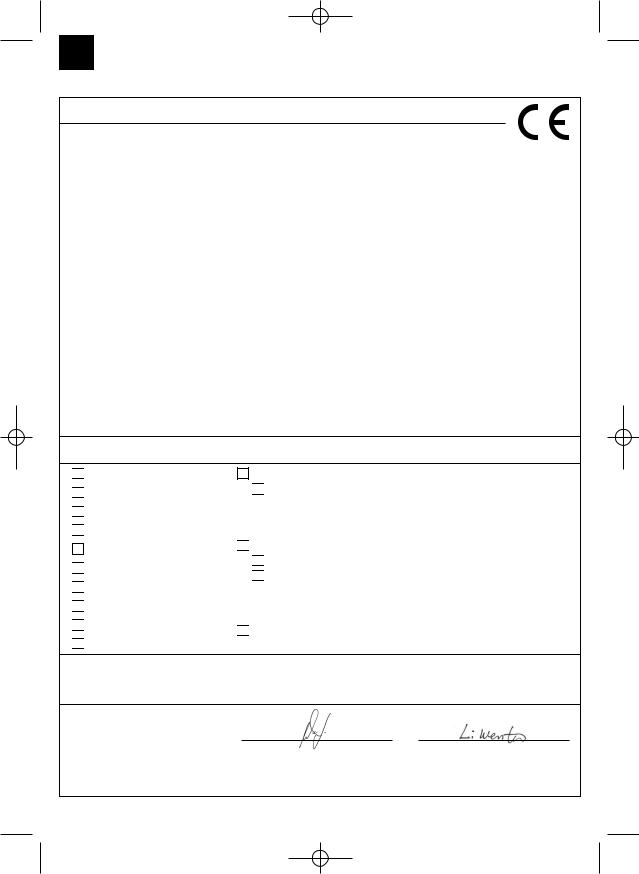
10. Declaration of conformity
Einhell Germany AG · Wiesenweg 22 · D-94405 Landau/Isar
Konformitätserklärung
k erklärt folgende Konformität gemäß EU-Richtlinie und
Normen für Artikel
t explains the following conformity according to EU directives and norms for the following product
p déclare la conformité suivante selon la directive CE et les normes concernant l’article
C dichiara la seguente conformità secondo la direttiva UE e le norme per l’articolo
N verklaart de volgende overeenstemming conform EU richtlijn en normen voor het product
m declara la siguiente conformidad a tenor de la directiva y normas de la UE para el artículo
O declara a seguinte conformidade, de acordo com a directiva CE e normas para o artigo
l attesterer følgende overensstemmelse i medfør af
EU-direktiv samt standarder for artikel
U förklarar följande överensstämmelse enl. EU-direktiv och standarder för artikeln
q vakuuttaa, että tuote täyttää EU-direktiivin ja standardien vaatimukset
. tõendab toote vastavust EL direktiivile ja standarditele
j vydává následující prohlášení o shodě podle směrnice
EU a norem pro výrobek
X potrjuje sledečo skladnost s smernico EU in standardi za izdelek
W vydáva nasledujúce prehlásenie o zhode podľa smernice
EÚ a noriem pre výrobok
A a cikkekhez az EU-irányvonal és Normák szerint a következő konformitást jelenti ki
P deklaruje zgodność wymienionego poniżej artykułu z następującymi normami na podstawie dyrektywy WE.
e декларира съответното съответствие съгласно
Директива на ЕС и норми за артикул
H paskaidro šādu atbilstību ES direktīvai un standartiem
G apibūdina šį atitikimą EU reikalavimams ir prekės normoms
Q declară următoarea conformitate conform directivei UE
şi normelor pentru articolul
z δηλώνει την ακόλουθη συμμόρφωση σύμφωνα με την
Οδηγία ΕΚ και τα πρότυπα για το προϊόν
B potvrđuje sljedeću usklađenost prema smjernicama EU i normama za artikl
f potvrđuje sljedeću usklađenost prema smjernicama EU i normama za artikl
4 potvrđuje sledeću usklađenost prema smernicama EZ i normama za artikal
T следующим удостоверяется, что следующие
продукты соответствуют директивам и нормам ЕС
1 проголошує про зазначену нижче відповідність
виробу директивам та стандартам ЄС на виріб
5 ја изјавува следната сообрзност согласно
ЕУ-директивата и нормите за артикли
Z Ürünü ile ilgili AB direktifleri ve normları gereğince aşağıda açıklanan uygunluğu belirtir
L erklærer følgende samsvar i henhold til EU-direktivet og standarder for artikkel
E Lýsir uppfyllingu EU-reglna og annarra staðla vöru
Seilhebezug PSZ 250 A2 (Parkside)

 87/404/EC_2009/105/EC

 2005/32/EC_2009/125/EC

 2006/95/EC
 2006/28/EC
x 2004/108/EC

 2004/22/EC

 1999/5/EC

 97/23/EC

 90/396/EC_2009/142/EC
 89/686/EC_96/58/EC
x 2006/42/EC

 Annex IV
Notified Body: Notified Body No.: Reg. No.:

 2000/14/EC_2005/88/EC

 Annex V

 Annex VI
Noise: measured LWA = dB (A); guaranteed LWA = dB (A) P = KW; L/Ø = cm
Notified Body:

 2004/26/EC
Emission No.:
Standard references: EN 14492-2; EN 60204-32;
EN 55014-1; EN 55014-2; EN 61000-3-2; EN 61000-3-3
Landau/Isar, den 18.04.2011
Weichselgartner/General-Manager |
Wentao/Product-Management |
|
|
First CE: 09 |
Archive-File/Record: NAPR003513 |
Art.-No.: 22.551.22 I.-No.: 11031 |
Documents registrar: Robert Mayn |
Subject to change without notice |
Wiesenweg 22, D-94405 Landau/Isar |
12

Anleitung_LB4_2255122:_ 01.06.2011 14:14 Uhr Seite 13
GB
11. GUARANTEE CERTIFICATE
Dear Customer,
All of our products undergo strict quality checks to ensure that they reach you in perfect condition. In the unlikely event that your device develops a fault, please contact our service department at the address shown on this guarantee card. Of course, if you would prefer to call us then we are also happy to offer our assistance under the service number printed below. Please note the following terms under which guarantee claims can be made:
1.These guarantee terms cover additional guarantee rights and do not affect your statutory warranty rights.
We do not charge you for this guarantee.
2.Our guarantee only covers problems caused by material or manufacturing defects, and it is restricted to the rectification of these defects or replacement of the device. Please note that our devices have not been designed for use in commercial, trade or industrial applications. Consequently, the guarantee is invalidated if the equipment is used in commercial, trade or industrial applications or for other equivalent activities. The following are also excluded from our guarantee: compensation for transport damage, damage caused by failure to comply with the installation/assembly instructions or damage caused by unprofessional installation, failure to comply with the operating instructions (e.g. connection to the wrong mains voltage or current type), misuse or inappropriate use (such as overloading of the device or use of non-approved tools or accessories), failure to comply with the maintenance and safety regulations, ingress of foreign bodies into the device (e.g. sand, stones or dust), effects of force or external influences (e.g. damage caused by the device being dropped) and normal wear resulting from proper operation of the device. This applies in particular to rechargeable batteries for which we nevertheless issue a guarantee period of 12 months.
The guarantee is rendered null and void if any attempt is made to tamper with the device.
3.The guarantee is valid for a period of 3 years starting from the purchase date of the device. Guarantee claims should be submitted before the end of the guarantee period within two weeks of the defect being noticed. No guarantee claims will be accepted after the end of the guarantee period. The original guarantee period remains applicable to the device even if repairs are carried out or parts are replaced. In such cases, the work performed or parts fitted will not result in an extension of the guarantee period, and no new guarantee will become active for the work performed or parts fitted. This also applies when an on-site service is used.
4.In order to assert your guarantee claim, please send your defective device postage-free to the address shown below. Please enclose either the original or a copy of your sales receipt or another dated proof of purchase. Please keep your sales receipt in a safe place, as it is your proof of purchase. It would help us if you could describe the nature of the problem in as much detail as possible. If the defect is covered by our guarantee then your device will either be repaired immediately and returned to you, or we will send you a new device.
Of course, we are also happy offer a chargeable repair service for any defects which are not covered by the scope of this guarantee or for units which are no longer covered. To take advantage of this service, please send the device to our service address.
13
Anleitung_LB4_2255122:_ 01.06.2011 14:14 Uhr Seite 14
HU |
|
|
Tartalomjegyzék: |
Oldal |
|
1. |
Bevezetés .............................................................................. |
15 |
2. |
Biztonsági utasítások ............................................................. |
15 |
3. |
A készülék leírása és a szállítás terjedelme ............................ |
15 |
4. |
Rendeltetés szerinti használat ................................................ |
16 |
5. |
Technikai adatok..................................................................... |
16 |
6. |
Beüzemeltetés előtt ................................................................ |
16-17 |
7. |
Kezelés ................................................................................... |
17-18 |
8. |
Tisztítás, karbantartás és pótalkatrész megrendelés .............. |
18 |
9. |
Megsemmisítés és újrahasznosítás ........................................ |
19 |
10. Konformkijelentés ................................................................... |
20 |
|
11. Garanciaokmány .................................................................... |
21 |
|
A termékek dokumentációjának és a |
|
kisérőpapírjainak az utánnyomtatása vagy |
|
egyébb sokszorosítása, kivonatosan is csak az |
|
ISC GmbH kihangsúlyozott beleegyezésével |
Technikai változtatások jogát fenntartva |
engedélyezett. |
|
14 |
|

Anleitung_LB4_2255122:_ 01.06.2011 14:14 Uhr Seite 15
1. Bevezetés
Figyelem!
A készülékek használatánál, a sérülések és a károk megakadályozásának az érdekébe be kell tartani egy pár biztonsági intézkedést.
Olvassa ezért ezt a használati utasítást gondosan át. Őrizze ezeket jól meg, azért hogy mindenkor a rendelkezésére álljanak az információk. Ha más személyeknek adná át a készüléket, akkor kérjük kézbesítse ki vele együtt ezt a használati utasítást is. Nem vállalunk felelőséget olyan balesetekért vagy károkért, amelyek ennek az utasításnak és a biztonsági utasításoknak a figyelmen kívül hagyásából keletkeznek.
2. Biztonsági utasítások
FIGYELMEZTETÉS
Olvasson minden biztonsági utalást és utasítást el. A biztonsági utalások és utasítások betartásán belüli mulasztások következménye áramcsapás, tűz és/vagy nehéz sérülések lehetnek.
Őrizze meg a biztonsági utalásokat és utasításokat a jövőre nézve.
Elleőrizze mindig le, hogy a hálózati feszültség a típustáblán levő feszültségnek megfelel e. Abban az esetben, ha nem megfelelő a hálózati feszültség, akkor ez a gép abnormális működéséhez és személysérülésekhez vezethet.
Az áramellátásnak földeléssel kell rendelkeznie és egy hibaáram védőkapcsolóval lebiztosítva lennie.
Tilos olyan terheknek az emelése, amelyek túllépik a névleges tehert.
A készüléket csak az előrelátott célra használni. Ne emeljen sohasem személyeket a kötélemelővonóval.
Ne húzzon a kábelon a dugó kihúzására. Tartsa a kábelt hőségtől, olajtól és éles szélektől távol.
Ne próbáljon sohasem feszes vagy blokkolt terheket megemelni.
HU
Húzza ki a hálózati dugót, ha nincs használatban a kötélemelővonó.
Gyerkeket és más nem autorizált személyeket távol tartani a géptől.
Tilos terheket oldalvást vagy egy oldalról húzni. Kerülje el a teher lengését.
Biztosítsa, hogy a kampó ugyanabba az irányba mozogjon, mint a nyomótaszteren mutatott.
Ellenőrizze rendszeresen le a kötélemelővonót sérülésekre. A nyomótaszternek jó állapotban kell lennie.
A javítási és karbantartási munkákat csak egy feljogosított szakműhelyben, egy villamossági szakember által elvégeztetni. Javításokat csak egy villamossági szakember végezheti el, különben balesetek érhetik a használót.
Kerülje el a gyors beés kikapcsolást (megérintési üzem).
Legyen a kötélemelővonó kezelésénél mindig figyelmes.
Ne álljon vagy dolgozzon a felemelt teher alatt.
Nem engedélyezett az erősen tartott vagy beszorult terhek megemelése.
3.A készülék leírása és a szállítás terjedelme (képek 1-től - 2-ig)
1.Felerősítési fül
2.Felerősítési lyuk a kampónak
3.Dob
4.Kar a maximális kötélhosszúsághoz
5.Az automatikus stopmechanizmus karja
6.Acélkötél
7.Lekapcsolótömeg
8.Kampó
9.Vész-ki-kapcsoló
10.Nyomótaszter
11.Távirányító
12.Hálózati kábel
13.Vezérlővezeték
14.Motor
15.Terelőgörgő
16.Pótkampó
15

Anleitung_LB4_2255122:_ 01.06.2011 14:14 Uhr Seite 16
HU
4. Rendeltetés szerinti használat 6. Beüzemeltetés előtt
A kötélemelővonó zárt termekben a készülékteljesítményének megfelelő terhek emelésére és leeresztésére szolgál.
A gépet csak rendeltetése szerint szabad használni. Ezt túlhaladó bármilyen használat, nem számít rendeltetésszerűnek. Ebből adódó bármilyen kárért vagy bármilyen fajta sérülésért a használó ill. a kezelő felelős és nem a gyártó.
Kérjük vegye figyelembe, hogy a készülékeink rendeltetésük szerint nem az ipari, kézműipari vagy gyári használatra lettek konstruálva. Nem vállalunk szavatosságot, ha a készülék ipari, kézműipari vagy gyári üzemek területén valamint egyenértékű tevékenységek területén van használva.
5. Technikai adatok
Feszültség (V) |
230 V ~ 50 Hz |
|
Névleges áram (A) |
|
2,2 |
Teljesítményfelvétel (W) |
|
500 |
Üzemmód |
S3 20% 10 perc |
|
Névleges teher (kg) |
125 / 250 |
|
Emelőmagasság (m ) |
11,5 / 5,7 |
|
Névleges sebesség (m/perc) |
|
8 / 4 |
Az acélkötél átmérője (mm) |
|
3,0 |
Az acélkötél húzószilárdsága (N/mm²) |
1870 |
|
Izolációosztály |
|
B |
Védőosztály |
|
IP24 |
Hajtóműosztály |
|
M1 |
Nettó tömeg (kg) |
|
10,5 |
Üzemmód S3 - 20% - 10perc: S3 = megszakításos üzem az indulási folyamat befolyásolása nélkül. Ez annyit jelent, hogy egy 10 perces időtartam alatt a max. üzemidő 20% (2 perc).
Győződjön meg rákapcsolás előtt arról, hogy a típustáblán megadott adatok megegyeznek a hálózati adatokkal.
Mielőtt beállításokat végezne el a készüléken, húzza mindig ki a hálózati csatlakozót.
A kötélemelővonó nem alkalmas forró vagy olvadt tömegek szállítására, továbbá nem alkalma a kötélemelővonó alacsony hőmérsékletek és intenzív időjárásbehatásolt környezeten belüli használatra.
A mechanikus csoport az M1.
A kötélemelővonó használati tartama cca. 8000 ciklus (exkl. a gyorsan kopó részek). Ha a vonó meghaladta a 8000 ciklust, akkor minden mechanikus részt le kell ellenőrizni és generáljavítást kell elvégezni rajtuk.
Olvassa és értse meg a használati utasítást mielőtt használná a kötélemelővonót.
Biztosítsa, hogy a kezelő személyzet tudja, hogy hogyan működik a gép és hogy hogyan kellene üzemeltetni.
A használónak mindig a használati utasítással megegyezően kell tevékenykednie.
Az emelővonó nem lett tartósüzemre előrelátva. Az üzemód: megszakításos üzem az indulási folyamat befolyása nélkül.
A gép névleges teljesítménye variál a megterhelés helyzetével.
6.1 Kicsomagolni
A csomagolás kinyitása után ellenőrizze le lehetséges szállítási károkra a készüléket, az acélkötelet, a kampókat a maximális kötélhosszhoz levő kart és az automatikus stopmechanizmus karját.
16
Anleitung_LB4_2255122:_ 01.06.2011 14:14 Uhr Seite 17
6.2 Összeszerelés (5-ös kép)
A kötélemelővonó 2 rögzítőfüllel (1) van felszerelve, amelyekkel egy négyszögű csőre / lengőkarra kell felerősíteni. A négyszögű cső / lengőkar méreteinek meg kell egyeznie a rögzítőfül (1) nagyságával és a névleges teher kétszeresét kell tudnia hordani. Ajánljuk, hogy vegye fel a kapcsolatot egy kvalifikált technikussal. Minden csavarnak helyesen meg kell húzva lennie. A beüzemeltetés előtt le kellene egy kvalifikált technikusnak ellenőriznie a négyszögű cső / lengőkar lerögzítését.
6.3 Emelő csigasorfunkció (képek 6-tól – -9-ig)
A kötélemelővonó egy terelőgörgővel (15) és egy kiegészítő kampóval (16) van felszerelve. Helyes használatnál a kötélemelővonó a dupla terhet tudja emelni. A terelőgörgőt (15) és a pótkapmót (16) a 6-tól – 8-ig levő képeken mutatottak szerint felszerelni. A feszesen felszerelt kampót (8) be kell akasztani a rögzítőlyukba (2) (9-es kép).
A teher most két acélkötél segítségével lesz megemelve, így a kötélemelővonó a dupla terhet tudja megemelni.
7. Kezelés
7.1 Beüzemelés
Az első használat előtt távolítsa el a ragasztószalagot a dobról (3).
Az A-értékelt zajemisszió értéke az üzemeltető helyén 70dB-nél alacsonyabb.
Ellátó feszültség: 230V ± 10%, 50Hz ± 1%.
A kötélemelővonót 0°C és 40°C fok között, 85% alatti relatív nedvességű környezetben kell üzemeltetni. A tengerszint feletti magasság: max. 1000 m.
A szállításhoz és tároláshoz a hőmérsékletnek -25°C és 55°C között szabad lennie. A legnagyobb engedélyezett hőmérsékletnek nem szabad 70°C felett lennie.
A használónak a tehert a talajról a lehetséges legkisebb sebességgel kell hogy megemelje. A kötélnek a teher megemelésénél feszítve kell lennie.
HU
A kötélemelővonó motorja (14) egy termosztátkapcsolóval van felszerelve. Ezért a kötélemelővonó üzemeltetése alatt lestoppolhat a motor (14), amely lehüles után automatikusan ismét beindul.
Az elektromos kötélemelővonó nincs egy névleges teljesítményhatárolóval felszerelve. Ezért ne próbálja tovább megemelni a tehert, ha a túlhevülés elleni védelem korlátolja az üzemet. Ebben az esetben túllépi a teher a kötélemelővonó névleges teljesítményét.
Ne hagyjon logó terheket, anélkül hogy megfelelő biztonsági intézkedéseket végezett volna el, felügyelet nélkül.
Az áramkör biztosításához biztosítsa le a készüléket egy 10 A-os biztosítékkal vagy egy 10 A-os hibaáram-védőkapcsolóval.
Ne használja a kart (4/5) rutin stopbrendezésként. Ez csak szükség esetén szolgál stopberendezésként.
Mielőtt kezdene, biztosítsa hogy az acélkötél (6) helyesen fel van tekerve a dobra (3) és a csavarulatok közötti távolság kisebb mint az acélkötél (3-as kép).
Biztosítsa, hogy a rakomány a kampón (8) illetve a láncos csigasoros üzemnél a pótkampón (16) helyesen biztosítva van és tartson mindig távolságot a teherhez és az acélkötélhez (6).
7.2 Üzem (képek 9-től - 10-ig)
Ellenőrizze le, hogy a vész-ki-kapcsoló (9) nyomva van e. A kireteszeléshez csavarja a vész-ki-kapcsolót az óramutató forgási irányába.
A teher megemeléséhez nyomja meg a nyomótasztert ▲ (10).
A teher leeresztéséhez nyomja meg a nyomótasztert ▼ (10).
Az automatikus stopmechanizmus (5) karja: Ha elérte a maximális emelőmagasságot, akkor a lekapcsolótömeg (7) felnyomja a kart (5). Azáltal üzemeltetve lesz a végkapcsoló és nem lehet tovább felemelni a terhet.
Kar a maximális kötélhosszúsághoz (4): Ha a teher elérte a lehető legalacsonyabb pozíciót, akor üzemeltetve lesz egy végkapcsoló, amely lehetetlené teszi a
17

Anleitung_LB4_2255122:_ 01.06.2011 14:14 Uhr Seite 18
HU
teher további leeresztését. Ez a végkapcsoló úgyszintén megakadályozná a kötélemelővonónak a rossz irányba történő üzemét (a kampó a nyomótaszteren mutatott iránnyal ellenkezően mozog).
Ha üzemeltetve lesz a vész-ki-kapcsoló (9), akkor megáll a kötélemelővonó.
Egy vész szükség esetén, a kötélemelővonó megállításához azonnal üzemeltetni a vész-ki-kapcsolót (9). A kötélemelővonó kezelése nem lehetséges, ha a vész-ki-kapcsoló üzemeltetve lett.
8.Tisztítás, karbantartás és pótalkatrész megrendelés
Tisztítási munkák előtt húzza ki a hálózati csatlakozót.
8.1 Tisztítás
Tartsa a védőberendezéseket, szellőztető réseket és a gépházat annyira porés piszokmentesen, amennyire csak lehet. Dörzsölje le a készüléket egy tiszta posztóval vagy pedig fújja ki alacsony nyomás alatt sűrített levegővel.
A készüléket direkt a használat után megtisztítani.
A készüléket rendszeresen egy nedves posztóval és egy kevés kenőszappannal megtisztítani. Ne használjon tisztító vagy oldó szereket; ezek megtámadhatják a készülék műanyagrészeit. Ügyeljen arra, hogy ne kerüljön víz a készülék belsejébe.
8.2 Karbantartás
Figyelem! Mindig biztosítani, hogy a gép ápolásánál a gép nincs összecsatlakoztatva az áramhálózattal.
Alábbi: Egy ciklus, egy tehernek a felés lefelé való mozgásának felel meg. A periodikus leellenőrzés, egy 100 ciklus utáni leellenőrzésnek felel meg.
Ellenőrizze le periodikusan, hogy a kötélemelővonó végkapcsolója rendeltetésszerűen működik. (teher nélkül ellenőrizni le) Az ellenőrzés a következő képpen történik: Ha a kötél elérte a
maximális emelőmagasságot, akkor üzemeltetve lesz az automatikus stopmechanizmus (5) karja. A motornak
(14)most le kell stoppolnia. Ha az acélkötél
(6)annyira le van tekerve amennyire csak lehet, akkor üzemeltetve lesz a maximális kötélhosszúság (4) karja. A motornak (14) most le kell stoppolnia.
Ellenőrizze periodikusan le a hálózati kábelt
(12)és a vezérlővezetéket (13).
Minden 200 ciklusnál meg kell kenni az acélkötelet (6) és a terelőgörgőt (15).
Minden 30 ciklusnál a 4-es képnek megfelelően le kell ellenőrizni, hogy az egész acélkötél (6) jó állapotban van e. Ha károsut, akkor ki kell cserélni a technikai adatoknak megfelelő acélkötéllel.
Minden 1000 ciklusnál leellenőrizni, hogy a rögzítőfül (1) és a terelőgörgő (15) csavarjai jól megvannak e húzva.
Minden 1000 ciklusnál leellenőrizni, hogy a kampók (8/16) és a terelőgörgő (15) jó állapotban vannak e.
A kötélemelővonó minden használata előtt leellenőrizni, hogy a vész-ki-kapcsoló (9) és a nyomótaszter (10) kifogástalan üzemállapotban van e.
Minden 1000 ciklusban leellenőrizni a fékszisztémát. Ha a motor (14) szokatlan zajokat bocsájtana ki vagy nem tudná megemelni a névleges tehert, akkor lehetséges, hogy a fékszisztémán egy generáljavítást kell elvégezni:
Cserélje ki a károsult vagy elkopott részeket és őrizze meg a hozzátartozó karbantartási dokumentációt.
A terven kívüli gondozási munkákhoz kérjük forduljon egy feljogosított szervízközponthoz.
8.3 A pótalkatrész megrendelése:
A pótalkatrészek megrendlésénél a következő adatokat kellene megadni:
A készülék típusát
A készülék cikk-számát
A készülék identszámát Aktuális árak és információk a www.isc-gmbh.info alatt találhatóak.
18
Anleitung_LB4_2255122:_ 01.06.2011 14:14 Uhr Seite 19
HU
9.Megsemmisítés és újrahasznosítás
A szállítási károk megakadályozására a készülék egy csomagolásban található. Ez a csomagolás nyersanyag és ezáltal ismét felhasználható vagy pedig visszavezethető a nyersanyag körforgáshoz. A készülék és annak a tartozékai különböző anyagokból állnak, mint például fémből és műanyagokból.
Vigye a károsult alkatrészeket a különhulladék megsemmisítési helyhez. Érdeklődjön utánna a szaküzletben vagy a községi közigazgatásnál!
Csak az EU-országoknak
Ne dobja az elektromos szerszámokat a háztartási hulladék közé!
Az elektromosés elektronikus-öregkészülékek 2002/96/EK európai irányvonala és a nemzeti jogba való átvétele szerint az elhasznált elektromos szerszámokat különválasztva kell összegyüjteni és vissza kell vezetni egy környezetvédelemnek megfelelő újrafelhasználáshoz.
Recycling-alternatívák a visszaküldési felszólításhoz:
Az elektromos készülék tulajdonosa, a tulajdon feladása esetében köteles a visszaküldés helyett alternativ a szakszerű értékesítéssel kapcsolatban összedolgozni. Ehhez az öreg készüléket egy visszavevő helynek is át lehet hagyni, amely elvégzi a nemzeti körforgásipar és hulladéktörvények értelmében levő megsemmisítést. Ez nem érinti az öreg készülékek mellékelt elektromos alkotórészek nélküli tartozékait és segítőeszközeit.
19
Anleitung_LB4_2255122:_ 01.06.2011 14:14 Uhr Seite 20
HU
10. Konformkijelentés
Einhell Germany AG · Wiesenweg 22 · D-94405 Landau/Isar
Konformitätserklärung
k erklärt folgende Konformität gemäß EU-Richtlinie und
Normen für Artikel
t explains the following conformity according to EU directives and norms for the following product
p déclare la conformité suivante selon la directive CE et les normes concernant l’article
C dichiara la seguente conformità secondo la direttiva UE e le norme per l’articolo
N verklaart de volgende overeenstemming conform EU richtlijn en normen voor het product
m declara la siguiente conformidad a tenor de la directiva y normas de la UE para el artículo
O declara a seguinte conformidade, de acordo com a directiva CE e normas para o artigo
l attesterer følgende overensstemmelse i medfør af
EU-direktiv samt standarder for artikel
U förklarar följande överensstämmelse enl. EU-direktiv och standarder för artikeln
q vakuuttaa, että tuote täyttää EU-direktiivin ja standardien vaatimukset
. tõendab toote vastavust EL direktiivile ja standarditele
j vydává následující prohlášení o shodě podle směrnice
EU a norem pro výrobek
X potrjuje sledečo skladnost s smernico EU in standardi za izdelek
W vydáva nasledujúce prehlásenie o zhode podľa smernice
EÚ a noriem pre výrobok
A a cikkekhez az EU-irányvonal és Normák szerint a következő konformitást jelenti ki
P deklaruje zgodność wymienionego poniżej artykułu z następującymi normami na podstawie dyrektywy WE.
e декларира съответното съответствие съгласно
Директива на ЕС и норми за артикул
H paskaidro šādu atbilstību ES direktīvai un standartiem
G apibūdina šį atitikimą EU reikalavimams ir prekės normoms
Q declară următoarea conformitate conform directivei UE
şi normelor pentru articolul
z δηλώνει την ακόλουθη συμμόρφωση σύμφωνα με την
Οδηγία ΕΚ και τα πρότυπα για το προϊόν
B potvrđuje sljedeću usklađenost prema smjernicama EU i normama za artikl
f potvrđuje sljedeću usklađenost prema smjernicama EU i normama za artikl
4 potvrđuje sledeću usklađenost prema smernicama EZ i normama za artikal
T следующим удостоверяется, что следующие
продукты соответствуют директивам и нормам ЕС
1 проголошує про зазначену нижче відповідність
виробу директивам та стандартам ЄС на виріб
5 ја изјавува следната сообрзност согласно
ЕУ-директивата и нормите за артикли
Z Ürünü ile ilgili AB direktifleri ve normları gereğince aşağıda açıklanan uygunluğu belirtir
L erklærer følgende samsvar i henhold til EU-direktivet og standarder for artikkel
E Lýsir uppfyllingu EU-reglna og annarra staðla vöru
Seilhebezug PSZ 250 A2 (Parkside)

 87/404/EC_2009/105/EC

 2005/32/EC_2009/125/EC

 2006/95/EC
 2006/28/EC
x 2004/108/EC

 2004/22/EC

 1999/5/EC

 97/23/EC

 90/396/EC_2009/142/EC
 89/686/EC_96/58/EC
x 2006/42/EC

 Annex IV
Notified Body: Notified Body No.: Reg. No.:

 2000/14/EC_2005/88/EC

 Annex V

 Annex VI
Noise: measured LWA = dB (A); guaranteed LWA = dB (A) P = KW; L/Ø = cm
Notified Body:

 2004/26/EC
Emission No.:
Standard references: EN 14492-2; EN 60204-32;
EN 55014-1; EN 55014-2; EN 61000-3-2; EN 61000-3-3
Landau/Isar, den 18.04.2011
Weichselgartner/General-Manager |
Wentao/Product-Management |
|
|
First CE: 09 |
Archive-File/Record: NAPR003513 |
Art.-No.: 22.551.22 I.-No.: 11031 |
Documents registrar: Robert Mayn |
Subject to change without notice |
Wiesenweg 22, D-94405 Landau/Isar |
20
 Loading...