


Anleitung_LB4_4300688:_ 20.12.2010 10:06 Uhr Seite 1
PKS 1700 A1
|
|
SLIDING CROSS CUT MITRE SAW |
BÜTÜZŐÉS GÉRVÁGÓ FŰRÉSZ |
Operation and Safety Notes |
Kezelési és biztonsági utalások |
Original operating instructions |
Eredeti használati utasítás |
|
|
VLEČNA, ČELILNA IN ZAJERALNA ŽAGA |
MULTIFUNKČNÍ PILA |
Navodila za upravljanje in varnostna opozorila |
Pokyny pro obsluhu a bezpečnostní pokyny |
Originalna navodila za uporabo |
Originální návod k obsluze |
|
|
DVOJRUČNÁ, SKRACOVACIA A |
PIŁA DWURĘCZNA, TARCZÓWKA, ZE |
POKOSOVÁ PÍLA |
SKRĘTNĄ TARCZĄ |
Pokyny pre obsluhu a bezpečnostné pokyny |
Wskazówki dotyczące obsługi i bezpieczeństwa |
Originálny návod na obsluhu |
Instrukcją oryginalną |
|
4 |
ZUG-, KAPPUND GEHRUNGSSÄGE |
|
Bedienungsund Sicherheitshinweise |
Originalbetriebsanleitung
Anleitung_LB4_4300688:_ 20.12.2010 10:06 Uhr Seite 2
Before reading, unfold the page containing the illustrations and familiarise yourself with all functions of the device.
Olvasás előtt kattintson az ábrát tartalmazó oldalra és végezetül ismerje meg a készülék mindegyik funkcióját.
Pred branjem stran s slikami odprite navzven in se nato seznanite z vsemi funkcijami naprave.
Před čtením si otevřete stranu s obrázky a potom se seznamte se všemi funkcemi přístroje.
Pred čítaním si odklopte stranu s obrázkami a potom sa oboznámte so všetkými funkciami prístroja.
Przed przeczytaniem proszę rozłożyć stronę z ilustracjami, a następnie proszę zapoznać się z wszystkimi funkcjami urządzenia.
Klappen Sie vor dem Lesen die Seite mit den Abbildungen aus und machen Sie sich anschließend mit allen Funktionen des Gerätes vertraut.
GB |
Operation and Safety Notes |
Page |
8 |
HU |
Kezelési és biztonsági utalások |
Oldal |
24 |
SI |
Navodila za upravljanje in varnostna opozorila |
Stran |
41 |
CZ |
Pokyny pro obsluhu a bezpečnostní pokyny |
Strana |
57 |
SK |
Pokyny pre obsluhu a bezpečnostné pokyny |
Strana |
73 |
PL |
Wskazówki dotyczące obsługi i bezpieczeństwa |
Strona |
89 |
DE/AT/CH |
Bedienungsund Sicherheitshinweise |
Seite |
106 |
2
Anleitung_LB4_4300688:_ 20.12.2010 10:06 Uhr Seite 3
1
1
18 |
c |
35 |
|
2
3
4
5
6
7
8
8 |
9 |
|
19
10
18 11
17
12
|
9 |
|
10 |
16 |
15 |
14 |
|
13 |
2 |
|
|
|
|
|
3 |
27 |
|
|
20 21 |
24 |
22 |
|
|
|
|
|
|
|
|
|
|
28 |
|||
|
|
|
|
|
|
|
|
|
12 |
25 |
|
|
26 |
|
|
|
|
|
|
|
23 |
|
|
|
|
|
|
|
|
18 |
|
|
|
|
|
13 |
17 |
|
|
|
|
|
30 |
29 |
|
|
|
|
|
|
|
|
3
Anleitung_LB4_4300688:_ |
20.12.2010 |
10:07 Uhr |
Seite 4 |
|
|
4 |
|
5 |
|
|
|
|
13 |
|
|
|
|
|
|
|
9 |
17 |
10 |
6 |
|
7 |
|
|
|
18 |
|
|
|
|
|
32
23
d 31
8 |
9 |
21
7 |
31 |
|
20 |
16 |
z |
|
|
d
4
Anleitung_LB4_4300688:_ 20.12.2010 |
10:08 Uhr |
Seite 5 |
|
|
||
10 |
|
|
11 |
|
|
|
|
|
|
|
|
|
32 |
|
y |
16 |
|
|
|
|
7 |
|
|
|
|
|
|
12 |
1 |
|
13 |
|
|
|
|
|
|
2 |
|
|
|
|
|
|
3 |
|
|
|
|
8 |
|
5 |
8 |
|
5 |
|
|
|
|
|
||
29 |
|
|
|
29 |
|
|
|
|
|
30 |
|
|
|
30 |
|
|
19 |
|
|
|
17 |
16 |
|
|
13 |
15 |
16 |
14 |
|
|
15 |
|
|
|
|
|
|
|
|
|
5 |
|
5 |
|
|
|
|
|
|
8 |
|
|
|
|
|
29 |
|
|
|
29 |
|
8 |
|
16 |
|
|
|
|
16 |
5

Anleitung_LB4_4300688:_ 20.12.2010 10:08 Uhr Seite 6
16 |
17 |
27
28
6 |
33 |
34 |
18
c
20 |
|
40 |
7 |
6 |
|
19
4 |
21 |
37 |
38 |
36 |

Anleitung_LB4_4300688:_ 20.12.2010 10:08 Uhr Seite 7
22 |
23 |
38
35
39
7

Anleitung_LB4_4300688:_ 20.12.2010 10:08 Uhr Seite 8
GB |
|
|
Table of contents |
Page |
|
1. |
Introduction ............................................................................. |
10 |
2. |
Safety information .................................................................. |
10-14 |
3. |
Layout ..................................................................................... |
14 |
4. |
Items supplied......................................................................... |
15 |
5. |
Intended use .......................................................................... |
15 |
6. |
Technical data......................................................................... |
16 |
7. |
Before starting the equipment ................................................. |
16-17 |
8. |
Operation ................................................................................ |
17-20 |
9. |
Replacing the power cable...................................................... |
20 |
10. Cleaning, maintenance and ordering of spare parts................ |
20-21 |
|
11. Disposal and recycling ............................................................ |
21 |
|
12. Declaration of conformity ........................................................ |
22 |
|
13. Guarantee certificate............................................................... |
23 |
|
The reprinting or reproduction by any other |
|
means, in whole or in part, of documentation |
|
and papers accompanying products is |
|
permitted only with the express consent of ISC |
Technical changes subject to change |
GmbH. |
|
8 |
|
Anleitung_LB4_4300688:_ 20.12.2010 10:08 Uhr Seite 9
GB
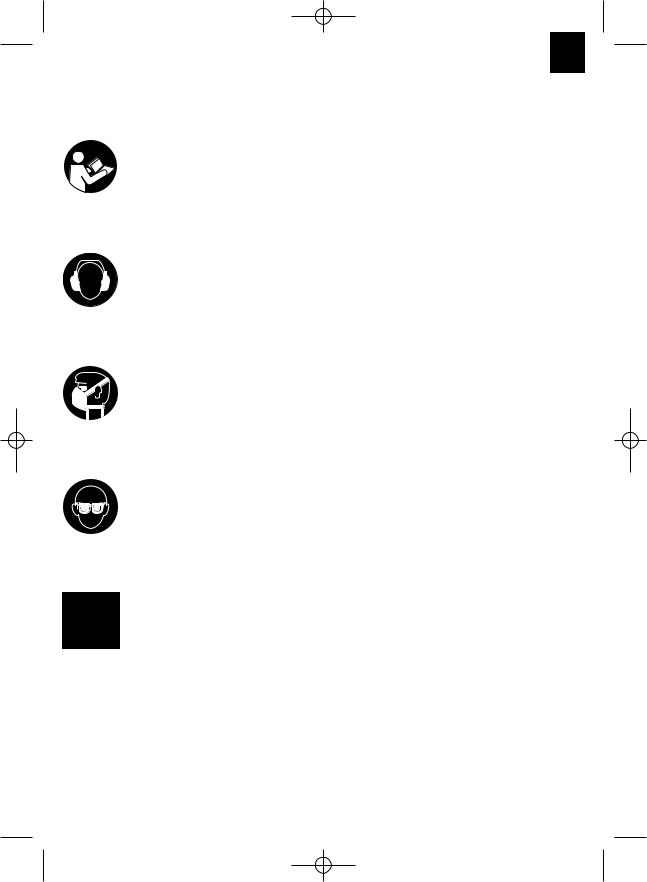
Explanation of the symbols on the equipment
“Caution - Read the operating instructions to reduce the risk of inquiry”
Wear ear-muffs.
The impact of noise can cause damage to hearing.
Wear a breathing mask.
Dust which is injurious to health can be generated when working on wood and other materials. Never use the device to work on any materials containing asbestos!
Wear safety goggles.
Sparks generated during working or splinters, chips and dust emitted by the device can cause loss of sight.
Important. Risk of injury.
Never reach into the running saw blade.
9

Anleitung_LB4_4300688:_ 20.12.2010 10:08 Uhr Seite 10
GB
1. Introduction
Important.
When using the equipment, a few safety precautions must be observed to avoid injuries and damage. Please read the complete operating instructions and safety information with due care. Keep this manual in a safe place so that the information is available at all times. If you give the equipment to any other person, hand over these operating instructions and the safety information as well. We cannot accept any liability for damage or accidents which arise due to a failure to follow these instructions and the safety information.
2. Safety information
CAUTION
Read all the safety information and instructions. Any errors made in following the safety information and instructions set out below may result in an electric shock, fire and/or serious injury.
Keep all the safety information and instructions in a safe place for future use.
2.1 General safety information on electric power tools
Important. The following safety precautions must be taken when using electric power tools in order to protect the user from electric shocks and the risk of injury and fire. Read and follow these instructions before using the equipment.
Keep your work area tidy
-Untidy work areas can result in accidents.
Make allowance for ambient conditions
-Do not expose electric power tools to rain. Never use electric power tools in damp or wet locations. Provide good lighting. Do not use electric power tools near flammable liquids or gases.
Guard against electric shock
-Avoid bodily contact with earthed parts (e.g. pipes, radiators, cookers and
10
refrigerators).
Keep children away
-Do not allow other persons to touch the equipment or cable, keep them away from your work area.
Keep your electric power tools in a safe place.
-Unused tools must be stored in a dry, locked room out of children’s reach.
Do not overload your tools
-It will work better and safer when used within its quoted capacity range.
Use the right tool
-Do not use tools or attachments too weak for heavy duty work. Never use tools on jobs for which they are not intended; for example, do not use a hand-held circular saw to fell trees or lop off branches.
Wear suitable work clothes
-Never wear loose fitting clothes or jewelry. They may get caught in moving parts. Rubber gloves and non-slip shoes are recommended when working outdoors. Wear a hair net if you have long hair.
Wear safety goggles.
-Use a dust mask when working on dusty jobs.
Do not use the cable for purposes other than that for which it is designed.
-Do not carry the equipment by its cable and do not use the cable to pull the plug out of the socket. Protect the cable from heat, oil and sharp edges.
Secure your workpiece
-Use clamps or a vise to hold the workpiece securely. This is safer than using your hand and also enables you to operate the machine with both hands.
Do not overstretch.
-Avoid abnormal working postures. Make sure you stand squarely and keep your balance at all times.
Take care of your tools
-Keep your tools sharp and clean in order to work well and safely. Follow the maintenance information and the instructions for changing tools. Check the power plug and cable on a regular basis and have them replaced by an authorized specialist if they are damaged. Check the
Anleitung_LB4_4300688:_ 20.12.2010 10:08 Uhr Seite 11
extension cable regularly and replace it if damaged. Keep handles dry and free from oil and grease.
Pull the power plug
-When tools are not in use, before starting any maintenance work or when changing attachments such as saw blades, drill bits and all kinds of mounted tools.
Always remove keys and wrenches after use
-Before switching on, make sure that all keys and wrenches have been removed from the tool.
Avoid unintentional starting
-Never carry a tool with your finger on the switch button while the tool is connected to the power supply. Make sure that the switch is turned off when connecting the tool to the power supply.
When using an extension cable outdoors
-Check that it is approved for outdoor duty and is marked accordingly.
Be alert at all times
-Keep an eye on your work. Use common sense when working. Never use the tool when you are distracted.
Check the equipment for damage
-Before using the tool again, check the safety devices or any slightly damaged parts to ensure that they are in good working order. Check that the moving parts are working correctly, that they do not jam, and that no parts are damaged. Make sure that all parts are fitted correctly to ensure that the equipment remains safe to use. Unless otherwise stated in the operating instructions, damaged guards and parts have to be repaired or replaced by a customer service workshop. Damaged switches have to be replaced by a customer service workshop. Never use an electric power tool with a switch that cannot be turned on and off.
Important!
-For your own safety you must only use the accessories and additional units listed in the operating instructions or recommended or specified by the manufacturer. The use of mounted tools or accessories other than
GB
those recommended in the operating instructions or catalog may place your personal safety at risk.
Repairs may only be carried out by a qualified electrician
-This electric power tool complies with the pertinent safety information. Repair work must only be carried out by a trained electrician, otherwise the equipment may cause accidents.
Connect up a vacuum extraction system
-If there are provisions for connecting up a vacuum extraction system, make sure that such a system is fitted and in use.
2.2 Special safety information on the equipment
1. Safety precautions
Change a worn out table insert.
Use only blades which are recommended by the manufacturer and comply with EN 847- 1.
If necessary, wear suitable personal protection equipment. This could consist of:
-Ear plugs to prevent the risk of damaging your hearing
-A breathing mask to avoid the risk of inhaling hazardous dust
-Always wear gloves when handling saw blades and rough materials. Whenever practicable, saw blades must be carried in a container.
The following can have an influence on dust development:
-Worn, damaged or cracked saw blades
-Recommended capacity of the vacuum extraction system: 20 m/s
-Proper guidance of the workpiece
Blades made of high-alloy high-speed steel (HSS) must not be used.
11
Anleitung_LB4_4300688:_ 20.12.2010 10:08 Uhr Seite 12
GB
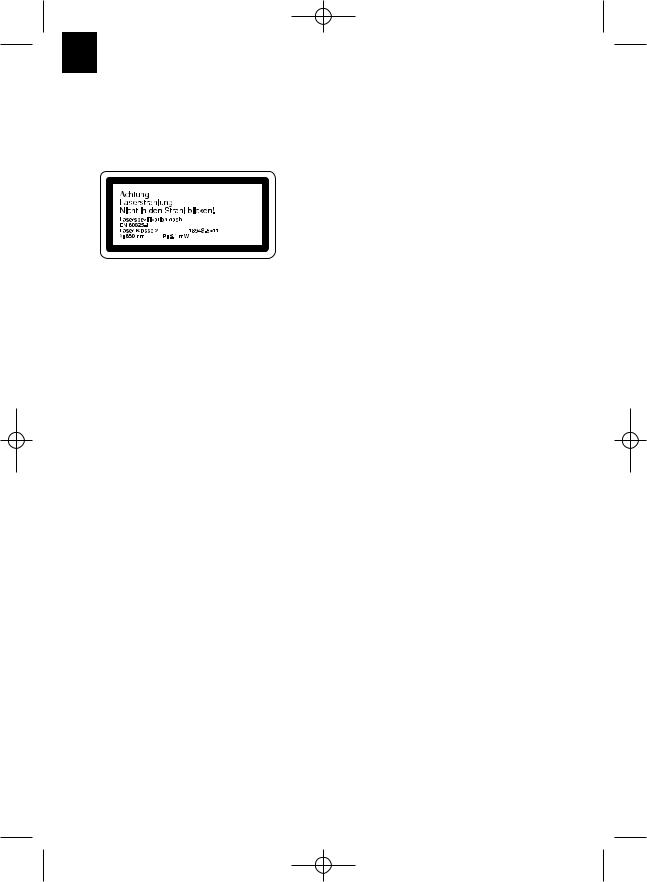
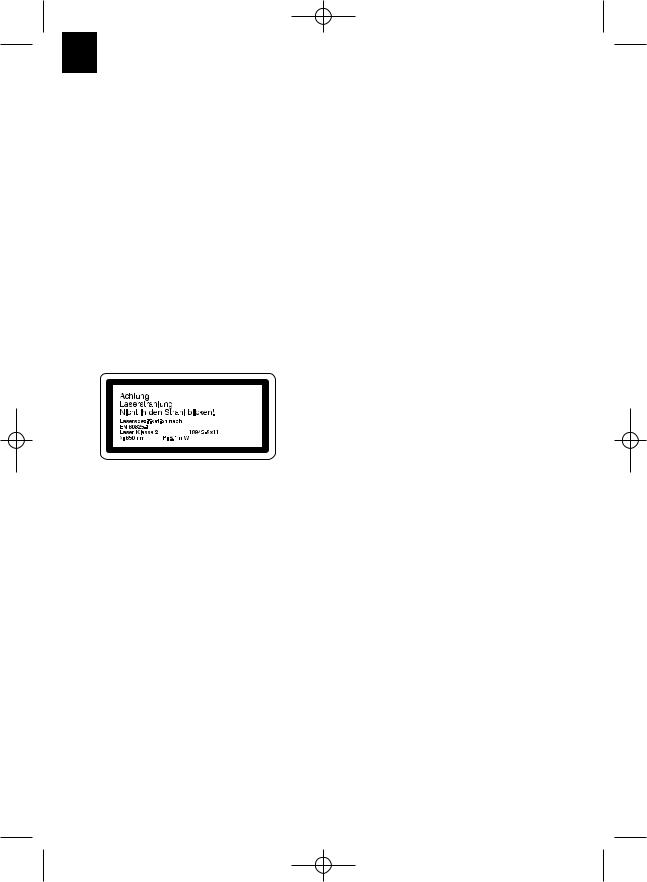
2. Safety information on the laser
Important: Laser radiation
Do not look into the beam Laser class 2
Protect yourself and your environment from accidents by taking the appropriate precautionary measures.
Do not look directly into the laser beam with the naked eye.
Never look directly into the laser path.
Never direct the laser beam at reflecting surfaces, persons or animals. Even a low output laser beam can inflict injury on the eye.
Caution: It is vital to follow the work procedures described in these instructions. Using the equipment in any other way may result in hazardous exposure to laser radiation.
Never open laser module.
When the laser is not going to be used for an extended period of time, the batteries should be removed.
Never use an optical instrument (for example magnifying glass) to view the laser beam.
Check the laser for damage on a regular basis and always before use. To protect yourself against injury, never use the equipment if it is damaged.
Defective lasers have to be repaired by a customer service workshop.
3. Safety information on the batteries
Never recharge the batteries. Danger of explosion.
Keep batteries out of the reach of children. Do not throw batteries into the fire, shortcircuit or take them apart.
If necessary clean the contacts on the
12
batteries and equipment before inserting the batteries.
Remove flat batteries immediately from the equipment. Risk of leakage!
Always replace all batteries in one go. Only use new batteries of the same make.
Avoid contact with skin, eyes and mucous membranes. If you come into contact with battery acid, rinse the affected pars at once with plenty of clear water and seek immediate medical assistance.
Do not expose batteries to extreme conditions, e.g. do not place on heaters or in direct sunshine. Increased risk of leakage.
4. Maintenance and service
The following conditions can have an influence on noise impact on the operator:
-Type of saw blade (e.g. saw blades designed to reduce noise development)
-Material of the workpiece
-The force with which the workpiece is pushed against the saw blade
Faults on the machine or its guards, safety devices and blade must be reported to the person in charge as soon as they are discovered.
5. Safe operation
Use a suitable blade for the material you wish to saw.
Never use the drag, crosscut and miter saw to cut any materials other than those specified by the manufacturer.
Use only the transport devices to move the equipment. Never use the guards for handling or moving the equipment.
Use the saw only if it is in perfect condition and properly maintained and only if the guards are correctly positioned.
When cutting miters, make sure that the device for swiveling the arm is fastened securely.
The floor around the machine must be level, clean and free of loose particles, such as chips and cutting residues.
The operator must receive proper training in the use, adjustment and operation of the machine.
Only use properly sharpened saw blades.

Anleitung_LB4_4300688:_ 20.12.2010 10:08 Uhr Seite 13
Do not exceed the maximum speed specified on the blade.
Be sure to only use spacers and spindle rings specified by the manufacturer as suitable for the intended purpose.
If the machine is equipped with a laser, this laser may not be replaced by a different type of laser. Repairs may only be carried out by the manufacturer of the laser or one of his authorized agents.
Do not remove any cutting residues or other parts of workpieces from the cutting zone while the machine is running and the saw unit is not at rest.
Make sure that the machine is always secured on a workbench or a table if at all possible.
Support long workpieces (e.g. with a roller table) to prevent them sagging at the end of a cut.
Additional safety information on crosscut saws
Give these safety instructions to all persons who work on the machine.
Do not use this saw to cut fire wood.
Caution! Hands and fingers may be injured on the rotating saw blade.
Before you use the machine for the first time, check that the voltage marked on the rating plate is the same as your mains voltage.
If you need to use an extension cable, make sure its conductor cross-section is big enough for the saw’s power consumption. Minimum cross-section: 1.5 mm2.
If you use a cable reel, the complete cable must be pulled off the reel.
Operators have to be at least 18 years of age. Trainees of at least 16 years of age are allowed to use the machine under supervision.
Persons working on the machine should not be distracted.
Note the direction of rotation of the motor and saw blade.
After you have switched off the motor, never slow down the saw blade by applying pressure to its side.
Only fit blades which are well sharpened
GB
and have no cracks or deformations.
Faulty saw blades must be replaced immediately.
Never use saw blades which do not comply with the data specified in this manual.
It is imperative to make sure that the arrow on the saw blade conforms with the arrow on the machine.
Pull out the power plug and twist the blade with your hand into the 45° and 90° positions in order to make sure that the blade does not touch the turntable in any position. If necessary, readjust the saw head.
It is imperative to make sure that all devices which cover the saw blade are in good working order.
Never wedge the hinged saw blade guard in open position.
Never dismantle the machine’s safety devices or render them inoperative.
Damaged or faulty safety devices have to be replaced immediately.
Never cut workpieces which are too small to hold securely in your hand.
Avoid placing your hands in hazardous positions in which, one or both hands could touch the saw blade if they slip suddenly.
The saw must not to be used for cutting round workpieces.
There must be no nails or other foreign bodies in the part of the workpiece that you wish to saw.
Always stand to the side of the saw blade when working with the saw.
Never load the machine so much that it cuts out.
Always press the workpiece firmly against the workbench and the stop rail to prevent the workpiece wobbling or twisting.
Ensure that the off-cuts can be removed to the side of the saw blade. Otherwise it is possible that they will be caught by the saw blade and catapulted out of the machine.
Never saw more than one workpiece at any one time.
Never remove loose splinters, chips or jammed pieces of wood when the saw blade is running.
To rectify faults or remove jammed pieces
13

Anleitung_LB4_4300688:_ 20.12.2010 10:08 Uhr Seite 14
GB
of wood, always switch off the machine first.
- Pull out the power plug-
Refit all guards and safety devices immediately after you have completed any repairs or maintenance work.
Be sure to observe the safety information and operating and maintenance instructions issued by the manufacturer, as well as the dimensions listed in the Technical Data.
It is imperative to observe the accident prevention regulations in force in your area as well as all other generally recognized rules of safety.
It is imperative to observe the accident prevention regulations in force in your area as well as all other generally recognized rules of safety.
Operation in enclosed areas is permitted only with a suitable vacuum extraction system.
The crosscut saw has to be connected to a 230 V socket-outlet (shock-proof socket) with earthing contact and minimum fusing of 10 A.
Do not use any low-powered machines for heavy duty work.
Be careful when working in vertical mode.
Caution: Take extra care when making double miter cuts!
Please keep these safety instructions in a safe place
3. Layout
1.Handle
2.ON/OFF switch
3.Release lever
4.Saw shaft lock
5.Machine head
6.Movable blade guard
7.Saw blade
8.Clamping device
9.Workpiece support
10.Locking screw for workpiece support
11.Table insert
12.Latched position lever
13.Locking grip
14.Pointer
15.Scale
16.Turntable
17.Fixed saw table
18.Additional stability bar
19.Stop rail
20.Scale
21.Pointer
22.Sawdust bag
23.Locking screw
24.Locking screw for drag guide
25.Fastening bolt
26.Drag guide
27.Knurled screw for cutting depth limiter
28.Stop for cutting depth limiter
29.Adjustable stop rail
30.Locking lever for adjustable stop rail
31.Adjustment screw (90°)
32.Adjustment screw (45°)
33.Flange bolt
34.Outer flange
35.Laser
36.ON/OFF switch for laser
37.Battery compartment
38.Battery compartment cover
39.Screw
40.Inner flange
c)Wrench
d)Counternut
y) 45° stop angle (not supplied) y) 90° stop angle (not supplied)
14

Anleitung_LB4_4300688:_ 20.12.2010 10:08 Uhr Seite 15
4. Items supplied
Drag, crosscut and miter Saw
2 x Clamping device (8)
2 x Workpiece support (9)
Sawdust bag (22)
Allen key
Wrench (c)
Additional stability bar (18)
2 x Battery (1.5 V LR6)
5. Intended use
The drag, crosscut and miter saw is designed to crosscut wood and plastic respective of the machine’s size. The saw is not designed for cutting firewood.
The equipment is to be used only for its prescribed purpose. Any other use is deemed to be a case of misuse. The user / operator and not the manufacturer will be liable for any damage or injuries of any kind caused as a result of this.
Please note that our equipment has not been designed for use in commercial, trade or industrial applications. Our warranty will be voided if the equipment is used in commercial, trade or industrial businesses or for equivalent purposes.
The equipment is to be operated only with suitable saw blades. It is prohibited to use any type of cutting-off wheel.
To use the equipment properly you must also observe the safety information, the assembly instructions and the operating instructions to be found in this manual.
All persons who use and service the equipment have to be acquainted with this manual and must be informed about the equipment’s potential hazards. It is also imperative to observe the accident prevention regulations in force in your area. The same applies for the general rules of health and safety at work.
The manufacturer will not be liable for any changes made to the equipment nor for any
GB
damage resulting from such changes. Even when the equipment is used as prescribed it is still impossible to eliminate certain residual risk factors. The following hazards may arise in connection with the machine’s construction and design:
Contact with the saw blade in the uncovered saw zone.
Reaching into the running saw blade (cut injuries).
Kick-back of workpieces and parts of workpieces.
Saw blade fracturing.
Catapulting of faulty carbide tips from the saw blade.
Damage to hearing if ear-muffs are not used as necessary.
Harmful emissions of wood dust when used in closed rooms.
The product meets the requirements of EN 61000-3-11 and is subject to special connection conditions. This means that use of the product at any freely selectable connection point is not allowed.
Given unfavorable conditions in the power supply the product can cause the voltage to fluctuate temporarily.
The product is exclusively intended for use at connection points that have a continuous current-carrying capacity of at least 100 A per phase.
As the user, you are required to ensure, in consultation with your electric power company if necessary, that the connection point at which you wish to operate the product meets the specified requirements.
15
Anleitung_LB4_4300688:_ 20.12.2010 10:08 Uhr Seite 16
GB
6. Technical data
AC motor: |
230V ~ 50Hz |
Power: |
1700 W |
Operating mode: |
S1 |
Idle speed n0: |
4,800 min-1 |
Carbide saw blade: |
ø 210 x ø 30 x 2.8 mm |
Number of teeth: |
24 |
Swiveling range: |
-45° / 0°/ +45° |
Miter cut: |
0° to 45° to the left |
Saw width at 90°: |
205 x 65 mm |
Saw width at 45°: |
140 x 65 mm |
Saw width at 2 x 45° |
|
(double miter cut): |
140 x 40 mm |
Protection class: |
II / |
|
|
Weight: |
approx. 15 kg |
Laser class: |
2 |
Wavelength of laser: |
650 nm |
Laser output: |
≤ 1mW |
Laser module power supply:
2 x 1.5 V Micro (AAA)
Noise emission values
The saw’s noise is measured in accordance with EN 61029.
|
Idle speed |
LpA sound pressure level |
86 dB |
KpA uncertainty |
3 dB |
LWA sound power level |
99 dB |
KWA uncertainty |
3 dB |
Total vibration values (vector sum of three directions) determined in accordance with EN 61029.
Vibration emission value ah < 2.5 m/s2 K uncertainty = 1.5 m/s2
Warning!
The specified vibration value was established in accordance with a standardized testing method. It may change according to how the electric equipment is used and may exceed the specified value in exceptional circumstances.
The specified vibration value can be used to compare the equipment with other electric power tools.
The specified vibration value can be used for initial assessment of a harmful effect.
Reduce noise generation and vibration to a minimum!
Use only equipment that is in perfect condition.
Maintain and clean the equipment regularly.
Adopt your way of working to the equipment.
Do not overload the equipment.
Have the equipment checked if necessary.
Switch off the equipment when not in use.
7. Before starting the equipment
7.1 General information
The equipment must be set up where it can stand securely, i.e. it should be bolted to a workbench, a universal base frame or similar.
All covers and safety devices have to be properly fitted before the equipment is switched on.
It must be possible for the blade to run freely.
When working with wood that has been processed before, watch out for foreign bodies such as nails or screws, etc.
Before you press the ON/OFF switch check that the saw blade is fitted correctly. Moving parts must run smoothly.
Before you connect the equipment to the power supply make sure the data on the rating plate are identical to the mains data.
16

Anleitung_LB4_4300688:_ 20.12.2010 10:08 Uhr Seite 17
7.2 Assembling the saw (Fig. 1-2, 4-6)
To adjust the turntable (16), loosen the locking grip (13) by approx. 2 turns and press the latched position lever (12) to disengage the turntable (16) (Figure 4).
To release the saw from its bottom position, apply light downward pressure to the machine head (5). At the same time pull the safety pin (25) out of the motor mount. Turn the safety pin (25) through 90° so that the saw remains unlocked (Fig. 1-2).
Swing the machine head (5) up until the release lever (3) latches into place (Fig. 1).
Fit the clamping devices (8) on the left and/or right side of the fixed saw table (17) (Fig. 1).
Undo the locking screws for the workpiece support (10) (Fig. 5).
Mount the workpiece support (9) on the fixed saw table (17) and tighten the appropriate locking screw (10) (Fig. 5).
Mount the second workpiece support (9) on the opposite side of the saw and secure with the appropriate locking screw (10).
When the locking screw (23) is loosened, you can tilt the machine head (5) to the left by up to 45° (Fig. 1-2).
Screw the additional stability bar (18) to the back of the equipment (Fig. 6).
7.3 Precision adjustment of the stop for crosscut 90° (Fig. 7-8)
No stop angle included.
Fasten the turntable (16) in 0° position.
Undo the locking screw (23) and move the machine head (5) all the way to the right using the handle (1).
Place the 90° angular stop (z) between the blade (7) and the turntable (16).
Slacken the counternut (d). Adjust the adjustment screw (90°) (31) until the angle between the blade (7) and the turntable (16) equals 90°.
Retighten the counternut (d) to secure this setting.
Check the position of the pointer (21) on the scale (20). If necessary, release the pointer (21) with a crosstip screwdriver, move to the 0° position of the scale (20) and retighten.
GB
7.4 Precision adjustment of the stop for miter cut 45° (Fig. 1, 7, 10-11)
No stop angle included.
Fasten the turntable (16) in 0° position.
Undo the locking screw (23) and move the machine head (5) all the way to the left using the handle, until it coincides at 45°.
Place the 45° stop angle (y) between the blade (7) and the turntable (16).
Adjust the adjustment screw (32) so that the angle between the blade (7) and the turntable (16) equals exactly 45°.
8. Operation
8.1 Cross cut 90° and turntable 0° (Fig. 1-3, 12)
Important! The integral resetting springs will automatically lift the machine head. Do not simply let go of the handle (1) after cutting, but allow the machine head (5) to rise slowly, applying slight counter pressure as it does so.
For cutting widths up to approx. 100 mm it is possible to fix the saw’s drag function with the locking screw for drag guide (24) in rear position. If the cutting width exceeds 100 mm you must ensure that the locking screw for drag guide (24) is slackened and that the machine head (5) can be moved.
Important. To make 90° crosscuts, the adjustable stop rail (29) must be fixed at the inner position.
Open the locking lever (30) for the adjustable stop rail and push the adjustable stop rail inwards.
The adjustable stop rail (29) must be fixed far enough in front of the innermost position that the distance between the stop rail (29) and the saw blade (7) amounts to a maximum of 5mm.
Before making a cut, check that the stop rail (29) and the saw blade (7) cannot collide.
Secure the locking lever (30) again.
Move the machine head (5) to its upper position.
Use the handle (1) to push back the machine head (5) and fix it in this position if
17

Anleitung_LB4_4300688:_ 20.12.2010 10:08 Uhr Seite 18
GB
required (dependent on the cutting width).
Place the piece of wood to be cut at the stop rail (19) and on the turntable (16).
Lock the material with the clamping device
(8)on the fixed saw table (17) to prevent the material from moving during the cutting operation.
Push down the release lever (3) to release the machine head (5).
Press the ON/OFF switch (2) to start the motor.
With the drag guide (26) fixed in place: use the handle (1) to move the machine head
(5)steadily and with light pressure downwards until the saw blade (7) has completely cut through the workpiece.
With the drag guide (26) not fixed in place: pull the machine head (5) all the way to the front. Lower the handle (1) to the very bottom by applying steady and light downward pressure. Now push the machine head (5) slowly and steadily to the very back until the saw blade (7) has completely cut through the workpiece.
When the cutting operation is completed, move the machine head (5) back to its upper (home) position and release the ON/OFF button (2).
8.2 Cross cut 90° and turntable 0° - 45° (Fig. 1-3, 13)
The crosscut saw can be used to make crosscuts of 0° -45° to the left and 0° -45° to the right in relation to the stop rail.
Important. To make 90° crosscuts, the adjustable stop rail (29) must be fixed at the inner position.
Open the locking lever (30) for the adjustable stop rail and push the adjustable stop rail inwards.
The adjustable stop rail (29) must be fixed far enough in front of the innermost position that the distance between the stop rail (29) and the saw blade (7) amounts to a maximum of 5mm.
Before making a cut, check that the stop rail (29) and the saw blade (7) cannot collide.
Secure the locking lever (30) again.
Release the turntable (16) by slackening the locking grip (13).
18
Press the latched position lever (12). Turn the turntable (16) and scale pointer (14) to the desired angular setting on the scales
(15)and lock into place with the locking grip
(13).The saw has locking positions at angles of - 45°, -30°, -22.5°, -15°, 0°, 15°, 22.5°, 30° and 45°, at which you can engage latched position lever (12).
Cut as described under section 8.1.
8.3 Miter cut 0°- 45° and turntable 0° (Fig. 1-3, 14)
The crosscut saw can be used to make miter cuts of 0° - 45° in relation to the work face. Important. To make miter cuts (inclined saw head), the adjustable stop rail (29) must be fixed at the outer position.
Open the locking lever (30) for the adjustable stop rail and push the adjustable stop rail outwards.
The adjustable stop rail (29) must be fixed far enough in front of the innermost position that the distance between the stop rail (29) and the saw blade (7) amounts to a maximum of 5mm.
Before making a cut, check that the stop rail
(29)and the saw blade (7) cannot collide.
Secure the locking lever (30) again.
If required, dismantle the clamping device
(8)or mount on the opposite side of the fixed saw table (17).
Move the machine head (5) to its upper position.
Fasten the turntable (16) in 0° position.
Undo the locking screw (23). Use the handle (1) to tilt the machine head (5) to the left until the pointer (21) points to the required angle on the scale (20).
Re-tighten the fixing screw (23).
Use the handle (1) to push back the machine head (5) and fix it in this position if required (dependent on the cutting width).
Place the piece of wood to be cut at the stop rail (19) and on the turntable (16).
Lock the material with the clamping device
(8)on the fixed saw table (17) to prevent the material from moving during the cutting operation.
Push down the release lever (3) to release the machine head (5).
Anleitung_LB4_4300688:_ 20.12.2010 10:08 Uhr Seite 19
Press the ON/OFF switch (2) to start the motor.
With the drag guide (26) fixed in place: use the handle (1) to move the machine head
(5) steadily and with light pressure downwards until the saw blade (7) has completely cut through the workpiece.
With the drag guide (26) not fixed in place: pull the machine head (5) all the way to the front. Lower the handle (1) to the very bottom by applying steady and light downward pressure. Now push the machine head (5) slowly and steadily to the very back until the saw blade (7) has completely cut through the workpiece.
When the cutting operation is completed, move the machine head (5) back to its upper (home) position and release the ON/OFF button (2).
8.4 Miter cut 0°- 45° and turntable 0°- 45° (Fig. 1-3, 15)
The crosscut saw can be used to make miter cuts to the left of 0°- 45° in relation to the work face and, at the same time, 0° - 45° to the left or 0° - 45° to the right in relation to the stop rail (double miter cut).
Important. To make miter cuts (inclined saw head), the adjustable stop rail (29) must be fixed at the outer position.
Open the locking lever (30) for the adjustable stop rail and push the adjustable stop rail outwards.
The adjustable stop rail (29) must be fixed far enough in front of the innermost position that the distance between the stop rail (29) and the saw blade (7) amounts to a maximum of 5mm.
Before making a cut, check that the stop rail
(29)and the saw blade (7) cannot collide.
Secure the locking lever (30) again.
If required, dismantle the clamping device
(8)or mount on the opposite side of the fixed saw table (17).
Move the machine head (5) to its upper position.
Release the turntable (16) by slackening the locking grip (13).
Press the latched position lever (12). Turn the turntable (16) and scale pointer (14) to
GB
the desired angular setting on the scales (15) and lock into place with the locking grip (13).
Undo the locking screw (23) and use the handle (1) to tilt the machine head (5) to the left until it coincides with the required angle value (in this connection see also section 8.3).
Re-tighten the fixing screw (23).
Cut as described under section 8.3.
8.5 Limiting the cutting depth (Fig. 16)
The cutting depth can be infinitely adjusted using the screw (27). To do this loosen the knurled nut on the screw (27). Move the stop for the cutting depth limiter (28) to the outside. Turn the screw (27) in or out to set the required cutting depth. Then re-tighten the knurled nut on the screw (27).
Check the setting by completing a test cut.
8.6 Sawdust bag (Fig. 2)
The saw is equipped with a debris bag (22) for sawdust and chips.
The debris bag (22) can be emptied by means of a zipper at the bottom.
8.7 Changing the saw blade (Fig. 1, 17-20) Remove the power plug!
Important.
Wear safety gloves when changing the saw blade. Risk of injury.
Swing up the machine head (5). Use the safety pin (25) to lock the machine head in this position.
Press the release lever (3). Swing up the saw blade guard (6) to the point where the recess in the saw blade guard (6) is above the flange bolt (33).
Press the saw shaft lock (4) with one hand. With the other hand position the wrench (c) over the flange bolt (33).
Firmly press the saw shaft lock (4) and slowly rotate the flange bolt (33) in clockwise direction. The saw shaft lock (4) engages after no more than one rotation.
Now, using a little more force, slacken the flange screw (33) in the clockwise direction.
Turn the flange screw (33) right out and remove the external flange (34).
19

Anleitung_LB4_4300688:_ 20.12.2010 10:08 Uhr Seite 20
GB
Take the blade (7) off the inner flange (40) and pull downwards and out.
Carefully clean the flange screw (33), outer flange (34) and inner flange (40).
Fit and fasten the new saw blade (7) in reverse order.
Important! The cutting angle of the teeth, in other words the direction of rotation of the saw blade (7) must coincide with the direction of the arrow on the housing.
Before continuing your work make sure that all safety devices are in good working condition.
Important! Every time that you change the saw blade (7), check to see that it spins freely in the table insert (11) in both perpendicular and 45° angle settings.
Important! The work to change and align the saw blade (7) must be carried out correctly.
8.8 Transport (Fig. 1-3)
Retighten the locking grip (13) to secure the turntable (16) in place.
Activate the release lever (3), press the machine head (5) downwards and secure with the safety pin (25). The saw is now locked in its bottom position.
Fix the saw’s drag function with the locking screw for drag guide (24) in rear position.
Carry the equipment by the fixed saw table (17).
When reassembling the equipment proceed as described under section 7.2.
8.9 Using the laser (Fig. 21-23/Item 35)
To switch on: Move the ON/OFF switch of the laser (36) to the “1” position. A laser line is projected onto the material you wish to process, providing an exact guide for the cut.
To switch off: Move the ON/OFF switch of the laser (36) to the “0” position.
Setting the laser: The laser is adjusted with the screw (39) and glued in place exworks. Further adjustment of the laser during operation is not required. Important. Do not look into the laser beam.
Replacing the battery: Switch off the laser (35). Remove the battery compartment
20
cover (38). Remove the batteries and replace with new batteries (2 x 1.5 Volt Type R03, LR 03 Micro, AAA) Check that the battery terminals are positioned correctly when inserting new batteries. Close the battery compartment (37) again.
9. Replacing the power cable
If the power cable for this equipment is damaged, it must be replaced by the manufacturer or its after-sales service or similarly trained personnel to avoid danger.
10.Cleaning, maintenance and ordering of spare parts
Always pull out the mains power plug before starting any cleaning work.
10.1 Cleaning
Keep all safety devices, air vents and the motor housing free of dirt and dust as far as possible. Wipe the equipment with a clean cloth or blow it down with compressed air at low pressure.
We recommend that you clean the equipment immediately after you use it.
Clean the appliance regularly with a damp cloth and some soft soap. Do not use cleaning agents or solvents; these may be aggressive to the plastic parts in the appliance. Ensure that no water can get into the interior of the equipment.
10.2 Carbon brushes
In case of excessive sparking, have the carbon brushes checked only by a qualified electrician. Important. The carbon brushes should not be replaced by anyone but a qualified electrician.
10.3 Servicing
There are no parts inside the equipment which require additional maintenance.
Anleitung_LB4_4300688:_ 20.12.2010 10:08 Uhr Seite 21
10.4 Ordering replacement parts:
Please provide the following information on all orders for spare parts:
Model/type of the equipment
Article number of the equipment
ID number of the equipment
For our latest prices and information please go to www.isc-gmbh.info
11. Disposal and recycling
The equipment is supplied in packaging to prevent it from being damaged in transit. The raw materials in this packaging can be reused or recycled. The equipment and its accessories are made of various types of material, such as metal and plastic. Defective components must be disposed of as special waste. Ask your dealer or your local council.
Disposing of batteries:
Batteries contain materials that are potentially harmful to the environment. Never place batteries in your household refuse, in fire or in water. Batteries should be collected, recycled or disposed of by environment-friendly means. Send your old batteries to iSC GmbH, Eschenstrasse 6 in D-94405 Landau. You can then be sure that the equipment will be correctly disposed of by the manufacturer.
GB
For EU countries only
Never place any electric power tools in your household refuse!
To comply with European Directive 2002/96/EC concerning old electric and electronic equipment and its implementation in national laws, old electric power tools have to be separated from other waste and disposed of in an environment-friendly fashion, e.g. by taking to a recycling depot.
Recycling as an alternative to returning to the manufacturer:
As an alternative to returning the equipment to the manufacturer, the owner is obligated to ensure that the equipment is properly disposed of when he abandons ownership. The old equipment can be returned to a suitable collection point that will dispose of it in accordance with the national recycling and waste disposal laws. This does not apply to any accessories or aids without electrical components which are supplied with the old equipment .
21
Anleitung_LB4_4300688:_ 20.12.2010 10:08 Uhr Seite 22
GB
12. Declaration of conformity
Einhell Germany AG · Wiesenweg 22 · D-94405 Landau/Isar
Konformitätserklärung
k erklärt folgende Konformität gemäß EU-Richtlinie und
Normen für Artikel
t explains the following conformity according to EU directives and norms for the following product
p déclare la conformité suivante selon la directive CE et les normes concernant l’article
C dichiara la seguente conformità secondo la direttiva UE e le norme per l’articolo
N verklaart de volgende overeenstemming conform EU richtlijn en normen voor het product
m declara la siguiente conformidad a tenor de la directiva y normas de la UE para el artículo
O declara a seguinte conformidade, de acordo com a directiva CE e normas para o artigo
l attesterer følgende overensstemmelse i medfør af
EU-direktiv samt standarder for artikel
U förklarar följande överensstämmelse enl. EU-direktiv och standarder för artikeln
q vakuuttaa, että tuote täyttää EU-direktiivin ja standardien vaatimukset
. tõendab toote vastavust EL direktiivile ja standarditele
j vydává následující prohlášení o shodě podle směrnice
EU a norem pro výrobek
X potrjuje sledečo skladnost s smernico EU in standardi za izdelek
W vydáva nasledujúce prehlásenie o zhode podľa smernice
EÚ a noriem pre výrobok
A a cikkekhez az EU-irányvonal és Normák szerint a következő konformitást jelenti ki
P deklaruje zgodność wymienionego poniżej artykułu z następującymi normami na podstawie dyrektywy WE.
e декларира съответното съответствие съгласно
Директива на ЕС и норми за артикул
H paskaidro šādu atbilstību ES direktīvai un standartiem
G apibūdina šį atitikimą EU reikalavimams ir prekės normoms
Q declară următoarea conformitate conform directivei UE
şi normelor pentru articolul
z δηλώνει την ακόλουθη συμμόρφωση σύμφωνα με την
Οδηγία ΕΚ και τα πρότυπα για το προϊόν
B potvrđuje sljedeću usklađenost prema smjernicama EU i normama za artikl
Izjava o sukladnosti za ovaj proizvod dostupna je na internet stranici www.lidl.hr.
f potvrđuje sljedeću usklađenost prema smjernicama EU i normama za artikl
4 potvrđuje sledeću usklađenost prema smernicama EZ i normama za artikal
T следующим удостоверяется, что следующие
продукты соответствуют директивам и нормам ЕС
1 проголошує про зазначену нижче відповідність
виробу директивам та стандартам ЄС на виріб
Z Ürünü ile ilgili AB direktifleri ve normları gereğince aşağıda açıklanan uygunluğu belirtir
L erklærer følgende samsvar i henhold til EU-direktivet og standarder for artikkel
E Lýsir uppfyllingu EU-reglna og annarra staðla vöru
Zug-, Kappund Gehrungssäge PKS 1700 A1 (Parkside)

 87/404/EC_2009/105/EC

 2005/32/EC_2009/125/EC
 2006/95/EC
x 2006/42/EC

 Annex IV
Notified Body: Notified Body No.: Reg. No.:

 2006/28/EC
x 2004/108/EC

 2004/22/EC

 1999/5/EC

 97/23/EC

 90/396/EC_2009/142/EC
 89/686/EC_96/58/EC

 2000/14/EC_2005/88/EC

 Annex V

 Annex VI
Noise: measured LWA = dB (A); guaranteed LWA = dB (A) P = KW; L/Ø = cm
Notified Body:

 2004/26/EC
Emission No.:
Standard references: EN 61029-1; EN 61029-2-9; EN 55014-1;
EN 55014-2; EN 61000-3-2; EN 61000-3-11; EN 60825-1
Landau/Isar, den 08.09.2010
Weichselgartner/General-Manager |
Wentao/Product-Management |
|
|
First CE: 10 |
Archive-File/Record: 4300685-42-4199908-08 |
Art.-No.: 43.006.88 I.-No.: 11030 |
Documents registrar: Siegfried Roider |
Subject to change without notice |
Wiesenweg 22, D-94405 Landau/Isar |
22

Anleitung_LB4_4300688:_ 20.12.2010 10:08 Uhr Seite 23
GB
13. GUARANTEE CERTIFICATE
Dear Customer,
All of our products undergo strict quality checks to ensure that they reach you in perfect condition. In the unlikely event that your device develops a fault, please contact our service department at the address shown on this guarantee card. Of course, if you would prefer to call us then we are also happy to offer our assistance under the service number printed below. Please note the following terms under which guarantee claims can be made:
1.These guarantee terms cover additional guarantee rights and do not affect your statutory warranty rights. We do not charge you for this guarantee.
2.Our guarantee only covers problems caused by material or manufacturing defects, and it is restricted to the rectification of these defects or replacement of the device. Please note that our devices have not been designed for use in commercial, trade or industrial applications. Consequently, the guarantee is invalidated if the equipment is used in commercial, trade or industrial applications or for other equivalent activities. The following are also excluded from our guarantee: compensation for transport damage, damage caused by failure to comply with the installation/assembly instructions or damage caused by unprofessional installation, failure to comply with the operating instructions (e.g. connection to the wrong mains voltage or current type), misuse or inappropriate use (such as overloading of the device or use of non-approved tools or accessories), failure to comply with the maintenance and safety regulations, ingress of foreign bodies into the device (e.g. sand, stones or dust), effects of force or external influences (e.g. damage caused by the device being dropped) and normal wear resulting from proper operation of the device. This applies in particular to rechargeable batteries for which we nevertheless issue a guarantee period of 12 months.
The guarantee is rendered null and void if any attempt is made to tamper with the device.
3.The guarantee is valid for a period of 3 years starting from the purchase date of the device. Guarantee claims should be submitted before the end of the guarantee period within two weeks of the defect being noticed. No guarantee claims will be accepted after the end of the guarantee period. The original guarantee period remains applicable to the device even if repairs are carried out or parts are replaced. In such cases, the work performed or parts fitted will not result in an extension of the guarantee period, and no new guarantee will become active for the work performed or parts fitted. This also applies when an on-site service is used.
4.In order to assert your guarantee claim, please send your defective device postage-free to the address shown below. Please enclose either the original or a copy of your sales receipt or another dated proof of purchase. Please keep your sales receipt in a safe place, as it is your proof of purchase. It would help us if you could describe the nature of the problem in as much detail as possible. If the defect is covered by our guarantee then your device will either be repaired immediately and returned to you, or we will send you a new device.
Of course, we are also happy offer a chargeable repair service for any defects which are not covered by the scope of this guarantee or for units which are no longer covered. To take advantage of this service, please send the device to our service address.
23

Anleitung_LB4_4300688:_ 20.12.2010 10:08 Uhr Seite 24
HU |
|
|
Tartalomjegyzék: |
Oldal |
|
1. |
Bevezetés .............................................................................. |
26 |
2. |
Biztonsági utasítások ............................................................. |
26-30 |
3. |
A készülék leírása .................................................................. |
30-31 |
4. |
A szállítás terjedelme ............................................................. |
31 |
5. |
Rendeltetésszerűi használat .................................................. |
31 |
6. |
Technikai adatok .................................................................... |
32 |
7. |
Beüzemeltetés előtt ................................................................ |
32-33 |
8. |
Üzem ...................................................................................... |
33-36 |
9. |
A hálózati csatlakozóvezetéknek a kicserélése ...................... |
36 |
10. Tisztítás, karbantartás és pótalkatrészmegrendelés .............. |
37 |
|
11. Megsemmisítés és újrahasznosítás ........................................ |
37-38 |
|
12. Konformkijelentés .................................................................. |
39 |
|
13. Garanciaokmány .................................................................... |
40 |
|
A termékek dokumentációjának és a |
|
kisérőpapírjainak az utánnyomtatása vagy |
|
egyébb sokszorosítása, kivonatosan is csak az |
|
ISC GmbH kihangsúlyozott beleegyezésével |
Technikai változtatások jogát fenntartva |
engedélyezett. |
|
24 |
|

Anleitung_LB4_4300688:_ 20.12.2010 10:08 Uhr Seite 25
HU
A készüléken található szimbólumok magyarázata
„FIGYELMEZTETÉS – Sérülés veszélyének a lecsökkentéséhez olvassa el a használati utasítást”
Hordjon egy zajcsökkentő fülvédőt.
A zaj behatása hallásvesztéshez vezethet.
Viseljen egy porvédőálarcot.
Fa és más anyagok megdolgozásánál az egészségre káros por keletkezhet. Azbeszt tartalmú anyagokat nem szabad megmunkálni!
Hordjon egy védőszemüveget.
Munka közben keletkező szikrák vagy a készülékből kipattanó szillánk, forgács vagy a keletkező por vakulást okozhat.
Figyelem! Sérülés veszélye!
Ne nyúljon a futó fűrészlapba!
25

Anleitung_LB4_4300688:_ 20.12.2010 10:09 Uhr Seite 26
HU
1. Bevezetés
Figyelem!
A készülékek használatánál, a sérülések és a károk megakadályozásának az érdekébe be kell tartani egy pár biztonsági intézkedést. Ezért ezt a használati utasítást/biztonsági utasításokat gondosan átolvasni. Őrizze ezeket jól meg, azért hogy mindenkor a rendelkezésére álljanak az információk. Ha más személyeknek adná át a készüléket, akkor kérjük kézbesítse ki vele együtt ezt a használati utasítást/biztonsági utasításokat is. Nem vállalunk felelőséget olyan balesetekért vagy károkért, amelyek ennek az utasításnak és a biztonsági utasításoknak a figyelmen kívül hagyásából keletkeznek.
2. Biztonsági utasítások
FIGYELMEZTETÉS
Olvasson minden biztonsági utalást és utasítást el. A biztonsági utalások és utasítások betartásán belüli mulasztás áramcsapást, tűzet és/vagy nehéz sérüléseket okozhat.
Őrizze meg a biztonsági utalásokat és utasításokat a jövőre nézve.
2.1 Általános biztonsági utasítások az elektromos készülékekhez
Figyelem! Elektromos szerszámok használatánál, áram ütés, sérülések és tűzveszély elleni védelem szempontjából, figyelembe kell venni a következő biztonsági intézkedéseket. Olvassa és vegye figyelembe ezeket az utasításokat, mielőtt használná a készüléket.
Tartsa a munkakörét rendben
-Rendetlenség a munkakörben baleset veszélyét idézi elő.
Vegye a környezeti befolyásokat figyelembe
-Ne tegyen ki az elektromos szerszámokat esőnek. Ne használjon elektromos szerszámokat nedves vagy vizes
26
környezetben. Gondoskodjon jó megvilágításról. Ne használjon elektromos szerszámokat gyúllékony folyadékok vagy gázok közelében.
Óvja magát az áramütés elől
-Kerülje el a földelt részekkel való testi érintkezést, mint például csövekkel, fűtőtestekkel, tűzhelyekkel, hűtőszekrényekkel.
Tartsa a gyerekeket távol!
-Ne engedje meg más személynek, hogy megérintsék a szerszámot vagy a kábelt, tartsa őket a munkakörétől távol.
Tárolja a szerszámait biztonságosan
-Nem használt szerszámokat egy száraz, zárt teremben és a gyerekek számára nem elérhetően kell tárolni.
Ne terhelje túl a szerszámait
-Jobban és biztonságosabban dolgozik a megadott teljesítményi körben.
Használja a kellő szerszámot
-Ne használjon túl gyenge szerszámokat vagy kiegészítő egységeket nehéz munkákra. Ne használja a szerszámokat olyan célokra és munkákra, melyekre ezek nincsenek előrelátva; mint például ne használjon kézi körfűrészeket fák kivágására vagy ágak levágására.
Viseljen megfelelő munkaruhát
-Ne viseljen bő ruhát vagy ékszert. Ezeket elkaphatják a mozgó részek. A szabadban történö munkálatoknál gumikesztyű és tapadós lábbeli ajánlatos. Hosszú hajnál viseljen hajhálót.
Viseljen egy védőszemüveget
-Porképző munkálatoknál használjon porvédőmaszkot.
Ne használja fel a kábelt más célokra
-Ne hordja a szerszámot a kábelnál fogva, és ne használja fel a kábelt a csatlakozó dugó kihúzására a dugaszoló aljzatból. Óvja a kábelt hőségtől, olajtól és éles szélektől.
Biztosítsa a munkadarabot
-Használjon szorítószerkezeteket vagy egy satut a munkadarab befogására. Ezáltal ez biztosabban van rögzítve mint kézzel és lehetővé teszi a gép mindkét kézzeli kezelését.
Ne terjessze túl ki az állóhelyét
-Kerülje el az abnormális testtartást.

Anleitung_LB4_4300688:_ 20.12.2010 10:09 Uhr Seite 27
Gondoskodjon biztos állásról, és tartsa mindenkor az egyensúlyt.
Ápolja gondosan a szerszámait
-Tartsa a szerszámait élesen és tisztán, hogy jól és biztosan tudjon dolgozni. Kövesse a karbantartási előírásokat és az utasításokat a szerszámcserére. Ellenőrizze le rendszeresen a csatlakozási vezetéket és a kábelját, és sérülés esetén cseréltesse ki azt egy elismert szakember által. Ellenőrizze le rendszeresen a hosszabbító kábelt és sérülés esetén cserélje ki. Tartsa a fogantyúkat szárazon valamint olaj és zsír mentesen.
Húzza ki a hálózati csatlakozót
-A szerszám nem használatánál, karbantartás előtt és szerszámcserénél, mint például fűrészlap, fúró és mindenfajta gépszerszámoknál.
Ne hagyjon benne semmilyen szerszámkulcsot dugva
-Bekapcsolás előtt ellenőrizze le, hogy a kulcsok és a beállító szerszámok el vannak- e távolítva.
Kerülje el az akaratlan indulást
-Ne hordja ujjal a kapcsolón, a villamos hálózatra csatlakoztatott elektromos szerszámokat. Bizonyosodjon meg róla, hogy a kapcsoló a hálózatba való bedugáskor ki van kapcsolva.
Hosszabbító kábel a szabadban
-A szabadban csakis arra engedélyezett és megfelelően megjelölt hosszabbítókábelt használjon.
Legyen mindig figyelmes
-Figyeljen a munkájára. Járjon okosan el. Ne használja a szerszámot, ha dekoncentrált.
Ellenőrizze le a készülékét sérülésekre
-A szerszám további használata előtt a védő berendezéseket vagy enyhén sérült részeket gondosan megvizsgálni, hibátlan és meghatározásuknak megfelelő működésükre. Vizsgálja meg, hogy a mozgó részek működése rendben van, és hogy nem szorulnak vagy nincsennek károsulva részeik. Ahhoz, hogy a készülék biztonsága biztosítva legyen minden résznek helyesen fel kell szerelve lennie. Amennyiben a használati utasításban nincs
HU
más megadva, a károsult biztonsági berendezéseket és részeket szakszerüen egy elismert szakműhely által kell megjavíttatni vagy kicseréltetni. A károsult kapcsolókat egy vevőszolgálati műhely által muszáj kicseréltetni. Ne használjon olyan elektromos szerszámokat ahol a kapcsolót nem lehet beés kikapcsolni.
Figyelem!
-Saját biztonságáért, csak a használati utasításban megadott vagy a szerszám előállítójától ajánlott vagy megnevezett kellékeket és pótkészülékeket használni. A használati utasításban vagy a katalógusban ajánlott bevetési szerszámoktól vagy kellékektől eltérőek használata egy személysérülési veszélyt jelenthet az Ön számára.
Javítások csak egy villamossági szakember által
-Ez az elektromos szerszám megfelel a rávonatkozó biztonsági határozatoknak. Javításokat csak egy villamossági szakember végezheti el, különben balesetek érhetik a használót.
Csatlakoztassa rá a porelszívóberendezést
-Ha a porelszívási berendezésekhez csatlakozások vannak, akkor győződjön meg arról, hogy ezek rá is vannak kapcsolva és használva is vannak.
2.2 Speciális biztonsági utasítások a készülékhez
1. Biztonsági intézkedések
Elhasználódott asztalbetétet kicserélni.
Csak a gyártó által ajánlott, az EN 847-1- nek megfelelő fűrészlapokat használni.
Ha szükséges, akkor egy megfelelő személyi védőfelszerelést hordani. Ez a következőket tartalmazhatná:
-Zajcsökkentő füllvédő a rizikó lecsökkentéséhez, hogy nagyotthalló legyen;
-Porvédőálarcot a veszélyes por belélegzése rizikójának a lecsökkentéséhez.
-Fűrészlapokkal és durva munkadarabokkal történő bánásnál
27
Anleitung_LB4_4300688:_ 20.12.2010 10:09 Uhr Seite 28
HU
kesztyűket hordani. A fűrészlapokat amikor csak lehetséges egy tárolóban kell hordani.
A következő tényezők befolyásolhatják a porkibocsátást:
-Elkopott, sérült vagy repedezett fűrészlapok
-Az elszívószerelvény ajánlott elszívóteljesítménye 20 m/s.
-A munkadarbott szabályszerűen kell vezetni
Erősen ötvözött gyorsacélból (HSS-Acél) készült fűrészlapokat nem szabad használni.
2. Biztonsági utasítások a lézerhez
Figyelem:
Lézersugárzás
Ne nézzen a sugárba Lézerosztály 2
Megfelelő óvintézkedések használata által védje magát és a környezetét a balesetveszélyektől.
Ne tekintsen védetelen szemekkel közvetlenül a lézersugárba.
Ne tekintsen sohasem közvetlenül a sugárzásba.
Soha sem irányítsa a lézersugarat visszaverő felületekre, személyekre vagy állatokra. Egy kis telyesítményű lézersugár is károkat tud okozni a szemen.
Vigyázat - ha az itt megadott eljárási módtól eltér, akkor ez egy veszélyes sugárzási expozícióhoz vezethet.
A lézermodult sohasem kinyitni.
Ha a lézert hosszabb ideig nem használja, akkor az elemeket el kell távolítani belőle.
Ne használjon sohasem egy optikai műszert (mint például nagyítólencsét), a lézersugárzás figyeléséhez.
Rendszeresen valamint használat előtt leellenőrizni a lézert külső sérülésekre.
28
Veszélyeztetések elkerüléséhez ne használja a készüléket, ha károkat mutat fel.
Defektes lézert a veőszolgáltasási szakműhely által javíttatni meg.
3. Biztonsági utasítások az elemekhez
Ne töltse fel sohasem újra az elemeket. Robbanás veszélye áll fenn.
Tartsa az elemekte a gyerekektől távol, ne dobja őket tűzbe, zárja rövidre vagy szedje őket szét.
Az elem betétele előtt szükség esetén megtisztítani a elemés a készülékkontaktusokat.
Lemerült elemeket azonnal eltávolítani a készülékből. Kifutás veszélye!
Mindig minden elemet egyidejűleg kicserélni. Ehhez mindig csak új, egyforma típusú elemeket használni.
Kerülje le a bőrrel, szemmel vagy a nyálkahártyával való érintkezést. Elemsavval való érintkezés után az érintett helyeket azonnal sok tiszta vízzel kiöbliteni és közvetlenül felkeresni egy orvost.
Ne tegye ki az elemekt extrémi feltételeknek, mint például fűtőtestekre, napsütésnek! Magas a kifutás veszélye!
4. Gondozás és szervíz
A következő feltételek befolyásolhatják a kezelőszemélyre ható zajbehatást.
-A fűrészlap fajtája (mint például fűrészlapok a zajbehatás lecsökkentésére)
-A munkadarab anyaga
-Az erő, amely a munkadarabot a fűrészlap ellen tolja.
A gépben levő hibákat, beleértve a védőberendezéseket és a fűrészlapot is, azonnal a felfedezésük után jelenteni kell a biztonságért felelős személynek.
5. Biztos üzem
A megmunkálandó munkadarabnak megfelelő fűrészlapot használni.
Ne használja a fejező/húzó/sarkaló fűrészt sohasem a gyártó által megadott munkaanyagoktól eltérőek vágására.
A gép szállításánál csak a szállítási berendezést használni és ne használja sohasem kezelésre és szállításra a

Anleitung_LB4_4300688:_ 20.12.2010 10:09 Uhr Seite 29
védőberendezéseket.
A fűrészt csak akkor használni, ha a fűrész jó állapotban van és rendeltetésszerűen karban lett tartva és ha a védőberendezések az előrelátott pozícióban vannak.
Arra ügyelni, hogy a kar kilendítésére szolgáló berendezés a sarkalóvágásnál biztosan rögzítve legyen.
A gép környékén levő talajnak síknak, tisztának és laza részecskéktől, mint például forgácstól és vágáshulladékoktól mentesnek kell lennie.
A kezelő személynek elegendően ki kell oktatva lennie a gép használatában, beállíásában és kezelésében.
Csak helyesen élesített fűrészlapokat használni. Be kell tartani a fűrészlapon megadott legmagasabb fordulatszámot.
Ügyelni arra, hogy csak olyan távolságkorongokat és orsógyűrűket használjon, amelyek megfelelőek a gyártó által megadott célra.
Ha a gép lézerrel van felszerelve, akkor nem szabad ezt a lézert egy más típusú lézerért kicserélni. Javításokat csak a lézer gyártójának vagy egy autorizált képviselőnek szabad elvégznie.
Amig a gép fut és mig a fűrészaggregátum nyugalmi állapotban nincs, addig ne távolítson el vágási hulladékokat vagy egyébb munkadarbrészeket a vágási részből.
Ügyelni arra, hogy a gép, ha csak lehetséges, mindig egy munkapadra vagy egy asztalra fel legyen erősítve.
Hosszú munkadarbokat a vágási folyamat végéni lebillenés ellen biztosítani kell (mint például egy legurító állvánnyal).
6. Kiegészítő biztonsági utasítások a fejező fűrészeléshez
Adja tovább a gépen dolgozó minden személynek a biztonsági utasításokat.
Ne használja fel a fűrészt tüzelőfa fűrészelésére.
Vigyázat! A forgó fűrészlap által fennáll a kezek és ujjak megsértésének a veszélye.
A használatba vétel előtt ellenőrizze le, hogy a készülék típustábláján levő
HU
feszültség a hálózati feszültséggel megegyezik - e.
Ha hosszabbító kábelre lenne szüksége, akkor győződjön meg arról, hogy annak az átmérője a fűrész áramfelvételének elegendő. Legkisebb átmérő 1,5 mm².
Kábeldobot csak letekert állapotban használjon.
A kezelőszemélynek legalább 18 évesnek kell lennie, kiképzésben levőnek legalább 16 évesnek, de csak felügyelet alatt.
A gépen dolgozó személyek figyelmét nem szabad elterelni.
Vegye figyelembe a motor és a fűrészlap forgási irányát.
A fűrészlapokat semmi esetre sem szabad a meghajtás kikapcsolása után, oldali ellennyomás által lefékezni.
Csak jól élesített, repedésmentes és nem deformált fűrészlapokat szerelni be.
Hibás fűrészlapokat azonnal ki kell cserélni.
Ne használjon ebben a használati utasításban megadott jellemző adatoknak nem megfelelő fűrészlapokat.
Biztosítani kell, hogy a fűrészlapon levő nyíl a készüléken levő nyíllal megegyezzen.
Győződjön meg, azáltal hogy kihúzott hálózati csatlakozás melett a fűrészlapot kézzel a 45°-ú és a 90°-ú állásba fordítja arról, hogy a fűrészlap semmilyen állásban sem érinti meg az asztalt. Adott estben újból jusztírozni a fűrészfejet.
Biztosítani kell, hogy minden olyan berendezés, amely a fűrészlapot burkolja kifogástalanul dolgozzon.
A mozgatható fűrészlapvédőburkolatot nem szabad nyitott állapotban beszorítani.
A gépen levő biztonsági berendezéseket nem szabad leszerelni vagy hasznavehetetlenné tenni.
Megrongálódott vagy hibás védőberendezéseket azonnal ki kell cserélni.
Ne vágjon olyan munkadarbokat, amelyek túl kicsik ahhoz, hogy biztosan tudja őket kézzel tartani.
Kerülje el az olyan ügyetlen kézállásokat, ahol egy hirtelen lecsúszás által az egyik vagy mind a két kéz megérinthetné a fűrészlapot.
29
Anleitung_LB4_4300688:_ 20.12.2010 10:09 Uhr Seite 30
HU
Kerek munkadarabokat nem szabad vágni.
Nem szabad szögeknek vagy egyébb idegen testeknek lenniük a fűrészelésre előrelátott munkadarabrészen.
A munkaállás mindig a fűrészlaptól oldalra legyen.
Ne terhelje meg annyira a gépet, hogy az leálljon.
Nyomja a munkadarabot mindig feszesen a munkalap és az ütközősín ellen, azért hogy megakadályozza a munkadarab billenését vagy elfordulását.
Biztosítsa, hogy a fűrészlaptól oldalra el tudja távolítani a levágásokat. Különben lehetséges, hogy a fűrészlap által el lesznek kapva és hajítva.
Ne fűrészeljen sohasem több munkadarabot egyszerre.
A laza töredékeket, forgácsot vagy a beszorult farészeket sohasem szabad a forgó fűrészlapnál eltávolítani.
Az üzemzavarok elhárításánál vagy a beszorult fadarabok eltávolításánál kapcsolja ki a gépet. - Kihúzni a hálózati csatlakozót -
A lezárt javítás és karbantartási munka után azonnal újra fel kell szerelni minden védő és biztonsági berendezést.
Be kell tartani a gyártó biztonsági-, munkaés karbantartási utasításait, valamint a technikai adatokban megadott méreteket.
Figyelembe kell venni a megfelelő balesetvédelmi előírásokat és az egyébb, általánosan elismert technikai biztonsági szabályokat.
A zárt termekben történő üzemeltetés csakis egy megfelelő elszívószerelvénnyel engedélyezett.
A fejezőfűrészt egy 230 V-os védőérintkezős (földelt konnektor), legalább 10 A-al biztosított, dugaszoló aljzatba kell bekapcsolni.
Ne használjon túl gyenge teljesítményű gépeket nehéz munkákra.
Legyen óvatos a merőleges munkálatoknál.
Figyelem, duplasarkaló vágásoknál különös óvatosság szükséges!
3. A készülék leírása
1.Fogantyú
2.Be- /Kikapcsoló
3.Kireteszelőkar
4.Fűrésztengelyzár
5.Gépfej
6.Fűrészlapvédő mozgatható
7.Fűrészlap
8.Feszítőberendezés
9.Munkadarabfeltét
10.Rögzítőcsavar a munkafeltéthez
11.Asztalbetét
12.Reteszelés álláskar
13.Rögzítő fogantyú
14.Mutató
15.Skála
16.Forgóasztal
17.Rögzített fűrészasztal
18.Kiegészítő állófül
19.Ütközősín
20.Skála
21.Mutató
22.Forgácsfelfogózsák
23.Rögzítő csavar
24.Rögzítő csavar a vonó vezetéshez
25.Biztosító csapszeg
26.Vonó vezetés
27.Recézett fejű csavar a vágásmélységhatárolóhoz
28.Ütköző a vágásmélységhatárolóhoz
29.Eltolható ütközősín
30.Rögzítőkar az eltolható ütközősínhez.
31.Jusztírozó csavar (90°)
32.Jusztírozó csavar (45°)
33.Karimáscsavar
34.Külső karima
35.Lézer
36.Be- / Kikapcsoló lézer
37.Elemtartó rekesz
38.Elemtartó rekeszfedél
39.Csavar
40.Belső karima
Őrizze jól meg a biztonsági utasításokat
30
 Loading...