


Anleitung_4152412_LB4:_ 26.10.2011 16:16 Uhr Seite 1
PSE 2800 A1
|
|
|
|
|
|
GENERATOR |
ÁRAMFEJLESZTŐ |
Operation and Safety Notes |
Kezelési és biztonsági utalások |
Original operating instructions |
Eredeti használati utasítás |
|
|
ELEKTRIČNI AGREGAT |
GENERÁTOR |
Navodila za upravljanje in varnostna opozorila |
Pokyny pro obsluhu a bezpečnostní pokyny |
Originalna navodila za uporabo |
Originální návod k obsluze |
|
|
GENERÁTOR |
PRĄDNICA SPALINOWA |
Pokyny pre obsluhu a bezpečnostné pokyny |
Wskazówki dotyczące obsługi i bezpieczeństwa |
Originálny návod na obsluhu |
Instrukcją oryginalną |
|
4 |
STROMERZEUGER |
|
Bedienungsund Sicherheitshinweise |
|
Originalbetriebsanleitung |
|
|
|

Anleitung_4152412_LB4:_ 26.10.2011 16:16 Uhr Seite 2
Before reading, unfold the page containing the illustrations and familiarise yourself with all functions of the device.
Olvasás előtt kattintson az ábrát tartalmazó oldalra és végezetül ismerje meg a készülék mindegyik funkcióját.
Pred branjem stran s slikami odprite navzven in se nato seznanite z vsemi funkcijami naprave.
Před čtením si otevřete stranu s obrázky a potom se seznamte se všemi funkcemi přístroje.
Pred čítaním si odklopte stranu s obrázkami a potom sa oboznámte so všetkými funkciami prístroja.
Przed przeczytaniem proszę rozłożyć stronę z ilustracjami, a następnie proszę zapoznać się z wszystkimi funkcjami urządzenia.
Klappen Sie vor dem Lesen die Seite mit den Abbildungen aus und machen Sie sich anschließend mit allen Funktionen des Gerätes vertraut.
GB |
Operation and Safety Notes |
Page |
7 |
HU |
Kezelési és biztonsági utalások |
Oldal |
18 |
SI |
Navodila za upravljanje in varnostna opozorila |
Stran |
30 |
CZ |
Pokyny pro obsluhu a bezpečnostní pokyny |
Strana |
41 |
SK |
Pokyny pre obsluhu a bezpečnostné pokyny |
Strana |
52 |
PL |
Wskazówki dotyczące obsługi i bezpieczeństwa |
Strona |
63 |
DE/AT/CH |
Bedienungsund Sicherheitshinweise |
Seite |
75 |
2

Anleitung_4152412_LB4:_ 26.10.2011 16:17 Uhr Seite 3
1 |
1 |
2 |
3 3 4
10 9 8 7 6 5
2 |
3 |
6 |
5 |
3 |
3 |
4 |
11 |
13 L |
12
3

Anleitung_4152412_LB4:_ 26.10.2011 16:17 Uhr Seite 4
4 |
14 |
14 |
5 |
19 |
20 |
21 |
15 |
23 |
|
|
16 |
22 |
|
|
|
24 |
17 |
|
18
26 25
6 |
7 |
15
20
20
14 |
21 |
23 |
16 |
23 |
21 |
|
|
22 |
8 |
17 |
9 |
|
19 |
|
|
E |
|
|
19 |
23 |
23 23
4
Anleitung_4152412_LB4:_ 26.10.2011 16:18 Uhr Seite 5
10 |
|
11 |
|
9 |
A |
|
|
|
|
7 |
|
|
|
B |
|
8 |
|
|
|
A |
12
C
13 |
14
D
5
Anleitung_4152412_LB4:_ |
26.10.2011 |
16:18 Uhr |
Seite 6 |
15 |
|
|
|
|
|
1 |
|
|
|
2 |
|
|
|
3 |
|
|
|
4 |
|
6

Anleitung_4152412_LB4:_ 26.10.2011 16:18 Uhr Seite 7
GB
Table of contents |
Page |
|
1. |
Introduction ............................................................................ |
8 |
2. |
Safety Information .................................................................. |
8-9 |
3. |
Layout .................................................................................... |
9 |
4. |
Intended use ........................................................................... |
9 |
5. |
Technical data......................................................................... |
10 |
6. |
Before starting the equipment ................................................ |
10 |
7. |
Operation ................................................................................ |
11 |
8. |
Cleaning, maintenance, storage, transport |
|
|
and ordering of spare parts ..................................................... |
12-13 |
9. |
Disposal and recycling ............................................................ |
13 |
10. Troubleshooting guide ............................................................ |
14 |
|
11. Maintenance schedule ............................................................ |
15 |
|
12. Declaration of conformity ........................................................ |
16 |
|
13. Guarantee certificate .............................................................. |
17 |
|
The reprinting or reproduction by any other means, in whole or in part, of documentation and papers accompanying products is permitted only with the express consent of ISC GmbH.
Technical changes subject to change
7

Anleitung_4152412_LB4:_ 26.10.2011 16:18 Uhr Seite 8 |
GB
1. Introduction
Important.
When using the equipment, a few safety precautions must be observed to avoid injuries and damage. Please read the complete operating instructions and safety information with due care. Keep this manual in a safe place so that the information is available at all times. If you give the equipment to any other person, hand over these operating instructions and the safety information as well. We cannot accept any liability for damage or accidents which arise due to a failure to follow these instructions and the safety information.
2. Safety Information
No changes may be made to the generator.
Only original parts may be used for maintenance and accessories.
Important: Danger of poisoning. Emissions, fuels and lubricants are toxic. Do not inhale emissions.
Children are to be kept away from the generator.
Important: Risk of burns. Do not touch the exhaust system or drive unit.
Wear suitable ear protection when in the vicinity of the equipment.
Important: Petrol and petrol fumes are highly combustible or explosive.
Never operate the generator in nonventilated rooms or in a highly inflammable environment. If you intend to operate the generator in rooms with good ventilation, the exhaust gases must be channeled directly outdoors through an exhaust hose. Important: Toxic exhaust gases can escape despite the exhaust hose. Due to the fire hazard, never direct the exhaust hose towards inflammable materials.
Risk of explosion: Never operate the generator in rooms with combustible materials.
The speed preset by the manufacturer is not allowed to be changed. The generator or connected equipment may be damaged.
8
Secure the generator against shifting and toppling during transport.
Place the generator at least 1m away from walls and equipment connected to them.
Place the generator in a secure, level position. Do not turn, tip or change the generator’s position while it is working.
Always switch off the engine when transporting and refueling the generator.
Make sure that when you refuel the generator no fuel is spilt on the engine or exhaust pipe.
Never operate the generator in rain or snow.
Never touch the generator with wet hands.
Guard against electric danger.
When working outdoors, use only extension cables that are approved for outdoor use and which are marked accordingly (H07RN..).
The overall length of the extension cables used is not allowed to exceed 50 m for 1.5 mm² and 100 m for 2.5 mm².
No changes may be made to the settings of the motor or generator.
Repairs and adjustment work may only be carried out by authorized trained personnel.
Do not refuel or empty the tank near open lights, fire or sparks. Do not smoke!
Do not touch any mechanically driven or hot parts. Do not remove the safety guards.
Do not expose the equipment to damp or dust. Permissible ambient temperature -10 to +40°, altitude: 1000 m above sea level, relative humidity: 90 % (non-condensing)
The generator is driven by a combustion engine, which produces heat in the range of the exhaust (on the opposite side of the socket) and exhaust outlet. You should therefore avoid coming near these surfaces because of risk of skin burns.
The values quoted in the technical data under sound power level (LWA) and sound pressure level (LpA) are emission values and not necessarily reliable workplace values. As there is a correlation between emission and immission levels, the values cannot be taken to reliably determine the possible need for additional precautions. Factors influencing the current immission level of the user/operator include the
Anleitung_4152412_LB4:_ 26.10.2011 16:18 Uhr Seite 9
GB
properties of the work area, other sound |
16 |
Foot |
sources etc., e.g. the number of machines |
17 |
Push bar holder |
and other neighboring processes, and the |
18 |
Push bar |
time span over which the user/operator is |
19 |
Screws size M8 x 40 |
subjected to the noise. Also, the permitted |
20 |
Screws size M8 x 16 |
immission level can vary from country to |
21 |
Washers for wheels |
country. Nevertheless, this information |
22 |
Securing split pins for wheels |
makes it possible for the user to be able to |
23 |
Nuts M8 |
make a better assessment of the dangers |
24 |
Screwdriver |
and risks involved. |
25 |
Spark plug wrench |
|
26 |
Oil filler funnel |
Important: Use only normal, unleaded petrol as fuel.
CAUTION
Read all the safety regulations and instructions. Any errors made in following the safety regulations and instructions may result in an electric shock, fire and/or serious injury.
Keep all safety regulations and instructions in a safe place for future use.
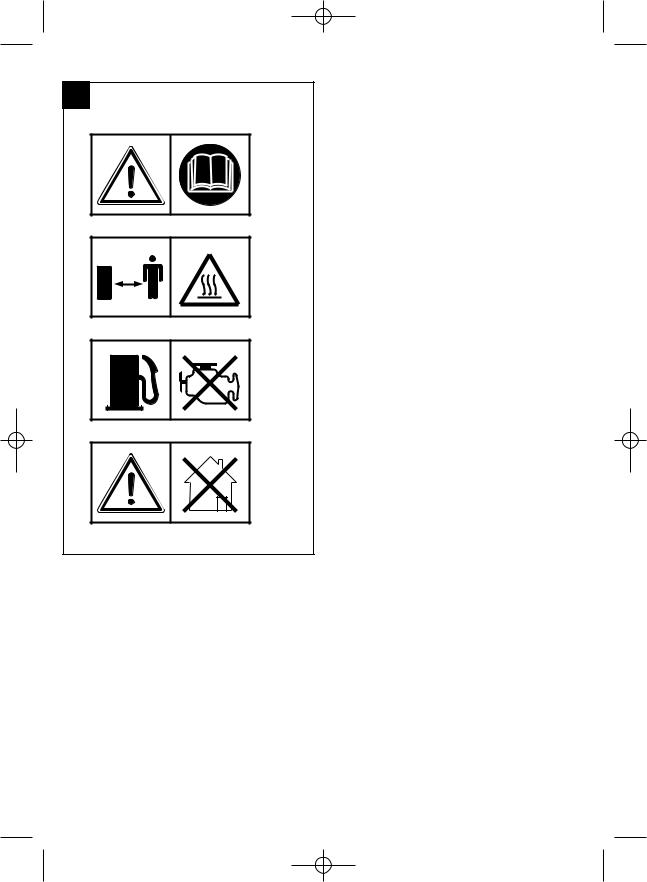
Explanation of the warning signs on the equipment (Fig. 15)
1.Important. Read the operating instructions.
2.Important. Hot parts. Keep your distance.
3.Important. Switch off the engine before refueling.
4.Important. Never operate in non-ventilated rooms.
3. Layout (Fig. 1-5)
1 Tank indicator
2Tank cover
3 2 x 230 V~ socket-outlets
4 Earth connection
5 Overload cut-out
6Voltmeter
7Oil filler screw
8 Oil drainage screw
9 Oil shortage cut-out
10On/Off switch
11Choke lever
12Reversing starter
13Petrol cock
14Wheels
15Axle
4. Intended use
The device is designed for applications operated with a 230 V alternating current source.
Be sure to observe the restrictions in the safety instructions. The generator is intended to provide electric power tools and light sources with electricity. When using the device with household appliances, please check their suitability in accordance with the relevant manufacturer’s instructions. In case of doubt, ask an authorized dealer of the respective equipment.
The equipment is to be used only for its prescribed purpose. Any other use is deemed to be a case of misuse. The user/operator and not the manufacturer will be liable for any damage or injuries of any kind caused as a result of this.
Please note that our equipment has not been designed for use in commercial, trade or industrial applications. Our warranty will be voided if the equipment is used in commercial, trade or industrial businesses or for equivalent purposes.
9

Anleitung_4152412_LB4:_ 26.10.2011 16:18 Uhr Seite 10
GB
5. Technical data
Generator: |
Synchronous |
|
Protection type: |
|
IP23 |
Continuous rated power Prated (S1): |
2600 W |
|
Maximum power Pmax (S2 2 min): |
2800 W |
|
Rated voltage Urated: |
|
2 x 230V~ |
Rated current Irated: |
|
11.3 A |
Frequency Frated: |
|
50 Hz |
Drive engine design: |
4-stroke, air-cooled |
|
Displacement: |
|
207.7 cm³ |
Fuel: |
|
Petrol |
Tank capacity: |
|
15 l |
Engine oil: |
approx. 0.6 l (15W40) |
|
Consumption at 2/3 load: |
approx. 1.36 l/h |
|
Weight: |
|
42 kg |
LpA sound pressure level: |
|
76 dB(A) |
LWA sound power level |
|
96 dB(A) |
K uncertainty: |
|
2.07 dB(A) |
Power factor cos ϕ: |
|
1 |
Power class: |
|
G1 |
Max. temperature: |
|
40°C |
Max. altitude (above mean sea level): 1,000 m
Spark plug: F7 RTC
Operating mode S1 (continuous operation)
The equipment can be continuously operated with the quoted power output.
Operating mode S2 (temporary operation)
The equipment may be temporarily operated with the quoted power output (2 min).
6. Before starting the equipment
6.1 Assembly
The installation of the equipment requires two open-ended wrenches (size 12).
Assemble the foot (16), wheels (14) and push bar (18) as shown in Figures 6-9.
Assemble all parts before filling in fuel and oil in order to prevent the fluids from leaking out.
To mount the wheels, first slide the axle (15) through the mountings on the bottom of the generator and fit the wheels (14) as shown on Figure 7.
When fitting the push bar (18) check that the angled side (Fig. 9/Item E) is pointing outwards to ensure that the swing up function works properly.
6.2 Electrical safety
Electric supply cables and connected equipment must be in perfect condition.
The generator is to be operated only with equipment whose voltage specifications conform to the generator’s output voltage.
Never connect the generator to the power supply (socket-outlet).
Keep the cable length to the consumer as short as possible.
6.3 Environmental protection
Dispose of soiled maintenance material and operating materials at the appropriate collection point.
Recycle packaging material, metal and plastics.
6.4 Connecting to earth
The housing must be connected to earth in order to discharge static electricity. To do this, connect one end of a cable to the earth connection on the generator (Fig. 3/Item 4) and the other end to an external earth.
10
Anleitung_4152412_LB4:_ 26.10.2011 16:18 Uhr Seite 11
7. Operation
Important. You must fill up with engine oil (approx. 0.6 l) and fuel before you can start the engine.
Check the fuel and engine oil levels and top up if necessary.
Make sure that the generator has sufficient ventilation
Make sure that the ignition cable is secured to the spark plug.
Inspect the immediate vicinity of the generator.
Disconnect any electrical equipment which may already be connected to the generator.
7.1 Starting the engine Important.
When starting with the reserve starter (12), the motor may recoil suddenly as it starts up, resulting in hand injuries. Wear protective gloves when starting the equipment.
Open the petrol cock (13) by turning it down
Set the ON/OFF switch (10) to the “ON” position
Move the choke lever (11) to position I Ø I.
Start the engine with the reversing starter (12), by pulling forcefully on the handle. If the engine does not start, pull the handle again.
Push the choke lever (11) back after the engine has started.
7.2 Connecting consumers to the generator
Connect the equipment you want to use to the 230 V~sockets (3).
Important: These sockets may be loaded continuously (S1) with 2600W and temporarily (S2) for a maximum of 2 minutes with 2800W.
The generator is suitable for 230 V~ AC appliances only.
Do not connect the generator to the household mains system as this may result in damage to the generator itself or to other electrical appliances in your home.
GB
Note: Some electrical appliances (power jigsaws, drills, etc.) may have a higher level of power consumption when used in difficult conditions
7.3 Switching off the engine
Before you switch off the generator, allow it to run briefly with no consumers so that it can “cool down”.
Set the ON/OFF switch (10) to the “OFF” position.
Close the petrol cock (13).
7.4 Overload cut-out 2 x 230 V socketoutlets
Important. The generator is fitted with an overload cut-out.
This shuts down the sockets (3). You can restart the sockets (3) by pressing the overload cut-out (5).
Important. If this happens, reduce the electric power you are taking from the generator or remove any defective connected appliances.
Important. Defective overload cut-outs must be replaced only by overload cut-outs of identical design and with the same performance data. If repairs are necessary, please contact your customer service center.
11

Anleitung_4152412_LB4:_ 26.10.2011 16:18 Uhr Seite 12
GB
8.Cleaning, maintenance, storage, transport and ordering of spare parts
Switch off the motor and pull the spark plug boot from the spark plug before doing any cleaning and maintenance work on the equipment.
Important: Switch off the equipment immediately and contact your service station:
In the event of unusual vibrations or noise
If the engine appears to be overloaded or misfires
8.1 Cleaning
Keep all safety devices, air vents (Fig. 2/Item L) and the motor housing free of dirt and dust as far as possible. Wipe the equipment with a clean cloth or blow it down with compressed air at low pressure.
We recommend that you clean the equipment immediately after you use it.
Clean the equipment regularly with a damp cloth and some soft soap. Do not use cleaning agents or solvents; these may be aggressive to the plastic parts in the equipment. Ensure that no water can get into the interior of the equipment.
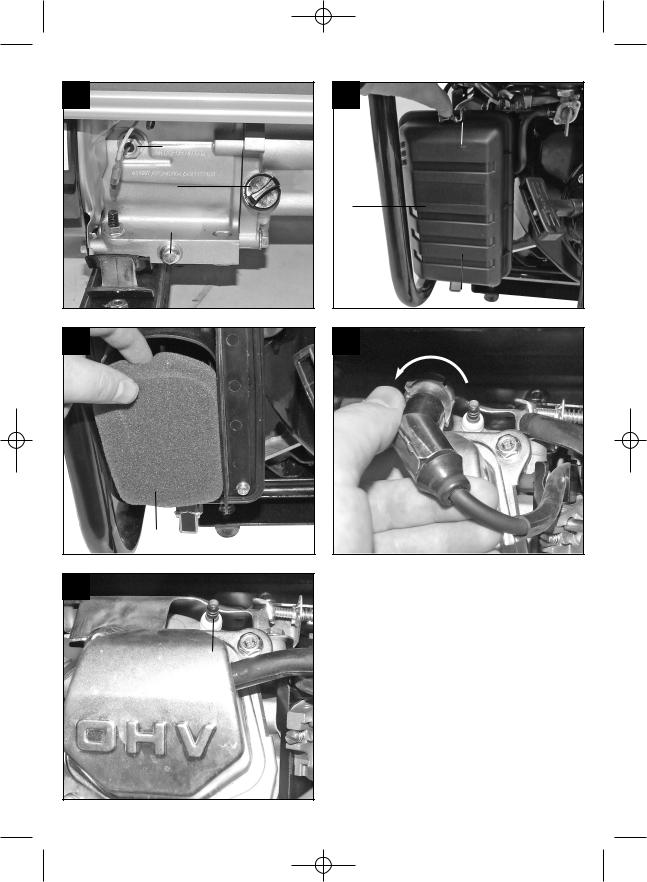
8.2 Air filter
In this connection, please also read the service information.
Clean the air filter at regular intervals, and replace it if necessary.
Open both clips (Fig. 11/A) and remove the air filter cover (Fig. 11/B).
Remove the filter elements (Fig. 12/C)
Do not use abrasive cleaning agents or petrol to clean the elements.
Clean the elements by tapping them on a flat surface. In cases of stubborn dirt first clean with soapy water, then rinse with clear water and air-dry.
Assemble in reverse order.
8.3 Spark plug (Fig. 13-14)
Check the spark plug for dirt and grime after 20 hours of operation and if necessary clean it with a copper wire brush. Thereafter service the spark plug after every 50 hours of operation.
Pull off the spark plug boot (Fig. 13) by twisting.
Remove the spark plug (Fig. 14/D) with the supplied spark plug wrench (25).
Assemble in reverse order.
8.4 Changing the oil and checking the oil level (before using the equipment)
The motor oil is best changed when the motor is at working temperature.
Only use motor oil (15W40).
Place the generator on a slightly inclined surface so that the oil drainage screw (8) is at the lower end.
Open the oil filler screw (7).
Open the oil drainage screw and let the hot engine oil drain out into a drip tray.
After the old oil has drained out, close the oil drainage screw and place the generator on a level surface again
Fill in engine oil up to the top mark on the oil dip stick (approx. 0.6 liters).
Important: Do not screw the dipstick (oil filler screw) in to check the oil level, simply insert it up to the thread.
Dispose of the waste oil properly.
8.5 Automatic oil cut-out
The automatic oil cut-out responds if there is too little oil in the engine. In this case it will not be possible to start the engine or it will cut out automatically after a short period of time. It cannot be started again until the engine oil has been topped up (see point 8.4).
12
Anleitung_4152412_LB4:_ 26.10.2011 16:18 Uhr Seite 13
8.6 Preparing the equipment for long-term storage
Warning: Do not empty the petrol tank in enclosed areas, near fire or when smoking. Petrol fumes can cause explosions and fire.
Empty the petrol tank using a petrol suction pump.
Start the engine and run it until the tank and fuel line are completely empty and the engine stalls.
Change the oil after each season. To do so, remove the used engine oil when the engine is warm and refill new oil.
Remove the spark plug (Fig. 14/Item D). Use an oil can to fill the cylinder with approx. 20 ml of oil. Slowly pull back the starter cord, which will bathe the cylinder wall with oil. Screw the spark plug back in.
Be sure to clean the entire equipment to protect the paint.
Store the equipment in a well-ventilated place or location.
8.7 Preparing the equipment for transport
Empty the petrol tank using a petrol suction pump.
Always let the engine run until it has used up the remainder of petrol in the tank.
Empty the engine oil from the warm engine.
Remove the spark plug boot (Fig. 13) from the spark plug.
Secure the equipment, e.g. with straps, against shifting.
8.8 Ordering replacement parts
Please provide the following information on all orders for spare parts:
Model/type of the equipment
Article number of the equipment
ID number of the equipment
For our latest prices and information please go to www.isc-gmbh.info
GB
9. Disposal and recycling
The equipment is supplied in packaging to prevent it from being damaged in transit. The raw materials in this packaging can be reused or recycled. The equipment and its accessories are made of various types of material, such as metal and plastic. Defective components must be disposed of as special waste. Ask your dealer or your local council.
For EU countries only
Never place any electric power tools in your household refuse.
To comply with European Directive 2002/96/EC concerning old electric and electronic equipment and its implementation in national laws, old electric power tools have to be separated from other waste and disposed of in an environment-friendly fashion, e.g. by taking to a recycling depot.
Recycling alternative to the return request: Instead of returning the equipment to the manufacturer, the owner of the electrical equipment is obliged to ensure that the equipment is properly disposed of if he abandons ownership. The old equipment can be returned to a suitable collection point, that will dispose of the equipment in accordance with the national recycling and waste disposal regulations. This does not apply to any accessories or aids without electrical components supplied with the old equipment .
13

Anleitung_4152412_LB4:_ 26.10.2011 16:18 Uhr Seite 14
GB
10. Troubleshooting guide
Fault |
Cause |
Remedy |
Engine does not start |
Automatic oil cut-out has not |
Check oil level, top up engine |
|
responded |
oil |
|
Spark plug fouled |
Clean or replace spark plug |
|
|
(electrode spacing 0.6 mm) |
|
No fuel |
Refuel / have the petrol cock |
|
|
checked |
Generator has too little or no |
Controller or capacitor |
Contact your dealer |
voltage |
defective |
|
|
Overcurrent circuit-breaker has |
Actuate the circuit-breaker and |
|
triggered |
reduce the consumers |
|
Air filter dirty |
Clean or replace the filter |
|
|
|
14

Anleitung_4152412_LB4:_ 26.10.2011 16:18 Uhr Seite 15
GB
11. Maintenance schedule
Please adhere to the following maintenance periods in order to ensure a failure-free operation.
Important. The equipment must be filled with engine oil and fuel before it is started.
|
Before each |
After an |
After an |
After an |
After an |
|
use |
operating |
operating |
operating |
operating |
|
|
period of 20 |
period of 50 |
period of 100 |
period of 300 |
|
|
hours |
hours |
hours |
hours |
Checking the |
x |
|
|
|
|
engine oil |
|
|
|
|
|
|
|
|
|
|
|
Changing the |
|
For the first |
|
|
|
engine oil |
|
time, then |
x |
|
|
|
|
every 50 |
|
|
|
|
|
hours |
|
|
|
Checking the air |
|
|
|
|
Change the |
filter |
x |
|
|
|
filter insert if |
|
|
|
|
|
necessary |
Cleaning the air |
|
|
x |
|
|
filter |
|
|
|
|
|
|
|
|
|
|
|
Cleaning the |
|
|
|
x |
|
petrol filter |
|
|
|
|
|
|
|
|
|
|
|
Visual inspection |
x |
|
|
|
|
of the equipment |
|
|
|
|
|
|
|
|
|
|
|
Cleaning the |
|
|
Distance: 0.6 |
|
|
spark plug |
|
|
mm, replace if |
|
|
|
|
|
necessary |
|
|
Checking and |
|
|
|
|
|
readjusting the |
|
|
|
|
x* |
throttle vale on |
|
|
|
|
|
the carburetor |
|
|
|
|
|
Cleaning the |
|
|
|
|
x* |
cylinder head |
|
|
|
|
|
|
|
|
|
|
|
Set the valve play |
|
|
|
|
x* |
|
|
|
|
|
|
Important: The positions marked with “x*“ should only be carried out by an authorized dealer.
15
Anleitung_4152412_LB4:_ 26.10.2011 16:18 Uhr Seite 16
GB
12. Declaration of conformity
Einhell Germany AG · Wiesenweg 22 · D-94405 Landau/Isar
Konformitätserklärung
k erklärt folgende Konformität gemäß EU-Richtlinie und
Normen für Artikel
t explains the following conformity according to EU directives and norms for the following product
p déclare la conformité suivante selon la directive CE et les normes concernant l’article
C dichiara la seguente conformità secondo la direttiva UE e le norme per l’articolo
N verklaart de volgende overeenstemming conform EU richtlijn en normen voor het product
m declara la siguiente conformidad a tenor de la directiva y normas de la UE para el artículo
O declara a seguinte conformidade, de acordo com a directiva CE e normas para o artigo
l attesterer følgende overensstemmelse i medfør af
EU-direktiv samt standarder for artikel
U förklarar följande överensstämmelse enl. EU-direktiv och standarder för artikeln
q vakuuttaa, että tuote täyttää EU-direktiivin ja standardien vaatimukset
. tõendab toote vastavust EL direktiivile ja standarditele
j vydává následující prohlášení o shodě podle směrnice
EU a norem pro výrobek
X potrjuje sledečo skladnost s smernico EU in standardi za izdelek
W vydáva nasledujúce prehlásenie o zhode podľa smernice
EÚ a noriem pre výrobok
A a cikkekhez az EU-irányvonal és Normák szerint a következő konformitást jelenti ki
P deklaruje zgodność wymienionego poniżej artykułu z następującymi normami na podstawie dyrektywy WE.
e декларира съответното съответствие съгласно
Директива на ЕС и норми за артикул
H paskaidro šādu atbilstību ES direktīvai un standartiem
G apibūdina šį atitikimą EU reikalavimams ir prekės normoms
Q declară următoarea conformitate conform directivei UE
şi normelor pentru articolul
z δηλώνει την ακόλουθη συμμόρφωση σύμφωνα με την
Οδηγία ΕΚ και τα πρότυπα για το προϊόν
B potvrđuje sljedeću usklađenost prema smjernicama EU i normama za artikl
Izjava o sukladnosti za ovaj proizvod dostupna je na internet stranici www.lidl.hr.
f potvrđuje sljedeću usklađenost prema smjernicama EU i normama za artikl
4 potvrđuje sledeću usklađenost prema smernicama EZ i normama za artikal
T следующим удостоверяется, что следующие
продукты соответствуют директивам и нормам ЕС
1 проголошує про зазначену нижче відповідність
виробу директивам та стандартам ЄС на виріб
Z Ürünü ile ilgili AB direktifleri ve normları gereğince aşağıda açıklanan uygunluğu belirtir
L erklærer følgende samsvar i henhold til EU-direktivet og standarder for artikkel
E Lýsir uppfyllingu EU-reglna og annarra staðla vöru
Stromerzeuger PSE 2800 A1 (Parkside)

 87/404/EC_2009/105/EC

 2005/32/EC_2009/125/EC

 2006/95/EC
 2006/28/EC
x 2006/42/EC

 Annex IV
Notified Body: Notified Body No.: Reg. No.:
x 2004/108/EC

 2004/22/EC

 1999/5/EC

 97/23/EC

 90/396/EC_2009/142/EC

 89/686/EC_96/58/EC
 2011/65/EC
x2000/14/EC_2005/88/EC

 Annex V
x Annex VI
Noise: measured LWA = 93,93 dB (A); guaranteed LWA = 96 dB (A) P = KW; L/Ø = cm
Notified Body: TÜV SÜD Industrie Service GmbH, Westendstrasse 199, 80686 München, Deutschland (Notified Body 0036)
x 2004/26/EC
Emission No.: e11*97/68SA*2004/26*1338*00
Standard references: EN 12601; EN 55012; EN 61000-6-1
Landau/Isar, den 14.09.2011
Weichselgartner/General-Manager |
Frank/Product-Management |
|
|
First CE: 11 |
Archive-File/Record: NAPR003981 |
Art.-No.: 41.524.12 I.-No.: 11031 |
Documents registrar: Markus Jehl |
Subject to change without notice |
Wiesenweg 22, D-94405 Landau/Isar |
16

Anleitung_4152412_LB4:_ 26.10.2011 16:18 Uhr Seite 17
GB
13. GUARANTEE CERTIFICATE
Dear Customer,
All of our products undergo strict quality checks to ensure that they reach you in perfect condition. In the unlikely event that your device develops a fault, please contact our service department at the address shown on this guarantee card. Of course, if you would prefer to call us then we are also happy to offer our assistance under the service number printed below. Please note the following terms under which guarantee claims can be made:
1.These guarantee terms cover additional guarantee rights and do not affect your statutory warranty rights. We do not charge you for this guarantee.
2.Our guarantee only covers problems caused by material or manufacturing defects, and it is restricted to the rectification of these defects or replacement of the device. Please note that our devices have not been designed for use in commercial, trade or industrial applications. Consequently, the guarantee is invalidated if the equipment is used in commercial, trade or industrial applications or for other equivalent activities. The following are also excluded from our guarantee: compensation for transport damage, damage caused by failure to comply with the installation/assembly instructions or damage caused by unprofessional installation, failure to comply with the operating instructions (e.g. connection to the wrong mains voltage or current type), misuse or inappropriate use (such as overloading of the device or use of non-approved tools or accessories), failure to comply with the maintenance and safety regulations, ingress of foreign bodies into the device (e.g. sand, stones or dust), effects of force or external influences (e.g. damage caused by the device being dropped) and normal wear resulting from proper operation of the device. This applies in particular to rechargeable batteries for which we nevertheless issue a guarantee period of 12 months.
The guarantee is rendered null and void if any attempt is made to tamper with the device.
3.The guarantee is valid for a period of 3 years starting from the purchase date of the device. Guarantee claims should be submitted before the end of the guarantee period within two weeks of the defect being noticed. No guarantee claims will be accepted after the end of the guarantee period. The original guarantee period remains applicable to the device even if repairs are carried out or parts are replaced. In such cases, the work performed or parts fitted will not result in an extension of the guarantee period, and no new guarantee will become active for the work performed or parts fitted. This also applies when an on-site service is used.
4.In order to assert your guarantee claim, please send your defective device postage-free to the address shown below. Please enclose either the original or a copy of your sales receipt or another dated proof of purchase. Please keep your sales receipt in a safe place, as it is your proof of purchase. It would help us if you could describe the nature of the problem in as much detail as possible. If the defect is covered by our guarantee then your device will either be repaired immediately and returned to you, or we will send you a new device.
Of course, we are also happy offer a chargeable repair service for any defects which are not covered by the scope of this guarantee or for units which are no longer covered. To take advantage of this service, please send the device to our service address.
17

Anleitung_4152412_LB4:_ 26.10.2011 16:18 Uhr |
Seite 18 |
|
HU |
|
|
Tartalomjegyzék |
Oldal |
|
1. |
Bevezetés .............................................................................. |
19 |
2. |
Biztonsági utasítások ............................................................. |
19-20 |
3. |
A készülék leírása .................................................................. |
20 |
4. |
Rendeltetésszerűi használat .................................................. |
21 |
5. |
Technikai adatok .................................................................... |
21 |
6. |
Beüzemeltetés előtt ................................................................ |
22 |
7. |
Kezelés .................................................................................. |
22-23 |
8. |
Tisztítás, karbantartás, tárolás, szállitás és |
|
|
pótalkatrészmegrendelés ....................................................... |
23-24 |
9. |
Megsemmisítés és újrahasznosítás ........................................ |
25 |
10. Hibakeresési tervrajz .............................................................. |
26 |
|
11. Karbantartási terv ................................................................... |
27 |
|
12. Konformkijelentés .................................................................. |
28 |
|
13. Garanciaokmány .................................................................... |
29 |
|
A termékek dokumentációjának és a |
|
kisérőpapírjainak az utánnyomtatása vagy |
|
egyébb sokszorosítása, kivonatosan is csak az |
|
ISC GmbH kihangsúlyozott beleegyezésével |
Technikai változtatások jogát fenntartva |
engedélyezett. |
|
18 |
|

Anleitung_4152412_LB4:_ 26.10.2011 16:18 Uhr Seite 19
1. Bevezetés
Figyelem!
A készülékek használatánál, a sérülések és a károk megakadályozásának az érdekébe be kell tartani egy pár biztonsági intézkedést. Ezért ezt a használati utasítást/biztonsági utasításokat gondosan átolvasni. Őrizze ezeket jól meg, azért hogy mindenkor a rendelkezésére álljanak az információk. Ha más személyeknek adja át a készüléket, akkor kérjük kézbesítse ki vele együtt ezt a használati utasítást/biztonsági utasításokat is. Nem vállalunk felelőséget olyan balesetekért vagy károkért, amelyek ennek az utasításnak és a biztonsági utasításoknak a figyelmen kívül hagyásából keletkeznek.
2. Biztonsági utasítások
Nem szabad az ármafejlesztőn semmilyen fajta változtatásokat elvégezni.
Karbantartáshoz és tartozékként csak originálrészeket szabad felhasználni.
Figyelem: Mérgezés veszélye, kipufogó gázok, üzemanyagok és kenőanyagok mérgezőek, a kipufogó gázokat nem szabad belélegezni.
Gyerekeket távoltartani az áramfejlesztőtöl.
Figyelem: Megégetés veszélye, ne érintse meg a kipufogószerelvényt vagy a meghajtó aggregátot.
Ha a készülék közelében tartózkodik, akkor használjon egy megfelelő hallásvédőt.
Figyelem: Benzín és bezínpára könnyen gyullékony ill. robbanékony.
Ne üzemeltesse az áramfejlesztőt nem szellőztetett termekben vagy egy könnyen gyullékony környezetben. Ha az áramfejlesztő jól szellőztetett termekben lesz üzemeltetve, akkor a kipufogó gázokat egy kipufogógáztömlőn keresztül direkt a szabadba kell kivezetni. Figyelem: Egy kipufogógáztömlő használatánál is el tudnak távozni mérgező gázok. Tűzveszély miatt nem szabad sohasem gyullékony anyagokra irányítani a kipufogógáztömlőt.
Robbanásveszély! Ne üzemeltese az
HU
áramfejlesztőt sohasem gyullékony anyagokat tartalmazó termekben.
A gyártó által előre beállított fordulatszámot nem szabad megváltoztatni. Megsérülhet az áramfejlesztő vagy a csatlakoztatott készülékek.
A szállítás ideje alatt biztosítani kell az áramfejlesztőt elcsúszás vagy billenés ellen.
Az áramfejlesztőt a falaktól vagy a csatlakoztatott készülékektől legalább 1 méteres távolságra kell felállítani.
Az áramfejlesztőt egy biztos, sík helyre tenni. Tilos az üzemeltetés ideje allati elfordítás és döntés vagy a telephely megváltoztatása.
Szállításnál és feltankolásnál a motort mindig lekapcsolni.
Ügyeljen arra, hogy a feltankolásnál ne loccsantson ki üzemanyagot a motorra vagy a kipufogóra.
Ne üzemeltese az áramfejlesztőt sohasem esőben vagy havazásban.
Ne nyúljon sohasem nedves kézzel az áramfejlesztőhöz.
Óvja magát az elektromos veszélyek elöl.
A szabadban csakis arra engedélyezett és megfelelően megjelölt hosszabbítókábelt használni (H07RN.).
Hosszabbító kábelek használatánál nem szabad azok teljes hosszának 1,5mm²-nél 50 m-t, 2,5mm²-nél 100 m-t túllépniük.
Nem szabad a motorés a generátorbeállításokon változtatásokat elvégezni.
Javítási és beállítási munkálatokat csak felhatalmazott szakszemélyzetnek szabad elvégeznie.
A tartályt ne töltse fel ill. ürítse ki nyílt fény, tűz vagy szikrahullás közelében. Ne dohányozzon!
Ne érintse meg a mechanikusan mozgatott vagy forró részeket. Né távolítsa el a védőburkolatokat.
Nem szabad a készülékeket nedvességnek vagy pornak kitenni. Az engedélyezett környezeti hőmérséklet –10-től +40°-ig, magasság: 1000 m az NN fölött, rel. légnedvesség: 90% (nem kondenzálódó).
Az áramfejlesztő egy belső égésű motor
19

Anleitung_4152412_LB4:_ 26.10.2011 16:18 Uhr Seite 20
HU
által van meghajtva, amely a kipufogócső terén (a dugaszoló aljzattal szemben levő oldalon) és a kipufogó kiáramlásánál hőséget hoz létre. Kerülje ezeknek a felületeknek a közelségét a bőr megégetésének veszélye miatt.
A technikai adatoknál a hangteljesítménymérték (LWA) és a hangnyomásmérték (LpA) alatt megadott értékek, emissziós szintet jelentenek és nem okvetlenül biztos munkahelyi szintet. Mivel az emissziósés imisszió szint között egy összefüggés áll fenn, ezért ezt nem lehet megbízhatóan az esetleg szükséges kiegészítő óvóintézkedések meghatorázására felhasználni. A munkaerő aktuális imisszió szintjét befolyásoló tényezők magukba foglalják a munkaterem tulajdonságát, más zajforrásokat, stb. mint például a gépek számát és más szomszédos lefolyásokat valamint az időtartamot, amig a kezelő zajnak van kitéve. Ugyszintén eltérhet országról országra az engedélyezett imisszió szint. Mégis ez az információ megadja a gép használójának a lehetőséget a rizikó és a veszélyeztetés felbecsülésének az elvégzésére.
Figyelem: Üzemanyagként kizárólag csak ólommentes normál-benzínt használni.
FIGYELMEZTETÉS
Olvasson minden biztonsági utalást és utasítást el. A biztonsági utalások és utasítások betartásán belüli mulasztások következménye áramcsapás, tűz és/vagy nehéz sérülések lehetnek.
Őrizze meg a biztonsági utalásokat és utasításokat a jövőre nézve.
A készüléken található jelzőtáblák magyarázata (15-ös kép)
1.Figyelem! Elolvasni a használati utasítást.
2.Figyelem! Forró részek. Távolságot tartani.
3.Figyelem! A tankolás ideje alatt leállítani a motort.
4.Figyelem! Ne üzemeltesse nem szellőztetett termekben.
3.A készülék leírása (ábrák 1-től – 5-ig)
1 Tank kijelző
2Tanksapka
3 2 x 230 V ~ dugaszoló aljzat
4Földelőcsatlakozás
5 Túlterhelés elleni védelem
6Voltméter
7 |
Olajbetöltőcsavar |
8 |
Olajleengedőcsavar |
9 |
Olajhiánybiztosítás |
10Be-/kikapcsoló
11Hidegindítókar
12Reverzálóindítóberendezés
13Benzíncsap
14Kerekek
15Keréktengely
16Állóláb
17Tolófültartó
18Tolófül
19Csavarok M8x40
20Csavarok M8x16
21Alátétkorongok a kerekekhez
22Biztosítósasszegek a kerekekhez
23Anyák M8
24Csavarhajtó
25Gyújtógyertyakulcs
26Olajbetöltőtölcsér
20
Anleitung_4152412_LB4:_ 26.10.2011 16:18 Uhr Seite 21
4. Rendeltetésszerűi használat |
5. Technikai adatok |
|
|
|
|
|
|
|
|||
A készülék olyan használatra alkalmas, |
Generátor: |
|
Szinkron |
||
amelyek egy 230 V-os váltakozó |
|
|
|
|
|
Védelmi rendszer: |
|
|
IP23 |
||
feszültségforráson történő üzemet látnak elő. |
|
|
|||
Vegye okvetlenül figyelebe a biztonsági |
|
Tartósteljesítmény Pnév (S1): |
|
2600 W |
|
utasításokban foglalt fenntartásokat. A |
|
||||
Maximális teljesítmény Pmax (S2 2 perc): |
|||||
generátor célja az elektromos szerszámok |
|
|
|
2800 W |
|
meghajtása és a világítóforrásoknak az |
|
|
|
||
árammal történő ellátása. Kérjük ellenőrizze le |
Névleges feszültség Unév: |
|
2 x 230V~ |
||
a háztartási készülékeknél az egyes gyártó |
Névleges áram Inév: |
|
11,3 A |
||
adatai szerinti megfelelőséget. Kétség esetén, |
|
|
|
|
|
Frekvencia Fnév: |
|
|
50 Hz |
||
érdeklődjön a megfelelő készülék feljogosított |
|
|
|||
|
|
|
|
|
|
szakkereskedőjénél. |
A hajtómotor szerkezete: 4 ütemű léghűtéses |
||||
A gépet csak rendeltetése szerint szabad |
Lökettérfogat: |
|
207,7 cm³ |
||
Üzemanyag: |
|
Benzin |
|||
használni. Ezt túlhaladó bármilyen használat, |
|
|
|
|
|
Tartálytartalom: |
|
|
15 l |
||
nem számít rendeltetésszerűnek. Ebből adódó |
|
|
|||
bármilyen kárért vagy bármilyen fajta sérülésért |
|
Motorolaj: |
cca. 0,6 l (15W40) |
||
a használó ill. a kezelő felelős és nem a gyártó. |
Fogyasztás 2/3 teherénél: |
cca. 1,36 l/óra |
|||
Kérjük vegye figyelembe, hogy a készülékeink |
Tömeg: |
|
|
42 kg |
|
|
|
|
|
|
|
rendeltetésük szerint nem az ipari, kézműipari |
Hangnyomásmérték LpA: |
|
76 dB(A) |
||
vagy gyári használatra lettek konstruálva. Nem |
Hangteljesítménymérték LWA |
|
96 dB(A) |
||
vállalunk szavatosságot, ha a készülék ipari, |
|
|
|
||
Bizonytalanság K |
|
2,07 dB(A) |
|||
kézműipari vagy gyári üzemek területén |
|
|
|
|
|
Teljesítménytényező cos ϕ: |
|
1 |
|||
valamint egyenértékű tevékenységek területén |
|
||||
van használva. |
Teljesítményosztály: |
|
|
G1 |
|
|
Hőmérséklet max: |
|
|
40°C |
|
|
Max. felállításmagasság (NN felett): |
1000 m |
|||
|
Gyújtógyertya: |
|
F7 RTC |
||
Üzemmód S1 (Tartósüzem)
A gépet tartósan lehet a megadott teljesítménnyel üzemeltetni.
21

Anleitung_4152412_LB4:_ 26.10.2011 16:18 Uhr Seite 22
HU
6. Beüzemeltetés előtt
6.1 Összeszerelés
A készülék felszereléséhez két villás kulcsra van szüksége (kulcsbőség 12)
A 6-tól – 9-ig levő képeken mutatottak szerint felszerelni az állólábat (16), a kerekeket (14) és a tolófület (18).
Minden részt felszerelni, mielőtt üzemanyagot vagy olajat töltene be, azért hogy elkerülje a folyadékok kifolyását.
A kerekek felszereléséhez tolja elősször a keréktengelyt (15) az áramfejlesztő alulsó oldalán levő tartókon keresztül és szerelje fel a 7-es képen mutatottak szerint a kerekeket (14).
A tolófül felszerelésénél (18) ügyelni arra, hogy a ferde oldala (9-es ábra/poz. E) kifelé legyen irányítva azért, hogy garantálva legyen a helyes csapófunkció.
6.2 Elektromos biztonság:
Az elektromos vezetékeknek és a csatlakoztatott készülékeknek egy kifogástalan állapotban kell lenniük.
Csak olyan készülékeket szabad csatlakoztatni, amelyek megadott feszültsége az áramfejlesztő kimeneteli feszültségével megegyezik.
Ne kapcsolja sohasem össze az áramfejleszőt a villamos hálózattal (dugaszoló aljzat).
A fogyasztóhoz vezető vezetékek hosszát lehetőleg röviden kell tartani.
6.3 Környezetvédelm
A szennyezett karbantartási anyagot és az üzemanyagokat az arra előrelátott gyűjtőhelyen leadni.
A csomagolási anyagot, fémet és műanyagokat visszavazetni az újrahasznosításhoz.
6.4 Földelés
A statikai feltöltődések levezetéséhez szükséges a gépház földelése. Ehhez egy kábelt az egyik oldalon az áramfejlesztő (3-es ábra/poz. 4) földelő kapocsával és a másik oldalon egy externi tömeggel összekötni.
7. Kezelés
Figyelem! Az első beüzemeltetésnél motorolajat (cca. 0,6 l) és üzemanyagot kell betölteni.
Leelleőrizni az üzemanyagállást és a motorolajat, esetleg utántölteni.
Gondoskodni a készülék elegendő szellőztetéséről
Győződjön meg arról, hogy a gyújtókábel rá van erősítve a gyújtógyertyára
Megitélni az áramfejlesztő közvetlen környezetét.
Válassza esetleg le a villamos készülékeket az áramfejlesztőröl.
7.1 A motor startolása Figyelem!
A reverzálókapcsoló (12) általi indításkor a hirtelen visszacsapódás által, előidézve a beinduló motor által, a kezeken sérülések keletkezhetnek. Hordjon az indításhoz védőkesztyűket.
Benzincsapot (13) megnyitni; ehhez a csapot lefelé fordítani.
A be-/kikapcsolót (10) az “ON” állásba tenni.
A hideginditókart (11) az I Ø I állásba tenni.
A reverzálókapcsolóval (12) indítani a motort; ehhez a fogantyút erősen meghúzni. Ha nem indult volna meg a motor, akkor mégegyszer a fogantyúnál fogva meghúzni.
A motor stratolása után a hidegindítókart (11) ismét visszatolni
22

Anleitung_4152412_LB4:_ 26.10.2011 16:18 Uhr Seite 23
7.2 Az áramfejlesztő megterhelése
Az üzemeltendő készülékeket rákapcsolni a 230 V~dugaszoló aljzatokra (3).
Figyelem: Ezeket a dugaszoló aljzatokat tartósan (S1) 2600W-al és rövid ideig (S2) max. 2 percig 2800W-al szabad megterhelni.
Az áramfejlesztő a 230 V~ váltakozó feszültségű készülékekre alkalmas.
Ne kapcsolja rá a generátort a háztartási hálózatra, mivel azáltal a generátor vagy a háztartásban levő más villamos készülékek megsérülését idézheti elő.
Utasítás: Némely villamos készülékeknek ( motorszúrófűrészek, fúrógépek stb. ) egy magasabb áramfogyasztásuk van, ha megnehezített körülmények alatt lesznek használva.
7.3 Leállítani a motort
Mielőtt leállítaná az áramfejlesztőt hagyja röviden megterhelés nélkül futni, azért hogy az aggregát tudjon „utána hülni“.
A be-/kikapcsolót (10) az “OFF” állásba tenni.
Lezárni a benzincsapot (13).
7.4 Túlterhelés elleni védelem 2x 230 V dugaszoló aljzat
Figyelem! Az áramfejlesztő egy túlterhelés elleni védővel van felszerelve.
Ez lekapcsolja a dugaszoló aljzatokat (3). A túlterhelés elleni védő (5) megnyomása által lehet a dugaszoló aljzatokat (3) ismét üzembe venni.
Figyelem! Ha ez az eset lépne fel, akkor csökkentse le az áramfejlesztőtöl igényelt elektromos teljesítményt vagy távolítsa el a csatlakoztatott defektes készülékeket.
Figyelem! Defektes túlterhelés elleni kapcsolókat csak ugyanolyan felépítésű, ugyanazokkal a teljesítményi adatokkal rendelkező túlterhelés elleni kapcsolók által szabad kicserélni. Forduljon ehhez a vevőszolgáltatásához.
HU
8.Tisztítás, karbantartás, raktározás, szállítás és pótalkatrészmegrendelés
Minden tisztítási és karbantartási munka előtt leállítani a motort és á gyújtógyertyadugót lehúzni a gyújtógyertyáról.
Figyelem: Állítsa azonnal le a készüléket és forduljon a szervíz állomáshoz:
Szokatlan rezgéseknél vagy zörejeknél.
Ha a motor túlterheltnek látszik, vagy hibás gyújtásai lennének.
8.1 Tisztítás
Tartsa a védőberendezéseket, szellőztető réseket (2-es ábra / poz. L) és a gépházat annyira porés piszokmentesen, amennyire csak lehet. Dörzsölje le a készüléket egy tiszta posztóval vagy pedig fújja ki alacsony nyomás alatt sűrített levegővel.
Ajánljuk, hogy minden használat után azonnal kitisztítsa a készüléket.
A készüléket rendszeresen egy nedves posztóval és egy kevés kenőszappannal megtisztítani. Ne használjon tisztító vagy oldó szereket; ezek megtámadhatják a készülék műanyagrészeit. Ügyeljen arra, hogy ne kerüljön víz a készülék belsejébe.
8.2 Légszűrő
Vegye ehhez a szervíz-információkat is figyelembe.
Rendszeresen megtisztítani a légszűrőt, ha szükséges kicserélni.
Nyissa ki mind a két kapocst (ábra 11/A) és távolítsa el a légszűrőfedelet (ábra 11/B).
Vegye ki a szűrőelemeket (ábra 12/C).
Az elemek tisztításához nem szabad maró hatású tisztítókat vagy benzínt használni.
Az elemeket egy sima felületen történő kiporolás által tisztítani. Erős szennyeződésnél szappanlúggal kimosni, azután tiszta vízzel kiöblíteni és hagyni a levegőn megszáradni.
Az összeszerlés az ellenkező sorrendben történik.
23

Anleitung_4152412_LB4:_ 26.10.2011 16:18 Uhr Seite 24
HU
8.3 Gyújtógyertya (ábrák 13-től – 14-ig)
A gyújtógyertyát elősször 20 üzemóra után leellenőrizni szennyeződésekre és adott esetben egy rézdrótkefével megtisztítani. Azután a gyújtógyertyát minden 50 üzemóra után karban kell tartani.
Húzza egy csavarófordulattal le a gyújtógyertyadugót (13-as ábra).
Távolítsa el a mellékelt gyújtógyertyakulccsal (25) a gyújtógyertyát (ábra 14/D).
Az összeszerlés az ellenkező sorrendben történik.
8.4 Olajcsere, lellenőrizni az olajszint (minden használat előtt)
A motorolajcserét üzemmeleg motornál kellene elvégezni.
Csak motorolajat (15W40) használni
Állítsa le az áramfejlesztőt egy megfelelő alátétre, enyhén ferdén az olajleengedő csavarhoz (8).
Kinyitni az olajbetöltőcsavart (7)
Megnyitni az olajleengedő csavart és leengedni a meleg motorolajat egy felfogó tartályba.
A fáradt olaj kifolyása után bezárni az olajleengedő csavart és az áramfejlesztőt ismét egyenesre felállítani.
Motorolajat az olajmérő pálca felső jelzéséig betölteni (cca. 0,6 l).
Figyelem: Az olajmérő pálcát (olajbetöltőcsavar) az olajállás leellenőrzéséhez ne csavarja be, hanem csak dugja be a menetig.
A fáradt olajat helyesen kell megsemmisíteni.
8.5 Olajlekapcsolóautómata
Az olajlekapcsolóautómata akkor lép üzembe, ha túl kevés olaj van benne. Ebben az esetben nem lehet indítani a motort vagy rövid idő után automatikusan leáll. Egy indítás csak a motorolaj feltöltése után (lásd a 8.4-es pontot) lehetséges.
8.6 Előkészítés a beraktározáshoz Figyelmeztetési utasítások: Ne távolítsa a benzínt zárt termekben, tüzek közelében vagy dohányzás mellett el. A gázpárák robbanásokat vagy tüzet okozhatnak.
A benzintartályt egy benzínelszívó szivattyúval kiüríteni.
Indítsa be a motort és hagyja addig futni a motort, amig a hátramaradt benzín el nem fogyott.
Csináljon minden szezon után egy olajcserét. Távolítsa ahhoz a meleg motorból el a fáradt motorolajat és töltsön frisset utánna.
Távolítsa el a légszűrőt (14-es ábra /poz. D) Töltsön egy olajkannával cca. 20 ml olajat a hengerbe. Húzza lassan az indító kötélhúzó szerkezetet, úgyhogy az olaj belülről védje a hengert. Csavarja ismét be a gyújtógyertyát.
Tisztítsa meg az egész készüléket, azért hogy védje a lakkfestéket.
A készüléket mindig egy jól szellőztetett helyen vagy helységben megőrizni.
8.7 Előkészítés a szállításhoz
A benzintartályt egy benzínelszívó szivattyúval kiüríteni.
Hagyja a motort addig futni, amig a hátramaradt benzín el nincs fogyasztva.
Ürítse ki meleg motorból a motorolajat.
Távolítsa el a gyújtógyertyadugód (13-as ábra) a gyújtógyertyáról.
Biztosítsa a készüléket például feszítőszíjjal elcsúszás ellen.
8.8 A pótalkatrész megrendelése
A pótalkatrészek megrendlésénél a következő adatokat kellene megadni:
A készülék típusát
A készülék cikk-számát
A készülék identszámát
Aktuális árak és inforációk a www.isc-gmbh.info alatt találhatóak.
24

Anleitung_4152412_LB4:_ 26.10.2011 16:18 Uhr Seite 25
HU
9.Megsemmisítés és újrahasznosítás
A szállítási károk megakadályozásához a készülék egy csomagolásban található. Ez a csomagolás nyersanyag és ezáltal ismét felhasználható vagy pedig visszavezethető a nyersanyagi körforgáshoz. A készülék és annak a tartozékai különböző anyagokból állnak, mint például fémből és műanyagokból. Vigye a károsult alkatrészeket a különhulladék megsemmisítési helyhez. Érdeklődjön utánna a szaküzletben vagy a községi közigazgatásnál!
Csak az EU-országoknak
Ne dobja az elektromos szerszámokat a háztartási hulladék közé!
Az elektromosés elektronikus-öregkészülékek 2002/96/EK európai irányvonala és a nemzeti jogba való átvétele szerint az elhasznált elektromos szerszámokat szétválasztva kell összegyüjteni és vissza kell vezetni egy környezetvédelemnek megfelelő újrafelhasználáshoz.
Recycling-alternatívák a visszaküldési felszólításhoz:
Az elektromos készülék tulajdonosa, a tulajdon feladása esetében köteles a visszaküldés helyett alternativ a szakszerű értékesítéssel kapcsolatban összedolgozni. Ehhez az öreg készüléket egy visszavevő helynek is át lehet hagyni, amely elvégzi a nemzeti körforgásipariés hulladéktörvények értelmében levő megsemmisítést. Ez nem érrinti az öreg készülékek mellékelt elektromos alkotórészek nélküli tartozékait és segítőeszközeit.
25

Anleitung_4152412_LB4:_ 26.10.2011 16:18 Uhr Seite 26
HU
10. Hibakeresési terv
Zavar |
Ok |
Intézkedés |
Nem lehet indítani a motort |
Beugrik az |
Leellenőrizni az olajállást, |
|
olajlekapcsolóautomatika |
feltölteni a motorolajat |
|
Kormozott a gyújtógyertya |
Megtisztítani a gyújtógyertyát, |
|
|
ill. kicserélni. Elektródatávolság |
|
|
0,6 mm |
|
Nincs üzemanyag |
Üzemanyagot utánnatölteni / |
|
|
leellenőriztetni a benzincsapot |
Túl kevés vagy hiányzik a |
Defektes a szabályozó vagy a |
Felkeresni a szakkereskedőt |
generátor feszültsége |
kondenzátor |
|
|
Kioldott a túláramvédőkapcsoló |
Üzemeltetni a kapcsolót és |
|
|
lecsökkenteni a fogyasztót |
|
Szennyezett a legszűrő |
Megtisztítani vagy kicserélni a |
|
|
szűrőt |
|
|
|
26

Anleitung_4152412_LB4:_ 26.10.2011 16:18 Uhr Seite 27
HU
11. Karbantartási terv
Okvetlenül betartani a következő karbantartási határidőket, azért hogy biztosítva legyen a zavarmentes üzem. Figyelem! Az első üzembevételnél motorolajat és üzemanyagot muszáj beletölteni.
|
Minden |
20 óra |
50 óra |
100 óra |
300 óra |
|
használat előtt |
üzemidő után |
üzemidő után |
üzemidő után |
üzemidő után |
|
|
|
|
|
|
A motorolaj |
x |
|
|
|
|
leellenőrzése |
|
|
|
|
|
|
|
|
|
|
|
A motorolaj |
|
Elősször, |
|
|
|
kicserélése |
|
utánna |
x |
|
|
|
|
minden 50 óra |
|
|
|
|
|
után |
|
|
|
A légszűrő |
|
|
|
|
Esetleg |
leellenőrzése |
x |
|
|
|
kicserélni a |
|
|
|
|
|
szűrőbetétet |
A légszűrő |
|
|
x |
|
|
tisztítása |
|
|
|
|
|
|
|
|
|
|
|
A benzínszűrő |
|
|
|
x |
|
tisztítása |
|
|
|
|
|
|
|
|
|
|
|
Szemmeli |
|
|
|
|
|
vizsgálat a |
x |
|
|
|
|
készüléken |
|
|
|
|
|
A gyújtógyertya |
|
|
Távolság: 0,6 |
|
|
megtisztítása |
|
|
mm, esetleg |
|
|
|
|
|
kicserélni újért |
|
|
Leellenőrizni és |
|
|
|
|
|
újbol beállítani a |
|
|
|
|
x* |
fojtószelepet a |
|
|
|
|
|
karburátoron |
|
|
|
|
|
A cilinderfejnek a |
|
|
|
|
x* |
megtisztítása |
|
|
|
|
|
|
|
|
|
|
|
Beállítani a |
|
|
|
|
x* |
szelepjátékot |
|
|
|
|
Figyelem: Az “x*” pontokat csak egy autorizált szaküzemnél elvégeztetni.
27
 Loading...