


|
.com |
|
-service |
www |
lidl |
|
AUTOMATIC WELDING HELMET PSHL 2 A2
GB IE NI |
HU |
AUTOMATIC WELDING |
AUTOMATA |
HELMET |
HEGESZTŐPAJZS |
Operation and Safety Notes |
Szerelési, használati és biztonsági utasítások |
Translation of the original instructions |
Az originál használati utasítás fordítása |
SI |
CZ |
AVTOMATSKA ČELADA |
AUTOMATICKÁ SVAŘOVACÍ |
ZA VARJENJE |
PŘILBA |
Navodila za montažo, uporabo in varnostna navodila |
Pokyny k montáži, obsluze a bezpečnostní pokyny |
Prevod originalnega navodila za uporabo |
Překlad originálního provozního návodu |
SK |
DE AT CH |
AUTOMATICKÁ ZVÁRACIA |
AUTOMATIK- |
PRILBA |
SCHWEISSHELM |
Pokyny pre montáž, obsluhu a bezpečnostné pokyny |
Bedienungsund Sicherheitshinweise |
Preklad originálneho návodu na obsluhu |
Originalbetriebsanleitung |
IAN 310884
HU SI CZ SK
GB IE NI
Before reading, unfold the page containing the illustrations and familiarise yourself with all functions of the device.
HU
Olvasás előtt kattintson az ábrát tartalmazó oldalra és végezetül ismerje meg a készülék mindegyik funkcióját.
SI
Pred branjem odprite stran s slikami in se nato seznanite z vsemi funkcijami naprave.
CZ
Před čtením si otevřete stranu s obrázky a potom se seznamte se všemi funkcemi přístroje.
SK
Pred čítaním si odklopte obidve strany s obrázkami a potom sa oboznámte so všetkými funkciami prístroja.
DE AT CH
Klappen Sie vor dem Lesen die Seite mit denAbbildungen aus und machen Sie sich anschließend mit allen Funktionen des Gerätes vertraut.
GB / IE / NI |
Installation, operating and safety information |
Page |
5 |
HU |
Szerelési, használati és biztonsági utasítások |
Oldal |
19 |
SI |
Navodila za montažo, uporabo in varnostna navodila |
Stran |
35 |
CZ |
Pokyny k montáži, obsluze a bezpečnostní pokyny |
Strana |
51 |
SK |
Pokyny pre montáž, obsluhu a bezpečnostné pokyny |
Strana |
65 |
DE / AT / CH |
Montage-, Bedienungsund Sicherheitshinweise |
Seite |
81 |

16
E 

17

Table of contents
List of pictograms used.................................................................................. |
Page |
6 |
Introduction.......................................................................................................... |
Page |
6 |
Intended use............................................................................................................ |
Page |
6 |
Parts Description .................................................................................................... |
Page |
6 |
Technical Data......................................................................................................... |
Page |
7 |
Scope of delivery.................................................................................................... |
Page |
7 |
Safety instructions............................................................................................ |
Page |
7 |
Initial use............................................................................................................... |
Page |
11 |
Cleaning and Maintenance.......................................................................... |
Page |
13 |
Storage................................................................................................................... |
Page |
13 |
Environmental instructions and disposal information.................... |
Page |
13 |
Troubleshooting................................................................................................. |
Page |
13 |
Warranty and service information........................................................... |
Page |
14 |
Warranty terms....................................................................................................... |
Page |
14 |
Extent of warranty................................................................................................... |
Page |
14 |
Processing of warranty claims................................................................................. |
Page |
14 |
Service.................................................................................................................... |
Page |
15 |
Label meanings.................................................................................................. |
Page |
15 |
EU Declaration of Conformity ...................................................................... |
Page |
16 |
GB 5

List of pictograms used / Introduction
List of pictograms used
|
|
|
|
|
|
|
Caution! |
|
Attention, potential dangers! |
|
|
|
|
|
|
|
|||
|
|
|
|
|
|
|
Read instructions for use! |
|
|
|
|
|
|
|
|
|
|
|
|
|
|
|
|
|
|
|
|
|
|
|
|
|
|
|
|
|
Do not dispose of electrical |
|
Important notice! |
|
|
|
|
|
|
|
|
||
|
|
|
|
|
|
|
|||
|
|
|
|
|
|
|
equipment in household waste! |
|
|
|
|
|
|
|
|
|
|
|
|
|
|
|
|
|
|
|
|
|
|
|
|
|
|
|
|
|
|
|
|
|
|
|
|
|
|
|
Attention: The welding helmet |
|
Warning: arc rays can injure |
|
|
|
|
|
|
|
|||
|
|
|
|
|
|
|
does not provide any eye, ear |
|
|
|
|
|
|
|
|
|
|
the eye's retinas! |
|
|
|
|
|
|
|
|
or face protection! |
|
|
|
|
|
|
|
|
|
|
|
|
|
|
|
|
|
|
|
|
|
|
|
|
|
|
|
|
|
Made from recycling material |
|
|
|
|
|
|
|
|
|
|
|
|
Automatic Welding Helmet
PSHL 2 A2
zz Introduction
Congratulations!

 You have chosen a high-quality product from our company. Familiarise yourself with the product before using it for the first time. In addition, please carefully refer to the instructions for use and the safety instructions below.
KEEP OUT OF THE REACH OF
CHILDREN!
zzIntended use
This welding helmet protects the eyes and face from sparks, splashes and UV rays while welding and automatically adapts to the lighting conditions. It ensures an immediate, sensor-controlled darkening upon arc ignition as well as automatic illumination at the end of the welding procedure (including a short delay to protect against afterglow). This welding helmet provides a freely adjustable DIN protection level with a lateral adjustment
6 GB
wheel and is also adjustable for flying sparks during grinding work. Only use the product as described and for its indicated purpose. Keep these instructions in a safe place. When passing this product on to others, please also include all the documents. Any use other than the intended is prohibited and potentially dangerous. Damages resulting from noncompliance or misuse are not covered by the warranty and are not included in the manufacturer‘s liability. This device
has been designed for household use and may not be used for commercial or industrial purposes.
zzParts Description
1Viewing pane
2Helmet casing
3Solar cell
4Rear pane
5Headband
6Rear control dial headband
7Lateral control dial headband
8UV filter
9Darkening regulator
10Test button
11Delay setting
12Sensitivity setting
13Low battery display

14LED Lighting switch
15Battery compartment
16Bracket
17arc sensor
zzTechnical Data
Filter cartridge size: |
110 x 90 x 10 mm |
Field of vision: |
9.2 x 4.2 cm |
Bright state: |
DIN 4 |
Dark state: |
DIN 9–DIN 13 |
Switching times |
|
Bright to dark: |
0.23~0.72 ms |
Dark to bright: |
0.15~0.45 s |
Switch on / off: |
Fully automatic |
Energy supply: |
Solar cell |
UV / IR protection: |
DIN 16 |
Operating temperature: -5 °C to +55 °C |
|
Storage temperature: |
-20 °C to + 70 °C |
Welding procedure: |
MMA, MIG, MAG, |
|
TIG, plasma cutting |
|
and plasma welding |
Maximum service life: |
approx. 6 years |
zzScope of delivery
1 Auto-Darkening Welding Helmet
1 Set of instructions for use
 Safety instructions
Please carefully read the instructions for use and follow the specified notices. Familiarise yourself with the equipment, its proper use and the safety notices using these instructions for use. All technical data about this welding helmet is on the label, please learn about this product‘s technical facts.
Introduction/ Safety instructions
The product is not suitable for laser welding.
The product is only approved for use within a temperature range of between -5 °C to 55 °C.
The product is not fire-resistant.
Welding helmet and ADF filter must not be exposed to any heat or moisture.
Do not remove the ADF filter from the welding helmet and never open the housing of the ADF filter without authorisation from the manufacturer.
Prior to each use, check whether the Welding/ Grinding setting was selected correctly.
The cover lens must be installed on the outer side of the ADF
filter. Otherwise, the ADF filter can get damaged.
Do not carry out any modifications/replacements on the welding helmet and ADF filter without consent.
If the filter does not darken automatically whilst welding please stop the operation immediately and contact the dealers without delay.
Do not use any alcohol, fuel or diluting agents to clean the ADF filter. Do not place the ADF filter in water.
GB 7

Safety instructions
The response time of the ADF liquid crystal slows down if the ambient temperature is lower, however this does not have an impact on the protective functions.
Please replace the housing of the ADF filter immediately if it is damaged or scratched because this can impair visibility and the protective performance.
Please replace the viewing pane immediately if it is broken or scratched. Do not use any hard objects to replace the viewing pane of the filter.
Regularly clean the surfaces of the ADF filter, sensor and solar cells.
The welding helmet cannot withstand any damages that are caused by a heavy blow, explosion or abrasive liquids.
The useful life depends on many different individual factors such as usage, cleaning, storage and maintenance. Regular inspections and replacement
in the case of damage are recommended.
The material used to manufacture the product will age over time. This can result in breakages on the welding helmet, for example. As a result of these
8 GB
damages, the welding helmet is no longer able to provide effective protection. In this case, the user should replace the welding helmet immediately.
This product cannot be used for overhead welding work and cutting operations. If this product is use for overhead welding or cutting, the molten metal drops could burn through the ADF filter and result in injuries to the user.
If the filter is faulty, the user must stop using the welding helmet immediately. Slag splashes can damage the surface of the filter and cause injury to the user’s skin or cause other serious accidents.
This product is temperature resistant and hardly inflammable but in case of direct contact with naked flames or in case of access to an object with a high temperature, the helmet may begin to burn or melt. Please store and only use the welding helmet in the manner described in order to reduce such risks.
The ADF filter is an electronic product that is not waterproof. Please ensure it is kept dry and clean and not stored in a damp environment.

Improper use could result in injury to the user and cause other types of diseases.
Please examine the filter prior to each use. As soon as the function and appearance seem defective, they must no longer be used.
The use of the welding helmet is prohibited if the filter flickers or if the level of darkening no longer corresponds to the standard value or there are other abnormal working conditions.
Please do not expose this product to unnecessary solar radiation.
Please only use original spare parts. The use of non-original parts can cause problems with regard to the protective function, serviceability and degree of product protection.
Exceeding the service life (insufficient protection) – please check the protective glasses prior to each use for damage and durability.
Using eye protection without the filter effect against radiation (damages the eyes) – prior to each use check whether the eye protection exhibits the necessary scale number.
Safety instructions
Using the product against splashes (insufficient protection) – always check whether the correct protective effect is present.
Using the product against large dust particles (injury, accident). The eye protection equipment must only be used for the work described in the operating instructions. Any deviation from the instructions in the operating instructions can result in injuries or accidents.
Using damaged products (insufficient protection) – prior to each use check the protective glasses for damage and durability.
Improper use of the eye protection (injury, accident). The eye protection device must only be used for the work described
in the operating instructions. Any deviation from the instructions can result in injuries or accidents.
This device may be used by children aged 16 years and up, as well as by persons with reduced physical, sensory or mental capacities, or lacking experience and / or knowledge, so long as they are supervised or instructed in the safe use
GB 9

Safety instructions
of the device and understand the associated risks. Do not allow children to play with the product. Cleaning and user maintenance should not be performed by children without supervision.
The welding helmet with automatic darkening is not suitable for laser and gas welding.
Never place the welding helmet on hot surfaces.
Never open the welding helmet. Never carry out repairs on or modifications to the welding helmet. These may only be carried out by trained experts.
Please ensure that you have set the automatic darkening before each welding procedure.
The safety visor should not be opened. It protects the filter from dirt and damage.
If the filter does not automatically darken, then immediately end the welding procedure and contact the manufacturer.
Only use the welding helmet in temperatures between -5 °C and +55 °C. The filter‘s reaction time will slow down if this temperature has not been reached or is exceeded.
10 GB
Clean the filter, the surface of the helmet and the solar cells regularly.
Replace the protective visor if scratches or damages appear.
The welding helmet does not provide protection against impact.
Frequent use, cleaning or storage can mean that the service life is less than 6 years. Replace the welding helmet immediately if the viewing panel gets scratched or the viewing panel is visibly damaged in any other way.
 ATTENTION! Materials that come into contact with the wearer‘s skin may cause allergic reactions in people with sensitive skin.
 ATTENTION! Eye protection can represent a hazard for the wearer if it is worn over normal corrective glasses due to the impact from high-speed particles.
 ATTENTION! If protection against high-speed particles at extreme temperatures is required, the eye protection chosen must be labelled with the letter T directly after the letter for the impact
|
|
|
|
|
|
|
|
|
|
|
|
|
Safety instructions / Initial use |
|
|
|||||||||||||
intensity, i. e. FT, BT or AT. If the |
|
ATTENTION! The darkening regulator |
|
|
||||||||||||||||||||||||
letter for the impact intensity is not |
9 |
has the setting position “grind“. If the |
|
|
||||||||||||||||||||||||
|
|
|
|
|
|
|
|
|
|
|
|
|
|
|
|
|
|
|
|
|
|
|
|
|
|
|
|
|
followed by the letter T, the eye |
darkening regulator |
9 |
is set to this position |
|
|
|||||||||||||||||||||||
the automatic darkening is deactivated. |
|
|
||||||||||||||||||||||||||
protection may only be used |
|
|
||||||||||||||||||||||||||
Only use this setting when you do not wish |
|
|
||||||||||||||||||||||||||
against high-speed particles at |
to use the welding helmet for welding. The |
|
|
|||||||||||||||||||||||||
room temperature. |
automatic darkening is then no longer active. |
|
|
|||||||||||||||||||||||||
Check the light density before each use. |
|
|
||||||||||||||||||||||||||
|
|
|
|
|
|
|
|
|
|
|
|
Test procedure: Bring the viewing panel |
|
|
||||||||||||||
zz Initial use |
|
|
|
|
|
|
|
|
|
closer to an external light source with a |
|
|
||||||||||||||||
|
|
|
|
|
|
|
|
|
value of more than 40 W and examine |
|
|
|||||||||||||||||
Note: Only use the welding helmet with the |
|
whether or not the screen darkens or |
|
|
||||||||||||||||||||||||
|
illuminates. To do so, turn the darkening |
|
|
|||||||||||||||||||||||||
rear pane mounted |
|
4 |
. |
|
|
|
|
|
control |
9 |
|
clockwise from "Grind" to |
|
|
||||||||||||||
Note: Keep the UV filter‘s sensors |
|
clean |
|
the next position. This sets the filter to |
|
|
||||||||||||||||||||||
8 |
|
|
|
|||||||||||||||||||||||||
and clear. |
|
|
|
|
|
|
|
|
|
auto-darkening mode. If you turn the |
|
|
||||||||||||||||
|
|
|
|
|
|
|
|
|
|
|
|
|
darkening control |
9 |
anticlockwise back |
|
|
|||||||||||
|
After opening the package, immediately |
|
to "Grind", the filter's auto-darkening |
|
|
|||||||||||||||||||||||
check to ensure that the package contents |
|
feature is once again deactivated. |
|
|
|
|
|
|||||||||||||||||||||
are complete and undamaged. Contact your |
To replace the UV filter/solar cell, press |
|
|
|||||||||||||||||||||||||
dealer immediately if the package contents is |
|
the locking lugs on both sides outwards |
|
|
||||||||||||||||||||||||
incomplete or has any defects. Do not use the |
|
(Fig. B). Then lift the filter with your finger |
|
|
||||||||||||||||||||||||
device if it is defective |
|
to the upper edge. Then use a finger to lift |
|
|
||||||||||||||||||||||||
|
|
|
|
|
|
|
|
|
|
|
|
|
the filter at the notch at the top of |
|
|
|
|
|
||||||||||
|
Check that the welding helmet and the |
|
the filter. |
|
|
|
|
|
||||||||||||||||||||
protective screen are intact before each use. |
|
Then remove the darkening control |
9 |
|
|
|
||||||||||||||||||||||
If the protective screen has scratches, cracks |
|
from the exterior of the welding helmet by |
|
|
||||||||||||||||||||||||
or irregularities, it must be replaced before |
|
simply pulling it away, and unscrew the |
|
|
||||||||||||||||||||||||
use, as serious injuries may occur otherwise. |
|
nut that is located beneath it. Once you |
|
|
||||||||||||||||||||||||
|
|
|
|
|
|
|
|
|
|
|
|
|
have removed the nut from the thread, |
|
|
|||||||||||||
Remove the protective film from the inside |
|
you can completely remove the filter from |
|
|
||||||||||||||||||||||||
and the outside of the visor. |
|
the welding helmet. (Variant: Black) |
|
|
|
|
|
|||||||||||||||||||||
Adjust the welding helmet with the help of |
To replace the UV filter/solar cell, pull the |
|
|
|||||||||||||||||||||||||
the headband |
|
5 |
. Turn the rear control |
|
bracket |
16 |
at the bottom edge of the filter |
|
|
|||||||||||||||||||
dial headband |
|
6 |
in order to adjust the |
|
over the two protruding locking pins and |
|
|
|||||||||||||||||||||
|
|
|
|
|
||||||||||||||||||||||||
welding helmet to the respective head |
|
outwards (see figure C). Flip the bracket |
|
|
||||||||||||||||||||||||
size and the lateral control dial headband |
|
upwards (see figure D). With your thumbs |
|
|
||||||||||||||||||||||||
|
7 |
in order to lock the welding helmet. |
|
centred underneath the filter, lift the filter |
|
|
||||||||||||||||||||||
|
|
|
|
|
||||||||||||||||||||||||
When adjusting, ensure that your head is |
|
and pull it down to remove it. |
|
|
|
|
|
|||||||||||||||||||||
placed as far into the helmet as possible |
|
Then remove the darkening control |
9 |
|
|
|
||||||||||||||||||||||
and that it sits as close as possible to your |
|
from the exterior of the welding helmet by |
|
|
||||||||||||||||||||||||
face. |
|
|
|
|
|
|
|
|
|
simply pulling it away, and unscrew the nut |
|
|
||||||||||||||||
Set the appropriate darkening shade |
|
that is located beneath it. Once you have |
|
|
||||||||||||||||||||||||
before the welding procedure (see the |
|
removed the nut from the thread, you |
|
|
||||||||||||||||||||||||
following table). The darkening shade |
|
can completely remove the filter from the |
|
|
||||||||||||||||||||||||
may be manually adjusted from 9 to 13 |
|
welding helmet. (Variant: With flames) |
|
|
||||||||||||||||||||||||
by twisting the darkening regulator |
9 |
on |
You can use the test button |
10 |
to check |
|
|
|||||||||||||||||||||
the outside of the helmet. |
|
whether the welding helmet's darkening |
|
|
||||||||||||||||||||||||
|
|
|
|
|
|
|
|
|
|
|
|
|
|
|
|
|
|
|
|
|
|
GB |
|
11 |
|
|
||
|
|
|
|
|
|
|
|
|
|
|
|
|
|
|
|
|
|
|
|
|
|
|
|
|
||||
|
|
|
|
|
|
|
|
|
|
|
|
|
|
|
|
|||||||||||||
|
|
|
|
|
|
|
|
|
|
|
|
|
|
|
|
|||||||||||||

Initial use
feature is working properly.
You can adjust the delay setting 11 to configure whether or not the autodarkening feature should be switched off immediately after stopping welding work, depending on the type of welding
work. At the lowest setting, auto-darkening is switched off immediately. Turn the rotary switch clockwise towards the highest setting to prolong the time the auto-darkening feature remains active after welding work. This feature is very useful for handling afterglow.
You can use the sensitivity setting 12 to adjust the light sensitivity of the sensor. With low incident light, the control can be adjusted to the highest setting to ensure
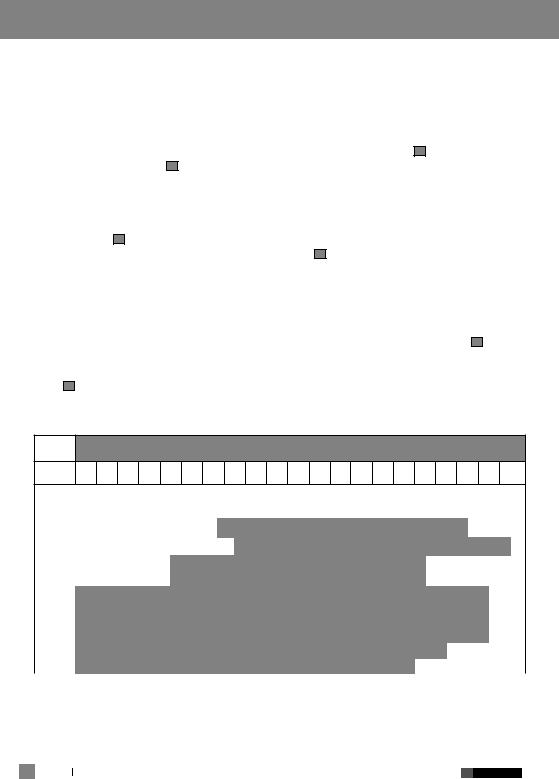
Table for setting the darkening shades
that the auto-darkening feature is activated even for a weak light source. Even with this additional feature, you can also adjust the light sensitivity of the sensor to suit your own personal requirements.
The lowlight sensor switches the LED lamp on in dark environments and off in brightly lit environments. This helps to illuminate the object being welded in dark working conditions. The LED lamp can be switched on and off using the lamp control 14. If the battery charge level is too low, you can replace the batteries. To do so, slide the left side of the battery compartment
15 to the left (see figure A). A low battery charge level is indicated with a red warning light on the display 13.
Arc current (ampere)
|
1,5 |
6 |
10 |
15 |
30 |
40 |
60 |
70 |
100 |
125 |
150 |
175 |
200 |
225 |
250 |
300 |
350 |
400 |
450 |
500 |
600 |
|
|
|
|
|
|
|
|
|
|
|
|
|
|
|
|
|
|
|
|
|
|
|
Grind |
|
|
|
|
|
Grinding function - automatic dimming not active |
|
|
|
|
|
|
||||||||||||||||||||
|
SMAW |
|
|
|
8 |
|
|
|
|
|
|
9 |
|
10 |
|
11 |
|
12 |
|
|
|
|
13 |
|
|
14 |
|
||||||
|
|
|
|
|
|
|
|
|
|
|
|
|
|
|
|
|
|
|
|
|
|
|
|
|
|
|
|
|
|
|
|
|
|
|
MAG |
|
|
|
8 |
|
|
|
|
|
|
9 |
|
|
10 |
|
|
11 |
|
|
|
12 |
|
|
|
13 |
|
14 |
|||||
|
|
|
|
|
|
|
|
|
|
|
|
|
|
|
|
|
|
|
|
|
|
|
|
|
|
|
|
|
|
|
|
|
|
|
TIG / |
|
|
8 |
|
|
|
9 |
|
|
|
10 |
|
|
|
11 |
|
|
|
12 |
|
|
13 |
|
|
|
|
|
|
||||
|
GTAW |
|
|
|
|
|
|
|
|
|
|
|
|
|
|
|
|
|
|
|
|
|
|
||||||||||
|
|
|
|
|
|
|
|
|
|
|
|
|
|
|
|
|
|
|
|
|
|
|
|
|
|
|
|
|
|
|
|
|
|
|
MIG |
|
|
|
9 |
|
|
|
|
|
|
|
|
|
|
10 |
|
11 |
|
|
12 |
|
13 |
|
14 |
|
|
||||||
|
(schwer) |
|
|
|
|
|
|
|
|
|
|
|
|
|
|
|
|
|
|
|
|
||||||||||||
|
|
|
|
|
|
|
|
|
|
|
|
|
|
|
|
|
|
|
|
|
|
|
|
|
|
|
|
|
|
|
|
|
|
|
MIG |
|
|
|
|
|
|
10 |
|
|
|
|
|
|
|
|
|
|
|
11 |
12 |
|
13 |
|
14 |
|
|
||||||
|
(leicht) |
|
|
|
|
|
|
|
|
|
|
|
|
|
|
|
|
|
|
|
|
|
|||||||||||
|
|
|
|
|
|
|
|
|
|
|
|
|
|
|
|
|
|
|
|
|
|
|
|
|
|
|
|
|
|
|
|
|
|
|
PAC |
|
|
|
9 |
|
|
|
|
|
|
|
|
10 |
11 |
|
12 |
|
|
13 |
|
|
|
|
|
|
|||||||
|
|
|
|
|
|
|
|
|
|
|
|
|
|
|
|
|
|
|
|
|
|
|
|
|
|
|
|
|
|||||
|
PAW |
|
4 |
5 |
|
6 |
|
7 |
|
|
8 |
|
9 |
|
10 |
|
11 |
|
|
12 |
|
|
|
|
|
|
|
||||||
|
|
|
|
|
|
|
|
|
|
|
|
|
|
|
|
|
|
|
|
|
|
|
|
|
|
|
|
|
|
|
|||
|
SMAW: |
|
welding with coated |
|
|
|
|
|
|
PAC: |
|
|
plasma cutting |
|
|
|
|
||||||||||||||||
|
|
|
|
electrodes |
|
|
|
|
|
|
|
|
|
|
PAW: |
|
|
plasma welding |
|
|
|
|
|||||||||||
|
MIG (heavy): |
MIG welding heavy metals |
|
|
|
Grind: |
|
|
Grinding function: Automatic |
|
|||||||||||||||||||||||
|
MIG (light): |
MIG welding light metals |
|
|
|
|
|
|
|
|
dimming not active. Only use the |
||||||||||||||||||||||
|
|
|
|
and alloys |
|
|
|
|
|
|
|
|
|
|
|
|
|
|
|
setting if you do not use welding |
|||||||||||||
|
TIG / GTAW: |
welding with inert gases |
|
|
|
|
|
|
|
|
helmet for welding. |
|
|
|
|
||||||||||||||||||
|
MAG: |
|
welding with metal active |
|
|
|
|
|
|
|
|
|
|
|
|
|
|
|
|
|
|
|
|||||||||||
|
|
|
|
gass |
|
|
|
|
|
|
|
|
|
|
|
|
|
|
|
|
|
|
|
|
|
|
|
|
|
|
|
|
|
|
|
|
GB |
|
|
|
|
|
|
|
|
|
|
|
|
|
|
|
|
|
|
|
|
|
|
|
|
|
|
|
|
|
|
|
12 |
|
|
|
|
|
|
|
|
|
|
|
|
|
|
|
|
|
|
|
|
|
|
|
|
|
|
|
|
|
|
|
|
|
|
|
|
|
|
|
|
|
|
|
|
|
|
|
|
|
|
|
|
|
|
|
|
|
|
|
|
|
|
|
|||
|
|
|
|
|
|
|
|
|
|
|
|
|
|
|
|
|
|
|
|
|
|
|
|
|
|
|
|
|
|
|
|||
Cleaning and ... / Storage / Environmental instructions ... / Troubleshooting
zz Cleaning and Maintenance
Do not use any harsh cleaning agents to clean the helmet casing 2 .
Never bring the UV filter 8 into contact with water.
Clean the product with a soft, dry cloth, with a cloth dampened with pure alcohol or with a cloth dampened with disinfectant.
zz Storage
Keep the device in a dry place and out of the reach of children.
zz Environmental instructions and disposal information
Don‘t waste, recycle!
The device, accessories and packaging should be recycled in an environmentally friendly manner.
Do not throw the auto-darkening welding helmet into household rubbish, fire or water. If possible, non-operational equipment should be recycled. Contact your local retailer for information.
zz Troubleshooting
Error |
Cause |
Solution |
|
|
|
|
|
||
|
|
|
|
|
|
|
|
|
|
The filter does not darken in |
The protector does not |
Clean the protector or |
|
|
|
|
|
||
a normal way or flickers. |
darken in a normal way or |
replace it. |
|
|
|
|
|
||
|
flickers. |
|
|
|
|
|
|
||
|
The arc sensor is not clear. |
Clean the arc sensor's |
|
|
|
|
|
||
|
|
|
|
surface. |
|
|
|
|
|
|
The welding current is |
Set the sensitivity to the |
|
|
|||||
|
too low. |
maximum degree. |
|
|
|
|
|
||
The reaction is slow. |
The ambient temperature is |
Only use the welding |
|
|
|
|
|
||
|
too low / high. |
helmet in temperatures |
|
|
|||||
|
|
|
|
between -5 °C and +55 °C. |
|
|
|||
|
The sensitivity is too low. |
Set the sensitivity to a |
|
|
|
|
|
||
|
|
|
|
higher setting. |
|
|
|
|
|
The visibility is poor. |
The protector / the protective |
Clean the protector and the |
|
|
|||||
|
screen is dirty. |
protective screen. |
|
|
|
|
|
||
|
The protective film on the |
Remove the protective film. |
|
|
|||||
|
protective screen was not |
|
|
|
|
|
|
||
|
removed. |
|
|
|
|
|
|
||
|
The ambient light is not |
Apply more light to your |
|
|
|||||
|
sufficient. |
work surroundings. |
|
|
|
|
|
||
|
The wrong darkening shade |
Reset the darkening shade. |
|
|
|||||
|
has been set. |
|
|
|
|
|
|
||
The welding helmet slips. |
The headband |
|
has been |
Put on the headband |
|
|
|
|
|
5 |
5 |
|
|
|
|
||||
|
put on incorrectly. |
again tighter. |
|
|
|
|
|
||
|
|
|
|
GB |
|
|
13 |
|
|
|
|
|
|
|
|
|
|
||
|
|
|
|
|
|
||||
|
|
|
|
|
|
||||

Warranty and service information
zz Warranty and service information
Creative Marketing & Consulting GmbH warranty
Dear customer, the warranty for this device is 3 years from the date of purchase. In the event of product defects, you have legal rights against the retailer of this product. Your statutory rights are not limited in any way by our warranty detailed below.
zzWarranty terms
The warranty period begins on the date of purchase. Please keep the original receipt in a safe place. This document is required as your proof of purchase. Should this device show any fault in materials or manufacture within 3 years from the date of purchase, it will be repaired or replaced – at our choice
– by us free of charge. This warranty is conditional on the defective device and the receipt of purchase being presented within the 3 year warranty period, and that there is a brief written description of the nature of the defect and of the date it arose.
If the defect is covered by our warranty, you will receive the product which has been repaired or a new product. A repair or exchange of the device does not begin a new warranty period.
zzExtent of warranty
The appliance has been manufactured to strict quality guidelines and meticulously examined before delivery.
The warranty applies to defects in material or manufacture. This warranty does not apply to product parts subject to normal wear and tear and which can therefore be considered as wear items, or to damage to fragile parts,
e.g. switches, storage batteries or glass parts.
14 GB
This warranty becomes void if the device has been damaged or improperly used or maintained.
All instructions provided in the instructions for use must be followed strictly to constitute proper use of the product. Purposes and practices which the operating instructions warn of or advise against must be avoided without fail.
This product is intended for private, non-commercial use only. Any incorrect or improper use of the device, use of force and changes not performed by our authorized service branch will void the warranty.
zzProcessing of warranty claims
Please follow the instructions below to ensure your claim is processed quickly:
When inquiring about your product please have your receipt and product number (e.g. IAN) ready as your proof of purchase.
The product number can be found on the type plate, an engraving, the cover page of your instructions (bottom left) or the decal at the back or bottom. In the event of malfunctions or other defects, please first contact the service department below by phone or e-mail.
A product recorded as defective, along with the proof of purchase (sales receipt) and
a description of the defect and when it occurred, can then be returned free of charge to you to the service address provided.
Note:
On www.lidl-service.com you can download this as well as many other manuals, product videos and software.
Warranty and service information / Label meanings
zzService |
zz Label meanings |
Only use original accessory parts:
Black variant
(PSHL 2 A2, Item no.:2169):
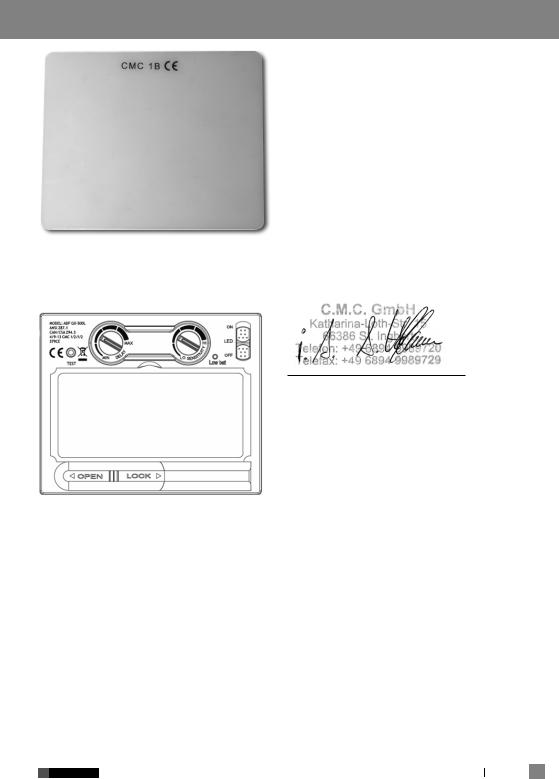
•Viewing pane (CMC 1B CE):
110.8mm x 90 mm x 1.0 mm
•Rear lens (CMC 1F CE):
98.6mm x 46 mm x 0.8 mm
Variant with flames
(PSHL 2 A2, Item no.:2170):
•Viewing pane (CMC 1B CE):
109.6mm x 86 mm x 1.0 mm
•Rear lens (CMC 1F CE):
98.6mm x 46 mm x 0.8 mm
How to contact us:
GB |
|
Name: |
C.M.C. Creative Marketing |
|
& Consulting GmbH |
Website: |
www.cmc-creative.de |
E-mail: |
service.gb@cmc-creative.de |
Phone: |
0-808-189-0652 |
Registered office: Germany
IAN 310884
Please note that the following address is not a service address. Please first contact the service point named above.
Address:
C.M.C. Creative Marketing & Consulting
GmbH
Katharina-Loth-Str. 15
DE-66386 St. Ingbert
DEUTSCHLAND
Ordering spare parts:
www.lidl.com/contact-us
Safety viewing panels approved according to DIN EN 166 (CXXXXCMC, CXXXXCMC):
•Viewing pane: CMC 1 B CE
CMC = manufacturer code 1 = optical class
B = mechanical strength (medium-energy impact at 120 m/s)
CE = CE symbol)
•Rear pane: CMC 1 F CE
CMC = manufacturer code 1 = optical class
F = mechanical strength (low-energy impact at 45 m/s)
CE = CE symbol)
ADF approved according to DIN EN 379: 4/9-13 CMC 1/1/1/2/379 CE (CXXXXCMC)
Legend:
4 = bright state 9–13 = dark state
CMC = manufacturer code number 1 = optical class number 2 = scattered light grade number 3 = homo-geneity class
number 4 = angle dependency class 379 = test standard
CE = CE symbol
Welding helmet case: CMC EN 175 F CE (CXXXXCMC, CXXXXCMC):
Manufacturer identification: |
CMC |
Number of the standard: |
EN 175 |
Area(s) of application (if required): S, F, B Mass in grams (if required)
IP rating for welding helmet, order no.: 2169/2170: F
CE = CE symbol
GB 15

Label meanings / EU Declaration of Conformity
Sym- |
Pro- |
Description |
bol |
tection |
of scope |
|
type |
of application |
Sincreased Mechanical strength strength
F |
Low |
Mechanical strength |
|
energy |
|
|
impact |
|
B |
Medium |
Mechanical strength |
|
energy |
|
|
impact |
|
 If the symbols F, B and A are not obtained for the viewing panel as well as the supporting body, the entire eye protection device is to be conferred with a lower rating.
Certification body:
DIN CERTCO Gesellschaft für Konformitätsbewertung mbH Alboinstrasse 56
12103 Berlin
Notified body number 0196
66386 St. Ingbert
GERMANY
3. The manufacturer is solely responsible for the creation of the declaration of conformity.
C.M.C. Creative Marketing &
Consulting GmbH
4. The object of the declaration (identification of the PPE that enables traceability; if necessary, it can contain a sufficient sharp image if it is necessary for the identification of the PPE):
Welder visor PSHL 2 A2,
item no. 2169, welder visor PSHL 2 A2, item no. 2170
z EU Declaration of Conformity
Viewing pane without filter effect
1. PSA (product, type, batch or serial number): PSHL 2 A2, item no. 2167, 2168,
2169, 2170
Automatic welding helmet IAN: 310884
Serial number:
2169 (black variant) /
2170 (variant with flames) Year of manufacture: 2019/15 Model: PSHL 2 A2
2. Name and address of the manufacturer and his/her representative, if required:
C.M.C. Creative Marketing &
Consulting GmbH
Documentation Officer:
Alexander Hoffmann
Katharina-Loth-Str. 15
Viewing pane without filter effect PSHL 2 A2, item no. 2167, 2168, 2169, 2170
16 GB
Automatic welder protective filter with manually adjustable protection level PSHL 2 A2, item no. 2167, 2168, 2169, 2170
5. The object of the declaration described under number 4 corresponds to the relevant harmonisation legislation of the union:
Electromagnetic Compatibility 2014 / 30 / EU
RoHS directive 2011 / 65 / EU
Personal Protective Equipment - Ordinance
(EU) / 2016/425
6. Indication of the relevant harmonised standards used or other technical specifications in relation to which conformity is declared, including the date of the standards
EU Declaration of Conformity
or other technical specifications:
EN 166:2001
EN 175:1997
EN 379:2009.
7. The notified certification body DIN CERTCO Gesellschaft für Konformitätsbewertung mbH, Alboinstrasse 56, 12103 Berlin, Notified body number 0196, carried out the EC type examination and issued the EC type examination certificate CXXXXCMC/R0, CXXXXCMC/R0, CXXXXCMC/R0, CXXXXCMC/R0, CXXXXCMC/R0.
St. Ingbert, 22.10.18
On behalf of M. Sc. Alexander Hoffmann
– Quality Assurance –
GB 17

18 GB

Tartalomjegyzék
Az alkalmazott piktogramok jelmagyarázata.................................................... |
|
oldal |
20 |
||
Bevezető............................................................................................................................. |
|
|
|
oldal |
20 |
Rendeltetésszerű használat................................................................................................. |
|
|
|
oldal |
20 |
Alkatrészleírás...................................................................................................................... |
|
|
|
oldal |
20 |
Műszaki adatok.................................................................................................................... |
|
|
|
oldal |
21 |
A csomag tartalma................................................................................................................ |
|
|
|
oldal |
21 |
Biztonsági tudnivalók................................................................................................... |
|
|
|
oldal |
21 |
Üzembe helyezés............................................................................................................ |
|
|
|
oldal |
25 |
Tisztítás és karbantartás............................................................................................. |
|
|
|
oldal |
27 |
Tárolás................................................................................................................................. |
|
|
|
oldal |
27 |
Környezetvédelmi tudnivalókés |
megsemmisítési adatok.......................... |
oldal |
27 |
||
Hibák elhárítása............................................................................................................... |
|
|
|
oldal |
28 |
Tudnivalók a garanciával |
és aszervizeléssel |
kapcsolatban...................... |
oldal |
28 |
|
Garanciális feltételek............................................................................................................ |
|
|
|
oldal |
28 |
A garancia terjedelme........................................................................................................... |
|
|
|
oldal |
29 |
Garanciális ügyek lebonyolítása........................................................................................... |
|
|
oldal |
29 |
|
Szerviz.................................................................................................................................. |
|
|
|
oldal |
29 |
Jelmagyarázat.................................................................................................................. |
|
|
|
oldal |
30 |
EU megfelelőségi nyilatkozat................................................................................... |
|
|
oldal |
31 |
|
Jótállási tájékoztató...................................................................................................... |
|
|
|
oldal |
33 |
HU 19

Az alkalmazott piktogramok jelmagyarázata / Bevezető
Az alkalmazott piktogramok jelmagyarázata
|
|
|
Vigyázat! |
|
Figyelem, lehetséges |
|
|
|
Olvassa el az Üzemeltetési |
|
|
|
|
|
|
veszélyek! |
|
|
|
|
útmutatót! |
|
|
|
|
|
|
|
|
|
|
|
Ne semmisítsen meg |
|
|
|
|
|
elektromos készülékeket |
|
Fontos utasítás! |
|
|
|
a háztartási hulladékkal! |
|
|
|
|
|
|
|
|
|
|
|
|
|
|
|
|
|
Figyelem: A heggesztősisak |
|
Figyelem: Az ívhegesztő |
|
|
|
nem szolgál szem-, fülés |
|
sugarai károsíthatják |
|
|
|
arcvédőként! |
|
a szem kötőhártyáját! |
|
|
|
|
|
|
|
|
|
Újrahasznosított anyagból |
|
|
|
|
|
készült |
|
|
|
|
|
|
|
|
AUTOMATA HEGESZTŐPAJZS PSHL 2 A2
z Bevezető
Szívből gratulálunk! Cégünk értékes készüléke mellett
döntött. Az első üzembevétel előtt ismerkedjen a készülékkel. Ebből a célból olvassa el fi gyelmesen a következő használati utasítást és a biztonsági tudnivalókat.
NE ENGEDJE, HOGY GYERMEKEK
KEZÉBE KERÜLJÖN!
A heggesztősisak az oldalsó állítókerékkel fokozatmentesen beállítható DIN-védelmi szinttel rendelkezik és a csiszolási munkálatok során fellépő szikraszóródásra is beállítható. A terméket csak a leírtak szerint és a megadott felhasználási területeken alkalmazza. Gondosan őrizze meg ezt
az útmutatót. A termék harmadik félnek történő továbbadása esetén adja át a teljes dokumentációt is. Minden a rendeltetésszerűtől eltérő használat tilos és potenciálisan veszélyes. A be nem tartásból, illetve
a hibás használatból eredő károkra
a garancia nem vonatkozik és ezek nem tartoznak a gyártó felelősségi körébe sem. A készülék otthoni felhasználásra készült, közületi, vagy ipari célra nem szabad használni.
|
z Rendeltetésszerű használat |
z |
Alkatrészleírás |
|||
|
Ez a heggesztősisak védi a szemet és |
|||||
|
|
|
|
|||
|
az arcot a szikráktól, fröccsenéstől és |
|
1 |
Előtéttárcsa |
||
|
|
|
||||
|
UV-sugárzástól és automatikusan igazodik |
|
2 |
Sisakburkolat |
||
|
|
|
||||
|
a fényviszonyokhoz. Gondoskodik az azon- |
|
3 |
Napelem |
||
|
|
|
||||
|
nali, érzékelők által vezérelt elsötétítésről |
|
4 |
Háttérlemez |
||
|
|
|
||||
|
a fényív begyulladásakor, valamint magától |
|
5 |
Fejpánt |
||
|
|
|
||||
|
visszavilágosodik a heggesztés befejezé- |
|
6 |
Fejpánt hátsó szabályozó forgógombja |
||
|
|
|
||||
|
sekor (rövid visszafogás az utóizzás elleni |
|
7 |
Fejpánt oldalsó szabályozó forgógombjai |
||
|
|
|
||||
|
védelemhez). |
|
8 |
UV-szűrő |
||
|
|
|
||||
|
|
HU |
|
|
|
|
|
20 |
|
|
|
|
|
|
|
|
|
|||
|
|
|
|
|||
9 lsötétítés-szabályozó
10Tesztgombot
11Késleltetés beállítóval
12Erzékenység beállítóval
13Elem kijelzőn
14LED kapcsolóval
15Elemtartóban
16Kengyelt
17Fényív-érzékelő
zz Műszaki adatok
Szűrőkazetta mérete: |
110 x 90 x 10 mm |
Látómező: |
9,2 x 4,2 cm |
Világos állapot: |
DIN 4 |
Sötét állapot: |
DIN 9–DIN 13 |
Kapcsolási idők |
|
Világosból sötétbe: |
0,23~0,72 ms |
Sötétből világosba: |
0,15~0,45 s |
Be- / kikapcsolás: |
teljes automatika |
Energiaellátás: |
napelem |
UV- / IR-védelem: |
DIN 16 |
Üzemi hőmérséklet: |
-5 °C -tól +55 °C-ig |
Tárolási hőmérséklet: |
- 20 °C -tól +70 °C-i |
Heggesztési eljárások: MMA, MIG, MAG, TIG, plazmavágás és plazmaheggesztés
Maximális élettartam: kb. 6 év
zz A csomag tartalma
1 Automata hegesztősisak
1 Használati útmutató
 Biztonsági tudnivalók
Kérjük, olvassa el gondosan ezt a használati útmutatót és tartsa be az utasításokat. A használati
útmutató segítségével ismerkedjen meg a készülékkel, annak helyes használatával, valamint
Bevezető / Biztonsági tudnivalók
a biztonsági tudnivalókkal.
A típustáblán megtalálható a heggesztősisak minden fontosabb műszaki adata, kérjük, tájékozódjon a termék műszaki adottságairól.
A termék lézerhegesztéshez nem alkalmas.
A termék használata csak a –5 °C és +55 °C közötti hőmérséklet-tartományban megengedett.
A termék nem tűzálló.
Ne tegye ki a hegesztősisakot és az ADF szűrőt magas hőmérsékletnek vagy nedvességnek.
Ne távolítsa el az ADF szűrőt a hegesztősisak elől, és az ADF szűrő házát semmi esetre se nyissa fel a gyártó engedélye nélkül.
Kérjük, minden használat előtt ellenőrizze, hogy a hegesztés/csiszolás beállítása helyesen van-e kiválasztva.
Az előtétlapot fel kell helyezni az ADF szűrő külső oldalára.
Ellenkező esetben az ADF szűrő megsérülhet.
Ne hajtson végre semmilyen módosítást/cserét a hegesztősisakon és az ADF szűrőn engedély nélkül.
Kérjük, azonnal állítsa le a hegesztési műveletet,
HU 21

Biztonsági tudnivalók
és forduljon sürgősen
a kereskedőhöz, ha a szűrő hegesztéskor nem sötétedik be automatikusan.
Ne tisztítsa az ADF szűrőt alkohollal, benzinnel vagy hígítóval. Ne tegye az ADF szűrőt vízbe.
Az ADF-folyadékkristály reakcióideje alacsonyabb környezeti hőmérsékleten lelassul, ez azonban nincs kedvezőtlen hatással
a védelmi funkciókra.
Kérjük, azonnal cserélje ki az ADF szűrő házát, ha az megsérül vagy
megkarcolódik, mert az ilyen sérülések jelentősen rontják a kilátást és a védelmi szintet.
Kérjük, azonnal cserélje ki az ablakokat, ha azok eltörnek vagy megkarcolódnak.
A szűrőablakok cseréjekor soha ne használjon kemény tárgyakat.
Tisztítsa meg rendszeresen az ADF szűrő, az érzékelő
és a napelemek felületét.
A hegesztősisak nem ellenálló az erős ütés, robbanás vagy maró folyadékok okozta sérülésekkel szemben.
Az élettartam számos egyéni tényezőtől függ,
22 HU
így a használati gyakoriságtól, a tisztítástól, a tárolástól
és a karbantartástól. Ajánlott a rendszeres ellenőrzés, sérülés esetén pedig a csere.
Atermék gyártásához használt anyag az idő folyamán öregszik. Így a hegesztősisakon például törési sérülések keletkezhetnek. Ilyen sérülésekkel a hegesztősisak már nem képes hatékony védelmet nyújtani. Ebben az esetben a felhasználónak azonnal ki kell cserélnie
a hegesztősisakot.
Ez a termék nem használható fej feletti hegesztési és vágási feladatok elvégzésére. A termék fej feletti hegesztési vagy vágási feladatokra történő használata esetén az olvadt fémcseppek
átéghetnek az ADF szűrőn
és felhasználói sérüléseket okozhatnak.
Ha a szűrő meghibásodik, a felhasználónak haladéktalanul be kell fejeznie
a hegesztősisak használatát. A fröccsenő salak sérüléseket okozhat a szűrőn vagy a felhasználó bőrén, vagy más súlyos balesetekhez is vezethet.
Ez a termék hőálló és nehezen gyulladó anyagokat

Biztonsági tudnivalók
tartalmaz, nyílt lánggal való közvetlen érintkezés vagy magas hőmérsékletű tárgyak megközelítése esetén azonban a hegesztősisak meggyulladhat vagy olvadni kezdhet. Kérjük, az ilyen kockázatok mérséklése érdekében a hegesztősisakot csak a leírtaknak megfelelően használja.
AzADF szűrő elektronikai termék, amely nem vízzáró kialakítású. Kérjük, tartsa mindig szárazon és tisztán,
és ne tárolja nedves környezetben.
A nem rendeltetésszerű használat sérüléseket és egyéb megbetegedéseket okozhat a felhasználónak.
Kérjük, minden használat előtt ellenőrizze a szűrőt.
Ha a működése vagy külső megjelenése kétségeket vet fel, ne használja tovább.
Ha a szűrő villódzik vagy már nem sötétedik be az előírt mértékben, illetve ha más rendellenességeket tapasztal a munkavégzés során,
ne használja tovább a hegesztősisakot.
Kérjük, ne tegye ki a terméket feleslegesen napsugárzásnak.
Kérjük, csak eredeti tartozékokat használjon.
A nem eredeti tartozékok használata problémákat okozhat a védelmi funkciók, a használhatóság és
a termék által nyújtott védelmi szint tekintetében.
Élettartam túllépése (elégtelen védelem) – Minden használat előtt ellenőrizze a védőszemüveg épségét
és élettartamának lejártát.
Szűrőhatás nélküli védőszemüveg használata optikai sugárzás ellen (szemkárosodás) – Minden használat előtt ellenőrizze, hogy a szemvédelem szintje megfelel-e az előírt skálaértéknek.
Termék használata fröccsenés ellen (elégtelen védelem) –
Mindig ellenőrizze, hogy meg- felelő-e a védelmi hatásfok.
Termék használata nagyméretű porszemcsék ellen
(sérülés, baleset).
A szemvédelmi felszerelést kizárólag a használati utasításban leírt munkákhoz szabad használni. A kezelési
útmutatóban leírtaktól való eltérés sérülésekhez és balesetekhez vezethet.
Sérült termékek használata (elégtelen védelem) – Minden használat előtt ellenőrizze
a védőszemüveg épségét és
élettartamának lejártát.
HU 23

Biztonsági tudnivalók
Védőszemüveg szaksze rűtlen használata (sérülés, baleset). A szemvédőt kizárólag a használati utasításban leírt munkákhoz szabad használni. Az utasításoktól való eltérés sérülésekhez és balesetekhez vezethet.
A készüléket 16 éves kor feletti gyermekek, valamint korlátozott fizikai, érzékszervi vagy szellemi képességgel élő vagy nem megfelelő tapasztalattal és tudással rendelkező személyek csak felügyelet mellett, illetve
a készülék biztonságos használatára vonatkozó felvilágosítás és a lehetséges veszélyek megértése után használhatják. A gyermekek nem játszhatnak a készülékkel. A tisztítást és az ápolást gyermekek felügyelet nélkül nem végezhetik.
Az automatikus elsötétítésű heggesztősisak nem alkalmas lézerés autogénheggesztéshez.
Soha ne tegye a heggesztősisakot forró felületre.
Semmi esetre se nyissa fel a heggesztősisakot.
Ne végezzen változtatásokat vagy javításokat a heggesztősisakon. Ilyet csak képzett szakszemélyzet végezhet el.
24 HU
Ügyeljen arra, hogy minden heggesztés előtt
állítsa be az automatikus elsötétítést.
A biztonsági reteszt nem szabad kinyitni. Ez védi
a szűrőt a szenynyeződésektől és a sérüléstől.
Ha a szűrő nem sötétedik el automatikusan, azonnal hagyja abba a heggesztést
és lépjen kapcsolatba a gyártóval.
Csak -5 °C és +55 °C között használja a heggesztősisakot. A szűrő reakcióideje lelassul, amennyiben ezt
a hőmérséklettartományt elhagyjuk.
Rendszeresen tisztítsa meg a szűrőt, a sisak felületét
és a napelemeket.
Cserélje ki a védőreteszt, ha az megkarcolódik, vagy megsérül.
A heggesztősisak nem óv a becsapódás ellen.
A használat, tisztítás és
a tárolás módja csökkentheti a kb. 6 éves élettartamot. A kémlelőlemez karcosodása, vagy bármilyen látható sérülése esetén azonnal cserélje ki a kémlelőlemezt, ill. a hegesztőmaszkot.
 FIGYELEM! Az azt viselő személy bőrével kapcsolatba kerülő anyagok az erre érzékenyeknél allergiás reakciókat válthat ki.
Biztonsági tudnivalók / Üzembe helyezés
zz Üzembe helyezés
Útmutatás: Csak a beépített háttérlemezzel 4 használja a heggesztősisakot. Útmutatás: Tartsa az UV-szűrő érzékelőit 8 tisztán.
 FIGYELEM! A szemvédőberendezések a nagysebességű részecskék becsapódása során az ütközés átadásával veszélyyeztetheti az azt viselő személyt, ha szokványos korrek- ciós-szemüveggel együtt viseli.
 FIGYELEM! Amennyiben extrém hőmérséklet mellett a nagysebességű részecske elleni védelem szükséges, úgy
a választott szemvédő-berende- zésnek rendelkeznie kell a becsapódási intenzitás betűjele után közvetlenül egy T betűnek kell állnia, tehát FT, BT, vagyAT.
Ha a becsapódás intenzitását jelző betű után hiányzik a T- betű, akkor a szemvédőberendezést csak szobahőmérsékleten szabad a nagysebességgel becsapódó részecskék ellen bevetni.
 A csomagolás kinyitása után haladéktalanul ellenőrizze, hogy a szállítási terjedelem hiánytalan és ép. Ha a szállítmány hiányos vagy hibás, azonnal vegye fel a kapcsolatot az eladóval. Meghibásodás esetén ne működtesse a készüléket.
 Minden használatbavétel előtt ellenőrizze, hogy a heggesztősisak és
a védőtárcsa érintetlen-e. Ha a védőtárcsán karcolás, repedés, vagy egyenetlenség látszik, akkor azt használat előtt feltétlenül ki kell cserélni, mivel egyébként súlyos sérülések keletkezhetnek.
Távolítsa el a védfóliát a retesz belső és külső oldaláról.
Állítsa be a heggesztősisakot a fejpánt 5 segítségével. Nyomja be a beállítógombokat 6 a heggesztősisak rögzítéséhez és a beállítógombot 7
a heggesztősisak kioldásához.
A beállítás során ügyeljen arra, hogy a heggesztősisak a fején a lehető legmélyebben és az arcához a lhető legközelebb legyen.
A heggesztési folyamat előtt állítsa be a megfelelő elsötétedési szintet (lásd a következő táblázatot). Az elsötétedési szintet 9 és 13 között lehet állítani az elsötétítés-szabályozó 9 tekerésével a sisak külső oldalán.
 FIGYELEM! Az elsötétítés-szabályozó 9 végső beállítási helyzete a „Grind / Kiütés“. Ha az elsöétítés-szabályozó 9 erre a helyzetre van beállítva, úgy az automatikus elsötétítés deaktivált állapotban van. Ezt a beállítást csak akkor használja, ha a heggesztősisakot nem heggesztéshez szeretné használni.
HU 25
Üzembe helyezés
Az automatikus elsötétítés ekkor nem aktív.Minden használat előtt ellenőrizze
a fénysűrűséget.
A tesztelés lefolytatása: Közelítsen egy 40 w-os külső fényforrást a kémlelőtárcsához és ellenőrizze, hogy a tárcsa elsötétül, ill. kivilágosodik-e. Csavarja a sötétítő-szabályzót 9 a „jelzéstől” kezdve az óramutató járásával megegyező irányba a következő fokozatra. Ezután automatikusan sötétedni kezd a szűrő. Ha a sötétítő-
szabályzót 9 az óramutató járásával ellentétes irányba visszatekeri
a „jelzésre”, akkor a szűrő automatikus sötétedése megszűnik.
Az UV szűrő/a napelem cseréjéhez nyomja ki a szűrő mindkét oldalán
a rögzítőfület (lásd a B képet). Ezután emelje meg a szűrőt az egyik ujjával a felső bemélyedésnél.
Ezt követően egyszerűen húzza le a 9 -es jelű sötétítésszabályozót
Táblázat az elsötétítési szint beállításához
a hegesztősisak külsejéről, majd oldja ki az alatta lévő anyát. Miután leoldotta az anyát a menetről, teljesen leválaszthatja a szűrőt a hegesztősisakról.
(Wariant: czarny)
Az UV-szűrő/a napelem cseréjéhez húzza ki a kengyelt 16 a szűrő alsó szélén a két előre álló biztosítócsap felett (lásd a C képet). Hajtsa fel
a kengyelt (lásd a D képet). A hüvelykujjával alul középen emelje meg a szűrőt, és húzza ki azt lefelé.
Ezt követően egyszerűen húzza le
a9 -es jelű sötétítésszabályozót
ahegesztősisak külsejéről, majd oldja
ki az alatta lévő anyát. Miután leoldotta az anyát a menetről, teljesen leválaszthatja a szűrőt a hegesztősisakról.
(Wariant: z płomieniami)
Ha megnyomja a tesztgombot 10 , ellenőrizheti, hogy működik-e
a hegesztősisak sötétítő funkciója.
Fénysugáráram (Ampere)
1,5 6 10 15 30 40 60 70 100 125 150 175 200 225 250 300 350 400 450 500 600
Grind |
|
|
Köszörülési funkció – az automatikus elsötétítés nem aktív |
|
|
|
|
||||||||||||||||||||||||
|
|
|
|
|
|
|
|
|
|
|
|
|
|
|
|
|
|
|
|
|
|
|
|
|
|
|
|
|
|
|
|
SMAW |
|
|
8 |
|
|
|
|
|
9 |
|
10 |
|
11 |
|
|
12 |
|
|
|
|
13 |
|
|
|
14 |
|
|||||
|
|
|
|
|
|
|
|
|
|
|
|
|
|
|
|
|
|
|
|
|
|
|
|
|
|
|
|
|
|
|
|
MAG |
|
|
8 |
|
|
|
|
|
9 |
|
|
10 |
|
|
|
11 |
|
|
|
|
12 |
|
|
|
13 |
|
14 |
||||
|
|
|
|
|
|
|
|
|
|
|
|
|
|
|
|
|
|
|
|
|
|
|
|
|
|
|
|
|
|
|
|
TIG / |
|
8 |
|
|
|
9 |
|
|
10 |
|
|
|
11 |
|
|
|
12 |
|
|
13 |
|
|
|
|
|
|
|||||
GTAW |
|
|
|
|
|
|
|
|
|
|
|
|
|
|
|
|
|
|
|
|
|||||||||||
|
|
|
|
|
|
|
|
|
|
|
|
|
|
|
|
|
|
|
|
|
|
|
|
|
|
|
|
|
|
|
|
MIG |
|
|
|
|
|
9 |
|
|
|
|
|
|
|
|
10 |
|
|
|
11 |
|
|
12 |
|
13 |
|
14 |
|
|
|||
(schwer) |
|
|
|
|
|
|
|
|
|
|
|
|
|
|
|
|
|
|
|
|
|
|
|||||||||
|
|
|
|
|
|
|
|
|
|
|
|
|
|
|
|
|
|
|
|
|
|
|
|
|
|
|
|
|
|
|
|
MIG |
|
|
|
|
|
10 |
|
|
|
|
|
|
|
|
|
|
11 |
|
12 |
|
13 |
|
14 |
|
|
||||||
(leicht) |
|
|
|
|
|
|
|
|
|
|
|
|
|
|
|
|
|
|
|
|
|||||||||||
|
|
|
|
|
|
|
|
|
|
|
|
|
|
|
|
|
|
|
|
|
|
|
|
|
|
|
|
|
|
|
|
PAC |
|
|
|
|
|
9 |
|
|
|
|
|
|
10 |
11 |
|
|
|
12 |
|
|
13 |
|
|
|
|
|
|
||||
PAW |
4 |
5 |
|
6 |
|
7 |
|
8 |
|
9 |
|
10 |
|
|
|
11 |
|
|
12 |
|
|
|
|
|
|
|
|
||||
26 HU

... / Tisztítás és karbantartás / Tárolás / Környezetvédelmi tudnivalókés ...
SMAW: |
Heggesztés |
PAC: |
Plazmavágás |
|
köpenyelektródákkal |
PAW: |
Plazmaheggesztés |
MIG (nehéz): |
MIG heggesztés |
Grind: |
Köszörülési funkció: Az |
|
nehézfémekkel |
|
automatikus elsötétítés |
MIG (könnyű): |
MIG heggesztés könnyűfé- |
|
nem aktív. A beállítást csak |
|
mekkel és ötvözeteivel |
|
akkor használja, ha nem |
TIG / GTAW: |
Inertgáz-heggesztés |
|
hegesztés céljából viseli a |
MAG: |
Heggesztés |
|
hegesztősisakot. |
|
fém-aktívgázzal |
|
|
A késleltetés beállítóval 11 a hegesztési folyamattól függően változtathatja, hogy az automatikus elsötétítő
a hegesztési folyamat befejezése után rögtön kikapcsoljon-e vagy sem. A min. fokozaton az automatikus elsötétítés közvetlenül kikapcsol. Minél tovább tekeri a szabályzót az óramutató járásával egyező irányba a max. fokozat felé, annál hosszabban marad az elsötétítés a hegesztési folyamat után. Ez a funkció nagyon hasznos utánizzáskor.
Az érzékenység beállítóval 12 szabályozhatja az érzékelő fényérzékenységét. Gyenge fényviszonyok esetén beállíthatja a szabályzót max. fokozatra, hogy az automatikus sötétítés gyenge fénynél is működjön. Ennél
a kiegészítő funkciónál is saját igényei szerint állíthatja be az érzékelő fényérzékenységét.
Az alkonyatérzékelő sötét fényviszonyok esetén bekapcsolja a LED lámpákat, világosban pedig lekapcsolja azokat. Ez a funkció arra szolgál, hogy sötét környezetben megvilágítja a hegesztendő tárgyat. A LED lámpákat a kapcsolóval 14 ki-be kapcsolhatja. Gyenge töltöttségük esetén kicserélheti az elemtartóban lévő elemeket. Tolja ehhez az elemtartó bal oldalát balra 15
(lásd az A. ábrát). Az elem gyenge töltöttségi szintjét a kijelzőn 13 található piros jelzőlámpa mutatja.
zz Tisztítás és karbantartás
A sisak burkolatának 2 tisztításához ne használjon maró vagy súroló hatású tisztítószereket.
Az UV-szűrőt 8 soha ne érje víz.A terméket egy puha és száraz, tiszta alkohollal, vagy fertőtlenítőszerrel benedvesített kendővel tisztítsa.
zz Tárolás
Tartsa a készüléket száraz helyen, a gyermekektől távol.
zzKörnyezetvédelmi tudnivalókés megsemmisítési adatok
Nyersanyag visszanyerése hulladékkezelés helyett!
Az eszközt, a tartozékot és a csomagolást környezetvédelmi újrahasznosításba kell juttatni. Ne dobja az automata-heggesz- tősisakot a házi szemetesbe, tűzbe, vagy vízbe. Ha lehetséges, az üzemképtelen készülékeket újra kell hasznosítani. Kérjen segítséget helyi kereskedőjétől.
HU 27
Hibák elhárítása / Tudnivalók a garanciával és aszervizeléssel kapcsolatban
zz Hibák elhárítása
Hiba |
Ok |
Megoldás |
||||
A szűrő enm rendszeresen |
A protektor szennyezett, |
Tisztítsa meg, vagy cserélje |
||||
sötétedik el, ill. vibrál. |
vagy sérült. |
ki a protektort. |
||||
|
A fényív-érzékelő nem |
Tisztítsa meg |
||||
|
tiszta. |
a fényív-érzékelő felületét. |
||||
|
A heggesztőáram túl |
Állítsa be az érzékenységet |
||||
|
alacsony. |
a max. szintre. |
||||
A reakció lelassult. |
A környezeti hőmérséklet túl |
Csak -5 °C és + +55 °C |
||||
|
alacsony / magas. |
között használja a hegges- |
||||
|
|
|
|
ztősisakot. |
||
|
Az érzékenység túl |
Állítsa az érzékenységet |
||||
|
alacsony. |
magasabb szintre. |
||||
Rosszul kilátás. |
A protektor / a védőtárcsa |
Tisztítsa meg a protektort és |
||||
|
szennyezett, vagy sérült. |
a védőtárcsát. |
||||
|
A védőfólia nem lett |
Távolítsa el a védőfóliát. |
||||
|
eltávolítva a védőtárcsáról. |
|
|
|
||
|
A környezet fényereje nem |
Világosítsa ki |
||||
|
elegendő. |
a munkakörnyezetet. |
||||
|
Nem megfelelő elsötítési |
Állítsa be újra az elsötétítési |
||||
|
szint van beállítva. |
szintet. |
||||
A heggesztősisak elcsúszik. |
A fejpánt |
|
hibásan van |
Állítsa be újra a fejpántot |
|
|
5 |
5 |
|||||
|
|
|||||
|
beállítva. |
szorosabbra. |
||||
zz Tudnivalók a garanciával és aszervizeléssel kapcsolatban
A Creative Marketing Consulting Kft. garanciája
Tisztelt Ügyfelünk, Ön erre a készülékre a vásárlás időpontjától számított 3 év garanciát kap. Ha a készüléken hiányosságot tapasztal, akkor a termék eladójával szemben törvényes jogok illetik meg Önt. Ezeket a törvényes jogokat a következőkben ismertetett garancia vállalásunk nem korlátozza.
28 HU
zz Garanciális feltételek
A garanciális idő a vásárlás dátumával kezdődik. Kérjük, jól őrizze meg a pénztári blokkot. Ez a bizonylat szükséges
a vásárlás tényének az igazolásához.
Ha a készülék vásárlásától számított három éven belül anyagvagy gyártási hiba merül fel, akkor a választásunk szerint a készüléket ingyen megjavítjuk vagy kicseréljük. Garanciális szolgáltatásunk előfeltétele, hogy Ön ezen a hároméves határidőn belül a meghibásodott készüléket és
a vásárlás igazolását bizonyító számlát (pénztári blokkot) részünkre bemutassa és írásban röviden ismertesse a hibát és a hiba felléptének időpontját.

Tudnivalók a garanciával és aszervizeléssel kapcsolatban
Ha garanciánk kiterjed erre a hibára, akkor visszakapja a megjavított terméket vagy egy új terméket kap vissza. Javításkor vagy a termék kicserélésekor nem indul újra
a garanciális idő.
zz A garancia terjedelme
A készüléket szigorú minőségi előírások betartásával gondosan gyártottuk, és szállítás előtt lelkiismeretesen ellenőriztük.
A garancia az anyagvagy gyártáshibákra vonatkozik. A garancia nem terjed ki azokra a termékrészekre, melyek normál kopásnak vannak kitéve és ezért azok fogyóeszköznek tekinthetők, illetve a törékeny részekre, pl. kapcsolók, akkuk, vagy üvegből készült részek.
A garancia megszűnik, ha a terméket megrongálták, nem szakszerűen kezelték vagy karbantartották. A termékék szakszerű használatához pontosan be kell tartani
a kezelési utasításban megadott útmutatásokat. Azokat az alkalmazási célokat és cselekményeket, melyeket a kezelési utasítás nem javasol vagy melyektől az óva int, felétlenül el kell kerülni.
A termék kizárólag magánhasználatra, nem ipari használatra készült. A garancia érvényét veszti viszszaélésszerű vagy szakavatatlan kezelés, erőszak alkalmazása vagy olyan beavatkozások esetén, amelyeket az engedélyünkkel nem rendelkező szervizekkel végeztettek.
a készülék hátvagy alsó oldalán lévő címkén.
Ha működési hiba vagy egyéb hiányosság lépne fel, akkor először telefonon vegye fel a kapcsolatot a következőkben megnevezett szervizosztállyal vagy küldjön e-mailt. Ha a szóban forgó termék meghibásodott, akkor a vásárlási bizonylat (pénztári blokk) mellékelésével, a hiba leírásával és keletkezési idejének
megadásával, portómentesen elküldheti az Önnek megadott szerviz címére.
Utalás:
A www.lidl-service.com weboldalról letöltheti ezt és még sok más kézikönyvet, termékbemutató videót és szoftvert is.
zz Szerviz
Csak eredeti tartozékokat használjon:
Típus: Fekete
(PSHL 2 A2, Cikkszám.:2169):
•Előtéttárcsa (CMC 1B CE): 110,8 mm x 90 mm x 1,0 mm
•Háttérlemez (CMC 1F CE): 98,6 mm x 46 mm x 0,8 mm
Típus: lángokkal
(PSHL 2 A2, Cikkszám.:2170):
•Előtéttárcsa (CMC 1B CE): 109,6 mm x 86 mm x 1,0 mm
•Háttérlemez (CMC 1F CE): 98,6 mm x 46 mm x 0,8 mm
zzGaranciális ügyek lebonyolítása
Ügyének gyors elintézhetősége céljá- |
Elérhetőségünk: |
|
|
|
|
HU |
|
|
|
|
|
ból, kérjük kövesse az alábbi útmutatást: |
|
|
|
|
|
Kérjük, hogy minden ügyintézéskor tartsa |
Név: |
Europa Kft. |
|
|
|
kéznél a pénztári blokkot és a cikkszámot |
Internetcím: |
www.cmc-creative.de |
|
|
|
(pl. IAN) a vásárlás tényének az igazolásá- |
E-Mail: |
service.hu@cmc-creative.de; |
|
||
ra. A cikkszámot megtalálja az adattáblán, |
|
info@europa-kft.de |
|
|
|
a begravírozásban vagy az utasítás |
Telefon: |
0 6 85 550 660 |
|
|
|
címlapján (lásd lent balra) vagy pedig |
Székhely: |
Németország |
|
|
|
|
|
HU |
|
29 |
|
|
|
|
|
||
|
|
|
|
||
Tudnivalók a garanciával és aszervizeléssel kapcsolatban / Jelmagyarázat
IAN 310884
Kérjük vegye figyelembe, hogy a következő cím nem szerviz cím. Először vegye fel
a kapcsolatot a fent megnevezett szervizzel.
Cím:
C.M.C. Creative Marketing & Consulting
GmbH
Katharina-Loth-Str. 15
DE-66386 St. Ingbert
NÉMETORSZÁG
Alkatrész rendelése:
www.lidl.com/contact-us
zz Jelmagyarázat
Biztonsági tárcsák a DIN EN 166 (CXXXXCMC, CXXXXCMC):
•Előtéttárcsa: CMC 1 B CE
CMC = gyártói rövidítés 1 = optikai osztály
B = mechanikai szilárdság (közepes erejű lökés, 120 m/s)
CE = CE-jel
•Háttérlemez: CMC 1 F CE
CMC = gyártói rövidítés 1 = optikai osztály
F = mechanikai szilárdság (kis erejű lökés, 45 m/s)
CE = CE-jel
ADF a DIN EN 379:
4/9-13 CMC 1/1/1/2/379 CE (CXXXXCMC)
Magyarázat:
4 =világos állapot 9–13 =sötét állapotok CMC = gyártói rövidítés
Számjegy 1 = optikai osztály Számjegy 2 = szórt fény osztály
30 HU
Számjegy 3 = homogenitás-osztály Számjegy 4 = szögfüggvény-osztály 379 = vizsgálati szabvány
CE = CE-jel
Heggesztősisak-héj: CMC EN 175 F CE
(CXXXXCMC, CXXXXCMC)
A gyártó azonosítója: CMC
A vonatkozó szabvány száma: EN 175 Alkalmazási terület(ek) (adott esetben): S, F, B
Tömeg grammban (adott esetben)
A 2169/2170 cikkszámű hegesztősisakok védettségi besorolása: F
CE = CE-jel
Jelzés |
Védelmi |
A felhasználási |
|
jelleg |
terület |
|
|
leírása |
S |
Növelt |
Mechanikai |
|
szilárdság |
szilárdság |
F |
Becsapódás |
Mechanikai |
|
alacsony |
szilárdság |
|
energiával |
|
B |
Becsapódás |
Mechanikai |
|
közepes |
szilárdság |
|
energiával |
|
Ha az F, B és A jelek sem
a kémlelőtárcsára, sem pedig
a hordozótestre nem érvényesek, úgy a teljes szemvédő-készülék alacsony foka ismerhető fel.
Tanúsítványt kiadó szerv:
DIN CERTCO Gesellschaft für Konformitätsbewertung mbH Alboinstrasse 56
12103 Berlin
Notified body number 0196
 Loading...