


Olympia Business Systems Vertriebs GmbH Zum Kraftwerk 1
D-45527 Hattingen www.olympia-vertrieb.de
Information Status
04/2014 - Ident.-No.: 042014-3
Gi
Before starting to read the information, fold out the page containing the illustrations and then familiarise yourself with all the functions provided by the device.
Gi
Programmable Radiator Thermostat
RT2000
Operating and Safety Instructions
Gi Operating and Safety Instructions
IAN 101034 |
Gi |

1  6
6
2


3


 7
7
4 


 8
8
|
5 |
9 |
1 |
|
2 |
|
|
15 |
|
10 |
13 |
12 |
11 |
14 |
|
|
|
3 |
|
4 |
14 |
13 |
13 |
|
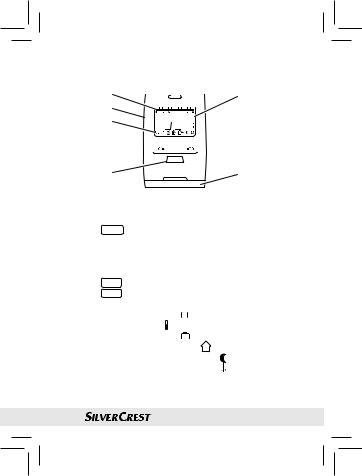
1Heating times
2USB port
3AUTO or MANU mode active
4a |
MENU button – opens the main menu (starting from the standard |
|
|
display); when a menu is open, the display moves one menu |
|
|
level back each time the button is pressed |
|
4b |
OK |
button – confirm a setting |
4c |
TIME |
button – timer function |
5Adjusting wheel
6Child safety lock 
7 Battery is flat
8a Holiday function 
8b Comfort temperature 

8c Energy-save temperature
8d Frost monitoring function 


9Battery compartment
10Union nut
11Maximum value, radiator
12Thermostat head
13Groove
14Spigot
15Plunger extension
Gi
Scope of Delivery
1Programmable radiator thermostat, RT2000
1Coupling ring
3Adapters (Danfoss RA, Danfoss RAV, Danfoss RAVL)
1Operating instructions
2Batteries (AA mignon), 1.5V
14

Contents
Introduction 7
General Function |
7 |
Intended Use |
8 |
Operating and Display Elements |
9 |
Settings |
10 |
Technical Data |
12 |
Scope of Delivery |
13 |
Safety Instructions 13
Safety Information on Batteries |
14 |
Inserting/Changing the Batteries 15 Setting the Date and Time 16 Installation 18
Disassembling the Old Thermostat Head |
19 |
Adapters for Danfoss |
20 |
Disassembly 22 Adaptation 23 Operating Modes 24
MANU Mode |
24 |
AUTO Mode |
24 |
Setting the Heating and Energy-save Times |
25 |
Setting an Individual Programme |
26 |
Setting Comfort and Energy-save Temperatures |
27 |
Timer Function |
28 |
Offset |
29 |
Gi 5

Window Function |
29 |
Holiday Function |
31 |
Key Lock |
32 |
Heating Pause |
32 |
Standby (LC Display) |
33 |
Summertime/Wintertime |
34 |
Version Number |
34 |
Resetting the Factory Settings |
35 |
Frost Monitoring Function |
35 |
Calcification Protection Function |
36 |
Optional Accessories 36
USB Programming Flash Drive |
36 |
Troubleshooting and Maintenance 37 Cleaning 38 Disposal 39 Guarantee 41 Manufacturer 43
6 Gi
Introduction
Congratulations on the purchase of your new device. You have chosen
a high quality product. Familiarise yourself with the device before putting it into operation for the first time. Read the following operating instructions and safety information carefully. Only use the device as described and for the purpose for which it was intended. Keep this operating instruction manual in a safe place. Hand over all the documents with the device if it is transferred to third-parties.
General Function
The programmable radiator thermostat RT2000, with its pre-programmed and individually adjustable heating and energy-sav- ing times, enables you to regulate the room temperature according to defined times. The device moves a valve which controls the
Gi 7

heat flow to the radiator. The programmable RT2000 radiator thermostat fits on all common radiator valves and is easy to install – there is no necessity to drain heating water or interfere with the heating system.
Intended Use
The programmable radiator thermostat RT2000, subsequently referred to as "device", serves to regulate a common radiator valve. The device may only be operated indoors. Any use other than that described in this operating manual is considered unintended use and results in loss of rights related to the terms of guarantee and exemption of liability. This also applies to any reconstruction and modification. The device is exclusively intended for private use.
8 Gi
Operating and Display
Elements
1  6
6
2


3


 7
7
4 


 8
8
5 |
9 |
1Heating times
2USB port
3AUTO or MANU mode active 4a MENU button – opens the main
(starting from the standard display); when a menu is open, the display moves one menu level back each time the button is pressed
4b OK button – confirm a setting
4c TIME button – timer function
5Adjusting wheel
6Child safety lock 
7 Battery is flat
8a Holiday function
8b Comfort temperature 

8c Energy-save temperature
8d Frost monitoring function 


9Battery compartment
Gi 9

Settings
On pressing the MENU button, a menu opens in which to define settings. The various items can be selected by means of the adjusting wheel. Press the OK button to select an option and use the adjusting wheel to modify the corresponding parameters. Press the
OK button to confirm the entry, press the
MENU button to move one level back in the sequence of menus.
MODE Operating mode:
AUTO = automatic mode MANU = manual mode
PROG Timer programme
TEMP Comfort and energy-save temperature
ZEIT Date and time FENS Window function
RES Reset the default factory settings
10 Gi

ADAP Adaptation to valve adjustment URLA Holiday function
INST Installation function (only fit the device on the coupling ring in this position)
OFFS Adapt the temperature to local characteristics (or subjective perception of temperature)
STBY Standby mode
DST Summertime/Wintertime VERS Version number
Gi 11
Technical Data
Model |
RT2000 |
Supply voltage |
3 VDC |
Max. power consump- |
100 mA |
tion |
|
Batteries |
2 x AA mignon, |
|
1.5 V |
Battery service life |
Approx. 1 year |
Display |
LC display |
Dimensions (mm) |
58 x 71.5 x 90 |
Connection |
M30 x 1.5 |
Ambient temperature |
+5 to +55 °C |
Surface temperature |
Max. +90 °C |
|
(on the radiator) |
Linear stroke |
4.3 mm |
We reserve the right to make technical changes to improve the product.
12 Gi
Scope of Delivery
1 Programmable radiator thermostat
RT2000
1 Coupling ring
3Adapters (Danfoss RA, Danfoss RAV, Danfoss RAVL)
1Operating instructions
2Batteries (AA mignon), 1.5V
Safety Instructions
RISK OF FATAL AND PER-
 SONAL INJURY TO INFANTS AND CHILDREN! Never leave children unattended when the packaging material is nearby. The packaging material
represents a risk of suffocation. Children often underestimate the risks involved. Always keep children away from the packaging material. The device is not a toy.
Gi 13
Do not open the device; it does not contain any parts which can be
serviced by the user. In the event of any faults, send the device to the Service Department.
This device can be used by children from the age of 8 and persons with reduced physical, sensory or mental
capabilities or lack of experience and knowledge when they are under supervision or have received instruction regarding safe use of the device and any risks involved in respect of its use. Children must not play with the device. The device must not be cleaned or serviced by children without appropriate supervision.
Safety Information on Batteries
Never attempt to recharge non-rechargeable batteries and do
14 Gi
not short circuit or open them. This could result in the risk of overheating, fire or bursting. Never throw batteries in a fire or water. The batteries could explode.
Leaking batteries could damage the device. Be particularly careful when
handling damaged or leaking batteries and wear protective gloves. Switch the device off when it is not in use to save the batteries. Remove the batteries if the device will be out of use for a longer period.
Inserting/Changing the Batteries
□□
□□
Remove the battery compartment cover.
Insert the batteries (2 x AA mignon) in the battery compartment, ensuring correct polarity (pay attention to the marking in the battery compartment).
Gi 15
Property damage!
Risk of damage to the device through reverse poling when inserting the batteries.
Pay attention the batteries are correctly aligned when inserted.
□□ Replace the battery compartment cover. □□ The service life of new batteries is approx.
1 year. The battery icon appears when the batteries need to be changed.
NOTE: Do not use rechargeable batteries to operate the device.
Setting the Date and Time
After inserting the batteries, the year flashes.
Set the date and time.
□□ Use the adjusting wheel to set the year.
Confirm by pressing OK .
□□ Use the adjusting wheel to set the month.
16 Gi
 Loading...