


STEAM IRON SDBK 2200 C3
STEAM IRON |
ŻELAZKO NA PARĘ |
Operating instructions |
Instrukcja obsługi |
GŐZÖLŐS VASALÓ |
PARNI LIKALNIK |
Használati utasítás |
Navodila za uporabo |
NAPAŘOVACÍ ŽEHLIČKA |
NAPAROVACIA ŽEHLIČKA |
Návod k obsluze |
Návod na obsluhu |
DAMPFBÜGELEISEN |
|
Bedienungsanleitung |
|
IAN 102540
Before reading, unfold the page containing the illustrations and familiarise yourself with all functions of the device.
Przed przeczytaniem proszę rozłożyć stronę z ilustracjami, a następnie proszę zapoznać się z wszystkimi funkcjami urządzenia.
Olvasás előtt kattintson az ábrát tartalmazó oldalra és végezetül ismerje meg a készülék mindegyik funkcióját.
Pred branjem odprite stran s slikami in se nato seznanite z vsemi funkcijami naprave.
Před čtením si otevřete stranu s obrázky a potom se seznamte se všemi funkcemi přístroje.
Pred čítaním si odklopte stranu s obrázkami a potom sa oboznámte so všetkými funkciami prístroja.
Klappen Sie vor dem Lesen die Seite mit den Abbildungen aus und machen Sie sich anschließend mit allen Funktionen des Gerätes vertraut.
GB |
Operating instructions |
Page |
1 |
PL |
Instrukcja obsługi |
Strona |
11 |
HU |
Használati utasítás |
Oldal |
21 |
SI |
Navodila za uporabo |
Stran |
31 |
CZ |
Návod k obsluze |
Strana |
41 |
SK |
Návod na obsluhu |
Strana |
51 |
DE / AT / CH |
Bedienungsanleitung |
Seite |
61 |

CONTENT |
PAGE |
|
|
Introduction |
2 |
|
|
Intended Use |
2 |
|
|
Items supplied |
2 |
|
|
Operating Elements |
2 |
|
|
Technical data |
2 |
|
|
Safety instructions |
3 |
|
|
Before the First Use |
5 |
|
|
Tips for utilisation |
5 |
|
|
Filling the water tank |
6 |
|
|
Plugging in and ironing |
7 |
|
|
Steam ironing |
7 |
|
|
Ironing with steam blast |
7 |
|
|
Temporarily setting the steam iron aside |
7 |
|
|
Taking the steam iron out of service |
8 |
|
|
Anti-drip function |
8 |
|
|
Cleaning |
8 |
Self-cleaning function . . . . . . . . . . . . . . . . . . . . . . . . . . . . . . . . . . . . . . . . . . . . . . . . . . . . . . . . .8 Housing . . . . . . . . . . . . . . . . . . . . . . . . . . . . . . . . . . . . . . . . . . . . . . . . . . . . . . . . . . . . . . . . . . .8 Metal parts . . . . . . . . . . . . . . . . . . . . . . . . . . . . . . . . . . . . . . . . . . . . . . . . . . . . . . . . . . . . . . . .8
Troubleshooting |
9 |
|
|
Disposal |
9 |
|
|
Warranty and Service |
9 |
|
|
Importer |
9 |
Read the operating instructions carefully before using the device for the first time and preserve this booklet for later reference. Pass this manual on to whoever might acquire the device at a future date.
- 1 -
STEAM IRON |
|
Operating Elements |
|
|
|
Introduction |
|
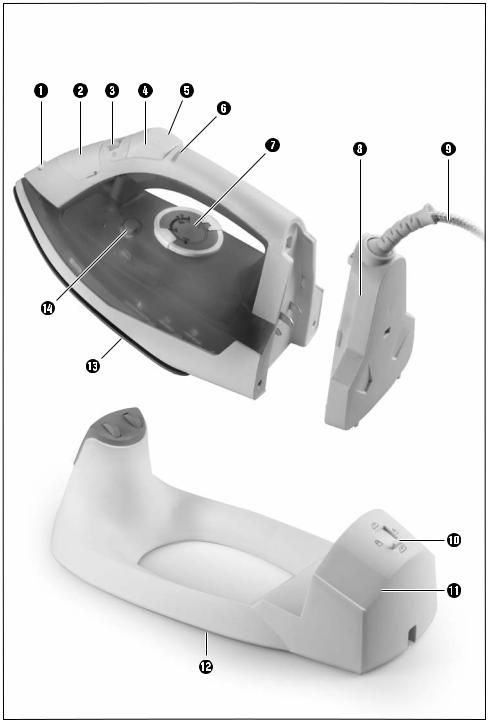
1 Water jet |
|
2 Filler opening for the water tank |
|
|
|
3 Steam regulator |
Congratulations on the purchase of your new appli- |
|
4 Button for fine water spray |
ance. |
|
5 Button for steam blast |
You have clearly decided in favour of a quality |
|
6 Temperature control lamp |
product. These operating instructions are a part of |
|
7 Temperature regulator |
this product. They contain important information in |
|
8 Cable base |
regard to safety, use and disposal. Before using the |
|
9 Power cable |
product, familiarise yourself with all of these operating |
|
0 Unlocking switch |
and safety instructions. Use the product only as des- |
|
q Station |
cribed and only for the specified areas of application. |
|
w Cable retainer |
In addition, pass these documents on, together with |
|
e Ironing sole |
the product, to any future owner. |
|
r Self-clean button |
Intended Use |
|
Technical data |
|
The steam iron is intended exclusively for the ironing |
|
Power Supply Voltage: |
220 - 240 V ~, |
of textiles. The iron may only be used indoors and |
|
|
50/60 Hz |
in private households. All other use is deemed |
|
max. power consumption: |
2200 W |
improper use.
Items supplied
Steam iron
Station
Cable base
Measuring beaker
Operating instructions
- 2 -

Safety instructions
 There is a risk of burns!
•When it is hot, hold the steam iron only by the handle.
•Children should be supervised to ensure that they do not play with the appliance.
•Never hold your hand over the steam spray and do not touch hot metal parts.
•Do not open the water reservoir filler opening while the iron is in use. Allow the steam iron to cool down first and remove the plug from the power socket.
•While the appliance is heating up or cooling down, the iron and its connecting cable must be kept out of reach of children younger than 8 years old.
 CAUTION: hot surfaces!
 Risk of injury! Risk of fire!
•Never leave a hot steam iron unattended if it is switched on or connected to the mains power supply.
•Only put the steam iron into storage when it has cooled down completely.
•This steam iron may only be used and set down on a stable surface.
•When ironing, use only the temperatures detailed in the garment care instructions, or those suitable for the material. Otherwise, you could damage the
textiles. Should care instructions not be given or known, start with the lowest temperature setting.
•NEVER allow children to use the steam iron.
•Place the station on a level and heat-resistant surface. The station must be stable when you place the steam iron on it.
•If you want to put the steam iron down, place it only on the cable base or connect it to the station.
•Place the iron only on a level and heat-resistant surface. The iron must be stable.
•The iron may only be used with the supplied dock (i.e. cable base).
- 3 -

Danger of electrical shocks!
•The voltage of the power supply must comply with that given on the appliance’s rating plate.
•To avoid potential risks, arrange for a defective appliance to be checked and repaired by a qualified workshop, or contact our Customer Service Department.
•To avoid risks, arrange for defective plugs and/or power cables to be replaced immediately by qualified technicians or our Customer Service Department.
•To disconnect from the power source, pull only on the plug itself, never on the cable.
•Never bend (kink) or crush the power cable. Arrange it in such a way that it cannot come into contact with hot surfaces and so that no-one can step on it or trip over it.
•Remove the plug from the power socket after every use, before cleaning and when refilling with water.
•Always unwind the power cable fully before switching on and do not use an extension cable.
•Never touch the power cable or the power plug with wet hands.
•Never use the steam iron adjacent to water contained in a bath, shower, wash basin or other containers. The proximity of water is hazardous, even if the appliance is switched off.
•Under no circumstances should you submerge the steam iron in any liquid or allow liquids to penetrate into the housing of the steam iron. Do not expose the appliance to moisture and do not use it outdoors. If liquid gets into the housing, disconnect the appliance from the mains power socket immediately and have it repaired by a qualified technician.
•You may not open the steam iron housing. Have a defective appliance repaired only by an authorised technician.
•Under NO circumstance should you use the appliance if it shows visible signs of damage, has been dropped or leaks water. Arrange for it to be repaired by qualified specialists.
•Stop using the appliance if the anti-kink protection on the power cable is damaged!
- 4 -

•This appliance may be used by children aged 8 years or more and by persons with reduced physical, sensory or mental capabilities or lack of experience and/or knowledge if they are supervised, or have been instructed in the safe use of the appliance and have understood the potential risks. Children must not play with the appliance. Cleaning and user maintenance must not be carried out by children unless they are supervised.
Attention!
•Should the clothing care instructions forbid ironing, (Symbol  ), the clothing item may not be ironed. If you do so, the clothing item could be
permanently damaged.
•The water tank is to be filled exclusively with mains or distilled water. You will otherwise damage the steam iron.
•You may not clean the steam iron with solvents, alcohol or abrasive cleaning agents. These could damage it.
Before the First Use
•Remove the steam iron from the packaging.
•Remove all protective coverings and protective foils from the steam iron and from the ironing sole e.
Risk of asphyxiation!
Plastic bags can be dangerous. To avoid the risks of asphyxiation, keep plastic bags out of the reach of toddlers and small children.
•Pour water into the water tank (see chapter "Filling the water tank").
•Connect the steam iron with the cable base 8 and with the station q (see chapter "Tips for utilisation").
•Insert the plug into a wall power socket supplying an electrical current as detailed on the rating plate.
•Place the temperature regulator 7 into the position "MAX".
To set the temperature, turn the outer ring of the temperature regulator 7.
The setting which can be seen in the cut-out is the set temperature.
•Heat the steam iron up for several minutes at this highest setting.
•Remove the steam iron from the station q (see chapter “Tips for utilisation”).
•Press the button for the steam blast 5 a few times such that steam exits from the ironing sole e.
•Then iron a piece of material that is no longer required, to remove possible contamination from the ironing sole e.
Tips for utilisation
In addition to the typical utilisation with a cable, you can also separate the steam iron from the cable base 8 for a short period to iron textiles which are not located close to an electrical power socket.
To separate the steam iron from the cable base 8:
•Place the steam iron, with the cable base 8
engaged, onto the station q. The unlocking switch 0 must be in the position  .
.
- 5 -
•Slide the unlocking switch 0 into the
position  . The steam iron now allows itself to be lifted off. The cable base 8 remains combined with the station q.
Note:
As the steam iron cannot be heated up without the cable base 8, you can only work for a short period without the cable base 8. Reconnect the steam iron with the cable base 8 as soon as the steam blast or the ironing quality diminishes.
To reconnect the steam iron with the cable base 8:
•Insert the steam iron into the cable base 8 connected to the station q. Slide the unlocking
switch 0 to  . You can now lift the steam iron with the cable base 8 from the station q.
Should you wish to secure the steam iron to the station q, for safekeeping for example, slide the unlocking switch 0 with the preplaced steam iron to  . The steam iron can now no longer be removed from the station q.
Filling the water tank
•Once it has cooled down, place the steam iron horizontally on the soleplate e or place the steam iron on the station q.
•Slide off the filler opening cover for the water tank 2.
•Fill the measuring cup up to the Max. marking with tap water and tip this water into the water tank.
•Slide the cover of the filler opening for the water tank 2 back to close it.
Note:
Should the mains water at your locality be rated as hard, it is recommended that you mix mains water with some distilled water. Otherwise, the jets for the steam blast function could calcify (become blocked) prematurely.
To extend the optimal steam blast function, mix mains water with distilled water according to the table.
|
Ratios - distilled |
Water hardness |
water to mains |
|
water |
|
|
very soft / soft |
0 |
|
|
medium |
1 : 1 |
|
|
hard |
2 : 1 |
|
|
very hard |
3 : 1 |
|
|
The water hardness level can be queried at your local water works.
- 6 -

Plugging in and ironing
Dry ironing without steam is possible at all temperatures, steam ironing is only possible within the temperature range •••  (marked black) on the temperature regulator 7.
• Insert the plug into a power socket.
Attention!
Should the clothing care instructions forbid ironing, (Symbol  ), the clothing item may not be ironed. If you do so, the clothing item could be permanently damaged.
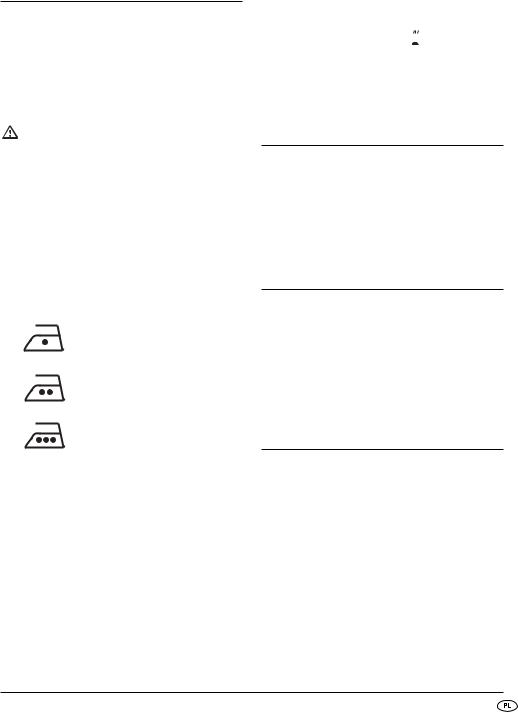
•Check the care instructions on the labels in the garment to see if it is suitable for being ironed, and at which temperature setting.
Symbol |
Symbol |
|
|
Temperature |
Type of material |
||
Care instruction |
|||
regulator 7 |
|
||
|
• |
Synthetic |
|
|
fibres |
||
|
|
|
|
|
•• |
Silk, wool |
•••Cotton,
MAX |
linen |
•Select the best suitable temperature setting with the temperature controller 7.
The control lamp for the temperature 6 glows. When the set temperature has been reached, the temperature control lamp 6 goes out.
•Wait until the temperature control lamp 6 extinguishes.
•To moisten the laundry, press the spray button 

 4.
4.
This function is suitable for very dry and very crumpled garments.
Steam ironing
•Programme the steam regulator 3 to the desired steam setting.
•The temperature regulator 7 must be turned into at least the adjustment range •••  . Otherwise it cannot produce any steam.
Ironing with steam blast
The steam blast is especially suitable for smoothing difficult to reach parts of a garment.
•Slightly raise the steam iron.
•For a steam blast, press the steam blast button  5.
5.
Temporarily setting the steam iron aside
Risk of fire!
NEVER leave the hot, mains-connected or switchedon steam iron unattended.
•Place the temperature regulator 7 into the position "MIN".
•Place the steam iron only on the cable base 8 or insert it onto the station q.
- 7 -
Taking the steam iron out of service
•Remove the plug from the wall power socket.
•Empty the water tank and clean the ironing sole e.
•Place the cooled down steam iron on the station q
and secure it, in that you slide the unlocking switch 0 into the position  .
.
•The power cable 9 can be wrapped and stored around the cable retainer w on the underside of the station q:
Anti-drip function
With conventional steam irons, water can drip from the iron soleplate e at low temperatures. This iron, however, has an anti-drip function. At low temperatures the iron automatically switches off the steamblast function. When this happens, a "click" can be heard. You must then set a suitable temperature with the temperature regulator 7. As soon as this is reached, steam production is continued.
Cleaning
Self-cleaning function
•Connect the steam iron with the cable base 8.
•Fill the water tank to the marking MAX.
•Insert the plug into a wall socket.
•Place the temperature regulator 7 into the position MAX.
•Adjust the steam regulator 3 to maximum steam power.
•Allow the steam iron to heat up until the heat control lamp 6 extinguishes and once again glows.
•Hold the steam iron horizontally over a catchment receptacle.
•Position the steam regulator 3 at the maximal steam power level. Press and hold down the button Self-clean r. Thereby, steam and boiling water flows from the steam exit holes in the ironing sole e. Impurities that may be present are washed out.
•Release the Self-clean button r as soon as all of the water has exited.
•Thoroughly dry the ironing sole e. For this, slide the ironing sole e back and forth over a hand towel or an old piece of material several times.
•Allow the steam iron to cool down before placing it in storage.
Housing
Potentially fatal danger!
Disconnect the plug before cleaning. Otherwise there is the risk of you receiving a potentially fatal electric shock!
Risk of physical injury!
Allow the appliance to cool before cleaning it.
If you do not, there is a risk of you receiving burn injuries!
• Clean the housing with a soft, dry cloth only.
Important!
Do not use aggressive, abrasive or chemical cleaning agents. These could attack the surfaces and cause irreparable damage to the appliance.
Metal parts
•Clean the metal components with a lightly watermoistened cloth and a mild, non-abrasive cleaning agent.
- 8 -
Troubleshooting |
|
Warranty and Service |
The steam iron blows out no or very little steam:
The reserves of water in the steam iron are depleted. Fill the water tank with mains water (See "Filling the water tank").
The steam iron does not get hot:
•The steam iron is not plugged in or is not switched on. Insert the plug into a wall power socket and adjust the temperature regulator 7 to the desired ironing temperature.
•The steam iron is defect. Arrange for the steam iron to be repaired by qualified specialists.
Disposal
Do not dispose of the appliance in your normal domestic waste. This appliance is subject to the provisions of European Directive 2012/19/EU.
Dispose of the appliance through an approved disposal centre or at your community waste facility. Observe the currently applicable regulations. In case of doubt, please contact your waste disposal centre.
 Dispose of all packaging materials in an environmentally friendly manner.
The warranty for this appliance is for 3 years from the date of purchase. The appliance has been manufactured with care and meticulously examined before delivery. Please retain your receipt as proof of purchase. In the event of a warranty claim, please make contact by telephone with our Service Department. Only in this way can a post-free despatch for your goods be assured.
The warranty covers only claims for material and manufacturing defects, but not for transport damage, for wearing parts or for damage to fragile components, e.g. buttons or batteries. This product is for private use only and is not intended for commercial use. The warranty is void in the case of abusive and improper handling, use of force and internal tampering not carried out by our authorized service branch. Your statutory rights are not restricted in any way by this warranty.
The warranty period will not be extended by repairs made under warranty. This applies also to replaced and repaired parts. Any damage and defects extant on purchase must be reported immediately after unpacking the appliance, at the latest, two days after the purchase date. Repairs made after the expiration of the warranty period are subject to payment.
Service Great Britain
Tel.: 0871 5000 720 (£ 0.10/Min.)
E-Mail: kompernass@lidl.co.uk
IAN 102540
Hotline availability:
Monday to Friday 08:00 - 20:00 (CET)
Importer
KOMPERNASS HANDELS GMBH BURGSTRASSE 21
44867 BOCHUM, GERMANY
www.kompernass.com
- 9 -

- 10 -
SPIS TREŚCI |
STRONA |
|
|
Wprowadzenie |
12 |
|
|
Zastosowanie zgodnie z przeznaczeniem |
12 |
|
|
Zakres dostawy |
12 |
|
|
Elementy obsługowe |
12 |
|
|
Dane techniczne |
12 |
|
|
Wskazówki bezpieczeństwa |
13 |
|
|
Przed pierwszym użyciem |
15 |
|
|
Wskazówki dotyczące użytkowania |
15 |
|
|
Napełnianie zbiornika wodą |
16 |
|
|
Podłączanie i prasowanie |
17 |
|
|
Prasowanie z parą |
17 |
|
|
Prasowanie z uderzeniem pary |
17 |
|
|
Chwilowe odstawianie żelazka z nawilżaczem |
17 |
|
|
Wyłączanie żelazka z nawilżaczem |
18 |
|
|
Funkcja zapobiegająca kapaniu |
18 |
|
|
Czyszczenie |
18 |
Funkcja samooczyszczania . . . . . . . . . . . . . . . . . . . . . . . . . . . . . . . . . . . . . . . . . . . . . . . . . . .18 Obudowa . . . . . . . . . . . . . . . . . . . . . . . . . . . . . . . . . . . . . . . . . . . . . . . . . . . . . . . . . . . . . . . .18 Elementy metalowe . . . . . . . . . . . . . . . . . . . . . . . . . . . . . . . . . . . . . . . . . . . . . . . . . . . . . . . . .18
Usuwanie zakłóceń działania |
19 |
|
|
Usuwanie/wyrzucanie |
19 |
|
|
Gwarancja i serwis |
19 |
|
|
Importer |
20 |
Przed pierwszym użyciem urządzenia należy dokładnie przeczytać niniejszą instrukcję obsługi i zachować ją na przyszłość. W przypadku przekazania urządzenia osobom trzecim należy przekazać im także instrukcję.
- 11 -
ŻELAZKO NA PARĘ |
|
Elementy obsługowe |
|
|
|
Wprowadzenie |
|
1 Dysza |
|
2 Otwór do wlewania wody |
|
|
|
3 Regulator pary |
Gratulujemy Ci zakupu naszego urządzenia. |
|
4 Przycisk spryskiwacza |
Jest to produkt wysokiej jakości. Instrukcja obsługi |
|
5 Przycisk uderzenia pary |
stanowi część tego produktu. Zawiera ona ważne |
|
6 Lampka kontrolna temperatury |
wskazówki dotyczące bezpieczeństwa, użytkowa- |
|
7 Regulator temperatury |
nia i utylizacji urządzenia. Przed przystąpieniem do |
|
8 Podstawa z kablem |
użytkowania produktu zapoznaj się z wszystkimi |
|
9 Kabel sieciowy |
wskazówkami obsługi i bezpieczeństwa. Używaj |
|
0 Przycisk do odryglowania |
produkt zgodnie z opisem i w podanych obszarach |
|
q Stacja |
użytkowania. W razie przekazania produktu na- |
|
w Schowek na kabel zasilający |
stępnej osobie, nie zapomnij dołączyć również in- |
|
e Stopa żelazka |
strukcji obsługi. |
|
r Przycisk funkcji Selfclean |
Zastosowanie zgodnie |
|
Dane techniczne |
|
z przeznaczeniem |
|
|
|
|
Napięcie zasilające: |
220-240 V ~/ |
|
Żelazko na parę jest przeznaczone wyłącznie do |
|
||
|
|
50/60 Hz |
|
prasowania ubrań. Można go używać wyłącznie |
|
Maks. pobór mocy: |
2200 W |
w pomieszczeniach zamkniętych w prywatnych gospodarstwach domowych. Jakiegokolwiek inne zastosowania uważane są za niezgodne z przeznaczeniem.
Zakres dostawy
Żelazko na parę Stacja
Podstawa z kablem Miarka
Instrukcja obsługi
- 12 -

Wskazówki bezpieczeństwa
 Niebezpieczeństwo poparzenia!
•Gdy żelazko jest gorące, chwytać je tylko za uchwyt.
•Dzieci powinny być pod nadzorem; nie można pozwolić im na zabawę urządzeniem.
•Nigdy nie wkładać rąk w obłok pary ani nie dotykać nimi gorących części metalowych.
•Podczas korzystania nie wolno otwierać otworu do napełniania zbiornika wody. Najpierw odczekać do ostygnięcia żelazka, a następnie wyjąć wtyk z gniazda.
•Żelazko oraz jego przewód przyłączeniowy w trakcie włączania lub stygnięcia muszą być poza zasięgiem dzieci w wieku poniżej 8 lat.
 OSTROŻNIE: gorące powierzchnie!
 Zagrożenie odniesieniem obrażeń! Niebezpieczeństwo pożaru!
•Nigdy nie pozostawiać gorącego lub włączonego żelazka parowego bez nadzoru.
•Żelazko parowe należy chować tylko po całkowitym wystygnięciu.
•Żelazko parowe powinnmo być używane i odstawiane wyłącznie na stabilnym podłożu.
•Prasować zawsze z zachowaniem ustawień temperatur podanych we wskazówkach konserwacyjnych oraz dozwolonych przy określonym rodzaju materiału. W przeciwnym wypadku można doprowadzić do uszkodzenia prasowanego materiału. Gdy brak jest wyraźnych instrukcji dotyczących temperatury prasowania, zacząć od najniższego ustawienia, a następnie stopniowo zwiększać temperaturę.
•Nie pozwalać na używanie żelazka dzieciom.
•Stację stawiać na płaskim i odpornym na wysoką temperaturę podłożu. Stacja musi stać stabilnie, gdy znajduje się w niej żelazko.
•Gdy chcesz odstawić żelazko, stawiaj je tylko na podstawie lub na stacji.
•Urządzenie stawiać na płaskiej i odpornej na wysoką temperaturę podstawie. Żelazko musi stać stabilnie.
•Żelazko można odstawiać tylko na dołączone urządzenie do odstawiania lub na podstawę.
- 13 -

 Niebezpieczeństwo porażenia prądem elektrycznym!
•Napięcie źródła zasilania musi być zgodne z danymi podanymi na tabliczce znamionowej urządzenia.
•By uniknąć zagrożeń, uszkodzone urządzenie oddaj niezwłocznie do autoryzowanego warsztatu naprawczego lub zwróć się do serwisu producenta.
•Wymianę uszkodzonego wtyku lub kabla sieciowego należy niezwłocznie zlecić specjalistycznemu warsztatowi lub serwisowi.
•Ciągnąć zawsze za wtyk, nigdy za kabel.
•Nie załamywać ani nie zgniatać kabla sieciowego. Układać go w taki sposób, aby nie stykał się z gorącymi powierzchniami i aby nikt nie mógł na niego wejść albo się na nim potknąć.
•Przed przystąpieniem do czyszczenia, podczas nalewania wody i po każdym użyciu urządzenia wyjmować wtyk z gniazda.
•Przed włączeniem należy zawsze całkowicie rozwinąć kabel sieciowy. Nie należy używać przedłużaczy.
•Nigdy nie chwytać ani nie dotykać kabla ani wtyku sieciowego wilgotnymi rękoma.
•Nigdy nie używać żelazka parowego w pobliżu wody, znajdującej się na przykład w wannie, brodziku prysznica, umywalce lub w innych naczyniach. Bliskość wody stanowi poważne zagrożenie nawet przy wyłączonym urządzeniu.
•Nie wolno zanurzać żelazka parowego w żadnych cieczach, ani pozwolić na dostanie się cieczy do wnętrza obudowy żelazka parowego. Nie należy użytkować urządzenia w warunkach podwyższonej wilgotności ani na otwartej przestrzeni. Jeśli zdarzyło by się, że jakaś ciecz dostała się do wnętrza urządzenia, należy natychmiast wyciągnąć wtyk z gniazda sieciowego i oddać urządzenie do naprawy w ręce wykwalifikowanego fachowca.
•Nie należy samemu otwierać obudowy żelazka. Uszkodzone żelazko oddawać zawsze do naprawy wykwalifikowanemu specjaliście.
•Nigdy nie używać żelazka, które ma widoczne uszkodzenia, spadło z wysokości lub z którego wylewa się woda. Zlecić naprawę wykwalifikowanemu specjaliście.
•Nigdy nie używać urządzenia, gdy uszkodzone zostało zabezpieczenie przed zaginaniem kabla.
- 14 -
•To urządzenie może być używane przez dzieci od 8 roku życia oraz przez osoby o zmniejszonych zdolnościach fizycznych, sensorycznych lub umysłowych lub też osoby nieposiadające odpowiedniego doświadczenia i/lub wiedzy, wyłącznie pod nadzorem lub po przeszkoleniu w zakresie bezpiecznego używania urządzenia oraz wynikających z niego zagrożeń. Dzieci nie mogą bawić się urządzeniem. Czyszczenie i konserwacja przez użytkownika nie mogą być wykonywane przez dzieci bez nadzoru.
Uwaga!
•W przypadku gdy wskazówki na matce danego materiału zabraniają prasowania (symbol  ), nie należy prasować, ponieważ groziłoby to uszkodzeniem materiału.
•Do zbiornika na wodę można nalewać wyłącznie wodę z kranu/wodę destylowaną. Inaczej nastąpi uszkodzenie żelazka z nawilżaczem.
•Nie można czyścić żelazka rozpuszczalnikami, alkoholem lub środkami do szorowania.
W przeciwnym razie można uszkodzić urządzenie.
Przed pierwszym użyciem
•Wyjmij żelazko z opakowania.
•Odklej wszystkie naklejki z żelazka i stopy e.
•Regulator temperatury 7 ustaw w położenie „MAX“.
W celu ustawienia temperatury obrócić zewnętrzny pierścień regulatora temperatury 7. Ustawienie widoczne w wycięciu to ustawiona temperatura.
•Po ustawieniu najwyższego zakresu temperatury odczekaj kilka minut do nagrzania się żelazka.
•Zdejmij żelazko ze stacji q (patrz rozdział „Wskazówki dotyczące użytkowania”).
•Naciśnij kilka razy przycisk działania pary 5, aż ze stopy żelazka e zacznie wydobywać się para.
•Przeprasuje fragment nieużywanego materiału, by ewentualnie usunąć ze stopy żelazka e brud.
Ostrzeżenie!
Plastikowe torebki mogą stanowić zagrożenie. Worki plastikowe trzymaj z dala od dzieci, które w zabawie workiem mogłyby się nim udusić.
•Wlej wodę do zbiornika (zobacz rozdział „Napełnianie zbiornika wodą”).
•Połącz żelazko parowe z podstawą 8 i ze stacją q (zobacz rozdział „Wskazówki dotyczące użytkowania”).
•Podłącz wtyczkę do gniazdka, zgodnego
z napięciem podanym na tabliczce znamionowej.
Wskazówki dotyczące użytkowania
Żelazko, oprócz standardowego prasowania z podłączonym kablem, możesz na chwilę odłączyć
od podstawy z kablem 8, by przeprasować materiały znajdujące się z dala od gniazdka elektrycznego.
By odłączyć żelazko z podstawy z kablem 8:
•Żelazko z podłączoną podstawą z kablem 8
postaw na stacji q. Wyłącznik odryglowania 0 musi się znajdować w położeniu  .
.
- 15 -

•Wyłącznik odryglowania 0 przesuń
w położenie  . Teraz możesz odłączyć żelazko. Podstawa z kablem 8 pozostaje
w stacji q.
Wskazówka:
Ponieważ żelazko po odłączeniu od podstawy
z kablem 8 przestaje grzać, można je używać bez podstawy 8 tylko przez krótki czas. Podłącz żelazko do podstawy z kablem 8 gdy tylko zawuważysz spadek skuteczności działania uderzenia pary lub mocy grzania.
By podłączyć żelazko do podstawy z kablem 8:
•Żelazko wstaw w zablokowaną w stacji q
podstawę z kablem 8. Przełącznik odryglowa-
nia 0 przesuń w położenie . Teraz możesz zdjąć żelazko razem z podstawą z kablem 8 ze stacji q.
By pozostawić żelazko zaryglowane w stacji q, np. w celu bezpiecznego przechowania, przesuń wyłącznik odryglowania 0 z założonym żelazkiem w położenie  . Teraz żelazka nie można zdjąć ze stacji q.
Napełnianie zbiornika wodą
•Ustawić żelazko parowe w stanie schłodzonym poziomo na stopie e lub odstawić je na stację q.
•Otworzyć pokrywę otworu wlewowego zbiornika wody 2.
•Napełnić kubek pomiarowy wodą z kranu do ooznaczenia Max i wlać wodę do zbiornika.
•Zamknąć pokrywę otworu wlewowego zbiornika 2.
Wskazówka:
Jeśli woda w kranie jest za twarda, zaleca się mieszanie jej z wodą destylowaną. W przeciwnym wypadku dysze funkcji uderzenia parę mogą przedwcześnie zatkać się osadem z kamienia. W celu przedłużenia prawidłowego działania funkcji uderzenia pary zmieszaj wodę z kranu
z wodą destylowaną w proporcjach podanych w tabeli.
Stosunek ilości
wody destyloTwardość wody wanej do wody
kranowej
bardzo miękka/ |
0 |
|
miękka |
||
|
||
|
|
|
średni: |
1 : 1 |
|
|
|
|
na twardo |
2 : 1 |
|
|
|
|
bardzo twarda |
3 : 1 |
Informacje dotyczące twardości wody można uzyskać od miejscowych wodociągów miejskich.
- 16 -
Podłączanie i prasowanie
Prasowanie bez pary jest możliwe przy wszystkich temperaturach, a z parą dopiero od oznaczonego kolorem czarnym zakresu ustawienia •••  na regulatorze temperatury 7.
• Podłącz wtyczkę do gniazdka zasilania.
•Odczekaj, aż lampka kontrolna temperatury 6 zgaśnie.
•W celu zwilżenia prasowanych ubrań naciśnij przycisk spryskiwania wodą 

 4.
4.
Ta funkcja jest przeznaczona do bardzo suchych, silnie mnących się ubrań.
Uwaga!
Gdy nie pozwala na to informacja na metce obrania (symbol  ), nie można próbować prasowania. Mogłoby to spowodować uszkodzenie ubrania.
•Sprawdź na metce ubrania, czy i w jakich temperaturach można je prasować.
Symbol |
Symbol |
Rodzaj |
|
wskazówki |
Temperatur- |
||
materiału |
|||
pielęgnacji |
regler 7 |
||
|
|||
|
• |
Włókna |
|
|
syntetyczne |
||
|
|
|
|
|
•• |
Jedwab, wełna |
|
|
|
|
|
|
••• |
Bawełna, len |
|
|
MAX |
|
|
|
|
|
•Za pomocą regulatora temperatury 7 ustaw odpowiednią temperaturę.
Zapala się lampka kontrolna temperatury 6. Gdy lampka kontrolna zgaśnie 6, żelazko nagrzało się do wymaganej temperatury.
Prasowanie z parą
•Za pomocą regulatora pary 3 ustaw żądaną siłę.
•Regulator temperatury 7 musi być obrócony
aż do oznaczonego kolorem czarnym zakresu
•••  . W przeciwnym razie nie powstanie para.
Prasowanie z uderzeniem pary
Funkcja uderzenia pary jest skuteczna do przeprasowania trudnodostępnym miejsc ubrań.
•Podnieś lekko żelazko.
•Naciśnij przycisk uderzenia pary  5.
5.
Chwilowe odstawianie żelazka z nawilżaczem
 Niebezpieczeństwo pożaru!
Nigdy nie oddalaj się od gorącego, podłączonego do zasilania lub włączonego żelazka.
•Regulator temperatury 7 ustaw w położenie „MIN“.
•Żelazko postaw na podstawie z kablem 8 lub postaw je na stację q.
- 17 -
Wyłączanie żelazka z nawilżaczem
•Wyjąć wtyczkę z gniazdka.
•Wylej wodę ze zbiornika i wyczyść stopę e.
•Chłodne żelazko postaw na stacji q i zarygluj
je, przestawiając wyłącznik odryglowania 0 w położenie  .
.
•Kabel sieciowy 9 możesz zwinąć i schować w schowku w pod stacją q:
Funkcja zapobiegająca kapaniu
W tradycyjnych żelazkach parowych może się zdarzyć, że przy zbyt niskiej temperaturze prasowania ze stopy e będzie ciekła woda. To żelazko jest jednak wyposażone w funkcję zapobiegającą kapaniu. Przy niższych temperaturach prasowania żelazko automatycznie wyłącza funkcję uderzenia pary. Zadziałanie funkcji można rozpoznać po charakterystycznym „kliknięciu”. Za pomocą regulatora temperatury 7 ustawić właściwą temperaturę. Bezpośrednio po uzyskaniu żądanej temperatury, żelazko zacznie ponownie wypuszczać parę.
•Odczekaj od podgrzania żelazka, aż lampka kontrolna 6 wyłączy się, a następnie ponownie włączy.
•Przytrzymaj żelazko w położeniu poziomym nad naczyniem zlewowym.
•Pokrętło regulacji pary 3 ustaw w położenie maksymalnej mocy pary. Naciśnij przycisk Selfclean r i przytrzymaj go. Z otworów wylotowych w stopie żelazka e wydobywa się para wodna i gotująca się woda. Wraz z nią wylatują wszystkie nieczystości.
•Po opróżnieniu całej wody ze zbiornika puść przycisk Selfclean r.
•Dokładnie wysusz stopę żelazka e. W tym celu stopą żelazka e przeprasuj kilka razy czystą szmatkę lub kawałek niepotrzebnego materiału.
•Przed odstawieniem żelazka odczekaj do całkowitego ostygnięcia.
Obudowa
 Śmiertelne niebezpieczeństwo!
Przed przystąpieniem do czyszczenia zawsze najpierw wyciągaj wtyczkę z gniazdka sieciowego. Zachodzi niebezpieczeństwo porażenia prądem elektrycznym!
Czyszczenie
Funkcja samooczyszczania
•Podłącz żelazko do podstawy z kablem 8.
•Napełnij zbiornik wodą do zaznaczenia MAX.
•Podłącz wtyczkę do gniazdka zasilania.
•Regulator temperatury 7 ustaw w położenie MAX.
•Pokrętło regulacji pary 3 ustaw w położenie maksymalnej mocy pary.
 Niebezpieczeństwo odniesienia obrażeń!
Przed przystąpieniem do czyszczenia odczekaj, aż urządzenie ostygnie. W przeciwnym wypadku zachodzi niebezpieczeństwo poparzenia!
• Obudowę czyść wyłącznie miękką, suchą szmatką.
 Uwaga!
Do czyszczenia nie należy stosować agresywnych lub chemicznych środków czyszczących. Mogłyby one uszkodzić powierzchnię obudowy i doprowadzić do trwałego uszkodzenia urządzenia.
Elementy metalowe
•Elementy metalowe czyść szmatką lekko zwilżoną wodą z łagodnym środkiem do czyszczenia nie szorującym powierzchni.
- 18 -
Usuwanie zakłóceń działania |
|
Gwarancja i serwis |
Z żelazka nie wydobywa się para wodna lub wydobywa się w niewielkiej ilości:
Kończy się zapas wody w zbiorniku. Nalej wody do zbiornika (patrz „Napełnianie zbiornika wodą”).
Żelazko nie nagrzewa się:
•Żelazko nie jest podłączone lub włączone. Podłącz wtyczkę do gniazdka zasilania i ustaw pokrętło regulacji temperatury 7 w żądanym położeniu.
•Żelazko jest uszkodzone. Uszkodzone żelazko oddawaj zawsze do naprawy wykwalifikowanemu personelowi.
Usuwanie/wyrzucanie
W żadnym przypadku nie należy wyrzucać urządzenia do normalnych śmieci domowych. W odniesieniu do produktu ma zastosowanie dyrektywa europejska 2012/19/EU.
Przekaż urządzenie do utylizacji w odpowiednim zakładzie utylizacyjnym lub w miejskim przedsiębio rstwie oczyszczania.
Przestrzegaj aktualnie obowiązujących przepisów. W razie pytań i wątpliwości odnośnie zasad utylizacji skontaktować z najbliższy zakładem utylizacji.
 Wszystkie materiały wchodzące w skład
  opakowania należy przekazać do odpowiednich punktów zbiórki odpadów.
Urządzenie objęte jest 3-letnią gwarancją, licząc od daty zakupu. Urządzeniezostało starannie wyprodukowane i poddane skrupulatnej kontroli przed wysyłką. Paragon należy zachować jako dowód dokonania zakupu. W przypadku roszczeń gwarancyjnych należy skontaktować się telefonicznie z serwisem. Tylko w ten sposób można zagwarantować bezpłatną wysyłkę zakupionego produktu. Gwarancja obejmuje wyłącznie wady materiałowe i fabryczne, natomiast nie obejmuje szkód powstałych podczas transportu, części ulegających zużyciu ani uszkodzeń części łatwo łamliwych/podatnych na uszkodzenia mechaniczne, np. wyłączników, akumulatorów. Produkt przeznaczony jest wyłącznie do użytku domowego, a nie do zastosowań profesjonalnych.
Gwarancja traci ważność w przypadku niewłaściwego używania urządzenia, używania niezgodnego z przeznaczeniem, użycia siły lub ingerencji w urządzenie dokonywanej poza naszymi autoryzowanymi punktami serwisowymi. Niniejsza gwarancja nie ogranicza ustawowych praw nabywcy urządzenia.
Okres gwarancji nie ulega wydłużeniu o czas trwania usługi gwarancyjnej. Dotyczy to również wymienionych i naprawionych części. Szkody i wady zauważone już w chwili zakupu należy zgłosić od razu po rozpakowaniu, nie później niż po upływie dwóch dni od daty zakupu. Po upływie okresu gwarancyjnego wszystkie naprawy będą wykonywane płatnie.
Serwis Polska
Tel.: 22 397 4996
E-Mail: kompernass@lidl.pl
IAN 102540
Czas pracy infolinii:
od poniedziałku do piątku, w godzinach 08:00 - 20:00 czasu środkowoeuropejskiego
- 19 -
 Loading...