


SAB 4.8 A2
4
IAN 89884
RECHARGEABLE FLOOR SWEEPER SAB 4.8 A2
RECHARGEABLE FLOOR SWEEPER
Operating instructions
METLA NA BATERIJE
Navodila za uporabo
AKKUMULÁTOROS SEPRŰGÉP
Használati utasítás
SZCZOTKA AKUMULATOROWA
Instrukcja obsługi
METLA NA AKUMULÁTOR
Návod na obsluhu
AKU KOŠTĚ
Návod k obsluze
AKKU-BESEN
Bedienungsanleitung
GB Operating instructions Page 1
PL Instrukcja obsługi Strona 7
HU Használati utasítás Oldal 13
SI Navodila za uporabo Stran 19
CZ Návod k obsluze Strana 25
SK Návod na obsluhu Strana 31
DE / AT / CH Bedienungsanleitung Seite 37
Before reading, unfold the page containing the illustrations and familiarise yourself with all functions of
the device.
Przed przeczytaniem proszę rozłożyć stronę z ilustracjami, a następnie proszę zapoznać się z wszystkimi
funkcjami urządzenia.
Olvasás előtt kattintson az ábrát tartalmazó oldalra és végezetül ismerje meg a készülék mindegyik
funkcióját.
Pred branjem odprite stran s slikami in se nato seznanite z vsemi funkcijami naprave.
Před čtením si otevřete stranu s obrázky a potom se seznamte se všemi funkcemi přístroje.
Pred čítaním si odklopte stranu s obrázkami a potom sa oboznámte so všetkými funkciami prístroja.
Klappen Sie vor dem Lesen die Seite mit den Abbildungen aus und machen Sie sich anschließend mit allen
Funktionen des Gerätes vertraut.
A
B
C
D

- 1 -
Content Page
Introduction 2
Proper Use 2
Items supplied 2
Parts Description 2
Technical data 2
Safety information 3
Prior to initial use 3
Assembling the floor sweeper 3
Battery charging 3
Working with the floor sweeper 4
Cleaning 4
To clean the housing . . . . . . . . . . . . . . . . . . . . . . . . . . . . . . . . . . . . . . . . . . . . . . . . . . . . . . . . .4
How to clean the dirt container . . . . . . . . . . . . . . . . . . . . . . . . . . . . . . . . . . . . . . . . . . . . . . . .4
How to clean the brush . . . . . . . . . . . . . . . . . . . . . . . . . . . . . . . . . . . . . . . . . . . . . . . . . . . . . . .4
Storage 5
Disposal 5
Warranty & Service 5
Importer 5
- 2 -
Rechargeable
Floor Sweeper
Introduction
Congratulations on the purchase of your new appli-
ance.
You have clearly decided in favour of a quality
product. These operating instructions are a part of
this product. They contain important information in
regard to safety, use and disposal. Before using the
product, familiarise yourself with all of these opera-
ting and safety instructions. Use the product only as
described and only for the specified areas of appli-
cation. In addition, pass these documents on, together
with the product, to any future owner.
Proper Use
This rechargeable battery floor sweeper is intended
for the sweeping of dry dirt in dry enclosed rooms
and only for private use. It must only be operated
with the enclosed accessories.
The rechargeable battery floor sweeper is not
intended for the sweeping of gravel-faced concrete,
gravel and similar surfaces, not for deeppile carpets
and wet floor coverings or for commercial use. Use
only as described in this manual. Do not allow the
appliance to be used as toy. Do not let children use
this devices unsupervised.
Items supplied
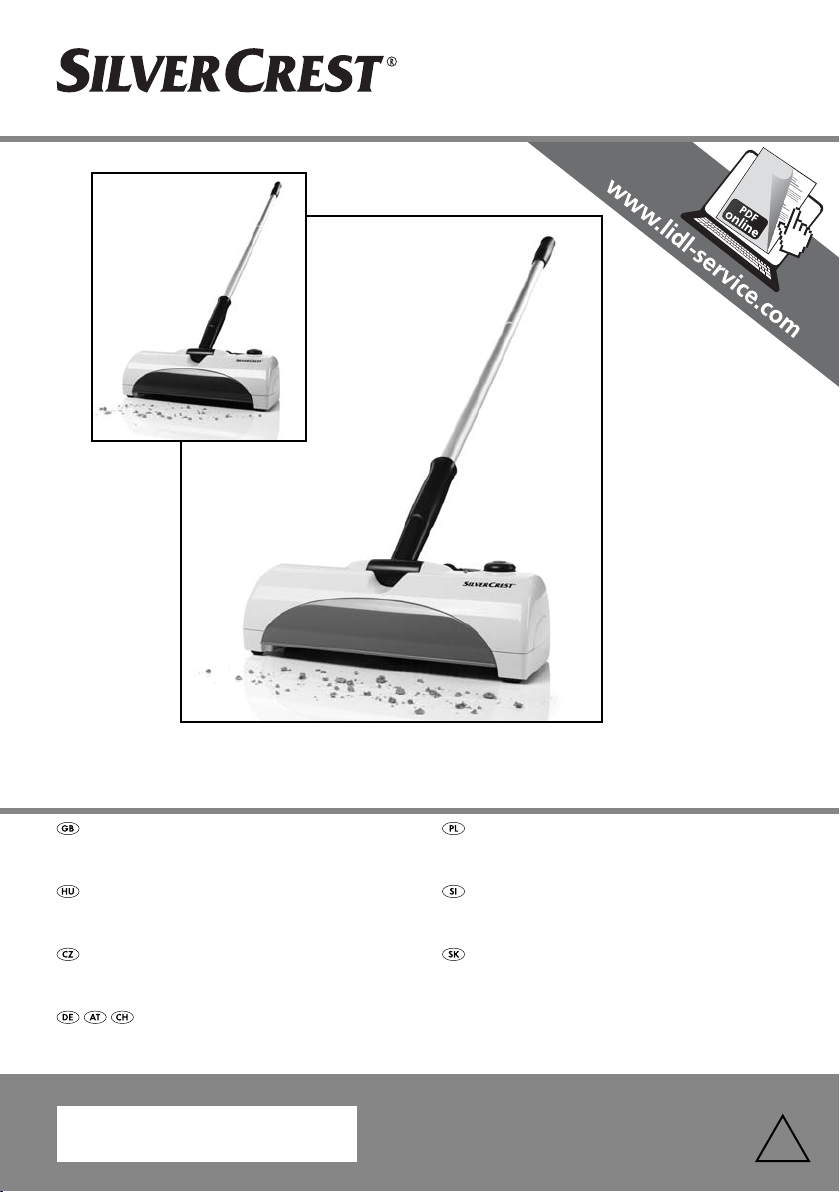
Rechargeable Floor Sweeper
Battery charger with cable
Broomstick (3 Elements)
Operating instructions
Parts Description
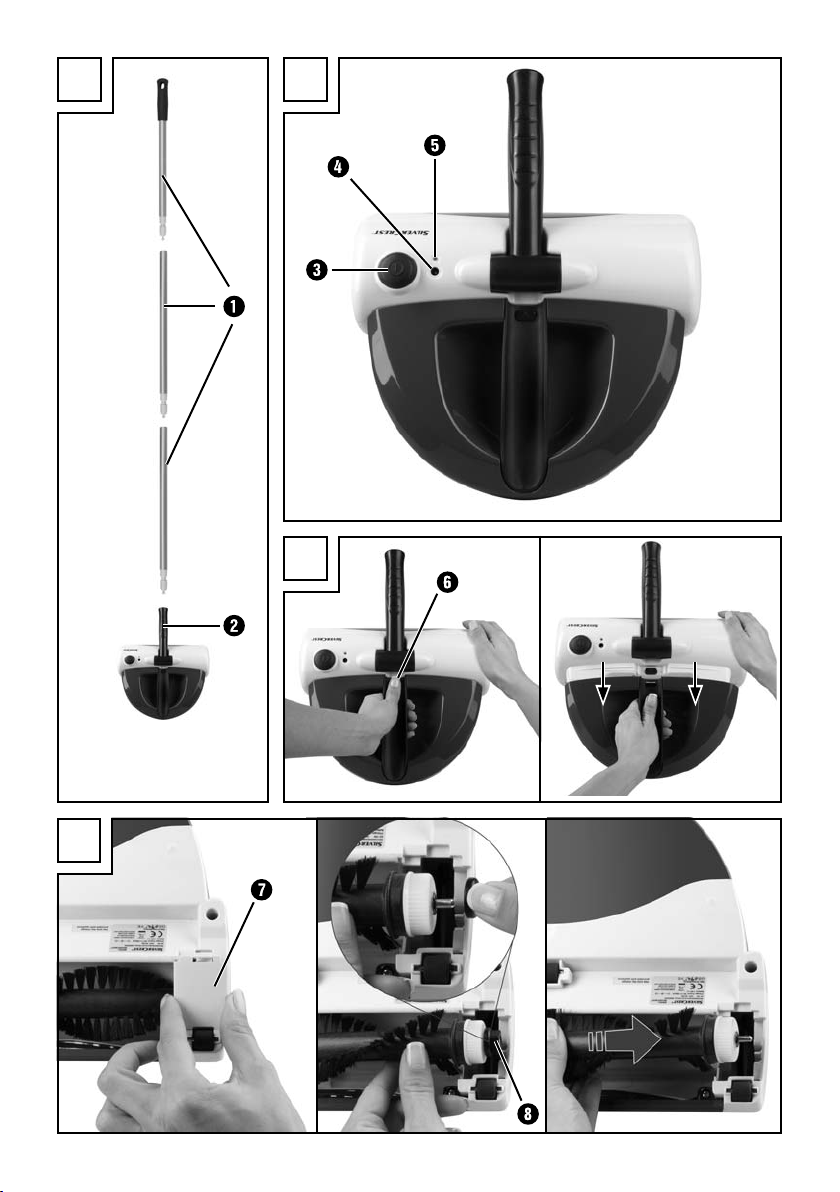
Figure A:
Broomstick (3 elements)
Holder
Figure B:
Switch
Charging socket
Charge indicator
Figure C:
Locking release button
Figure D:
Cover
Guide attachment (with washer)
Technical data
Battery Charger
Input: 100 - 240 V
~
,
50 / 60 Hz, 150 mA
Output: 9 V 200 mA
Manufacturer: Golden Profit Electronics Ltd.
Type designation: GPE003W-090020-2
Protection class: II /
Battery brush
Input voltage/current: 9 V 200 mA
Battery - working voltage 4.8 V
Batteries: NiMH, Type C
4 x 1.2 V, 1300 mAh
Operating time on a full
battery charge
(depending on floor covering) approx. 30 min
Charging time for an empty
battery 12 - 16 hours
- 3 -
Safety information
• Do not allow individuals (including children) to
use the appliance whose physical, sensorial or
mental abilities or lack of experience and know-
ledge hinder their safe usage of it if they have
not previously been supervised or instructed in
its correct usage.
• Tell children about the appliance and its poten-
tial dangers so that they do not play with it.
• Only this battery-broom may be charged with
the supplied battery charger, the charger is not
suitable for other batteries.
Danger of Electrocution!
• NEVER charge the appliance with a damaged
power adapter! To avoid risks, replace a dama-
ged power adapter immediately. For this, contact
Customer Services.
Prior to initial use
Before starting the device satisfy yourself that…
• The floor sweeper, the charger and its cable are
in perfect condition and ...
• All packaging materials have been removed
from the device.
Assembling the floor sweeper
• Assemble the broomstick by inserting the 3
elements into each other and turn to secure.
• Screw the broomstick in the the holder .
Battery charging
The rechargeable battery floor sweeper is supplied
with an empty Ni-MH rechargeable battery. To
ensure that the battery will receive its full efficiency
it is necessary to charge the battery for 16 hours
prior to initial use. Charging processes thereafter
take 12 - 16 hours.
With fully charged battery the device provides an
operating time of 30 minutes before recharging be-
comes necessary.
• To charge the battery, ensure that the battery
brush is switched off.
• If necessary, switch it off at the switch .
• Insert the plug of the charger into the charging
socket of the appliance and then the mains
plug into a mains power socket.
• The red charge indicator is illuminated during
the charging process. Should this not be the
case, check the plug connections and whether
the rechargeable floor sweeper is switched off.
Once the charging process is over, the device
switches over to the charge maintenance position
(management function). The red charge indicator
does not thereby switch itself off.
However, it is not advisable to leave the device per-
manently connected to the mains charging device
so as to prevent the batteries from possibly getting
damaged.
Caution!
• Only use the enclosed charger (9V 200 mA).
Other charging devices could irreparably damage
the appliance!
• Only operate the device with the enclosed
rechargeable battery. It could otherwise get
damaged.
• Do not attempt to remove the rechargeable
battery for charging.
• Do not attempt to open the rechargeable battery
jacket or dismantle the battery, this would destroy it.

- 4 -
Working with the floor sweeper
Caution:
• Never use the device with the dirt container
removed. The dirt would only be swirled around!
• Keep end of rotating brush, wands and other
openings away from your face and body. Risk of
injury!
• Press the switch to start the rechargeable bat-
tery floor sweeper. Press again to switch off the
device.
• Guide the rechargeable battery floor sweeper
over the floor.
• You can leave the broomstick locked in verti-
cal position during work interruptions.
Note:
With some types of carpet the rechargeable battery
floor sweeper could rattle or bounce. In this case
work slowly and in the opposite direction.
Cleaning
Caution:
Do not clean the appliance while charging it. Always
disconnect the battery charger from the mains po-
wer socket before cleaning the appliance!
To clean the housing:
Wipe the housing of the appliance with a damp
cloth. If necessary, use a mild detergent on the
cloth.
Ensure that the appliance is completely dry before
reconnecting it with the battery charger.
How to clean the dirt container:
To maintain the efficiency of the rechargeable
battery floor sweeper, empty the dirt container after
every use.
• Press the unlocking locking release button of
the dirt container to detach it from the device.
• Remove the dirt container from the appliance
horizontally with a downward movement.
• Empty the dirt container and re-insert.
How to clean the brush:
If the brush roller cannot be turned any longer
because of accumulated coarse dirt or threads,
proceed as follows:
• Turn over the rechargeable battery floor swee-
per and hold it so that the flat side with the brush
roller faces you.
• Remove the small cover on the right-hand
side.
• Loosen the drive belt by pushing it to the right.
• Lift the brush roller on the right-hand side and
remove the guide attachment with washer .
• Now pull the brush roller from the device to the
right-hand side.
• Remove the dirt (on both sides of the bristle) and
clean the brush.
After cleaning, proceed as follows to re-install the
brush roller:
• Insert the drive belt in the compartment and
place it around the motor drive pulley.
• Place the washer on the guide attachment with
washer and insert the brush roller into the left
guide channel.
• Pull the drive belt over the guide attachment with
washer and re-insert the brush roller into the
right channel.
• Now pull the drive belt over the drive cog of the
brush roller.
• Fit the brush cover by first introducing the
lower lugs in the recesses and press the cover
in at the top.
Caution:
• Ensure that the device is not inadvertently
switched on with the dirt container removed or
while cleaning the brush. Risk of Injury!
• Do not clean the device during the charging
process. Risk of Injury!
- 5 -
Storage
Caution:
• Do not expose the rechargeable battery floor
sweeper to extreme temperatures or moisture.
• Do not therefore store it near ovens, heating ele-
ments, burners or in the bathroom.
• Never leave the device without it having been
switched off - the rechargeable battery could be
damaged through depletion.
Store the appliance at a dry and dust-free place.
Disposal
To dispose of the appliance in an environmentally
friendly way, you must remove the battery from the
appliance:
1. Disconnect the appliance from the mains power
supply.
Caution:
Remove the battery from the appliance ONLY if you
want to scrap/dispose of the appliance! The appli-
ance is permanently defective after you have remo-
ved the battery!
2. Remove the dirt collector.
3. Remove the screw next to the unlocking button
and then take the cover off.
4. Pull the battery out and sever the cable.
5. Dispose of the battery in an environmentally
friendly way. Pay heed to the currently applica-
ble regulations. In case of doubt, please contact
your waste disposal centre.
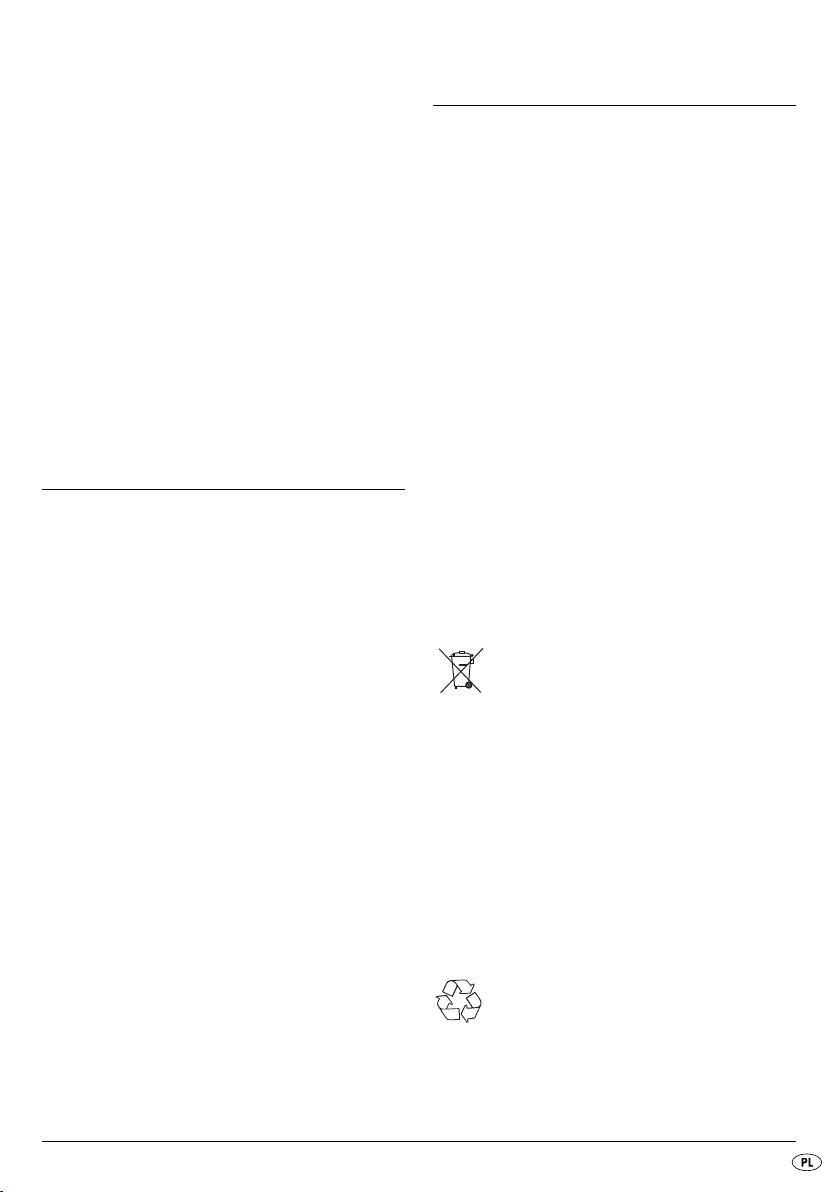
Do not dispose of the appliance in your
normal domestic waste. This product is
subject to the European guideline
2002/96/EC.
Dispose of the appliance through an approved dis-
posal centre or at your community waste facility.
Observe the currently applicable regulations.
In case of doubt, please contact your waste disposal
centre.
Dispose of all packaging materials in an
environmentally friendly manner.
Warranty & Service
The warranty for this appliance is for 3 years from
the date of purchase. The appliance has been ma-
nufactured with care and meticulously examined be-
fore delivery.
Please retain your receipt as proof of purchase. In
the event of a warranty claim, please make contact
by telephone with our Service Department. Only in
this way can a post-free despatch for your goods be
assured.
The warranty covers only claims for material and
maufacturing defects, but not for transport damage,
for wearing parts or for damage to fragile compo-
nents, e.g. buttons or batteries. This product is for pri-
vate use only and is not intended for commercial use.
The warranty is void in the case of abusive and im-
proper handling, use of force and internal tampering
not carried out by our authorized service branch.
Your statutory rights are not restricted in any way by
this warranty.
The warranty period will not be extended by repairs
made under warranty. This applies also to replaced
and repaired parts. Any damage and defects extant
on purchase must be reported immediately after un-
packing the appliance, at the latest, two days after
the purchase date. Repairs made after the expiration
of the warranty period are subject to payment.
Service Great Britain
Tel.: 0871 5000 720 (£ 0.10/Min.)
E-Mail: kompernass@lidl.co.uk
Hotline availability:
Monday to Friday 08:00 - 20:00 (CET)
Importer
KOMPERNASS GMBH
BURGSTRASSE 21
44867 BOCHUM, GERMANY
www.kompernass.com
IAN 89884

- 6 -

- 7 -
Spis treści Strona
Wprowadzenie 8
Przeznaczenie 8
Zakres dostawy 8
Opis części 8
Dane techniczne 8
Wskazówki dotyczące bezpieczeństwa 9
Przed pierwszym użyciem 9
Montaż akumulatorowej zamiatarki 9
Ładowanie akumulatora 9
Praca z akumulatorową zamiatarką 10
Czyszczenie 10
Jak należy czyścić obudowę . . . . . . . . . . . . . . . . . . . . . . . . . . . . . . . . . . . . . . . . . . . . . . . . .10
Sposób czyszczenia pojemnika na zanieczyszczenia . . . . . . . . . . . . . . . . . . . . . . . . . . . . .10
Sposób czyszczenia walcowej szczotki . . . . . . . . . . . . . . . . . . . . . . . . . . . . . . . . . . . . . . . . .10
Przechowywanie 11
Utylizacja 11
Gwarancja i serwis 12
Importer 12
- 8 -
Szczotka
akumulatorowa
Wprowadzenie
Gratulujemy Ci zakupu naszego urządzenia.
Jest to produkt wysokiej jakości. Instrukcja obsługi
stanowi część tego produktu. Zawiera ona ważne
wskazówki dotyczące bezpieczeństwa, użytkowa-
nia i utylizacji urządzenia. Przed przystąpieniem do
użytkowania produktu zapoznaj się z wszystkimi
wskazówkami obsługi i bezpieczeństwa. Używaj
produkt zgodnie z opisem i w podanych obszarach
użytkowania. W razie przekazania produktu na-
stępnej osobie, nie zapomnij dołączyć również in-
strukcji obsługi.
Przeznaczenie
Akumulatorowa zamiatarka jest przeznaczona do
zmiatania suchych zanieczyszczeń w suchych, zam-
kniętych pomieszczeniach i wyłącznie do użytku
prywatnego. Należy ją eksploatować wyłącznie z
dostarczonym wyposażeniem. Akumulatorowa
zamiatarka nie jest przeznaczona do zamiatania
betonu płukanego, tłucznia i podobnych powierzch-
ni, dywanów o długim włosie oraz mokrych wykład-
zin podłogowych, oraz do stosowania w warun-
kach przemysłowych i rzemieślniczych. Korzystaj z
urządzenia tylko w sposób opisany w instrukcji ob-
sługi. Urządzenie nie służy do zabawy! Nigdy nie
pozwól, aby dzieci pracowały z nim bez nadzoru.
Zakres dostawy
Szczotka akumulatorowa
Ładowarka z kablem
Trzonek (3 częściowy)
Instrukcja obsługi
Opis części
Ilustracja A:
Stojak (3 elementy)
Uchwyt
Ilustracja B:
Przełącznik
Gniazdo ładowania
Wskaźnik ładowania
Ilustracja C:
Przycisk odryglowania
Ilustracja D:
Osłona
Nasadka prowadząca (z podkładką)
Dane techniczne
Ładowarka
Wejście: 100 - 240 V
~
,
50 / 60 Hz, 150 mA
Wyjście: 9 V 200 mA
Producent: Golden Profit Electronics Ltd.
Model: GPE003W-090020-2
Klasa ochrony: II /
Szczotka akumulatorowa
Napięcie/prąd wejściowy: 9 V 200 mA
Napięcie robocze
akumulatora 4,8 V
Akumulatory: NiMH, typ C
4 x 1,2 V, 1300 mAh
Czas pracy przy
maksymalnie naładowanych
akumulatorach
(w zależności od
rodzaju podłogi) około 30 min.
Czas ładowania
akumulatorów 12 - 16 godzin
- 9 -
Wskazówki dotyczące
bezpieczeństwa
• Nie zezwalaj na użytkowanie zamiatarki przez
osoby (w tym dzieci) upośledzone umysłowo
lub fizycznie lub nie posiadające odpowiedniej
wiedzy i doświadczenia w bezpiecznym użytko-
waniu urządzeń, bądź jeśli nie zostały one
uprzednio odpowiednio poinstrowane lub
przeszkolone.
• Poinformuj dzieci o zagrożeniach związanych
z użytkowaniem urządzenia i nie pozwól
dzieciom bawić się urządzeniem.
• Za pomocą dołączonej ładowarki można ładować
wyłącznie miotłę akumulatorową, ładowarka nie
nadaje się do żadnych innych akumulatorów.
Niebezpieczeństwo porażenia
prądem!
• Nigdy nie próbuj ładować urządzenia za pomocą
uszkodzonego zasilacza! By uniknąć zagrożeń,
uszkodzony zasilacz wymień niezwłocznie na
nowy. Zwróć się w tej sprawie do serwisu obsługi
klienta.
Przed pierwszym użyciem
Przed pierwszym użyciem urządzenia upewnij się,
czy…
• akumulatorowa zamiatarka, ładowarka i jej
kabel są w odpowiednim stanie oraz, czy…
• z urządzenia usunięto wszystkie materiały
opakowaniowe.
Montaż akumulatorowej
zamiatarki
• Zmontuj trzonek , połącz ze sobą po kolei
trzy elementy i skręć je ze sobą.
• Wkręć trzonek w uchwyt urządzenia.
Ładowanie akumulatora
Akumulatorowa zamiatarka jest dostarczana wraz
z Ni-MH akumulatorem. Aby uzyskał on swoją
maksymalną wydajność musi był ładowany przed
pierwszym użyciem przez 16 godzin. Kolejne
ładowania wymagają 12-16 godzin.
Czas pracy przy naładowanym całkowicie
akumulatorze wynosi 30 minut, po tym czasie kon-
ieczne jest kolejne ładowanie.
• Przed naładowaniem akumulatora zamiatarki
upewnij się najpierw, czy urządzenie jest
wyłączone.
• W razie konieczności wyłącz je za pomocą wy-
łącznika .
• Podłącz wtyczkę ładowarki do gniazda łado-
wania w urządzeniu, a następnie wtyczkę sie-
ciową do gniazdka elektrycznego.
• Podczas ładowania pali się czerwona kontrolka
ładowania . Gdy tak się nie stanie, sprawdź
złącza i zobacz, czy zmiotka akumulatorowa
nie jest wyłączona.
Jeżeli zakończony został proces ładowania urząd-
zenia, przełącza się ono do funkcji podtrzymania
naładowania. Czerwony wskaźnik ładowania
nie wyłącza się przy tym.
Urządzenie nie powinno być jednakże stale po-
dłączone do ładowarki sieciowej; pozwoli to uni-
knąć ewentualnego uszkodzenia baterii.
Uwaga:
• Korzystaj tylko z załączonej ładowarki
(9V 200 mA). W innych ładowarkach urząd-
zenie może ulec trwałemu uszkodzeniu!
• Urządzenie eksploatuj tylko z załączonymi
akumulatorami. W przeciwnym razie może ulec
uszkodzeniu.
• Do ładowania nie próbuj akumulatora demontować.
• Nie próbuj otwierać obudowy akumulatora i
rozkładać go. Spowoduje to jego uszkodzenie.

- 10 -
Praca z akumulatorową
zamiatarką
Uwaga:
• Nigdy nie korzystaj z urządzania ze zdjętym
pojemnikiem na zanieczyszczenia. Spowodował-
oby to tylko zawirowanie kurzu!
• Nie zbliżaj do twarzy i części ciała końcówki
obracającej się szczotki walcowej, prętów i
otworów w urządzeniu. Niebezpieczeństwo od-
niesienia obrażeń!
• Aby włączyć zamiatarkę, wciśnij przełącznik .
Jego ponowne wciśnięcie wyłączy urządzenie.
• Postaw akumulatorową zamiatarkę na
czyszczonej podłodze.
• Trzonek w przerwach w pracy można
zatrzasnąć w pozycji pionowej.
Wskazówka:
przy niektórych rodzajach dywanów akumulatorowa
zamiatarka możeterkotać lub podskaki wać. W takim
przypadku pracuj powoli w odwrotnym kierunku.
Czyszczenie
Uwaga:
Nie czyść urządzenia podłączonego do ładowarki.
Przed przystąpieniem do czyszczenia urządzenia,
najpierw zawsze odłącz ładowarkę z gniazdka sie-
ciowego!
Jak należy czyścić obudowę:
Wytrzyj obudowę urządzenia wilgotną szmatką.
W razie potrzeby zwilż szmatkę łagodnym płynem
do mycia.
Pamiętaj o wytarciu urządzenia do sucha, zanim
ponownie podłączysz ładowarkę do zasilania.
Sposób czyszczenia pojemnika na
zanieczyszczenia:
Aby zapewnić pełną wydajność akumulatorowej
zamiatarki, opróżniaj pojemnik na zanieczyszczenia
po każdym użyciu.
• Wciśnij przycisk odryglowujący pojemnik na
zanieczyszczenia i odłącz go od urządzenia.
• Pojemnik na zanieczyszczenia wyjmij poziomo
ruchem w dół z urządzenia.
• Opróżnij pojemnik na zanieczyszczenia i umieść
go z powrotem w urządzeniu.
Sposób czyszczenia walcowej szczotki:
Jeżeli walcowa szczotka nie będzie się obracała,
ponieważ nagromadziły się na niej grube
zanieczyszczenia i włókna, postępuj w następujący
sposób:
• Odwróć akumulatorową zamiatarkę
i trzymaj ją tak, aby płaska powierzchnia wraz z
walcową szczotką skierowana była do środka.
• Zdejmij małą pokrywkę umieszczoną z pra-
wej strony.
• Poluzuj pasek napędowy przesuwając go w
prawo.
• Podnieś rolkę zamiatającą po jej prawej stronie
i wyjmij z nasadki prowadzącej wraz z podkład-
ką .
• Wyciągnij teraz szczotkę w prawo z urządzenia.
• Usuń zabrudzenia (z obu stron włosia) i oczyść
walcową szczotkę.
Po oczyszczeniu walcowej szczotki umieść ją z
powrotem w urządzeniu:
• Umieść pasek napędowy w urządzeniu i załóż
go na kółko napędowe silnika.
• Załóż podkładkę z nasadką prowadzącą i
wsuń rolkę zamiatającą w lewą prowadnicę.
• Załóż pasek napędowy na nasadkę prowadzą-
cą i ponownie załóż rolkę szczotkującą z
prawej strony.
- 11 -
• Teraz załóż pasek napędowy na kółka
napędowe rolki szczotkującej.
• Osadź pokrywę szczotki walcowej, wprowa-
dź najpierw dolne noski w wybrania, a następ-
nie u góry wciśnij.
Uwaga:
• Zwróć uwagę, aby nie uruchomić niechcący
urządzenia przy zdjętym pojemniku na zaniec-
zyszczenia lub w trakcie czyszczenia walcowej
szczotki. Niebezpieczeństwo odniesienia obrażeń!
• Nie czyść urządzenie w trakcie ładowania
akumulatorów. Niebezpieczeństwo odniesienia
obrażeń!
Przechowywanie
Uwaga:
• Nie wystawiaj akumulatorowej zamiatarki do
na oddziaływanie wysokiej temperatury i
wilgotności.
• Nie przechowuj jej w pobliżu pieców, kaloryfe-
rów, palników i łazienek.
• Nigdy nie odstawiaj urządzenia bez wcześniejs-
zego wyłączenia - głębokie rozładowanie
akumulatora może go uszkodzić.
Przechowuj urządzenie w miejscu wolnym od
wilgoci i kurzu.
Utylizacja
W celu zutylizowania urządzenia zgodnie z zasada-
mi ochrony środowiska, usuń akumulator z urządzenia:
1. Odłącz urządzenie od zasilania elektrycznego.
Uwaga:
Wyjmij akumulator z urządzenia tylko wówczas,
gdy urządzenia będzie miało być
zutylizowane/przekazane na złom! Po wymonto-
waniu akumulatora urządzenie jest uszkodzone!
2. Wyjmij zbiornik na zanieczyszczenia.
3. Odkręć śrubę obok przycisku odryglowania i
ściągnij pokrywę.
4. Wyciągnij akumulator i przetnij kable.
5. Przekaż akumulator do utylizacji. Należy
przestrzegać aktualnie obowiązujących przepi-
sów. W razie pytań i wątpliwości odnośnie za-
sad utylizacji skontaktować z najbliższy zakła-
dem utylizacji.
Urządzenia nie należy wyrzucać wraz
z normalnymi odpadami domowymi.
Niniejszy produkt podlega działaniom,
przewidziamyn w przepisach dyrekty-
wy europejskiej 2002/96/EC.
Urządzenie należy usuwać w akredytowanych za-
kładach utylizacji odpadów lub komunalnych zakła-
dach utylizacji odpadów.
Należy przestrzegać aktualnie obowiązujących
przepisów. W razie pytań i wątpliwości odnośnie
zasad utylizacji należy skontaktować się z najbliżs-
zym zakładem utylizacji odpadów.
Materiał opakowaniowy należy przekazy-
wać do utylizacji zgodnie z przepisami o
ochronie środowiska.
 Loading...