


LI-ION RECHARGEABLE HANDHELD
VACUUM CLEANER SAS 7.4 LI A2
LI-ION RECHARGEABLE HANDHELD |
LITIUMIONI-AKKUPÖLYNIMURI |
VACUUM CLEANER |
Käyttöohje |
Operating instructions |
|
HANDDAMMSUGARE |
HÅNDSTØVSUGER MED |
MED LITIUMJONBATTERI |
GENOPLADELIGT LI-ION-BATTERI |
Bruksanvisning |
Betjeningsvejledning |
ASPIRATEUR À MAIN |
LI-IONEN ACCU HANDSTOFZUIGER |
À BATTERIE LITHIUM-ION |
Gebruiksaanwijzing |
Mode d'emploi |
|
LI-IONEN-AKKU-HANDSTAUBSAUGER |
|
Bedienungsanleitung |
|
IAN 109560

Before reading, unfold the page containing the illustrations and familiarise yourself with all functions of the device.
Käännä ennen lukemista kuvallinen sivu esiin ja tutustu seuraavaksi laitteen kaikkiin toimintoihin.
Vik ut bildsidan och ha den till hands när du läser igenom anvisningarna och gör dig bekant med apparatens / maskinens funktioner.
Før du læser, vend siden med billeder frem og bliv bekendt med alle apparatets funktioner.
Avant de lire le mode d'emploi, ouvrez la page contenant les illustrations et familiarisez-vous ensuite avec toutes les fonctions de l'appareil.
Vouw vóór het lezen de pagina met de afbeeldingen open en maak u vertrouwd met alle functies van het apparaat.
Klappen Sie vor dem Lesen die Seite mit den Abbildungen aus und machen Sie sich anschließend mit allen Funktionen des Gerätes vertraut.
GB / IE |
Operating instructions |
Page |
1 |
FI |
Käyttöohje |
Sivu |
11 |
SE |
Bruksanvisning |
Sidan |
19 |
DK |
Betjeningsvejledning |
Side |
27 |
FR / BE |
Mode d'emploi |
Page |
35 |
NL / BE |
Gebruiksaanwijzing |
Pagina |
45 |
DE / AT / CH |
Bedienungsanleitung |
Seite |
55 |

1
q
2
3
0
9
4
8
7
6 |
5 |

Content |
Page |
|
|
Intended Usage |
2 |
|
|
Items supplied |
2 |
|
|
Appliance description |
2 |
|
|
Important safety instructions |
3 |
|
|
Technical data |
5 |
|
|
Before taking into use |
5 |
|
|
Information about the batteries |
5 |
|
|
Installation of the wall holder |
5 |
|
|
Charging |
6 |
|
|
Operation |
6 |
|
|
Cleaning |
7 |
|
|
Disposal |
7 |
|
|
Warranty and Service |
8 |
|
|
Importer |
9 |
- 1 -
Li-Ion Rechargeable
Handheld Vacuum
Cleaner
Congratulations on the purchase of your new appliance.
You have clearly decided in favour of a quality product. These operating instructions are a part of this product. They contain important information in regard to safety, use and disposal. Before using the product, familiarise yourself with all of these operating and safety instructions. Use the product only as described and only for the specified areas of application. In addition, pass these documents on, together with the product, to any future owner.
Intended Usage
This cordless hand-held vacuum cleaner may only be used to vacuum dry or wet surfaces resp. dry or wet materials and fluids. People or animals may not be vacuumed with this appliance. Any other usage of, or modification to, the appliance is deemed to be improper usage and carries the risk of serious personal injury. The manufacturer accepts no liability for damages that result from improper use of the appliance or are caused by the incorrect operation of it. The appliance is not intended for commercial use.
Items supplied
Li-Ion Rechargeable Handheld Vacuum Cleaner Crevice nozzle
Wet suction nozzle Wall holder Assembly material Power transformer Operating instructions
Check the items supplied directly after unpacking for completeness.
Appliance description
1 Wet suction nozzle
2 Crevice nozzle
3 Wall holder
4 Power adapter
5 Barrel plug
6 On/Off switch
7 Charge indicator lamp
8 Unlocking button
9 Dust filter bag
0 Dust filter
q Dirt container
Note:
This appliance is supplied with non-charged batteries. The batteries must be charged for 24 hours before the first use.
- 2 -

Important safety instructions
To avoid potentially fatal electric shocks:
•Do not charge or use the appliance outdoors.
•Never use the hand vacuum cleaner if the cable, plug or casing are damaged.
•To avoid risks, arrange for damaged power cables and/or plugs to be replaced as soon as possible by a qualified specialist or by our Customer Services.
•Arrange for repairs to be carried out only by specialist workshops. Under no circumstances should you open the appliance yourself. Interferences that are not carried out by a specialist workshop could lead to physical injuries.
•Before switching the hand vacuum cleaner on, ensure that the mains voltage corresponds to the voltage indicated in the technical data for the appliance.
•Never touch the power supply or the appliance with wet or damp hands.
•Do not use the power adapter with an extension cable; connect the power adapter directly to a power socket.
To avoid the risk of injury:
•Do not change any accessories while the appliance is switched on.
•Do not use the hand vacuum for vacuuming up sharp objects or glass shards.
•Never vacuum up burning matches, glowing ashes or cigarette butts.
•Do not use the hand vacuum for vacuuming up chemical products, stone dust, gypsum, cement or similar particles.
•This appliance is not suitable for use with inflammable and explosive substances or chemical and aggressive liquids.
•Always store the appliance indoors. To prevent accidents, keep the appliance in a dry location when not in use.
•Under extreme conditions, leaks in the battery cells may occur. In the event that battery fluid comes into contact with skin or eyes, the affected area must be rinsed off with water immediately. Contact a physician.
- 3 -

•This appliance may be used by children aged 8 over and by persons with reduced physical, sensory or mental capabilities or lack of experience and knowledge, provided that they are under supervision or have been told how to use the appliance safely and are aware of the potential risks. Children must not play with the appliance. Cleaning and user maintenance tasks may not be carried out by children unless they are supervised.
Tips for safety:
•Use only accessory parts recommended by the manufacturer.
•The power adapter may not be used for other purposes. Never carry the wall holder or the power adapter by the cable. Do not pull on the cable when you want to move the appliance.
•Always grip the power plug to disconnect the appliance from the power supply.
•Always be sure to keep the hand vacuum away from heating elements, ovens or other heated appliances and surfaces.
•Always make certain that the ventilation slits are open. A blocked ventilation circuit can result in overheating and damage to the appliance.
•This product contains rechargeable batteries. Do not thow the batteries into a fire and do not subject them to high temperatures. There is the risk of an explosion!
•Take special care when using the hand vacuum on stairs.
•Do not use the hand vacuum without the dust filter inserted.
•Do not use the power adapter for a different product and do not attempt to charge this appliance with a different charging station. Use only the charging station supplied with this appliance.
•Never try to recharge non-rechargeable batteries.
- 4 -
Technical data |
|
Information about the batteries |
Power adapter 4 |
|
|
|
|
|
|
|
|
|
|
|
|
|
|
|
Input voltage / |
|
|
|
|
|
|
|
|
|
|
|
|
|
|
|
- current: |
100 - 240 V ~, 50/60 Hz |
||||||||||||||
|
max. 300 mA |
||||||||||||||
Output voltage/ |
|
|
|
|
|
|
|
|
|
|
|
|
|
|
|
- current: |
9,6 V |
|
|
|
|
|
|
/ 300 mA |
|||||||
Protection class: |
II / |
|
|||||||||||||
Type designation: |
SAS 7.4 LI A2-1 |
||||||||||||||
Appliance |
|
|
|
|
|
|
|
|
|
|
|
|
|
|
|
Input voltage |
9,6 V |
|
|
|
|
|
|
|
|
|
|
|
|
|
|
|
|
|
|
|
|
|
|
|
|
|
|
|
|||
Batteries |
|
|
|
|
|
|
|
|
|
|
|
|
|
|
|
Capacity: |
1300 mAh |
|
|||||||||||||
Batteries: |
7,4 V |
|
|||||||||||||
|
(2 x 3.7 V Lithium-Ion |
||||||||||||||
|
Batteries) |
|
|||||||||||||
Before taking into use
•Remove all packaging materials from the appliance, particularly the protective cap over the On/Off switch 6.
•Place the dirt container q onto the motor block:
•Slide the plastic tab on the underside of the handheld vacuum cleaner into the recess in the dirt container q.
•Press the unlocking button 8 and slide the dirt container q onto the motor block at the same time.
•Let go of the unlocking button 8 so that the lokking mechanism engages in the recess.
The dirt container q is now sitting securely on the motor block.
1.This hand-held vacuum cleaner is powered by rechargeable lithium-ion batteries.
Before using the cableless hand vacuum cleaner for the first time, the batteries must be charged for at least 24 hours.
2.The batteries reach their full capacity after a charging period of 24 hours. For care of the batteries we recommend the following: after the batteries are charged, remove the power adapter 4 from the mains power socket. Reconnect the power adapter 4 again with the mains power socket when the suction power of the appliance is noticeably weaker.
Installation of the wall holder
 Mortal danger!
Ensure that there are no power cables or other conduits or pipes in the wall at the location where you intend to bore the holes for the wall holder 3.
It would be a potentially fatal risk to bore into a current carrying electric cable!
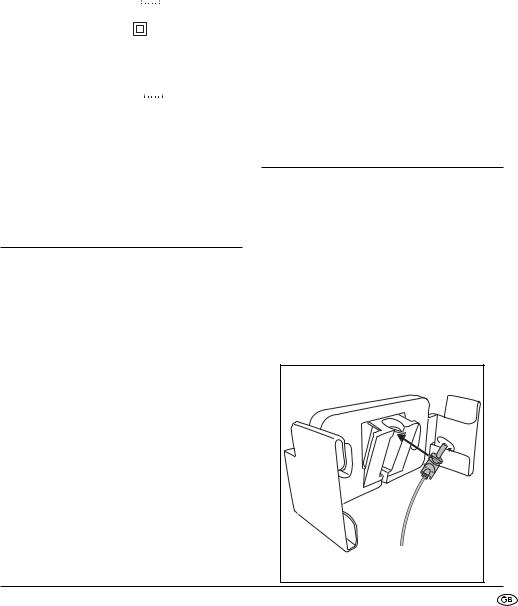
1.Place the barrel plug 5 of the power adapter 4 into the wall holder 3 as shown in the diagramme. Secure the barrel plug 5 by turning it.
- 5 -
2.Select a suitable installation location for the wall holder 3: It should present no problem with taking the hand vacuum cleaner out of it and a mains power socket for the power adapter 4 must be accessible.
3.Bore two holes with a spacing of approx. 68 mm. Use the wall holder 3 to mark the boreholes: this will ensure the spacing is correct. The boreholes must be suitable for 5 mm wallplugs.
4.Insert the wallplugs into the boreholes and, using the screws, firmly screw the wall holder 3 to the wall.
5.You can place the nozzles on the lateral accessories holder.
6.Connect the power adapter 4 to a mains power socket.
Charging
Note:
Check to ensure that the on/off switch 6 has been slid back (to the position "0") before starting the charging process.
•Place the hand vacuum cleaner from above into the wall holder 3, so that the barrel plug 5 slips into the socket on the hand vacuum cleaner. The charge indicator lamp 7 flashes red and the charging process begins.
Important:
•When the hand vacuum again has enough energy to vacuum, the charge indicator lamp 7 glows green. This does not mean that the batteries are fully charged. When the charge indicator lamp 7 glows green, it means the batteries are charged to about 80%.
•When charging is complete, which with fully discharged batteries can take approx. 5 hours, the appliance automatically switches to a trickle charge (maintenance function). Nevertheless, in order to avoid possible damage to the batteries, do not leave the appliance permanently connected to the power adapter 4.
•First recharge the batteries when the suction power of the hand vacuum cleaner is noticeably weaker and the charge indicator lamp 7 green is blinking.
Note:
The hand vacuum cleaner can also be charged directly via the power adapter 4. For this, remove the barrel plug 5 with a slight twist from the wall holder 3 and insert it into the socket on the hand vacuum cleaner.
Operation
Warning!
The suction opening must always be open and unblocked. Blockages lead to overheating and damage to the motor.
Tips:
•Make certain that the dust filter 0 is always inserted before using the appliance.
•As the maximum, suck up only as much liquid as will fill the dirt container q to the MAX mark.
1.Take the hand vacuum cleaner from the wall holder 3 or, if you do not use the wall holder 3, remove the barrel plug 5 from the socket.
2.If required, place the appropriate nozzle into the suction opening:
•the crevice nozzle 2, to clean narrow and difficult to reach locations.
•the wet suction nozzle 1 to vacuum liquids up.
- 6 -
 Note:
Note:
After you have vacuumed up liquids, immediately clean the dirt container q. Otherwise bacteria and microbes could form in it! Ensure that the dust filter bag 9 is completely dry before using the appliance again.
3.To switch the appliance on, slide the on/off switch 6 forwards. The charge indicator lamp 7 lights up green.
4.When you have finished using it, slide the on/ off switch 6 to the rear.
 Note:
Note:
Place the hand vaccum cleaner into the wall holder 3 and start the charging process when the suction power is noticeably weaker and the charge indicator lamps 7 green is blinking.
Cleaning
To achieve the best results, empty the dirt container q and clean the dust filter 0 after every use.
Important:
Do not use aggressive, chemical or abrasive cleaning agents. These could damage the surfaces of the appliance.
1.To open the dirt container q, press the unlocking button 8 and remove the dirt container q.
2.Remove the dust filter 0 from the dirt container q.
3.Empty the dirt container q.
4.Pull the dust filter bag 9 with its mounting out of the dust filter 0.
5.Rinse the dust filter bag 9 in cold water and then wait until it is completely dry again before you place it back into the dust filter 0. Do not dry it with hot air.
6.Place the dust filter 0 back into the dirt container q. Ensure that the dust filter 0 is seated squarely and that the rubber lip seals the dirt container q.
7.Replace the dirt container q back onto the motor block:
•Push the plastic nose on the underside of the hand vacuum cleaner into the recess on the dirt container q.
•Press the unlocking button 8 and, at the same time, slide the dirt container q onto the motor block.
•Release the unlocking button 8 so that the restraint grips into the recess. The dirt container q now sits firmly on the motor block.
8.Clean the housing and both nozzles with a lightly moistened cloth. For stubborn soiling use a mild detergent on the cloth.
9.Dry all parts thoroughly before reusing the appliance or putting it into storage.
Disposal
The appliance and the batteries must be disposed of separately.
Disposal of the device
Do not dispose of this appliance in your normal domestic waste. This product is subject to the provisions of European Directive 2012/19/EU.
Dispose of the appliance through an approved disposal centre or at your community waste facility. Observe the currently applicable regulations.
In a case of doubt, please contact your waste disposal centre.
- 7 -
Disposal of batteries/cells
Used batteries/cells may not be disposed of in house-hold waste. Every consumer is statutorily obliged to dispose of batteries
at a collection site of his community/city district or at a retail store.
The purpose of this obligation is to ensure that batteries are disposed of in a non-polluting manner. Only dispose of batteries/cells when they are fully discharged.
To dispose of the appliance in an environmentally friendly manner you must remove the battery from the appliance.
Risk of electric shock!
Disconnect the appliance from the mains power supply when you remove the battery!
Attention! Damage to property!
Remove the battery from the appliance ONLY if you want to scrap/dispose of the appliance! The appliance is permanently defective after you have removed the battery!
1.Remove the dirt container q from the motor unit.
2.Undo the 4 cross-head screws on the side of the motor unit and the cross-head screw on the round grill on the motor unit.
3.You can now dismantle the motor unit.
4.Snip the 3 cables connecting the printed circuit board to the blue battery pack. You can now remove the battery.
5.Dispose of the battery in an environmentally friendly manner. Please observe the currently applicable regulations. Please contact your waste disposal centre if you are in any doubt.
Dispose of all packaging materials in an  environmentally friendly manner.
Warranty and Service
The warranty for this appliance is for 3 years from the date of purchase. The appliance has been manufactured with care and meticulously examined before delivery.
Please retain your receipt as proof of purchase. In the event of a warranty claim, please make contact by telephone with our Service Department. Only in this way can a post-free despatch for your goods be assured.
The warranty covers only claims for material and maufacturing defects, but not for transport damage, for wearing parts or for damage to fragile components, e.g. buttons or batteries. This product is for private use only and is not intended for commercial use. The warranty is void in the case of abusive and improper handling, use of force and internal tampering not carried out by our authorized service branch. Your statutory rights are not restricted in any way by this warranty.
The warranty period will not be extended by repairs made under warranty. This applies also to replaced and repaired parts. Any damage and defects extant on purchase must be reported immediately after unpacking the appliance, at the latest, two days after the purchase date. Repairs made after the expiration of the warranty period are subject to payment.
Service Great Britain
Tel.: 0871 5000 720 (£ 0.10/Min.)
E-Mail: kompernass@lidl.co.uk
IAN 109560
Service Ireland
Tel.: 1890 930 034
(0,08 EUR/Min., (peak))
(0,06 EUR/Min., (off peak)) E-Mail: kompernass@lidl.ie
IAN 109560
Hotline availability:
Monday to Friday 08:00 - 20:00 (CET)
- 8 -

Importer
KOMPERNASS HANDELS GMBH BURGSTRASSE 21
44867 BOCHUM GERMANY www.kompernass.com
- 9 -

- 10 -

Sisällysluettelo |
Sivu |
|
|
Määräystenmukainen käyttö |
12 |
|
|
Toimitussisältö |
12 |
|
|
Laitteen kuvaus |
12 |
|
|
Tärkeitä turvaohjeita |
13 |
|
|
Tekniset tiedot |
15 |
|
|
Ennen ensimmäistä käyttöönottoa |
15 |
|
|
Akkuja koskevia tietoja |
15 |
|
|
Seinäpidikkeen asentaminen |
15 |
|
|
Lataaminen |
16 |
|
|
Käyttö |
16 |
|
|
Puhdistaminen |
17 |
|
|
Hävittäminen |
17 |
|
|
Takuu ja huolto |
18 |
|
|
Maahantuoja |
18 |
- 11 -
Litiumioniakkupölynimuri
Sydämellinen onnittelumme uuden laitteesi johdosta.
Olet valinnut laadukkaan tuotteen. Käyttöohje on osa tätä tuotetta. Se sisältää tärkeitä turvallisuutta, käyttöä ja hävittämistä koskevia ohjeita. Tutustu kaikkiin käyttöja turvaohjeisiin ennen tuotteen käyttöä. Käytä tuotetta vain kuvatulla tavalla ja vain mainittuihin käyttötarkoituksiin. Anna myös kaikki asiakirjat edelleen luovuttaessasi tuotteen eteenpäin.
Toimitussisältö
Litiumioni-akkupölynimuri
Rakosuutin
Märkäimusuutin
Seinäpidike
Asennusmateriaali
Verkkolaite
Käyttöohje
Tarkasta toimituksen täydellisyys välittömästi pakkauksen avaamisen jälkeen.
Määräystenmukainen käyttö |
|
Laitteen kuvaus |
Akkupölynimuri saa käyttää vain kuivien tai märkien pitojen taikka kuivien tai märkien roskien tai nesteiden imurointiin. Rikkaimurilla ei saa imuroida ihmisiä tai eläimiä. Laitteen muu käyttö tai muuttaminen ei ole määräysten mukaista ja voi aiheuttaa huomattavan tapaturmavaaran. Valmistaja ei vastaa vahingoista, jotka aiheutuvat määräysten vastaisesta tai väärästä käytöstä.
Laite on tarkoitettu ainoastaan kotitalouskäyttöön.
1 |
Märkäimusuutin |
2 |
Rakosuutin |
3 |
Seinäpidike |
4 |
Verkkolaite |
5 |
Tasavirtapistoke |
6 |
Virtakytkin |
7 |
Latauksen merkkivalo |
8 |
Avauspainike |
9 |
Pölysuodatinpussi |
0 |
Pölysuodatin |
q Likasäiliö
Ohje:
Laite toimitetaan akut lataamattomina. Akkuja on ladattava 24 tuntia ennen laitteen ensimmäistä käyttökertaa.
- 12 -

Tärkeitä turvaohjeita
Hengenvaarallisen sähköiskun välttämiseksi:
•Älä lataa tai käytä laitetta ulkotiloissa.
•Älä käytä rikkaimuria, jos johto, pistoke tai kotelo on vaurioitunut.
•Anna valtuutetun ammattihenkilöstön vaihtaa vaurioitunut verkkojohto tai verkkopistoke välittömästi uuteen vaarojen välttämiseksi.
•Anna korjaukset ainoastaan alan ammattikorjaamon tehtäväksi. Älä missään tapauksessa avaa laitteen koteloa itse. Muut kuin alan yrityksen suorittamat korjaukset voivat johtaa loukkaantumisiin.
•Tarkista ennen laitteen käynnistämistä, että verkkojännite vastaa laitteen teknisiin tietoihin kirjattua jännitettä.
•Älä tartu verkkolaitteeseen tai laitteeseen, jos kätesi ovat märät.
•Älä käytä verkkolaitetta jatkojohdon kanssa. Liitä verkkolaite suoraan pistorasiaan.
 Loukkaantumisvaaran välttämiseksi:
•Älä vaihda lisälaitteita, kun laite on käynnissä.
•Älä imuroi rikkaimurilla teräviä roskia tai lasins-iruja.
•Älä koskaan imuroi palavia tulitikkuja, hehkuvaa tuhkaa tai tupakantumppeja.
•Älä imuroi rikkaimurilla kemiallisia tuotteita, kivipö-lyä, kipsiä, sementtiä tai muita vastaavia aineita.
•Laite ei sovellu syttyvien tai räjähtävien aineiden taikka kemiallisten ja aggressiivisten nesteiden imuroimiseen.
•Säilytä laitetta aina sisätiloissa. Vältä tapaturmia säilyttämällä laitetta käytön jälkeen kuivassa paikassa.
•Ääriolosuhteissa akkupesässä saattaa esiintyä vuotoja. Jos vuotava neste pääsee kosketuksiin ihon tai silmien kanssa, kyseinen kohta on huuhdeltava välittömästi puhtaalla vedellä. Hakeudu lääkäriin.
- 13 -

•Kahdeksan vuotta täyttäneet lapset sekä henkilöt, joiden fyysiset, aistimukselliset tai henkiset kyvyt ovat rajalliset, tai joilla ei ole riittävää kokemusta tai tietoa laitteen käytöstä, saavat käyttää laitetta vain valvonnan alaisena, tai jos heitä on opastettu laitteen turvalliseen käyttöön, ja he ovat ymmärtäneet laitteen käyttöön liittyvät vaarat. Lapset eivät saa leikkiä laitteella. Lapset eivät saa suorittaa puhdistusta ja käyttäjähuoltoa ilman valvontaa.
Näin toimit turvallisesti:
•Käytä ainoastaan valmistajan hyväksymiä lisäosia.
•Verkkolaitetta ei saa käyttää muihin tarkoituksiin. Älä koskaan kanna seinäpidikettä tai verkkolaitetta virtajohdosta. Älä siirrä laitetta vetämällä sitä johdosta.
•Irrota laite virtalähteestä aina pistokkeesta vetämällä.
•Varmista, että rikkaimuria ei aseteta suoraan lämmityslaitteen, uunien tai muiden kuumien laitteiden tai pintojen päälle.
•Varmista, että tuuletusaukkoja ei peitetä. Jos tuuletusaukot on peitetty, laite saattaa ylikuumeta ja vaurioitua.
•Tämä tuote sisältää ladattavat akut. Älä heitä akkuja tuleen äläkä altista niitä korkeille lämpötiloille. Räjähdysvaara!
•Ole varovainen, kun käytät rikkaimuria portaissa.
•Älä käytä rikkaimuria ilman pölysuodatinta.
•Älä käytä verkkolaitetta muissa tuotteissa, äläkä yritä ladata laitetta toisessa latauslaitteessa.
Käytä vain tämän laitteen mukana toimitettua verkkolaitetta.
•Älä milloinkaan yritä ladata ei-uudelleenladattavia akkuja.
- 14 -

Tekniset tiedot |
|
Akkuja koskevia tietoja |
Verkkolaite 4 |
|
|
|
|
|
|
|
|
|
Tulojännite/ |
|
|
|
|
|
|
|
|
|
-virta: |
100 - 240 V ~, 50/60 Hz |
||||||||
|
max. 300 mA |
||||||||
Lähtöjännite/ |
|
|
|
|
|
|
|
|
|
-virta: |
9,6 V |
|
|
/ 300 mA |
|||||
|
|||||||||
|
|
|
|
|
|
|
|||
Suojausluokka: |
II/ |
|
|||||||
Tyyppimerkintä: |
SAS 7.4 LI A2-1 |
||||||||
Laite |
|
|
|
|
|
|
|
|
|
Tulojännite |
9,6 V |
|
|
|
|
|
|
|
|
|
|
|
|
|
|
||||
|
|
|
|
|
|
|
|
||
Akut |
|
|
|
|
|
|
|
|
|
Kapasiteetti: |
1300 mAh |
|
|||||||
Akku: |
7,4 V |
|
|||||||
|
(2 x 3,7 V Litium-ioni-akku) |
||||||||
Ennen ensimmäistä käyttöönottoa
•Poista kaikki pakkausmateriaalit tuotteesta, erityisesti virtakytkimen 6 päällä oleva suojus.
•Aseta likasäiliö q moottorilohkolle:
•Työnnä rikkaimurin pohjassa oleva muovinen nokka likasäiliön q syvennykseen.
•Paina lukituksen avauspainiketta 8 ja työnnä samanaikaisesti likasäiliö q moottorilohkolle.
•Vapauta lukituksen vapautuspainike 8 niin, että lukitus osuu syvennykseen. Likasäiliö q on nyt tiiviisti moottorilohkolla.
1.Käsirikkaimuria käytetään uudelleenladattavilla litium-ioni-akuilla.
Akkuja on ladattava vähintään 24 tuntia ennen rikkaimurin ensimmäistä käyttökertaa.
2.Akut saavuttavat täyden kapasiteettinsa 24 tunnin latausajan jälkeen. Suosittelemme akkujen hoitamiseksi seuraavaa: Irrota verkkolaite 4 verkkopistorasiasta akkujen lataamisen jälkeen. Liitä verkkolaite 4 verkkopistorasiaan
uudelleen vasta, kun laitteen imuteho heikkenee huomattavasti.
Seinäpidikkeen asentaminen
 Hengenvaara!
Varmista, ettei seinässä, johon haluat porata reiät seinäpidikettä 3 varten, kulje sähköjohtoja tai muita johtoja tai putkia. On olemassa hengenvaara, jos poraat virtaa johtavaan johtoon!
1.Aseta verkkolaitteen 4 tasavirtapistoke 5 seinäpidikkeeseen 3 seuraavassa kuvassa esitetyllä tavalla. Kiinnitä tasavirtapistoke 5 kiertämällä sitä.
- 15 -

2.Etsi seinäpidikkeelle 3 sopiva asennuspaikka: Rikkaimuri tulee voida ottaa pidikkeestä helposti ja virtapistorasian on oltava lähellä verkkolaitetta 4 varten.
3.Poraa seinään kaksi reikää n. 68 mm:n etäisyydelle toisistaan. Käytä seinätelinettä 3 reikien piirtämiseen: Näin etäisyys on laskettu oikein.
Reiät on porattava 5 mm:n tulpille sopiviksi.
4.Työnnä tulpat reikiin ja ruuvaa seinäpidike 3 kiinni ruuvien avulla.
5.Voit työntää suuttimet sivussa olevaan tarvikepidikkeeseen.
6.Kytke verkkolaite 4 pistorasiaan.
Lataaminen
Ohje:
Varmista, että virtakytkin 6 on työnnetty taaksepäin (asento "0"), ennen kuin aloitat lataamisen.
•Aseta käsirikkaimuri ylhäältä seinäpidikkeeseen 3 niin, että tasavirtapistoke 5 liukuu rikkaimurin holkkiin. Latauksen merkkivalo 7 vilkkuu punaisena ja lataustapahtuma alkaa.
Tärkeää:
•Kun rikkaimurissa on jälleen riittävästi energiaa imemiseen, latauksen merkkivalo 7 palaa vihreänä. Tämä ei tarkoita sitä, että akut on ladattu täyteen. Kun latauksen merkkivalo 7 syttyy palamaan vihreänä, akut on ladattu n. 80 %.
•Jos lataustapahtuma on lopetettu, mikä voi kestää täysin purkautuneilla akuilla n. 5 tuntia, laite kytkee automaattisesti kunnossapitovaraukseen (hoitotoiminto). Älä kuitenkaan jätä laitetta jatkuvasti verkkolaitteeseen 4 liitettynä, jotta mahdolliset akkujen vauriot vältettäisiin.
•Lataa akut uudelleen vasta, kun käsirikkaimurin imuteho tiulee havaittavasti heikommaksi ja latauksen merkkivalo 7 vilkkuu vihreänä.
Ohje:
Rikkaimuri voidaan ladata myös suoraan verkkolaitteella 4. Irrota sitä varten tasavirtapistoke 5 sei näpidikkeestä 3 kevyesti kiertäen ja liitä se rikkaimurin holkkiin.
Käyttö
Huomio
Imuaukkoa ei saa missään tapauksessa peittää eikä tukkia. Tukokset johtavat moottorin ylikuumenemiseen ja vaurioitumiseen.
Ohjeita:
•Varmista, että pölysuodatin 0 on asennettu, ennen kuin käytät laitetta.
•Ime korkeintaan niin paljon nestettä, että likasäiliö q on täynnä MAX-merkintään asti.
1.Ota rikkaimuri seinäpidikkeestä 3, tai jos et käytä seinäpidikettä 3, vedä tasavirtapistoke 5 hol- kis-ta.
2.Aseta halutessasi imuaukkoon sopiva suutin:
•rakosuutin 2 ahtaiden, vaikeapääsyisten paikkojen puhdistamiseen.
•märkäimusuutin 1 nesteiden imuroimiseen.
- 16 -
Ohje:
Puhdista likasäiliö välittömästi nesteiden imuroinnin jälkeen q. Muuten muodostuu bakteereita ja taudinsiemeniä! Varmista, että pölysuodatin 9 on asennettu, ennen kuin käytät laitetta.
3.Kytke laite päälle työntämällä virtakytkin 6 eteen. Latauksen merkkivalo 7 välähtää vihreänä.
4.Työnnä virtakytkin 6 käytön jälkeen taakse.
 Ohje:
Ohje:
Aseta käsirikkaimuri seinäpidikkeeseen 3 ja aloita lataustapahtumalla, kun imuteho heikkenee havaittavasti ja latauksen merkkivalo 7 vilkkuu vihreänä.
Puhdistaminen
Parhaimpiin tuloksiin päästään, kun likasäiliö q tyhjennetään ja pölysuodatin 0 puhdistetaan jokaisen käyttökerran jälkeen.
Tärkeää:
Älä käytä mitään aggressiivisia, kemiallisia tai hankaavia puhdistusaineita. Nämä vaurioittavat laitteen pintaa.
1.Avaa likasäiliö q painamalla lukituksen avauspainiketta 8 ja irrottamalla likasäiliö q.
2.Ota pölysuodatin 0 likasäiliöstä q.
3.Tyhjennä likasäiliö q.
4.Vedä pölysuodattimen pussi 9 pidikkeineen pois pölysuodattimesta 0.
5.Huuhtele pölysuodattimen pussi 9 kylmässä vedessä ja odota, kunnes se on jälleen täysin kuiva, ennen kuin asetat sen takaisin pölysuodattimeen 0. Älä kuivaa sitä kuumalla ilmalla.
6.Aseta pölysuodatin 0 jälleen takaisin likasäiliöön q. Varmista, että pölysuodatin 0 on suorassa ja kumihuuli sulkee likasäiliön q.
7.Aseta likasäiliö q jälleen moottorilohkolle:
•Työnnä rikkaimuri alapinnalla oleva muovinokka likasäiliön q syvennykseen.
•Paina lukituksen vapautuspainiketta 8 ja työnnä samanaikaisesti likasäiliö q moottorilohkolle.
•Vapauta lukituksen vapautuspainike 8 niin, että lukitus osuu syvennykseen. Likasäiliö q on nyt tiiviisti moottorilohkolla.
8.Puhdista kotelo ja molemmat suuttimet kevyesti kostutetulla liinalla. Jos lika on kovapintaista, lisää liinaan mietoa puhdistusainetta.
9.Kuivaa kaikki osat hyvin, ennen kuin käytät laitetta uudelleen tai laitat sen pois.
Hävittäminen
Laite ja akku täytyy hävittää toisistaan erotettuina.
Laitteen hävittäminen
Älä hävitä laitetta tavallisen talousjätteen mukana. Tämä tuote on eurooppalaisen direktiivin 2012/19/EU alainen.
Anna laite hyväksytyn jätehuoltoyrityksen tai kunnallisen jätelaitoksen hävitettäväksi.
Noudata voimassa olevia määräyksiä. Epäselvissä tilanteissa ota yhteyttä paikalliseen jätehuoltoviranomaiseen.
- 17 -
Paristojen/akkujen hävittäminen
Paristoja/akkuja ei saa hävittää kotitalousjätteiden seassa. Jokaisella käyttäjällä on
lakisääteinen velvollisuus luovuttaa paristot/ akut kuntansa/kaupungin-osansa tai kaupan keräilypisteeseen.
Näin varmistetaan, että paristot/akut hävitetään ympäristöystävällisellä tavalla. Palauta paristot/akut ainoastaan purkautuneina.
Hävitä laite ympäristöystävällisesti poistamalla akku laitteesta.
Sähköiskun vaara!
Irrota laite sähköverkosta irrottaessasi akkua!
Huomio! Aineelliset vahingot!
Poista akku laitteesta vain, jos haluat hävittää/ romuttaa laitteen! Laite on viallinen, kun akku on irrotettu laitteesta!
1.Irrota likasäiliö q moottorilohkosta.
2.Irrota 4 moottorilohkon sivussa olevaa ristipääruuvia sekä moottorilohkon pyöreässä ritilässä oleva ristipääruuvi.
3.Voit nyt ottaa moottorilohkon osiinsa.
4.Katkaise 3 kaapelia, jotka yhdistävät piirilevyn ja sinisellä kuorella päällystetyn akun. Nyt voit irrottaa akun.
5.Hävitä akku ympäristöystävällisellä tavalla. Noudata voimassa olevia määräyksiä. Ota epäselvissä tapauksissa yhteyttä paikalliseen jätehuoltolaitokseen.
Hävitä kaikki pakkausmateriaalit  ympäristöystävällisellä tavalla.
Takuu ja huolto
Laitteen takuu on 3 vuotta ostopäivästä. Laite on valmistettu huolellisesti ja tarkistettu tarkasti ennen toimitusta. Säilytä ostokuitti todisteeksi takuun voimassaolosta.
Ota takuutapauksessa puhelimitse yhteyttä huoltopisteeseesi. Vain näin voidaan taata tuotteesi maksuton lähettäminen huoltoon.
Takuu koskee ainoastaan materiaalija valmistusvirheitä, ei kuitenkaan kuljetusvaurioita, kuluvia osia tai herkästi vaurioituvien osien, esim. kytkinten tai akkujen vaurioita. Tuote on tarkoitettu ainoastaan yksityiseen, ei kaupalliseen käyttöön.
Väärä tai asiaton käyttö, väkivallan käyttö ja muiden kuin valtuutetun huoltopisteen suorittamat korjaukset aiheuttavat takuun raukeamisen. Tämä takuu ei rajoita kuluttajan lakisääteisiä oikeuksia. Takuukorjaus ei pidennä takuuaikaa. Tämä koskee myös vaihdettuja ja korjattuja osia. Mahdollisista jo ostettaessa olemassa olevista vahingoista ja puutteista on ilmoitettava välittömästi pakkauksesta purkamisen jälkeen, kuitenkin viimeistään kaksi päivää ostopäiväyksen jälkeen. Takuuajan jälkeen suoritetut korjaukset ovat maksullisia.
Huolto Suomi
Tel.: 010309 3582
E-Mail: kompernass@lidl.fi
IAN 109560
Palvelupuhelin:
Maanantaista perjantaihin klo 8:00 – 20:00 (CET)
Maahantuoja
KOMPERNASS HANDELS GMBH BURGSTRASSE 21
44867 BOCHUM GERMANY www.kompernass.com
- 18 -
 Loading...