


|
|
|
KITCHEN TOOLS |
4 |
Digital Kitchen Scale SKW 3 EDS A1 |
|
|
Digital Kitchen Scale |
Cyfrowa waga kuchenna |
Operating instructions |
Instrukcja obsługi |
Digitális konyhamérleg |
Digitalna kuhinjska tehtnica |
Használati utasítás |
Navodila za uporabo |
Kuchyňská digitální váha |
Digitálna kuchynská váha |
Návod k obsluze |
Návod na obsluhu |
KOMPERNASS GMBH
BURGSTRASSE 21 · D-44867 BOCHUM
www.kompernass.com
ID-Nr.: SKW 3 EDS A1-03/11-V2
IAN: 64679
SKW 3 EDS A1
1
2
3
8 |
|
|
|
|
|
4 |
||
|
|
|
|
|
||||
7 |
|
|
|
|
|
|
5 |
|
|
|
|
||||||
|
|
|
|
|
|
|||
|
|
|
|
|
|
|||
6

Index |
Page |
Introduction . . . . . . . . . . . . . . . . . . . . . . . . . . . . . . . . . . . . . . . . . . . . . . . . . . . . . . 2
Information about these operating instructions . . . . . . . . . . . . . . . . . . . . . . . . . . . . . . . . . . . . . . . 2 Copyright. . . . . . . . . . . . . . . . . . . . . . . . . . . . . . . . . . . . . . . . . . . . . . . . . . . . . . . . . . . . . . . . . . . 2 Intended Use . . . . . . . . . . . . . . . . . . . . . . . . . . . . . . . . . . . . . . . . . . . . . . . . . . . . . . . . . . . . . . . . 2 Warning Notices . . . . . . . . . . . . . . . . . . . . . . . . . . . . . . . . . . . . . . . . . . . . . . . . . . . . . . . . . . . . . 2
Safety instructions . . . . . . . . . . . . . . . . . . . . . . . . . . . . . . . . . . . . . . . . . . . . . . . . . 2
Unpacking . . . . . . . . . . . . . . . . . . . . . . . . . . . . . . . . . . . . . . . . . . . . . . . . . . . . . . . 3
Disposal of packaging. . . . . . . . . . . . . . . . . . . . . . . . . . . . . . . . . . . . . . . . . . . . . . . . . . . . . . . . . 3
Items supplied . . . . . . . . . . . . . . . . . . . . . . . . . . . . . . . . . . . . . . . . . . . . . . . . . . . . 4
Operating Elements . . . . . . . . . . . . . . . . . . . . . . . . . . . . . . . . . . . . . . . . . . . . . . . . 4
Startup . . . . . . . . . . . . . . . . . . . . . . . . . . . . . . . . . . . . . . . . . . . . . . . . . . . . . . . . . . 4
Setting the time . . . . . . . . . . . . . . . . . . . . . . . . . . . . . . . . . . . . . . . . . . . . . . . . . . . . . . . . . . . . . . 4 Setup . . . . . . . . . . . . . . . . . . . . . . . . . . . . . . . . . . . . . . . . . . . . . . . . . . . . . . . . . . . . . . . . . . . . . . 5
Operation . . . . . . . . . . . . . . . . . . . . . . . . . . . . . . . . . . . . . . . . . . . . . . . . . . . . . . . . 5
Setting the units of measurement . . . . . . . . . . . . . . . . . . . . . . . . . . . . . . . . . . . . . . . . . . . . . . . . . 5 Weighing . . . . . . . . . . . . . . . . . . . . . . . . . . . . . . . . . . . . . . . . . . . . . . . . . . . . . . . . . . . . . . . . . . . 5 Adding & Weighing (Tare Function) . . . . . . . . . . . . . . . . . . . . . . . . . . . . . . . . . . . . . . . . . . . . . . 5 Removing weighed items . . . . . . . . . . . . . . . . . . . . . . . . . . . . . . . . . . . . . . . . . . . . . . . . . . . . . . . 6 Setting the Timer . . . . . . . . . . . . . . . . . . . . . . . . . . . . . . . . . . . . . . . . . . . . . . . . . . . . . . . . . . . . . 6 Switching the weighing function o . . . . . . . . . . . . . . . . . . . . . . . . . . . . . . . . . . . . . . . . . . . . . . . 6 Temperature Display . . . . . . . . . . . . . . . . . . . . . . . . . . . . . . . . . . . . . . . . . . . . . . . . . . . . . . . . . . 6
Troubleshooting . . . . . . . . . . . . . . . . . . . . . . . . . . . . . . . . . . . . . . . . . . . . . . . . . . . 7
Changing the batteries . . . . . . . . . . . . . . . . . . . . . . . . . . . . . . . . . . . . . . . . . . . . . 7
Storage . . . . . . . . . . . . . . . . . . . . . . . . . . . . . . . . . . . . . . . . . . . . . . . . . . . . . . . . . . 7
Cleaning . . . . . . . . . . . . . . . . . . . . . . . . . . . . . . . . . . . . . . . . . . . . . . . . . . . . . . . . . 7
Technical data . . . . . . . . . . . . . . . . . . . . . . . . . . . . . . . . . . . . . . . . . . . . . . . . . . . . 8
Disposal . . . . . . . . . . . . . . . . . . . . . . . . . . . . . . . . . . . . . . . . . . . . . . . . . . . . . . . . . 8
Warranty . . . . . . . . . . . . . . . . . . . . . . . . . . . . . . . . . . . . . . . . . . . . . . . . . . . . . . . . 8
Customer Service . . . . . . . . . . . . . . . . . . . . . . . . . . . . . . . . . . . . . . . . . . . . . . . . . . 9
Importer . . . . . . . . . . . . . . . . . . . . . . . . . . . . . . . . . . . . . . . . . . . . . . . . . . . . . . . . . 9
Read the operating instructions carefully before using the device for the first time and preserve this booklet for later reference. Pass this manual on to whoever might acquire the device at a future date.
- 1 -
Introduction
Information about these operating instructions
Congratulations on the purchase of your new appliance!
Thereby, you have decided in favour of a modern and high quality product. This operating manual is a component of this product. It contains important information in regard to safety, use and disposal.
Familiarise yourself with all of these operating and safety instruction before using the product. Use the appliance only as specified and only for the described applications. Additionally, pass this documentation on to whoever might acquire the appliance at a future date.
Claims of any kind resulting from damage caused by improper use, incompetent repairs, unauthorized modifications or the use of non-approved spare parts will not be acknowledged.
The operator alone bears liability.
Warning Notices
In these extant operating instructions the following warnings are used:
 Warning
A warning at this risk level indicates a possibly dangerous situation.
If the dangerous situation is not avoided, it could lead to personal injury.
Follow the instructions in this warning to avoid personal injuries.
Copyright
This documentation is copyright protected.
Any copying or reproduction, including as extracts, as well as the reproduction of images, also in an altered state, is only permitted with the written authorisation of the manufacturer.
Intended Use
These kitchen scales are intended for use in weighing non-caustic, non-aggressive and non-abrasive liquids (especially water and milk) and solid materials in domestic households. The weighing of medications and non-permitted materials is considered to be improper use.
The appliance is intended for domestic use only, it is not suitable for commercial or industrial applications.
 Warning:
Risks from unintended use!
Risks can be engendered by the appliance if it is used for unintended purposes and/or other types of use.
Use the appliance exclusively for its intended purposes.
Observe the procedures described in these operating instructions.
 Important
A warning at this risk level signifies possible property damage.
If the situation is not avoided it could lead to property damage.
The directives in this warning are there to avoid property damage.
 Notice
A notice signifies additional information that assists in the handling of the appliance.
Safety instructions
 Warning - RISK OF INJURY
•This appliance is not intended for use by individuals (including children) with restricted physical, physiological or intellectual abilities or deficiences in experience and/or knowledge unless they are supervised by a person responsible for their safety or receive from this person instruction in how the appliance is to be used.
•Children should be supervised in order to make sure that they do not play with the appliance.
 Important
Strictly observe the following safety notices. Failure to comply with them could damage the scales and possibly nullify your claims under the warranty provisions.
- 2 -

•Ensure that the batteries are inserted with the correct polarity and do not apply excessive force when inserting them.
•Never place more than 5 kg on the scale.
•Ensure that no fluids can permeate the scale.
•Avoid contact with solvents and with corrosive or abrasive cleaning materials.
•Only use the scale on level and firm surfaces.
•Do not place anything on the display.
•Do not subject the scale to high temperatures or powerful magnetic fields.
•Avoid electrostatic charging and discharging. These can cause erroneous displays and/or the sudden deactivation of the scales.
Information regarding the handling of batteries
When interacting with batteries, please observe the following:
 Risk of explosion!
•Do not throw batteries into a fire. Do not recharge the batteries. The risk of explosions and injuries exists!
•Never open batteries, never solder or weld batteries. The risk of explosions and injuries exists!
 Warning
•Keep batteries away from children. Children can put batteries into their mouths and swallow them. If a battery is swallowed, medical assistance must be sought IMMEDIATELY.
 Warning
•Regularly check the condition of the batteries. Leaking batteries can cause damage to the device.
•If you do not intend to use the appliance for an extended period, remove the batteries.
•Wear protective gloves in the event of having to remove a leaking battery. Then clean the battery compartment and the battery contacts with a dry cloth.
Unpacking
Remove all parts of the appliance and these operating instructions from the box.
Remove all packaging materials and protective foils.
Disposal of packaging
The packaging protects the appliance against transport damage. The packaging materials are selected from the point of view of their environmental friendliness and disposal technology and are therefore recyclable.
The recirculation of packaging into the material circuit saves on raw material and reduces generated waste. Dispose of packaging material that is no longer needed according to the regionally established regulations.
 Notice
If possible preserve the appliance’s original packaging during the warranty period so that, in the event of a warranty claim, you can package the appliance properly for its return.
- 3 -
Items supplied
The appliance is supplied with the following components as standard:
Kitchen Scale
2 x Batteries Type Micro/LR03/AAA
Operating Instructions
 Notice
Check the contents to ensure everything has been provided, and for signs of visible damage.
If the contents are incomplete, or have been damaged due to defective
packaging or transportation, contact the Service Hotline (see chapter Service).
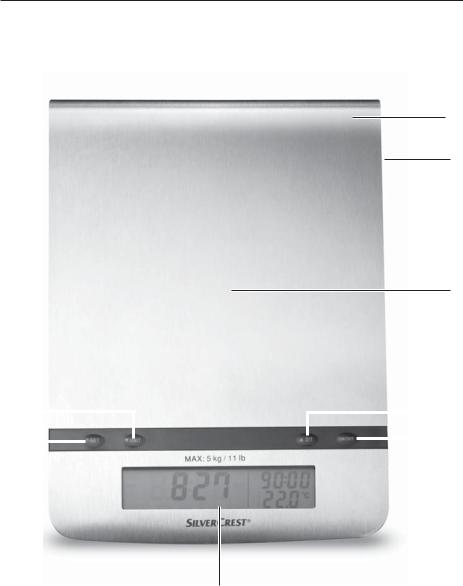
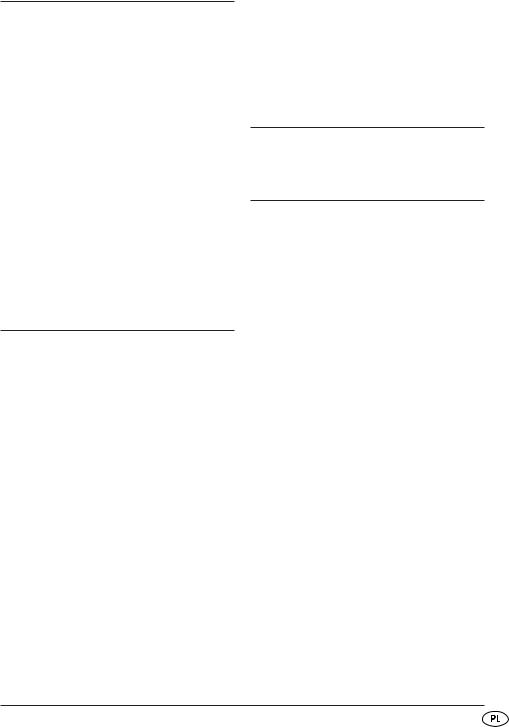
Operating Elements
1Suspension
2Battery compartment
3Weighing field
4Button ▲ Z/T ( ZERO/TARA)
5Button ON/OFF (On/O )
6Display
7Button T-SET (Timer/Clock adjustment)
8Button ▼ UNIT (Measuring unit adjuster)
Startup
1)Open the battery compartment 2 on the underside of the scale.
2)Pull on the tab to open the restraint for the batteries.
3)Remove the protective foil from the batteries.
4)Insert the batteries into the battery compartment 2. Pay heed to the polarity markings given in the battery compartment.
5)Press the restraint for the batteries down so that it engages.
6)Press to close the battery compartment cover, until it locks in place.
The scale is now in clock mode and ready for use.
Setting the time
On commissioning and on a change of batteries the current time must be programmed in, resp. adjusted.
1)As soon as the batteries have been inserted the hour indicator blinks. Press the buttons ▲Z/T 4 resp. ▼ UNIT 8 to set the hour.
2)Press the button T-SET 7 to switch to the minute indicator.
3)Press the button ▲ Z/T 4 resp. the button ▼ UNIT 8 to set the minutes.
4)Press the button T-SET 7.
The time display is now programmed.
 Notice
If you should ever need to re-adjust the time display, press and hold the button T-Set 7 until the hour indicator blinks. Then proceed as described above.
- 4 -

Setup
Place the kitchen scales on a level and slip-free surface.
 Notice
This appliance is equipped with non-slip rubber feet. As furniture surfaces may be made of a variety of materials and are treated with many di erent types of cleaning agents, it cannot be completely ruled out that some substances contain ingredients which may perish the rubber feet and soften them. If possible place an anti-slip material under the feet of the appliance.
3)To alternate within measurement unit systems between...
g/kg - ml water - ml milk or
oz/lb:oz - fl´oz water - fl´oz milk
... briefly press the button UNIT 8 until the desired measurement unit appears in the display 6.
 Notice
Always fill liquids into a container before you measure it!
Operation
Setting the units of measurement
You can choose between the metric and the AngloAmerican (Imperial) system. From 0 g - 999 g the unit is indicated in g/oz and from 999 g in kg/lb and g/oz.
Additionally, you can weigh liquids. In the metric system:
•Milliliter (ml) water
•Milliliter (ml) milk.
In the Anglo-American system:
•Fluid ounces (fl´oz) water
•Fluid ounces (fl´oz) milk.
1)Press the button ON/OFF 5. The scale is now in the weighing mode. The programmed unit adjustment appears under or to the right of the weight indication in the display 6.
2)To switch between the metric and AngloAmerican systems, press the button UNIT 8 until the measurement unit details change.
Weighing
1)Press the button ON/OFF 5 to the switch the scales on (weighing mode). The display 6 will light up.
2)Programme in the desired measurement unit (see chapter “Setting the units of measurement”).
The scales indicate a weight of “0”. “O” is shown in the display 6 and on the left.
3)Place a suitable receptacle on the scales and press the button Z/T 4. The scales once again shows “0”, it does not take account of the weight of the receptacle.
Place the item(s) to be weighed into the receptacle.
 Notice
If a button is not pressed or there is not a change of the current measured weight after approx.30 seconds, the display lighting 6 switches itself o . After a further 90 seconds the appliance returns to the Clock Mode.
Adding & Weighing (Tare Function)
You can repeatedly set the scale back to “0” in order to weigh additional partial quantities.
1)For this, press the button Z/T 4 once. In the display 6 “TARE” appears on the left. The scales indicate a weight of “0” again.
2)Place the additional item(s) to be weighed into the receptacle.
In the display 6 the weight of the newly added item(s) is shown.
- 5 -

 Notice
You can repeat this procedure several times. However, never place more than 5 kg on the scale.
On removal of the receptacle and ingredients from the scales, and on pressing the button Z/T 4, “O” is once again indicated on the left in the display 6.
Removing weighed items
1)Press the button Z/T 4 once. In the display 6 “TARE” is shown on the left. The scales indicate a weight of “0” again.
2)Remove the desired amount of item.
The weight value of the removed item appears in the display 6 as a negative value.
 Notice
You can repeat this procedure several times.
With removal of the receptacle and ingredients from the scales, and on pressing the button Z/ T 4, “O” is once again indicated on the left in the display 6.
4)Press the button T-SET 7 once. Using the buttons ▲ Z/T 4 resp. ▼ UNIT 8, programme in the desired ten-second setting.
5)Press the button T-SET 7 once. Using the buttons ▲ Z/T 4 resp. ▼ UNIT 8, programme in the desired one-second setting.
6)Press the button T-SET 7 to start the countdown.
 Notice
You can reset the timer: Press the button T-SET 7 to reset the timer.
As soon as the programmed time has expired, an acoustic signal sounds. This signal can be switched o by pressing any button.
Switching the weighing function o
If you do not weigh anything for ca. 2 minutes the scale automatically switches into the clock mode.
•To switch over to the clock mode manually, press the button ON/OFF 5.
Setting the Timer
The timer can be used in both the clock and the weighing mode.
The timer enables you to set the clock for a specific period of time, at the end of which a signal tone sounds. The preset time runs as in a countdown
1)Press the button T-SET 7 once. In the display 6 the bell symbol appears  .
.
 Notice
You can adjust the time accurately to the second. If you press and hold down the button ▲ Z/T 4
resp. ▼ UNIT 8 the time-indicator figures run through faster.
2)Using the buttons ▲ Z/T 4 resp. ▼ UNIT 8, programme in the desired ten-minute setting.
3)Press the button T-SET 7 once. Using the buttons ▲ Z/T 4 resp. ▼ UNIT 8 , programme in the desired one-minute setting.
Temperature Display
In the display 6 the temperature is shown on the bottom right in °C.
- 6 -
Troubleshooting
•If the display 6 shows „Err“, the scale is overburdened. Remove items from the scale. Never place more than 5 kg on the scale.
•If the display 6 briefly indicates „Err“ and the weighing mode cannot be switched on, the scale is overburdened. Remove items from the scale and then switch the scale back on again. Place less than 5 kg on the scale.
•If the display 6 shows „Lo“, the batteries are discharged. Replace the batteries.
 Notice
The indicator “Lo” only appears in the weighing mode.
•If „- - - -“ appears in the display 6, wait for a few seconds.
•Should your scale not function as expected, replace the batteries. Should the malfunction not be eliminated with these steps please make contact with our Service Centre (see “Service“).
Changing the batteries
 WARNING - Property Damage!
Pay attention to the correct polarity when exchanging batteries. An incorrect battery exchange could lead to the risk of an explosion. Only exchange batteries for identical or equivalent types. Should the batteries leak, clean the battery compart-
ment 2 with a dry cloth whilst wearing protective gloves.
 Risk of poisoning!
Batteries can be swallowed by children and cause a serious impairment of health. Keep the batteries out of the reach of children.
1)To exchange the batteries, open the battery compartment cover on the underside of the scales.
2)Pull on the tab to open the restraint for the batteries.
3)Remove the batteries by loosening them from the battery compartment 2 with the aid of the small cloth strip.
4)Insert the new batteries into the battery compartment 2. Pay heed to the polarity markings given in the battery compartment. The small cloth strip must lie under the batteries.
5)Press the restraint for the batteries down so that it engages.
6)Press and close the battery compartment cover, until it locks in place.
Storage
When the kitchen scale is not in use it can be hung up by means of the integrated suspension 1, for example from a kitchen ledge.
Cleaning
 WARNING - Property Damage!
•Ensure that no fluids can permeate the scale. Permeating liquids can damage the scale.
•Do not use abrasive or aggressive cleaning materials. These could attack the upper surfaces and irreparably damage the appliance.
•Wipe the scale clean with a cloth lightly moistened by a mild detergent solution or use a special stainless steel cleaner. Do not use abrasive or solvent cleaners.
•Clean the display 6 with a lightly moistened cloth only and then wipe it dry with a lint-free towel.
- 7 -
Technical data
Power supply: |
2 x 1.5 V |
|
|
|
|
|
|
|
|
|
|||||
|
Type Micro/AAA/LR03 |
||||||
Temperature display: |
0° C - 40° C, in 0.5° C |
||||||
|
steps; with a tolerance |
||||||
|
of ± 2° C |
||||||
Weighing Range: |
1 g - 5000 g, in 1 gram |
||||||
|
steps |
||||||
Disposal
Do not dispose of this appliance in your normal domestic waste. This product is subject to the provisions of European Directive 2002/96/EC.
Dispose of the appliance through an approved disposal centre or at your community waste facility. Observe the currently applicable regulations. In case of doubt, please contact your waste disposal centre.
Disposal of batteries
Used batteries/rechargeable batteries may not be disposed of in household waste. Every consumer is statutorily obligated to dispose of batteries at a collection site of his community / city district or at a retail store.
The purpose of this obligation is to ensure that batteries are disposed of in a non-polluting manner. Only dispose of batteries when they are fully discharged.
Warranty
Dear Customer,
The warranty for this appliance is for 3 years from the date of purchase. In cases of defects with this product, statutory rights are available to you against the seller of the product. These statutory rights are not restricted in any way by our warranty, which is detailed in the following.
Warranty Provisions
The warranty period begins on the date of purchase. Please retain your receipt as proof of purchase. This document is required as proof of purchase.
Should a material or manufacturing defect occur within three years from the date of purchase of this product, the product will - at our option - be repaired or replaced free of charge by us. This warranty benefit requires that, within the three-year period, the defective product and the proof of purchase (receipt) are presented and the defect is briefly described in writing, in particular what it is and when it occurred.
Should the defect be covered by our warranty, we will return the product either repaired or as a new replacement. A new warranty period does not begin with the repair or replacement of the product.
Warranty period and statutory defect claims
The warranty period is not extended by repairs made under the warranty. This applies also to replaced and repaired parts. Damages and defects extant at the time of purchase must be reported immediately after unpacking, resp. no later than two days after the date of purchase. Repairs made after the lapse of the warranty period are subject to charge.
Warranty Coverage
The appliance was carefully produced according to strict quality guidelines and thoroughly checked before delivery.
The warranty provisions apply to material or manufacturing defects. This warranty does not extend
to product components exposed to normal wear and tear, and which can therefore be regarded as wearing parts, or for damage to fragile parts such as switches, batteries, or parts that are made of glass. A warranty liability will not be triggered for minor deviations from the reference characteristics that are irrelevant to the value and usability of the product, or for damage caused by the chemical and electrochemical e ects of water, as well as in general from abnormal environmental conditions or extraneous operating conditions or when the product has otherwise come into contact with inappropriate materials.
This warranty lapses if the product is damaged or has not been appropriately used or maintained. To qualify as appropriate use of the product, all directives listed in the operating instructions are to be strictly observed. Utilisations and activities that are advised against or warned against in the operating instructions are to be implicitly avoided.
- 8 -
This product is for domestic use only and is not intended for commercial applications. The warranty is void in the case of abusive and improper handling, use of force and internal tampering not carried out by our authorised service branch.
Processing of Warranty Claims
To ensure the fast processing of your claim, please comply with the following instructions:
■For all queries please hold ready the item number (e.g., IAN 12345) and the receipt as proof of the purchase.
■For the article number, please obtain it from the typeplate, a gravure on the back of the operating instructions or as a sticker on the back or underside of the product.
■Should malfunctions or other defects occur, first contact the following designated service department by phone or e-mail.
■A product recorded as defective can then be sent, with enclosure of the proof of purchase (receipt) and an indication of what the defect is and when it occurred, postage free to the service address notified to you.
Customer Service
 Service Great Britain
Tel.: 0871 5000 720 (£ 0.10/Min.) E-Mail: kompernass@lidl.gb
IAN 64679
 Service Ireland
Tel.: 1890 930 034
(0,08 EUR/Min., (peak))
(0,06 EUR/Min., (o peak))
E-Mail: kompernass@lidl.ie
IAN 64679
Importer
Please note that the following address is not a Service address. Please contact the above detailed Service Centre first.
KOMPERNASS GMBH BURGSTRASSE 21
44867 BOCHUM, GERMANY
www.kompernass.com
- 9 -

- 10 -

Spis treści |
Strona |
Wprowadzenie . . . . . . . . . . . . . . . . . . . . . . . . . . . . . . . . . . . . . . . . . . . . . . . . . . 12
Informacje o niniejszej instrukcji obsługi . . . . . . . . . . . . . . . . . . . . . . . . . . . . . . . . . . . . . . . . . . 12 Prawo autorskie . . . . . . . . . . . . . . . . . . . . . . . . . . . . . . . . . . . . . . . . . . . . . . . . . . . . . . . . . . . . . 12 Użycie zgodne z przeznaczeniem . . . . . . . . . . . . . . . . . . . . . . . . . . . . . . . . . . . . . . . . . . . . . . 12 Wskazówki ostrzegawcze. . . . . . . . . . . . . . . . . . . . . . . . . . . . . . . . . . . . . . . . . . . . . . . . . . . . . 12
Wskazówki dotyczące bezpieczeństwa . . . . . . . . . . . . . . . . . . . . . . . . . . . . . . 12
Rozpakowanie. . . . . . . . . . . . . . . . . . . . . . . . . . . . . . . . . . . . . . . . . . . . . . . . . . . 13
Utylizacja opakowania . . . . . . . . . . . . . . . . . . . . . . . . . . . . . . . . . . . . . . . . . . . . . . . . . . . . . . . 13
Zakres dostawy. . . . . . . . . . . . . . . . . . . . . . . . . . . . . . . . . . . . . . . . . . . . . . . . . . 14
Elementy obsługowe. . . . . . . . . . . . . . . . . . . . . . . . . . . . . . . . . . . . . . . . . . . . . . 14
Uruchomienie . . . . . . . . . . . . . . . . . . . . . . . . . . . . . . . . . . . . . . . . . . . . . . . . . . . . 14
Ustawianie godziny . . . . . . . . . . . . . . . . . . . . . . . . . . . . . . . . . . . . . . . . . . . . . . . . . . . . . . . . . . 14 Ustawianie. . . . . . . . . . . . . . . . . . . . . . . . . . . . . . . . . . . . . . . . . . . . . . . . . . . . . . . . . . . . . . . . . 15
Obsługa . . . . . . . . . . . . . . . . . . . . . . . . . . . . . . . . . . . . . . . . . . . . . . . . . . . . . . . . 15
Ustawianie jednostki miary . . . . . . . . . . . . . . . . . . . . . . . . . . . . . . . . . . . . . . . . . . . . . . . . . . . . 15 Ważenie . . . . . . . . . . . . . . . . . . . . . . . . . . . . . . . . . . . . . . . . . . . . . . . . . . . . . . . . . . . . . . . . . . 15 Doważanie produktu (funkcja tarowania) . . . . . . . . . . . . . . . . . . . . . . . . . . . . . . . . . . . . . . . . . 15 Zdejmowanie ważonego produktu . . . . . . . . . . . . . . . . . . . . . . . . . . . . . . . . . . . . . . . . . . . . . . 16 Ustawianie zegara sterującego (timera) . . . . . . . . . . . . . . . . . . . . . . . . . . . . . . . . . . . . . . . . . . 16 Wyłączanie funkcji ważenia . . . . . . . . . . . . . . . . . . . . . . . . . . . . . . . . . . . . . . . . . . . . . . . . . . . 16 Wskaźnik temperatury. . . . . . . . . . . . . . . . . . . . . . . . . . . . . . . . . . . . . . . . . . . . . . . . . . . . . . . . 16
Usuwanie usterek . . . . . . . . . . . . . . . . . . . . . . . . . . . . . . . . . . . . . . . . . . . . . . . . 17
Wymiana baterii . . . . . . . . . . . . . . . . . . . . . . . . . . . . . . . . . . . . . . . . . . . . . . . . . 17
Przechowywanie . . . . . . . . . . . . . . . . . . . . . . . . . . . . . . . . . . . . . . . . . . . . . . . . . 17
Czyszczenie . . . . . . . . . . . . . . . . . . . . . . . . . . . . . . . . . . . . . . . . . . . . . . . . . . . . . 17
Dane techniczne . . . . . . . . . . . . . . . . . . . . . . . . . . . . . . . . . . . . . . . . . . . . . . . . . . 18
Utylizacja . . . . . . . . . . . . . . . . . . . . . . . . . . . . . . . . . . . . . . . . . . . . . . . . . . . . . . . 18
Gwarancja . . . . . . . . . . . . . . . . . . . . . . . . . . . . . . . . . . . . . . . . . . . . . . . . . . . . . . 18
Serwis . . . . . . . . . . . . . . . . . . . . . . . . . . . . . . . . . . . . . . . . . . . . . . . . . . . . . . . . . . 19
Importer . . . . . . . . . . . . . . . . . . . . . . . . . . . . . . . . . . . . . . . . . . . . . . . . . . . . . . . . 19
Przed pierwszym użyciem urządzenia należy dokładnie przeczytać niniejszą instrukcję obsługi i zachować ją na przyszłość. W przypadku przekazania urządzenia osobom trzecim należy przekazać im także instrukcję.
- 11 -
Wprowadzenie
Informacje o niniejszej instrukcji obsługi
Gratulujemy Ci zakupu naszego urządzenia! Jest to nowoczesny produkt o wysokiej jakości. Instrukcja obsługi stanowi element składowy produktu. Zawiera ona ważne wskazówki na temat bezpieczeństwa, użytkowania i utylizacji. Przed przystąpieniem do użytkowania produktu
zapoznaj się z wszystkimi wskazówkami dotyczącymi obsługi i bezpieczeństwa. Używaj urządzenia zawsze zgodnie z opisem i podanych obszarach użytkowania. W przypadku przekazania urządzenia następnej osobie, nie zapomnij dołączyć również instrukcji obsługi.
Prawo autorskie
Niniejsza dokumentacja jest prawnie chroniona. Wszelkie powielanie lub przedruk, także we fragmentach, oraz przekazywanie ilustracji, również po ich modyfikacji, jest dozwolone wyłącznie po uzyskaniu pisemnej zgody producenta.
Użycie zgodne z przeznaczeniem
Waga kuchenna służy do ważenia nie żrących, nie agresywnych ani nie szorujących płynów (najlepiej wody i mleka) oraz produktów w stanie stałym
w warunkach domowych. Ważenie medykamentów i niedopuszczalnych substancji jest niezgodne
z przeznaczeniem.
Urządzenie jest przeznaczone wyłącznie do użytku w warunkach domowych z wyłączeniem celów komercyjnych i przemysłowych.
 Ostrzeżenie!
Niebezpieczeństwo spowodowane użytkowaniem niezgodnie z przeznaczeniem!
Użytkowanie urządzenia niezgodnie z jego przeznaczeniem i/lub inne wykorzystanie urządzenia może wiązać się z różnymi zagrożeniami.
Urządzenie należy użytkować wyłącznie zgodnie z jego przeznaczeniem.
Należy przestrzegać opisanych w niniejszej instrukcji obsługi metod postępowania.
Wyklucza się możliwość wnoszenia jakichkolwiek roszczeń z tytułu uszkodzeń spowodowanych zastosowaniem niezgodnie z przeznaczeniem, nieprawidłowymi naprawami, niedozwolonymi zmianami lub użyciem niedopuszczalnych części zamiennych.
Wszelkie ryzyko ponosi wyłącznie użytkownik.
Wskazówki ostrzegawcze
W niniejszej instrukcji obsługi zastosowano następujące wskazówki ostrzegawcze:
 Ostrzeżenie
Wskazówka ostrzegawcza tego stopnia zagrożenia oznacza możliwą do wystąpienia sytuację niebezpieczną.
W razie braku możliwości uniknięcia niebezpiecznej sytuacji, może to doprowadzić do odniesienia obrażeń.
Instrukcje w niniejszej wskazówce ostrzegawczej stosuje się, by uniknąć odniesienia obrażeń osób.
 Uwaga
Uwaga
Wskazówka ostrzegawcza tego stopnia zagrożenia oznacza możliwą szkodę materialną.
W razie braku możliwości uniknięcia niebezpiecznej sytuacji, może to doprowadzić do szkód materialnych.
Instrukcje w niniejszej wskazówce ostrzegawczej stosuje się, by uniknąć szkód materialnych.
 Wskazówka
Wskazówka oznacza dodatkowe informacje, ułatwiające korzystanie z urządzenia.
Wskazówki dotyczące bezpieczeństwa
 Ostrzeżenie – niebezpieczeństwo odniesienia obrażeń
•Tego urządzenie nie powinny używać osoby (w tym również dzieci) o ograniczonej sprawności fizycznej, ruchowej lub umysłowej lub z brakiem doświadczenia i / lub wiedzy, chyba że dla ich bezpieczeństwa będą przebywały pod opieką dorosłej osoby lub zostaną poinstruowane przez osobę sprawującą opiekę o sposobie użytkowania urządzenia.
•Nie można pozwolić dzieciom na zabawę urządzeniem.
- 12 -

 Uwaga
Uwaga
Ściśle przestrzegaj następujących wskazówek bezpieczeństwa. W wypadku ich nieprzestrzegania może dojść do uszkodzenia wagi i utraty gwarancji.
•Przy wkładaniu baterii zwracać uwagę na poprawne położenie biegunów oraz nie używać zbyć dużej siły.
•Nie stawiaj więcej niż 5 kg na wadze.
•Nie dopuść do tego, by do wagi dostały się płyny.
•Unikaj kontaktu z rozpuszczalnikami oraz żrącymi i szorującymi środkami czyszczącymi.
•Wagę stawiaj wyłącznie na płaskim i stabilnym podłożu.
•Nie stawiaj wagi na wyświetlaczu.
•Nie narażaj wagi na działanie wysokich temperatur ani pól magnetycznych.
•Unikaj gromadzenia się ładunków i wyładowań elektrostatycznych. Mogą one powodować przekłamania podczas ważenia, błędne wskazania na wyświetlaczu i niekontrolowane wyłączenie wagi.
Wskazówki dotyczące postępowania z bateriami
Podczas obchodzenia się z bateriami przestrzegaj następujących zasad:
 Niebezpieczeństwo wybuchu
•Baterii nie wolno wrzucać do ognia. Nigdy nie ładować rozładowanych baterii. Istnieje niebezpieczeństwo wybuchu i odniesienia obrażeń!
•Baterii nie wolno otwierać, lutować ani spawać. Istnieje niebezpieczeństwo wybuchu i odniesienia obrażeń!
 Ostrzeżenie
•Baterie nie powinny nigdy trafić w ręce dzieci. Dziecko może połknąć baterię. W razie połknięcia baterii należy natychmiast skorzystać
z pomocy medycznej.
 Ostrzeżenie
•Regularnie sprawdzaj stan baterii. Rozlane baterie mogą spowodować uszkodzenia urządzenia.
•Wyjmij baterie, jeśli urządzenie nie będzie użytkowane przez dłuższy okres czasu.
•W celu wyjęcia z urządzenia wylanych baterii zakładaj zawsze rękawice ochronne. Schowek baterii i styki baterii czyść tylko suchą szmatką.
Rozpakowanie
Wyjmij z kartonu wszystkie elementy urządzenia oraz instrukcję obsługi.
Zdejmij wszystkie elementy opakowania i folie ochronne.
Utylizacja opakowania
Opakowanie chroni urządzenie przed uszkodzeniami podczas transportu. W trosce o ochronę środowiska, wszystkie zastosowane elementy opakowania nadają się do ponownego przetworzenia.
Zwracanie opakowania do obiegu materiałów oszczędza surowce naturalne i zmniejsza zanieczyszczenie odpadami. Zbędne materiały opakowania utylizuj zgodnie z obowiązującymi przepisami.
 Wskazówka
W miarę możliwości zachowaj oryginalne opakowanie na czas trwania gwarancji, by w razie odsyłania urządzenia móc je prawidłowo zapakować.
- 13 -
Zakres dostawy
Urządzenie jest wyposażone standardowo w następujące elementy:
waga kuchenna
2 x bateria typu Micro/LR03/AAA Instrukcja obsługi
 Wskazówka
Po rozpakowaniu nowego urządzenia sprawdź, czy w środku są wszystkie części.
W przypadku stwierdzenia niekompletnej zawartości opakowania lub uszkodzeń spowodowanych nieprawidłowym opakowaniem lub transportem, skontaktuj się z infolinią obsługi klienta (zobacz rozdział Serwis).
Uruchomienie
1)Otwórz komorę na baterie 2 pod wagą.
2)Pociągnij za języczek, by otworzyć blokadę baterii.
3)Ściągnij folię ochronną z baterii.
4)Włóż baterie do komory na baterie 2. Zwróć uwagę na umiejscowienie biegunów pokazane w komorze na baterie. Tasiemka musi się znajdować pod bateriami.
5)Wciśnij blokadę baterii, aż się zatrzaśnie.
6)Zamknij klapkę komory na baterie, aż się zatrzaśnie.
Na wyświetlaczu wagi wyświetla się czas i urządzenie jest gotowe do pracy.
Elementy obsługowe
1wieszak
2komora na baterie
3powierzchnia do ważenia
4przycisk ▲ Z/T ( ZERO/TARA)
5przycisk ON/OFF (wł./wył.)
6wyświetlacz
7przycisk T-SET (ustawianie zegara sterującego (timera)/czasu)
8przycisk ▼ UNIT (przełącznik jednostek)
Ustawianie godziny
Przy pierwszym uruchomieniu lub po zmianie baterii należy ustawić czas.
1)Po umieszczeniu baterii w urządzeniu miga wskazanie godzin. Naciskaj przycisk ▲ Z/ T 4 wzgl. ▼ UNIT 8, aż do ustawienia prawidłowej godziny.
2)Naciśnij przycisk T-SET 7, by przejść do wskazania minut.
3)Naciskaj przycisk ▲ Z/T 4 wzgl. przycisk ▼ UNIT 8, aż do ustawienia minut.
4)Naciśnij przycisk T-SET 7.
W tym momencie czas jest ustawiony.
 Wskazówka
By zmienić czas w trakcie późniejszej pracy, naciśnij i przytrzymaj przycisk T-Set 7, aż zacznie migać wskazanie godzin. Postępuj tak samo, jak opisano powyżej.
- 14 -

Ustawianie
Postaw wagę na płaskiej i szorstkiej powierzchni.
 Wskazówka
Urządzenie jest wyposażone w podkładki antypoślizgowe. Ponieważ powierzchnie mebli są wykonane z różnych materiałów i przez to wymagają stosowania różnych środków konserwujących, nie można wykluczyć, że niektóre z tych środków mogą działać niszcząco na gumowe podkładki antypoślizgowe. W razie konieczności podłóż pod urządzenie stosowną matę lub inną podkładkę.
Obsługa
Ustawianie jednostki miary
Dostępne są dwa systemy miar, brytyjski i metryczny. Waga 0 g - 999 g pojawia się jednostce g/oz, natomiast powyżej 999 g w kg/LB i g/oz.
Dodatkowo możesz również ważyć płyny. W systemie metrycznym:
•mililitry (ml) wody (Water)
•mililitry (ml) mleka (Milk).
W systemie brytyjskim:
•uncja płynu (fl´oz) wody (Water)
•uncja płynu (fl´oz) mleka (Milk).
1)Naciśnij przycisk ON/OFF 5. Waga może tylko ważyć. Ustawiona jednostka wyświetla się na dole wyświetlacza 6 lub z prawej strony obok wskazania wagi.
2)By wybrać wskazania w systemie metrycznym lub brytyjskim, naciśnij i przytrzymaj przycisk UNIT 8 dotąd, aż zmieni się wskazanie jednostki.
3)By w danym systemie miar przejść do ustawienia...
g/kg - ml Water - ml Milk lub
oz/lb:oz - fl´oz Water - fl´oz Milk
..., naciśnij krótko przycisk UNIT 8, aż na wyświetlaczu 6 wyświetli się żądana jednostka miary.
 Wskazówka
Płyny przed zważeniem zawsze najpierw wlej do pojemnika!
Ważenie
1)Naciśnij przycisk ON/OFF 5, by włączyć wagę (ważenie). Włącza się wyświetlacz 6.
2)Ustaw żądaną jednostkę miary (zobacz rozdział „Ustawianie jednostki miary”).
Waga pokazuje „0”. Na wyświetlaczu 6 z lewej strony wyświetla się „O”.
3)Postaw na wadzę odpowiednie naczynie i naciśnij przycisk Z/T 4. Waga ponownie pokazuje „0” nie ważąc naczynia.
Wlej do naczynia ważony płyn.
 Wskazówka
Po upływie 30 sekund bez naciśnięcia przycisku lub zmianie aktualnie ważonego ciężaru, podświetlenie wyświetlacza 6 gaśnie.
Po upływie kolejnych 90 sekund ponownie wyświetla się czas.
Doważanie produktu (funkcja tarowania)
W celu doważenia dodatkowych ilości częściowych można ustawić wagę na „0”.
1)W tym celu naciśnij jeden raz przycisk Z/T 4. Z lewej strony wyświetlacza 6 wyświetla się „TARE”. Waga ponownie pokazuje „0”.
2)Wlej do naczynia dodatkową ilość płynu.
Na wyświetlaczu 6 wyświetla się ciężar dodatkowej ilości produktu.
- 15 -
 Wskazówka
Tę czynność można powtarzać wielokrotnie. Nie należy jednak nigdy ustawiać więcej niż 5 kg na wadze.
Po zdjęciu całego ważonego produktu z wagi i naciśnięciu przycisku Z/T 4, z lewej strony wyświetlacza 6 wyświetla się „O”.
Zdejmowanie ważonego produktu
1)Naciśnij jeden raz przycisk Z/T 4. Na wyświetlaczu 6 z lewej strony wyświetla się „TARE”. Waga ponownie pokazuje „0”.
2)Zdejmij odpowiednią ilość produktu.
Ciężar zdjętego produktu wyświetla się na wyświetlaczu 6 jako wartość ujemna.
 Wskazówka
Tę czynność możesz powtarzać wielokrotnie.
Po zdjęciu z wagi całej zawartości produktu i naciśnięciu przycisku Z/T 4, na wyświetlaczu 6 z lewej strony wyświetli się „O”.
Ustawianie zegara sterującego (timera)
Zegar sterujący (timer) można wykorzystywać zarówno wtedy, gdy waga wyświetla czas, jak i wtedy, gdy waży produkty.
Zegar sterujący umożliwia ustawianie czasu, po upływie którego nastąpi włączenie sygnału dźwiękowego. Ustawiony czas jest odliczany wstecz.
1)Naciśnij jeden raz przycisk T-SET 7. Na wyświetlaczu 6 wyświetla się ikona dzwonka  .
.
 Wskazówka
Możesz nastawić czas z dokładnością do jednej sekundy. Naciśnięcie i przytrzymanie przycisku
▲ Z/T 4 wzgl. ▼ UNIT 8 powoduje szybsze odliczanie.
2)Za pomocą przycisku ▲ Z/T 4 wzgl. ▼ UNIT 8 ustaw żądany czas w dziesiątkach minut.
3)Naciśnij jeden raz przycisk T-SET 7. Za pomocą przycisku ▲ Z/T 4 wzgl. ▼ UNIT 8 ustaw żądany czas w pojedynczych minutach.
4)Naciśnij jeden raz przycisk T-SET 7. Za pomocą przycisku ▲ Z/T 4 wzgl. ▼ UNIT 8 ustaw żądany czas w dziesiątkach sekund.
5)Naciśnij jeden raz przycisk T-SET 7. Za pomocą przycisku ▲ Z/T 4 wzgl. ▼ UNIT 8 ustaw żądany czas w pojedynczych sekundach.
6)Naciśnij przycisk T-SET 7, by rozpocząć odliczanie czasu.
 Wskazówka
Możesz wyzerować zegar sterujący (timer): Naciśnij przycisk T-SET 7, by wyzerować zegar sterujący (timer).
Po upływie ustawionego czasu włącza się sygnał dźwiękowy.Sygnał dźwiękowy możesz wyłączyć poprzez naciśnięcie dowolnego przycisku.
Wyłączanie funkcji ważenia
Automatyka przełącza wagę na wskazanie czasu, gdy w ciągu 2 minut nie zostanie zważony żaden produkt.
•By przejść ręcznie do wskazania czasu, naciśnij przycisk ON/OFF 5.
Wskaźnik temperatury
Na wyświetlaczu 6 w prawym dolnym rogu wyświetla się temperatura w °C.
- 16 -
Usuwanie usterek
•Jeśli na wyświetlaczu 6 widać wskazanie „Err”, waga jest przeciążona. Ująć ważonego towaru. Nie ustawiać więcej niż 5 kg na wadze.
•Jeśli na wyświetlaczu 6 widać wskazanie „Err” przy wyłączonej funkcji ważenia, waga jest przeciążona. Zdejmij ważony produkt z wagi i ponownie włącz wagę. Połóż mniej niż 5 kg na wadze.
•Jeśli na wyświetlaczu 6 widać wskazanie „Lo”, wyczerpały się baterie. Wymienić baterie.
 Wskazówka
Wskazanie „Lo” wyświetla się tylko przy wybranej funkcji ważenia.
•Jeśli na wyświetlaczu 6 pojawi się „- - - -”, odczekaj kilka sekund.
•Jeśli waga nie działa zgodnie z oczekiwaniami, należy wymienić baterie. Gdyby nie udało się w ten sposób usunąć wadliwego działania, należy zwrócić się do serwisu (zobacz „Serwis”).
Wymiana baterii
 Uwaga – szkody materialne!
Przy wkładaniu baterii zwracać uwagę na poprawne położenie biegunów. W wypadku przeprowadzania w nieprzepisowy sposób wymiany baterii istnieje zagrożenie eksplozji. Zużyte baterie wymieniać zawsze na takie same lub
takiego samego typu. Komorę 2 zanieczyszczoną rozlanymi bateriami wytrzyj suchą szmatkę. Do pracy zakładaj rękawice ochronne.
 Niebezpieczeństwo zatrucia!
Baterie mogą zostać przypadkowo połknięte przez dzieci i spowodować zagrożenie dla zdrowia. Baterie należy przechowywać w miejscu niedostępnym dla dzieci.
1)By zmienić baterie, otwórz pokrywę komory na baterie pod obudową wagi.
2)Pociągnij za języczek, by otworzyć blokadę baterii.
3)Pociągając za tasiemkę wyjmij baterie ze schowka 2.
4)Włóż nowe baterie do komory na baterie 2. Zwróć uwagę na umiejscowienie biegunów pokazane w komorze na baterie. Tasiemka musi się znajdować pod bateriami.
5)Wciśnij blokadę baterii, aż się zatrzaśnie.
6)Zamknij klapkę komory na baterie, aż się zatrzaśnie.
Przechowywanie
Nieużywaną wagę możesz zawiesić w kuchni na wieszaku 1.
Czyszczenie
 Uwaga – szkody materialne!
•Nie dopuść do tego, by do wagi dostały się płyny. Ciecze, przedostające się do wnętrza wagi, mogą spowodować jej uszkodzenie.
•Nie używaj środków szorujących powierzchnię ani żrących. Niszczą one powierzchnię urządzenia i mogą doprowadzić do powstania uszkodzenia, którego naprawa nie będzie wykonalna.
•Wytrzyj wagę szmatką lekko zwilżoną delikatnym płynem do mycia naczyń lub specjalnym środkiem do mycia powierzchni ze stali nierdzewnej. Nie stosuj żadnych środków szorujących ani rozpuszczalników.
•Wyświetlacz 6 czyść wyłącznie szmatką lekko zwilżoną wodą, a następnie wytrzyj do sucha.
- 17 -
 Loading...