


CONVECTION HEATER SKT 2000 B1
CONVECTION HEATER |
KONWEKTOR |
Operating instructions |
Instrukcja obsługi |
KONVEKTOR |
KONVEKTORSKI GRELNIK |
Kezelési útmutató |
Navodilo za uporabo |
KONVEKTOR |
KONVEKTOR |
Návod k obsluze |
Návod na obsluhu |
KONVEKTOR |
|
Bedienungsanleitung |
|
IAN 100157
RP1001057_Konvektor Timer_Cover_LB4.indd 2 |
|
|
11.04.14 12:10 |
|
|
||
|
|
|
|
RP100157 Konvektor Timer LB4 Seite 1 Mittwoch, 11. Juni 2014 12:37 12
English . . . . . . . . . . . . . . . . . . . . . . . . . . . . . . . . . . . . . . . . . . 3
Be sure to note the fold-out page.
Polski . . . . . . . . . . . . . . . . . . . . . . . . . . . . . . . . . . . . . . . . . |
15 |
Proszę zwrócić uwagę na informacje umieszczone na wewnętrznej stronie okładki
Magyar . . . . . . . . . . . . . . . . . . . . . . . . . . . . . . . . . . . . . . . . |
28 |
Kérjük, figyeljen a kinyitható oldalra |
|
Slovensko . . . . . . . . . . . . . . . . . . . . . . . . . . . . . . . . . . . . . . |
41 |
Prosimo, upoštevajte tekst na zavihani strani. |
|
Česky . . . . . . . . . . . . . . . . . . . . . . . . . . . . . . . . . . . . . . . . . |
52 |
Povšimněte si vyklápěcí strany |
|
Slovensky . . . . . . . . . . . . . . . . . . . . . . . . . . . . . . . . . . . . . . |
63 |
Prosím, všimnite si vyklápaciu stranu. |
|
Deutsch . . . . . . . . . . . . . . . . . . . . . . . . . . . . . . . . . . . . . . . . |
75 |
Bitte beachten Sie die Ausklappseite |
|
SKT 2000 B1_14_V1.2_GB_PL_HU_SI_CZ_SK_DE

RP100157 Konvektor Timer LB4 Seite 1 Mittwoch, 11. Juni 2014 12:37 12 |
|||
1 |
2 |
|
3 |
|
|
|
4 |
|
|
|
5 |
|
|
|
6 |
|
|
|
7 |
|
|
|
8 |
|
|
|
9 |
|
|
|
10 |
14 |
13 |
12 |
11 |
RP100157 Konvektor Timer LB4 Seite 2 Mittwoch, 11. Juni 2014 12:37 12
RP100157 Konvektor Timer LB4 Seite 3 Mittwoch, 11. Juni 2014 12:37 12
Contents
1. Description . . . . . . . . . . . . . . . . . . . . . . . . . . . . . . . . . . . . . . . . . . . . . . . . . . . . . . . . . . . . 3 2. Names of parts (see fold-out page) . . . . . . . . . . . . . . . . . . . . . . . . . . . . . . . . . . . . . . . . . . . 4 3. Technical data . . . . . . . . . . . . . . . . . . . . . . . . . . . . . . . . . . . . . . . . . . . . . . . . . . . . . . . . . . 4 4. Safety instructions. . . . . . . . . . . . . . . . . . . . . . . . . . . . . . . . . . . . . . . . . . . . . . . . . . . . . . . 4 5. Unpacking and setting up. . . . . . . . . . . . . . . . . . . . . . . . . . . . . . . . . . . . . . . . . . . . . . . . . . 7 6. Operation . . . . . . . . . . . . . . . . . . . . . . . . . . . . . . . . . . . . . . . . . . . . . . . . . . . . . . . . . . . . . 9 7. Cleaning . . . . . . . . . . . . . . . . . . . . . . . . . . . . . . . . . . . . . . . . . . . . . . . . . . . . . . . . . . . . . 11 8. Troubleshooting . . . . . . . . . . . . . . . . . . . . . . . . . . . . . . . . . . . . . . . . . . . . . . . . . . . . . . . 12 9. Disposal . . . . . . . . . . . . . . . . . . . . . . . . . . . . . . . . . . . . . . . . . . . . . . . . . . . . . . . . . . . . . 12
10. HOYER Handel GmbH Warranty . . . . . . . . . . . . . . . . . . . . . . . . . . . . . . . . . . . . . . . . . . . . 13
Congratulations on the purchase of your new product.
You have selected a high-quality product. The operating instructions are a constituent part of this product. They contain important information about safety, use and disposal.
Familiarize yourself with all the operating and safety instructions before using the product. Use the product only as described and for the stated spheres of application.
If you pass the product on to a third party, always pass on all the documentation as well.
1. Description
1.1 Intended purpose
This SilverCrest SKT 2000 B1 convector heater may be used to heat dry rooms.
This appliance is intended for private use and is not suitable for commercial purposes. The appliance is likewise suitable for:
•use in staff kitchens in shops, offices and other commercial areas,
•use in agricultural settings,
•customers in hotels, motels and other accommodations,
•bed-and-breakfast establishments.
The appliance is suitable for providing auxiliary heating. It is not suitable for use on its own to heat large spaces.
The appliance is floor-standing only or can be wall-mounted using the wall brackets also supplied.
1.2 Scope of supply
•1 convector heater
•2 feet
•4 screws for feet
•4 wall hooks
•4 wall plugs with screws for wall hooks
•1 set of operating instructions
SKT 2000 B1 |
3 |
RP100157 Konvektor Timer LB4 Seite 4 Mittwoch, 11. Juni 2014 12:37 12
1.3 Symbols on the appliance
The adjacent symbol 3 warns against covering the appliance as this could cause a build up of heat leading to damage and the risk of fire.
2. Names of parts (see fold-out page)
1 |
Carry handles |
8 |
Temperature selector |
2 |
Air outlet |
9 |
Frost symbol |
3 |
Warning symbol - "Do not cover” |
10 Timer |
|
4 |
Feet |
11 Scale for time |
|
5 |
Switch 1250W |
12 Control segments |
|
6 |
Switch 750W |
13 Hourly markings |
|
7 |
Fan switch |
14 Main switch |
|
|
3. Technical data |
||
|
|
|
|
Power supply: |
220 - 240 V~/50 Hz |
||
Maximum power: |
2,000 watts |
||
Protection class: |
I |
|
|
4. Safety instructions
4.1 Terms used
The following signalling terms are found in these Operating Instructions:
Warning!
High risk. Disregarding the warning may cause injury to life
and limb.
Caution!
Medium risk. Disregarding the warning may cause damage to property.
Note:
Low risk. Circumstances that should be taken into account when dealing with this appliance.
4
RP100157 Konvektor Timer LB4 Seite 5 Mittwoch, 11. Juni 2014 12:37 12
4.2Special informations for this appliance
Warning! To avoid injury, please observe the following information.
•Children under the age of 3 should be kept away from the appliance unless they are under constant supervision.
•Children between the ages of 3 and 8 may only switch the appliance on or off provided they are supervised or instructed in the safe use of the appliance and have understood its associated hazards and only when the appliance is placed or installed in its normal working position.
•Children between the ages of 3 and 8 may not insert the plug into the plug socket, control the appliance, clean or maintain it.
•This appliance can be used by children aged 8 or more, and by persons who have reduced physical, sensory or mental ability or who lack experience and/or knowledge, provided they are supervised or instructed in the safe use of the appliance and have understood its associated hazards. Do not allow children to play with the appliance.
•Children may not be permitted to carry out cleaning or maintenance of the appliance unless they are older than 8 and are supervised.
•Children under the age of 8 should be kept away from the appliance and its power cable.
•Caution – some parts of the appliance may become very hot and lead to burns. Please be especially careful when children or vulnerable persons are nearby.
•The metal surfaces of the appliance may get hot, so only hold the appliance by the carry handles 1.
•Always take the mains plug out of its socket before cleaning.
•Never immerse the appliance in water, and protect it from splashes and drips.
•Before cleaning, allow the appliance to cool down to avoid the danger of burns.
•To prevent the heater overheating, do not cover it.
•The appliance should never be placed directly below a wall power socket, because the radiated heat could damage the electrical installation.
•Do not use this heater with a programming switch, a timer switch, a separate remote control system or any other device which switches the heater on automatically, as there is a risk of fire if the heater
is covered or incorrectly set up.
Caution! To prevent material damage, please comply with the conditions below.
•Never use scouring, corrosive or abrasive cleaning materials.
•Never use the appliance in the immediate vicinity of a sink, bath tub, shower or swimming pool as splashes might get into the appliance.
4.3 General information
•Before using the appliance, be sure to read these Operating Instructions carefully. They are a component part of the appliance and must be available at all times.
•Use the appliance only for the purpose described (see “1.1 Intended purpose” on page 3).
•Check whether the mains voltage (see type plate on the appliance) agrees with your mains voltage.
•If there should be any malfunctions, the appliance may only be repaired by our Service Centre. The contact data can be found in “Service Centre” on page 14.
•The appliance must only be set up on a firm, level, dry and non-flammable surface.
•Check that the power socket is easily accessible so that you can pull out the mains plug quickly if necessary.
SKT 2000 B1 |
5 |
RP100157 Konvektor Timer LB4 Seite 6 Mittwoch, 11. Juni 2014 12:37 12
4.4 Protection against electric shock
Warning! The following safety information is intended to protect you against electric shock.
•Only plug the appliance into a correctly installed, earthed wall socket.
•Do not use the appliance if it has fallen on the floor, received a hard blow or fallen into water. In this case, please contact our Service Centre. The contact data can be found in “Service Centre” on page 14.
•The appliance must not under any circumstances be used if it is damaged. Have the device repaired in such cases by a qualified specialist. The contact data can be found in “Service Centre” on page 14.
•If the mains cable for this appliance is damaged, it must be replaced by the manufacturer or a person with similar qualifications in order to avoid a hazard.
•Water or other liquids must never be allowed to enter the appliance. For this reason:
–never use outdoors;
–never place containers filled with liquid, such as drinking glasses, vases etc. on the appliance;
If nonetheless liquid does enter the appliance, unplug the mains plug immediately and have the appliance repaired by a qualified specialist. The contact data can be found in “Service Centre” on page 14.
•Never insert fingers or any objects through the protective guards into the inside of the appliance.
•Never touch the appliance, the mains cord or the mains plug with moist hands.
•Always pull the mains cord out by the plug. Never pull it by the cord itself.
•Ensure that the mains cable is not kinked, twisted or crushed.
•Ensure that the mains cable is not damaged on sharp edges.
•Keep the mains cord away from hot surfaces (such as stove eyes).
•If you are not using the appliance for a prolonged period of time, remove the plug from the wall socket. Only then is the appliance completely free of current.
•You should avoid using extension cords. This is only allowed under very particular conditions:
–The extension cord has to be suited for the appliance's amperage.
–The extension cord must not be installed "loose": it must not be possible to trip over it or within the reach of children.
–The extension cord must not by any means be damaged.
–No other devices other than this appliance must be connected to the mains socket, as otherwise overloading of the power supply network could occur (multiple sockets are not allowed!).
4.5 Protection against the danger of fire
Warning! As the appliance works at high temperatures, please observe the following safety information to prevent fire.
•While the appliance is operating, there must be no flammable objects (e.g. curtains, paper) in the immediate vicinity of the appliance.
•Never use the appliance to dry textiles or other items on, over or in front of the appliance.
6
RP100157 Konvektor Timer LB4 Seite 7 Mittwoch, 11. Juni 2014 12:37 12
•When deciding where to place the appliance on the floor, maintain a minimum distance of 0.5 m from other appliances or the wall.
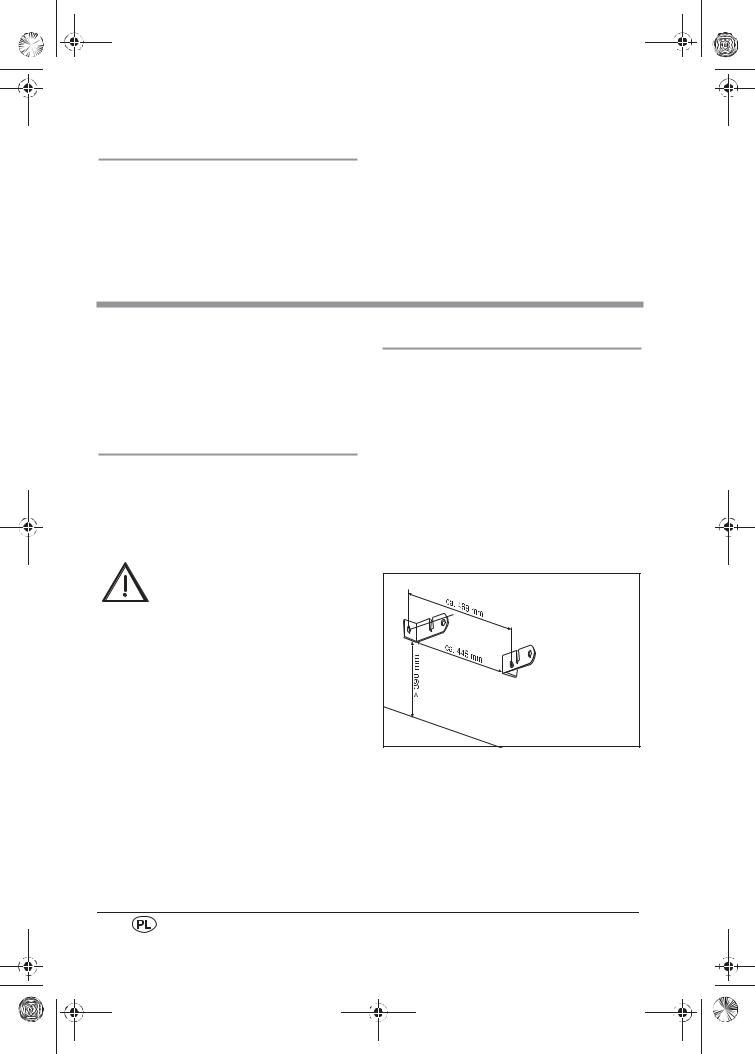
•If you are mounting the appliance on the wall, only the wall hooks supplied should be used. It must then be ensured that air can circulate freely around the convector. The minimum distance between the floor and the lower edge of the appliance is 10 cm.
•If you are mounting the appliance on the wall, it must not be flammable and should be strong enough for this purpose.
•Never operate the appliance in rooms where there is a risk of explosion or in the vicinity of flammable gases or liquids.
•Always check that air can freely enter and escape. Heat might otherwise build up inside the appliance.
4.6 Protection against injury
Warning! To avoid injury, please observe the following information.
•Ensure that it is not possible for anyone to trip over or to get caught up in or step on the mainscable.
•Once hot, if you wish to transport the appliance, switch it off, pull out the mains plug, and wait until the appliance has cooled down. Otherwise you could burn yourself on the hot surface.
4.7 For the safety of your child
Warning! Children often cannot assess dangers correctly and are injured as a result. Please therefore observe the following:
•Ensure that the packing foil does not become a deadly trap for a child. Packing foils are not toys.
4.8 Material damage
Caution! To avoid material damage, please observe the following conditions.
• When setting up on the floor, check that the feet are fitted correctly (see “5.1 Assembling the appliance for setup on the floor” on page 7) - otherwise the floor might be scratched or scorched.
5. Unpacking and setting up
1.Unpack the appliance from the packaging.
2.Remove the transport packaging.
3.Check that the appliance shows no signs of damage.
5.1Assembling the appliance for set-up on the floor
1.Screw the feet 4 to the underside of the convector using the short screws provided. 2 screws are inserted diagonally per foot.
SKT 2000 B1 |
7 |
RP100157 Konvektor Timer LB4 Seite 8 Mittwoch, 11. Juni 2014 12:37 12
Warning! Check that there is sufficient distance from the wall, fixtures and other appliances. When setting up on the floor, the distance must be at least 0.5 m to exclude the risk of fire.
The distance to the wall must always be observed unless you are using the wall hooks supplied. The wall should not be flammable.
2.Select a location in compliance with the safety information (see “4. Safety instructions” on page 4).
5.2 Mounting the appliance on a wall
Caution!
•The wall must not be flammable and should also be strong enough.
•The appliance must be at least 10 cm above the floor so air can circulate freely.
Note: If you are mounting the appliance on a wall, the feet must not be screwed on.
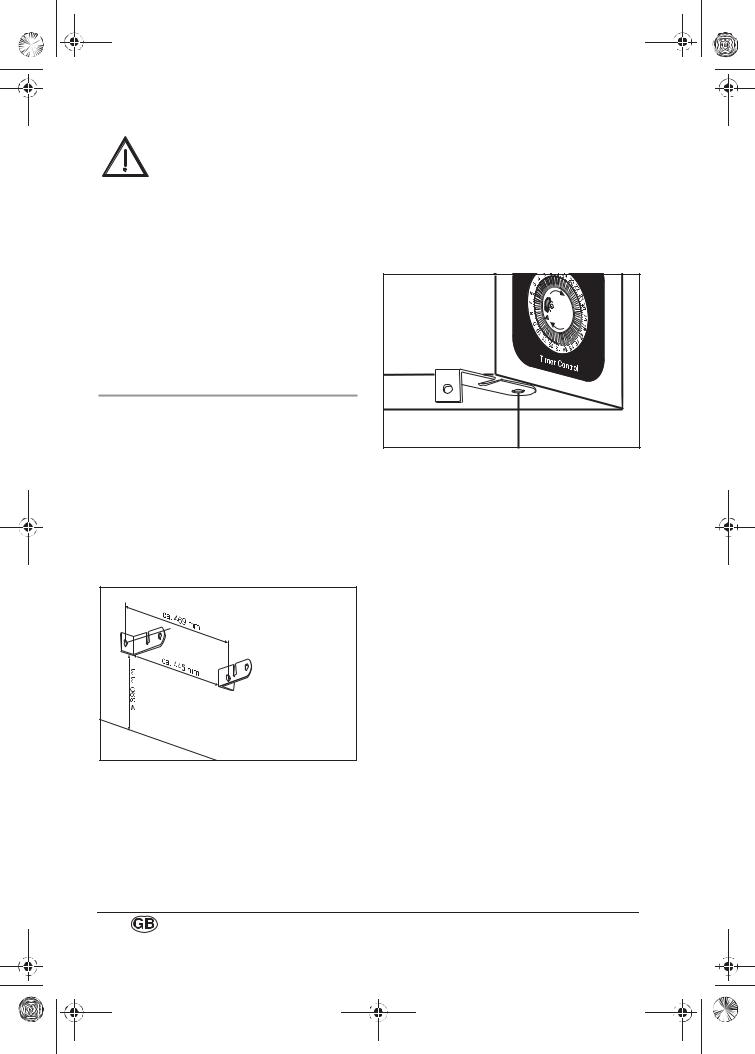
1.Screw the wall hooks supplied securely to a wall suitable for this purpose:
–Mark the position of the two drill holes so that the space between the wall hooks matches the space between the two slots on the rear of the appliance.
–Make sure that the two drill holes are absolutely horizontal.
–Drill a hole around 40 mm deep using an 8 mm bit.
–Insert a wall plug in each hole.
–Screw the two wall hooks in place using the long screws.
2.To ensure the appliance hangs vertically on the wall, the two other wall hooks are used here as spacers:
–Screw the two remaining wall hooks to the underside of the appliance.
–Use the short screws for this purpose.
3.Hang the appliance from the wall hooks.
4.You can also screw the two spacers to the wall to make the appliance even more stable.
8
RP100157 Konvektor Timer LB4 Seite 9 Mittwoch, 11. Juni 2014 12:37 12
6. Operation
Notes:
•As the appliance and heating coils are supplied with a thin film of grease, there might be a small amount of smoke and odour the first time the appliance is used. This is not harmful and will stop after a short time. Ensure adequate ventilation during this process.
•If you have plugged other power consumers into the same circuit, check that the maximum load for the installed fuse is not exceeded, as otherwise the fuse will trip.
6.1Using the appliance for the first time and switching off
1.Insert the mains plug into a mains socket that complies with the technical data (see “3. Technical data” on page 4).
2.Set the main switch 14 to "I" to switch on the power supply. 


The appliance is now ready to use. 

3.Set the main switch 14 to "0" to switch off the power supply.

6.2 Setting the heating setting
The heating settings are used to select how quickly the appliance heats up.
The appliance has three heating settings:
–Level 1: 750 watts: Press switch 6;
–Level 2: 1250 watts: Press switch 5;
–Level 3: 2000 watts: Press switches 5 and 6.
If you want the appliance to heat up particularly quickly, select level 3. If you only want it to heat up slowly, select level 1.
A red indicator lights up in the activated switches as soon as the appliance starts to heat up.
If no switch is pressed, the appliance will not produce any heat.
6.3 Selecting the temperature
Set the required temperature with the temperature selector 8.
•When the required room temperature is reached, slowly turn down the temperature selector 8 until you hear a quiet "click".
The red indicators in the switches 5 and 6 will be extinguished.
The current room temperature will be maintained.
As soon as the appliance needs to heat up again to maintain the temperature, the red indicators in the switches 5 and 6 will light up once again in the meantime.
SKT 2000 B1 |
9 |
RP100157 Konvektor Timer LB4 Seite 10 Mittwoch, 11. Juni 2014 12:37 12
6.4 Fan function
The appliance is equipped with a fan to distribute the air more quickly in the room. To switch on the fan, press the fan switch 7. A red indicator in the fan switch 7 will then light up.
Note: The appliance can also be operated without the fan being switched on. The heat will then be concentrated more around the convector and will not be distributed so quickly in the room.
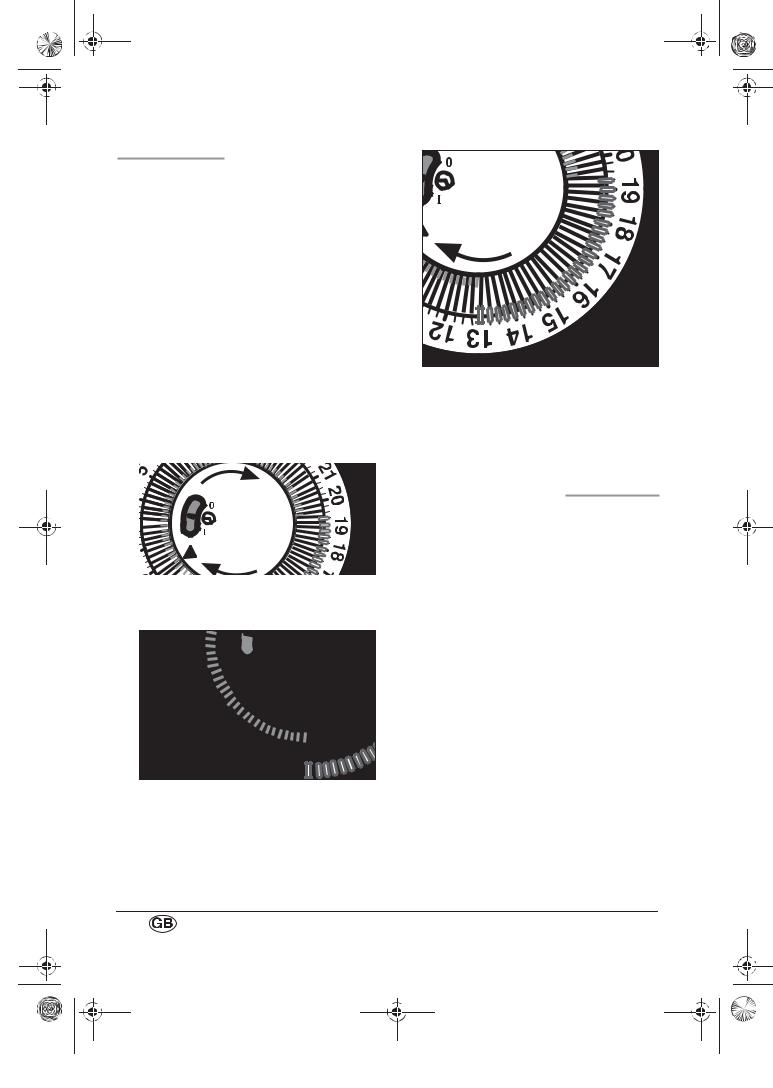
6.5 Setting the heating time
The appliance has a timer with which you can set the required heating time.
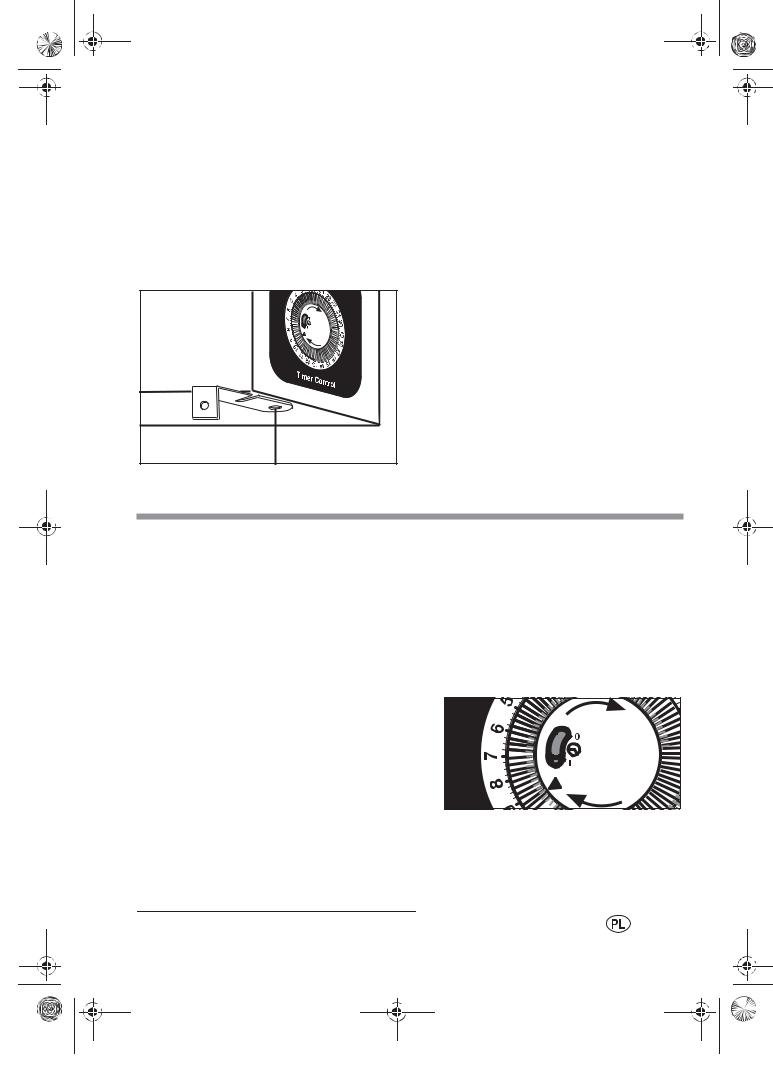
1.Switch the timer on by setting the main switch 14 to the Clocksymbol.
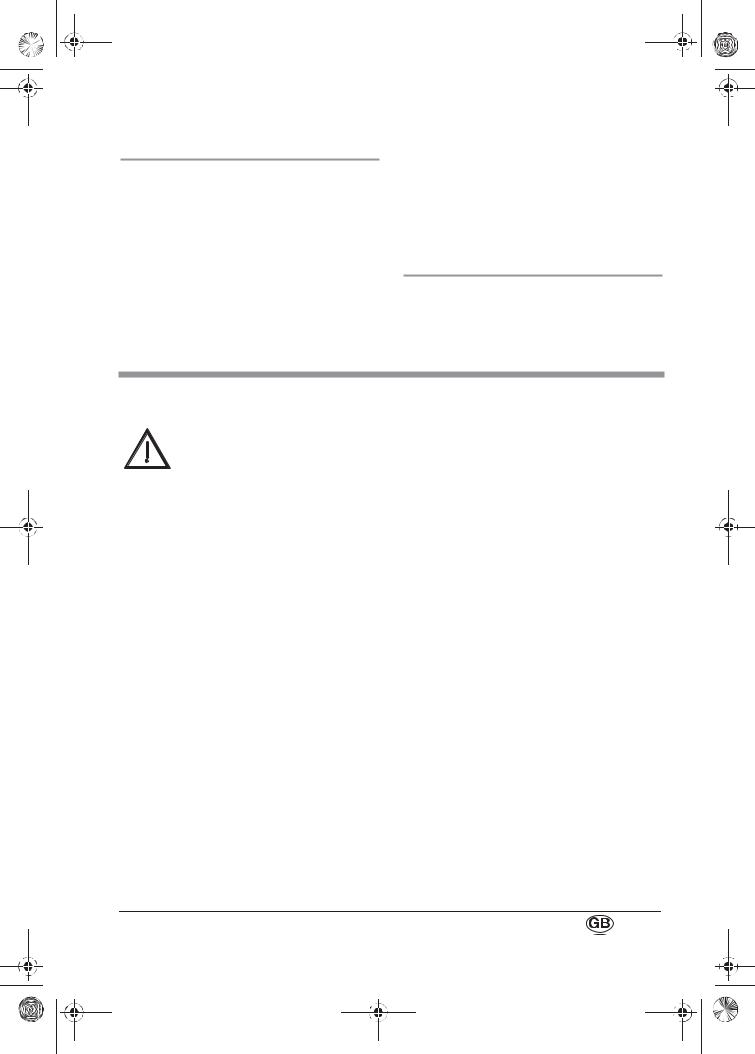
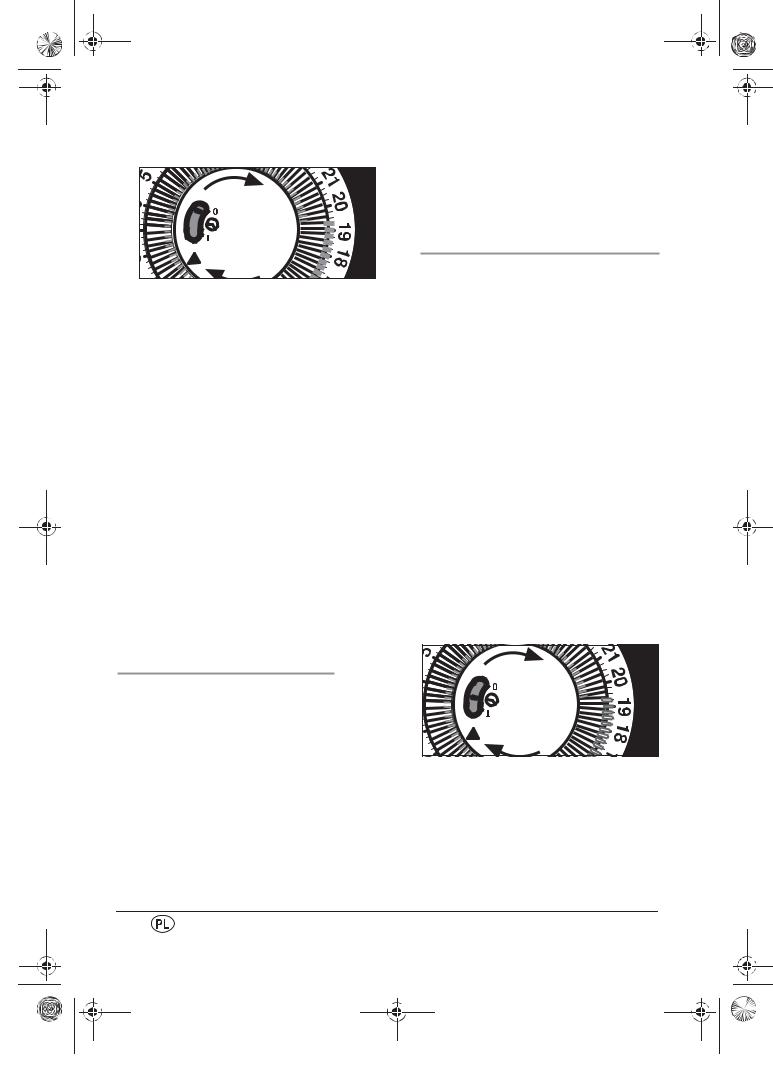
2.Turn the scale for the time 11 with the control segments 12 until the current time points to the hourly marking 13.
In this example the time is 09.15 am.
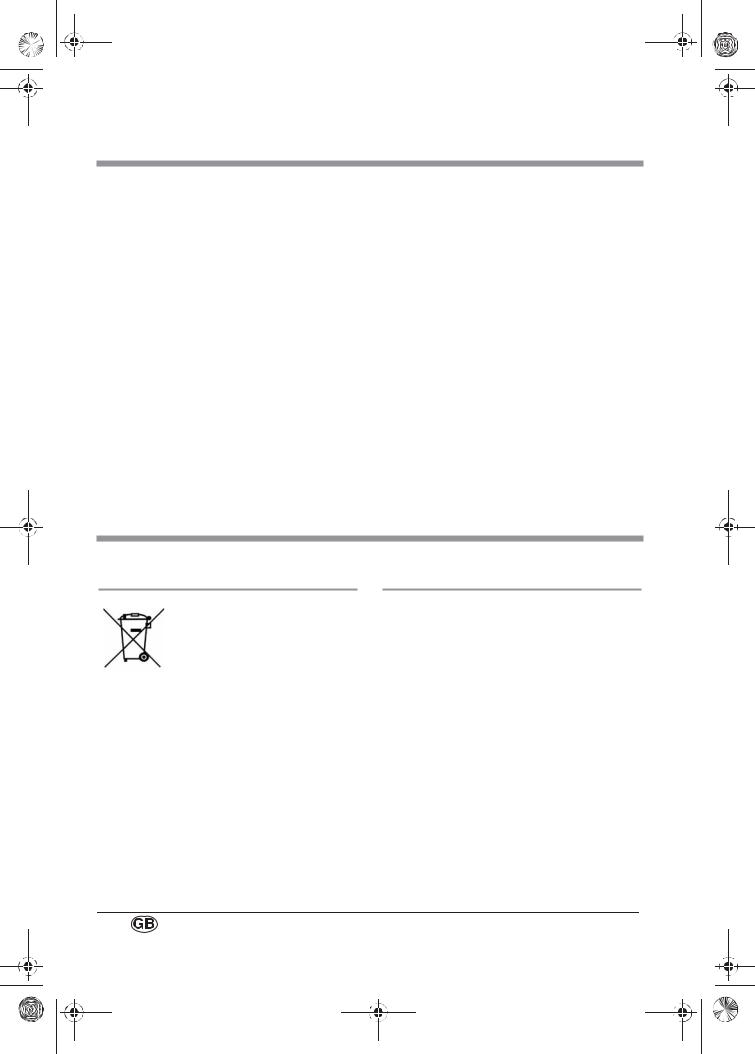
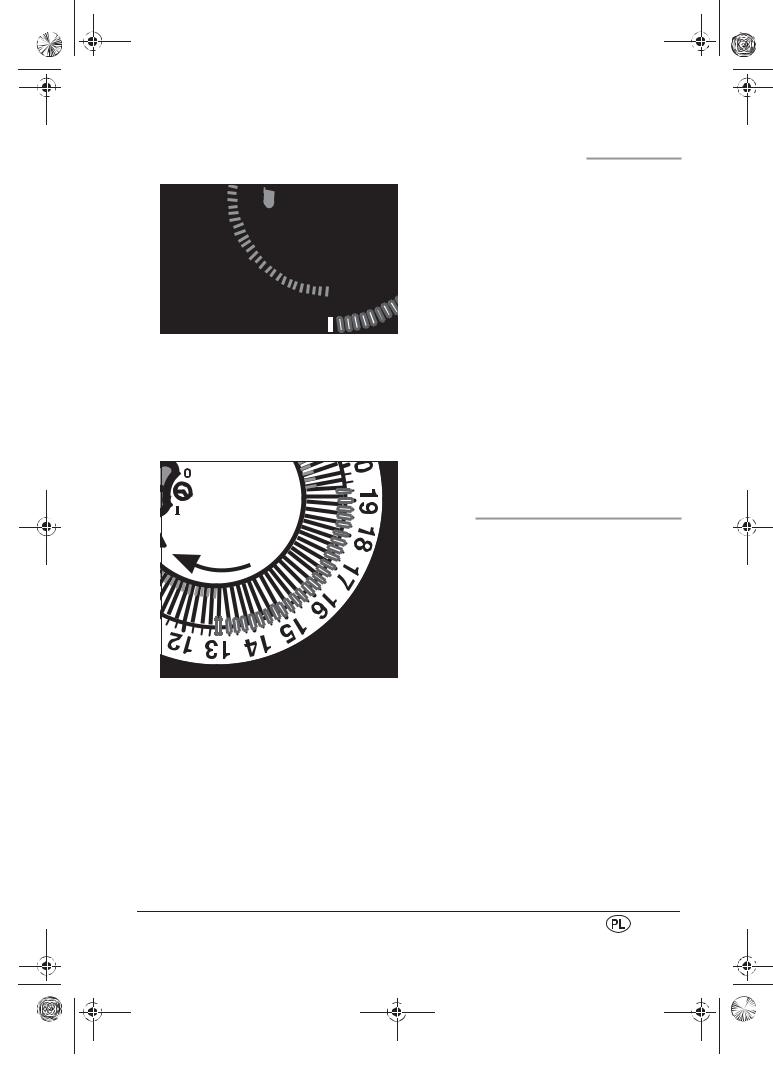
3. Select the times when the appliance is to function by pulling all control segments 12 to the outside from the beginning to the end according to the
scale for the time 11. |
In this example the heating time runs from 01.00 pm to 07.15 pm.
4.To switch off the timer, move the main switch 14 to "I " (continuous) or "0" (appliance switched off).
6.6 Thermal cut-out
For your safety the appliance has a thermal cut-out.
If the temperature inside the appliance becomes too high, the appliance switches off automatically:
1.Set the main switch 14 to "0" to switch off the power supply.
2.Make sure that the air can enter and escape freely.
If you cannot establish a cause and the fault occurs repeatedly, have the appliance repaired or else take it out of use.
3.Wait for the appliance to cool down.
4.You can then continue to operate it normally.
10
RP100157 Konvektor Timer LB4 Seite 11 Mittwoch, 11. Juni 2014 12:37 12
6.7 Frost protection setting
With this function, the appliance prevents the room temperature falling below the frost line.
1.Turn the temperature selector 8 to the Frost symbol 9.
2.Set the main switch 14 to "I" to switch on the power supply.
3.Use the switches 5 and 6 to select a heating level (see “6.2 Setting the heating setting” on page 9).
4.Switch on the fan by pressing the fan switch 7 (see “6.4 Fan function” on page 10).
6.8 Transporting the appliance
If you wish to transport the appliance, always carry it by the carry handles 1.
7. Cleaning
To ensure your appliance gives you lasting service, you should clean it regularly.
Warning! To avoid the danger of an electric shock or burning:
– remove the mains plug before each clean;
–allow the appliance to cool down;
–never immerse the appliance in water;
–never allow water or cleaning agent to run into the appliance.
1.Carefully remove major dust deposits with a vacuum cleaner.
2.Clean the outside of the appliance with a damp cloth. You could also use a little washing-up liquid.
Caution! Never use caustic or abrasive cleaning agents, as this could damage your appliance.
3.Wipe the appliance with a cloth moistened with clear water.
4.Do not use the appliance again until it has dried completely.
SKT 2000 B1 |
11 |
RP100157 Konvektor Timer LB4 Seite 12 Mittwoch, 11. Juni 2014 12:37 12
8. Troubleshooting
Fault |
Cause |
Remedy |
|
|
|
|
|
Appliance cannot be |
Faulty fuse or wall socket |
Select another wall socket |
|
switched on |
|
|
|
Faulty appliance |
Have repairs carried out at a specialist |
||
|
|||
|
|
workshop or dispose of the appliance. |
|
|
|
You will find the service address in |
|
|
|
“Service Centre” on page 14. |
|
|
|
|
|
Appliance switches |
Thermal cut-out has |
Allow the appliance to cool down (see |
|
off automatically |
triggered |
“6.6 Thermal cut-out” on page 10) |
|
|
|
|
|
|
|
Clean the appliance (see |
|
|
|
“7. Cleaning” on page 11) |
|
|
|
|
|
|
Selected temperature has |
Heating switches on again automati- |
|
|
been reached |
cally as soon as the room temperature |
|
|
|
falls |
|
|
|
|
|
|
|
Select a higher required temperature |
|
|
|
|
9. Disposal
9.1 Appliance
The symbol with the crossedout rubbish bin on wheels means that within the European Union, the product must be disposed of to a sorted rubbish
collection. This applies to the product and all accessories which are marked with this symbol. Marked products must not be disposed of via the regular domestic waste but must be handed in to a recycling centre for electrical or electronic devices. Recycling helps to reduce the use of raw materials and to relieve the environment. It is therefore imperative that you follow the disposal regulations applicable in your country.
9.2 Packaging
If you would like to dispose of the packaging, please observe the corresponding environmental regulations in your country.
12
RP100157 Konvektor Timer LB4 Seite 13 Mittwoch, 11. Juni 2014 12:37 12
10. HOYER Handel GmbH Warranty
Dear Customer,
You have a warranty on this product which is valid for 3 years from the date of purchase. In the event of this product being defective, you have statutory rights against the seller of the product. These statutory rights are not limited by our warranty as set out below.
Warranty conditions
The warranty period begins with the date of purchase. Please keep the original till receipt in a safe place. This is required as your proof of purchase.
If a defect in materials or workmanship occurs within three years of the date your product was purchased, we will repair or replace the product at our discretion at no charge to you. This service under warranty assumes that the defective product and the proof of purchase (till receipt) are submitted within the three-year period and that a brief description in writing is provided of what the defect is and when it occurred.
If the defect is covered by our warranty, the repaired product or a new one will be sent back to you. There is no new warranty period following repair or replacement of the product.
Warranty period and statutory claims relating to defects
The warranty period is not extended when a service is provided under warranty. This also applies to replaced and repaired parts. Any damage or defects present at purchase must be reported immediately the product is unpacked. Repairs incurred once the warranty period has expired are chargeable.
Scope of warranty
The product has been carefully manufactured in accordance with strict quality guidelines and was thoroughly checked before being delivered.
The warranty applies to defective materials or workmanship. This warranty does not extend to product parts exposed to normal wear and tear (and which can therefore be considered wear parts) or to damage to fragile parts such as switches, batteries or parts made of glass.
This warranty is void if the product is damaged or if it is not used or maintained properly. All the information in the operating instructions should be observed precisely to ensure that the product is used properly.
It is essential to avoid intended uses and actions which are discouraged or warned against in the operating instructions.
The product is intended for only private use and not for commercial purposes.
The warranty is void in the event of misuse, incorrect treatment, use of force or interference by anyone other than our authorized service centre.
Warranty process
Please follow the instructions below to ensure that your claim is processed quickly.
•In case of any enquiry, please keep the article number (for this product: IAN 100157) and the till receipt as proof of purchase.
•The article number can be found on the rating plate, as an engraving, on the cover sheet of your instructions (bottom left) or as a label on the back or underside of your appliance.
SKT 2000 B1 |
13 |
RP100157 Konvektor Timer LB4 Seite 14 Mittwoch, 11. Juni 2014 12:37 12
•If malfunctions or any other defects should occur, in the first instance contact the Service Centre mentioned below by telephone or e-mail.
•Once a product has been recorded as defective, you can then send it Freepost to the service address you are given, enclosing the proof of purchase (till receipt) and quoting what the defect is and when it occurred.
You can download these instructions and many other manuals, product videos and software from www.lidl-service.com.
 Supplier
Please note that the address below is not a service address. In the first instance, contact the service centre mentioned above.
HOYER Handel GmbH
Kühnehöfe 5
22761 Hamburg
Germany
 Service Centre
 Service Great Britain
Tel.: 0871 5000 720 (£ 0.10/Min.) E-Mail: hoyer@lidl.co.uk
IR Service Ireland
Tel.: 1890 930 034 (0,08 EUR/Min., (peak))
(0,06 EUR/Min., (off peak)) E-Mail: hoyer@lidl.ie
CY Service Cyprus
Tel.: 8009 4409
E-Mail: hoyer@lidl.com.cy
MT Service Malta
Tel.: 80062230
E-Mail: hoyer@lidl.com.mt
IAN: 100157
14
RP100157 Konvektor Timer LB4 Seite 15 Mittwoch, 11. Juni 2014 12:37 12
Spis treści
1. Opis urządzenia . . . . . . . . . . . . . . . . . . . . . . . . . . . . . . . . . . . . . . . . . . . . . . . . . . . . . . . 15 2. Nazwa części (patrz strona rozkładana) . . . . . . . . . . . . . . . . . . . . . . . . . . . . . . . . . . . . . . 16 3. Dane techniczne . . . . . . . . . . . . . . . . . . . . . . . . . . . . . . . . . . . . . . . . . . . . . . . . . . . . . . . 16 4. Instrukcje bezpieczeństwa . . . . . . . . . . . . . . . . . . . . . . . . . . . . . . . . . . . . . . . . . . . . . . . . 16 5. Rozpakowanie i ustawianie . . . . . . . . . . . . . . . . . . . . . . . . . . . . . . . . . . . . . . . . . . . . . . . 20 6. Obsługa . . . . . . . . . . . . . . . . . . . . . . . . . . . . . . . . . . . . . . . . . . . . . . . . . . . . . . . . . . . . . 21 7. Czyszczenie . . . . . . . . . . . . . . . . . . . . . . . . . . . . . . . . . . . . . . . . . . . . . . . . . . . . . . . . . . 24 8. Usuwanie usterek . . . . . . . . . . . . . . . . . . . . . . . . . . . . . . . . . . . . . . . . . . . . . . . . . . . . . . 24 9. Utylizacja . . . . . . . . . . . . . . . . . . . . . . . . . . . . . . . . . . . . . . . . . . . . . . . . . . . . . . . . . . . . 25
10. Gwarancja firmy HOYER Handel GmbH. . . . . . . . . . . . . . . . . . . . . . . . . . . . . . . . . . . . . . . 25
Gratulujemy zakupu nowego urządzenia.
Jest to wysokiej jakości produkt. Instrukcja obsługi jest integralną częścią tego produktu. Zawiera ona ważne wskazówki dotyczące bezpieczeństwa, użytkowania i utylizacji.
Przed rozpoczęciem użytkowania produktu należy się zapoznać z wszystkimi instrukcjami dotyczącymi obsługi oraz bezpieczeństwa. Produktu należy używać tylko w opisany sposób i do opisanych celów.
Przekazując produkt innym osobom, należy razem z nimi przekazać całą jego dokumentację.
1. Opis urządzenia
1.1 Zastosowanie
Konwektor SilverCrest SKT 2000 B1 służy do ogrzewania suchych pomieszczeń mieszkalnych.
Urządzenie przeznaczone jest do użytku prywatnego, nie do stosowania w działalności gospodarczej.
Urządzenie nadaje się również do:
•używania w kuchniach pracowniczych w sklepach, biurach i innych pomieszczeniach pracowniczych,
•używania w gospodarstwach rolnych,
•używania przez klientów w hotelach, motelach i innych kompleksach mieszkalnych,
•używania w pensjonatach podających śniadania.
Urządzenie przeznaczone jest do pełnienia funkcji ogrzewania dodatkowego. Nie może pełnić funkcji ogrzewania głównego w dużych pomieszczeniach.
Urządzenie wolno ustawiać wyłącznie na podłodze albo mocować do ściany przy użyciu dostarczonego z nim uchwytu ściennego.
SKT 2000 B1 |
15 |
RP100157 Konvektor Timer LB4 Seite 16 Mittwoch, 11. Juni 2014 12:37 12
1.2 Skład zestawu |
|
|
1.3 Oznaczenia na urządzeniu |
|
|
||||||
• |
1 konwektor |
|
|
|
|
|
|
Przedstawiony |
obok symbol |
3 |
|
|
|
|
|
|
|
||||||
• |
2 nóżki |
|
|
|
|
|
|
ostrzega przed |
przykrywaniem |
||
• |
4 śruby do nóżek |
|
|
|
|
|
|
urządzenia, ponieważ grozi |
to |
||
• |
4 haki ścienne |
|
|
|
|
|
|
przegrzaniem |
oraz |
||
|
|
|
|
|
|
||||||
• |
4 kołki ze śrubami pod haki ścienne |
|
|
|
|
uszkodzeniem |
urządzenia |
|
i |
||
|
|
|
|
pożarem. |
|
|
|
||||
• |
1 instrukcja obsługi |
|
|
|
|
|
|
|
|
|
|
|
|
|
|
|
|
|
|
|
|
||
|
|
2. Nazwa części (patrz strona rozkładana) |
|
|
|
||||||
|
|
|
|
|
|
|
|
|
|||
|
|
|
|
|
|
|
|
|
|||
1 |
Uchwyty do przenoszenia |
8 |
Pokrętło temperatury |
|
|
|
|||||
2 |
Wylot powietrza |
|
|
9 |
Symbol śnieżynki |
|
|
|
|||
3 |
Symbol ostrzegawczy „Nie otwierać” |
10 Timer |
|
|
|
||||||
4 |
Nóżki |
|
|
11 Skala czasu |
|
|
|
||||
5 |
Przełącznik 1250 W |
|
|
12 Segmenty sterowania |
|
|
|
||||
6 |
Przełącznik 750 W |
|
|
13 Wskaźnik czasu |
|
|
|
||||
7 |
Przełącznik wentylatora |
14 Wyłącznik główny |
|
|
|
||||||
|
|
3. Dane techniczne |
|
|
|
||||||
|
|
|
|
|
|
|
|
|
|
||
|
|
|
|
|
|
|
|
|
|
||
Zasilanie: |
220 - 240 V~/50 Hz |
|
|
|
|
|
|
|
|
||
Moc maksymalna: |
2.000 Wat |
|
|
|
|
|
|
|
|
||
Klasa ochrony: |
I |
|
|
|
|
|
|
|
|
||
4. Instrukcje bezpieczeństwa
4.1 Wyjaśnienie haseł
Instrukcja obsługi zawiera następujące hasła ostrzegawcze:
Ostrzeżenie!
Wysokie ryzyko. Nieprzestrzeganie tego ostrzeżenia grozi utratą zdrowia lub życia.
Uwaga!
Średnie ryzyko. Nieprzestrzeganie tego ostrzeżenia może spowodować szkody materialne.
Wskazówka:
Niskie ryzyko. Kwestie, które należy uwzględnić przy eksploatacji urządzenia.
16

RP100157 Konvektor Timer LB4 Seite 17 Mittwoch, 11. Juni 2014 12:37 12
4.2Specjalne wskazówki dotyczące tego produktu
Ostrzeżenie! Należy przestrzegać podanych niżej wskazówek, aby uniknąć zranienia.
•Dzieci w wieku poniżej 3 lat należy trzymać z daleka o produktu, jeżeli nie są pod ciągłą opieką.
•Dzieci w wieku powyżej 3 lat i poniżej 8 lat mogą włączać i wyłączać urządzenie tylko pod opieką lub pod warunkiem, że zostały poinstruowane o bezpiecznym sposobie używania urządzenia i zrozumiały zagrożenia związane z używaniem urządzenia oraz pod warunkiem, że urządzenie jest ustawione bądź zainstalowane w swoim normalnym położeniu roboczym.
•Dzieci w wieku powyżej 3 lat i poniżej 8 lat nie mogą podłączać wtyczki urządzenia do gniazdka sieciowego, regulować urządzenia, czyścić urządzenia ani wykonywać przewidzianych dla uytkownika czynności pielęgnacyjnych.
•Dzieci powyżej 8 roku życia i osoby o ograniczonej sprawności fizycznej, sensorycznej i umysłowej oraz osoby nieposiadające dostatecznej wiedzy albo wystarczającego doświadczenia mogą używać tego produktu tylko pod opieką lub pod warunkiem, że zostały poinstruowane o bezpiecznym sposobie używania produktu i zrozumiały zagrożenia związane z jego używaniem. Dzieciom nie wolno bawić się produktem.
•Dzieciom nie wolno czyścić urządzenia ani wykonywać przewidzianych dla użytkownika czynności pielęgnacyjnych, chyba że mają więcej niż 8 lat i znajdują się pod opieką.
•Dzieci w wieku poniżej 8 lat należy trzymać z daleka od produktu i przewodu sieciowego.
•Uwaga - Niektóre części urządzenia mogą się bardzo silnie nagrzewać i powodować
oparzenia. Szczególną ostrożność należy zachować w obecności dzieci i osób wymagających opieki.
•Metalowe powierzchnie urządzenia mogą być bardzo gorące. Urządzenie należy w związku z tym chwytać wyłącznie za rączki 10.
•Przed rozpoczęciem czyszczenia zawsze odłączać wtyczkę od gniazdka sieciowego.
•Nigdy nie zanurzać produktu w wodzie i chronić go przed pryskającą lub kapiącą wodą.
•Przed rozpoczęciem czyszczenia zaczekać, aż produkt wystygnie na tyle, by nie groził poparzeniem.
•Aby uniknąć przegrzania grzejnika, nie wolno go przykrywać.
•Urządzenia nie należy nigdy ustawiać bezpośrednio pod gniazdkiem ściennym, ponieważ wytwarzane ciepło mogłoby spowodować uszkodzenie instalacji elektrycznej.
•Nie używać tego grzejnika z programatorem, zegarem sterującym, oddzielnym układem zdalnego sterowania i innymi elementami, które automatycznie włączają grzejnik, ponieważ może to grozić pożarem w przypadku przykrycia albo
nieprawidłowego ustawienia grzejnika.
Uwaga! Aby uniknąć szkód materialnych, należy przestrzegać poniższych wskazówek:
•Nie stosować nigdy szorujących, żrących lub rysujących środków czyszczących. Mogłoby to uszkodzić produkt lub powłokę antyadhezyjną.
•Urządzenia nie należy nigdy używać w bezpośredniej bliskości zlewozmywaka, wanny, prysznica lub basenu, ponieważ do urządzenia mogłaby dostać się rozpryskiwana woda.
SKT 2000 B1 |
17 |
RP100157 Konvektor Timer LB4 Seite 18 Mittwoch, 11. Juni 2014 12:37 12
4.3 Wskazówki ogólne
•Przed użyciem należy zapoznać się dokładnie z instrukcją obsługi. Jest ona częścią urządzenia i musi być zawsze dostępna.
•Termowentylator należy zawsze
stosować zgodnie z opisanym zastosowaniem (patrz "1.1 Zastosowanie" na stronie 15).
•Sprawdzić, czy wymagane napięcie sieciowe (patrz tabliczka znamionowa urządzenia) zgodne jest z faktycznym napięciem w sieci.
•W przypadku ewentualnych usterek do przeprowadzenia naprawy uprawniony jest wyłącznie nasz serwis. Dane kontaktowe znajdziesz w "Centrum serwisowe" na stronie 27.
•Urządzenie można ustawiać wyłącznie
na |
stabilnym, |
równym, |
suchym |
i niepalnym podłożu. |
|
||
•Gniazdko sieciowe powinno być łatwo dostępne, aby w razie potrzeby można było szybko wyciągnąć wtyczkę.
4.4Ochrona przed porażeniem elektrycznym
Ostrzeżenie! Poniższe zasady bezpieczeństwa mają chronić użytkowników przed porażeniem prądem.
•Urządzenie należy podłączać tylko do prawidłowo zainstalowanego gniazdka z uziemieniem.
•Nie należy używać urządzenia, jeśli spadło na podłogę, zostało mocno obite lub upadło do wody. W takim przypadku prosimy o kontakt z naszym centrum serwisowym. Dane kontaktowe znajdziesz w "Centrum serwisowe" na stronie 27.
•W razie uszkodzenia urządzenia nie należy w żadnym wypadku go używać. Należy oddać urządzenie do naprawy wykwalifikowanemu personelowi. Dane kontaktowe znajdziesz w "Centrum serwisowe" na stronie 27.
•W razie uszkodzenia przewodu sieciowego urządzenia musi on zostać wymieniony przez producenta lub podobnie wykwalifikowaną osobę, aby uniknąć zagrożeń.
•Do urządzenia nie może nigdy dostać się woda ani inne płyny. Dlatego:
–nigdy nie stosować urządzenia na zewnątrz
–nie stawiać na urządzeniu żadnych naczyń z płynem, np. szklanek, wazonów itp.
Jeżeli do urządzenia dostaną się jakieś płyny, należy natychmiast odłączyć wtyczkę od sieci i oddać urządzenie do naprawy przez wykwalifikowany personel. Dane kontaktowe znajdziesz w "Centrum serwisowe" na stronie 27.
•Nigdy nie wkładać palców ani przedmiotów przez kratkę ochronną do wnętrza urządzenia.
•Nigdy nie chwytać urządzenia, kabla sieciowego ani wtyczki mokrymi dłońmi.
•Kabel sieciowy odłączać zawsze za wtyczkę. Nigdy nie ciągnąć za sam kabel.
•Nie załamywać i nie przygniatać kabla sieciowego.
•Nie dopuścić do uszkodzenia kabla sieciowego przez ostre krawędzie.
•Nie zbliżać kabla sieciowego do gorących przedmiotów (np. płyty kuchennej).
•Jeżeli urządzenie nie będzie używane przez dłuższy czas, należy odłączyć
wtyczkę od sieci. Tylko wtedy
18
RP100157 Konvektor Timer LB4 Seite 19 Mittwoch, 11. Juni 2014 12:37 12
urządzenie |
jest |
całkowicie odłączone |
powietrze |
mogło |
swobodnie opływać |
||||||
od napięcia. |
|
|
|
|
|
konwektor. Minimalna odległość między |
|||||
• Unikać |
stosowania |
przedłużaczy. |
podłogą i dolną krawędzią urządzenia |
||||||||
Dopuszczalne |
jest |
|
to |
tylko |
wynosi 10 cm. |
|
|
|
|||
w określonych warunkach: |
|
|
• Jeżeli urządzenie jest mocowane do |
||||||||
– przedłużacz musi być przystosowany |
ściany, ściana nie może być palna i musi |
||||||||||
do |
natężenia |
prądu |
|
pobieranego |
posiadać dostateczną wytrzymałość. |
||||||
przez urządzenie, |
|
|
|
• Nigdy nie należy używać urządzenia w |
|||||||
– przedłużacz nie może |
swobodnie |
pomieszczeniach |
|
zagrożonych |
|||||||
wisieć: |
nie |
może |
stanowić |
wybuchem oraz w pobliżu gazów |
|||||||
przeszkody, o którą można by się |
palnych lub cieczy palnych. |
|
|||||||||
potknąć, i musi być niedostępny dla |
• Zawsze upewniać się, że możliwy jest |
||||||||||
dzieci, |
|
|
|
|
|
swobodny |
wlot |
i |
wylot |
powietrza. |
|
– przedłużacz |
nie |
może |
być |
W przeciwnym razie |
może |
dojść do |
|||||
uszkodzony, |
|
|
|
|
przegrzania urządzenia. |
|
|||||
–do przedłużacza nie można
podłączać żadnych innych urządzeń 4.6 Ochrona przed uszkodzeniami ciała
poza piekarnikiem, gdyż może to
spowodować przeciążenie instalacji elektrycznej (zakaz stosowania przedłużaczy z kilkoma gniazdami!).
4.5 Ochrona przeciwpożarowa
Ostrzeżenie! Ponieważ urządzenie wytwarza wysokie temperatury, należy przestrzegać następujących zasad bezpieczeństwa, aby uniknąć zagrożenia pożarem.
•Podczas pracy urządzenia w jego bezpośrednim sąsiedztwie nie mogą znajdować się żadne palne przedmioty (np. zasłony, papier itp.).
•Nigdy nie stosować urządzenia do suszenia przed nim, na nim lub nad nim tekstyliów ani innych przedmiotów.
•Ustawiając urządzenie na podłodze, należy zachować minimalny odstęp 0,5 m od innych urządzeń lub od ściany.
•Jeżeli urządzenie jest mocowane do ściany, dozwolone jest użycie wyłącznie dostarczonych z nim haków ściennych. Należy w tej sytuacji uważać, by
Ostrzeżenie! Należy przestrzegać następujących wskazówek, aby uniknąć uszkodzeń ciała.
•Kabel sieciowy powinien być ułożony w sposób uniemożliwiający potknięcie się, zaplątanie się w nim lub deptanie po nim.
•W celu przenoszenia gorącego urządzenia należy wyłączyć
urządzenie, wyciągnąć wtyczkę z gniazdka i zaczekać, aż urządzenie ostygnie. Dotknięcie gorącej powierzchni grozi oparzeniem.
4.7Dla bezpieczeństwa Twojego dziecka
Ostrzeżenie! Dzieci nie są często w stanie prawidłowo ocenić zagrożenia i mogą się przez to zranić. Dlatego należy pamiętać:
•Uważać, aby folia z opakowania nie stała się dla dziecka śmiertelną pułapką. Folia z opakowania nie jest zabawką.
SKT 2000 B1 |
19 |
RP100157 Konvektor Timer LB4 Seite 20 Mittwoch, 11. Juni 2014 12:37 12
4.8 Szkody materialne
Uwaga! By uniknąć szkód materialnych należy przestrzegać poniższych wskazówek.
• Przy ustawianiu |
urządzenia |
na |
|
podłodze uważać |
na prawidłowe |
||
zamocowanie |
|
nóżek |
(patrz |
"5.1 Montaż |
urządzenia |
przy |
|
ustawianiu na podłodze" na stronie 20) w przeciwnym razie podłoga może zostać porysowana lub nadpalona.
5. Rozpakowanie i ustawianie
1.Wyjąć urządzenie z opakowania.
2.Usunąć opakowanie transportowe.
3.Upewnić się, że urządzenie nie jest uszkodzone.
5.1Montaż urządzenia przy ustawianiu na podłodze
1.Przykręcić nóżki 4 z dostarczonych śrub krótkich do spodniej strony konwektora. Każda nóżka mocowana jest za pomocą dwóch śrub dokręcanych po przekątnej.
Ostrzeżenie! Zachować dostateczny odstęp od ściany, umeblowania i innych urządzeń. W celu wykluczenia zagrożenia pożarowego przy ustawianiu urządzenia na podłodze odstęp ten powinien wynosić co najmniej 0,5 m.
Odstęp od ściany może być mniejszy tylko pod warunkiem zastosowania dostarczonych z urządzeniem haków ściennych, o ile ściana nie jest palna.
2.Wybrać takie miejsce, które będzie zgodne z zasadami bezpieczeństwa (patrz "4. Instrukcje bezpieczeństwa" na stronie 16).
5.2 Montaż urządzenia na ścianie
Ostrożnie!
•Ściana nie może być palna i musi posiadać dostateczną wytrzymałość.
•Urządzenie musi się znajdować co najmniej 10 cm nad podłogą, aby był zapewniony swobodny dopływ powietrza.
Wskazówka: Jeżeli urządzenie jest mocowane do ściany, nie wolno przykręcać nóżek.
1.Przykręcić dostarczone haki ścienne do odpowiedniej ściany:
–Zaznaczyć oba otwory pod śruby tak, by odległość między hakami ściennymi była dokładnie taka sama jak odległość między obydwoma szczelinami w tylnym panelu urządzenia.
–Uważać, by oba otwory leżały dokładnie na linii poziomej.
20
RP100157 Konvektor Timer LB4 Seite 21 Mittwoch, 11. Juni 2014 12:37 12
– Wywiercić wiertłem o średnicy 8 mm |
|
– Przykręcić oba pozostałe haki ścienne |
|||||
otwór o głębokości ok. 40 mm. |
|
do dolnej części urządzenia. |
|
||||
– Włożyć do otworów po jednym kołku. |
|
– Użyć do tego celu krótszych śrub. |
|||||
– Przykręcić |
oba |
haki ścienne z |
3. |
Zawiesić |
urządzenie |
na |
hakach |
długimi śrubami. |
|
|
ściennych. |
|
|
|
|
2. Aby zawiesić urządzenie na ścianie w |
4. |
Oba elementy dystansowe |
można |
||||
dokładnym poziomie, należy użyć obu |
|
również przykręcić do ściany, aby |
|||||
pozostałych |
haków |
ściennych jako |
|
zapewnić |
zwiększoną |
stabilność |
|
elementów dystansowych: |
|
zawieszenia. |
|
|
|||
6. Obsługa |
Wskazówka:
•Ponieważ urządzenie i jego grzałki są dostarczane w lekko naoliwionym stanie, podczas pierwszego użycia może pojawić się lekki dym i zapach. Są one nieszkodliwe i ustają w krótkim czasie. Należy wtedy zapewnić dostateczne przewietrzenie pomieszczenia.
•Jeżeli do tego samego obwodu podłączone są jeszcze inne odbiorniki prądu, należy uważać, aby nie przekroczyć maksymalnej obciążalności zainstalowanego bezpiecznika, ponieważ w przeciwnym razie bezpiecznik zadziała.
6.1Uruchamianie i wyłączanie urządzenia
1. Podłączyć |
wtyczkę do |
gniazdka |
sieciowego |
o wymaganych |
|
parametrach |
technicznych |
(patrz |
"3. Dane techniczne" na stronie 16).
2. Włączyć zasilanie elektryczne, ustawiając wyłącznik główny 14
 na „I”.
Teraz urządzenie jest gotowe do pracy. 
SKT 2000 B1 |
21 |
RP100157 Konvektor Timer LB4 Seite 22 Mittwoch, 11. Juni 2014 12:37 12
3. Wyłączyć zasilanie elektryczne, ustawia- |
jąc wyłącznik główny 14 na „0”. |
6.2 Ustawianie stopnia ogrzewania
Za pomocą stopni ogrzewania można wybrać szybkość rozgrzewania urządzenia. Urządzenie ma trzy stopnie ogrzewania:
– Stopień |
1: |
750 W: |
włączyć |
przełącznik 6; |
|
|
|
– Stopień |
2: |
1250 W: |
włączyć |
przełącznik 5; |
|
|
|
– Stopień |
3: |
2000 W: |
włączyć |
przełącznik 5 oraz przełącznik 6. Jeśli szybkość rozgrzewania ma być szczególnie duża, należy wybrać stopień 3, a jeśli rozgrzewanie ma przebiegać powoli, należy wybrać stopień 1.
Kiedy urządzenie nagrzewa się, czerwona lampka kontrolna włączonych przełączników świeci się.
Kiedy żaden z przełączników nie jest włączony, urządzenie nie wytwarza ciepła.
6.3 Wybór temperatury
Za pomocą pokrętła temperatury 8 można ustawić żądaną temperaturę.
•Kiedy osiągnięta zostanie żądana temperatura pomieszczenia, należy powoli odkręcić pokrętło temperatury 8, aż do usłyszenia cichego „kliknięcia”.
Czerwone lampki kontrolne przy przełącznikach 5 bądź 6 gasną.
Obecna temperatura pomieszczenia będzie utrzymywana.
Kiedy konieczne będzie ponowne rozgrzanie urządzenia w celu utrzymania temperatury, czerwone lampki kontrolne przy przełącznikach 5 bądź 6 włączą się ponownie.
6.4 Funkcja wentylatora
Urządzenie jest wyposażone w wentylator, którego zadaniem jest szybsze rozprowadzanie nagrzanego powietrza w pomieszczeniu.
Aby włączyć wentylator, należy wcisnąć przełącznik wentylatora 7. Przy przełączniku wentylatora 7 zaświeci się wówczas czerwona lampka kontrolna.
Wskazówka: urządzenie może być eksploatowane także bez włączonego wentylatora. Wówczas ciepło skupia się bardziej wokół konwektora i nie jest tak szybko rozprowadzane w pomieszczeniu.
6.5Ustawianie czasu trwania ogrzewania
Urządzenie jest wyposażone w timer, dzięki któremu można ustawić żądany czas ogrzewania.
1. Włączyć timer, ustawiając wyłącznik |
główny 14 na symbolu zegara. |
22
RP100157 Konvektor Timer LB4 Seite 23 Mittwoch, 11. Juni 2014 12:37 12
2.Należy obracać skalą czasu 11, aż wskaźnik czasu będzie wskazywał aktualną godzinę 13.
W tym przykładzie jest to godzina 09.15.
3.Należy wybrać godziny, w których urządzenie ma pracować, przesuwając na zewnątrz wszystkie segmenty sterowania 12 od początku do końca, zgodnie ze skalą czasu 11.
W podanym przykładzie ustawiono czas nagrzewania od godz 13.00 do godz. 19.15.
4.Aby wyłączyć timer, należy przesunąć wyłącznik główny 14 do pozycji „I” (tryb ciągły) lub „0” (urządzenie wyłączone).
6.6 Zabezpieczenie przed przegrzaniem
Ze względów bezpieczeństwa urządzenie wyposażone jest w zabezpieczenie przed przegrzaniem.
Jeżeli temperatura we wnętrzu urządzenia będzie zbyt wysoka, urządzenie wyłączy się automatycznie:
1.Wyłączyć zasilanie elektryczne, ustawiając wyłącznik główny 14na „0”.
2.Sprawdzić, czy zapewniony jest swobodny dopływ i odpływ powietrza.
Jeżeli nie da się |
ustalić |
przyczyny, |
|
a błąd |
wystąpi |
ponownie, należy |
|
naprawić |
urządzenie lub |
wyłączyć je |
|
z eksploatacji.
3.Odczekać do ostygnięcia urządzenia.
4.Następnie można normalnie używać urządzenia.
6.7 Ochrona przed zamarzaniem
Dzięki tej funkcji urządzenie zapobiega spadkowi temperatury pomieszczenia poniżej granicy zamarzania.
1.Ustawić pokrętło temperatury 8 na symbol śnieżynki 9.
2.Włączyć zasilanie elektryczne,
ustawiając wyłącznik główny 14 na
„I”.
3.Za pomocą przełączników 5 i 6 należy
wybrać stopień ogrzewania (patrz "6.2 Ustawianie stopnia ogrzewania" na stronie 22).
4. Włączyć |
wentylator, |
wciskając |
|
przełącznik |
wentylatora |
7 |
(patrz |
"6.4 Funkcja |
wentylatora" |
na |
|
stronie 22). |
|
|
|
SKT 2000 B1 |
23 |
RP100157 Konvektor Timer LB4 Seite 24 Mittwoch, 11. Juni 2014 12:37 12
6.8 Transportowanie urządzenia
Transportując urządzenie, należy zawsze trzymać je za uchwyty do przenoszenia 1.
7. Czyszczenie
Aby długo cieszyć się urządzeniem, należy je regularnie czyścić.
Ostrzeżenie! Aby zapobiec porażeniu prądem lub oparzeniu:
– przed czyszczeniem zawsze odłączać wtyczkę sieciową,
–odczekać do ostygnięcia urządzenia,
–nigdy nie zanurzać urządzenia w wodzie,
–nie dopuścić, aby woda lub płyn czyszczący dostały się do urządzenia.
1.Większe złogi kurzu należy usunąć ostrożnie odkurzaczem.
2.Wyczyścić urządzenie z zewnątrz wilgotną szmatką. Można również użyć nieco płynu do mycia naczyń.
Uwaga! Nie stosować nigdy środków żrących ani mleczka do czyszczenia, gdyż mogłoby to uszkodzić urządzenie.
3.Wyczyścić ponownie szmatką zwilżoną czystą wodą.
4.Urządzenie stosować dopiero po jego całkowitym wyschnięciu.
8. Usuwanie usterek
Zakłócenie |
Przyczyna |
Postępowanie |
|
|
|
Nie można włączyć |
Uszkodzony bezpiecznik lub |
Wybrać inne gniazdko sieciowe. |
urządzenia. |
gniazdko sieciowe. |
|
|
|
|
|
Urządzenie uszkodzone. |
Zlecić naprawę w specjalistycznym |
|
|
warsztacie lub oddać urządzenie do |
|
|
utylizacji. Adres serwisu znajduje się w |
|
|
punkcie "Centrum serwisowe" na |
|
|
stronie 27. |
|
|
|
24
RP100157 Konvektor Timer LB4 Seite 25 Mittwoch, 11. Juni 2014 12:37 12
Zakłócenie |
Przyczyna |
Postępowanie |
|
|
|
Urządzenie wyłącza |
Zadziałało zabezpieczenie |
Odczekać do ostygnięcia urządzenia |
się automatycznie. |
przed przegrzaniem. |
(patrz "6.6 Zabezpieczenie przed |
|
|
przegrzaniem" na stronie 23). |
|
|
|
|
|
Oczyścić urządzenie (patrz |
|
|
"7. Czyszczenie" na stronie 24). |
|
|
|
|
Ustawiona temperatura |
Gdy temperatura w pomieszczeniu |
|
została osiągnięta |
spadnie, ogrzewanie włączy się |
|
|
automatycznie |
|
|
|
|
|
Wybrać wyższą temperaturę zadaną |
|
|
|
9. Utylizacja
9.1 Urządzenie
Symbol przekreślonego kubła na śmieci na kółkach oznacza, że produkt w Unii Europejskiej musi być zbierany oddzielnie. Dotyczy to produktu i
wszystkich oznakowanych tym symbolem części wyposażenia. Oznakowane produkty nie mogą być odprowadzane do odpadów z gospodarstw domowych, lecz muszą być oddane na składowiska, zbierające produkty elektryczne oraz
elektroniczne do recyklingu. Recykling pomaga zredukować zużycie surowców i odciąża środowisko. W związku z tym ściśle przestrzegaj obowiązujących w kraju użytkowania przepisów dotyczących usuwania.
9.2 Opakowanie
Przestrzegać odpowiednich krajowych przepisów ochrony środowiska przy utylizacji opakowania.
10. Gwarancja firmy HOYER Handel GmbH
Szanowna Klientko, szanowny Kliencie,
dla tego urządzenia obowiązuje gwarancja ważna przez 3 lata od daty zakupu. W przypadku wad produktu Klient ma ustawowe prawa wobec sprzedawcy. Podane niżej warunki gwarancji nie ograniczają zakresu tych praw ustawowych.
Warunki gwarancji
Okres gwarancji zaczyna upływać w dniu zakupu. Należy zachować oryginalny paragon kasowy. Dokument ten jest potrzebny jako dowód zakupu.
Jeżeli w ciągu trzech lat od daty zakupu tego produktu wystąpi wada materiałowa lub wada wykonania, produkt zostanie przez nas – zgodnie z naszą decyzją –
SKT 2000 B1 |
25 |
 Loading...