


English .................................................................................................. |
2 |
Polski.................................................................................................. |
29 |
Magyar .............................................................................................. |
56 |
Slovenščina......................................................................................... |
83 |
Čeština.............................................................................................. |
110 |
Deutsch ............................................................................................. |
137 |
V 1.11
|
SilverCrest SKD 1000 A3 |
Table of Contents |
|
|
|
Table of Contents ............................................................................................. |
2 |
Trademarks ..................................................................................................... |
4 |
Introduction ..................................................................................................... |
4 |
Intended Use ................................................................................................... |
4 |
Package Contents ............................................................................................ |
5 |
Technical Specifications .................................................................................... |
6 |
Safety Instructions ........................................................................................... |
7 |
Getting Started .............................................................................................. |
10 |
Connectors and Controls ............................................................................................................... |
10 |
Left Panel ..................................................................................................................................... |
10 |
Right Panel .................................................................................................................................. |
10 |
Top............................................................................................................................................... |
10 |
Front............................................................................................................................................. |
11 |
Interior view of the cassette compartment ................................................................................ |
11 |
Installing the Conversion Software ................................................................................................ |
12 |
System Requirements.................................................................................................................. |
12 |
Installing AudioLava ................................................................................................................... |
12 |
Preparing the Cassette Digitizer .................................................................................................... |
12 |
Inserting the Batteries ................................................................................................................. |
13 |
Playing Cassettes........................................................................................... |
14 |
Connecting the earphones ............................................................................................................. |
14 |
Playing audio cassettes .................................................................................................................. |
14 |
|
|
2 |
English |

SilverCrest SKD 1000 A3 |
|
Inserting an audio cassette ........................................................................................................ |
14 |
Playing the cassette .................................................................................................................... |
15 |
Removing the audio cassette ..................................................................................................... |
15 |
Copying Audio Cassettes to a PC.................................................................... |
16 |
Connecting the device to your PC ................................................................................................. |
16 |
Copying the cassette content to the PC ........................................................................................ |
17 |
Editing the digitized content........................................................................................................... |
21 |
Maintenance / Cleaning................................................................................. |
24 |
Environmental Considerations and Recycling ................................................. |
25 |
Conformity Notice.......................................................................................... |
25 |
Troubleshooting............................................................................................. |
26 |
The cassette digitizer can’t be switched on .............................................................................. |
26 |
No sound .................................................................................................................................... |
26 |
Problems when copying cassette content to a computer ........................................................ |
26 |
Information about warranty and service processing ..................................... |
27 |
English |
3 |

SilverCrest SKD 1000 A3
Trademarks
Windows® is a registered trademark of Microsoft Corporation.
USB is a registered trademark.
Pentium is a registered trademark of Intel Corporation.
Other names and products can be the trademarks or registered trademarks of their respective owners.
Introduction
Thank you for choosing a SilverCrest product. With this cassette digitizer you can not only play your audio cassettes when moving or travelling; you can also convert them to a modern, digital multimedia format and even store the digital audio data on a CD or a USB memory stick.
Intended Use
This is a consumer electronics device. It is designed for playing and digitizing audio cassettes. It may only be used for private use, not industrial or commercial purposes. Furthermore, the device may not be used in tropical climates.
This device fulfils all conformity-relevant norms and standards. Any modifications to the device may result in these directives no longer being met. Only use the accessories recommended by the manufacturer.
Please observe the regulations and laws in the country of use.
4 |
English |
SilverCrest SKD 1000 A3
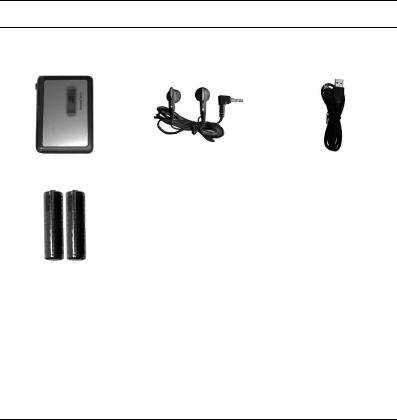
Package Contents
Remove the device and all the accessories from the packaging. Remove the packaging material and check whether all the parts are complete and undamaged. In the case that you find anything missing or damaged, please contact the manufacturer.
SilverCrest Cassette Digitizer |
SilverCrest |
USB cable, length 70 cm |
|
SKD 1000 A3 |
earphones PS-09 |
||
|
|||
|
|
|
|
2 AA-sized brand-name |
CD with the AudioLava |
User manual with service |
|
conversion software (Lineart |
|||
batteries, 1.5 V |
information (Lineart illustration) |
||
illustration) |
|||
|
|
English |
5 |

|
|
|
|
SilverCrest SKD 1000 A3 |
||||
Technical Specifications |
|
|
|
|
|
|
|
|
|
|
|
|
|
|
|
|
|
|
|
|
|
|
|
|
|
|
|
Model name |
SilverCrest SKD 1000 A3 |
|
|||||
|
Power supply |
2 AA batteries, 1.5 V |
|
|
||||
|
|
(optionally via a mains adapter, 3 V |
|
, |
|
|
||
|
|
|
|
|
||||
|
|
polarity |
|
) |
|
|
||
|
|
or via a USB 2.0 cable connection |
|
|
||||
|
|
(recommended) to the computer (+5 V) |
|
|
||||
|
Maximum current consumption |
500 mA |
|
|
||||
|
Dimensions |
11.3 x 8.4 x 3.2 cm |
|
|
||||
|
Weight |
170 g (without batteries) |
|
|
||||
|
Operating temperature |
5 °C to 35 °C |
|
|
||||
|
Operating humidity |
85 % rel. humidity |
|
|
||||
|
|
|
|
|
|
|
|
|
|
|
|
|
|
|
|
|
|
|
Earphones |
PS-09 |
||||||
|
Impedance |
32 Ohms |
||||||
|
Broadband characteristics voltage |
approx. 100 mV |
|
|||||
|
Max. sound pressure level with supplied |
approx. 94 dB(A) |
|
|||||
|
earphones |
|
|
|
|
|
|
|
|
Max. output voltage on earphones jack |
approx. 80 mV |
||||||
|
|
|
|
|
|
|
|
|
The technical data and design may be changed without notification.
6 |
English |
SilverCrest SKD 1000 A3
Safety Instructions
Before you use this device for the first time, please read the following notes in this manual and heed all warnings, even if you are familiar with handling electronic devices. Keep this manual safe for future reference. If you sell the device or pass it on, it is essential that you also hand over this manual. The manual is an integral part of the device.
CAUTION! This icon and the word “Caution” alert you to a potentially dangerous situation. Ignoring them could lead to severe injury or even death.
WARNING! This symbol and the word “Warning” denote important information required for the safe operation of the product and for the safety of its users.
This icon denotes further information on the topic.
Risks associated with excessive volume levels
WARNING! Using headphones to listen to high-volume audio can damage your auditory system.
CAUTION! Only use the earphones supplied with your device (SilverCrest PS09). Other types of earphones can produce harmful sound pressure levels.
In accordance with safety regulations the maximum permitted noise level is 100 dB(A). The device fully complies with these legal requirements.
Do not use the earphones at high volume levels, otherwise you will damage your hearing and possibly disturb other people. Although the device is designed to enable you to perceive external noise, only adjust the volume to maximum level so that you still capable of hearing what is happening around you. Environment noise can sound unfamiliar. Under dangerous circumstances (for example when driving a vehicle or when working with machines) the sound
English |
7 |
SilverCrest SKD 1000 A3
may distract your attention or prevent you from being aware of what is happening around you. You should not use the device in these situations.
Operating Environment
The device is not designed for use in environments with high temperatures or humidity (e.g. bathrooms), and must be kept free of dust. Operating temperature and operating humidity: 5°C to 35°C, max. 85 % RH.
CAUTION! Always make sure that:
there is free circulation of air (do not place the device on shelves, on a carpet, on a bed, or anywhere that obstructs the ventilation, and ensure at least 10 cm clearance on all sides)
no direct heat sources (e.g. radiators) can affect the device
no direct sunlight or bright artificial light reaches the device
contact with sprayed and dripping water and abrasive liquids must be avoided and the device should never be operated near water. It must especially never be immersed (do not place any items containing liquids such as beverages, vases, etc. onto or next to the device)
the device is never placed in the immediate vicinity of magnetic fields (e.g. loudspeakers)
no foreign bodies enter the device
the device is not subject to major great temperature fluctuations as this can cause condensation and short-circuits. If the device is exposed to strong temperature fluctuations, wait (approx. 2 hours) until it has reached ambient temperature before turning it on
the device is not subjected to excessive shocks and vibrations
Candles and any other open flames must be kept away from this product at any times in order to avoid the risk of fire
8 |
English |
SilverCrest SKD 1000 A3
CAUTION!Batteries
Insert the batteries with the correct polarity. Refer to the polarity markings beside the battery compartment. Do not try to recharge the batteries and do not throw batteries into the fire. Do not mix battery types (old and new or carbon and alkaline, etc.). Remove the batteries when the device is not to be used for a long time. In the event of improper use, there is a risk of explosion and leakage.
Batteries must never be opened or deformed, as this could result in chemicals leaking out which could cause injuries. Batteries and small parts represent potential choking hazards. Keep the batteries in a safe place. If a battery is swallowed, seek medical help immediately. If the battery fluid becomes in contact with the skin or eyes, rinse immediately with plenty of water and seek medical aid.
CAUTION! Children and persons with disabilities
Electrical devices are not suitable for children. Also persons with reduced physical, sensorial or mental capabilities should only use electrical devices in appropriate circumstances. Do not allow children or persons with disabilities to use electrical devices when not under supervision, unless they are instructed accordingly and supervised by a competent person responsible for their safety. Children should always be supervised to ensure that they do not play with the product.
Keep the packaging away from children and persons with disabilities too.
Danger of suffocation!
English |
9 |

SilverCrest SKD 1000 A3
Getting Started
Connectors and Controls
This User Manual has a fold-out cover. Please fold out the title page and read the following descriptions. This will enable you to always have the diagram visible, permitting a better understanding of the location of the different buttons and sockets.
Left Panel
1Socket for an optional mains adapter
Right Panel
2Volume control: Turn the volume control knob to increase or lower the volume.
3USB port: The USB port is used to connect the USB cable to allow connection of the device to a PC and copying of audio cassettes. We recommend that you use a USB 2.0 port on your PC.
4Earphone socket: For connecting the supplied earphones.
5Release button for the cassette compartment cover. To open the cassette compartment, slide this button in the direction of the arrow.
Top
6DIR button: Press this button during playback or when playback has been stopped to switch between playback of side A and side B of the cassette.
7 / button: Sliding this button to the position ensures that the playback toggles
to the other side when the end of the current side of the cassette is reached. After the second side has been played, playback will stop. Sliding this button to the position ensures that the playback toggles to the other side when the end of the current side of the cassette is reached and the cassette sides continue to alternate, playing in loop.
Note: In the position, playback will not stop once the end of the cassette has been reached. The device will play side A, side B, side A etc. in loop.
10 |
English |

SilverCrest SKD 1000 A3
8FF button*: This is the Fast Forward button for advancing the cassette tape. To stop the Fast Forward function, press the STOP button (11).
The STOP button (11) is also used to stop the Fast Forward function when the end of the tape is reached.
9REW button*: Press this button to rewind the cassette tape. To stop the Rewind function, press the STOP button (11).
The STOP button (11) is also used to stop the Rewind function when the start of the tape is reached.
10PLAY button: Press this button to start playback of the cassette.
11STOP button: Press this button to stop playback and to stop the Fast Forward or the Rewind function.
Front
12 Cassette compartment cover
Interior view of the cassette compartment
13 Battery compartment
* Please note that the cassette will wind into the opposite direction if the cassette side has been toggled by pressing the DIR button or if it has toggled automatically.
English |
11 |

SilverCrest SKD 1000 A3
Installing the Conversion Software
System Requirements
With the supplied AudioLava conversion software you can digitize your analog recordings and at the same time filter out hissing, sound imperfections, crackling and other background noise, and add Hall effects etc. Before installing the software, make sure that your computer fulfils the following minimum requirements:
Pentium or compatible processor, 800 MHz or higher
Minimum of 256 MB RAM
Graphics board with a colour depth of at least 16 bits
A Windows-compatible sound board
Operating system: Windows 7/8, Windows Vista or Windows XP
DirectX 8.0 or higher.
Installing AudioLava
The software is provided on the supplied CD.
1.Insert the supplied CD into the CD or DVD drive of your computer. The software should install and launch automatically; if it doesn’t, double-click on the “CD_Start.exe” file in the main folder on the CD.
2.Then follow the on-screen instructions to install the software. If you are then asked whether the computer should be restarted, click on Yes.
Preparing the Cassette Digitizer
You can operate the device using the supplied AA-sized (Mignon) batteries, via the USB cable connected to a PC, or by using an optional mains adapter (not supplied). The mains adapter must have a compatible DC output plug and must supply an operating voltage of 3V. Mains adapter output polarity: 
12 |
English |
SilverCrest SKD 1000 A3
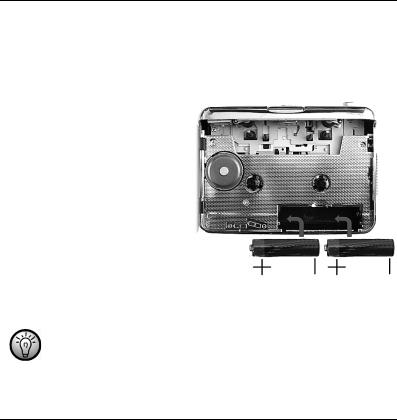
Inserting the Batteries
The battery compartment (13) is located underneath the cassette compartment cover (12).
1.Slide the black release button (5) in the direction indicated by the arrow to release the cassette compartment cover, and then raise the cover.
2.Insert your fingernail into the recess above the cover of the battery compartment (13) and open the cover. Remove the cover and put it to one side.
3.Insert the supplied AA batteries into the unit with the correct polarity (+ and -). Push the first battery as far as you can to the left so that it is no longer visible, and then insert the second battery (see the diagram to the left of the battery compartment).
4.Replace the cover on the battery compartment. First position its lower edge on the two lugs at the bottom left and right of the battery compartment, and then carefully press down the top edge of the cover with your finger until it clicks into place.
If the volume level drops, or if the device stops operating or the playback becomes distorted, replace the batteries with new batteries of the same type. The device does not provide an indication that the batteries are weak.
English |
13 |
SilverCrest SKD 1000 A3
Playing Cassettes
You can use your SilverCrest SKD 1000 A3 just like a normal, portable cassette player for listening to audio cassettes. Thanks to its compact and lightweight construction and the independent power supply via batteries, it’s a mobile device that can be used when travelling, jogging etc. To be able to directly listen to audio cassettes, you first need to connect the earphones.
Connecting the earphones
When using the earphones, please heed the warnings in the Safety Instructions on page 7.
To listen to music, you can connect the supplied SilverCrest PS-09 earphones.
WARNING! Using headphones to listen to high-volume audio can damage
your auditory system.
1. Insert the earphones jack into the earphones socket (4).
CAUTION! Only use the earphones supplied with your device (SilverCrest PS09). Other types of earphones can produce harmful sound pressure levels.
Playing audio cassettes
Inserting an audio cassette
1.Open the cassette compartment cover by sliding the release button (5) in the direction of the arrow.
2.Insert an audio cassette into the cassette compartment. Insert the side at which the tape is visible first. Make sure that the two pins at the top of the cassette compartment slot into the corresponding holes of the cassette.
14 |
English |

SilverCrest SKD 1000 A3
Before inserting the cassette, you should make sure that the tape is slightly tensioned. This is to avoid the tape becoming chewed. Hold the cassette in front of you with one hand, and using a finger of your other hand, or a pencil, rotate the right-hand knurled wheel clockwise.
3. Close the cassette compartment by simply pressing down the cover until it clicks into place.
Playing the cassette
You can play, stop, fast forward or rewind the cassette using the PLAY (10), STOP (11), FF
(8) and REW (9) buttons. See the description of the buttons on page 10.
During the playback, you can adjust the volume by turning the volume knob (2) clockwise or anticlockwise.
Removing the audio cassette
1.If the tape is still playing or if the Fast Forward or Rewind functions are operating, press the STOP button (11) to stop it.
2.Open the cassette compartment cover by sliding the release button (5) in the direction of the arrow.
3.Remove the audio cassette from the cassette compartment. First lift the side of the cassette at which the tape is visible. Insert a fingernail into the upper edge of the cassette and lift it slightly, so that you can then grip it at both sides and completely remove it from the cassette compartment.
4.Close the cassette compartment by simply pressing down the cover until it clicks into place.
English |
15 |
SilverCrest SKD 1000 A3
Copying Audio Cassettes to a PC
To be able to digitize and store your cassettes on a PC, you must first have installed the supplied AudioLava software on your computer (see page 12, Installing AudioLava).
Connecting the device to your PC
1.Connect your SilverCrest SKD 1000 A3 to a switched-on PC using the supplied USB cable. Connect the end of the cable with the small USB connector to the USB port (3) on the device, and the end with the large USB connector to a USB 2.0 port on your PC.
2.Your SilverCrest SKD 1000 A3 should then be detected automatically by the operating system and the necessary drivers should be installed automatically (this step is only performed the first time you connect the SilverCrest SKD 1000 A3 to your PC).
When the cable has been connected and the PC is switched on, power will be supplied to your SilverCrest SKD 1000 A3 by the computer via the USB cable. You can leave the batteries in place or the optional mains adapter connected.
16 |
English |

SilverCrest SKD 1000 A3
Copying the cassette content to the PC
This section provides basic information on digitizing an audio cassette on your PC. The AudioLava software used to perform the digitizing offers a wide range of functions which are not all described in this user manual. A detailed description of the functions of AudioLava is available in the AudioLava online Help files.
1.Start the AudioLava program by clicking on the  icon on the Desktop. The AudioLava Cleaning Wizard is then displayed.
2. In the Cleaning Wizard, click on "Record from tape deck" to start recording.
English |
17 |
SilverCrest SKD 1000 A3
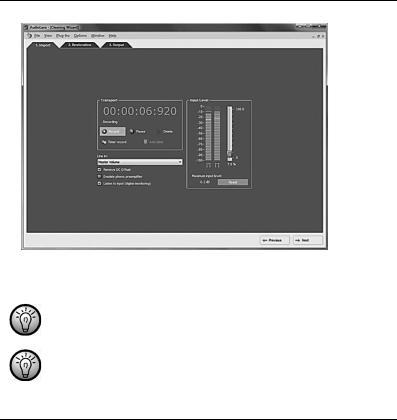
The recording window is then displayed.
3.Insert the cassette that you wish to digitize and then press the PLAY button (10) to start playing the tape. Adjust the volume using the Volume Control knob (2) on the device as described in the "Input Level" option (see Step 4 below).
Use the FF button (8) or the REW button (9) to spool to the start of the tape or to find the track that you wish to digitize.
Make sure that the correct recording console is configured in the AudioLava software. Select "Options" > "Device Settings". Under “Recording Console” you can select an entry. This entry can be, for example: "[MME] Microfon (USB Microphone)" or "[MME] Microphone (USB Microphone)". Please note that this entry may vary depending on the operating system.
18 |
English |
SilverCrest SKD 1000 A3
If you wish, you can activate the "Listen to input (digital monitoring)" option (described in the next step) to monitor the audio signal via the PC speakers.
4.Click on the red "Record" button to start recording.
The following options are also available in the Recording window:
Pause: Clicking on this button temporarily stops the recording. To continue recording after a pause, simply click once again on “Record”.
Delete: Clicking on this button deletes the current recording. Please note that the recording will be deleted immediately: no further safety prompt will appear.
Timer record: Click on this button to start timer-controlled recording. A new dialog box is displayed in which you can define the start and end times for recording:
You can have the recording to start immediately, when an input signal is detected or have the recording to start at a specific date and time.
You can have the recording not ending automatically and after a specific timeout with no signal (in this case you have to set the silence threshold value) or after a recording time you set.
Line in: This list contains the signal sources available on your computer. To record digital audio data from your SilverCrest SKD 1000 A3, select "Master Volume" (Windows VISTA/7/8) or "Microphone Array" (Windows XP).
Remove DC Offset: Some computer sound boards superimpose a DC voltage on the audio signal. You can activate this option to remove the resulting DC offset.
Emulate phono preamplifier: This option is provided for recording from record players and should be left deactivated for your SilverCrest SKD 1000 A3.
Listen to input (digital monitoring): Activating this option outputs the Line In signal via the PC speakers. You should not, however, keep this option activated for the entire
English |
19 |

SilverCrest SKD 1000 A3
duration of the recording, since this can result in audio dropouts during recording on slow systems.
Input Level: The level meters here show the levels of the input signal on the left and right stereo channels. You can adjust the signal level using the slide control to the right of the level indicators. Please make sure that the loudest passages never reach or exceed the maximum level of 0 dB, otherwise your recording will become clipped (overmodulated). The “Maximum input level” displayed at the bottom of this section of the display shows the maximum level measured during the entire recording. The “Reset” button allows you to delete the stored maximum level and repeat the recording with a lower level.
If necessary, adjust the level using the Volume Control knob (2) on your digitizer.
5.Once you have digitized the desired tracks or the entire content of the cassette, click on the "Pause" button to end the recording on the PC, and then press the STOP button (11) on the cassette digitizer to stop the playback.
20 |
English |

SilverCrest SKD 1000 A3
Editing the digitized content
1.Click on the “Next” button at the bottom of the window to open the “Restoration” tab, where you can edit your recording.
Graphical view of the recording: This view provides a graph of the recording. If an extremely quiet passage lasting several seconds is detected, the program splits the individual pieces of music separated by this gap into so-called “tracks”. If the individual tracks detected by the program don’t correspond with the music tracks on the cassette, you can also manually edit the tracks generated by the program. This process is explained in the AudioLava Help system.
Track List: This list contains the tracks (i.e. pieces of music) detected by the program. If the individual tracks detected by the program don’t correspond with the music tracks
English |
21 |

SilverCrest SKD 1000 A3
on the cassette, you can also manually edit the tracks generated by the program. This process is explained in the AudioLava Help system.
Transport bar: The transport bar is located directly below the graphical view of the recording, and contains buttons for playing a marked section of the recording (which you mark using the mouse in the graphical display), for playing the entire recording, for enlarging or reducing the scale of the graphical display, and for normalisation and interpolation. You can also use the “Redetect tracks” option to manually repeat the automatic track detection process.
The filters described in the following can be enabled by clicking on the  icons.
Declicker: The Declicker is used to remove loud clicks and pops. You can individually configure this filter function by dragging the slide control with the mouse.
Decrackler: The Decrackler is used to remove frequent short clicks, also referred to as crackling. You can individually configure this filter function by dragging the slide control with the mouse.
Declipper: The Declipper is used to correct recordings with digital or analog clipping. You can individually configure this filter function by dragging the slide control with the mouse.
Denoiser: For removing static noise (e.g. tape transport noise). You can individually configure this filter function by dragging the slide control with the mouse.
Additional Effects: This option allows you to add additional effects and tools for editing your recordings. Further information on this is available in the AudioLava Help system.
22 |
English |
SilverCrest SKD 1000 A3
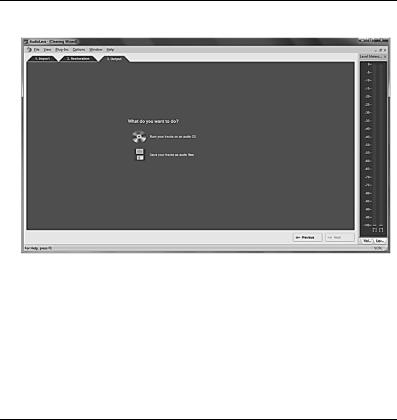
2.Once you have finished editing your recording, you can save it. Click on the “Next” button at the bottom of the window to open the “Output” tab.
3.Here you can select whether you wish to burn your digitized tracks on an audio CD or save them as digital audio files.
Burn your tracks on an audio CD: This option allows you to burn your recorded tracks on a audio CD which you can subsequently listen to on a conventional CD player. To be able to burn your tracks to an audio CD, a CD burner or DVD burner must be available on your computer; the burner is selected in the next step.
Save your tracks as audio files: This option allows you to save your recorded tracks as digital audio files on your computer. You can specify where you want the files to be saved (e.g. a new folder with the title of the cassette or the album), and can assign a name for the album, select a digital file format (e.g. mp3 or wav) and if
English |
23 |

SilverCrest SKD 1000 A3
required one of the options available for that file format. Further information on this is available in the AudioLava Help system.
4. Click again on “Next” to start the burn/save process.
Maintenance / Cleaning
Repairs are required when this device has been damaged in any way, for example when the device housing is damaged, when liquids or objects have entered the device or when the product has been exposed to rain or moisture. Repairs are also necessary when the product does not perform normally or if it has been dropped. If smoke, unusual noises or smells are noticed, switch off the device immediately. In these cases the device should no longer be used and should be inspected by authorized service personnel. Please contact qualified personnel when servicing is needed. Do not attempt to open the housing of the device, otherwise you will void your warranty.
To clean use a dry cloth. Never use any solvents or cleaners that may damage the plastic housing. Make sure that no liquid gets into the housing. If the product is very dirty, use a slightly moistened cloth.
24 |
English |
SilverCrest SKD 1000 A3
Environmental Considerations and Recycling
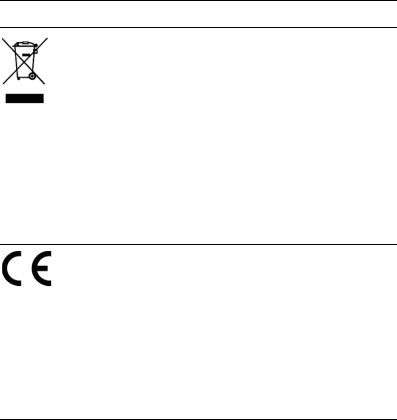
If the product is labelled with a struck-out waste bin, it is subject to European Directive 2012/19/EU. All electrical and electronic devices must be disposed of separately from household waste at official disposal centres. With proper disposal of old devices you avoid damage to the environment and your personal health. For further information about proper disposal, contact your local government, disposal bodies or the shop where you bought the device.
Respect the environment. Old batteries do not belong in with domestic waste. They must be handed in to a collection point for old batteries. Please note that batteries must be disposed of fully discharged at appropriate collection points for old batteries. If disposing of batteries which are not fully discharged, take precautions to prevent short circuits.
Also recycle the packaging material properly. Cardboard packaging can be taken to paper recycling containers or public collection points for recycling. Any films or plastic contained in the packaging should be taken to your public collection points.
Conformity Notice
This device complies with the basic and other relevant requirements of EMC Directive 2004/108/EC and the RoHS Directive 2011/65/EU. The declaration of conformity can also be found at the end of this user manual.
English |
25 |

SilverCrest SKD 1000 A3
Troubleshooting
You can solve most common problems yourself using the table below. If the problem persists after checking the suggested solutions, please contact our Service Hotline (see page 28). Do not attempt to repair the product yourself.
The cassette digitizer can’t be switched on
Insert the batteries with the correct polarity.
Replace the batteries.
If you are using an optional mains adapter, connect the adapter firmly to the DC input (1) of the device and to a properly-functioning power socket. Make sure that the small round connector of the mains adapter has the correct polarity ( ) and that the mains adapter outputs 3 V DC.
No sound
Are you sure the inserted cassette contains recordings?
Is the volume set to very low?
Problems when copying cassette content to a computer
Please check that the USB cable is properly connected.
Make sure that the USB cable is not damaged.
Make sure that the correct recording console is configured in the AudioLava software. Select "Options" > "Device Settings". Under “Recording Console” you can select an entry. This entry can be, for example: "[MME] Microfon (USB Microphone)" or "[MME] Microphone (USB Microphone)". Please note that this entry may vary depending on the operating system.
If the input level does not rise above –50 dB in the AudioLava recording (see the level meters in the "Import" tab), either the cassette is empty, or you have forgotten to start playback on the SilverCrest SKD 1000 A3, or the volume has been turned right down on
26 |
English |

SilverCrest SKD 1000 A3
the device. You may also have inadvertently turned the volume down in Windows for the recording device. Click on "Start", "Control Panel", "Hardware and Sound", "Manage Audio Devices", and in the “Sound” window which is then displayed open the "Recording" tab. Select the "Microphone Array" device and then click on "Properties". In the “Microphone Array Properties” window which is then displayed, open the "Levels" tab and if necessary use the mouse to drag the slider control a little to the right.
Information about warranty and service processing
Warranty of TARGA GmbH
This device is sold with three years warranty from the date of purchase. Please keep the original receipt in a safe place as proof of purchase. Before using your product for the first time, please read the enclosed documentation. Should any problems arise which cannot be solved in this way, please call our hotline. Please have the article number and, if available, the serial number to hand for all enquiries. If it is not possible to solve the problem on the phone, our hotline support staff will initiate further servicing procedures depending on the fault. Within the warranty period the product will be repaired or replaced free of charge as we deem appropriate. No new warranty period commences if the product is repaired or replaced. Consumables such as batteries, rechargeable batteries and lamps are not covered by the warranty.
Your statutory rights towards the seller are not affected or restricted by this warranty.
English |
27 |
SilverCrest SKD 1000 A3
Service
Phone: |
0207 – 36 50 744 |
E-Mail: |
service.GB@targa-online.com |
Phone: |
01 – 242 15 83 |
E-Mail: |
service.IE@targa-online.com |
Phone: |
800 – 62 175 |
E-Mail: |
service.MT@targa-online.com |
Phone: |
800 – 92 496 |
E-Mail: |
service.CY@targa-online.com |
IAN: 106953
Manufacturer
TARGA GmbH
Coesterweg 45
59494 SOEST
GERMANY
28 |
English |
 Loading...