


English...................................................................................................... |
2 |
Suomi..................................................................................................... |
29 |
Svenska ................................................................................................. |
56 |
Dansk..................................................................................................... |
83 |
Français................................................................................................ |
110 |
Nederlands .......................................................................................... |
137 |
Deutsch ................................................................................................ |
164 |
V 2.0

SilverCrest SMS 5.0 A1 |
|
Contents |
|
Trademarks........................................................................................................ |
3 |
Introduction........................................................................................................ |
3 |
Intended use ...................................................................................................... |
3 |
Supplied items.................................................................................................... |
4 |
Technical data .................................................................................................... |
6 |
Safety instructions .............................................................................................. |
7 |
Copyright ........................................................................................................... |
9 |
Overview ......................................................................................................... |
10 |
Prior to use....................................................................................................... |
12 |
First use ............................................................................................................ |
12 |
Inserting memory card ....................................................................................................................... |
12 |
Switching the device on and off........................................................................................................ |
12 |
Inserting slides .................................................................................................................................... |
13 |
Inserting negatives ............................................................................................................................. |
14 |
Inserting photos .................................................................................................................................. |
15 |
Inserting business cards ..................................................................................................................... |
16 |
Main menu ......................................................................................................................................... |
17 |
Selecting recording source ................................................................................................................ |
17 |
Recording............................................................................................................................................ |
17 |
Flipping ........................................................................................................................................... |
18 |
Adjusting brightness ....................................................................................................................... |
18 |
Adjusting colour ............................................................................................................................. |
19 |
Recording and saving .................................................................................................................... |
19 |
Memory full .................................................................................................................................... |
20 |
Memory card protected................................................................................................................. |
20 |
Playback ............................................................................................................................................. |
21 |
USB mode........................................................................................................................................... |
22 |
Formatting the memory card ............................................................................................................. |
23 |
TV-out .................................................................................................................................................. |
24 |
Storage when not in use .................................................................................................................... |
25 |
Troubleshooting ............................................................................................... |
25 |
Environmental and disposal information .......................................................... |
26 |
Conformity information .................................................................................... |
26 |
Warranty and servicing advice ........................................................................ |
27 |
2 - English

SilverCrest SMS 5.0 A1
Trademarks
Microsoft Windows is a registered trademark of Microsoft Corporation, USA.
SD and SDHC are registered trademarks.
USB is a registered trademark.
Other names and products may be the trademarks or registered trademarks of their respective owners.
Introduction
Thank you for purchasing a SilverCrest product.
Intended use
The SilverCrest SMS 5.0 A1 multi scanner is an information technology device and is not designed for commercial use or operation in a company. It can be used to digitize slides, negatives, paper photos and business cards. This device may only be used for private purposes, and any other use is not as intended. Furthermore, the device may not be used outdoors or in tropical climates. This device meets the requirements of all relevant norms and standards in conjunction with the Declaration of Conformity. In the event of any modification to the device that was not approved by the manufacturer, compliance with these standards is no longer guaranteed. The manufacturer does not accept any liability for any resulting damage or faults in such cases.
Please observe the regulations and laws in the country of use.
English - 3
SilverCrest SMS 5.0 A1
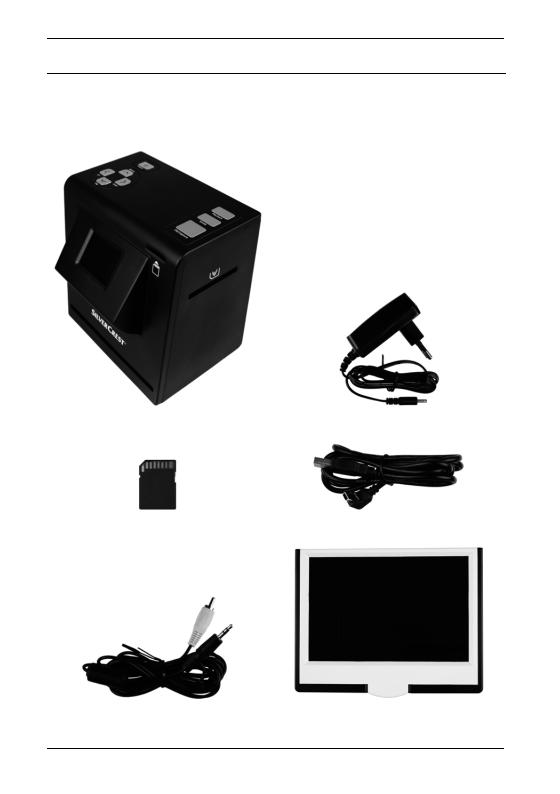
Supplied items
Take the device and all accessories from the packaging. Remove all packaging material and check that all parts are complete and undamaged. In the event of an incomplete or damaged delivery, please contact the manufacturer.
SilverCrest SMS 5.0 A1 multi scanner |
Power supply adapter |
128MB SD card |
USB cable |
Video cable |
Photo/business card holder |
4 - English
SilverCrest SMS 5.0 A1
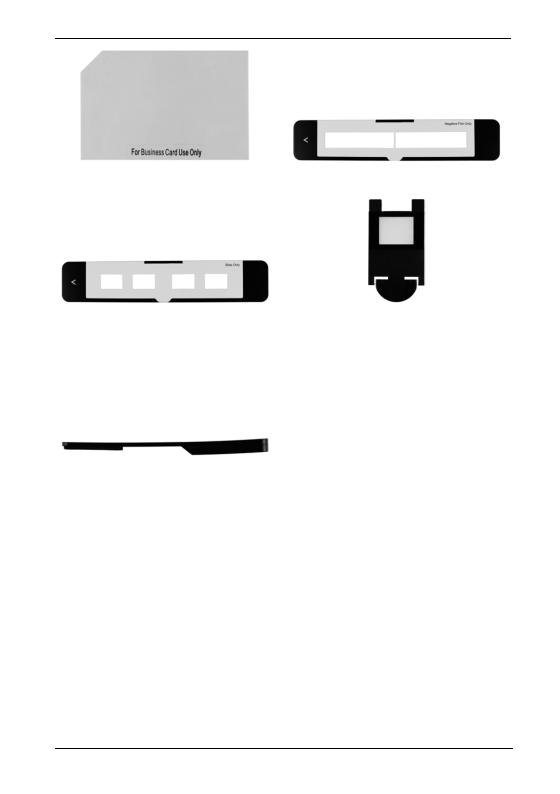
Business card fixing |
Negative holder |
Slide holder |
Backlight rail |
|
|
Cleaning brush |
Operating instructions |
(for slides and negatives) |
(symbolic representation) |
English - 5

SilverCrest SMS 5.0 A1
Technical data
|
Image sensor |
5-megapixel CMOS sensor |
|
||
|
Screen |
approx. 6 cm (2.4 inch) TFT LCD colour display |
|
External memory |
SD/SDHC (up to 32GB) |
|
Scan method |
single pass |
|
Scanner resolution |
1800 dpi |
|
Exposure control |
7 levels |
|
Colour setting |
7 levels |
|
Light source |
negatives/slides: 3 white LEDs |
|
|
photos/business cards: 8 white LEDs |
|
Colour depth |
24-bit |
|
Connections |
composite TV-out (3.5 mm jack) |
|
|
USB 2.0 (USB mass storage) |
|
|
Power supply |
|
Operating temperature |
5 °C to 35 °C |
|
Storage temperature |
-10 °C to 50 °C |
|
Operating air humidity |
max. 85 % rel. air humidity |
|
Dimensions (W x H x D) |
approx. 190 x 205 x 165 mm |
|
Weight |
approx. 900 g |
|
Power supply |
5V , 1.0A |
|
Power consumption in standby mode |
approx. 0.6W (multi scanner with power supply |
|
|
adapter) |
|
|
approx. 0.2W (only power supply adapter) |
|
Power supply adapter |
manufacturer: Taiytech |
|
|
type designation: TYTM0500100EU |
|
|
input: 100-240V~ 50/60Hz, 0.18A |
|
|
output: 5V 1A |
|
System requirements |
- PC with a free USB 2.0 port |
|
|
- Microsoft® Windows® XP, Windows Vista® or |
|
|
Windows® 7/8 |
The technical data and design may be changed without notification.
6 - English
SilverCrest SMS 5.0 A1
Safety instructions
Before using this device for the first time, always read the following instructions and pay attention to all warnings, even if you are familiar with handling electronic devices. Store these operating instructions in a safe place for future reference. If you sell the device or pass it on, always include these operating instructions. They are an integral part of the device.
DANGER! This symbol in conjunction with the "danger" note indicates an imminent dangerous situation which, if not prevented, could result in serious injury or even death.
WARNING! This symbol in conjunction with the "warning" note indicates important information for safe operation of the device and the safety of the user.
This symbol indicates an imminent risk of an electric shock.
This symbol indicates other important information on the topic.
Only use the supplied power supply adapter (manufacturer: Taiytech /type designation TYTM0500100EU) to connect to the multi scanner.
DANGER! Ensure that
no direct heat sources (e.g. heating) can affect the device
no direct sunlight or bright artificial light reaches the device
contact with sprayed and dripping water and corrosive liquids is prevented and the device is never operated near water; in particular it should never be immersed (do not place any objects filled with liquids such as vases or drinks on or near the device)
the device is not in the immediate vicinity of magnetic fields (e.g. speakers)
no fire sources (e.g. burning candles) are placed on or near the device
no foreign objects penetrate the device
the device is not subjected to any extreme temperature fluctuations, as this could result in condensation and electrical short circuits. If the device was subjected to extreme temperature
English - 7

SilverCrest SMS 5.0 A1
fluctuations, however, wait (approx. 2 hours) until the device has reached ambient temperature before use
the device is never subjected to excessive shocks and vibrations
If the aforementioned instructions are not adhered to, it poses a risk to your health or the device could be damaged.
DANGER! Children and persons with disabilities
Electrical devices do not belong in the hands of children. Persons with disabilities should also only use electrical devices within the scope of their abilities. Never allow children or persons with disabilities to use electrical devices unsupervised. Unless they have been instructed accordingly or are supervised by a person responsible for their safety. Children should always be supervised to ensure that they do not play with this device. Small parts can be fatal if swallowed. Also always keep plastic packaging out of reach.
It poses a suffocation risk.
DANGER! Power supply adapter
Only insert the power supply adapter in a suitable mains socket that is always easily accessible. Never touch the power supply adapter with wet hands. It poses an electric shock risk. Always disconnect the power supply adapter from the mains in the following situations:
If there is a hazardous situation.
If there are any unusual sounds or if smoke is emitted from the power supply adapter.
Before stormy weather, when there is the risk of lightning;
The power supply adapter was damaged.
If the power supply was exposed to rain, liquids or extreme moisture.
If you want to clean it.
The power supply adapter consumes power even in standby mode, thus it must be removed from the mains socket to be completely disconnected from the mains.
Pay attention to these instructions to avoid a risk of fatal injury or fire! The power supply adapter also may never be blocked because there is a risk of fire. Never try to open the housing of the power supply adapter. There is a risk of a fatal electric shock.
8 - English
SilverCrest SMS 5.0 A1
DANGER! Cables
Always handle the cables by the connector and do not pull on the cables themselves. Never place furniture or other heavy objects on the cables and take care that the cables are not kinked, especially near the plug and connection sockets. Do not connect the cables over hot or sharp points and edges to prevent damage. Never make knots in any of the cables or tie them together with other cables. Ensure that all cables are placed so that no one can trip over them and they do not cause an obstruction.
Operating environment
The device is not designed for use in environments with high humidity (e.g. bathrooms) or in extremely dusty conditions. Operating temperatures and operating air humidity: 5 °C to 35 °C, max. 85 % rel. air humidity.
WARNING! Cleaning / maintenance
It is necessary to repair the device if it has been damaged in any way, for example, if the power supply adapter or housing is damaged, if liquid or objects have penetrated the device or if the product has been exposed to rain or moisture. Repair work is also required if the device is not working properly or has been dropped. If smoke is produced, or there are any unusual sounds or smells, the device must be switched off immediately and the power supply adapter must be removed from the mains socket. In these cases, the device should not be used until it has been inspected by authorised service personnel. Only have the device repaired by qualified personnel. Never open the housing of the device. Only use a clean, dry cloth for cleaning and never use any corrosive liquids. Never try to open the housing of the device as this would void your warranty.
Copyright
All information contained in these instructions is subject to copyright and is provided for information purposes only. It is only permitted to copy or duplicate data and information with the express and written consent of the author. This also includes commercial use of the content and data. The text and illustrations are based on the state of the art at the time of printing. Subject to change without notice.
English - 9
SilverCrest SMS 5.0 A1
Overview
An additional illustration of the controls with the relevant reference numbers can be found on the fold-out inside cover of these operating instructions. You can leave this cover page folded out while reading further sections of these operating operations. Thus you always keep a reference to the relevant control in sight.
10 - English

SilverCrest SMS 5.0 A1
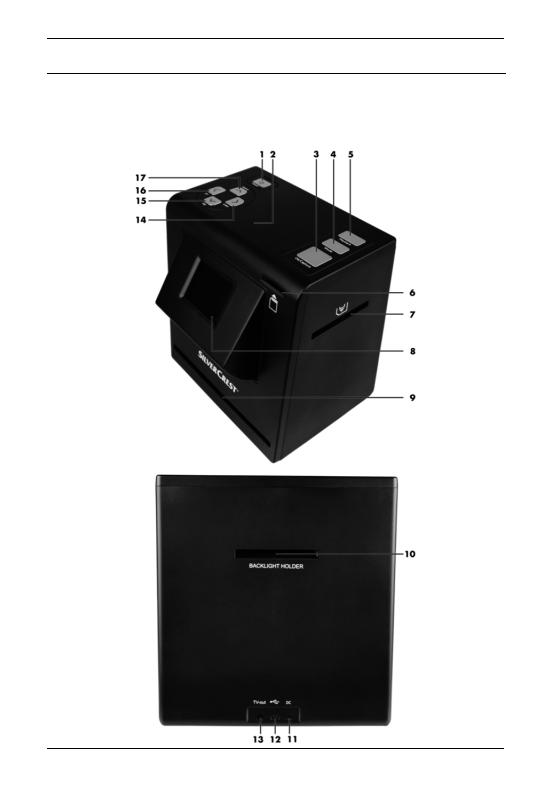
1 Power button
2Status LED
3 OK/Capture button
4Mode button
5 Playback button
6 Memory card slot
7Negative/slide slot
8Screen
9 Photo/business card slot
10Backlight slot
11Power supply connection
12USB 2.0 port (USB mass storage)
13TV-out port (3.5 mm jack)
14Right/Colour (to operate the menu or change the parameters)
15Down/Flip (to operate the menu or change the parameters)
16Left/EV (to operate the menu or change the parameters)
17Up/Mirror (to operate the menu or change the parameters)
English - 11
SilverCrest SMS 5.0 A1
Prior to use
Remove all protective foil from the device and accessories.
Connect the plug of the supplied power supply adapter to the power supply connection [11] on the rear of the multi scanner.
Insert the power supply adapter in a mains socket that is always easily accessible.
WARNING! When laying the cable, make sure that nobody can trip over it.
First use
Inserting memory card
WARNING! Switch the device off before you insert or remove a memory card.
You must insert a memory card to be able to save pictures. Proceed as follows:
Slide the memory card with the contacts upwards and pointing towards the multi scanner into the memory card slot [6] until it snaps into place. To remove the memory card, press it lightly. The memory card is ejected slightly and can be pulled out.
Switching the device on and off
To switch on the device, press the Power button [1] once briefly. The status LED [2] lights up blue when the device is switched on. During the scanning process, the status LED [2] lights up red.
To switch off the device, press the Power button [1] again briefly.
12 - English
SilverCrest SMS 5.0 A1
Inserting slides
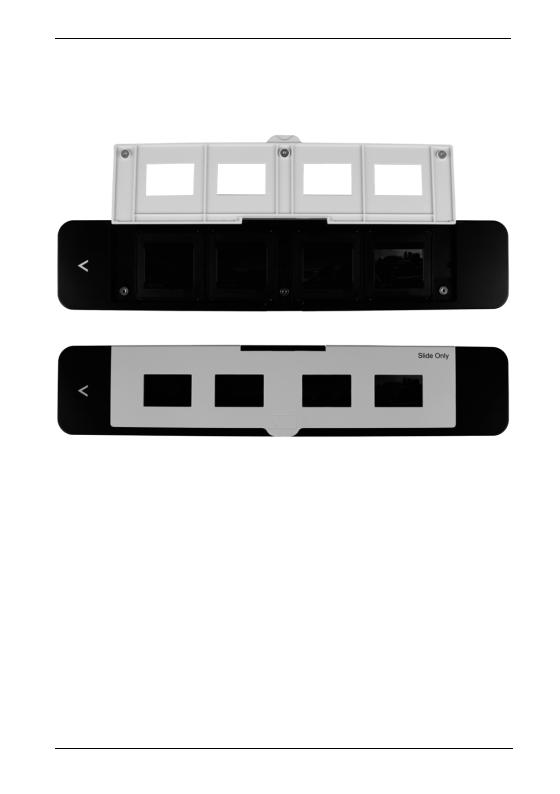
Open the slide holder at the point marked "OPEN". Place up to four framed slides in the device as shown in the following image. Make sure that the slides are not inserted the wrong way around or upside down.
Close the slide holder.
Insert the backlight rail, with the reflective surface facing upwards, in the backlight slot [10] until it noticeably snaps into place.
Insert the slide holder, with the inscription facing upwards, in the direction of the arrow in the negative/slide slot [7]. Insert the slide holder in until it noticeably snaps into place in the first position. For more slides, insert the slide holder in further until it noticeably snaps into place in the next position.
To record the slides, please read the section "Recording" from page 17.
Remove the backlight rail and the slide holder after you have recorded your slides. You remove the backlight rail by pressing it down lightly on the protruding point and pulling it out.
English - 13
SilverCrest SMS 5.0 A1
Inserting negatives
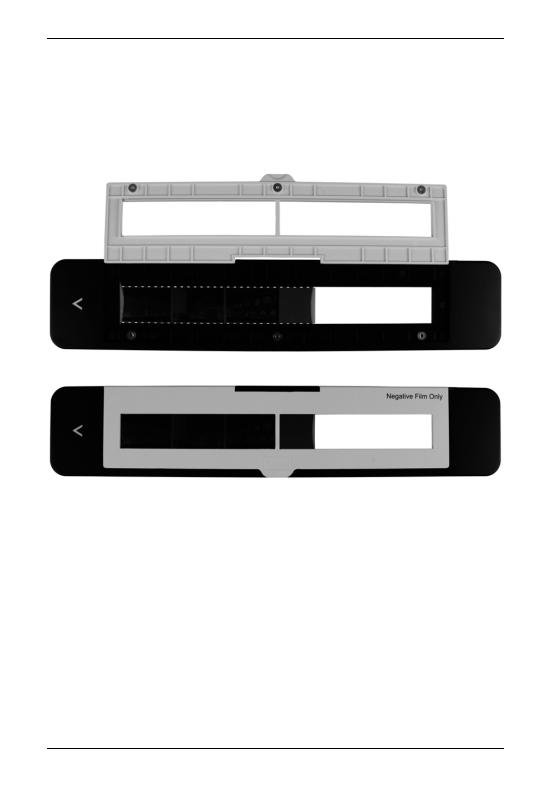
Open the negative holder at the point marked "OPEN". Then place the negatives in the device as shown in the following image. Make sure that the negatives are not inserted the wrong way around or upside down. In this case, you can refer to the numbering on the negative strip. The perforations of the film strip must engage in the corresponding retaining pins in the negative holder.
Close the negative holder.
Insert the backlight rail, with the reflective surface facing upwards, in the backlight slot [10] until it noticeably snaps into place.
Insert the negative holder, with the inscription facing upwards, in the direction of the arrow in the negative/slide slot [7]. Insert the negative holder in until it noticeably snaps into place in the first position. For more negatives, insert the negative holder in further until it noticeably snaps into place in the next position.
To record the negatives, please read the section "Recording" from page 17.
Remove the backlight rail and the negative holder after you have recorded your negatives. You remove the backlight rail by pressing it down lightly on the protruding point and pulling it out.
14 - English
SilverCrest SMS 5.0 A1
Inserting photos
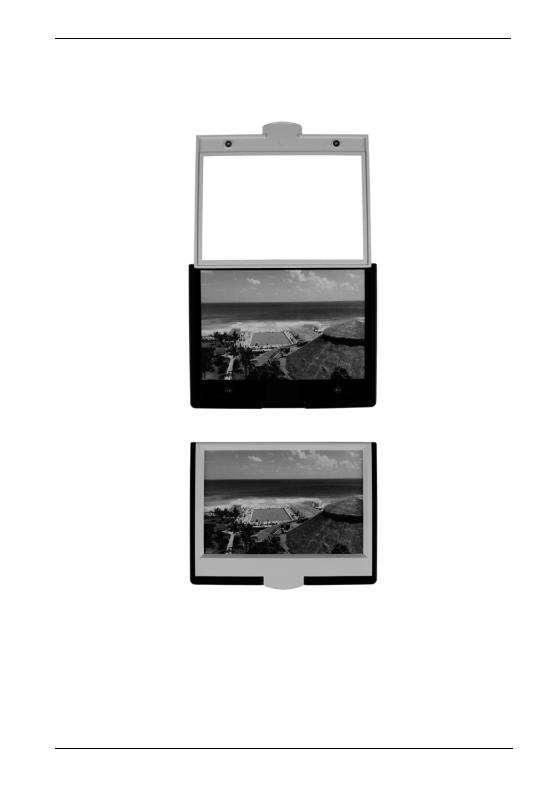
Open the photo/business card holder at the point marked "OPEN". Then place a 10 x 15 photo in the device as shown in the following image.
Close the photo/business card holder.
Remove the backlight rail, if it is still inserted, by pressing it down lightly on the protruding point and pulling it out.
Insert the photo/business card holder, with the photo upwards, in the photo/business card slot [9]. Insert the photo/business card holder as far as possible.
To scan the photos, please read the section "Recording" from page 17.
Remove the photo/business card holder after you have scanned your photos.
English - 15
SilverCrest SMS 5.0 A1
If you want to scan smaller photos, e.g. 7 x10cm or 9 x 13cm, use the business card fixing to ensure that the photo is lying flat in the photo/business card holder.
Inserting business cards
Remove the protective foil from the business card fixing.
Then place a business card in the device and place the business card fixing on the business card as shown in the following image.
Remove the backlight rail, if it is still inserted, by pressing it down lightly on the protruding point and pulling it out.
Insert the photo/business card holder, with the business card upwards, in the photo/business card slot [9]. Insert the photo/business card holder as far as possible.
To scan the business cards, please read the section "Recording" from page 17.
Remove the photo/business card holder after you have scanned your business cards.
16 - English
SilverCrest SMS 5.0 A1
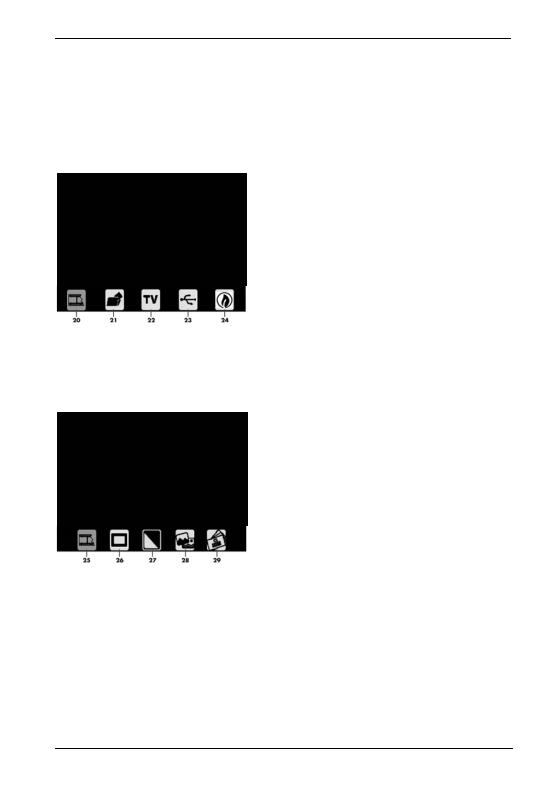
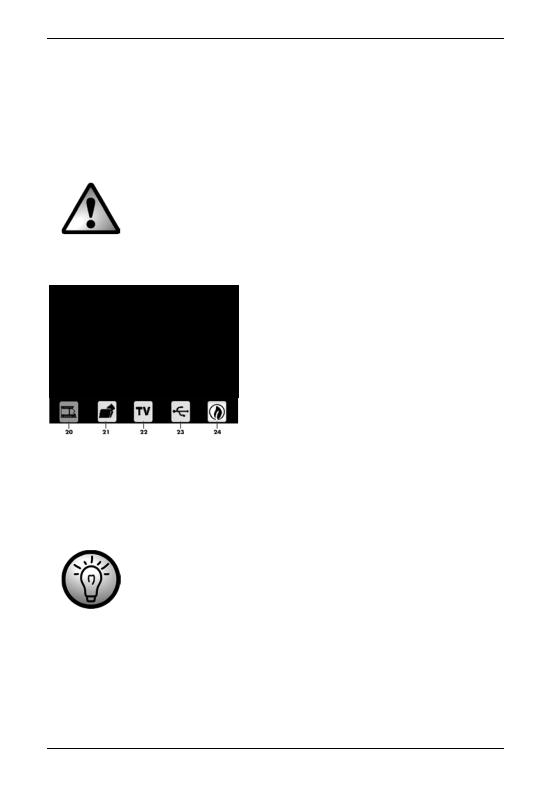
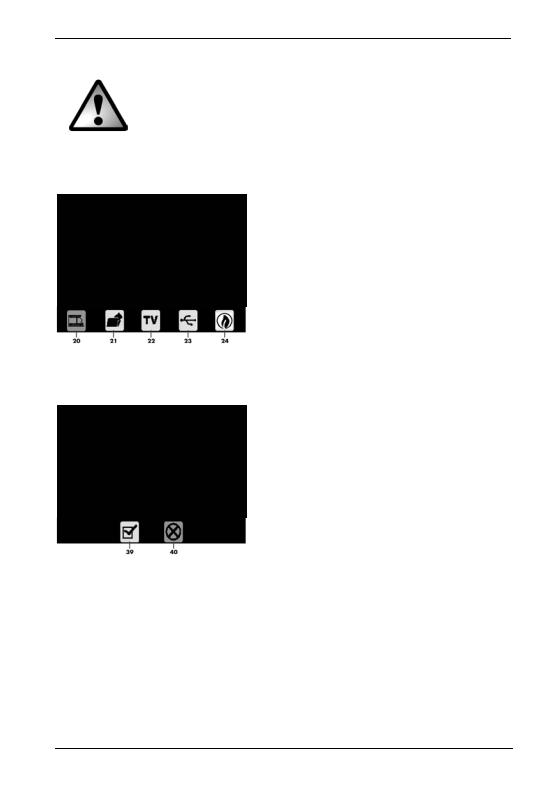
Main menu
After you have read the safety instructions and have connected the device as described, switch on the device. Now press the Mode button [4] to access the main menu. You navigate within the menu via the keys Right/Colour [14], Down/Flip [15], Left/ EV [16] and Up/Mirror [17]. Press the OK/Capture button [3] to confirm the selection. To exit the menu, press the Mode button [4] again. The following options are available in the main menu:
20 Select recording source
21 Format memory card
22 TV
23 USB mode
24 Energy-saving mode (automatic switch-off after approx. 3 minutes)
Selecting recording source
After you have inserted your slides, negatives, photos or business cards in the device as described, select the recording source. The following options are available:
25 Negatives (colour)
26 Slides
27 Negatives (black & white)
28 Photos
29 Business cards
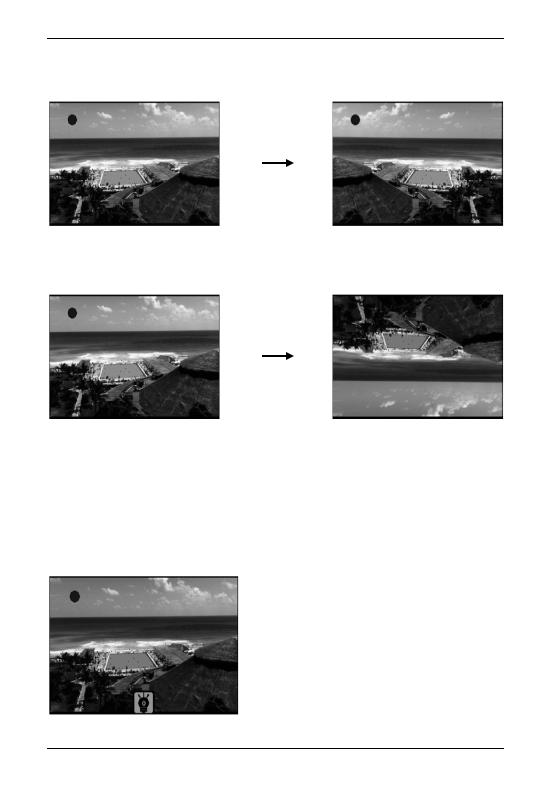
Recording
After you have selected a recording source, a preview of the inserted image is displayed on the screen [8]. You can recognise the recording mode by the flashing red dot in the upper left corner. You can now flip the image horizontally or vertically and adjust the brightness and colours before recording.
English - 17
SilverCrest SMS 5.0 A1
Flipping
Press the Up/Mirror button [17] to flip the image horizontally.
Horizontal
flipping
Press the Down/Flip button [15] to flip the image vertically.
Vertical flipping
Adjusting brightness
Press the Left/EV [16] button to adjust the brightness. A lamp symbol then appears on the screen [8].
You can now adjust the brightness in the range from +3 (bright) to -3 (dark) with the keys Up/Mirror [17] and Down/Flip [15]. At the same time, the current value appears in the lamp symbol. To apply the current value, press the Mode button [4].
18 - English
SilverCrest SMS 5.0 A1
Adjusting colour
Press the Right/Colour button [14] to adjust the colour. Three symbols for the colours red, green and blue then appear on the screen [8].
First, select the colour that you want to adjust using the buttons Left/EV [16] and Right/Colour [14]. You can now adjust the selected colour in the range from +3 (intensive) to -3 (weak) with the keys Up/Mirror [17] and Down/Flip [15]. At the same time, the current value appears in the symbol. When you have adjusted all values as desired, press the Mode button [4] to apply the values.
Recording and saving
Press the OK/Capture button [3] to record the image. You can still rotate the image before saving it. The following options are available:
30 Save
31 Rotate 90° clockwise
32 Rotate 90° anti-clockwise
33 Cancel (image is not saved)
If the image was rotated 90° clockwise or anti-clockwise, two symbols appear on the screen [8]. In the following example, the image was rotated 90° clockwise. The following options are available:
34 Save
35 Undo
English - 19
SilverCrest SMS 5.0 A1
Memory full
The inserted memory card is full if no reaction occurs after pressing the OK/Capture button [3] in record mode.
To be able to record more images, you should then transfer the previously recorded images to a computer and format the memory card. To this end, please read the section "USB mode" on page 22 and "Formatting the memory card" on page 23.
Alternatively, you can also insert a new memory card. In this case, please read the section "Inserting memory card" on page 12.
Memory card protected
If, after pressing the OK/Capture button [3], the following message is displayed on the screen [8] for a short time in record mode, the write protection is activated for the memory card in use.
Remove the memory card from the deactivated multi scanner. To remove the memory card, press it lightly. The memory card is ejected slightly and can be pulled out.
The memory card is equipped with a write-protect switch. If the write protection is activated (see right illustration below), you cannot record any images.
Write protection deactivated |
Write protection activated |
Deactivate the write protection (see left illustration above) and insert the memory card again into the deactivated multi scanner. To do so, slide the memory card with the contacts upwards and pointing towards the multi scanner into the memory card slot [6] until it snaps into place.
20 - English

SilverCrest SMS 5.0 A1
Playback
You start playback mode by pressing the Playback button [5].
If the following message is displayed on the screen [8] after pressing the Playback button [5], there are still no images on the memory card.
You must first create recordings to be able to view them in playback mode. In this case, please read the section "Recording" on page 17.
The stored recordings are then displayed automatically in sequence in a slide show. Press the OK/Capture button [3] to stop the slide show. You can then browse through the recordings manually by pressing the button Right/Colour [14] or Left/ EV [16]. Press the OK/Capture button [3] to start the slide show again.
Press the Mode button [4] twice in playback mode during the slide show or press it once if the slide show has finished. The following options are available here:
36 Rotate 90° clockwise
37 Rotate 90° anti-clockwise
38 Delete
Press the Mode button [4] to exit the menu. If changes were made to the image, these are automatically applied when exiting the menu. To exit playback mode, press the Playback button [5]. The device is now in record mode again.
English - 21
SilverCrest SMS 5.0 A1
USB mode
You can transfer your images to a computer via USB. To do so, first connect the device to your computer as follows:
Connect the small connector of the supplied USB cable to the USB 2.0 port [12] of the multi scanner.
Connect the large connector of the supplied USB cable to a USB port on your computer.
WARNING! When laying the cable, make sure that nobody can trip over it.
Then press the Mode button [4] to access the main menu.
20 Select recording source
21 Format memory card
22 TV
23 USB mode
24 Energy-saving mode (automatic switch-off after approx. 3 minutes)
Select the option "USB mode" [23] using the buttons Right/Colour [14] or Left/EV [16] and confirm your selection with the OK/Capture button [3]. The USB icon is then displayed in the centre of the screen [8]. The computer sets up a removable storage medium via which you have access to the images. After you have transferred the images to your computer, press the Power button [1]. The USB mode is now terminated and the device switches itself off.
Alternatively, you can remove the memory card from the deactivated multi scanner and transfer it via a memory card reader (if available). To remove the memory card, press it lightly. The memory card is ejected slightly and can be pulled out.
22 - English
SilverCrest SMS 5.0 A1
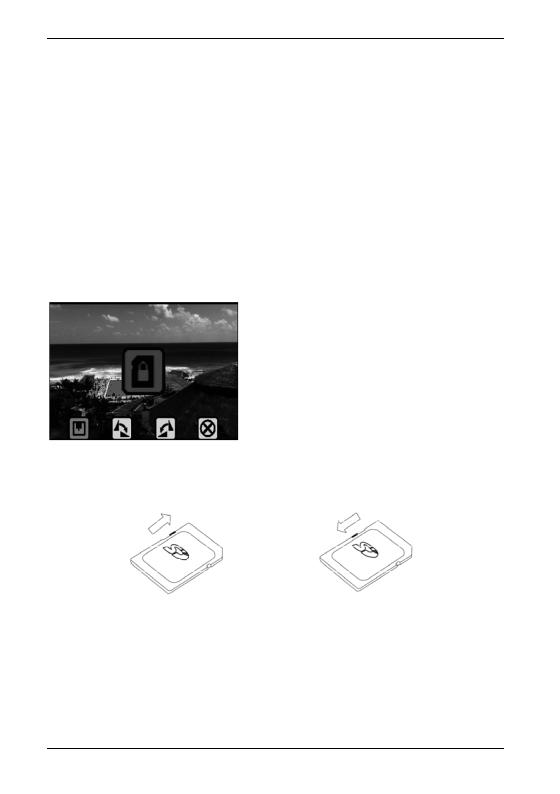
Formatting the memory card
WARNING! Please note that all data is permanently deleted during formatting.
You can format an inserted memory card. Proceed as follows:
Press the Mode button [4] to access the main menu.
20 Select recording source
21 Format memory card
22 TV
23 USB mode
24 Energy-saving mode (automatic switch-off after approx. 3 minutes)
Select the option "Format memory card" [21] using the buttons Right/Colour [14] or Left/EV [16] and confirm your selection with the OK/Capture button [3]. The following options are available:
39 Confirm
40 Cancel
Select the option "Confirm" [39] to format the memory card or the option "Cancel" [40] to cancel and confirm your selection with the OK/Capture button [3].
English - 23

SilverCrest SMS 5.0 A1
TV-out
You can also connect the multi scanner to a television via the TV-out port [13]. You can thus transfer the displayed content to a TV screen. In this case, your television must have a suitable composite video input. First, check the TV-out setting of the multi scanner as follows:
Press the Mode button [4] to access the main menu.
20 Select recording source
21 Format memory card
22 TV
23 USB mode
24 Energy-saving mode (automatic switch-off after approx. 3 minutes)
Select the option "TV" [22] using the buttons Right/Colour [14] or Left/EV [16] and confirm your selection with the OK/Capture button [3]. The following options are available:
41 PAL
42 NTSC
Choose between the TV standards PAL and NTSC. NTSC is the standard in the United States and Japan, while PAL is used in Europe. This choice affects only the playback with the video cable.
After you have identified the TV standards, connect the multi scanner and TV as follows with the video cable:
Connect the jack plug of the supplied video cable to the TV-out port [13] of the multi scanner.
Insert the yellow RCA connector of the supplied video cable into the composite video input of your TV. Once the video cable is inserted in the multi scanner and in the TV, the screen [8] is switched off automatically.
WARNING! When laying the cable, make sure that nobody can trip over it.
24 - English

SilverCrest SMS 5.0 A1
Storage when not in use
If you will not be using the multi scanner for a prolonged period, store the device and power supply adapter in a dry, clean and preferably dust-free location.
Troubleshooting
The multi scanner cannot be switched on.
Check whether the power supply adapter is firmly in the mains socket and the plug of the power supply cable is securely inserted in the power supply connection [11] of the multi scanner. Insert the power supply adapter in another mains socket if possible.
The multi scanner is not detected by the operating system.
Check the USB connection and switch on USB mode. In this case, please read the section "USB mode" on page 22.
Use another USB port if possible.
Error when saving the scanned images to the memory card.
Check whether the write protection of the memory card is activated. In this case, please read the section "Memory card protected" on page 20.
Check whether the memory card is full. Replace it if necessary.
The memory card may be defective. Replace it if necessary.
Stains are visible on the scanned images.
The photo to be scanned is dirty.
With the supplied cleaning brush, you can remove dirt from slides and negatives before they are scanned. Proceed carefully here in order to avoid damaging the slide or negative.
The photo/business card holder is dirty. Clean it with a soft, lint-free cloth.
The backlight rail is dirty. Clean it with a soft, lint-free cloth.
The multi scanner itself is maintenance-free and must not be cleaned.
English - 25
SilverCrest SMS 5.0 A1
Environmental and disposal information
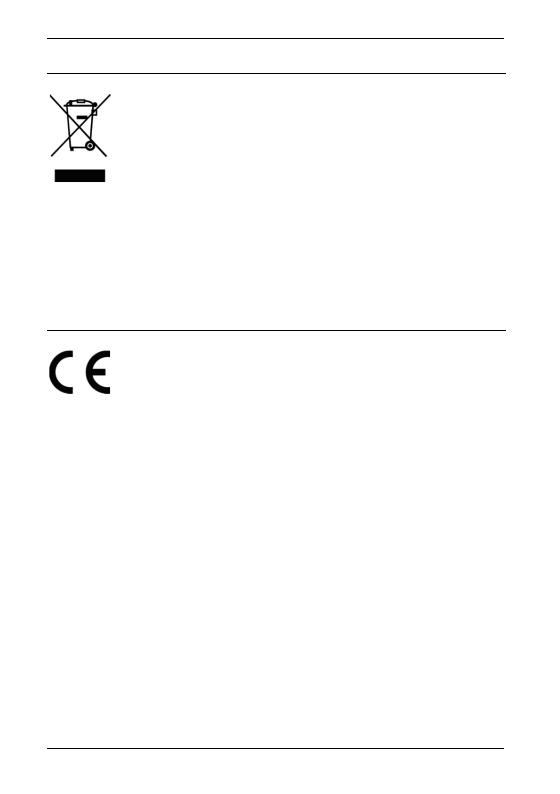
When this symbol appears on a product, this indicates that the product is subject to the European Directive 2012/19/EU. All electrical and electronic devices must be disposed of separately from household waste at designated disposal points. Disposal of old devices in this manner will prevent harm to the environment and human health hazards. For further information regarding disposal of old devices in accordance with the directive, contact your local government office or the retailer where you purchased the device.
Dispose of the packaging in an environmentally compatible manner. Cardboard can be put out for municipal paper collections or brought to public collection points for recycling. Films and plastic used for packaging the device are collected by your local disposal services and disposed of in an environmentally compatible manner.
Conformity information
This device meets the basic requirements and other relevant regulations of the EMC Directive 2004/108/EC, the Low Voltage Directive 2006/95/EC, the ErP Directive 2009/125/EC and the RoHS Directive 2011/65/EU. The Declaration of Conformity can be found at the end of this manual.
26 - English

SilverCrest SMS 5.0 A1
Warranty and servicing advice
Warranty of TARGA GmbH
Dear Customer,
This device is sold with three years warranty from the date of purchase. In the event of product defects, you have legal rights towards the seller. These statutory rights are not restricted by our warranty as described below.
Warranty conditions
The warranty period commences upon the date of purchase. Please keep the original receipt in a safe place as it is required as proof of purchase. If any material or manufacturing faults occur within three years of purchase of this product, we will repair or replace the product free of charge as we deem appropriate.
Warranty period and legal warranty rights
The warranty period is not extended in the event of a warranty claim. This also applies to replaced and repaired parts. Any damage or defects discovered upon purchase must be reported immediately when the product has been unpacked. Any repairs required after the warranty period will be subject to charge.
Scope of warranty
The device was carefully manufactured in compliance with stringent quality guidelines and subjected to thorough testing before it left the works. The warranty applies to material and manufacturing faults. This warranty does not cover product components which are subject to normal wear and which can therefore be regarded as wearing parts, or damage to fragile components such as switches, rechargeable batteries or components made of glass. This warranty is void if the product is damaged, incorrectly used or serviced. To ensure correct use of the product, always comply fully with all instructions contained in the user manual. The warnings and recommendations in the user manual regarding correct and incorrect use and handling of the product must always be observed and complied with. The product is solely designed for private use and is not suitable for commercial applications. The warranty is rendered void in the event of incorrect handling and misuse, if it is subjected to force, and also if any person other than our authorised service technicians interfere with the device. No new warranty period commences if the product is repaired or replaced.
English - 27
SilverCrest SMS 5.0 A1
Submitting warranty claims
To ensure speedy handling of your complaint, please note the following:
-Before using your product for the first time, please read the enclosed documentation carefully. Should any problems arise which cannot be solved in this way, please call our hotline.
-Always have your receipt, the product article number as well as the serial number (if available) to hand as proof of purchase.
-If it is not possible to solve the problem on the phone, our hotline support staff will initiate further servicing procedures depending on the fault.
Service
Phone: |
0207 – 36 50 744 |
E-Mail: service.GB@targa-online.com
Phone: |
01 – 242 15 83 |
E-Mail: service.IE@targa-online.com
Phone: |
800 – 62 175 |
E-Mail: service.MT@targa-online.com
Phone: |
800 – 92 496 |
E-Mail: service.CY@targa-online.com
IAN: 92308
Manufacturer
Please note that the following address is not a service address. First contact the service point stated above.
TARGA GmbH
Coesterweg 45
59494 SOEST
GERMANY
28 - English
 Loading...