


6-IN-1 COOKER SMUK 1500 A1
6-IN-1 COOKER |
MULTIFUNKČNÍ VAŘIČ 6 V 1 |
Operating instructions |
Návod k obsluze |
MULTIVARIČ 6 V 1 |
6-IN-1-MULTIKOCHER |
Návod na obsluhu |
Bedienungsanleitung |
IAN 90860

Before reading, unfold the page containing the illustrations and familiarise yourself with all functions of the device.
Před čtením si otevřete stranu s obrázky a potom se seznamte se všemi funkcemi přístroje.
Pred čítaním si odklopte stranu s obrázkami a potom sa oboznámte so všetkými funkciami prístroja.
Klappen Sie vor dem Lesen die Seite mit den Abbildungen aus und machen Sie sich anschließend mit allen Funktionen des Gerätes vertraut.
GB |
Operating instructions |
Page |
1 |
CZ |
Návod k obsluze |
Strana |
21 |
SK |
Návod na obsluhu |
Strana |
41 |
DE / AT / CH |
Bedienungsanleitung |
Seite |
61 |

A
B |
6 x |

Contents
GB
Introduction. . . . . . . . . . . . . . . . . . . . . . . . . . . . . . . . . . . . . . . . . . . . . . . . . . . . . . . . . . . 2
Intended use . . . . . . . . . . . . . . . . . . . . . . . . . . . . . . . . . . . . . . . . . . . . . . . . . . . . . . . . . . 2
Package contents . . . . . . . . . . . . . . . . . . . . . . . . . . . . . . . . . . . . . . . . . . . . . . . . . . . . . . 2
Appliance description. . . . . . . . . . . . . . . . . . . . . . . . . . . . . . . . . . . . . . . . . . . . . . . . . . . 2
Technical data . . . . . . . . . . . . . . . . . . . . . . . . . . . . . . . . . . . . . . . . . . . . . . . . . . . . . . . . . 2
Safety guidelines . . . . . . . . . . . . . . . . . . . . . . . . . . . . . . . . . . . . . . . . . . . . . . . . . . . . . . 3
Information about this appliance . . . . . . . . . . . . . . . . . . . . . . . . . . . . . . . . . . . . . . . . . 5
Before first use . . . . . . . . . . . . . . . . . . . . . . . . . . . . . . . . . . . . . . . . . . . . . . . . . . . . . . . . 5
Assembly and setting up . . . . . . . . . . . . . . . . . . . . . . . . . . . . . . . . . . . . . . . . . . . . . . . . 6
Operation . . . . . . . . . . . . . . . . . . . . . . . . . . . . . . . . . . . . . . . . . . . . . . . . . . . . . . . . . . . . 7
Temperature settings . . . . . . . . . . . . . . . . . . . . . . . . . . . . . . . . . . . . . . . . . . . . . . . . . . . . . . . . . . . . . . . 7 Keeping warm/slow cooking/boiling/roasting . . . . . . . . . . . . . . . . . . . . . . . . . . . . . . . . . . . . . . . . . . 7 Fondue . . . . . . . . . . . . . . . . . . . . . . . . . . . . . . . . . . . . . . . . . . . . . . . . . . . . . . . . . . . . . . . . . . . . . . . . . 8 Steaming . . . . . . . . . . . . . . . . . . . . . . . . . . . . . . . . . . . . . . . . . . . . . . . . . . . . . . . . . . . . . . . . . . . . . . . . 8 Sautéing/roasting . . . . . . . . . . . . . . . . . . . . . . . . . . . . . . . . . . . . . . . . . . . . . . . . . . . . . . . . . . . . . . . . . 9 Deep frying . . . . . . . . . . . . . . . . . . . . . . . . . . . . . . . . . . . . . . . . . . . . . . . . . . . . . . . . . . . . . . . . . . . . . . 9
Cleaning and care. . . . . . . . . . . . . . . . . . . . . . . . . . . . . . . . . . . . . . . . . . . . . . . . . . . . . 10
Storage . . . . . . . . . . . . . . . . . . . . . . . . . . . . . . . . . . . . . . . . . . . . . . . . . . . . . . . . . . . . . 10
Troubleshooting . . . . . . . . . . . . . . . . . . . . . . . . . . . . . . . . . . . . . . . . . . . . . . . . . . . . . . 11
Warranty and service . . . . . . . . . . . . . . . . . . . . . . . . . . . . . . . . . . . . . . . . . . . . . . . . . 12
Disposal . . . . . . . . . . . . . . . . . . . . . . . . . . . . . . . . . . . . . . . . . . . . . . . . . . . . . . . . . . . . . 12
Importer . . . . . . . . . . . . . . . . . . . . . . . . . . . . . . . . . . . . . . . . . . . . . . . . . . . . . . . . . . . . 12
Recipes. . . . . . . . . . . . . . . . . . . . . . . . . . . . . . . . . . . . . . . . . . . . . . . . . . . . . . . . . . . . . . 13
SMUK 1500 A1 |
1 |

6-IN-1 COOKER SMUK 1500 A1
GB
Introduction
Congratulations on the purchase of your new appliance.
You have selected a high-quality product.
The operating instructions are part of this product. They contain important information on safety, usage and disposal. Before using the product, familiarise yourself with all handling and safety guidelines. Use the product only as described and for the range of applications specified. Upon cession of the product to any future owner(s) also hand over all documents.
Intended use
This appliance is intended exclusively for preparing food. This appliance is intended solely for use in private homes. Not to be used for commercial purposes.
Appliance description
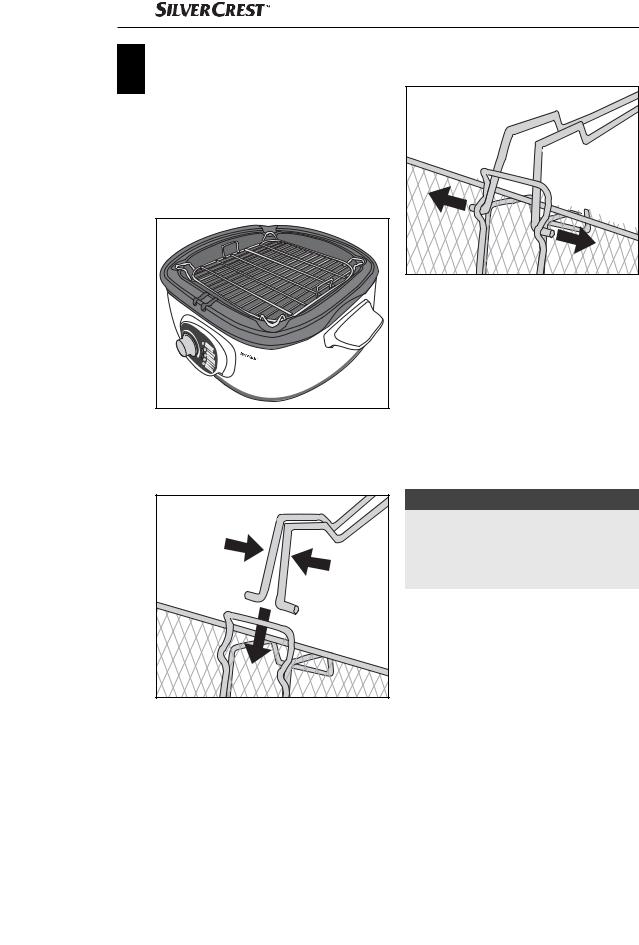
Figure A:
1Lid
2Grab handle
3Frying basket hook
4Frying basket
5Inner bowl
6Base
7Indicator lamp
8Heat-up indicator lamp
9Temperature control
Figure B:
0 Steamer grill q Skimmer
w Fondue forks
Package contents
Multi-cooker (base) with inner bowl and lid Frying basket
Steamer grill 6 fondue forks Skimmer Grab handle
Operating instructions
NOTE
Check contents for completeness and damage immediately after unpacking. Contact Customer Services if necessary.
Technical data
Rated voltage: |
220 - 240 V ~, 50 Hz |
Max. power consumption: |
1500 W |
2 |
SMUK 1500 A1 |

Safety guidelines
DANGER – ELECTRIC SHOCK! |
GB |
|
►Do not use the appliance outdoors.
►To prevent accidents, have defective plugs and/or power cables replaced immediately by a qualified specialist technician or our Customer Service department.
►Do not kink or crush the power cable. Keep the power cable well away from sources of heat.
►Never touch the power plug or the power cable with wet hands.
►Remove the inner bowl 5 from the base 6 before rinsing with water!
 Never immerse the appliance in water or any other liquid!
 WARNING! RISK OF INJURY!
►This appliance is not to be used by children under the age of 8.
►This appliance may be used by children aged 8 and above if they are under constant supervision.
►This appliance can be used by persons with limited physical, sensory or mental capabilities or lack of experience and knowledge if they have been given supervision or instruction concerning safe use of the appliance, and if they are aware of the potential risks.
►Cleaning and maintenance may not be carried out by children.
►Cooking appliances should be set up in a stable position using the grab handles to avoid spillage of hot liquids.
►Children must not use the appliance as a plaything.
►Children younger than 8 years of age must be kept away from the appliance and the power cable.
►To ensure that you can disconnect the appliance quickly in the event of an emergency, do not use extension cables.
SMUK 1500 A1 |
3 |

 WARNING! RISK OF INJURY!
GB
► Do not operate the appliance if it has been dropped or is damaged in any way. Have the appliance checked and/or repaired by qualified technicians if necessary.
► Hot steam is given o during cooking, steaming, sautéing and frying, especially if you open the lid 1 . Maintain a safe distance from the steam.
► Ensure that all parts are completely dry before pouring oil or liquid fat into the deep fat fryer. Otherwise, hot oil or fat could splatter out.
► Carefully pat all foodstu s dry before placing them in the frying basket for deep frying. Otherwise, hot oil or fat could splatter out.
► Use the inner bowl 5 exclusively with the base 6 that is supplied with it!
► Ensure that all parts are completely dry before operating the appliance. Dry all parts properly after cleaning.
► Be especially careful with frozen foodstu s. Remove all ice particles. The more ice there is on the foodstu , the more the hot oil or fat will splatter.
► Some parts of the appliance become very hot during operation. Touching these may cause serious burns.
► Never pour liquids directly into the base 6! Always insert the inner bowl 5 first.
 WARNING! RISK OF FIRE!
►Do not use the appliance near hot surfaces.
►Never leave the appliance unattended while it is being used.
►Do not use an external timing switch or a separate remote control system to operate the appliance.
4 |
SMUK 1500 A1 |

ATTENTION! MATERIAL DAMAGE!
GB
► Do not place the appliance close to open flames or other sources of heat (heating, direct sunlight, gas stoves, etc.).
► Never place the appliance in a fitted cupboard, recesses or similar.
► Never fill the appliance to above the MAX marking or to below the MIN marking. Ensure that enough liquid is in the appliance before switching it on.
► Be careful when using metallic, pointed or sharp objects to remove food from the appliance. These may damage the coating.
► Do not pare food in the inner bowl 5! This may damage the coating!
Information about this appliance
This appliance can be used for a number of purposes. This versatility and the various settings that are available, allow it to be used for:
–keeping warm,
–cooking,
–slow cooking,
–sautéing/roasting,
–steaming,
–deep frying
–and as a fondue.
Before first use
■Take all the parts out of the box and remove the packaging material and any protective wrapping or stickers.
■Clean all components as described in the section “Cleaning and Care”. Ensure that all parts are completely dry.
■Insert the inner bowl 5 so that the 3 power contacts on the base connect with the sockets in the base 6. Press the inner bowl 5 down carefully so that it sits firmly in the base 6.
■Insert the plug into a mains power socket. The indicator lamp 7 and the heat-up indicator lamp 8 light up.
■Set the temperature control 9 to level 4. Wait 3 minutes. Turn the temperature control 9 to level 0 again and then disconnect the power plug from the mains. Allow the appliance to cool down.
NOTE
The first time the appliance heats up, a small amount of smoke and odour may be generated due to production-related residue. This is normal and is completely harmless. Provide su cient ventilation by opening a window, for example.
SMUK 1500 A1 |
5 |
Assembly and setting up
GB ■ Place the appliance on a clean and level heatresistant surface.
■Insert the inner bowl 5 so that the 3 power contacts on the base of the inner bowl 5 connect with the sockets in the base 6. Press the inner bowl 5 down carefully so that it sits firmly in the base 6.
■For steaming, insert the steamer grill 0 into the inner bowl 5 so that it hangs within the inner bowl 5:
■For frying, you will need the frying basket 4 and the handle 2:
–Press the rods of the handle 2 together so that the holding pins can be inserted into the eyelets on the frying basket 4:
–Loosen your grip on the pressed together rods of the handle 2 so that the rods move apart and the holding pins project into the holes:
–The handle 2 now sits firmly on the frying basket 4.
■Place the lid 1 on the inner bowl 5.
■Insert the plug into a mains power socket. The indicator lamp 7 lights up and the appliance heats up to the defined temperature level.
■Once the temperature level defined has been reached, open the lid 1 and place the frying basket 4 carefully onto the floor of the inner bowl 5. The rods on the grab handle 2 are now positioned within the notches of the inner bowl 5.
■Now close the lid 1.
NOTE
If the lid 1 is open, you can hang the frying basket 4 on the rim of the inner bowl 5 using the hook 3.
For instance, if the fried food is ready and the excess fat is to be allowed to drain.
6 |
SMUK 1500 A1 |

Operation
Temperature settings
Temperature
Cooking type
level
1
Keep Warm (approx. 50 °C - 80 °C)
2
Slow Cook (approx. 80 °C - 120 °C)
3
Boil/Fondue (approx. 120 °C - 150 °C)
4
Steam
(approx. 150 °C - 170 °C)
5
Saute/Roast (approx. 170 °C - 190 °C)
• |
Deep Fry |
|
(approx. 170 |
°C) |
NOTE
►The figures in the table are only reference values. The temperature level can vary depending on the type and quantity of food being cooked.
NOTE
►The indicator lamp 7 lights up as soon as the power plug is connected to a mains power socket.
The heat-up indicator lamp 8 lights up as soon as the appliance has heated up to the set temperature level.
However, the lamp may go out and on again at any time. This indicates that the set temperature has briefly fallen and the appliance is heating itself back up.
Keeping warm/slow cooking/boiling/ |
|
roasting |
GB |
After you have assembled the appliance as described in the chapter “Assembly and setting up”:
1)Set the temperature control 9 to the required level (1, 2, 3 or 5). The heat-up indicator lamp 8 lights up as soon as the desired temperature has been reached.
2)Place the food in the inner bowl 5.
3)Now close the lid 1.
4)When you no longer need to use the appliance, turn the temperature control 9 to 0.
ATTENTION! MATERIAL DAMAGE!
►Use the supplied skimmer q or another heatresistant plastic or wooden utensil to remove food from the appliance. Otherwise the coating of the insert could be damaged and the appliance will be usable.
5)Remove the plug from the mains power socket.
SMUK 1500 A1 |
7 |
Fondue
GB After you have assembled the appliance as described in the chapter “Assembly and setting up”:
1)Add some oil or another fat suitable for fondue to the inner bowl 5. Add oil/fat to the inner bowl 5 until the MAX marking is reached. Do not exceed the MAX marking!
2)Close the lid 1.
3)Set the temperature control 9 to level 3. The heat-up indicator lamp 8 lights up as soon as the desired temperature has been reached.
4)Remove the lid 1.
5)Skewer small pieces of meat onto the fondue forks w and lower these carefully into the hot fat.
6)The pieces of meat will be ready in just a few minutes. Remove them from the fat.
7)Once you are finished using the fondue, turn the temperature to 0 and remove the plug from the mains power socket.
NOTE
►After the oil or fat has cooled down (fat must still be warm enough that it is still liquid), pour it into suitable containers, for example, bottles. Use the pouring spout at the corner of the inner bowl 5.
►The disposal of cooking oils and fats is regulated di erently in every community or town. Disposal of such oils or fats in normal domestic waste is often prohibited. Make enquiries at your local community administration o ce about suitable disposal sites.
Steaming
After you have assembled the appliance as described in the chapter “Assembly and setting up”:
1)Add about 1 litre of water to the inner bowl 5. 1 litre of water is su cient for about 30 minutes of steaming. If you wish to steam for a longer period, add more water accordingly. Pour a maximum of 2.5 litres of water into the appliance. Otherwise, the boiling water may spray onto the food from below.
NOTE
►The MIN and MAX markings on the inner bowl 5 only apply to fat/oil levels! They are not to be observed when adding water!
►The volume of water depends upon the duration for which you wish to steam. The longer the food needs to cook, the more water you will need to add.
►The more frequently the lid 1 is raised during cooking, the longer the cooking duration. Hot steam escapes every time the lid is raised! You may then require more water as a portion of the steam escapes each time the lid is raised.
►If, during cooking, the water is used up, carefully lift the lid 1 and add fresh water to the appliance. While re-adding water, ensure that it does not flow onto the food. After readding the water, it will take a while before the water is heated and steam re-forms.
2)Hang the steamer grill 0 in the inner bowl 5 as described in the chapter “Assembly and setting up”.
3)Set the temperature control 9 to level 4.
4)Wait until steam is perceptibly emitted.
5)Place the food onto the steamer grill 0.
6)Now close the lid 1.
8 |
SMUK 1500 A1 |

7)When the food is ready, use a pair of tongs or similar to remove it from the steamer grill 0.
 WARNING! RISK OF INJURY!
►The steamer grill 0 is very hot! Be careful when handling the steamer grill 0.
8)Set the temperature control to 0.
9)Remove the plug from the mains power socket.
NOTE
►When the appliance and remaining water have cooled down, pour out the water via the pouring runnel on the corner of the inner bowl 5.
Sautéing/roasting
After you have assembled the appliance as described in the chapter “Assembly and setting up”:
1)Add some oil to the inner bowl 5.
2)Set the temperature control 9 to level 5. The heat-up indicator lamp 8 lights up as soon as the desired temperature has been reached.
3)Place the sautéed/roasted food in the inner bowl 5.
4)Turn the food occasionally and remove it as soon as it is ready.
ATTENTION! MATERIAL DAMAGE!
►Use the supplied skimmer q or another heatresistant plastic or wooden utensil to remove food from the inner bowl 5. Otherwise
the coating of the inner bowl 5 may be damaged and the appliance may become unusable.
5)When you have removed the sautéed/roasted food, turn the temperature controller 9 to 0.
6)Remove the plug from the mains power socket.
Deep frying
After you have assembled the appliance as de- |
GB |
scribed in the chapter “Assembly and setting up”: |
|
1)Add some oil or another fat suitable for deepfat frying to the inner bowl 5. Add oil/fat to the inner bowl 5 until the MAX marking is reached. Do not exceed the MAX marking!
2)Close the lid 1.
3)Set the temperature control 9 to the level •. The level • is to be found between the numbers 4 and 5 on the temperature control 9. The heatup indicator lamp 8 lights up as soon as the desired temperature has been reached.
4)Add the food that is to be deep-fried into the frying basket 4. Ensure that the food is as dry as possible and remove any excess ice particles. Do not fill the frying basket 4 up to more than the MAX marking. Otherwise the food will not be cooked properly as it will not be properly immersed in the hot fat.
5)Remove the lid 1 and lower the frying basket 4 carefully into the hot fat. The rods on the grab handle 2 are now positioned within the notches of the inner bowl 5.
6)Replace the lid 1.
NOTE
►The grab handle 2 remains attached to the frying basket 4 during the frying process!
 WARNING! RISK OF INJURY!
►Fat can splash and cause burns if it comes into contact with wet food. Be careful when handling hot fat!
7)When the fried food is ready, remove the lid 1 and lift the frying basket 4 out of the hot fat. Using the hook 3 , hang it on the rim of the inner bowl 5. This allows the excess fat to drain.
SMUK 1500 A1 |
9 |

8) Once you are finished frying, turn the tempera- GB ture to 0 and remove the plug from the mains
power socket.
TIPS
►After the oil or fat has cooled down (fat must still be warm enough that it is still liquid), pour it into suitable containers, for example, bottles. Use the pouring spout at the corner of the inner bowl 5.
►The disposal of cooking oils and fats is regulated di erently in every community or town. Disposal of such oils or fats in the normal domestic waste is often prohibited. Make enquiries at your local community administration o ce about suitable disposal sites.
NOTE
►You can also finish o deep-fried pastries without using the frying basket 4. Simply add the food to the hot fat in the inner bowl 5. Remove the cooked food from the inner bowl 5 using the skimmer q .
Cleaning and care
 DANGER – ELECTRIC SHOCK!
►Before cleaning the appliance, disconnect the plug from the mains power socket! Risk of electric shock!
Never submerse the base 6 in water or other fluids!
 WARNING! RISK OF INJURY!
►Always allow the appliance to cool down before cleaning it. Otherwise there is a risk of burns!
ATTENTION! MATERIAL DAMAGE!
►Do not use abrasive or aggressive cleaning materials. These could damage the surface of the appliance!
■Clean the base 6 with a moist cloth.
For stubborn dirt use a mild detergent on the cloth. Ensure that the base 6 is completely dry before operating it again.
■Rinse the inner bowl 5, the fondue forks w, the skimmer q, the frying basket 4, the steamer grill 0, the lid 1 and the grab handle 2 in warm water. Add a little mild detergent.
Rinse all the parts o using clean water. After rinsing, dry all pieces thoroughly with a drying cloth.
Ensure that all parts are dry before reusing.
NOTE
►The frying basket 4, the lid 1, the skimmer q and the fondue forks w can also be washed in the dishwasher. Always ensure, however, that everything is completely dry before re-assem- bling and using the appliance.
Storage
■Store the cleaned appliance in a clean, dust-free and dry location.
10 |
SMUK 1500 A1 |

Troubleshooting
|
|
|
GB |
|
|
|
|
||
Fault |
Cause |
Solution |
||
|
|
|
|
|
|
The mains plug is not connected to the |
Insert the plug into a mains |
||
|
mains power. |
power socket. |
||
The appliance is not |
|
|
|
|
The mains power socket is defective. |
Use a di erent mains power socket. |
|||
working. |
||||
|
|
|
||
|
|
|
|
|
|
The appliance is defective. |
In this case, contact the |
||
|
ustomer Service. |
|||
|
|
|||
|
|
|
|
|
The food does not |
The wrong temperature level has been set. |
Select a higher temperature level. |
||
get hot. |
||||
|
|
|
||
|
|
|
|
|
|
The wrong temperature level has been set. |
Select the temperature level 4. |
||
No steam is gener- |
|
|
|
|
ated during cooking. |
The water is used up. |
Re-fill the appliance with water. |
||
|
||||
The heat-up indicator lamp 8 is illuminating
This is not a defect. The appliance is main-
and going out again
taining the set temperature level. To do this, This is not a defect.
frequently.
it has to heat up briefly every so often.
If the malfunction cannot be corrected with the above suggestions, or if you have found some other kind of malfunction, please contact our Customer Service.
SMUK 1500 A1 |
11 |
Warranty and service
GB You are provided a 3-year warranty on this device, valid from the date of purchase. This appliance has been manufactured with care and inspected meticulously prior to delivery. Please retain your receipt as proof of purchase. In the event of a warranty claim, please contact your Customer Service centre by telephone. This is the only way to guarantee free return of your goods.
The warranty only covers claims for material and manufacturing defects, not for damage sustained during carriage, components subject to wear and tear or damage to fragile components such as switches or batteries. This appliance is intended solely for private use and not for commercial purposes.
The warranty shall be deemed void in the case of misuse or improper handling, use of force and repairs or modifications which have not been carried out by one of our authorised Service centres.
Your statutory rights are not restricted by this warranty.
The warranty period is not prolonged by repairs e ected under the warranty. This also applies to replaced and repaired components. Any damage and defects present at the time of purchase must be reported immediately after unpacking, but no later than 2 days after the date of purchase. Repairs e ected after expiry of the warranty period shall be subject to charge.
 Service Great Britain
Tel.: 0871 5000 720 (£ 0.10/Min.)
E-Mail: kompernass@lidl.co.uk
IAN 90860
Hotline availability:
Monday to Friday 08:00 - 20:00 (CET)
Disposal
Under no circumstances should the appliance be dis-
posed of in standard domestic waste. This product is subject
to the provisions of European Directive 2012/19/EU.
Dispose of the device via an approved waste disposal company or your municipal waste disposal facility. Please observe all currently applicable regulations. Please contact your local waste disposal facility if you are in any doubt.
The packaging is made from environmentally friendly material and can be disposed of at your local recycling unit.
Importer
KOMPERNASS HANDELS GMBH
BURGSTRASSE 21
44867 BOCHUM
GERMANY
www.kompernass.com
12 |
SMUK 1500 A1 |

Recipes
NOTE
►These recipes are provided without guarantee. All ingredients and preparation information are guidelines. Enhance these recipe suggestions in line with your own experience.
Chocolate fondue
♦150 g milk chocolate couverture
♦150 g plain chocolate couverture
♦300 ml condensed milk
1)Add the chocolate and the condensed milk to the inner bowl 5.
2)Set the temperature control 9 to level 2.
3)Stir the ingredients until a smooth chocolate paste is formed.
4)Now set the temperature control 9 to level 1.
You can now dip fruit, nuts or marshmallows in the liquid chocolate.
Cheese dip
♦120 g processed cheese
♦240 ml salsa (in jar/tin)
♦1 green pepper
♦Pepper, salt, chilli powder
1)Wash and core the pepper. Cut it into small cubes.
2)Add all the ingredients to the inner bowl 5 and close the lid 1.
3)Set the temperature control 9 to level 2.
4)Simmer the ingredients for about 20–25 minutes so that the cheese melts and stir the cheesy mix occasionally.
5)Season the dip to taste with the spices.
6)Then turn the temperature control 9 down to 1 and serve the dip warm direct from the appliance.
You can dip crisps, nachos or bread in the mix.
Porridge
♦ 250 g porridge oats GB
♦600 ml milk
♦1 packets of vanilla sugar
1)Add all the ingredients to the inner bowl 5 and close the lid 1.
2)Set the temperature control 9 to level 2.
3)Simmer everything for about 12–15 minutes, stirring the porridge occasionally.
Prawns in cream sauce
♦Approx. 1000 g large prawns (cleaned)
♦2 large cloves of garlic (finely chopped)
♦150 ml cream
♦100 g butter
♦2 tbsp dry sherry or white wine
♦Salt, pepper, chilli
♦Possibly 3 tsp sauce thickener
1)Set the temperature control 9 to level 3.
2)Add the butter and the chopped garlic to the inner bowl 5 and wait until the butter has melted.
3)Then add the prawns.
4)Once the prawns have turned pink, add the sherry or white wine and cook everything for about one minute.
5)Add the cream and allow everything to simmer for a short while and add salt, chilli and pepper to taste.
6)If the cream sauce is too runny, you can add a little sauce thickener.
SMUK 1500 A1 |
13 |

Semolina pudding
GB ♦ 80 g semolina (durum wheat)
♦500 ml milk
♦100 ml cream
♦2 packets of vanilla sugar
1)Add all the ingredients to the inner bowl 5 and close the lid 1.
2)Set the temperature control 9 to level 2.
3)Simmer everything for around 10 minutes, stirring constantly.
NOTE
►If you prefer your semolina pudding a little more runny, simply add a little more milk and simmer a little while longer.
Garlic king prawns
♦Approx. 10 raw king prawns (cleaned)
♦1 clove of garlic (finely chopped)
♦A little olive oil
1)Add the olive oil to the inner bowl 5.
2)Set the temperature control 9 to the level 2 - 3.
3)Once the appliance has heated up, add the finely chopped garlic and the king prawns.
4)Turn the prawns occasionally until they are cooked.
The prawns taste especially good eaten with a piece of fresh bread.
Scrambled eggs with spinach
♦350 g spinach leaves
♦1/4 cup of finely chopped onion
♦2 tbsp olive oil
♦200 ml cream
♦5 eggs
♦Salt and pepper
1)Set the temperature control 9 to level 3.
2)Finely chop the spinach.
3)Add the olive oil to the inner bowl 5 and fry the onions until they are soft.
4)Add the spinach and stir everything while adding the cream for about 5–7 minutes. The spinach should then be soft.
5)Beat the eggs into a foamy consistency and add them while stirring constantly.
6)Keep stirring until the egg mix hardens (approx. 4–5 minutes).
7)Add salt and pepper to taste.
Amaretto apple sauce
♦5 apples
♦10 tbsp Amaretto
♦2 tbsp sugar
♦1 tsp. cinnamon
♦1 packets of vanilla sugar
1)Peel and core the apples.
2)Chop the apples into small pieces.
3)Set the temperature control 9 to level 3.
4)Add apple pieces and other ingredients to the inner bowl 5 and close the lid 1.
5)Stir the apple sauce occasionally.
6)Wait for 40–50 minutes. If the apple pieces have not disintegrated, you can mash them into a paste using a potato masher or similar.
14 |
SMUK 1500 A1 |

Asparagus and artichoke salad
♦2 bunches of asparagus
♦1 tin of artichoke hearts, approx 450 ml in water
♦3 peppers
♦3 onions
♦Balsamic vinegar
1)Set the temperature control 9 to level 4.
2)Add water for steaming to the inner bowl 5.
3)Insert the steamer grill 0 in the inner bowl 5 and lay the peeled asparagus on it.
4)Close the lid 1.
5)After about 10 - 20 minutes, depending on the thickness of the asparagus, the asparagus will be cooked.
6)Drain the artichoke hearts and chop each one into 4 pieces.
7)Finely chop the peppers and onions.
8)Cut the asparagus into small pieces and let it cool down.
9)Mix everything in a bowl and add a little balsamic vinegar.
Spicy dip
♦ 1 chilli pepper GB
♦1/2 bell pepper
♦1 clove of garlic
♦1 jar tomato sauce (approx. 250 g)
♦1 tbsp cooking oil
♦1/2 tsp chilli powder
♦1 pinch of paprika powder, spicy
♦1/2 tsp pepper, roughly ground
1)Peel the garlic and cut it into slices.
2)Add the oil to the inner bowl 5 and set the temperature control 9 to level 4.
3)Fry the garlic for a short time.
4)Core the chilli and the bell pepper and cut them into thin strips.
5)Add the chilli and the bell pepper to the inner bowl 5 and stew these for a little while.
6)Add the tomato sauce and allow the dip to cook for a little while.
7)Season the dip to taste with the spices.
You can dip crisps, nachos or bread in the mix.
SMUK 1500 A1 |
15 |

Steamed salmon
GB ♦ Approx. 500 g salmon fillet
♦Approx. 470 g rice
♦400 ml water
♦400 ml chicken stock
♦225 g peas (frozen)
♦1/4 cup of almond slivers
♦A little butter
1)Add the chicken stock, water, peas, rice and almond slivers to the inner bowl 5.
2)Now close the lid 1.
3)Set the temperature control 9 to level 3 and wait 5 minutes.
4)Open the lid 1, insert the steamer grill 0 into the inner bowl 5 and place the salmon fillets onto it. Deep-frozen salmon fillets should be allowed to thaw prior to cooking. Dab each salmon fillet with a knob of butter.
5)Close the lid 1 and let the whole thing cook for around 10 minutes at level 3.
NOTE
►The cooking time of the rice can vary depending on personal preference:
If you like your rice extremely soft, increase the cooking time somewhat. If so, add a little more water to prevent the rice from sticking to the bottom of the inner bowl 5.
If you prefer harder rice, reduce the cooking time a little. However, if you do this the quantity of water must be reduced, otherwise liquid will be left inside the inner bowl 5.
6)Set the temperature control 9 to level 2 and wait another 5 minutes.
7)Then turn the temperature control 9 to 0 and switch o the appliance.
8)Open the lid 1, carefully remove the salmon fillets from the steamer grill 0 and place to one side. Stir the rice once and allow it to simmer for approx. 5 minutes with the lid closed.
9)You can now serve the salmon with the rice.
Fried potatoes
♦5 potatoes
♦2 onions
♦Salt and pepper
♦Olive oil
1)Peel the potatoes and cut them into thin slices.
2)Peel the onions and dice them.
3)Add a thin layer of olive oil to the inner bowl 5.
4)Set the temperature control 9 to level 5 and wait until the appliance has heated up.
5)Then add the potato slices and onions and fry them until they are golden brown. Turn the potato slices occasionally.
6)Season the fried potatoes with salt and pepper.
Barbecued ribs
♦1500 -2500 g ribs (spare ribs)
♦1 bottle of barbecue sauce
♦1 packet of onion soup
♦1 medium-sized onion
♦100 ml tomato sauce
♦1 1/2 cups of water
♦2 potatoes
1)Clean the ribs and remove the fat.
2)Peel the potatoes and onions and dice them.
16 |
SMUK 1500 A1 |

3)Set the temperature control 9 to level 4 and wait until the appliance has heated up.
4)Mix the onion soup with the water.
5)Add the onion, barbecue sauce and the onion soup to the inner bowl 5 and stir the mixture.
6)Then add the ribs and potatoes.
7)Braise everything for about 1–1.5 hours (depending on the thickness of the ribs).
8)Afterwards, set the temperature control 9 to level 2–3 and simmer everything for about 2 hours.
Sandwiches
♦2 slices of bread (or hamburger bap)
♦Corned beef
♦Cheese (e.g. cheddar)
♦Drained sauerkraut
♦Mayonnaise/remoulade
♦Butter
1)Set the temperature control 9 to level 5 and wait until the appliance has heated up.
2)Butter the bread and fry it in the inner bowl 5.
3)Remove the bread from the inner bowl 5 and place the corned beef, sauerkraut, mayonnaise/ remoulade and cheese on it.
4)Hang the steamer grill 0 in the appliance.
5)Lay the bread and ingredients on the steamer grill 0 close the lid 1.
6)Wait until the cheese has melted.
Chilli con carne
♦ 800 g minced meat (half beef, half pork) |
GB |
♦ 2 onions |
|
♦ 2 tins of tomato pieces (approx. 800 ml) |
|
♦ 2 peppers |
|
♦ 1 tbsp ground chilli |
|
♦ 5 chilli peppers |
|
♦ 1 tsp caraway, ground |
|
♦ 1 tin of kidney beans |
|
♦ 1 tin of sweetcorn |
|
1)Set the temperature control 9 to level 5 and wait until the appliance has heated up.
2)Place the mince in the inner bowl 5 and brown.
3)Wash, core and slice the peppers and the chillies.
4)Chop the onions into small pieces.
5)Drain the beans and the sweetcorn. Wash the beans and sweetcorn under clear running water.
6)Add all the ingredients into the inner bowl 5.
7)Set the temperature control 9 to level 2 - 3.
8)Close the lid 1 and allow everything to simmer for about 2 - 3 hours so that the beans are soft.
SMUK 1500 A1 |
17 |
Cranberry turkey
GB ♦ Approx. 660 g turkey breast
♦Approx. 500 ml stock (turkey stock)
♦375 g cranberries
1)Skin the turkey breasts.
2)Set the temperature control 9 to level 5 and wait until the appliance has heated up.
3)Sear the meat on both sides.
4)Add the remaining ingredients and close the lid 1.
5)Set the temperature control 9 to level 3.
6)Leave the meat to simmer for 3 hours.
7)To serve, cut the meat into strips and garnish with the sauce.
Braised beef
♦Approx. 1350 g beef without bones
♦1 packet of onion soup
♦300 ml water
♦Approx. 800 ml peeled tomatoes (tinned)
♦2 large carrots
♦3 potatoes
♦Salt, pepper
1)Set the temperature control 9 to level 5 and wait until the appliance has heated up.
2)Sear the meat in the inner bowl 5.
3)Mix the onion soup with the water.
4)Add the onion soup and the tomatoes to the meat in the inner bowl 5.
5)Bring the mixture to the boil ad then set the temperature control 9 to level 3.
6)Close the lid 1 and leave everything to simmer for around 1 1/2 hours. Turn the meat occasionally.
NOTE
►If, during this process, the liquid in the inner bowl 5 gets used up, add a little water.
7)Peel the carrots and potatoes and cut them into strips.
8)After 1 1/2 hours, add the potatoes and carrots and simmer for a further 40 minutes until the meat and the vegetables are soft.
18 |
SMUK 1500 A1 |

Onion rings
♦3 large yellow onions
♦2 cups of beer (room temperature)
♦1 1/2 cups of flour
♦Salt and pepper
♦Cooking oil
1)Mix the flour and beer in a bowl and leave it to stand for 3 hours covered at room temperature.
2)Add oil (suitable for frying) to the inner
bowl 5 and set the temperature control 9 to the level •. Wait until the appliance has heated up.
3)Cut the onions into slices around 1/2 cm thick and separate out the rings.
4)Dip the onion rings into the flour-beer dough and then lower them carefully into the hot fat. Use heat-resistant tongs for this.
NOTE
►Do not use the frying basket 4 to lower the onion rings into the fat. The dough will stick to the basket and then tear o when you remove the onion rings.
5)Fry the onion rings for about 2 minutes. During this time, turn the onion rings once so that they acquire an even brown colour.
Chicken fillet
♦ Chicken fillet GB
♦3 cups of flour
♦2 tbsp ground paprika
♦2 eggs
♦1 cup of milk
♦Salt and pepper
♦Cooking oil
1)Whisk together the eggs, the milk and the water.
2)Add oil (suitable for frying) to the inner
bowl 5 and set the temperature control 9 to the level •. Wait until the appliance has heated up.
3)Roll the chicken fillet in the flour and the egg mixture and then in the flour again.
4)Add the coated chicken fillet to the frying basket 4 and then carefully lower the frying basket 4 into the hot oil and fry the chicken fillet for about 3 - 5 minutes.
5)Then turn the temperature control 9 down to level 4 and leave the chicken in the fat for about 18–20 minutes with the lid 1 closed. Turn the chicken fillet occasionally.
6)After 20 minutes, set the temperature control 9 back up to level•and wait 4–5 minutes.
7)Remove the chicken fillet carefully from the hot oil and allow it to drain.
SMUK 1500 A1 |
19 |

Chips
GB ♦ Approx. 4 potatoes
♦Salt
♦Cooking oil
1)Peel the potatoes.
2)Cut the potatoes into narrow strips (chips).
3)Add oil (suitable for frying) to the inner
bowl 5 and set the temperature control 9 to the level •. Wait until the appliance has heated up.
4)Add the chips to the frying basket 4.
5)Lower the frying basket 4 carefully into the hot oil and fry the chips for around 25–30 minutes.
6)Lift the frying basket 4 carefully out of the hot oil and hang it on the rim to allow any excess fat to drain.
20 |
SMUK 1500 A1 |
Obsah
Úvod . . . . . . . . . . . . . . . . . . . . . . . . . . . . . . . . . . . . . . . . . . . . . . . . . . . . . . . . . . . . . . . 22
Použití v souladu s určením . . . . . . . . . . . . . . . . . . . . . . . . . . . . . . . . . . . . . . . . . . . . . 22
CZ
Rozsah dodávky. . . . . . . . . . . . . . . . . . . . . . . . . . . . . . . . . . . . . . . . . . . . . . . . . . . . . . 22
Popis přístroje . . . . . . . . . . . . . . . . . . . . . . . . . . . . . . . . . . . . . . . . . . . . . . . . . . . . . . . . 22
Technické údaje . . . . . . . . . . . . . . . . . . . . . . . . . . . . . . . . . . . . . . . . . . . . . . . . . . . . . . 22
Bezpečnostní pokyny . . . . . . . . . . . . . . . . . . . . . . . . . . . . . . . . . . . . . . . . . . . . . . . . . . 23
Informace o přístroji. . . . . . . . . . . . . . . . . . . . . . . . . . . . . . . . . . . . . . . . . . . . . . . . . . . 25
Před prvním použitím. . . . . . . . . . . . . . . . . . . . . . . . . . . . . . . . . . . . . . . . . . . . . . . . . . 25
Smontování a ustavení. . . . . . . . . . . . . . . . . . . . . . . . . . . . . . . . . . . . . . . . . . . . . . . . . 26
Obsluha . . . . . . . . . . . . . . . . . . . . . . . . . . . . . . . . . . . . . . . . . . . . . . . . . . . . . . . . . . . . . 27
Nastavení teploty . . . . . . . . . . . . . . . . . . . . . . . . . . . . . . . . . . . . . . . . . . . . . . . . . . . . . . . . . . . . . . . . 27 Udržování teploty / dušení / vaření /pečení . . . . . . . . . . . . . . . . . . . . . . . . . . . . . . . . . . . . . . . . . . . . 27 Fondue . . . . . . . . . . . . . . . . . . . . . . . . . . . . . . . . . . . . . . . . . . . . . . . . . . . . . . . . . . . . . . . . . . . . . . . . 28 Vaření v páře. . . . . . . . . . . . . . . . . . . . . . . . . . . . . . . . . . . . . . . . . . . . . . . . . . . . . . . . . . . . . . . . . . . . 28 Pečení/pražení . . . . . . . . . . . . . . . . . . . . . . . . . . . . . . . . . . . . . . . . . . . . . . . . . . . . . . . . . . . . . . . . . . 29 Fritování. . . . . . . . . . . . . . . . . . . . . . . . . . . . . . . . . . . . . . . . . . . . . . . . . . . . . . . . . . . . . . . . . . . . . . . . 29
Čištění a údržba . . . . . . . . . . . . . . . . . . . . . . . . . . . . . . . . . . . . . . . . . . . . . . . . . . . . . . 30
Uložení. . . . . . . . . . . . . . . . . . . . . . . . . . . . . . . . . . . . . . . . . . . . . . . . . . . . . . . . . . . . . . 30
Odstranění závad. . . . . . . . . . . . . . . . . . . . . . . . . . . . . . . . . . . . . . . . . . . . . . . . . . . . . 31
Záruka a servis . . . . . . . . . . . . . . . . . . . . . . . . . . . . . . . . . . . . . . . . . . . . . . . . . . . . . . . 32
Likvidace . . . . . . . . . . . . . . . . . . . . . . . . . . . . . . . . . . . . . . . . . . . . . . . . . . . . . . . . . . . . 32
Dovozce . . . . . . . . . . . . . . . . . . . . . . . . . . . . . . . . . . . . . . . . . . . . . . . . . . . . . . . . . . . . . 32
Recepty . . . . . . . . . . . . . . . . . . . . . . . . . . . . . . . . . . . . . . . . . . . . . . . . . . . . . . . . . . . . . 33
SMUK 1500 A1 |
21 |

MULTIFUNKČNÍ VAŘIČ 6 V 1 SMUK 1500 A1
Úvod
CZ Gratulujeme vám k zakoupení nového přístroje.
Rozhodli jste se pro vysoce kvalitní výrobek. Návod k obsluze je součástí tohoto výrobku. Obsahuje důležité informace o bezpečnosti, použití a likvidaci. Před použitím výrobku se prosím dobře seznamte se všemi provozními a bezpečnostními pokyny. Výrobek používejte pouze předepsaným způsobem a pro uvedené oblasti použití. Při předávání výrobku třetím osobám předejte spolu s ním i tyto podklady.
Použití v souladu s určením
Tento přístroj slouží výhradně pro přípravu potravin. Tento přístroj je určen výhradně k použití v domácnostech pro soukromé účely. Není určen ke komerčnímu použití.
Popis přístroje
Obrázek A:
1víko
2úchyt
3háky fritovacího koše
4fritovací koš
5vnitřní miska
6základna
7provozní kontrolní žárovka
8kontrolní žárovka zahřívání
9regulátor teploty
Obrázek B:
0 rošt na vaření v páře q sběračka
w fondue vidličky
Rozsah dodávky
Multifunkční vařič (základna) s vnitřní miskou a víkem
fritovací koš
rošt na vaření v páře 6 fondue vidliček sběračka
úchyt
návod k obsluze
UPOZORNĚNÍ
Po vybalení ihned zkontrolujte rozsah dodávky, zda je úplná a není poškozená. V případě potřeby se obraťte na servis.
Technické údaje
Jmenovité napětí: |
220 - 240 V ~, 50 Hz |
Max. příkon: |
1500 W |
22 |
SMUK 1500 A1 |

Bezpečnostní pokyny |
|
|
NEBEZPEČÍ ÚRAZU ELEKTRICKÝM PROUDEM! |
|
|
► Přístroj nepoužívejte venku. |
|
|
|
||
► Poškozené zástrčky nebo poškozený přívodní kabel nechte ihned vyměnit |
CZ |
|
autorizovaným odborným personálem nebo zákaznickým servisem – vyhnete |
|
|
|
||
se tím nebezpečí. |
|
|
►Nepřehýbejte ani nestlačujte síťový kabel. Síťový kabel udržujte v dostatečné vzdálenosti od zdrojů tepla.
►Síťového kabelu a síťové zástrčky se nikdy nedotýkejte vlhkýma rukama.
►Vnitřní misku 5 vyjměte ze základny 6 ještě předtím, než ji začnete umývat ve vodě!
 Přístroj nikdy neponořujte do vody či jiných tekutin!
 VÝSTRAHA! NEBEZPEČÍ ZRANĚNÍ!
►Tento přístroj nesmí používat děti od 0 do 8 let.
►Tento přístroj mohou používat děti od 8 let, pokud jsou pod stálým dohledem.
►Osoby s omezenými fyzickými, smyslovými nebo mentálními schopnostmi či nedostatkem zkušeností a/nebo znalostí mohou používat tento přístroj pouze tehdy, pokud jsou pod dohledem nebo pokud byly poučeny o bezpečném používání přístroje a pokud porozuměly z toho vyplývajícímu nebezpečí.
►Čištění a uživatelskou údržbu nesmí provádět děti.
►Přístroje na vaření by se měly postavit pomocí rukojetí do stabilní polohy, aby se zabránilo rozlití horké tekutiny.
►Děti si nesmí s přístrojem hrát.
►Děti mladší 8 let nesmí mít přístup k přístroji a přívodnímu kabelu.
►Nepoužívejte prodlužovací kabel, v nouzové situaci musí být síťová zástrčka rychle na dosah.
SMUK 1500 A1 |
23 |
 Loading...