


4 
KOMPERNASS GMBH
BURGSTRASSE 21 · D-44867 BOCHUM www.kompernass.com
ID-Nr.: SPUV 90 A1/SPUH 90 A1-10/10-V2
IAN: 57122
HOME TECH
Projection Alarm Clock SPUV 90 A1/SPUH 90 A1
Projection Alarm
Clock
Operating instructions
Kivetítős
ébresztőóra
Használati utasítás
Budík s projekcí času
Návod k obsluze
Budzik z projektorem
Instrukcja obsługi
Budilka s projektorjem
Navodila za uporabo
Projekčný
budík
Návod na obsluhu
SPUV 90 A1
3 45 6 7 8 9 0
2
1
|
|
|
|
|
|
|
|
|
|
|
q |
|
|
|
|
|
|
|
|
||||
|
|
|
|
|
|
|
|
|
|
|
w |
|
|
|
|
|
|
|
|
|
|||
|
|
|
|
|
|
|
|
|
|
|
e |
|
|
|
|
|
|
|
|
|
|
||
|
|
|
|
|
|
|
|
|
|
|
r |
|
|
|
|
|
|
|
|
|
|
|
|
u |
|
|
|
|
|
|
|
|
|
|
t |
z |
|
|
|
|
|
||||||
|
|
|
|
|
|
|
|
||||
|
|
|
|
|
|
|
|
|
|||
SPUH 90 A1
0r u 2 86q
1
7 w
3
e
z |
|
t |
|
4 |
5 |
||
|
|||
9 |
|

CONTENT |
PAGE |
|
|
Warning Notice |
2 |
|
|
Safety information |
3 |
|
|
Intended Use |
5 |
|
|
Items supplied |
6 |
|
|
Operating Elements |
6 |
|
|
Technical Data |
7 |
|
|
Inserting the batteries |
9 |
|
|
Placing |
9 |
|
|
Operation |
10 |
|
|
Cleaning and care |
14 |
|
|
Troubleshooting |
14 |
|
|
Disposal |
15 |
|
|
Importer |
15 |
|
|
Warranty and Service |
16 |
Read these operating instructions carefully before using the device for the first time and preserve this manual for future reference. Pass this manual on to whoever might acquire the device at a future date.
- 1 -

PROJECTION ALARM CLOCK
This documentation is copyright protected.
All rights including those of photographic reproduction, duplication and distribution by means of particular methods (for example data processing, data carriers and data networks), wholly or partially as well as substantive and technical changes are reserved.
Warning Notice
In the existing operation instructions the following warnings are used:
Warning
A warning of this danger level signifies a possible dangerous situation. If the dangerous situation is not avoided it can lead to injuries. The directives in this warning are there to avoid personal injuries.
Important
A warning of this danger level signifies possible property damage. If the situation is not avoided it can lead to property damage. The directives in this warning are there to avoid property damage.
Note
A notice signifies additional information that assists in the handling of the device.
- 2 -

Safety information
Warning
To avoid potentially fatal electric shocks:
•Only use the device in dry rooms.
•Never allow fluids or other objects to get into the device.
•Do not place objects containing fluids, e.g. flower vases, on the device.
•Never open the housing of the device or of the mains power adapter (not supplied) and do not attempt to repair the device yourself, it does not contain any user-serviceable elements.
Warning
To avoid the risk of personal injury:
•This device is not intended for use by individuals (including children) with restricted physical, physiological or intellectual abilities or deficiences in experience and/or knowledge unless they are supervised by a person responsible for their safety or receive from this person instruction in how the device is to be used.
•Children should be supervised to ensure that they do not play with the device.
Important
To avoid the risk of fire:
•Place the device in an open and well-ventilated area so that heat pockets cannot be created within it. Never cover the ventilation slits!
•Do not place open fire sources, e.g. candles, on the device.
•Avoid close proximity to heat sources, e.g. direct solar radiation, heaters and other devices etc.!
- 3 -

Note:
This device is equipped with non-slip rubber pads. As floor and furniture upper surfaces comprise of various materials and are cleaned with various types of polishes and/or cleaning agents, it cannot be completely excluded that some of these substances contain components that could attack the rubber pads and soften them. If possible place an anti-slip material under the pads of the device.
Note:
In certain countries there could be exceptional regulations for the allocated radio frequency ranges.
Take note that you may not exploit irregularly received radio services, pass them on to third parties or improperly misuse them.
Information regarding the handling of batteries
The device uses batteries. When handling batteries, please observe the following:
Warning
•Do not throw batteries into a fire. Do not recharge the batteries.
•Never open batteries, never solder or weld batteries. The risk of explosions and injuries exists!
•Regularly check the condition of the batteries. Leaking batteries can cause damage to the device.
•If you do not intend to use the device for an extended period, remove the batteries.
- 4 -

•In the event of the batteries leaking acids, put on a pair of protective gloves.
•Clean the battery compartment and the battery contacts with a dry cloth.
•Keep batteries away from children. Children could put batteries into their mouths and swallow them. If a battery is swallowed, medical assistance must be sought IMMEDIATELY.
Note:
No liability/warranty claims will be considered for damage to the device caused by the effects of moisture, water penetration or overheating!
Intended Use
This device is designed to wake you by means of an alarm tone or radio and also for the reception of radio transmissions. Any other usage of, or modification to, the device is deemed to be improper usage and carries the risk
of serious personal injury. The manufacturer accepts no liability for damages that result from an improper use of the device or that are caused by an incorrect operation of it. It is not intended for commercial use.
- 5 -

Items supplied
1 Projection Alarm Clock
1 Operating instruction
2 x 1.5 V Type Micro/AAA/LR03
1 x 3 V Type CR2032
After unpacking, immediately check the contents for completeness and fault-free condition of the appliance. Remove all packaging materials and the protective foil from the device.
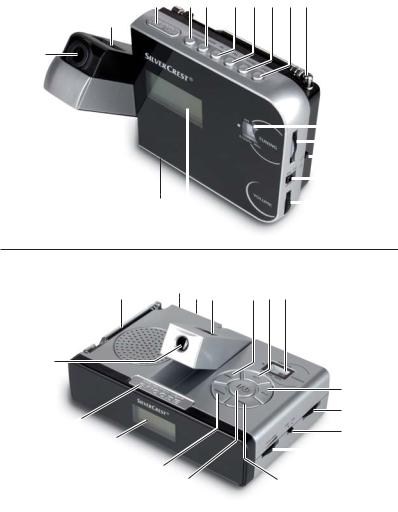
Operating Elements
q Projection lens
w Projektion focus (FOCUS)
e SNOOZE/PROJECTION LIGHT button r HOUR button
t MIN button y AL1 button u AL2 button i TIME button o 
 button
a Telescopic aerial s Frequency scale d TUNING regulator
f Wave band selector FM/AM
g Connection for 3V power adapter h Sound level regulator VOLUME j Display
k Battery compartment
- 6 -

Technical Data
This device satisfies the fundamental requirements and other relevant regulations of the EMC Directive 2004/108/EC.
Operating temperature range: +5°– +35°C Storage temperature range: 0°– +50°C Humidity: 5 – 90%
(no condensation)
SPUV 90 A1 |
|
Weight: |
248 g |
Dimensions: |
15.5 x 10.3 x 3.7 cm |
SPUH 90 A1 |
|
Weight: |
272 g |
Dimensions: |
15.6 x 10.2 x 4.1 cm |
Battery operation: |
2 x 1.5 V Type Micro/AAA/LR03 for radio |
|
operation, display illumination and projection. |
|
1 x 3 V Type CR2032 for the clock |
Frequency range : |
|
FM (USW) : |
87.5 - 108 MHz |
AM (MW) : |
526.5 - 1606.5 kHz |
The technical details of the device allow for a setable frequency range outside of the permissible 87.5–108 MHz and/or 526.5–1606.5 kHz. In different countries various national regulations regarding the allocated radio frequency range can exist. Please note that information received outside of the assigned radio frequency ranges may not be used, passed on to third parties or otherwise misused.
- 7 -

Power supply operation:
(Mains adapter not supplied)
Input voltage: |
230 V ~ 50 Hz |
||||
Output voltage: |
DC 3V (+/- 5%) |
||||
Rated current: |
min. 300 mA |
||||
Polarity: |
|
|
|
|
|
|
|
|
|
|
|
Even when using 3 V mains adapter, a battery of the type CR2032 must be inserted. If it is not, the clock will not function.
Important:
When using a power adapter the mains power socket must be easily accessible, so that in the case of an emergency the power adapter can be quickly disconnected.
Important:
Ensure that you have the correct polarities with the batteries and the power adapter.
False polarity will damage the device. The device can be operated as follows:
•only with batteries,
•with a power adapter and a battery of the type CR2032 for the clock.
- 8 -
Inserting the batteries
SPUV 90 A1:
You require 2 x 1.5 V batteries of the type Micro/AAA/LR03 and 1 battery of the type CR 2032 (all items supplied).
1.Open the cover of the battery compartment k at the rear of the device.
2.Insert the batteries into the battery compartment k, paying heed to the polarity markings shown in the battery compartment k.
3.Close the cover of the battery compartment k, such that it engages firmly.
SPUH 90 A1:
You require 2 x 1.5 V batteries of the type Micro/AAA/LR03 and 1 battery of the type CR 2032 (all items supplied).
1.Open the cover of the battery compartment k on the underside of the device.
2.Insert the batteries into the battery compartment k, paying heed to the polarity markings shown in the battery compartment k.
3.Close the cover of the battery compartment k, such that it engages firmly.
Placing
•Place the projection clock onto a level surface.
•Position the projection clock such that the projection lens q is directed onto an empty surface. The distance from the projection lens to the projection area (ceiling or wall) must lie between 0,4 m and 3 m.
- 9 -

Operation
Radio operation
1.Press the button 
 o to switch the device on.
2.Using the sound level controller VOLUME h, select the desired sound level.
3.Place the waveband selector switch f at the desired frequency range (FM/AM).
4.Adjust the TUNING regulator d to select the desired radio station. The frequencies can be read off from the frequency scale s.
5.Press the button 
 o to switch the device off.
Setting up the telescope aerial
•Remove the telescope aerial a from its retainer and set it up.
•Extend the telescope aerial a completely.
To improve reception in the FM frequency range, slowly turn the end of the telescope aerial a in various directions. As soon as you have found a position with good reception from your desired radio station, leave the telescope aerial a in this position. For the reception of AM transmissions, an antenna is built into the device. For improved reception, alter the position of the device in radio mode.
Setting the time
1.Press the button TIME i for 2 seconds. The time indicator in the display j blinks.
2.Press or hold the button HOUR r to set the hours.
3.Press or hold the button MIN t to set the minutes.
4.Press the button TIME i once again. The programmed time will be taken over.
- 10 -

Setting the alarm time
If the clock is set correctly, as described above:
1.Press the button AL1 y resp. AL2 u for 2 seconds. In the display j the indicator for the alarm function  resp.
resp.  appears and the time indicator blinks.
2.Press or hold the button HOUR r to set the hours.
3.Press or hold the button MIN t to set the minutes.
4.Press the button AL1 y resp. AL2 u once again. The programmed alarm time will be taken over.
Radio alarm call
When the alarm time is set correctly, as described above:
1.Select and set the desired radio station, and the sound volume, with which you wish to be woken (see also chapter Radio Operation).
2.Repeatedly press the button AL1 y resp. AL2 u until the symbol for radio reception  appears in the display j. At the programmed time the radio will now switch itself on.
3.Press the button 
 o to switch the radio off until the following day.
4.To deactivate the alarm function, repeatedly press the button AL1 y resp. AL2 u until a symbol is no longer shown next to the indicator for the alarm function  resp.
resp.  in the display j. After about 5 seconds the device returns to just a time display and the indicator for the alarm function disappears.
- 11 -

Wakening with the alarm tone
When the alarm time is set correctly, as described above:
1.Repeatedly press the button AL1 y resp. AL2 u until the symbol for the alarm tone  appears in the display j. At the programmed time the alarm tone will now switch itself on.
2.Press the button 
 o to switch the alarm tone off until the following day.
3.To deactivate the alarm function, repeatedly press the button AL1 y resp. AL2 u until a symbol is no longer shown next to the indicator for the alarm function  resp.
resp.  in the display j. After about 5 seconds the device returns to just a time display and the indicator for the alarm function disappears.
Snooze Function
Activation of the button SNOOZE e interrupts the alarm tone or the radio for about 10 minutes. After these 10 minutes the alarm procedure is repeated.
•Press the button 
 o to switch the alarm function off until the following day.
- 12 -

Projection
Attention:
When used properly, the radiation from the projection of the display is not at all dangerous!. However, avoid looking directly into the light beam and do not aim the beam at other persons or at animals.
To display the time correctly on a wall or the ceiling, the hinged projection element needs to be swivelled into the correct position and the room must be appropriately darkened.
1.Press the button PROJECTION LIGHT e for 2 seconds. The time projection switches itself on.
2.Adjust the projection element as desired. The time is projected onto the required position. The projection distance is approx. 40cm - 3m.
3.Adjust the clarity of the projection with the projection focus w.
4.Press the button PROJECTION LIGHT e once again for 2 seconds to switch the time projection off.
Background lighting for the display and projection
One-time activation of the button PROJECTION LIGHT e activates the display illumination for about 8 seconds.
- 13 -

Cleaning and care
Important:
Never permit fluids to permeate inside the device. The device could also be irreparably damaged!
•Keep the device and the ventilation openings clean at all times.
•Use a soft and dry cloth to clean the device housing.
•Never use detergents or solvents that could damage plastics.
•Check the state and charge condition of the inserted batteries at least once a year.
•If you do not intend to use the device for an extended period, remove the batteries.
•Store the appliance at a dry and clean location with an ambient temperature of approx. 0°– +50°C.
Troubleshooting
The device does not function.
•Batterie have not been inserted. Insert batteries.
•The batteries are exhausted. Exchange the batteries.
•The batteries have been inserted incorrectly. Check the poling of the batteries and, if necessary, correct it.
The projection is fuzzy.
•The focus is not correctly programmed. Adjust the clarity of the projection with the projection focus w.
•The distance to the projection area is too small or too large. Place the Projection Alarm Clock at a distance of between 40cm and 3m from the projection area.
- 14 -
Disposal
Do not dispose of the device in your normal domestic waste. This product is subject to the provisions of European Directive 2002/96/EC.
Dispose of the device through an approved disposal centre or at your community waste facility.
Observe the currently applicable regulations.
In case of doubt, please contact your waste disposal centre.
Disposal of batteries/accumulators
Used batteries/rechargeable batteries may not be disposed of in household waste. All consumers are statutorily obliged to dispose of batteries at a collection site of their community/city district or at a retail store.
The purpose of this obligation is to ensure that batteries are disposed of in a non-polluting manner. Only dispose of batteries when they are fully dis-charged.
 Dispose of all packaging materials in an environmentally friendly manner.
Importer
KOMPERNASS GMBH BURGSTRASSE 21
44867 BOCHUM, GERMANY
www.kompernass.com
- 15 -

Warranty and Service
The warranty for this appliance is for 3 years from the date of purchase. The appliance has been manufactured with care and meticulously examined before delivery. Please retain your receipt as proof of purchase. In the event
of a warranty claim, please make contact by telephone with our Service Department. Only in this way can a post-free despatch for your goods be assured. The warranty covers only claims for material and maufacturing defects, but not for transport damage, for wearing parts or for damage to fragile components, e.g. buttons or batteries. This product is for private use only and is not intended for commercial use. The warranty is void in the case of abusive and improper handling, use of force and internal tampering not carried out by our authorized service branch. Your statutory rights are not restricted in any way by this warranty.
The warranty period will not be extended by repairs made under warranty. This applies also to replaced and repaired parts. Any damage and defects extant on purchase must be reported immediately after unpacking the appliance, at the latest, two days after the purchase date. Repairs made after the expiration of the warranty period are subject to payment.
DES UK LTD
Tel.: 0871 5000 700 (£ 0.10 / minute)
E-Mail: support.uk@kompernass.com
Kompernass Service Ireland
Tel.: 1850 930 412 (0,082 EUR/Min.)
Standard call rates apply. Mobile operators may vary.
E-Mail: support.ie@kompernass.com
- 16 -

KAZALO VSEBINE |
STRAN |
|
|
Wskazówki ostrzegawcze |
18 |
|
|
Wskazówki bezpieczeństwa |
19 |
|
|
Użytkowanie zgodne z przeznaczeniem |
21 |
|
|
Zakres dostawy |
22 |
|
|
Elementy obsługowe |
22 |
|
|
Dane techniczne |
23 |
|
|
Wkładanie baterii |
25 |
|
|
Ustawianie |
25 |
|
|
Obsługa |
26 |
|
|
Czyszczenie i konserwacja |
30 |
|
|
Usuwanie usterek |
30 |
|
|
Utylizacja |
31 |
|
|
Importer |
31 |
|
|
Gwarancja i serwis |
32 |
Pred prvo uporabo ta navodila skrbno preberite in jih shranite za poznejšo uporabo. Ob predaji naprave tretji osebi zraven priložite tudi navodila za uporabo.
- 17 -

BUDZIK Z PROJEKTOREM
Niniejsza dokumentacja jest prawnie chroniona.
Wszelkie prawa, także te dotyczące odtwarzania fotomechanicznego, powielania i rozpowszechniania innymi metodami (np. obróbka danych, nośniki danych i sieci danych), także częściowo, jak również zmian zawartości i techniki zastrzeżone.
Wskazówki ostrzegawcze
W niniejszej instrukcji obsługi zastosowano następujące wskazówki ostrzegawcze:
Ostrzeżenie
Wskazówka ostrzegawcza tego stopnia zagrożenia oznacza możliwą do wystąpienia sytuację niebezpieczną. W razie braku możliwości uniknięcia niebezpiecznej sytuacji, może to doprowadzić do odniesienia obrażeń.
Instrukcje w niniejszej wskazówce ostrzegawczej stosuje się, by uniknąć odniesienia obrażeń osób.
Uwaga
Wskazówka ostrzegawcza tego stopnia zagrożenia oznacza możliwą szkodę materialna. W razie braku możliwości uniknięcia niebezpiecznej sytuacji, może to doprowadzić do szkód materialnych. Instrukcje w niniejszej wskazówce ostrzegawczej stosuje się, by uniknąć szkód materialnych.
Wskazówka
Wskazówka oznacza dodatkowe informacje, ułatwiające korzystanie z urządzenia.
- 18 -
Wskazówki bezpieczeństwa
Ostrzeżenie
Aby uniknąć zagrożenia życia przez porażenie prądem elektrycznym
•Urządzenia należy używać tylko w suchych pomieszczeniach.
•Należy zagwarantować, aby do urządzenia nigdy nie mogły dostać się ciecze lub przedmioty.
•Na urządzeniu nie wolno stawiać żadnych naczyń z wodą.
•Nigdy nie próbuj otwierać obudowy urządzenia ani zasilacza (nie wchodzą w zakres dostawy) ani też samemu naprawiać urządzenia, nie zawiera ono żadnych część do konserwacji.
Ostrzeżenie
Aby uniknąć niebezpieczeństwa obrażeń:
•Urządzenie nie jest przeznaczone do użytkowania przez osoby (w tym dzieci) z ograniczoną sprawnością fizyczną, sensoryczną bądź umysłową lub nieposiadające doświadczenia i / lub wiedzy, chyba że będą one przebywały pod opieką osoby odpowiedzialnej za ich bezpieczeństwo lub uzyskają od niej wskazówki dotyczące właściwego używania urządzenia.
•Nie można pozwolić dzieciom na zabawę urządzeniem.
Uwaga
Jak unikać zagrożenia pożarowego:
•Należy tak ustawiać urządzenie, aby nie mogło gromadzić się ciepło, to znaczy swobodnie i w dobrze przewietrzanym miejscu. Nie wolno nigdy zatykać otworów wentylacyjnych urządzenia!
•Na urządzeniu nie wolno stawiać żadnych otwartych źródeł ognia, np. zapalonych świeczek
•Unikać dodatkowego nagrzewania urządzenia, np. przez bezpośrednie napromieniowanie słoneczne, grzejniki, inne urządzenia itp!
- 19 -

Wskazówka:
Urządzenie jest wyposażone w podkładki antypoślizgowe. Ponieważ powierzchnie mebli oraz posadzki są wykonane z różnych materiałów oraz są konserwowane różnymi środkami czyszczącymi, to nie można wykluczyć, że niektóre z tych substancji nie będą zawierały składników, które działają niszcząco na gumowe podkładki urządzenia. W razie konieczności podłóż pod urządzenie stosowną matę lub inną podkładkę.
Wskazówka:
W różnych krajach obowiązują różne przepisy odnośnie przydzielanych zakresów częstotliwości radiowej.
Należy mieć na uwadze, że odbieranych ewentualnie przez radio wiadomości przekazywanych na drodze radiokomunikacji nie wolno wykorzystywać
w celach zarobkowych ani przekazywać ich osobom trzecim bądź też używać niezgodnie z przeznaczeniem.
Wskazówki odnośnie obchodzenia się z bateriami
W urządzeniu wykorzystywane są baterie. Podczas obchodzenia się z bateriami należy przestrzegać następujących zasad:
Uwaga
•Baterii nie wolno wrzucać do ognia. Nigdy nie ładować rozładowanych baterii jednorazowego użytku.
•Baterii nie wolno otwierać, lutować ani spawać. Istnieje niebezpie-czeńst- wo wybuchu i odniesienia obrażeń!
•Regularnie sprawdzaj stan baterii. Rozlane baterie mogą spowodować uszkodzenia urządzenia.
•Baterie należy wyjąć, jeśli urządzenie nie jest użytkowane przez dłuższy okres czasu.
- 20 -

•W celu wyjęcia z urządzenia wylanych baterii zakładaj zawsze rękawice ochronne.
•Schowek baterii i styki baterii należy czyścić tylko suchą szmatką.
•Baterie nie powinny nigdy trafić w ręce dzieci. Dziecko może połknąć baterię. W razie połknięcia baterii należy natychmiast skorzystać z pomocy medycznej.
Wskazówka:
Producent nie przejmuje odpowiedzialności za uszkodzenia urządzenia powstałe w wyniku oddziaływania wilgoci, przedostania się do urządzenia wody lub jego przegrzania!
Użytkowanie zgodne z przeznaczeniem
Urządzenie jest przeznaczone do budzenia za pomocą sygnału alarmowego, do budzenia za pomocą radia oraz do odbioru stacji radiowych. Jakiekolwiek inne użycie lub zmiany urządzenia uważane są za niezgodne z przeznaczeniem i wiążą się z poważnym niebezpieczeństwem wypadku. Producent urządzenia nie ponosi odpowiedzialności za szkody spowodowane użytkowaniem niezgodnym z przeznaczeniem lub nieprawidłową obsługą urządzenia. Urządzenie nie jest przeznaczone do zastosowań komercyjnych.
- 21 -

Zakres dostawy
1 Budzik z projektorem
1 instrukcja obsługi
2 x 1,5 V typ Micro / AAA / LR03 1 x 3 V typ CR2032
Przed przystąpieniem do uruchomienia sprawdź, czy w opakowaniu znajdują się wszystkie elementy zestawu, oraz czy podczas transportu nie doszło do uszkodzenia ładowarki. Zdejmij z urządzenia i akcesoriów wszystkie elementy opakowania.
Elementy obsługowe
q Soczewka projekcyjna
w Regulacja ostrości projekcji (FOCUS)
e Przycisk SNOOZE/PROJECTION LIGHT r Przycisk HOUR
t Przycisk MIN
y Przycisk AL1
u Przycisk AL2
i Przycisk TIME
o Przycisk
a Antena teleskopowa s Skala częstotliwości d Pokrętło TUNING
f Przełącznik pasma częstotliwości FM/AM g Podłączenie zasilacza 3 V
h Regulator głośności VOLUME j Wyświetlacz
k Schowek na baterie
- 22 -

Dane techniczne
Urządzenie zostało przetestowane i posiada dopuszczenie w zakresie podstawowych wymagań i innych obowiązujących przepisów dyrektywy w sprawie kompatybilności elektromagnetycznej 2004/108/EC.
Zakres temp. roboczych: |
+5°– +35°C |
Zakres temperatury przechowywania: 0°– +50°C |
|
Wilgotność: |
5–90% |
|
(przy braku kondensacji) |
SPUV 90 A1 |
|
Waga: |
248 g |
Wymiary: |
15,5 x 10,3 x 3,7 cm |
SPUH 90 A1 |
|
Waga: |
272 g |
Wymiary: |
15,6 x 10,2 x 4,1 cm |
Zasilanie na baterie: |
2 x 1,5 V typ Micro / AAA / LR03 do |
|
słuchania radia, podświetlenia wyświetlacza i |
|
wyświetlania czasu. |
|
1 x 3 V typ CR2032 do zegarka |
Zakres częstotliwości: |
|
FM (UKF): |
87,5 - 108 MHz |
AM (MW): |
526,5 - 1606,5 kHz |
Warunki techniczne urządzenia pozwalają ustawiać zakres częstotliwości poza dopuszczalnym przedziałem 87,5–108 MHz wzgl. 526,5–1606,5 kHz. W każdym kraju mogą obowiązywać różne przepisy odnośnie przydzielonych zakresów częstotliwości radiowych. Należy mieć na uwadze, iż informacji odebranych poza przydzielonym zakresem częstotliwości nie wolno wykorzystywać, udostępniać osobom trzecim lub nadużywać niezgodnie
z ich przeznaczeniem.
- 23 -

Zasilacz:
(nie wchodzi w zakres dostawy)
Napięcie wejściowe: |
230 V ~ 50 Hz |
||||
Napięcie wyjściowe: |
DC 3 V (+/- 5%) |
||||
Prąd znamionowy: |
min. 300 mA |
||||
Biegunowość: |
|
|
|
|
|
|
|
|
|
|
|
Także przy użytkowaniu zasilacza 3 V bateria CR2032 musi być włożona. W przeciwnym wypadku nie będzie działał zegarek.
Uwaga:
Przy korzystaniu z zasilacza należy zapewnić swobodny dostęp do gniazdka, by w razie zagrożenia móc szybko odłączyć wtyczkę.
Uwaga:
Należy zwrócić uwagę na prawidłowe podłączenie biegunów baterii oraz zasilacza.
Pomyłkowe podłączenie biegunów spowoduje uszkodzenie urządzenia. Urządzenie może być zasilane
•tylko bateriami,
•z zasilaczem i jedną baterią CR 2032 potrzebną do działania zegarka.
- 24 -

Wkładanie baterii
SPUV 90 A1:
Potrzebne będą 2 baterie 1,5 V typu Micro / AAA / LR03 i 1 bateria typu CR 2032 (znajdują się w zestawie).
1.Otwórz klapkę schowka na baterie k na spodzie urządzenia.
2.Włóż baterie do schowka k zwracając uwagę na oznaczenie biegunów k.
3.Zamknij klapkę schowka na baterie k, aż klapka się zatrzaśnie.
SPUH 90 A1:
Potrzebne będą 2 baterie 1,5 V typu Micro / AAA / LR03 i 1 bateria typu CR 2032 (znajdują się w zestawie).
1.Otwórz klapkę schowka na baterie k na dole urządzenia.
2.Włóż baterie do schowka k zwracając uwagę na oznaczenie biegunów k.
3.Zamknij klapkę schowka na baterie k, aż klapka się zatrzaśnie.
Ustawianie
•Ustaw budzik projektorem na płaskiej powierzchni.
•Ustaw budzik z projektorem w taki sposób, aby soczewka projekcyjna q była skierowana na pustą płaszczyznę. Odległość soczewki projekcyjnej od płaszczyzny rzutowania (sufitu lub ściany) musi wynosić między 0,4 m i 3 m.
- 25 -

Obsługa
Słuchanie radia
1.Naciśnij przycisk 
 o, by włączyć urządzenie.
2.Regulatorem głośności VOLUME h ustaw żądaną głośność.
3.Nastaw przełącznik zakresu częstotliwości f na żądany zakres (FM/AM).
4.Nastaw pokrętło dostrajania d na żądaną stację radiową. Częstotliwość odczytaj ze skali s.
5.Naciśnij przycisk 
 o, by wyłączyć urządzenie.
Rozłożenie anteny teleskopowej
•Odblokuj antenę teleskopową a z uchwytu i rozłóż ją.
•Wyciągnij do końca antenę teleskopową a.
Aby poprawić odbiór stacji radiowych w zakresie FM, powoli wychylaj końcówkę anteny teleskopowej a w różnych kierunkach. Po odszukaniu położenia zapewniającego dobry odbiór wybranej stacji zostaw antenę teleskopową a w tej pozycji. Do odbioru stacji radiowych nadających na falach AM wystarcza antena wbudowana w urządzenie na stałe.
Aby poprawić jakość odbioru tych stacji radiowych, ustawić radioodbiornik w innym położeniu.
Ustawianie godziny
1.Naciśnij i przytrzymaj przez 2 sekundy przycisk TIME i. Na wyświetlaczu j miga wskazanie czasu.
2.Naciśnij i przytrzymaj przycisk HOUR r, by ustawić godzinę.
3.Naciśnij i przytrzymaj przycisk MIN t, by ustawić minuty.
4.Naciśnij ponownie przycisk TIME i. Ustawiona godzina zostanie przyjęta.
- 26 -

Ustawianie czasu budzenia
Jeżeli aktualny czas został prawidłowo ustawiony zgodnie z powyższym opisem:
1.Naciśnij i przytrzymaj przez 2 sekundy przycisk AL1 y wzgl. AL2 u. Na wyświetlaczu j wyświetla się symbol funkcji budzenia  wzgl.
wzgl.  i miga wskazanie czasu.
2.Naciśnij i przytrzymaj przycisk HOUR r, by ustawić godzinę.
3.Naciśnij i przytrzymaj przycisk MIN t, by ustawić minuty.
4.Naciśnij ponownie przycisk AL1 y wzgl. AL2 u. Ustawiony czas budzenia zostanie przyjęty.
Budzenie radiem
Jeżeli czas budzenia został prawidłowo ustawiony zgodnie z powyższym opisem:
1.Nastaw żądaną stację radiową i głośność budzenia (zobacz również rozdział Słuchanie radia).
2.Naciskaj przycisk AL1 y wzgl. AL2 u dotąd, aż na wyświetlaczu j wyświetli się symbol odbioru radia  . Radio włączy się o nastawionej porze.
3.Naciśnij przycisk 
 o, by wyłączyć radio do następnego dnia.
4.W celu wyłączeni funkcji budzenia, naciskaj dotąd przycisk AL1 y wzgl. AL2 u, aż z wyświetlacza j zniknie symbol obok symbolu funkcji budzenia  wzgl.
wzgl.  . Po upływie około 5 sekund, na wyświetlaczu ponownie wyświetla się czas i znika symbol budzenia.
- 27 -

Budzenie sygnałem alarmowym
Jeżeli czas budzenia został prawidłowo ustawiony zgodnie z powyższym opisem:
1.Naciskaj przycisk AL1 y wzgl. AL2 u dotąd, aż na wyświetlaczu j wyświetli się symbol dzwonka alarmu  . Dzwonek będzie się teraz włączał o nastawionej godzinie.
2.Naciśnij przycisk 
 o, by wyłączyć dzwonek budzenia do następnego dnia.
3.W celu wyłączeni funkcji budzenia, naciskaj dotąd przycisk AL1 y wzgl. AL2 u, aż z wyświetlacza j zniknie symbol obok symbolu funkcji budzenia  wzgl.
wzgl.  . Po upływie około 5 sekund, na wyświetlaczu ponownie wyświetla się czas i znika symbol budzenia.
Funkcja drzemki
Naciśnięcie przycisku SNOOZE e przerywa dzwonek budzenia wzgl. odtwarzanie radia na około 10 minut. Po upływie 10 minut sygnał budzenia jest powtarzany.
• Naciśnij przycisk 
 o, by wyłączyć funkcję alarmu do następnego dnia.
- 28 -
 Loading...