


3BC
UNIVERSAL
REMOTE CONTROL
KH2150
UNIVERSAL REMOTE CONTROL
Operating instructions
KOMPERNASS GMBH · BURGSTRASSE 21 ·
D-44867 BOCHUM
www.kompernass.com
ID-Nr.: KH2150-07/08-V1
KH 2150
|
|
|
|
|
|
|
|
|
|
|
1 |
|
|
||||||
|
|
|
|
|
|
|
|
|
|
|
|
|
|
|
|
|
2 |
|
|
|
|
|
|
|
|
|
|
|
|
|
|
|
|
|
|
|
|||
|
|
|
|
|
|
|
|
|
|
|
3 |
|
|
||||||
|
|
|
|
|
|
|
|
|
|
|
|
|
|
|
|
4 |
|
|
|
|
|
|
|
|
|
|
|
|
|
|
|
|
|
||||||
19 |
|
|
|
|
|
|
|
|
|
|
|
|
|
|
|
5 |
|
|
|
|
|
|
|
|
|
|
|
|
|
|
|
|
|
|
|||||
|
|
|
|
|
|
|
|
|
|
|
|
|
|
|
6 |
|
|
||
|
|
|
|
|
|
|
|
|
|
|
|
||||||||
|
|
|
|
|
|
|
|
|
|
|
7 |
|
|
||||||
18 |
|
|
|
|
|
|
|
|
|
|
|
|
|
8 |
|
|
|||
|
|
|
|
|
|
|
|
|
|
|
|
|
|
|
|
||||
|
|
|
|
|
|
|
|
|
|
|
9 |
|
|
||||||
17 |
|
|
|
|
|
|
|
|
|
|
|
|
|
10 |
|
|
|||
|
|
|
|
|
|
|
|
|
|
|
|
|
|
|
|||||
|
|
|
|
|
|
|
|
|
|
|
11 |
|
|
||||||
|
|
|
|
|
|
|
|
|
|
|
|
|
|
12 |
|
20 |
|||
|
|
|
|
|
|
|
|
|
|
|
|
|
|
|
|||||
|
|
|
|
|
|
|
|
|
|
|
|
|
|
||||||
|
|
|
|
|
|
|
|
|
|
|
|
|
|
|
|||||
|
|
|
|
|
|
|
|
|
|
|
|
||||||||
|
|
|
|
|
|
|
|
|
|
|
|
|
|
13 |
|
|
|||
|
|
|
|
|
|
|
|
|
|
|
|
|
|||||||
16 |
|
|
|
|
|
|
|
|
|
|
|
|
|
14 |
|
|
|||
|
|
|
|
|
|
|
|
|
|
|
|
|
|
|
|
|
|||
|
|
|
|
|
|
|
|
|
|
|
|
|
|
|
|||||
|
|
|
|
|
|
|
|
|
|
|
|
|
|
15 |
|
|
|||
|
|
|
|
|
|
|
|
|
|
|
|
|
|
|
|
|
|
|
|
|
|
|
|
|
|
|
|
|
|
|
|
|
|||||||

CONTENT |
PAGE |
Safety |
3 |
Proper use . . . . . . . . . . . . . . . . . . . . . . . . . . |
. . . . . . . .3 |
Appliance Overview |
4 |
First use |
5 |
Unpacking the device /
checking the package contents . . . . . . . . . . . . . . . . .5 Inserting the batteries . . . . . . . . . . . . . . . . . . . . . . . . .5
Operating elements |
6 |
LCD display . . . . . . . . . . . . . . . . . . . . . . . . . . . . . . . .6 Buttons . . . . . . . . . . . . . . . . . . . . . . . . . . . . . . . . . . . .7 EXIT button (8) . . . . . . . . . . . . . . . . . . . . . . . . . . . . . .8
SYSTEM-SETUP–System settings |
10 |
VOL/MUTE SETUP . . . . . . . . . . . . . . . . . . . . . . . . . .11 VOL/MUTE SET . . . . . . . . . . . . . . . . . . . . . . . . . . . .12 VOL/MUTE RESET . . . . . . . . . . . . . . . . . . . . . . . . . .12 TIME-SETUP . . . . . . . . . . . . . . . . . . . . . . . . . . . . . . .12 DATE-SETUP . . . . . . . . . . . . . . . . . . . . . . . . . . . . . . .13 BACKLIGHT SETUP . . . . . . . . . . . . . . . . . . . . . . . . .14 SYSTEM-RESET . . . . . . . . . . . . . . . . . . . . . . . . . . . . .14
CODE-SETUP – Device code |
15 |
LIST CODES . . . . . . . . . . . . . . . . . . . . . . . . . . . . . . .15 ENTER CODES . . . . . . . . . . . . . . . . . . . . . . . . . . . . .17 SEARCH CODES . . . . . . . . . . . . . . . . . . . . . . . . . . .17 BRAND CODES . . . . . . . . . . . . . . . . . . . . . . . . . . . .19 Entering device codes for combination devices . . .20 Controlling combination devices . . . . . . . . . . . . . . .20 Display device code . . . . . . . . . . . . . . . . . . . . . . . .20
TIMER SETUP – Timer functions |
21 |
TV SLEEP SETUP . . . . . . . . . . . . . . . . . . . . . . . . . . . |
.21 |
TIMER SETUP . . . . . . . . . . . . . . . . . . . . . . . . . . . . . |
.22 |
LEARN-SETUP – Learning functions |
24 |
MODE LEARN . . . . . . . . . . . . . . . . . . . . . . . . . . . . .25 MODE CLEAR . . . . . . . . . . . . . . . . . . . . . . . . . . . . .26 ALL LEARN CLEAR . . . . . . . . . . . . . . . . . . . . . . . . . .26
1

MACRO-SETUP – Macro functions |
27 |
MACRO SET . . . . . . . . . . . . . . . . . . . . . . . . . . . . . |
.27 |
MACRO CLEAR . . . . . . . . . . . . . . . . . . . . . . . . . . . |
.28 |
Maintenance and Cleaning |
29 |
Battery maintenance . . . . . . . . . . . . . . . . . . . . . . . |
.29 |
Cleaning the remote control . . . . . . . . . . . . . . . . . |
.29 |
Disposal |
29 |
Troubleshooting |
30 |
Technical data |
31 |
Manufacturer codes |
31 |
Personal macros |
32 |
Personal device codes |
32 |
Conformity |
33 |
Importer |
33 |
Warranty and Service |
34 |
Read the operating instructions carefully before using the device for the first time and preserve these instructions for later reference. Hand over the instruction manual to whomsoever you might pass the device on to.
2

UNIVERSAL REMOTE
CONTROL KH2150
Safety
Proper use
Children may only operate the remote control under adult supervision.
The universal remote control can replace a maximum of ten remote controls. It can only be used for entertainment electronics with infrared receivers.
The functions of the universal remote correspond to those of the original remote controls. The universal remote control is intended for private use. It is not suitable for commercial use. Any other use is considered improper use. The manufacturer declines to accept responsibility for damage(s) arising from improper use.
 Risk of injury through incorrect handling of batteries!
Batteries must be handled with special care. Take note of the following safety instructions:
•Take the batteries out of the battery compartment as soon as they are empty.
•Do not throw batteries into a fire. Never subject batteries to high temperatures.
•If you will not be using the device for a longer period of time, remove the batteries to prevent them from discharging.
•Explosion hazard! Non-rechargeable batteries must never be recharged.
•Do not open the batteries or short-circuit them.
•Battery acid leaking from a battery can cause inflammation of the skin. In event of contact with the skin, rinse with large amounts of water. If the liquid comes into contact with your eyes, rinse thoroughly with water, do not rub and immediately consult a doctor.
Laser
The universal remote control has an infrared diode of laser class 1. A safety system prevents the emission of hazardous laser radiation during use. To prevent eye injuries, do not modify or damage the safety system of the device.
3

Damage to the device
•If the device is defective, do not attempt to repair it yourself. In case of damage, contact the manufacturer or his service hotline (see Warranty section).
•If liquid escapes from the device or if the device has been otherwise damaged, it must be inspected by the manufacturer or his service hotline. Contact the manufacturer or his service hotline (see Warranty section).
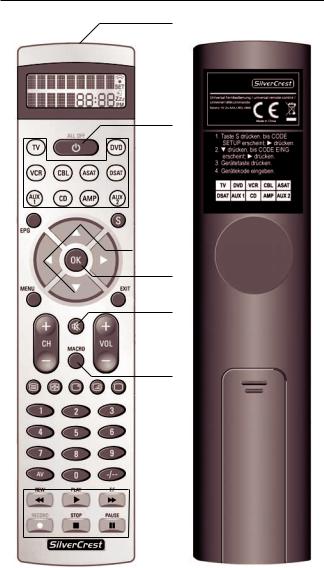
Appliance Overview
1 Infrared transmitter/receiver
2 LCD display with text field, number field and symbol field 3 ALL OFF button
4 Device buttons
5 S button
6 Arrow buttons
7 OK button
8 EXIT button
9 Speaker button
10VOL button
11MACRO button
12Video text buttons
13Number buttons
14Button for one-/two-digit programme numbers
15Playback buttons and function buttons
16AV button
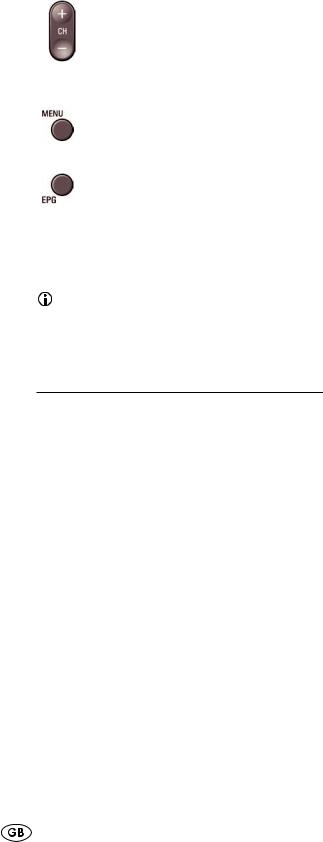
17CH button
18MENU button
19EPG button
20Battery compartment
4
First use
Unpacking the device / checking the package contents
Attention!
Keep the plastic packaging well away from small children. There is a risk of suffocation.
•Unpack the device and accessories.
•Check the package contents
-Universal remote control
-Operating instructions
-Manufacturer list with device code list
•Remove the protective foil from the LCD display (2).
Note: Transport damage
If you notice transport damage, contact customer service (see Warranty section).
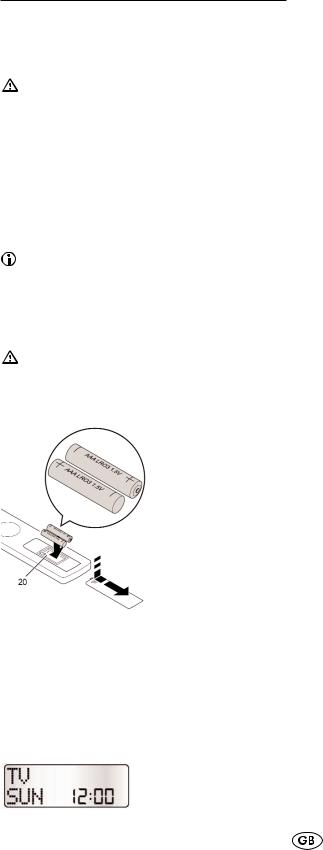
Inserting the batteries
Attention!
The universal remote control may only be operated with 1.5 volt batteries.
1.Open the battery compartment (20) in the direction indicated by the arrow.
2.Insert the batteries as shown in the figure and close the battery compartment.
The LCD display (2) is activated as long as the batteries are inserted.
The following figure shows the LCD display (2) after the batteries have been inserted or replaced.
5
Note:
If the LCD display (2) remains dark, check the polarity of the batteries or insert new batteries.
The LCD display (2) is explained in the section LCD display.
Operating elements
LCD display
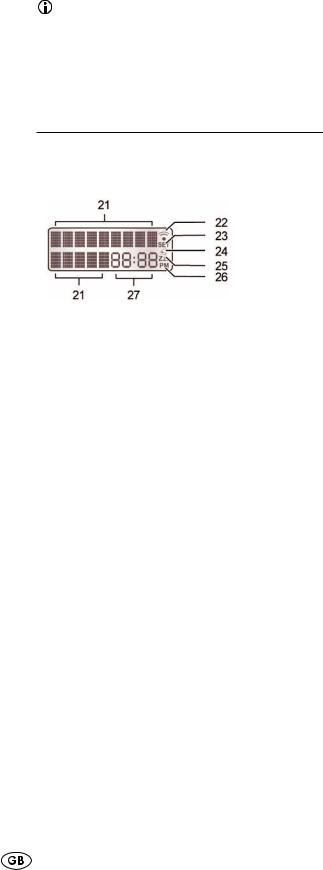
The LCD display (2) is divided into fields.
Text field (21)
The text field has two lines. The first line indicates the current device, such as DVD, TV or VCR. The second line shows the day of week information or device code.
Information in the LCD display (2) that is shown in the display on two lines is shown in these operating instructions on a
single line. |
|
Example |
|
LCD display |
Operating instructions |
SYSTEM- |
SYSTEM-SETUP |
SETUP |
|
Infrared symbol (22)
Every time a button is pressed, an infrared signal is sent and the infrared symbol lights up.
SET symbol (23)
The SET symbol indicates that the remote control is in setup mode and device codes can be entered, for example.
Timer symbol (24)
The Timer symbol indicates that a timer function has been configured and is active.
Zzz symbol (25)
The SLEEPTIMER function for the television is activated. After the time elapses, the television will be switched off.
6
AM/PM symbol (26)
If the time is set to 12-hour format, a PM symbol is displayed in the afternoon between 12:00 and 24:00. (See section SYSTEM-SETUP – System settings).
Number field (27)
The display field for time and date information as well as the device code.
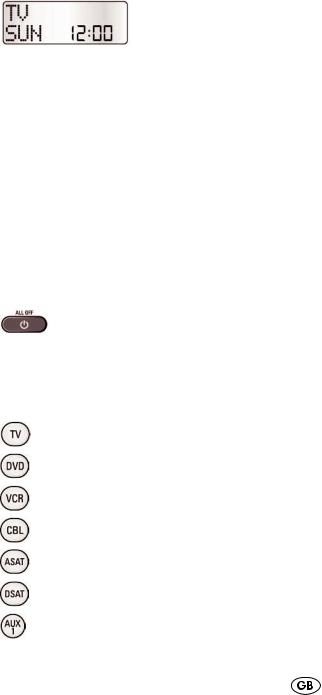
Standard display
The standard display on the LCD display (2) consists of the information for the current device "TV", the day of the week "SUN“ and the time "12:00“.
How to change the settings for day of the week "SUN“ and the time "12:00“ is described in the sections DATE-SETUP and TIME-SETUP.
Lighting
The LCD display (2) lights up as soon as you press a button on the remote control. The backlight switches off automatically. The backlight time can be configured. See the section "BACKLIGHT SETUP“. The default setting is ten seconds.
Buttons
ALL OFF button (3)
Switch device on/off.
Device buttons (4)
The device buttons are used to select which device should be operated. The TV button is permanently assigned, all other buttons can be freely configured.
Television
DVD player (Digital Versatile Disk)
Video recorder (Video Cassette Recorder)
Cable connection
Analogue satellite receiver
Digital satellite receiver
Auxiliary 1
7

CD player (Compact Disk)
Amplifier
Auxiliary 2
S button (5)
Load SETUP menu or activate SHIFT function.
Arrow buttons (6)
Move up, right, left and down in menus.
OK button (7)
You can confirm a menu selection with the OK button.
EXIT button (8)
Leave menu.
Speaker button (9)
Switch sound on/off.
VOL button (10)
Set volume.
MACRO button (11)
Pressing the MACRO button (11) followed by a number button (13) 1, 2 or 3 activates the saved commands.
8
Video text buttons (12)
Switch on video text.
Stop automatic paging forward for multi-page video texts.
Display information on the selected device.
Show video text and television programme at the same time.
Switch off video text.
Number buttons (13)
Enter programme and device code numbers.
Button for one-/two-digit programme numbers (14)
Button for one-/two-digit programme numbers. For two-digit programme numbers, first press button (14), then enter the programme number with the number buttons (13).
Playback buttons and function buttons (15)
The playback buttons REW, PLAY, F.F, RECORD, STOP and PAUSE control devices such as DVD players, VCRs and CD players. The coloured function buttons open categories in the video text selection.
REW – Rewind, video text, category red.
PLAY – Playback, video text, category yellow.
F.F. – Fast forward, video text, category blue.
RECORD – Record.
Press twice to record.
STOP – Stop playback, video text, category green.
PAUSE – Pause playback, video text, category magenta.
AV button (16)
Switch the video input (SCART).
9
CH button (17)
Change the television channel.
MENU button (18)
Open the menu.
EPG button (19)
|
Depending on the selected device, the EPG button |
|
activates the following functions: |
TV/SAT |
Access the electronic television programme |
|
guide. |
DVD : |
Access the title menu. |
VCR : |
Access ShowView. |
Note:
Consult the operating instructions of your VCR to learn whether the "ShowView" function is supported.
SYSTEM-SETUP–System settings
In the system settings, you can configure the following:
VOL/MUTE SETUP |
Volume control via a specific device. |
TIME-SETUP |
Time format and setting the time. |
DATE-SETUP |
Setting the date, year and day of |
|
the week. |
BACKLIGHT SETUP |
Backlighting of the LCD display (2). |
SYSTEM-RESET |
Reset all settings. |
10
 Loading...