


 Loading...
C E L L U L A R
E N H A N C E D C E L L U L A R TE L E P H O N E
Owner’s Manual

Welcome Thank you for selecting Motorola — a world leader in communications technology.
All Motorola cellular phones are designed and manufactured in the United States to meet Motorola’s exacting specifications and world class quality standards. The MicroTAC cellular phone is no exception. This personal phone withstands our rigorous durability tests including temperature, humidity, shock, dust, vibration, and a drop test.
Product superiority is yours with the MicroTAC cellular phone.
Carrier’s Name
Carrier’s Phone Number
•You will need to have the following information when you inquire about your phone or service. This information is located on the back of your phone after you remove the battery.
ESN Number
MSN Number
Model Number
Cellular Phone Number
Unlock Code — The sequential code of 1, 2, 3 is the standard unlock code programmed into all phones by the factory. It is often changed to the last three digits of your cellular phone number by the Carrier. For easy access to this unlock code in the future, please list it here now: . (Please contact your place of purchase if your unlock code has been changed and you do not have this information.)
Warranty Expiration Date
Date of Purchase
Need a large print version of this manual?
Call Motorola at 1-800-331-6465 (USA) or 1-800-461-4575 (Canada).

Table of Contents
Table of Contents
Introduction
Cellular Operation Safety Information . . . . . . . . . . vi
Introduction . . . . . . . . . . . . . . . . . . . . . . . . . . . . . . ix
Controls and Indicators
Controls and Indicators . . . . . . . . . . . . . . . . . . . . . . x
Getting Started
Prepare the Battery for Initial Use . . . . . . . . . . . . . . 1
Attach the Battery . . . . . . . . . . . . . . . . . . . . . . . . . . 2 Remove the Battery. . . . . . . . . . . . . . . . . . . . . . . . . 2 Standard Method. . . . . . . . . . . . . . . . . . . . . . . . . 2 Quick-Change Battery Removal/Replacement . . . . 3 Using Plug-In Chargers . . . . . . . . . . . . . . . . . . . . . . 3
Basic Operation
About the Antenna . . . . . . . . . . . . . . . . . . . . . . . . . 4
Turning Phone On and Off . . . . . . . . . . . . . . . . . . . 4
Start-up Self Tests . . . . . . . . . . . . . . . . . . . . . . . . 4
Start-up Messages . . . . . . . . . . . . . . . . . . . . . . . . 4
Start-up Status Indicators . . . . . . . . . . . . . . . . . . . 5
Illuminated Keypad . . . . . . . . . . . . . . . . . . . . . . . 5
Placing a Call . . . . . . . . . . . . . . . . . . . . . . . . . . . . . 6
To Correct an Error . . . . . . . . . . . . . . . . . . . . . . . 6
If Entering More Than 10 Digits . . . . . . . . . . . . . . 6
Unsuccessful Call Attempts . . . . . . . . . . . . . . . . . 7
Automatic Redialing . . . . . . . . . . . . . . . . . . . . . . . . 7
Ending a Call. . . . . . . . . . . . . . . . . . . . . . . . . . . . . . 8
Receiving a Call . . . . . . . . . . . . . . . . . . . . . . . . . . . 8
Call In Absence Indicator . . . . . . . . . . . . . . . . . . . . 9
Signal Strength Meter . . . . . . . . . . . . . . . . . . . . . . . 9
i

Table of Contents
Volume Meter . . . . . . . . . . . . . . . . . . . . . . . . . . . . 10
Adjusting Earpiece Volume . . . . . . . . . . . . . . . . . . 10
Adjusting Ringer Volume . . . . . . . . . . . . . . . . . . . . 10
Low Battery Warning. . . . . . . . . . . . . . . . . . . . . . . 10
Battery Voltage Meter . . . . . . . . . . . . . . . . . . . . . . 11
Storing Numbers in Memory
About Memory . . . . . . . . . . . . . . . . . . . . . . . . . . . 12
Storing a Phone Number . . . . . . . . . . . . . . . . . . . . 12
Storing an Area Code and Prefix (Postscripting) . . . 13
Memory Protect Feature . . . . . . . . . . . . . . . . . . . . 13
Deleting a Memory Entry. . . . . . . . . . . . . . . . . . . . 14
Changing a Memory Entry . . . . . . . . . . . . . . . . . . . 14
Placing Calls From Memory
About Recalling from Memory. . . . . . . . . . . . . . . . 15 Placing Calls by Entering Two-Digit Number . . . . . 15 Placing Calls by Scrolling. . . . . . . . . . . . . . . . . . . . 16
Advanced Memory Dialing Features
Last Number Redial . . . . . . . . . . . . . . . . . . . . . . . . 17
Recalling Last Number Called . . . . . . . . . . . . . . . . 17
Recalling Area Code and Prefix (Postscripting) . . . . 17
One Touch Dialing Keys . . . . . . . . . . . . . . . . . . . . 17
Placing a Call . . . . . . . . . . . . . . . . . . . . . . . . . . 17
Storing a One Touch Dialing Number . . . . . . . . 18
Displaying One Touch Dialing Numbers . . . . . . 18
Deleting One Touch Dialing Numbers . . . . . . . . 18
Turbo Dial Feature . . . . . . . . . . . . . . . . . . . . . . . . 18
Priority Call . . . . . . . . . . . . . . . . . . . . . . . . . . . . . 19
Super Speed Dial Feature . . . . . . . . . . . . . . . . . . . 20
Scratch Pad Memory . . . . . . . . . . . . . . . . . . . . . . . 20
Two-Part Tone Dialing . . . . . . . . . . . . . . . . . . . . . . 21
ii

Table of Contents
Memory Linking . . . . . . . . . . . . . . . . . . . . . . . . . . 21
Example of Memory Linking . . . . . . . . . . . . . . . 22
Special Call Features
Display Own Phone Number . . . . . . . . . . . . . . . . . 24
Microphone Muting. . . . . . . . . . . . . . . . . . . . . . . . 24
To mute microphone . . . . . . . . . . . . . . . . . . . . . 24
To disable mute. . . . . . . . . . . . . . . . . . . . . . . . . 24
Automatic Answer. . . . . . . . . . . . . . . . . . . . . . . . . 24
One Minute Beep . . . . . . . . . . . . . . . . . . . . . . . . . 24
Multiple Key Answer . . . . . . . . . . . . . . . . . . . . . . . 25
Hands Free Operation . . . . . . . . . . . . . . . . . . . . . . 25
Distinctive Ringer . . . . . . . . . . . . . . . . . . . . . . . . . 25
Multiple Language Display. . . . . . . . . . . . . . . . . . . 26
Extended Talk Time . . . . . . . . . . . . . . . . . . . . . . . . 26
Special System Features
About Special System Features. . . . . . . . . . . . . . . . 27
Calling Line ID . . . . . . . . . . . . . . . . . . . . . . . . . . . 27 Receiving Calls with Calling Line ID . . . . . . . . . 27 Recalling/Viewing Calling Line ID Messages . . . . 28 Placing a Call to a Calling Line ID Number . . . . 28 Storing a Calling Line ID Number in Memory . . . 29 Deleting an Individual Message . . . . . . . . . . . . . 29 Deleting All Messages . . . . . . . . . . . . . . . . . . . . 29
Other Messaging Services . . . . . . . . . . . . . . . . . . . 29
VOX Operation . . . . . . . . . . . . . . . . . . . . . . . . . . . 30 Reminder Beeps . . . . . . . . . . . . . . . . . . . . . . . . . . 30 PIN Code Operation . . . . . . . . . . . . . . . . . . . . . . . 30 Overview . . . . . . . . . . . . . . . . . . . . . . . . . . . . . 30 Placing a Call using PIN Operation . . . . . . . . . . 30
iii

Table of Contents
Using the Feature Menu
About the Feature Menu . . . . . . . . . . . . . . . . . . . . 32
Selecting and Deselecting Features . . . . . . . . . . . . 32
Status Review . . . . . . . . . . . . . . . . . . . . . . . . . . . . 36
Call Timers
About Timers . . . . . . . . . . . . . . . . . . . . . . . . . . . . 37
Individual Call Timer. . . . . . . . . . . . . . . . . . . . . . . 37
To Display . . . . . . . . . . . . . . . . . . . . . . . . . . . . 37
Resettable Call Timer. . . . . . . . . . . . . . . . . . . . . . . 37
To Display . . . . . . . . . . . . . . . . . . . . . . . . . . . . 37
To Reset . . . . . . . . . . . . . . . . . . . . . . . . . . . . . . 37
Cumulative Call Timer. . . . . . . . . . . . . . . . . . . . . . 37
To Display . . . . . . . . . . . . . . . . . . . . . . . . . . . . 37
Automatic Display Timer . . . . . . . . . . . . . . . . . . . . 38
Security Features
About Security Codes . . . . . . . . . . . . . . . . . . . . . . 39
Electronic Lock . . . . . . . . . . . . . . . . . . . . . . . . . . . 39
To Lock . . . . . . . . . . . . . . . . . . . . . . . . . . . . . . 39
To Unlock . . . . . . . . . . . . . . . . . . . . . . . . . . . . 39
Displaying the Unlock Code . . . . . . . . . . . . . . . . . 40
Changing the Unlock Code . . . . . . . . . . . . . . . . . . 40
Automatic Lock. . . . . . . . . . . . . . . . . . . . . . . . . . . 40
Setting Outgoing Call Restrictions . . . . . . . . . . . . . 40
Cellular System Information
Cellular System Overview . . . . . . . . . . . . . . . . . . . 42
Service Area . . . . . . . . . . . . . . . . . . . . . . . . . . . . . 42
Weak Signal Alert . . . . . . . . . . . . . . . . . . . . . . . . . 42
Switchhook and Advanced System Services . . . . . . 43
Roaming . . . . . . . . . . . . . . . . . . . . . . . . . . . . . . . . 43
Two-System Operation . . . . . . . . . . . . . . . . . . . . . 44
iv

Table of Contents
Programming Scanning Modes
Overview . . . . . . . . . . . . . . . . . . . . . . . . . . . . . . . 45
Reviewing / Changing Scanning Mode . . . . . . . . . . 45
To Review Scanning Mode . . . . . . . . . . . . . . . . 45
To Change Scanning Modes. . . . . . . . . . . . . . . . 45
Scanning Modes . . . . . . . . . . . . . . . . . . . . . . . . . . 46
Troubleshooting
Before Calling For Service . . . . . . . . . . . . . . . . . . . 48
Reference
Regulations and Precautions . . . . . . . . . . . . . . . . . 50
Message Glossary . . . . . . . . . . . . . . . . . . . . . . . . . 52
Index . . . . . . . . . . . . . . . . . . . . . . . . . . . . . . . . . . 55
FDA Consumer Update . . . . . . . . . . . . . . . . . . . . . 59
Patent Information . . . . . . . . . . . . . . . . . . . . . . . . 64
v

Introduction
Safety Information (US Version)
IMPORTANT:
Read this information before using your wireless handheld phone.
Exposure to Radio Frequency Signals
Your wireless handheld portable telephone is a low power radio transmitter and receiver. When it is ON, it receives and also sends out radio frequency (RF) signals.
In August 1996, The Federal Communications Commission (FCC) adopted RF exposure guidelines with safety levels for handheld wireless phones. Those guidelines are consistent with safety standards previously set by both U.S. and international standards bodies:
•American National Standards Institute (ANSI) IEEE. C95. 1-1992
•National Council on Radiation Protection and Measurement (NCRP). Report 86
•International Commission on Non-Ionizing Radiation Protection (ICNIRP) 1996
•Ministry of Health (Canada), Safety Code 6
Those standards were based on comprehensive and periodic evaluations of the relevant scientific literature. For example, over 120 scientists, engineers, and physicians from universities, government health agencies, and industry reviewed the available body of research to develop the ANSI Standard (C95.1).
The design of your phone complies with the FCC guidelines (and those standards). For additional information concerning exposure to radio frequency signals, see the statement by the FDA at the end of this user guide. To maintain compliance with FCC RF exposure guidelines, if you wear a handset on your body, use the Motorola-supplied or approved carrying case, holster, or other body-worn accessory. If you do not use a body-worn accessory, ensure the antenna is at least one inch (2.5 centimeters) from your body when transmitting. Use of non-Motorola accessories may violate FCC RF exposure guidelines.
Antenna Care
Use only the supplied or an approved replacement antenna. Unauthorized antennas, modifications, or attachments could damage the phone and may violate FCC regulations.
Phone Operation
Normal Operation
Hold the phone as you would any other telephone, with the antenna pointed up and over your shoulder.
Tips on Efficient Operation
Observe the following guidelines to operate your phone most efficiently.
• Extend your antenna fully, if applicable.
vi

Introduction
•Do not touch the antenna unnecessarily when the phone is in use. Contact with the antenna affects call quality and may cause the phone to operate at a higher power level than otherwise needed.
Batteries
Caution: All batteries can cause property damage, injury, or burns if a conductive material, such as jewelry, keys or beaded chains, touches exposed terminals. The material may complete an electrical circuit and become quite hot. To protect against such unwanted current drain, exercise care in handling any charged battery, particularly when placing it inside your pocket, purse, or other container with metal objects. When the battery is detached from the phone, your batteries are packed with a protective battery cover; please use this cover for storing your batteries when not in use.
Driving
Check the laws and regulations on the use of wireless telephones in the areas where you drive. Always obey them. Observe the following guidelines when using your phone while driving.
•Give full attention to driving--driving safely is your first responsibility.
•Use hands-free phone operation, if available.
•Pull off the road and park before making or answering a call if driving conditions so require.
Electronic Devices
Most modern electronic equipment is shielded from RF signals. However, certain equipment may not be shielded against the RF signals from your wireless phone.
Pacemakers
The Health Industry Manufacturers Association recommends that a minimum separation of six inches (6") be maintained between a handheld wireless phone and a pacemaker to avoid potential interference with the pacemaker. These recommendations are consistent with the independent research by and recommendations of Wireless Technology Research. Persons with pacemakers:
•should ALWAYS keep the phone more than six inches from their pacemaker when the phone is turned ON
•should not carry the phone in a breast pocket
•should use the ear opposite the pacemaker to minimize the potential for interference
•should turn the phone OFF immediately if you have any reason to suspect that interference is taking place
Hearing Aids
Some digital wireless phones may interfere with some hearing aids. In the event of such interference, you may want to consult your hearing aid manufacturer to discuss alternatives.
vii

Introduction
Other Medical Devices
If you use any other personal medical device, consult the manufacturer of your device to determine if it is adequately shielded from external RF energy. Your physician may be able to assist you in obtaining this information. Turn your phone OFF in health care facilities when any regulations posted in these areas instruct you to do so. Hospitals or health care facilities may be using equipment that could be sensitive to external RF energy.
Vehicles
RF signals may affect improperly installed or inadequately shielded electronic systems in motor vehicles. Check with the manufacturer or its representative regarding your vehicle. You should also consult the manufacturer of any equipment that has been added to your vehicle.
Posted Facilities
Turn your phone OFF in any facility where posted notices so require.
Aircraft
Switch OFF your phone before boarding an aircraft.
Airline regulations prohibit using your phone while in the air. Check and comply with the policy of your airline regarding the use of your phone while the aircraft is on the ground.
Blasting Areas
To avoid interfering with blasting operations, turn your phone OFF when in a "blasting area" or in areas posted: "Turn off two-way radio." Obey all signs and instructions.
Potentially Explosive Atmospheres
Turn your phone OFF, do not remove your battery when you are in any area with a potentially explosive atmosphere, and obey all signs and instructions. Sparks from your battery in such areas could cause an explosion or fire resulting in bodily injury or even death.
Areas with a potentially explosive atmosphere are often but not always clearly marked. They include: fueling areas such as gasoline stations; below deck on boats; fuel or chemical transfer or storage facilities; areas where fuel odors are present (for example, if a gas/propane leak occurs in a car or home); areas where the air contains chemicals or particles, such as grain, dust, or metal powders; and any other area where you normally would be advised to turn off your vehicle engine.
For Vehicles Equipped with an Air Bag
An air bag inflates with great force. Do NOT place objects, including both installed or portable wireless equipment, in the area over the air bag or in the air bag deployment area. If in-vehicle wireless equipment is improperly installed and the air bag inflates, serious injury could result.
US021600
viii
Introduction
Introduction
The MicroTAC cellular phone represents the state-of-the- art in personal cellular telephones today.
This MicroTAC phone features the  Enhanced Feature Set, which includes a large display, Extended Talk Time and Standby Time, and improved charging performance.
In addition, your MicroTAC phone also offers the following exceptional features.
• Calling Line ID Capable |
• Multilingual Prompts |
• 9 Selectable Ringer Styles • Two-System Operation |
|
• One Touch Dial Keys |
• Turbo Dial Operation |
• Priority Call |
• Multiple Key Answer |
• Super Speed Dialing |
• Auto Answer |
• Call Timers |
• Memory Protect |
Remember, these are just a few of the great features that your MicroTAC cellular phone provides to meet your business and personal needs. In addition, a number of optional accessories are available to help you tailor your phone to your individual preferences. These include a full range of Batteries, Chargers, Vehicle Adapters, and Data Products.
To help you become familiar with your telephone’s features, we suggest that you experiment with them as you progress through this manual.
Please read General Safety Information before operating your phone.
ix
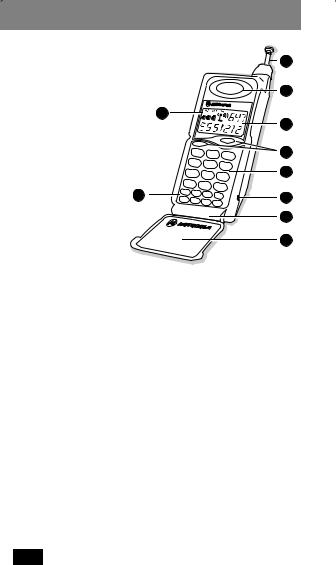
Controls and Indicators
Retractable
Antenna |
|
1 |
|
|
|
Extend for |
|
2 |
optimum |
|
|
|
|
|
performance. |
|
3 |
|
|
|
Earpiece |
|
4 |
Status |
|
5 |
Indicators |
|
6 |
Provide a |
|
|
|
|
|
visual |
7 |
8 |
indication of |
|
9 |
conditions |
|
|
|
|
|
associated |
|
10 |
with cellular |
|
|
|
|
|
telephone |
|
|
service. |
|
|
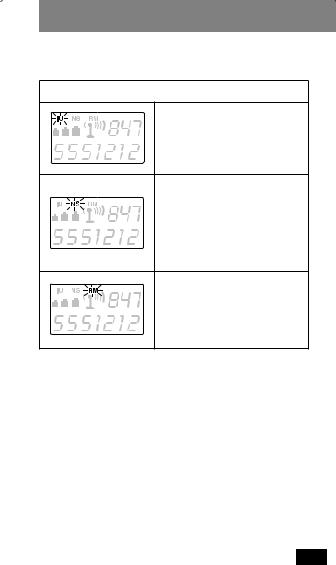
IU (In Use) — Flashes slowly when call is in progress.
RM(Roam) — Flashes if your phone is accessing another cellular system other than your home registered system.
NS (No Service) — Flashes slowly when the phone is out of service range of a cellular system. Calls cannot be placed or received when this light is on.
Signal Strength Indicator — Flashes the relative strength of the signal received by the phone (see page 9).
Battery Strength Indicator — Lights steadily to indicate the estimated remaining capacity of the battery (see page 11).
Number Display
(Be sure to remove the protective label affixed to the display.) Displays phone number, memory location number, or message. Some information will require viewing sequentially displayed messages.
x
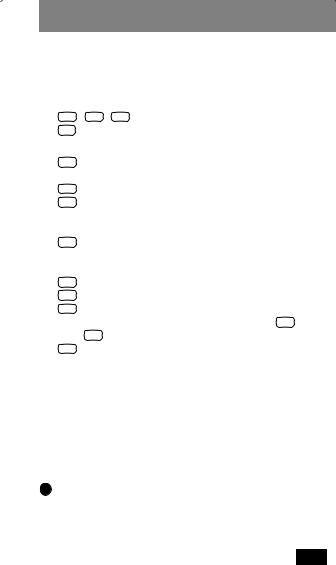
Controls and Indicators
Dedicated One Touch Memory Buttons
Press and hold either of the one-touch buttons to dial the number stored for that button.
Numeric Keypad
1 , 2 , 3 , etc., are used to enter call information.  scrolls forward.
  scrolls backward.
Function Keys
RCL Recalls and displays telephone numbers stored in memory.
STO Stores numbers into any of the memory locations. CLR Clears last digit when pressed and released. Press and hold to clear entire display in the event of an error (does not affect numbers stored in memory).
SND Initiates a call to the entered telephone number or answers a call. Sends a switchhook flash when a call is in progress.
PWR Turns phone on and off.
VOL Adjusts the earpiece and ringer volume. FCN Used in combination with other buttons for
specific user-programmed functions (e.g., FCN , 5 activates lock mode).
END Terminates a call in progress and exits special functions.
Headset Jack
Connect an optional accessory headset to this jack to provide simple hands-free conversations.
Mouthpiece
10 Keypad Cover
xi

Controls and Indicators
Notes…
xii
Getting Started
Prepare the Battery for Initial Use
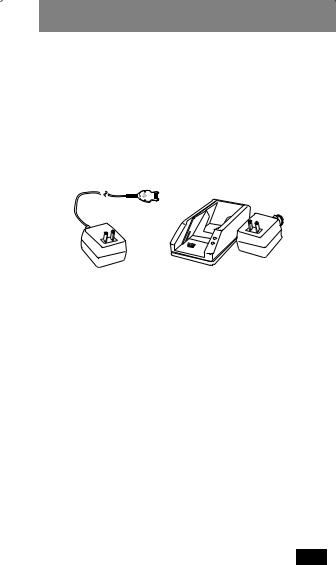
The Nickel Metal Hydride or Nickel-Cadmium battery supplied with your phone must be fully charged before placing your phone into service. The batteries are shipped from the factory in a discharged state in order to extend the life of the battery. It is recommended that you charge new batteries for at least 4 hours using the AC Charger/ Transformer, or overnight using the IntelliCharge Desktop Charger. Do not charge the battery longer than 24 hours. (Refer to page 3 if you are using a plug-in charger.)
|
|
|
IntelliCharge Desktop Charger |
AC Charger/Transformer |
|
||
Motorola desktop chargers for the MicroTAC line of products are dual pocket chargers. The charger’s front pocket can charge a battery while attached to the phone or by itself. The charger’s rear pocket can charge any compatible battery (not attached to a phone).
WARNING Battery may explode if exposed to fire.
WARNING To prevent injuries or burns, and to avoid damage to the battery, do not allow metal objects to contact or short circuit the battery terminals. Refer to “Batteries” on page vii for details.
CAUTION Charging your battery in anything other than a Motorola charger will void your warranty.
CAUTION To avoid damage to the battery, do not place it anywhere that might cause the battery terminals to short together.
1

Getting Started
Attach the Battery
1.Place the battery on the phone so that its grooves align. Align the top of the battery with the line on the back of the phone right below the arrows.
2.Slide upward in the direction of the arrows on the back of the phone until it clicks into place.
Remove the Battery
Standard Method
1.Turn your phone off.
2.Depress the latch button on the rear of the battery and slide the battery downward until it stops.
3.Lift the battery off.
2

Getting Started
Quick-Change Battery Removal/Replacement
The quick-change method allows you to remove your battery at any time and replace it with a charged spare battery during a telephone call. This is especially useful if you receive the low battery message (Lo bAt) or audible tone during a call.
Simply remove the battery from the phone and put on the spare battery. The phone will not go through the normal power-up cycle described on page 4. You will only have four seconds to complete this action before your telephone call is terminated. It is a good idea to practice this procedure a few times before using it on an actual telephone call. Advise the party on the other end of the call before beginning this procedure.
Using Plug-In Chargers
If you are using a charger that plugs into the bottom of the phone, you must remove the small plastic cover to gain access to the receptacle, as shown below.
1
Remove
Receptacle
Cover
2
Plug
Connector
into
Receptacle
3
Basic Operation
About the Antenna
There are two parts to the handset antenna, one internal and one retractable. This allows your phone to detect incoming calls without having the antenna extended. For optimum performance, fully extend the antenna when in a call or when placing a call.
Turning Phone On and Off
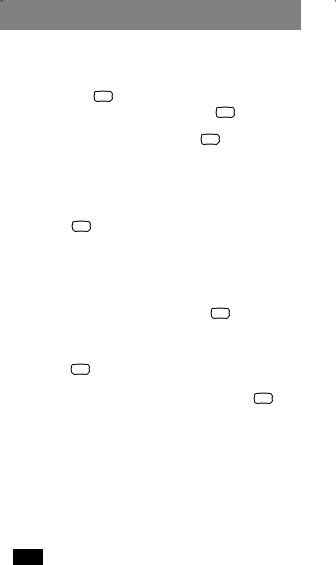
1.Press PWR to turn your phone on.
2.Press PWR again to turn your phone off.
Start-up Self Tests
Each time the phone is turned on, it performs a series of self tests, sounds a tone, and lights all display positions and status indicators to check their operation. The Signal Strength and Battery Meters then display and the keypad lights momentarily, as it will any time a key is pressed or the keypad cover is opened.
Start-up Messages
Message |
Explanation |
|
|
|
|
A1 |
• If your phone is programmed |
|
for two cellular systems, one of |
||
|
||
A2 |
these messages will appear in |
|
|
the display upon power up. |
|
b1 |
• These are reminders as to |
|
|
||
b2 |
which system and phone |
|
|
number are currently in use. |
|
|
|
|
|
• Indicates that the phone has |
|
Loc d |
been locked and cannot send or |
|
|
receive calls until unlocked. |
|
|
|
4
Basic Operation
Start-up Status Indicators
Indicator |
Explanation |
|
|
IU (In Use) Indicator
• Flashes slowly while a call is in progress
NS (No Service) Indicator
• Flashes slowly if phone is beyond range of a cellular service area
•Calls cannot be placed or received while NS is lit
RM (Roam) Indicator
If flashing, you are accessing a Cellular System other than your home system.
Illuminated Keypad
Your keypad lights whenever the phone is turned on, a call is received, or a key is pressed. To help conserve battery power and minimize distractions while driving at night, the display and keypad backlighting will turn off after 16 seconds if no key is pressed. You may reactivate the display by pressing any key or opening the keypad cover. The display and keypad backlighting remain lit during menu use.
5

Basic Operation
Placing a Call
1.With power on, enter the number you wish to call.
2.Press SND . diALing and the dialed number will alternate in the display until the called party answers.
3.Begin the conversation when the called party answers.
To Correct an Error
To correct an error, press and quickly release CLR to delete the last character. To clear the entire entry, press and hold CLR for about 1 second. Your entire entry will be deleted, and you may now re-enter the number you wish to call.
If Entering More Than 10 Digits
You can call a phone number with up to 16 digits, but only the last 10 digits will appear in the display.
To recall a stored phone number that is longer than 10 digits, press RCL and the memory location number. The display will flash the memory location number and the last 10 digits of the number. Press RCL again to view the entire number.
6
Basic Operation
Unsuccessful Call Attempts
If you hear one of the following signals, you have not successfully completed your call.
Tone / Message |
Description |
|
|
|
Cellular System Busy |
fast busy |
Press SND again before ending the |
(reorder signal) |
unsuccessful call attempt to |
Snd to rEdiAL |
automatically redial the call (refer |
|
to Automatic Redialing below), or |
|
press END and dial the call again. |
|
Cellular System Could Not |
|
|
Complete the Call |
|
alternating high/low |
You may have tried to place a call |
|
before the green IU indicator was |
||
tone |
flashing to let you know your |
|
(intercept) |
phone was fully operative. Either |
|
Snd to rEdiAL |
press SND again before ending the |
|
|
unsuccessful call attempt to |
|
|
automatically redial the call (refer |
|
|
to Automatic Redialing below), or |
|
|
press END and dial the call again. |
|
|
|
|
busy signal |
The Called Party’s Line is |
|
Busy |
||
|
Automatic Redialing
Your phone includes a convenient feature that eliminates the need for you to make repetitive call attempts when a cellular system is busy.
If you receive an alternating high/low signal (intercept) or the fast busy tone (reorder signal) when attempting to place a call and wish to retry the call, press SND before ending the unsuccessful call attempt. rEdiAL is then displayed.
7
Basic Operation
Your phone will make the call attempt continuously over the next four minutes. Once a connection is made, the phone will ring once to alert you so that you may lift the phone to your ear and begin the conversation. You do not have to press SND to answer the call.
If four minutes is insufficient time, press SND to begin another cycle. You may terminate Automatic Redial by turning off the phone, or by pressing END .
NOTE Automatic Redial applies only if the cellular system is busy, and will not engage when the called party’s line is busy.
Ending a Call
Press END or close the keypad cover.
The green IU will extinguish.
Receiving a Call
When you hear the ring tone indicating an incoming call, open the mouthpiece to answer the call. If the keypad cover is already open, press SND to answer the call.
NOTE Your phone is equipped with an Automatic Answer feature that allows you to answer calls without pressing SND . Refer to “Automatic Answer” on page 24 for details.
NOTE Opening the keypad cover and pressing SND may activate call transfer or other optional system features. Contact your Cellular System Provider for more information.
NOTE If you have subscribed to Calling Line ID, the calling party’s phone number (if available) will appear in the display. Refer to “Calling Line ID” on page 27 for details on the Calling Line ID feature.
8

Basic Operation
Call In Absence Indicator
If your phone is on and an incoming call is unanswered, CALL is displayed for 16 seconds. The display and keypad backlight will then extinguish to conserve the battery level. Pressing any key but CLR or END redisplays CALL to inform you of the call attempt. You must press CLR or END to cancel the message and clear the display.
NOTE Unless you have subscribed to Calling Line ID, the phone will not display or retrieve the phone number of the calling party.
Signal Strength Meter
The Signal Strength Meter (SSM) indicates the relative strength of the signal received by your phone. The SSM is displayed as shown below. The  alone represents the lowest strength, with each additional
  representing a stronger signal.
|
|
|
|
|
|
|
|
|
|
|
|
|
Weak Signal |
|
Strong Signal |
||
The SSM appears every time you turn your phone on. After the display blanks out (after about 16 seconds), the SSM will “strobe” to indicate that the phone is on. To redisplay the SSM press any key.
To best utilize the SSM, you should familiarize yourself with the relative signal strength levels and their associated call placement and call-in-progress qualities.
Any messages, such as Loc  d, appearing in the display as a result of activation of a feature will take priority over SSM. You will not see the SSM displayed in these cases.
9
Basic Operation
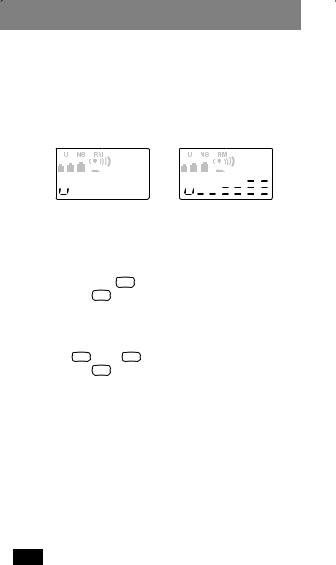
Volume Meter
The Volume Meter represents the current volume setting and is displayed whenever you adjust the earpiece or ringer volume. The volume level is displayed as a bar graph following the letter u at the left side of the display. The u alone represents the lowest volume setting, with each additional bar representing a higher volume setting.
|
|
|
|
|
|
|
|
|
|
|
|
|
Lowest Volume |
|
Highest Volume |
||
Adjusting Earpiece Volume
1.Open the keypad cover.
2.Press and hold VOL to raise the volume level. Release and press VOL again to lower the volume.
Adjusting Ringer Volume
1.Open the keypad cover.
2.Press FCN , then VOL to raise the volume level. Release and press VOL again to lower volume.
Low Battery Warning
Low battery power is indicated by a short dual-tone alert repeated periodically, and the displayed message Lo bAt. As the battery approaches discharge, the unit will automatically turn itself off.
10
Basic Operation
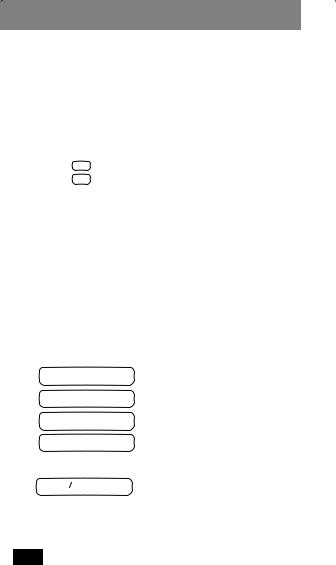
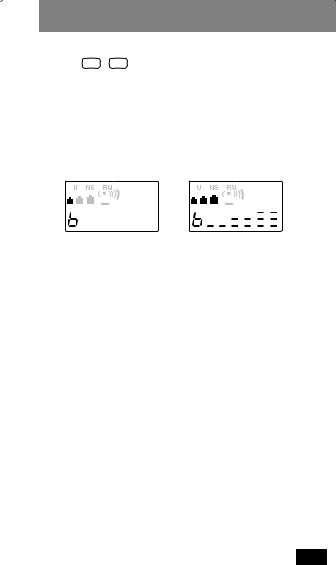
Battery Voltage Meter
Press FCN , 4 .
The Battery Voltage Meter (BVM) represents the current voltage level of the battery being used. You can use this to estimate the amount of battery capacity remaining. The BVM is displayed as a bar graph following the letter b at the left side of the display. Note that three battery symbols ( 

 ) are also provided to indicate the relative battery level whenever the display backlighting is on.
|
|
|
|
|
|
|
|
|
|
|
|
|
Low Battery |
|
Charged Battery |
||
NOTE Variables such as temperature, battery age, and charging conditions may affect battery voltage.
11
Loading...