


Moto Z3
Table of contents
 Loading...
User Guide
Check it out
Contents
Check it out
Get Started
First look
Insert the SIM and microSD cards
Charge up & power on
Sign in
Connect to Wi-Fi
Explore by touch
Improve battery life
Learn the basics
Home screen
Help & more
Search
Notifications
App notifications
Wireless Emergency Alerts (U.S. & some
countries)
Status icons
Volume
Do not disturb
Lock screen
Quick settings
Speak
Direct Share
Picture-in-Picture
Customize your phone
Redecorate your home screen
Choose apps & widgets
Customize sounds & appearance
Discover Moto
Apps
Phone
Messages
Chrome™
Camera
Photos
Gmail™
Duo
Moto
Calendar
More apps
Google Play™
Contacts
Maps
Drive
Music, movies, TV & Youtube
Clock
Connect, share & sync
Connect with Wi-Fi
Connect with Bluetooth wireless
Share files with your computer
Share your data connection
Connect with NFC
Print
Sync to the cloud
Use a memory card
Airplane mode
Mobile network
Protect your phone
Screen lock
Screen pinning
Backup & restore
Encrypt your phone
Your privacy
App safety
Data usage
Troubleshoot your phone
Restart or remove an app
Restart your phone
Check for software update
Reset
Stolen phone
Accessibility
Create a shortcut
Make your phone speak
Speak to your phone
Change your phone’s display
Change your phone’s sounds
Get more help
Where is my legal, safety, & regulatory
information?
Service & repairs
Copyright & trademarks
Check it out
When you’re up and running, explore what your phone can do.
Topic Location
Find these fast: Wi-Fi, airplane mode,
flashlight, and more.
Quick settings
Choose new wallpaper, set ringtones, and
add widgets.
Customize your phone
Experience crisp, clear photos, movies,
and videos.
Gmail™
Customize your phone to match the way
you use it.
Moto
Browse, shop, and download apps.
Apps
Keep your info safe. Set up your password
and more.
Protect your phone
Ask questions, get answers.
Speak
Share your Internet connection.
Wi-Fi hotspot
Tip: View all of these topics on your phone, swipe up
from the home screen and tap
Device Help. For FAQs, and other phone support, visit www.motorola.com/support.
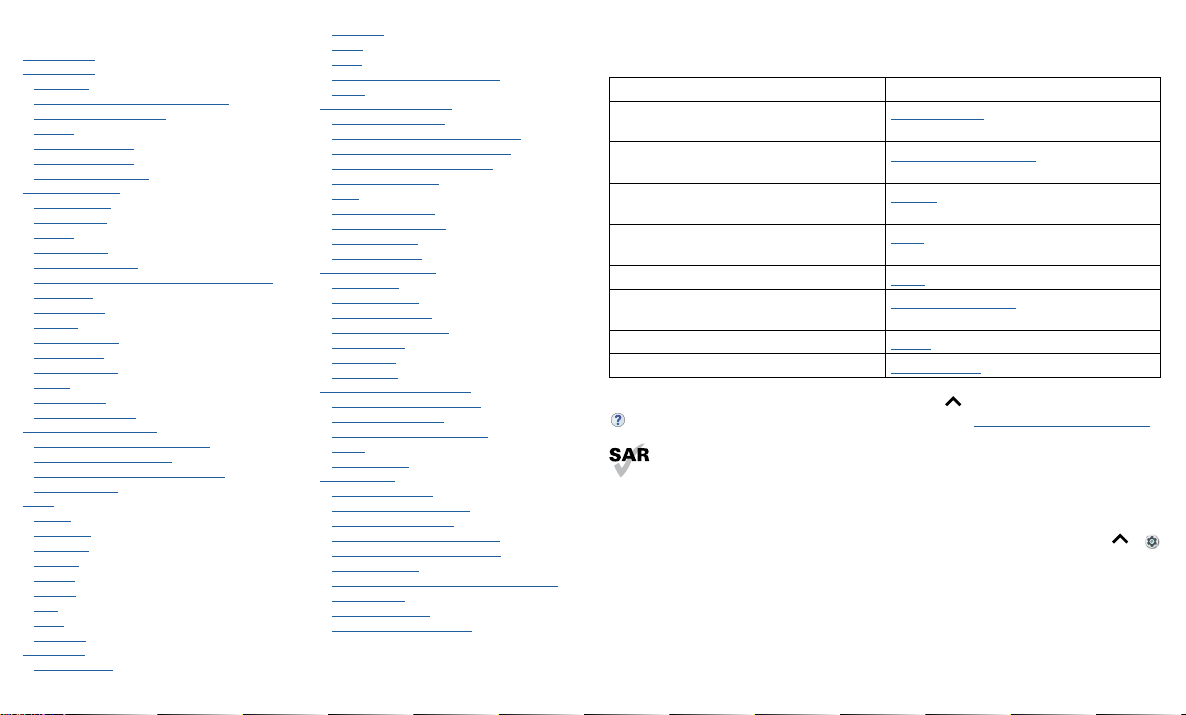
This product meets the applicable national or international RF exposure
guidance (SAR guideline) when used normally against your head or, when worn
or carried, at a distance of 5 mm from the body. The SAR guideline includes a
considerable safety margin designed to assure the safety of all persons, regardless of
age and health.
Caution: Before using your phone, please read the Legal information. Swipe up
>
Settings > System > Legal information.

Get Started
Get Started
First look
Let’s get started. We’ll guide you through startup and tell you a bit about your phone’s
features.
Phone hardware buttons: top right are Volume up and down keys, middle right is Power button. Bottom middle is charging port. Top right is headset jack. On screen, top left is front camera, top right is flash. Navigation
icons are along the bottom.
Note: Certain apps and features may not be available in all countries.
Power button
Your Power button helps in a few ways.
» Power on/o: Press and hold the Power button, then tap Power o. When your
phone is o, press and hold the Power button to turn it on.
» Sleep: To conserve battery power or prevent accidental touches, put the touchscreen
Volume Buttons
Front Camera
Speaker
Fingerprint
Sensor
Microphone
USB-C/Charger
Headset Jack (with adapter)
Power Button
Press:
Display on/o.
Press & hold:
Phone on/o.
Microphone
SIM & microSD
Card Slots
Back
Cameras
NFC
Touchpoint
(on back)
to sleep by pressing the Power button.
» Wake up: Press the Power button again.
» Reboot: To reboot your phone, press and hold the Power button , then tap Restart.
Tip: To add security to your phone, see Protect your phone.
Volume buttons
Your volume buttons can help:
» Ringer volume: Press the buttons when your phone is ringing to silence it.
» Earpiece volume: Press the buttons during a call.
» Music/video volume: Press the buttons during a song or video.
Tip: For more on volume control, see Volume.
Get Started
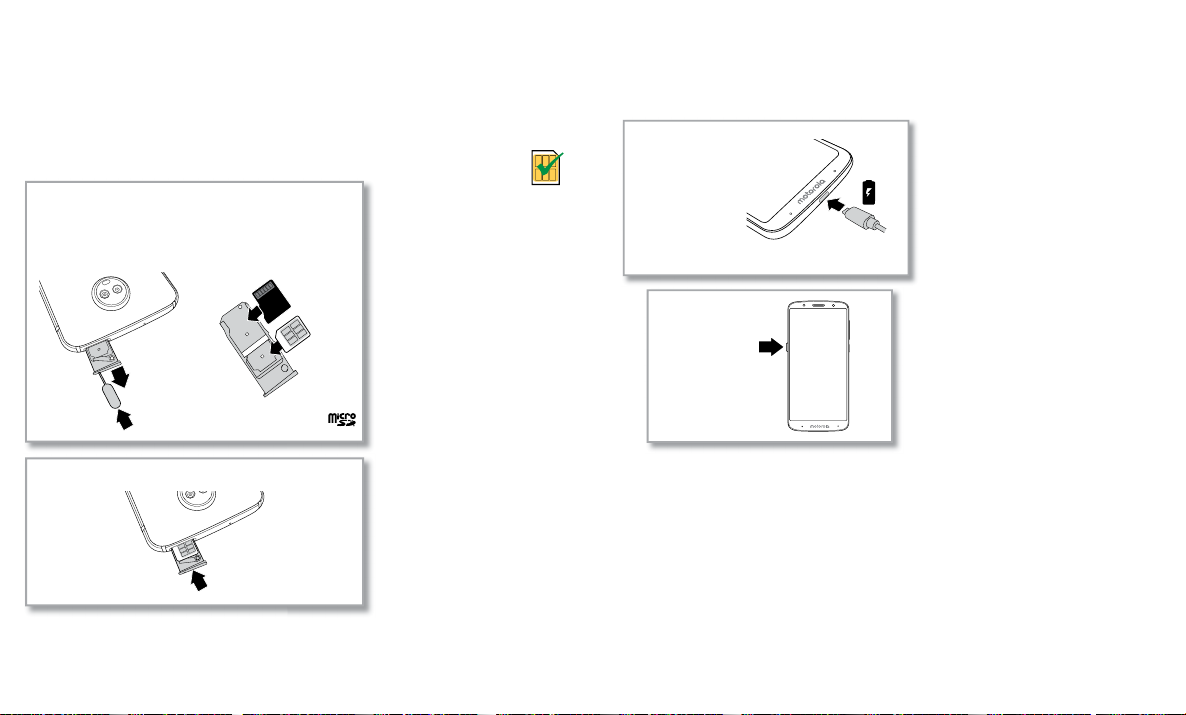
Insert the SIM and microSD cards
To activate phone service, you might need to insert a SIM card (or two), or this may
have been done for you. You can also add a microSD card, which is optional and sold
separately.
Put in the cards
Caution: Make sure you use the correct size SIM card and don’t cut the SIM card. .
SIM card insert graphic. After the battery is removed, the SIM card is inserted in the slot on the left with the clipped corner to the upper left. The SDcard is inserted in the right slot.
Nano SIM
Push the tray back into your phone.
Insert the nano SIM and memory cards.
Insert the SIM card with
the gold contacts up.
Insert an optional microSD
card (sold separately).
With the phone facing
down, insert the SIM
tool into the tray hole
to pop out the tray.
Charge up & power on
Charge your phone fully and turn the power on. Follow the screen prompts to get
started.
Battery in and power on graphic. Put the battery back in top down first and snap the cover on. After you charge the phone, press and hold the Power button until the screen lights up.
Power on.
Press & hold
Power until the
screen lights up.
Charge up.
Before using your
phone, fully
charge it with the
charger provided.
Get Started
Sign in
If you use Gmail™, you already have a Google™ account—if not, you can create an
account during setup. Signing into your Google account lets you access, sync, and
backup your stu. You can see your Google apps, contacts, calendar, photos, and more.
Tips
» To add, edit, or delete accounts, swipe up > Settings > Users & accounts.
» To set up email accounts, see Gmail™.
» For help with your Google account, visit www.google.com/accounts.
Connect to Wi-Fi
For faster Internet access and to conserve data use, swipe the status bar down twice,
then tap
to connect to Wi-Fi. For full instructions, see Connect with Wi-Fi.
Note: This phone supports apps and services that may use a lot of data, so make sure
your data plan meets your needs. Contact your service provider for details.
Explore by touch
Find your way around:
» Tap: Choose an icon or option.
» Touch and hold: See more options.
» Drag: Move items on the home screen.
» Swipe: Scroll through lists or between screens.
» Pinch or double-tap: Zoom in and out on websites, photos and maps.
» Twist: Twist a map with two fingers to rotate it, and pull two fingers down to tilt it.
» Back: Tap Back to go to the previous screen.
» Home: Tap Home to return to the home screen.
» Recents: Tap Recents to see your recent apps (or browser tabs), and tap an app
to reopen it. Double tap to quickly switch between your recent apps. To remove an
app from the recent list, swipe it left, right or tap
. To scroll the list, swipe up or
down.
Note: If One Button Nav is active, swipe the on-screen navigation bar right to switch
between apps. For more on this feature, see Control with one touch.
Tip: You don’t need to remove apps from Recents for your phone to run eciently.
» Split screen: From the recent apps list, touch and hold an app and then drag it to the
top of the screen to view two apps at once. Not all apps will work in split screen. To
close the split screen, drag the dividing line to the bottom of the screen. Or, touch
and hold
.
» Menus: When you see or , you can tap it to open options for the current screen.
» Close Keyboard: To close a keyboard, tap .
Improve battery life
Your phone processes tons of information. Depending on what you use, that can take a
lot of power.
When your phone is stationary, not charging, or not in use for a period of time,
unnecessary background processes are shut down to optimize battery life.
» To see what’s using up battery power, swipe up > Settings > Battery.
» To help improve battery life, swipe up > Settings > Battery > Battery saver,
and turn it on.
Tip: To quickly open Settings
, swipe down on the status bar and tap .
Battery Tips
To save even more battery life between charges, you could reduce:
» Widgets that stream information to your home screen, like news or weather.
» Unused accounts: Swipe up > Settings > Users & accounts.
» Recording or streaming videos or music.
Learn the basics
Learn the basics
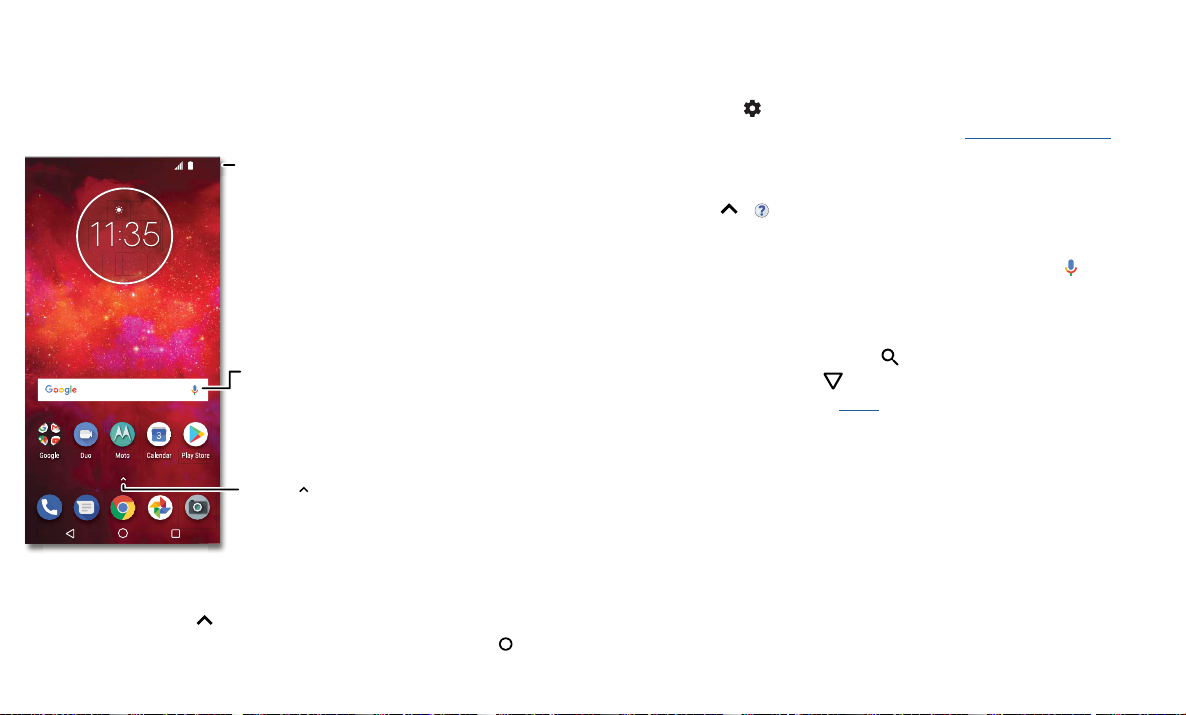
Home screen
The home screen is what you see when you turn on your phone. From here you can
explore apps and more.
Note: Software updates happen frequently, so your screen may look a little dierent.
Home screen. At the top, tap the Google bar to type search options or tap the right hand microphone icon to speak a search. Icons at the top show notifications and phone status icons. Swipe up from center bottom to
get to your apps. App icons along the bottom are commonly used apps: phone, message, Google Chrome, Gallery, and camera.
Tips
» Open app list: Swipe up to see all your apps.
» Return home: To return to the home screen from any location, tap Home .
73°7
3
3
APR
3
TUE
11:35
Swipe up to see
all your apps.
Search by typing or
say "OK, Google.”
Swipe down for
notifications and
settings.
» Pages: To add a page, drag an app to the right side of the screen until you see a new
page. You can add multiple pages. To see other pages of shortcuts and widgets (if
available), swipe the home screen left.
» Settings: To quickly open common settings, swipe the status bar down. To open
more settings, tap
.
» Customization: To personalize your home screen, see Customize your phone.
Help & more
Learn even more about your phone and get support.
Find it: Swipe up
> Device Help
Search
On the home screen, tap the Google Search box for a text search or tap to search by
voice.
When you type, suggestions appear below the search field:
» To search for a suggestion, tap it.
» To search for text in the search field, tap on the keyboard.
Tip: To close the keyboard, tap .
Note: For more on voice search, see Speak.
Notifications
At the top of the screen, icons on the left notify you about new messages or events. If
you don’t know what an icon means, swipe the status bar down for details.
Tip: Getting too many notifications? Touch and hold a notification to see which app is
sending them to you. Then you can turn them o.

Learn the basics
Notifications screen. Swipe down from the top of the home screen down to view notifications.
Tip: To quickly change common settings, swipe the status bar down. For more, see
Quick settings.
App notifications
You may see a notification dot on an app. This app notification, or badge,
tells you the app has an update or an announcement, such as a new email or
a missed call. Press and hold the app for more information, options, or app
shortcuts.
Wireless Emergency Alerts (U.S. & some countries)
Wireless Emergency Alerts, also known as CMAS or PLAN,
is a U.S. national emergency alert system. Emergency alerts
can pop up to tell you about a national or local crisis. After
you close an alert, you can reopen it by swiping up
>
Settings > Sound > Advanced >Emergency broadcasts.
Tip: Emergency alerts have a special sound and vibration that is two seconds long,
followed by one second, then another one second.
To choose which types of alerts you receive, swipe up
> Settings > Sound >
Advanced > Emergency broadcasts. The U.S. and local governments send these alerts
through your service provider. So you will always receive alerts for the area where you
are, and you won’t receive alerts if you’re outside of the U.S.
Tue, Apr 3
Weekly Staff Meeting
MARK AS READ REPLY
11:35
Messages now
Calendar 17m
CLEAR ALL
Can you come on Sat.?
10:30 - 11:30
Tip: Swipe left or right to
remove a notification.
Some notifications show
more options when you
slide them halfway.
Swipe down to see
your notifications.
Karen Travis
Tap a notification to open it,
or choose an option, such as
Reply.
A
LERTS
WIRELESS
CAPABLE
EMERGENCY
TM
For more, visit www.ctia.org and search “wireless emergency alerts.”
Status icons
Icons at the top right of the screen tell you about phone status:
Status Icons
Network strength Do not disturb
/ Wi-Fi in range/connected Alarm set
/ Bluetooth on/connected
Data Saver on
Airplane mode
/ Portrait/auto-rotate
/ Battery charging/full
/ Location on/o
Volume
Press the side volume buttons up or down to select a ringer volume from high to vibrate
.
Volume screen. Press the Volume keys up or down to control the volume for Ring Notification, Media, and Alarm sounds. On screen, change the volume using slide bars.
Do not disturb
To turn o some or all sounds, swipe the status bar down with two fingers and tap Do
not disturb. Then tap the switch to turn on and select one of these options:
» Total silence: Turn o all sounds and alarms. Override sound settings from other
apps. Set how long to stay in this mode, or choose indefinitely.
Media
Ring
Alarm
Tap to show all volume
controls. Tap again to
show only the ringtone
volume.
Tap an icon to mute
or set to vibrate.
Slide the bar to
increase/decrease
volume.

Learn the basics
» Alarms only: Set how long you want to only hear alarms, or choose indefinitely. Tap
MORE SETTINGS to customize which other interruptions to receive.
» Priority only: Set how long you want to only hear priority interruptions, or choose
indefinitely. Tap MORE SETTINGS to customize which interruptions to receive.
Tip: To create an exception for repeat callers that allows a call from the same person
within a 15 minute period, tap MORE SETTINGS > Priority only allows > Repeat callers.
Lock screen
Your touchscreen is on when you need it and o when you don’t.
Lock screen showing access to voice control on the bottom left and camera on the bottom right. Swipe this screen up to unlock it.
» Screen o and on: Press the Power button to turn the screen o and on.
» Screen lock: To unlock the screen, touch and drag up. To apply security to the lock
11:35
Tuesday, 3 April
Thanks for finding my phone!
Swipe up to unlock
your screen.
Add a lock screen message
for anyone who finds your
phone.
Swipe up to open the camera.
Swipe up for voice assist.
screen (recommended), see Screen lock.
» Notifications: Double tap a notification in the lock screen to open it.
Tip: To prevent notifications from appearing in the lock screen, swipe up
>
Settings > Apps & notifications > Notifications > On the lock screen > Don’t show
notifications at all.
» Owner info: To add a message to your lock screen, swipe up > Settings >
Security & Location, tap
> Lock screen message.
» Screen timeout: To change your timeout (screen locks automatically), swipe up >
Settings > Display > Advanced > Sleep.
Quick settings
For quick access to Wi-Fi, Bluetooth, Airplane mode, brightness, and other settings,
swipe the status bar or lock screen down. For even more settings, tap
.
Tap at the top of the screen to rearrange your settings and add or remove settings.
Quick Settings screen that shows options, such as Wi-Fi, Bluetooth, Airplane mode, Location and more. Customizable.
Speak
Google voice
Use Google voice commands to tell your phone what you want.
100% 11:35
Wi-Fi Bluetooth Do not disturb
Flashlight
Tue, Apr 3
Battery Saver
Auto-rotate
Turn Wi-Fi on/o.
See all phone settings.
Set screen brightness.
Tap an icon to turn it
on/o.
Learn the basics
» Use voice to make a call: Tap on the home screen or say “Ok Google” to control
your phone by voice.
Then say “Call” and then a contact name or number. Or, say “Send text,” “Go to” an
app, or “Help”.
Tip: If a contact has more than one number, you can say which number to call (for
example, “Call Joe Black Mobile”).
» Search by voice: Tap on the home screen or say “Ok Google” to search by voice.
Note: See also Google Assistant.
Moto Voice
Set up Moto Voice to get started. Then say “Hello Moto” to get your phone’s attention,
and speak your request. See Moto Voice.
Note: Moto Voice may not work in all languages.
Voice to text
On a keyboard, tap , then speak your message or search text. You can also speak
punctuation.
Google Assistant
Note: This feature may not be available in all languages.
Ask your phone questions, find answers and set tasks using the Google Assistant.
To turn on the Google Assistant, swipe up
> Settings > Google > Search >
Settings > Phone > Google Assistant.
Touch and hold Home
from any screen, then speak or type a command. If One
Button Nav is on, touch and hold the on-screen navigation bar. You can also say, “Ok
Google” to open the Google Assistant.
Screen search
Note: This feature may not be available in all languages.
Screen search provides information based on the app you’re in. Touch and hold Home
while in an app.
To turn Screen search on/o, swipe up > Settings > Google > Search > Settings
> Phone > Use Screen context.
For more on the Google Assistant, visit https://support.google.com/assistant.
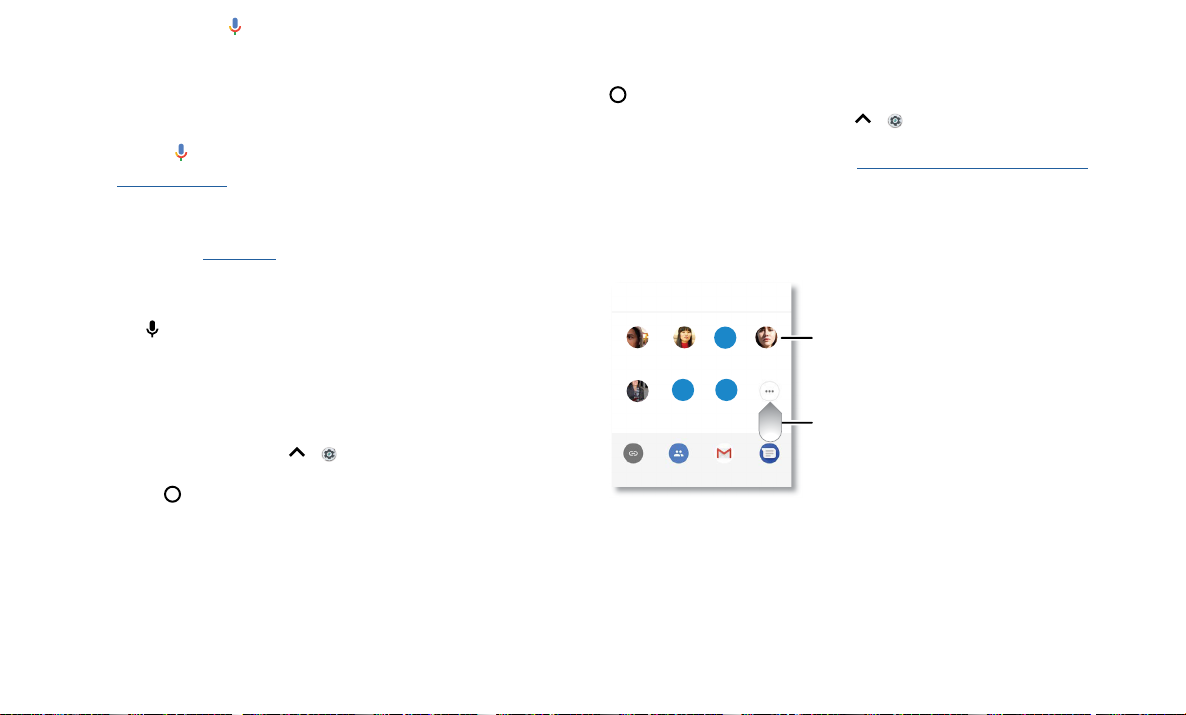
Direct Share
In some apps, you can share something directly to a contact, app, or conversation.
Select the share option within an app, then select a contact, choose an app, or type a
name or number to find a contact.
.
Google Direct Share screen. Tap a contact to share an item. Swipe up to get more options.
Abe
Allie
Create link Shared
album
Gmail Messages
Anna Medina Kevin Astrid Fanning
TO Type an name, phone number, or email
K
Michael
M
Nathan More
N
Swipe up for more
share options.
Tap a contact to
share information.

Customize your phone
Picture-in-Picture
If you’re watching a video, on a video call, or using navigation, and you change screens,
your video continues to play in a small window on your screen. Tap it to return to it. Tap
the
to close it.
Picture-in-Picture mode. Tap the video to open it on your screen.
29
January
29
Fri
10 AM
5 PM
4 PM
3 PM
2 PM
1 PM
12 PM
11 AM
Weekly Project Meeting
Start hangout with Alexis
https://plua.Google.com/hangouts
Pick up snacks for the party
11:35
Tap the video to return to it.
Customize your phone
Redecorate your home screen
Customize your home screen the way you want.
Home screen showing customize options. Touch and hold the home screen to add a widget. Tap an app to open it. Touch and hold it to move or remove it.
» Change your wallpaper: Touch and hold an empty spot on the home screen, then
tap WALLPAPERS.
» Add a home screen page: Drag an app to the right side of the home screen until a
new page appears. You can add multiple pages.
» Adjust display settings: Adjust brightness, font size, and screen saver. Swipe up >
Settings > Display.
» Rotate: In many apps, the touchscreen switches from portrait to landscape when
73°7
3
3APR
3
TUE
11:35
Tap a shortcut to open.
Touch and hold to move or
delete.
Touch and hold an empty
spot to change wallpaper.
Drag shortcuts on top of
each other to make a folder.

Customize your phone
you rotate your phone. To turn this on or o, swipe up > Settings > Display >
Advanced > Device Rotation.
Choose apps & widgets
» Add apps to the home screen: Swipe up , touch and hold an app, then drag it to
one of your home screen pages.
» Download new apps: Tap Play Store. For more on apps, see App safety.
» Group apps together: Drag one app onto another. Do it again to add more apps to
the folder. To name the folder, tap it and enter a name below the apps.
» See app options: Touch an hold an app. If the app has quick options (shortcuts),
you’ll see a list.
» Add widgets: Touch and hold an empty spot on the home screen, tap WIDGETS,
touch and hold a widget, then drag it to your home screen.
» Resize widgets: You can resize some widgets—touch and hold a widget until you feel
a vibration, then release. Drag the white circles at the edges to resize.
» Move or delete widgets and apps: Touch and hold a widget or app and drag it to
another spot, another page, or to
Remove.
Note: Removing an app from your home screen doesn’t uninstall the app from your
phone.
Customize sounds & appearance
Customize your phone’s sounds and display settings:
» Set ringtone and notifications: Swipe up > Settings > Sound.
Tip: Set notification sounds for individual apps within the app’s settings.
» Add vibrate for calls: To make your phone, swipe up > Settings > Sound and
tap Also vibrate for calls. To silence incoming calls, see Do not disturb.
» Set ringtone for a contact: Swipe up > Contacts, tap the contact, then tap
Menu
> Set ringtone.
» Change language: Swipe up > Settings > System > Languages & input >
Languages.
» Adjust font size: Swipe up > Settings > Display > Advanced > Font size.
Discover Moto
See Moto to set more custom features, like twisting your wrist twice to quickly open the
camera, using the One nav on-screen button to navigate, and placing the phone face
down to silence notifications and calls.
Loading...