


moto g stylus (2021)
Table of contents
 Loading...
User Guide
Contents
Hot topics
Get Started
First look
Insert the SIM and microSD cards
Power on
Sign in
Connect to Wi-Fi
Check your battery charge level
Navigate your phone
Improve battery life
Care for your phone
Learn the basics
Home screen
Help & more
Search
Notifications
Status icons
Volume
Do not disturb
Lock screen
Quick settings
Speak
Stylus shortcuts
Direct Share
Picture-in-Picture
Personalize your phone
Redecorate your home screen
Discover Moto
Digital wellbeing & parental controls
Apps
Phone
Messages
Chrome™
Camera
Photos
Gmail
Duo
Moto
Audio eects
Moto Note
Coloring book
Calendar
More apps
Connect, share, pay & sync
Connect with Wi-Fi
Connect with Bluetooth wireless
Share files with your computer
Share your data connection
Print
Sync to the cloud
Cast your screen to a TV
Use a memory card
Airplane mode
Mobile network
Protect your phone
Screen lock
Your privacy
Screen pinning
Backup & restore
App safety
Data usage
Troubleshoot your phone
Restart or remove an app
Restart your phone
Check for software update
Reset
Stolen phone
Accessibility
Create a shortcut
Make your phone speak
Speak to your phone
Change your phone’s display
Change your phone’s sounds
Hearing aids (U.S. only)
Get more help
Where is my legal, safety, & regulatory
information?
Service & repairs
Copyright & trademarks
Hot topics
» Stylus
» Stylus shortcuts
» Quick settings
» Personalize your phone
» Camera
» Moto
» Protect your phone
» Speak
» Connect to Wi-Fi
» System navigation
Tip: To view all of these topics on your phone, swipe up
screen and tap
Settings > Help. For FAQs and other phone support, visit
www.motorola.com/support.
To view the SAR and/or PD values for your phone, visit www.motorola.com/sar.
This product meets the applicable national or international RF exposure
guidance (SAR guideline) when used normally against your head or, when worn
or carried, at a distance of 5 mm from the body. To meet RF exposure guidelines during
body-worn operation, the device should be positioned at least this distance away from
the body. The SAR guideline includes a considerable safety margin designed to assure
the safety of all persons, regardless of age and health.
To view additional information, visit www.motorola.com/rfhealth.
Caution: Before using your phone, please read the legal information. Swipe up >
Settings > About phone > Legal information.
from the home
Hot topics
Get Started
Depth Camera
USB-C/Charger
SIM & micr
Jack
First look
Let’s get started. We’ll guide you through startup and tell you a bit about your phone’s
features.
Main
Camera
Ultra-wide
Camera
Macro
Camera
Front
Camera
oSD
Card Tray
Flash
Proximity
Sensor
Volume
Buttons
Power Button/
Fingerprint
Sensor
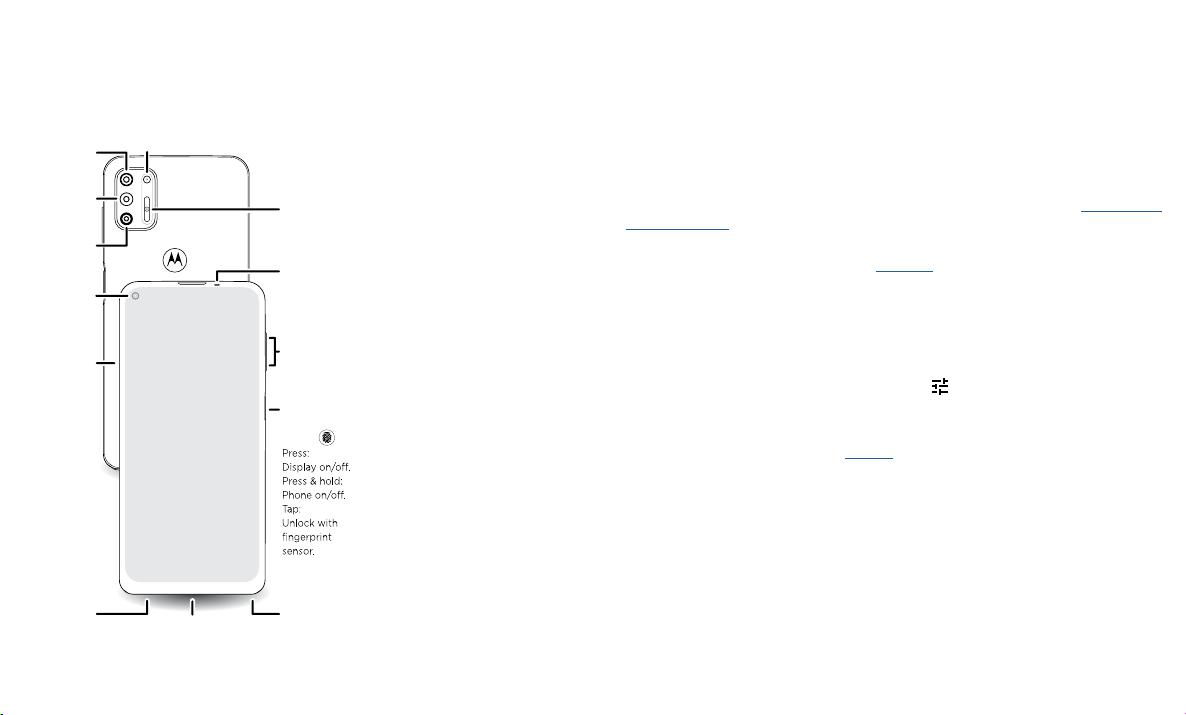
Power button & fingerprint sensor
The Power button/fingerprint sensor is located on the right side of your phone. Choose
from these options:
» Power on/o: Press and hold the Power button, then tap Power o. When your
phone is o, press and hold the Power button to turn it on.
» Sleep/Wake up: To conserve battery power and prevent accidental touches, put the
touchscreen to sleep by pressing the Power button. Press it again to wake it up.
» Restart: To restart your phone, press and hold the Power button, then tap Restart.
» Tap: Tap the Power button/fingerprint sensor to unlock your phone. See Unlock with
your fingerprint to set up the fingerprint sensor.
» Tap twice: Double-tap on the Power button/fingerprint sensor for quick shortcuts.
You’ll need Power touch turned on, see Gestures.
Volume buttons
To turn volume up or down:
» Music/video volume: Press the buttons when your phone is not ringing, or during a
song or video, to adjust media volume.
» Ringer volume: Press a volume button, then tap and slide the Ring volume bar.
Press a volume button when your phone is ringing to silence a call.
» Earpiece volume: Press the buttons during a call.
Tip: For more on volume control, see Volume.
Headset
Phone hardware buttons: top left are back cameras and flash. Middle right are Volume up and down keys. Lower middle right is Power button/fingerprint sensor. Bottom middle is charging port. Bottom left is headset jack.
Stylus
Note: Certain apps and features may not be available in all countries.
Get Started

Stylus
Your phone comes with a stylus you can use to navigate in apps, take notes, edit
screenshots, and more.
To remove the stylus, push the stylus inward to release it, then slide it out.
Note: To store the stylus, insert it into the slot with the notch facing left. Then, push it
until it locks in place.
Notch
Stylus graphic. Bottom right is the stylus.
Set up the stylus
See and change stylus default settings.
Find it: Swipe up
» Open Moto Note when your phone is locked: To launch Moto Note with your screen
locked, remove the stylus from the slot. To switch this feature o, swipe up
Settings > Stylus > When device is locked > Don’t open anything.
» Show stylus shortcuts when your phone is unlocked: The stylus shortcuts show by
default when the stylus is removed. To turn it o, swipe up
> When stylus is unlocked > Show nothing. To add, delete, or change the order of
the shortcuts, tap
> Settings > Stylus
>
> Settings > Stylus
next to Show shortcuts.
Tip: For more, see Stylus shortcuts.
» Open an app when your phone is unlocked: Choose an app to open each time you
remove the stylus with your phone unlocked. Swipe up
When device is unlocked > Open an app, then tap
> Settings > Stylus >
next to Open an app to select
an app.
» Set a removal reminder: Set a reminder when the stylus is out for a period of
time without use. Swipe up
> Settings > Stylus, then tap the switch next to
Removal reminder to turn it on. To change when your phone sends the notification,
tap Removal reminder.
» Record time and location of the last removal: To record when and where you last
removed the stylus, swipe up
> Settings > Stylus, then tap the switch next to
Record last removal to turn it on.
Tip: Tap the recorded coordinates to view the location in Maps.
» Vibrate when inserted: To feel a quick vibration when the stylus is in place, swipe up
> Settings > Stylus, then tap Vibrate when inserted to turn it on.
Get Started
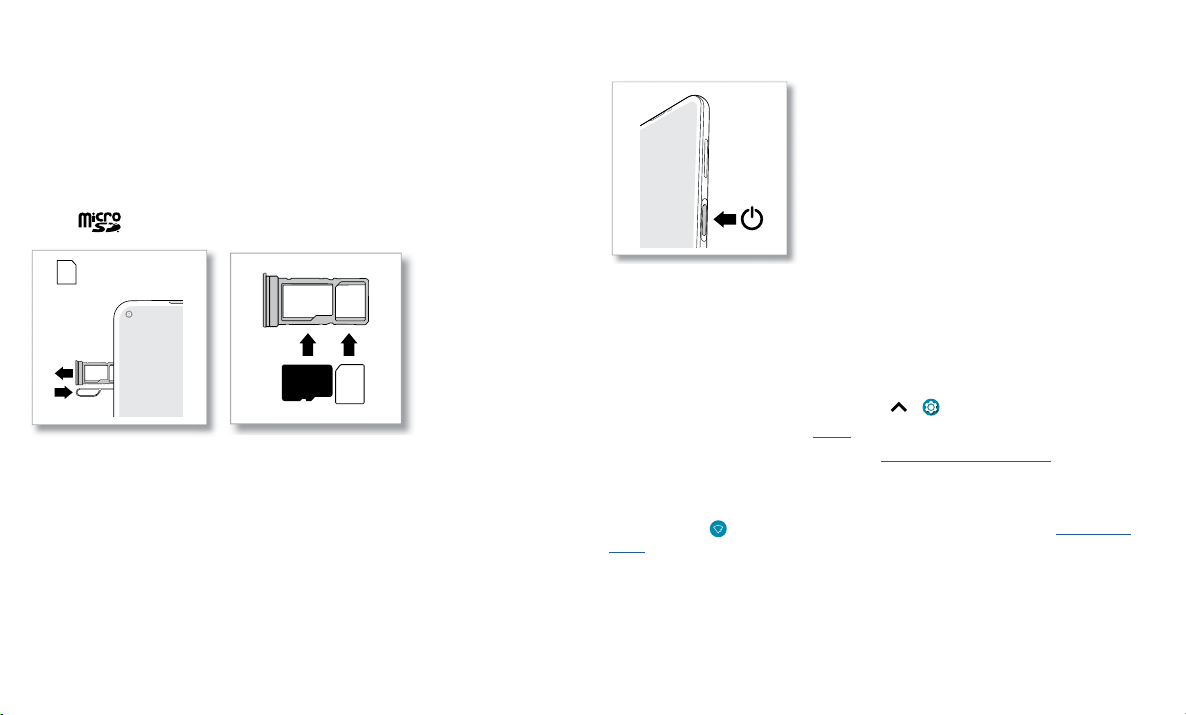
Insert the SIM and microSD cards
To activate phone service, you might need to insert a SIM card, or this may have been
done for you. You can also add a microSD card, which is optional and sold separately.
Put in the cards
Caution: Make sure you use the correct size SIM card and don’t cut the SIM card.
1 Insert the SIM tool into the hole next to the tray to pop out the tray.
2 Insert the SIM card with the gold contacts down, then gently push the tray into the
slot. Add a microSD card for additional storage.
Note:
Nano SIM
SIM card insert graphic. The SIM card is inserted in the slot on the left with the clipped corner to the upper left. The SD card is inserted in the right slot.
microSD card is optional, sold separately.
SIM
Power on
Press and hold the Power button, then follow the prompts to get started.
Power on graphic. Press and hold the Power button until the screen lights up.
Sign in
If you use Gmail™, you already have a Google™ account—if not, you can create an
account during setup. Signing into your Google account lets you access, sync, and
backup your stu. You can see your Google apps, contacts, calendar, photos, and more.
Tips
» To add, edit, or delete accounts, swipe up > Settings > Accounts.
» To set up email accounts, see Gmail.
» For help with your Google account, visit www.google.com/accounts.
Connect to Wi-Fi
For faster Internet access and to conserve mobile data use, swipe the status bar down.
Touch and hold
Wi-Fi.
Note: This phone supports apps and services that may use a lot of data, so make sure
your data plan meets your needs. Contact your service provider for details.
to choose a Wi-Fi network. For full instructions, see Connect to
Get Started
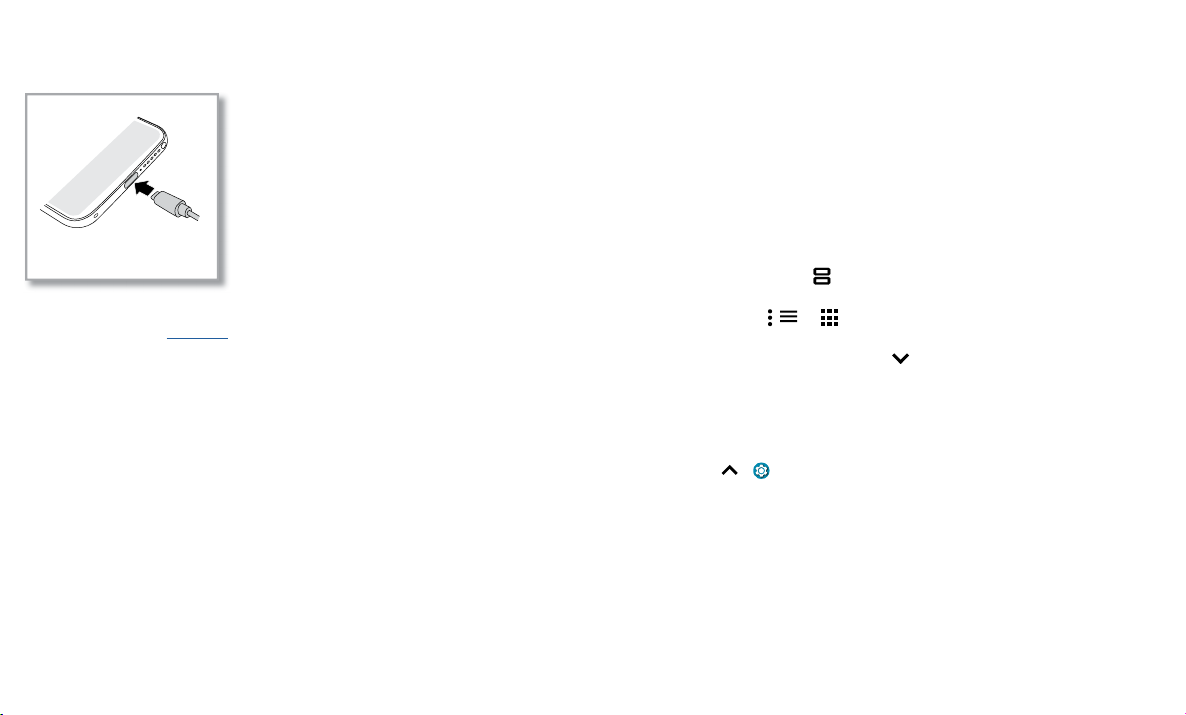
Check your battery charge level
Now is a good time to check if your phone needs to be charged. Swipe down on the
home screen to show battery charge level.
USB-C
Charge phone graphic. Plug in a charger to charge your phone fully.
To charge your phone, insert the charging cable that came with your phone into
the charging port (see First look for port location). Plug the other end into a power
receptacle.
Note: Use of other chargers is not recommended.
Navigate your phone
Explore by touch
Use the stylus or your fingers to find your way around:
» Tap: Choose an icon or option.
» Touch and hold: See more options.
» Drag: Move items on the home screen.
» Swipe: Scroll through lists or between screens.
» Pinch or double-tap: Zoom in and out on websites, photos, and maps.
» Twist: Twist a map with two fingers to rotate it, and pull two fingers down to tilt it.
» Split screen: Swipe up from the bottom of the screen and hold, then tap the icon at
the top of the screen and tap
close the split screen, drag the dividing line to the bottom of the screen.
» Menus: When you see , , or , you can tap it to open options for the current
screen.
» Close Keyboard: To close a keyboard, tap .
System navigation
Navigate using either gestures or buttons on the screen.
Navigation bar
Find it: Swipe up > Settings > System > Gestures > System navigation > Gesture
navigation
Split screen. Not all apps will work in split screen. To
Get Started
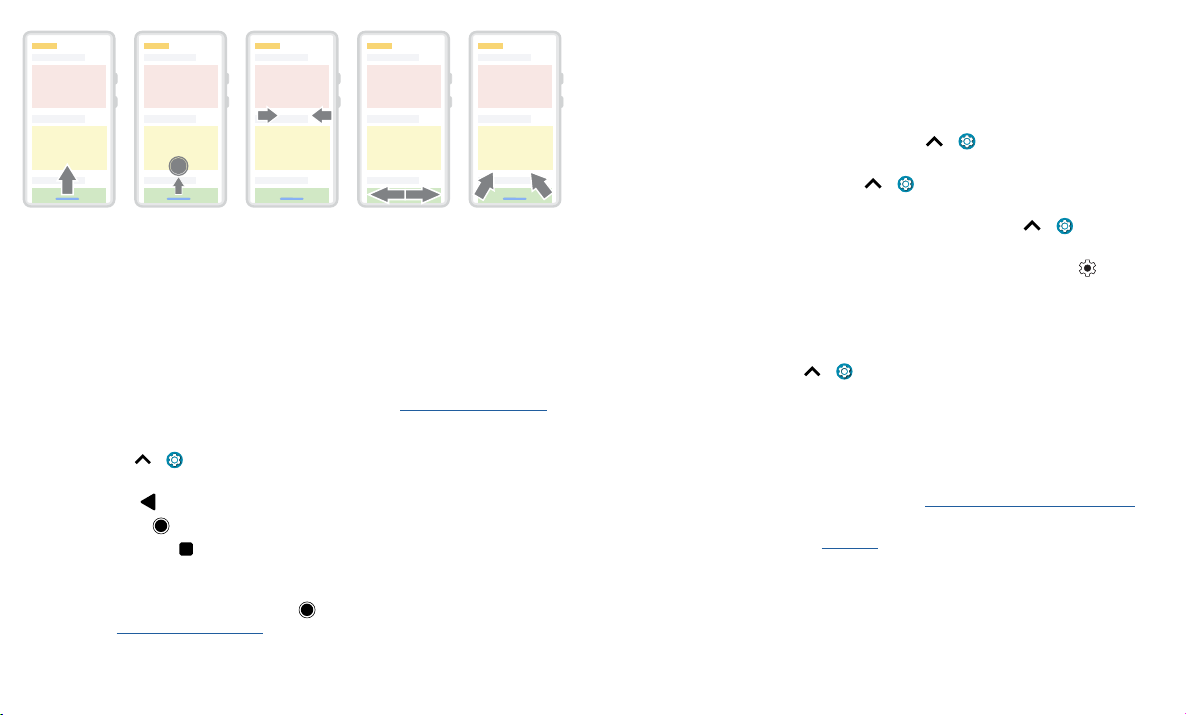
For Home screen,
swipe up.
Navigation bar. To go to the home screen, swipe up from the bottom of the screen. To see your recent apps, swipe up from the bottom and hold. To go back a screen, swipe toward the middle from the left or right edge..
For recent apps,
swipe up and hold.
To go back, swipe
toward the middle.
To switch apps,
swipe left or right at
the bottom.
For Google
Assistant, swipe
up diagonally.
» Go to the home screen: Swipe up from the bottom of the screen.
» See recent apps: Swipe up from the bottom of the screen and hold. Tap an app to
reopen it. Tap the app icon to see app info or split the screen.
» Go back a screen: Swipe toward the middle of the screen from the left or right edge.
» Switch between apps: Swipe left or right across the bottom of the screen.
» Launch the Google Assistant: Swipe up diagonally from the bottom corner of the
screen to launch the Google Assistant. Learn more about The Google Assistant™.
Navigation buttons
Find it: Swipe up > Settings > System > Gestures > System navigation >
3-button navigation
» Back: Tap Back to go to the previous screen.
» Home: Tap Home to return to the home screen.
» Recents: Tap Recents to see your recent apps (or browser tabs), and tap an app
to reopen it. Double tap to quickly switch between your recent apps. To remove an
app from the recent list, swipe it up. To scroll the list, swipe right or left.
» Google Assistant: Touch and hold Home to launch the Google Assistant. Learn
more about The Google Assistant™.
Improve battery life
Your phone processes tons of information. Depending on what apps are in use, your
phone may use a lot of power.
When your phone is not in use for a period of time, unnecessary background processes
are shut down to optimize battery life.
» To see what’s using up battery power, swipe up > Settings > Battery > USAGE
DETAILS.
» To help improve battery life, swipe up > Settings > Battery > Battery Saver,
and turn it on. When on, your phone’s display changes to Dark theme.
» To limit battery use for apps that you don’t use often, swipe up > Settings >
Battery > Adaptive Battery, and turn it on.
Tip: To quickly open Settings, swipe down twice on the status bar and tap
.
Battery Tips
To save even more battery life between charges, you could reduce:
» Widgets that stream information to your home screen, like news or weather.
» Unused accounts: Swipe up > Settings > Accounts.
» Recording or streaming videos or music.
Care for your phone
Tips
» When you’re near water, consider using a Bluetooth speaker to listen to music from
your phone while keeping it safe. For more, see Connect with Bluetooth wireless.
» Hold your phone firmly when using gestures to open the camera or to turn the
flashlight on/o. For more, see Gestures.
» Don’t leave your phone in a hot car on a sunny day. If you do accidentally do this, let
your phone cool o before powering up.
Get Started
In case of water
S
l
e
3
3
Swipe down for
Mobile devices marketed as water repellent are not waterproof. Avoid prolonged
exposure to water, and do not submerge in water. In the event your device is exposed
to water, dry your device and ports thoroughly with a soft, clean cloth. Water damage is
not covered by your warranty.
Tips to prevent damage to your phone:
» Dry your phone and ports thoroughly with a soft, clean cloth.
» Don’t try to charge your phone when it’s wet.
» Do not expose your phone to salt water or other liquids.
» Do not expose your phone to water at high pressure.
» Do not drop or puncture your device, as this could damage the water repellent
features.
Clean your phone
To disinfect your phone:
» Use wipes or cloths moistened with isopropyl alcohol with a concentration of 70%
(specific for electro-electronic products).
» It is recommended that you turn your phone o to clean it.
» Avoid moisture in the phone’s openings, including the charging port, headset jack,
microphones, and speakers.
» Do not immerse the phone in cleaning agents, and do not use cleaning materials that
contain bleach or abrasive agents.
» Do not use sprays directly on the screen.
Learn the basics
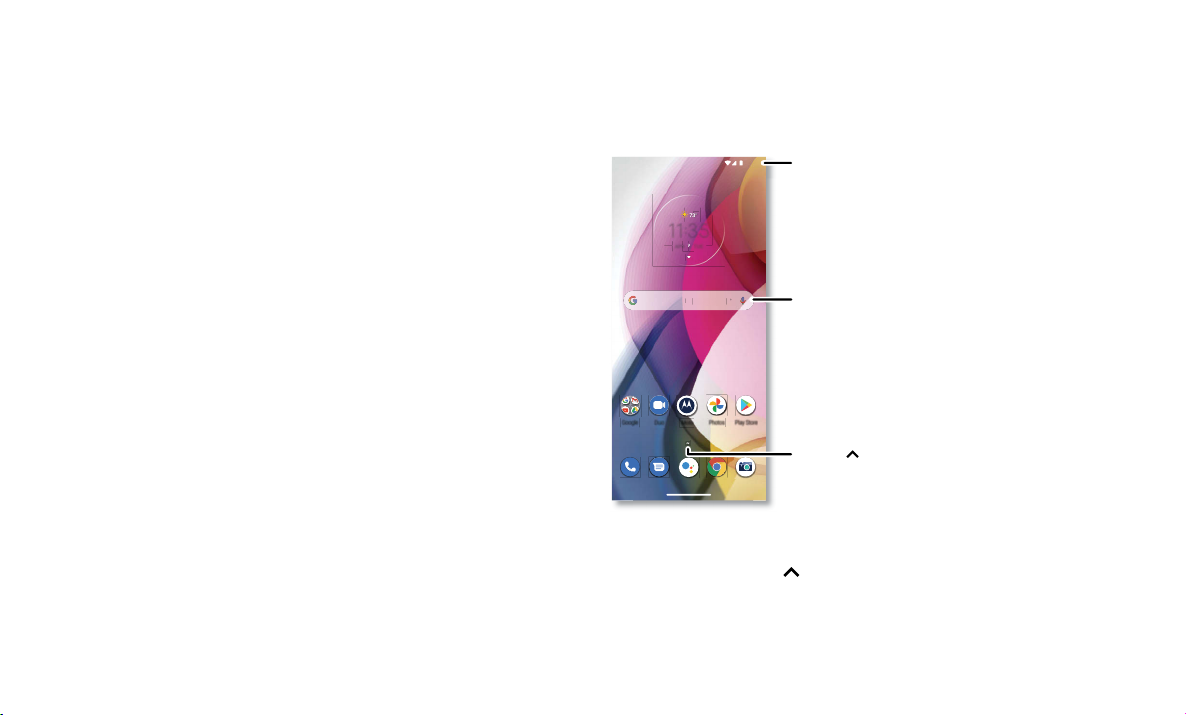
Home screen
The home screen is what you see when you turn on your phone. From here you can
explore apps and more.
Note: Software updates may change the look of your home screen.
Google
Home screen. At the top, tap the Google bar to type search options or tap the right hand microphone icon to speak a search. Icons at the top show notifications and phone status icons. Swipe up from center bottom to
get to your apps. App icons along the bottom are commonly used apps: phone, message, Google Assistant, Google Chrome, and camera.
Tips
» Open app list: Swipe up to see all your apps.
» Return home: To return to the home screen from any location, swipe up from the
» Pages: To add a page, drag an app to the right side of the screen until you see a new
Learn the basics
11:35
notifications and
settings.
11:35
33APR
TUE
ay “Hey Goog
Duo
Photos
PlayStore
Moto
Search by typing, or
tap the microphone
and say a command.
Swipe up to see
all your apps.
navigation bar.
page. You can add multiple pages. To see other pages of shortcuts and widgets (if

available), swipe the home screen left.
T
3
» Settings: To quickly open common settings, swipe the status bar down. To open
more settings, swipe the status bar down again and tap
.
» Customization: To personalize your home screen and other features, see Personalize
your phone.
Help & more
Learn even more about your phone and get support.
Find it: Swipe up
> Settings > Help
Tip: Some apps have their own help that’s specific to their features. Just tap the menu
inside the app for details.
Search
On the home screen, tap the Google Search box for a text search or tap to search by
voice.
When you type, suggestions appear below the search field:
» To search for a suggestion, tap it.
» To search for text in the search field, tap on the keyboard.
Tip: To close the keyboard, tap .
Note: For voice search, see Speak.
Notifications
At the top of the screen, icons on the left notify you about new messages or events. If
you don’t know what an icon means, swipe the status bar down for details.
Tip: Getting too many notifications? Touch and hold a notification to see which app is
sending them to you. Then you can turn them o.
ue, Apr
11:35 Wed, Dec 4
Android Setup
Finish setting up your phone.
FINISH SETUP
Drive · Anna Pics
1 file uploaded.
Vacation.png
Google · 27°
Manage Clear all
Notifications screen. Swipe down from the top of the home screen down to view notifications.
Tip: To quickly change common settings, swipe the status bar down. For more, see
Quick settings.
Smart reply
See suggestions based on notification content. For example, a text with an address may
show Google Maps as an option.
To turn o Smart reply, tap
Smart Reply.
App notifications
You may see a notification dot on an app. This app notification, or badge,
tells you the app has an update or an announcement, such as a new email or
a missed call. Touch and hold the app for more information, options, or app
shortcuts.
Swipe down to see
your notifications.
Tap a notification to open it, or
choose an option, such as Reply.
Tip: Swipe left or right to remove a
notification. Some notifications show
more options when you slide them
halfway.
Messages > Menu > Settings > Suggestions in chat >
Learn the basics
Wireless Emergency Alerts (U.S.)
A
LERTS
WIRELESS
CAPABLE
EMERGENCY
TM
e the ringer or set phone
Wireless Emergency Alerts, also known as CMAS or PLAN,
is a U.S. national emergency alert system. Emergency alerts
can pop up to tell you about a national or local crisis. After
you close an alert, you can reopen it by swiping up
Settings > Apps & notifications > Advanced > Wireless
emergency alerts.
Tip: Emergency alerts have a special sound and vibration that is two seconds long,
followed by one second, then another one second.
To choose which types of alerts you receive, swipe up
notifications > Advanced > Wireless emergency alerts. The U.S. and local governments
send these alerts through your service provider. So you will always receive alerts for the
area where you are, and you won’t receive alerts if you’re outside of the U.S.
For more, visit www.ctia.org and search “wireless emergency alerts.”
>
> Settings > Apps &
Status icons
Icons at the top right of the screen tell you about phone status:
Status Icons
Network strength Alarm set
/ Wi-Fi in range/connected
/ Bluetooth on/connected
Airplane mode / Battery charging/full
Do not disturb
Data Saver on
Battery Saver on
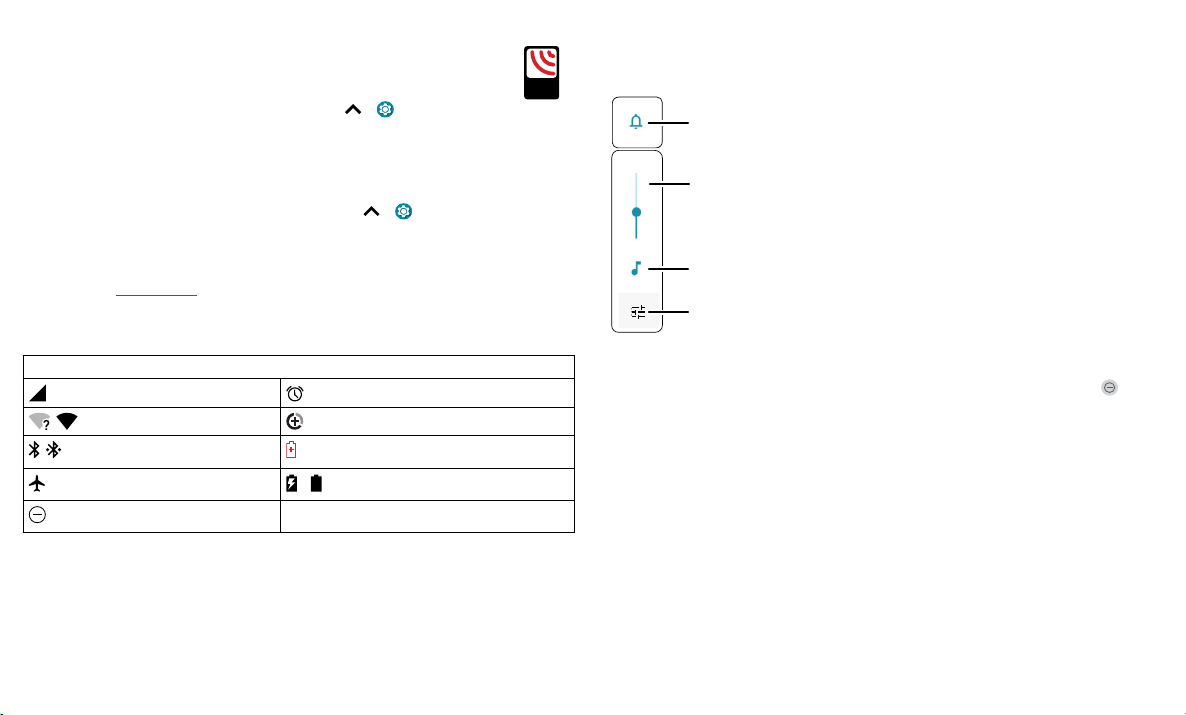
Volume
Press the side volume buttons up or down to select a ringer volume and see other
controls.
Mut
to vibrate.
Slide the bar to
increase/decrease volume.
Mute the media player.
Show all volume controls.
Volume screen. Press the Volume keys up or down to control the volume for Ring Notification, Media, and Alarm so
Do not disturb
To turn o some or all sounds, swipe the status bar down, and touch and hold Do
not disturb. Select an option:
» See all exceptions: Select whether to hear alarms, media, or touch sounds.
» Restrict notifications: Set if you’d like to see notifications when Do not disturb mode
is on.
» Default duration: Set duration Do not disturb mode is on.
» Schedules: Turn on Do not disturb at specific times during the day or night, or sync
with your calendar.
Tip: Create an exception for repeat callers that allows a call to sound from the same
person within a 15 minute period, tap Calls > Allow repeat callers.
Learn the basics
Lock screen
11:35
Tue, 3 April
Your touchscreen is on when you need it and o when you don’t.
11:35
Tue, 3 April
Thanks for finding my phone!
Add a lock screen message for
anyone who finds your phone.
» Screen timeout: To change your timeout (screen locks automatically), swipe up >
Settings > Display > Advanced > Screen timeout.
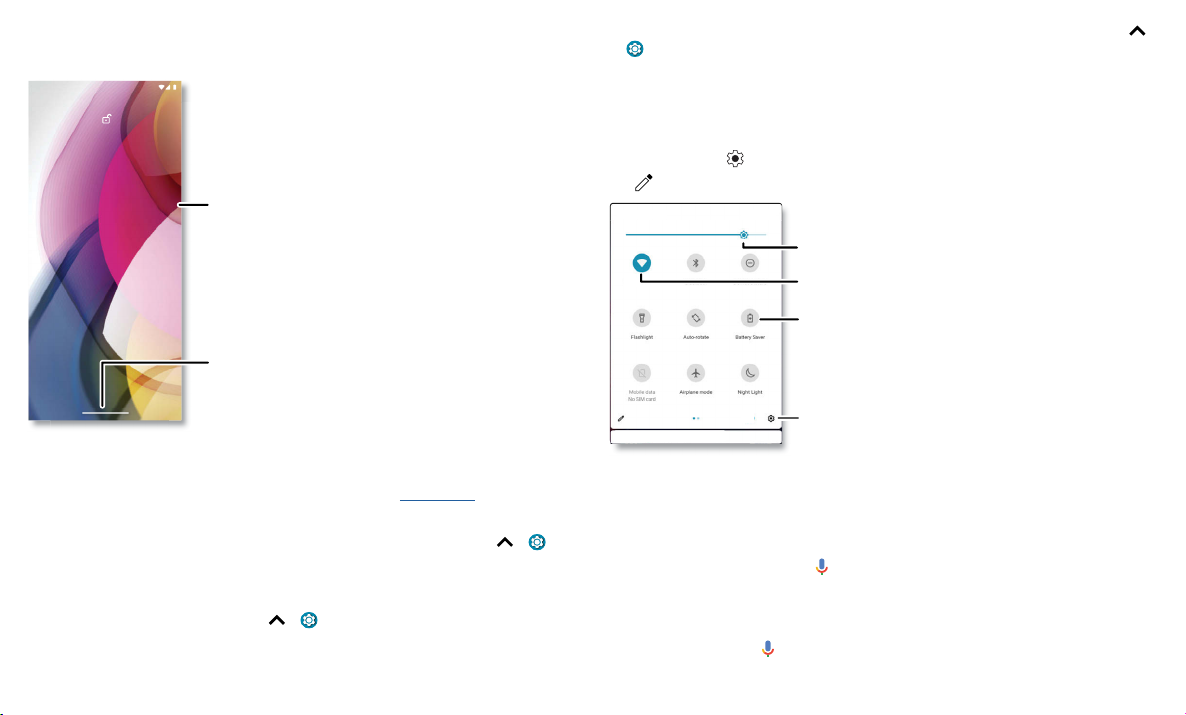
Quick settings
For quick access to Wi-Fi, Bluetooth, Airplane mode, brightness, and other settings,
swipe the status bar or lock screen down. Swipe down again for more settings. Tap an
icon to turn features on or o. Touch and hold an icon to see more options. For even
more settings, tap
Tap to rearrange your settings and add or remove settings.
.
Set screen brightness.
Swipe up to unlock
your screen.
Lock screen graphic. Swipe this screen up to unlock it.
» Screen o and on: Press the Power button to turn the screen o and on.
» Screen lock: To unlock the main lock screen, swipe up from the bottom of the screen.
To apply security to the lock screen (recommended), see Screen lock.
» Notifications: Double tap a notification to open it.
Tip: To prevent notifications from appearing in the lock screen, swipe up
>
Settings > Apps & notifications > Notifications > Notifications on lockscreen >
Don’t show notifications.
» Lock screen message: To add a message to your lock screen, such as your name in
case your phone gets lost, swipe up
> Settings > Display > Advanced > Lock
screen display > Lock screen message.
Quick Settings screen that shows options, such as Wi-Fi, Bluetooth, Airplane mode, Location and more. Customizable.
Speak
Google Voice™
Use Google voice commands to tell your phone what you want.
» Use voice to make a call: Tap on the home screen. Then say “Call” and then a
» Search by voice: Tap on the home screen to search by voice.
Learn the basics
Your network
BluetoothDo Not Disturb
Flashlight
Dolby
Auto-rotate
Smart audio
Battery Saver Airplane mode
Turn Wi-Fi on/off.
Tap an icon to turn it on/off.
Touch and hold to see more
options.
See all phone settings.
contact name or number. Or, say “Send text.”
Tip: If a contact has more than one number, you can say which number to call (for
example, “Call Joe Black Mobile”).
Note: To wake up your phone by saying “Hey Google,” see The Google Assistant™.
Voice to text
On a keyboard, tap , then speak your message or search text. You can also speak
punctuation.
The Google Assistant™
Note: This feature may not be available in all languages.
To open the Google Assistant:
» Tap from the home screen or from your list of apps.
» Swipe up from the bottom corner of the screen, then speak or type a command.
Note: You can also say “Hey Google” or “Ok Google” to start the Google Assistant. To
turn this feature on, swipe up
> Settings > Google > Account services > Search,
Assistant & Voice > Voice > Voice Match.
Tip: For more on the Google Assistant, visit https://support.google.com/assistant.
Stylus shortcuts
When you remove the stylus, the following stylus shortcuts appear. When the stylus
shortcuts minimize, tap
Write a note and save
it to
Ta ke a screenshot and
edit or share it.
Open Coloring book.
Open your camera in
Cinemagraph mode.
Customize stylus shortcuts.
Float bubble shortcuts. Tap the shortcuts to open screenshots editor, Moto Note, Coloring book, and Cinemagraph. Tap the settings icon on the bottom middle to customize stylus shortcuts.
» Take a note: Tap to start writing or drawing in Moto Note. Or, swipe up >
to expand again.
Moto Note.
» Edit a screenshot: Tap to take a screenshot. Then you can edit, share, or delete it.
» Use Coloring book: Tap to color in Coloring book.
» Open your camera in Cinemagraph mode: Tap to create a splash of motion in a
Tip: For more, see Stylus and Explore by touch.
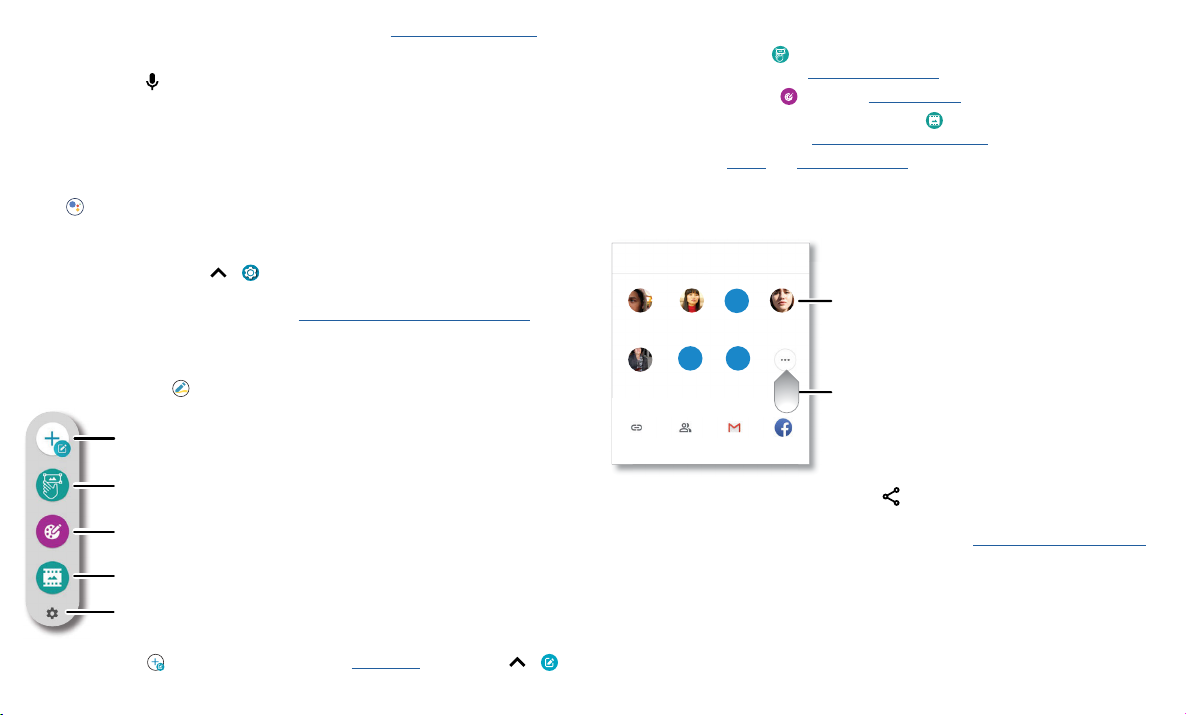
Direct Share
In some apps, you can share something directly to a contact, app, or conversation.
Create link Shared
Google Direct Share screen. Tap a contact to share an item. Swipe up to get more options.
Select the share option (usually by tapping ) within an app, then select a contact,
choose an app, or type a name or number to find a contact.
To use NFC, Bluetooth, or Nearby Share to share files, see Connect, share, pay & sync.
Learn the basics
Moto Note to create, edit, and share notes.
To capture a screenshot, see Capture your screen.
still photo. To learn more, see Take moving cinemagraphs.
TO Type a name, phone number, or email
Tap a contact to
share information.
Abe
Anna MedinaKevin Astrid Fanning
K
N
MichaelMNathan More
Allie
Gmail Messages
album
Swipe up for more
share options.

Picture-in-Picture
S
a
l
e
3
3
If you’re watching a video, on a video call, or using navigation, and you change screens,
your video continues to play in a small window on your screen.
» Tap twice to return to it.
» Tap the to close it.
» Swipe up from the bottom of the screen to put the video in a small window.
» Drag video around your screen.
Note: Not all apps support this feature.
January
29
Fri
10 AM
Weekly Project Meeting
11 AM
12 PM
Start hangout with Alexis
https://plua.Google.com/hangouts
1 PM
2 PM
Pick up snacks for the party
3 PM
4 PM
5 PM
Picture-in-Picture mode. Tap the video to open it on your screen.
29
Tap the video twice to return
to it.
Personalize your phone
Redecorate your home screen
Customize your home screen the way you want.
11:35
11:35
33APR
TUE
y “Hey Goog
Touch and hold an empty
spot to change wallpaper.
Tap a shortcut to open.
Touch and hold to move or delete.
Duo
Photos
Google
Home screen showing customize options. Touch and hold the home screen to add a widget. Tap an app to open it. Touch and hold it to move or remove it.
» Change your wallpaper: Touch and hold an empty spot on the home screen, then
tap Wallpapers.
» Add a home screen page: Drag an app to the right side of the home screen until a
new page appears. You can add multiple pages.
» Adjust display settings: Adjust brightness, font size, and screen saver. Swipe up >
Settings > Display.
» Switch to dark theme: Change your display to use dark theme, which saves battery
and can be easier on your eyes. Swipe up
Dark Theme.
PlayStore
Moto
Drag shortcuts on top of
each other to make a folder.
> Settings > Display > Advanced >
Personalize your phone
Loading...