


VT-3528 BK
RADIO CLOCK
MODEL VT-3528 BK
www.vitek-aus.com
3
8
14
20
INSTRUCTION MANUAL
26
3528IM.indd 13528IM.indd 1 24.11.2006 15:25:0024.11.2006 15:25:00
2
29 6 30
11
781019
19 20 18
14
2122
15
16
12
4
3
2
5
17
13
27
26
24
25
28
3528IM.indd 23528IM.indd 2 24.11.2006 15:25:0124.11.2006 15:25:01

ENGLISH
3
RADIOCLOCK
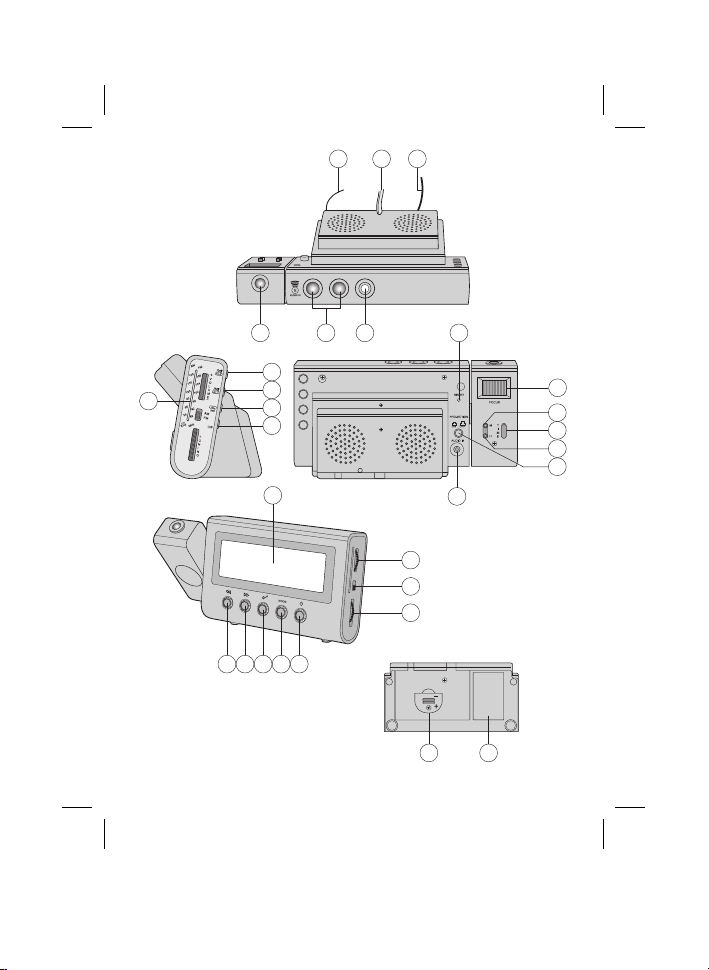
1. Mode set button “MODE”.
2. Alarm set button «АL».
3. Alarm 1 buzzer/radio select button «АL 1».
4. Alarm 2 buzzer/radio select button «АL 2».
5. Thermometer unit (“C/F”) select button
(C°/F°).
6. Infrared sensor.
7. Navigation button «
».
8. Navigation button « ».
9. Power (radio) on/off (alarm off) button
«ON/OFF».
10. Alarm repeat/timer on button «SNOOZE/
SLEEP».
11. Display.
12. Dial scale and pointer.
13. Audio in jack.
14. Volume control.
15. Wave band control.
16. Tuning control.
17. Reset button «RESET».
18. Temperature sensor (indoor)
19. AC power cord.
20. FM antenna wire.
21. Label.
22. Battery compar tment.
23. Speaker.
24. Minute button for projection unit «M».
25. Hour button for projection unit «H».
26. Time set button for projection unit.
27. Focus adjustment for projection unit.
28. Projection unit ON/OFF button.
29. Projection unit.
30. Auto display brightness switching button.
Power connection
Plug AC power cord to outlet AC source. The
unit is equipped with the battery back up
system too. It requires 3 x 3Volt CR 2025 flat
lithium batteries (not included). Insert the
battery in the battery compartment, making
certain that the positive and negative (+and-)
battery terminals are attached to correspond
terminals on the plate in the battery compart-
ment. If an AC power failure occurs, the clock
automatically switches to the battery power
supply. The clock and the timer memory con-
tinue running. When the AC power resumes,
the clock switches back to AC again.
Getting started
Connect the appliance to the outlet AC source.
Press the “RESET” button (17) located on the
back panel of the unit.
- The unit will display full segment, then it will
enter the normal mode.
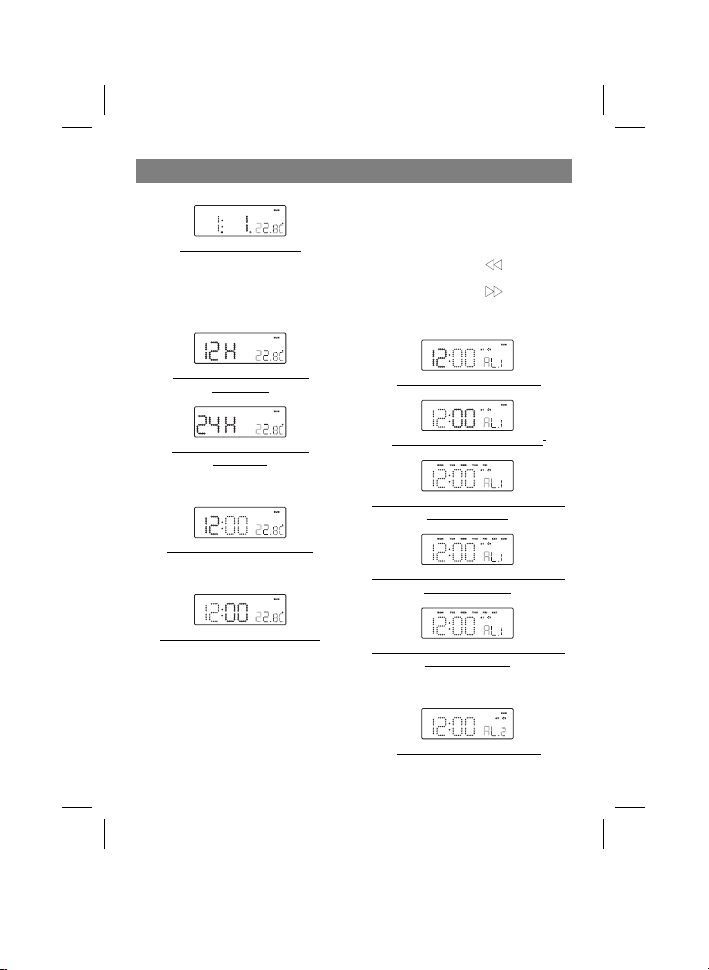
1. Time and calendar setting
А. Setting time and calendar:
- Press «MODE» button (1) and keep depress
over 2-3 seconds to enter setup mode,
press «MODE» button (1) to change the
mode cycle as follows:
Normal — Year — Month — Day — 12/24H.
— RTC Hour — RTC Min — Normal.
Actions (during data adjustment):
- Keep depressed button
over 2
seconds to adjust data backward.
- Keep depressed button
over 2
seconds to adjust data forward.
a. Year set mode.
Time range: 2006г. – 2099г.
Display show year set mode.
b. Month set mode.
Display show month set mode.
3
3528IM.indd 33528IM.indd 3 24.11.2006 15:25:0124.11.2006 15:25:01
ENGLISH
44
c. Day set mode.
Display show day set mode.
Remark: Weekday will be recalculated after
every year, month or day is adjusted.
d. 12/24H set mode.
Display show 12/24H set mode
(Select 12H.)
Display show 12/24H set mode.
(Select 24H)
e. RTC Hour set mode.
Display show RTC Hour set mode.
f. RTC Min set mode.
Display show RTC minutes set mode.
Remark: Seconds will be reset after every min-
ute adjustment.
B. Setting Alarm 1 and Alarm 2.
Press alarm set button «AL» (2) and keep
depressed for 2 seconds to enter alarm set
mode. Press alarm set button «AL» (2) to
change the set mode cycle as follows:
Normal — Alarm 1 (hour) — Alarm 1 (min)
— Alarm 1 (day) — Alarm 2 (hour) — Alarm 2
(min) — Alarm 1 (day) — Normal.
Actions (during data adjustment):
- Keep depressed button
over 2 seconds
to adjust data backward.
- Keep depressed button
over 2 seconds
to adjust data forward.
Alarm 1.
Display show hour setting mode.
Display show minute setting mode.
Display show DOW (day of the week) setting
mode (Mon to Fri).
Display show DOW (day of the week) setting
mode (Mon to Sun).
Display show DOW (day of the week) setting
mode (Mon to Sat).
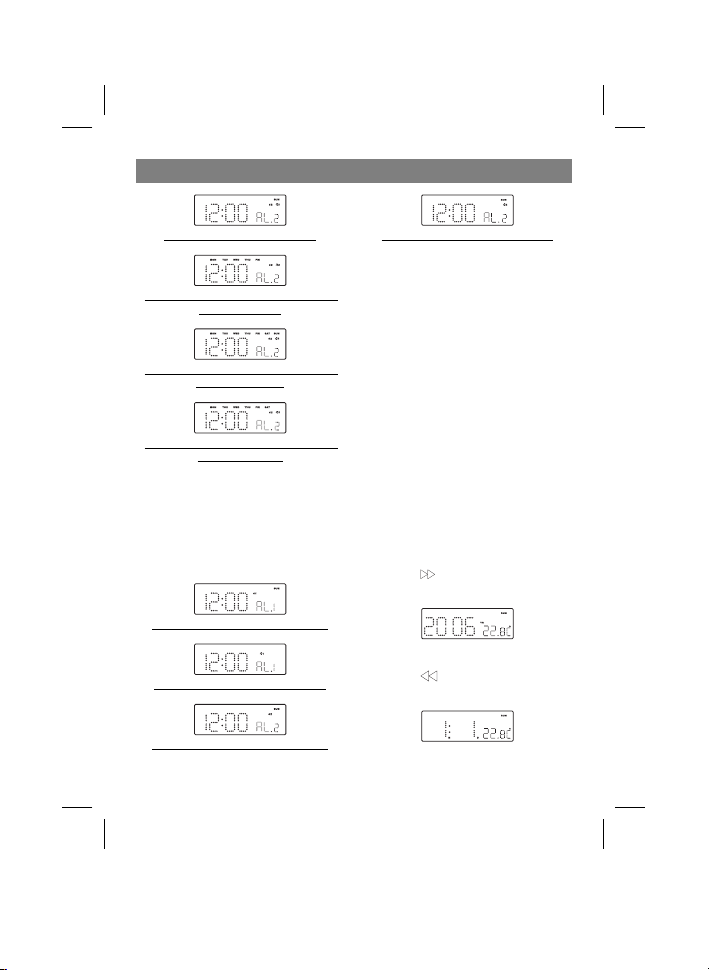
Alarm 2
Display show hour setting mode.
3528IM.indd 43528IM.indd 4 24.11.2006 15:25:0224.11.2006 15:25:02
ENGLISH
5
Display show minute setting mode.
Display show DOW (day of the week) setting
mode (Mon to Fri).
Display show DOW (day of the week) setting
mode (Mon to Sun).
Display show DOW (day of the week) setting
mode (Mon to Sat).
2. Setting alarm output and alarm ON/OFF.
А. Changing alarm output
Press «Al 1» (3)/«Al 2» (4) buttons in turn to
select wake up by Buzzer or Radio (adequate
label will be displayed).
Press button «Al 1» (3) or «Al 2» (4) trice to
switch off the alarms.
Display show Alarm 1 wake up by Buzzer
Display show Alarm 1 wake up by Radio
Display show Alarm 2 wake up by Buzzer
Display show Alarm 2 wake up by Radio
B. Buzzer pattern
1st 8 second output 1 beep, 2st 8 second out-
put 2 beep, 3rd 8 second output 4 beep, after
that continue output beep tone. The same pat-
tern repeat at the next minute again.
3. Alarm duration and snooze function
Alarm signals (buzzer or radio) will continue for
30 minutes if no key is pressed, then will stop
automatically and wait for the same alarm time
on the next day.
Snooze function:
- During alarming press « SNOOZE» button
(10) to enable snooze function. Buzzer
alarm or Radio alarm will be stopped.
- Snooze interval is 9 minutes.
- Snooze will continue unless the Power
ON/OFF (Alarm Off) button is pressed or
alarm signal is stopped automatically after
30 minutes.
4. Changing display content
Press button (8) to display current year,
after 5 sec display will return to the normal
mode.
5. Changing display content
Press button (7) to display current day
and month, after 5 sec display will return to the
normal mode.
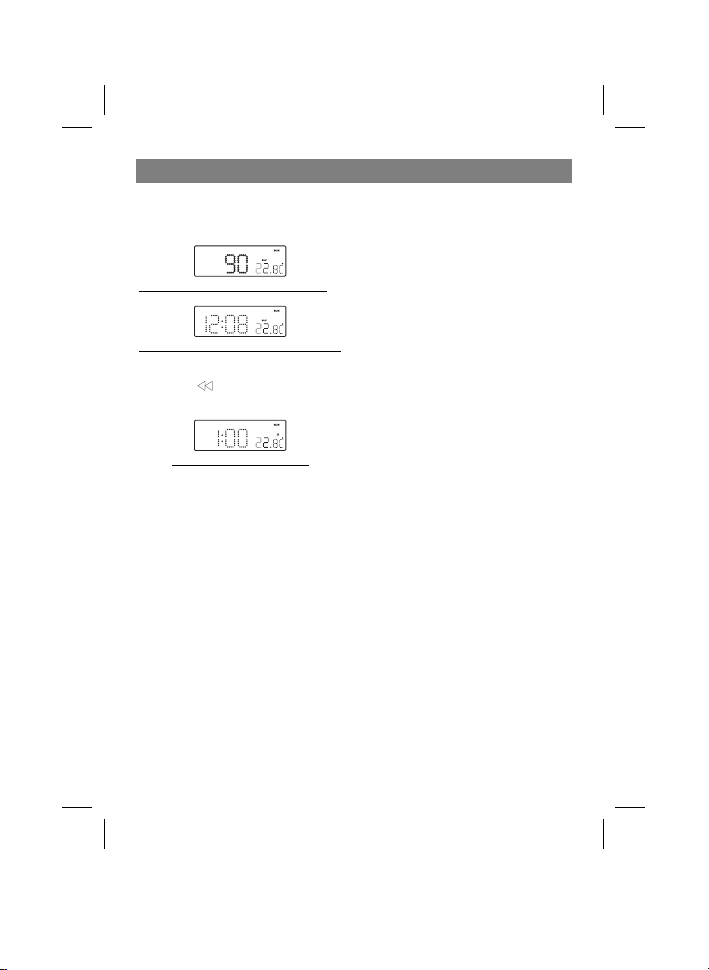
6. Sleep function
During radio mode press «SNOOZE/SLEEP»
3528IM.indd 53528IM.indd 5 24.11.2006 15:25:0324.11.2006 15:25:03
ENGLISH
6
button (10) to set Sleep time (time of switching
off). Press button «SNOOZE/SLEEP» (10) to
change sleep time duration from 90 min down
to 10 min.
Display show sleep time duration (blinking).
Display show under sleep mode (Radio is ON).
DST – Daylight Saving Time mode setting.
Press button « » (7) and hold for 3 sec to
toggle on and off DST function.
Display show turn DST icon On.
7. Thermometer function
Remark:
Temperature Range for Indoor: 0 to + 50°С or
32 до 122°F.
Radio operation
- Press the Power ON/OFF button (9) to enter
Radio mode.
- Select AM or FM band using the wave band
switch (15).
- Select the station using the tuning control
«TUNING» (16)
- Adjust the volume level using volume
control (14).
- Press the Power ON/OFF button (9) to turn
radio off.
Note:
- The AM band uses the internal directional
aerial. Rotate the radio for the best
reception.
- To get the best reception in FM band
change the location of antenna (20).
RESET
- The reset button «RESET» (17) is located
on the back of the unit. Use it to rollback the
settings, in case of malfunction or changing
the batteries (to press it use a ballpoint pen or
similar object). This will return all the settings
to the default values. All the stored data (time,
alarms) will be lost.
Caution:
- No naked flame sources, such as
lighted candles, should be placed on the
appliance.
- Do not place the unit in the closed
bookcase or racks without proper
ventilation.
- To prevent fire or shock hazard, do not
expose to rain or any type of moisture.
- The unit should not be exposed to direct
sunlight, very high or low temperature,
moisture, vibrations or placed in a dusty
environment.
- Do not use abrasive, benzene, thinner or
other solvents to clean the surfaces of the
unit. To clean, wipe it with mild non-abrasive
detergent solution and clean with soft cloth.
- Never attempt to insert wires, pins or other
such objects into the vents or openings of
the unit.
- Do not place the unit under the direct light
(of a table lamp, for example). The bright
light would affect the reception of the
infrared sensor function.
Warning: To reduce the risk of fire or electric
shock, do not expose this appliance to rain or
moisture.
Note: Do not connect FM antenna to outside
antenna.
Dripping warning: Prevent the appliance from
rain or other liquids drops.
Infrared sensor function
1. In radio Off mode, infrared display alarm 1
and alarm 2 time.
Keep the hand above the top of sensor (6)
for some time to show the alarm 1 time.
3528IM.indd 63528IM.indd 6 24.11.2006 15:25:0324.11.2006 15:25:03

ENGLISH
7
Keep the hand above the top of sensor second time (6) to show the alarm 2 time.
2. Radio mode is on, use the infrared sensor to turn sleep function on.
Keep the hand above the top of sensor (6) for 2-3 sec to turn the sleep on, the word «Slp» will be
shown on the display. Press button (9) to turn the function off.
3. In the alarm mode use the infrared sensor to turn the snooze function on.
Keep the hand above the top of sensor (6) for 1 sec to turn the snooze mode on for 9 min.
The LED digital clock and the projection clock must be set separately
Time setting and projection unit tuning.
- To preset the hours, press simultaneously the hour «Н» button (25) and time «TIME» button (26).
Keep them pressed until the hour digits to be preset are displayed.
- To preset the minutes, press simultaneously the minute «M» button (24) and time «TIME» button
(26). Keep them pressed until the minute digits to be preset are displayed.
- Focus setting: adjust the project unit brightness and focus by rotating brightness/focus
adjustment wheel (27).
Note: project time image on the ceiling or wall of a darkened room.
Maximum projection distance is 3-9 feet.
Specifications:
Frequency range: AM 530-1600 kHz
FM 88-108 MHz
Output power: 350 mW
Speaker impedance: 8 ohm
Battery backup: 9V (3x3 V CR 2025 flat lithium battery) (not included)
Power source: AC 230V – 50 Hz, 5 watts
Specifications subject to change without prior notice.
MINIMUM SERVICE LIFE - 3 YEARS
Guarantee
Details regarding guarantee conditions can be obtained from the dealer from whom the appliance
was purchased. The bill of sale or receipt must be produced when making any claim under the terms
of this guarantee.
This product conforms to the EMC-Requirements as laid down by the Council Directive
89/336/EEC and to the Law Voltage Regulation (73/23 EEC)
3528IM.indd 73528IM.indd 7 24.11.2006 15:25:0424.11.2006 15:25:04

8
Radiouhr
1. Taste Moduseinstellung «MODE».
2. Taste Weckereinstellung «АL»
3. Taste Wahl des Weckersignals 1(Summer
oder Radio) «AL 1».
4. Taste Wahl des Weckersignals (Summer
oder Radio) «AL 2».
5. Taste Wahl der Messeinheiten für
Thermometer (Cº/Fº).
6. Infraroter Sensor.
7. Taste Navigieren «
».
8. Taste Navigieren « ».
9. Taste «ON/OFF» an/ausschalten Radio
(Wecker abschalten).
10. Taste «SNOOZE/SLEEP»
Weckersignalwiederholung/Timer anschal-
ten
11. Bildschirm
12. Skala mit dem Zeiger
13. Audioeingang
14. LautstärkeRegler.
15. Umschalter des Wellenbereiches.
16. Einstellungssteuerung.
17. Taste Verwerfen «RESET».
18. Temperatursensor (im Raum).
19. Stromkabel (Wechselstrom).
20. FM Antenne.
21. Etikette.
22. Batteriefach.
23. Lautsprecher.
24. Taste Minuteneinstellungen des Projektors
«M».
25. Taste Stundeneinstellungen des Projektors
«H».
26. Taste Zeiteinstellungen des Projektors.
27. Fokussierung des Projektors.
28. Taste ON/OFF An/Ausschalten des
Projektors.
29. Projektor
30. Lichtsensor der automatischen
Umschaltung des Bildschirmlichts.
Stromversorgungsanschluss
Stromkabel wird an die Steckdose mit
Wechselstrom angeschlossen. Das Gerät ist mit
einem Batteriesystem für Stromversorgung ver-
sehen. Man braucht drei 3 V Lithiumbatterien
CR 2025 (nicht mitgeliefert). Setzen Sie die
Batterien ein, achten Sie auf Polarität, wie es
auf dem Deckel dargestellt ist. Bei Stromausfall
wird die Stromversorgung automatisch auf die
Speisung von den Batterien umgeschaltet.
Uhr und Timerspeicherungen bleiben erhalten.
Sobald die Spannung im Netz wiederhergestellt
wird, schaltet die Uhr automatisch auf die
Stromversorgungsquelle des Wechselstroms
um.
Inbetriebnahmevorbereitung
Schließen sie das Gerät ans Netz an. Drücken
sie die Taste «RESET» (17), die sich an der
hinteren Platte des Geräts befindet.
Am Bildschirm erscheint volle Liste der
Einstellungen, danach schaltet das Gerät zum
normalen Betriebsmodus.
1. Zeit und Kalendereinstellungen.
A. Zeit und Kalendereinstellungen:
drücken Sie die Taste «MODE» (1) und halten
Sie so 23 Sekunden, um die Einstellungen zu
betreten, drücken Sie die Taste «MODE», um
zum Einstellungszyklus zu wechseln:
Normal — Jahr — Monat — Tag — 12/24
Stunden — Stunden realer Zeit — Minuten
realer Zeit — Normal.
Handlungen (bei Dateneinstellungen):
Halten Sie die Taste «
» gedrückt 2
Sekunden, um Werte zu verkleinern.
Halten Sie die Taste «
» gedrückt 2
Sekunden, um Werte zu vergrößern.
DEUTSCH
3528IM.indd 83528IM.indd 8 24.11.2006 15:25:0424.11.2006 15:25:04

9
a. Jahreinstellung.
Zeitlicher Bereich: 2006 – 2099
Am Bildschirm erscheint Modus für
Jahreinstellung.
b. Monatseinstellung.
Am Bildschirm erscheint Modus für
Monateinstellung.
c. Tageseinstellung.
Am Bildschirm erscheint Modus für
Tageseinstellung.
Anmerkung: Wochentag ändert sich bei der
Jahres, Monat und Tageseinstellung.
d. Moduseinstellung 12/24 Stunden.
Am Bildschirm erscheint Modus für Einstellung
12 Stunden. (Wahl 12 h)
Abbildung des Modus 24 h.(Wahl 24 h)
e. Einstellung der Stunden realer Zeit.
Abbildung des Einstellungsmodus der Stunden
realer Zeit.
f. Einstellung der Minuten realer Zeit.
Abbildung der Einstellungen für Minuten realer
Zeit.
Anmerkung: Sekunden werden jedes Mal neu
eingestellt bei der Minuteneinstellung.
B. Einstellungen für den Wecker 1 und den
Wecker 2.
Drücken Sie die Taste «AL» (2) und halten Sie
so 2 Sekunden, um Weckereinstellungen zu
betreten. Drücken Sie die Taste «AL» (2) für
den Übergang nach dem Einstellungszyklus:
Normal — Wecker 1(Stunden) — Wecker
1(Minuten) — Wecker 1(Tage) — Wecker 2
(Stunden) — Wecker 2 (Minuten) — Wecker 2
(Tage) — Normal.
Handlungen (bei der Dateneinstellungen):
Halten Sie die Taste «
» 2 Sekunden
gedrückt , um die Angaben zu verkleinern.
Halten Sie die Taste «
» 2 Sekunden
gedrückt , um die Angaben zu vergrößern.
Wecker 1.
Abbildung der Stundeneinstellung.
Abbildung der Minuteneinstellung.
Abbildung Einstellungen für Wochentage
(Montag bis Freitag).
DEUTSCH
3528IM.indd 93528IM.indd 9 24.11.2006 15:25:0424.11.2006 15:25:04

DEUTSCH
10
Abbildung Einstellungen der Wochentage
(Montag bis Sonntag).
Abbildung Einstellungen der Wochentage
(Montag bis Samstag).
Wecker 2
Abbildung Stundeneinstellung.
Abbildung Minuteneinstellung.
Abbildung Einstellung der Wochentage (Montag
bis Freitag)
Abbildung Einstellung der Wochentage (Montag
bis Sonntag).
Abbildung Einstellung der Wochentage (Montag
bis Samstag).
2. Signaleinstellungen und An/
Ausschalten des Weckers.
A. Signaländerung
Drücken Sie abwechselnd die Tasten «Al 1»
(3) oder «Al 2» (4) und wählen Sie für den ent-
sprechenden Wecker ein einfaches Signal oder
Radio. (am Bildschirm erscheint das entspre-
chende Zeichen).
Drücken Sie die Taste «Al 1» (3) oder «Al 2» (4)
zum dritten Mal, schalten Sie die Wecker ab.
Das einfache Signal des Weckers 1 ist ange-
schaltet.
Das Radiosignal des Weckers 1 ist
angeschaltet.
Das einfache Signal des Weckers 2 ist ange-
schaltet.
Das Radiosignal des Weckers 2 ist
angeschaltet.
B. Einfaches Signal
Die ersten 8 Sek. 1 Ton, die anderen 8 Sek.
2 Töne, die dritten 8 Sek. 4 Töne, ein langer
Ton. Nach einer Minute wird der Zyklus wie-
derholt.
3. Die Signaldauer des Weckers und
Signalwiederholugsfunktion
Weckersignale (einfach oder Radio) werden 30
Minuten andauern, falls keine von den Tasten
gedrückt wird, danach hören Sie bis zur einge-
gebenen Zeit auf.
Signalwiederholungsfunktion:
Während des Signals drücken Sie
die Taste « SNOOZE» (10), um die
3528IM.indd 103528IM.indd 10 24.11.2006 15:25:0524.11.2006 15:25:05
 Loading...