


MULTI-FUNCTION ALARM-CLOCK/
WIRELESS WEATHER STATION
MODEL VT-3549 SR
INSTRUCTION MANUAL
2
14
28
42
55
www.vitek-aus.com
9.indd 1 |
02.06.2006 16:59:35 |
ENGLISH
INTRODUCTION
Congratulations on your purchase of the weather station.
The basic package comes with a main unit, which is the weather forecast station and, a remote unit, the thermo hygrometer sensor.
The main unit is capable of keeping track of the maximum and minimum temperature of different sites.
And no wire installation is required and operates at 433MHz.
Apart from temperature shows the indoor and outdoor relative humidity and rates the comfort level.
It also retains the maximum and minimum relative humidity readings. A remote ther- mo-hygro sensor is included with the unit. The weather station is able to receive and display readings from up to 3 remote sensors.
The built-in barometer enables to display the atmospheric pressure with user-se- lectable altitude adjustment. A bar graph will show the pressure trend of the last 24 hours.
What is more, is equipped with a moon phase scanner, which lets you check the moon phase of the forward & backward 39 days.
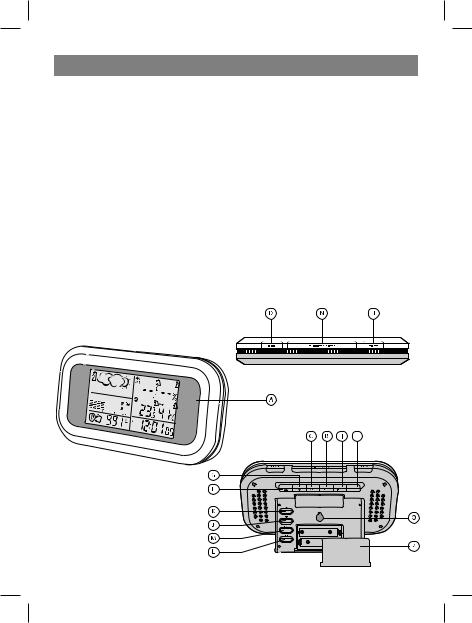
DESCRIPTION
2
9.indd 2 |
02.06.2006 16:59:35 |

ENGLISH
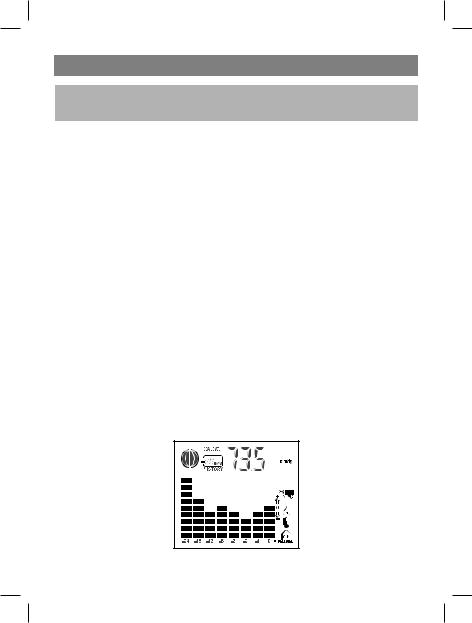
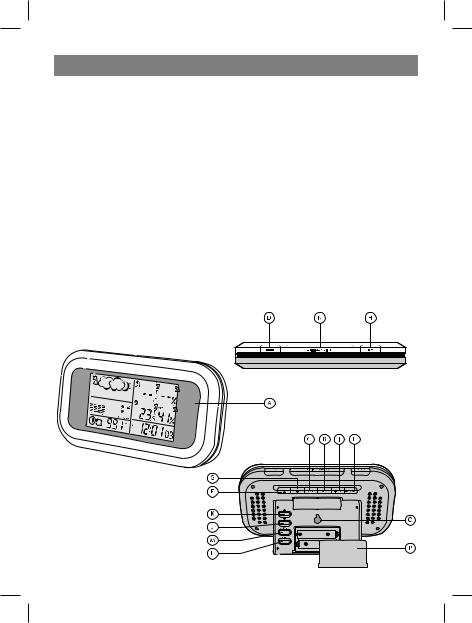
A DISPLAY
Facilitates easy reading of weather forecast, indoor & outdoor humidity, remote and indoors temperatures and calendar clock, weather forecast, Atmospheric pressure chart and moon phase.
B MEMORY [MEM] BUTTON
Recalls the maximum or minimum temperature and humidity of main and remote unit
C MODE BUTTON
Toggles the display modes and confirms entry while setting the values for display
D ALARM BUTTON
Displays the alarm time or sets the alarm status
E TEMPERATURE ALARM BUTTON
Displays the temperature alarm or sets the upper or lower limit.
F UP (+) BUTTON
Advances the value of a setting
G DOWN (-) BUTTON
Decreases the value of a setting
H CHANNEL BUTTON
Displays different sensor temperature & humidity
I HISTORY BUTTON
Displays the pressure history of previous hours.
J DOWN ( ) BUTTON (REAR PANEL)
Display the moon phase of previous days or sets the altitude or sea level pressure.
K UP ( ) BUTTON (REAR PANEL)
Display the moon phase of following days or sets the altitude or sea level pressure.
L UNIT BUTTON (REAR PANEL)
Sets the unit of altitude or pressure
M PRESSURE / ALTITUDE BUTTON (REAR PANEL) Toggles the display between local pressure, sea level
pressure and altitude.
N SNOOZE/LIGHT BUTTON
Activate the snooze function and backlight (for LED/EL light version)
O WALL-MOUNT RECESSED HOLE
For mounting the main unit on a wall
P BATTERY COMPARTMENTS
Accommodates two UM-3 or “AA” size 1.5V batteries
Q REMOVABLE TABLE STAND
For standing the main unit on a flat surface
3
9.indd 3 |
02.06.2006 16:59:35 |
ENGLISH
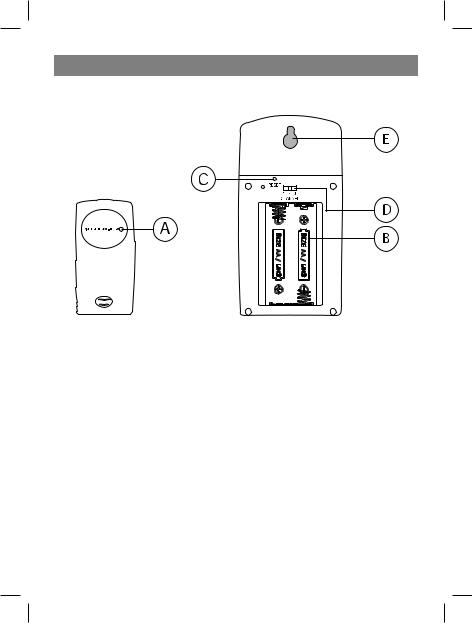
MAIN FEATURES: REMOTE UNIT
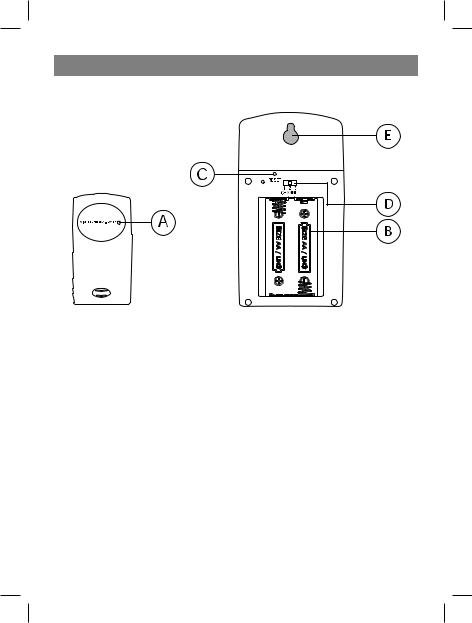
A LED INDICATOR
Flashes once when the remote unit transmits a reading
Flashes twice when low battery is detected on sensor unit
B BATTERY COMPARTMENT
Accommodates two AA-size batteries
C RESET BUTTON
Press to reset all setting if you have selected different channel.
D CHANNEL SELECTOR
Select the channel before you install batteries.
E WALL-MOUNT RECESSED HOLE
Supports the remote until in wall-mounting
BEFORE YOU BEGIN
For best operation:
1.Insert batteries for remote units before doing so for the main unit.
2.Position the remote unit and main unit within effective transmission range, which, in usual circumstances.
4
9.indd 4 |
02.06.2006 16:59:36 |

ENGLISH
Note that the effective range is vastly affected by the building materials and where the main and remote units are positioned.
Try various set-ups for best result.
Though the remote units are weather proof, they should be placed away from direct sunlight, rain or snow.
BATTERY INSTALLATION: REMOTE UNIT
1.Remove the screws on the battery compartment.
2.Select the channel
3.Install 2 batteries (UM-3 or “AA” size 1.5V) strictly according to the polarities shown.
4.Replace the battery compartment door and secure its screws.
BATTERY INSTALLATION: MAIN UNIT
1.Open the battery compartment door.
2.Install 2 batteries (UM-3 or “AA” size 1.5V) strictly according to the polarities shown.
3.Replace the battery compartment door.
LOW BATTERY WARNING
When it is time to replace batteries for the remote sensor, the respective low-battery indicator [ ] will show up on the indoor or outdoor temperature & hygrometer display.
HOW TO USE THE TABLE STAND OR WALL MOUNTING
The main unit has a removable table stand, which when connected, can support the unit on a flat surface. Or you can remove the stand and mount the unit on a wall using the recessed screw hole.
GETTING STARTED
1. SETTING UP THE BAROMETER
a.When batteries are installed, the display will shows the “hPa”, “mBar” and “mmHg”. User should press the
“Unit” key to the unit of pressure, it will shows “0” and “meter”. User can use the “Up” or “Down” keys to change to “feet”, or use the “Unit” key to confirm the unit.
b.After user confirmed the unit of height, it will shows “10” with “meter” or “32” with “feet”. User can use the “Up” or “Down” keys to change to height of the place, and use the “Unit” key to confirm the height.
Remark: The default unit of pressure is hPa/mBar, unit of height is meter, height is 10 meters. It will use the default value if no key is pressure for 60 seconds.
2. SETTING UP THE REMOTE TEMP. AND RC CLOCK
a. Once batteries are in place for the remote unit, they will start transmitting temperature and humidity readings at
5
9.indd 5 |
02.06.2006 16:59:36 |
ENGLISH
around 45 seconds intervals. The main unit will also start searching for signals for about two minutes once batteries are installed. 10 seconds upon successful reception, the outdoors temperatures and humidity will be displayed .The main unit will automatically update its readings at about 45-second intervals.
b. If no signals are received, blanks “--.-” will be displayed.
Hold [-] for 2 seconds to enforce another search for about 2 minutes. This is useful in synchronizing the transmission and reception of the remote and main units.
c. When remote signal reception is finished, it will automatically synchronize its current time and dated when brought within rang of the signal.
Repeat this step whenever you find discrepancies between the reading shown on the main unit and that on the remote unit.
HOW TO CHECK REMOTE AND INDOOR TEMPERATURES
The wave display on the outdoors temperature indicates the reception of the remote unit is in good order.
If no readings are received from the remote unit for more than two minutes, blanks “--
.-” will be displayed until further readings are successfully searched. Check the remote unit is sound and secure. You can wait for a little while or Hold [-] for 2 seconds to enforce an immediate search.
If the temperature or humidity goes above or below than the measuring range of the main unit or the remote unit (stated in specification), the display will show “--.-” & “HHH” or “LLL” respectively.
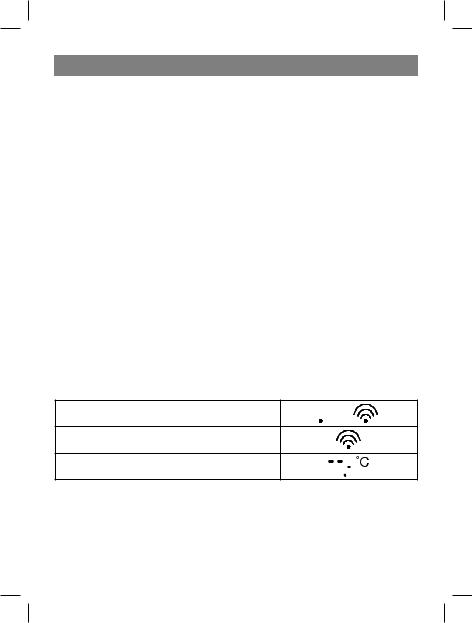
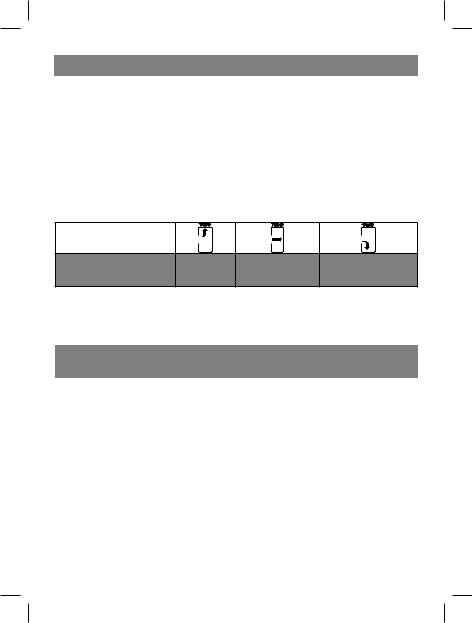
HOW TO READ THE KINETIC WAVE DISPLAY
The kinetic wave display shows the signal receiving status of the main unit. There are three possible forms:
The unit is in searching mode.
Temperature readings are securely registered.
No signals.
MAXIMUM AND MINIMUM TEMPERATURES AND HUMIDITY
The maximum and minimum recorded indoor temperature, humidity and outdoor temperatures will be automatically stored in memory. To display them, Press [MEM] once to display the maximum readings and again the minimum readings.
The respective indicators [MAX] or [ MIN ] will be displayed. To clear the memory, hold down [MEM] for two seconds. The maximum and minimum readings will be erased.
6
9.indd 6 |
02.06.2006 16:59:36 |
ENGLISH
If you press [MEM] now, the maximum and minimum readings will have the same values as the current ones until different readings are recorded.
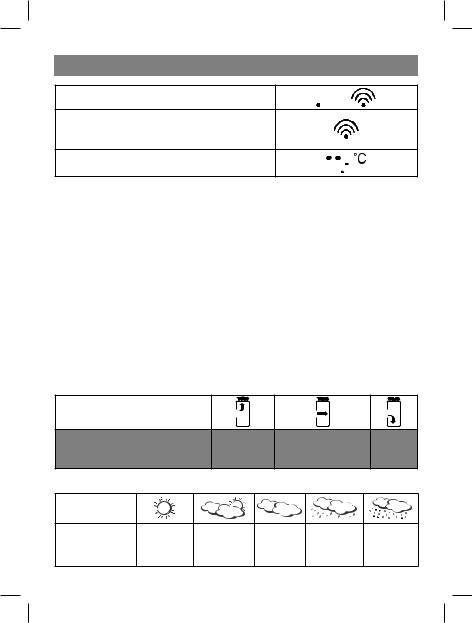
TEMPERATURE AND HUMIDITY TREND
The trend indicator shows the trend of temperatures and humidity collected at that particular remote sight.
Three trends: rising, steady, and falling will be shown.
Arrow indicator |
|
|
|
|
Temperature and |
Rising |
Steady |
Falling |
|
humidity trend |
||||
|
|
|
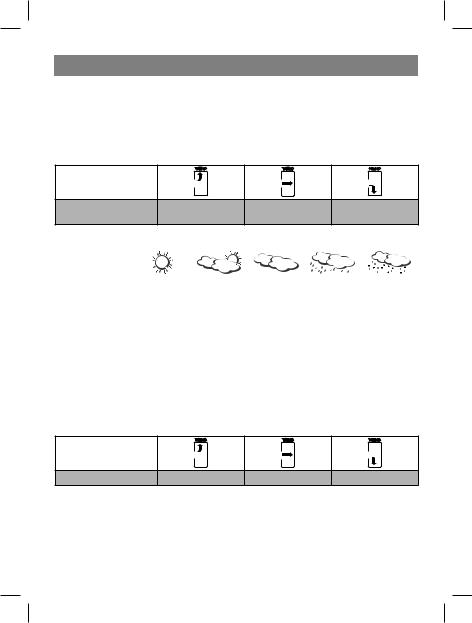
WEATHER FORECAST
Indicator |
|
|
|
|
|
|
displays on |
|
|
|
|
|
|
|
|
|
|
|
|
|
Forecast |
Sunny |
Slightly |
Cloudy |
Rainy |
Snowy |
|
Cloudy |
||||||
|
|
|
|
|
The unit is capable of detecting atmospheric pressure changes. Based on collected data, it can predict the weather for the forthcoming 12 to 24 hours.
NOTE:
1.The accuracy of a general pressure-based weather forecast is about 70%.
2.The weather forecasts. It may not necessarily reflect the current situation.
3.The “Sunny” icon, as applies to night time, implies clear weather.
ATMOSPHERIC PRESSURE
The atmospheric pressure indicator, in the weather forecast window, uses arrows to indicate if the atmospheric pressure is increasing, remaining stable, or decreasing.
Arrow indicator
Pressure Trend |
Rising |
Steady |
Falling |
COMFORT LEVEL INDICATORS
The comfort level indicators COM, WET or DRY will tell you if the current environment is comfortable, too wet or too dry. The comfort indicators will appear on the display of the main unit when the following conditions are satisfied:
7
9.indd 7 |
02.06.2006 16:59:36 |
ENGLISH
Indicator dis- |
Temperature |
Humidity |
Shows that the |
|
plays on the |
Current |
|||
Range |
Range |
|||
unit |
Environment |
|||
|
|
|||
|
20°C to 25°C |
40%RH - |
Ideal range for both |
|
COM |
relative humidity and |
|||
(68°F to 77°F) |
70%RH |
|||
|
temperature |
|||
|
|
|
||
WET |
-5°C -+ 50°C |
OVER 70%RH |
Contains excess |
|
(23°F - 122°F) |
moisture |
|||
|
|
|||
DRY |
-5°C -+ 50°C |
Below 40%RH |
Contains inadequate |
|
(23°F - 122°F) |
moisture |
|||
|
|
|||
|
|
|
|
|
|
Less than 20°C |
40%RH to |
|
|
No Indicator |
(68°F) or More |
No comment |
||
70%RH |
||||
|
than 25°C (77°F) |
|
||
|
|
|
||
|
|
|
|
HOW TO CHECK THE BAROMETRIC PRESSURE
The current and historical barometric pressure is shown on the atmospheric pressure window. For user staying at a higher altitude such as in the mountain area, see-level barometric pressure applies. Use Pressure/ Altitude key to toggle the display to sea level pressure display. Press and hold the Pressure/Altitude key to enter the sea level pressure adjusting mode. Use the UP or DOWN key to enter sea level pressure and use Pressure/Altitude to confirm. The atmospheric pressure can be displayed in mb/hPa or inHg. To change the pressure unit, press and hold the Unit key at sea level pressure display and use UP or Down key to select. Press the Unit key to confirm.
If you want to check the pressure history for a particular hour during the past 36 hours, press the HISTORY button. Each press on the button will go back by an hour.
The recorded atmospheric changes for the past 24 hour are displayed in a bar chart above the atmospheric pressure window.
8
9.indd 8 |
02.06.2006 16:59:37 |

ENGLISH
HOW TO USE AND SCAN THE MOON PHASE
Unit is equipped with a moon phase display and scanner with which eight moon phases are displayed on the screen from new moon to waning crescent. The one falls on the current day will flash on the screen.
If it is a full moon or new moon day, the icon will flash faster.
The eight phases are:
New Moon |
Waning |
First Quar- |
Waxing |
Full Moon |
Waning |
Last Quar- |
Waning |
|
Crescent |
ter |
Gibbous |
Gibbous |
ter |
Crescent |
|||
|
|
To check the moon phase for a particular day, press the UP or DOWN button once. The clock will enter moon phase scanning mode.
Use the UP or DOWN button to locate the date you want to check. The calendar will be day-driven in this mode.
You can go back 39 days travel to next 39 days.
The corresponding moon phase will appear immediately on the screen.
The unit will return to the last display mode when the UP and DOWN buttons are left idle for 2 seconds.
DISCONNECTED SIGNALS
If without obvious reasons the display of the outdoor temperature goes blank, Hold [-] for 2 seconds to enforce an immediate search.
If that fails, check:
1.The remote unit is still in place.
2.The batteries of both the remote unit and main unit. Replace as necessary.
Note: When the temperature falls below freezing point, the batteries of outdoor units will freeze, lowering their voltage supply and the effective range.
3.The transmission is within range and path is clear of obstacles and interference. Shorten the distance when necessary.
TRANSMISSION COLLISION
Signals from other household devices, such as door bells, home security systems and entry controls, may interfere with those of this product and cause temporarily reception failure.
This is normal and does not affect the general performance of the product. The transmission and reception of temperature readings will resume once the interference recedes.
9
9.indd 9 |
02.06.2006 16:59:37 |

ENGLISH
HOW TO SET THE RADIO CONTROLLED CLOCK
1.After the batteries are installed. The clock will automatically search the radio signal. It takes about 3-5 minutes to finish this process.
2.If user wishs to disable the auto-reception feature, holds the “Up” front panel for 2 seconds to disable it.
3.To enable the auto-reception feature again, holds the “Up” for 2 seconds again to force it receive and allow it receive at desired time.
4.If the radio signal is received, the date & time will be set automatically with radio control signal icon [ ] turns on.
5.If the clock fails to receive the time signal, it will be show as [  ] icon. Then user can set the time manually.
CALENDAR CLOCK DISPLAY MODES
The clock and the calendar share the same section of the display. The calendar is displayed in a day-month format.
Each press on the MODE button will change the display between clock with second, clock with day of week, zone time with day of week, zone time with second and daymonth.
HOW TO SET THE CLOCK MANUALLY
To set the clock manually, hold MODE for two seconds it will show the year. Use [-] or [+] to change it.
Press MODE to confirm. Repeat the same procedure to set display language, °C/°F, year, month, date, date-month format, 12/24, hour and minute.
During the setting, press and hold [-] or [+] will increase or decrease the value rapidly. For display language, you can choose among English (En), German (DE), French (Fr), Italian (IT) and Spanish (SP) - in that order.
If there is an item you do not wish to change, simply press [MODE] to bypass the item.
When you finished the change, press [MODE] to exit. The display will return to the clock mode.
HOW TO SET AND ARM THE ALARM
To set an alarm:
1.Press [ALARM] once to display alarm time. If the alarm is disarmed, the time will be displayed as “OFF”.
2.Hold [ALARM] for two seconds. The hour digits will blink.
3.Enter the hour using [-] or [+].
4.Press [ALARM]. The minute digits will blink.
5.Enter the minutes using [-] or [+].
6.Press [ALARM] to exit.
7.Repeat the same procedure to set single alarm.
10
9.indd 10 |
02.06.2006 16:59:37 |
ENGLISH
SNOOZE FEATURE
When the alarm sound is on, press the snooze key enter snooze mode. After 8 minutes, alarm sound will be wake up automatically. The snooze cycle will be restarted if you press the snooze key again.
If you leave the alarm sound on for 2 minutes, it will enter snooze mode automatically with maximum 3 times.
HOW TO STOP AN ALARM
Press [ALARM] on the unit to stop an alarm.
ALARM FEATURE
•Single Alarm
The alarm sound will be activated and the icon will be flashed once when it is armed and the alarm time is reach.
Once it finished, it will be disabled automatically.
•Pre-Alarm
The pre-alarm sound will be activated and the icon will be flashed if outdoor temperature under or equal two degree C.
Which is programmable 15, 30, 45, 60 or 90 minutes earlier than the weekday alarm or single alarm time.
HOW TO CHANGE THE TEMPERATURE ALARM SETTING
1.Press once [TEMP ALARM] button.
2.Then Press and hold [TEMP ALARM] button for 2 seconds.
3.Enter the Hi [ ] or Lo [
 ] temperature alert setting value by using [ ] or [ ] button.
4.Press [TEMP ALARM] once to exit.
PRECAUTIONS
This product is engineered to give you years of satisfactory service if you handle it carefully. Here are a few precautions:
1.Do not immerse the unit in water.
2.Do not clean the unit with abrasive or corrosive materials.
They may scratch the plastic parts and corrode the electronic circuit.
3.Do not subject the unit to excessive force, shock, dust, temperature or humidity, which may result in malfunction, shorter electronic life span, damaged battery and distorted parts.
4.Do not tamper with the unit’s internal components. Doing so will invalidate the warranty on the unit and may cause unnecessary damage. The unit contains no userserviceable parts.
5.Only use fresh batteries as specified in the user’s manual. Do not mix new and old batteries as the old ones may leak.
6.Always read the user’s manual thoroughly before operating the unit.
11
9.indd 11 |
02.06.2006 16:59:37 |

ENGLISH
SPECIFICATIONS
Main unit
Indoor Temperature Measurement
Proposed operating range: |
-5.0°C to +50.0°C |
|
23.0°F to 122.0°F |
Humidity Measuring range: |
R.H. 25% to 90% at 25°C ( 77°F ) |
Temperature resolution: |
0.1°C |
|
0.2°F |
Humidity resolution: |
1% R.H. |
Remote unit |
|
Proposed operating range: |
-20°C to + 60°C |
|
-4°F to 140 °F |
Temperature resolution: |
0.1°C |
|
0.2°F |
RF Transmission Frequency: |
433 MHz |
Maximum No. of Remote unit: |
3 |
RF Transmission Range: |
Maximum 40 meters (open area) |
Temperature sensing cycle: |
around 43~47 seconds |
Relative Humidity Measurement |
|
Remote relative humidity: |
25%RH to 90%RH measurement range |
Resolution: |
1%RH |
Barometric Pressure Measurement |
|
Pressure measuring range: |
750 to 1100 mb/hPa at 25°C (22.15 to 32.49 inHg) |
Pressure sampling cycle: |
20 minutes |
Moon Phase Functions |
|
Moon Phase Scanner Range: |
forward/backward 39 days |
Calendar Clock |
|
12/24 h display with hh: |
mm |
Date Format: |
Day - Month or Month-Day. |
Day of week selectable in 5 language (E, F, D, I,S) |
|
Dual 2-minute crescendo alarm with snooze |
|
Pre-alarm for ice alert |
|
Power |
|
Main unit: |
use 2 pcs UM-3 or ”AA” 1.5V battery |
Remote sensing unit: |
use 2 pcs UM-3 or “AA” 1.5V battery |
Weight |
|
Main unit: |
231g (without battery) |
Remote sensing unit: |
62g (without battery) |
|
12 |
9.indd 12 |
02.06.2006 16:59:37 |

ENGLISH
Dimension |
|
Main unit: |
197(L) x 108(H) x 45(D) mm |
Remote sensing unit: |
55.5(L) x 101(H) x 24(D) mm |
CAUTION
-The content of this manual is subject to change without further notice.
-Due to printing limitation, the displays shown in this manual may differ from the actual display.
-The contents of this manual may not be reproduced without the permission of the manufacturer.
MINIMUM SERVICE LIFE - 3 YEARS
GUARANTEE
Details regarding guarantee conditions can be obtained from the dealer from whom the appliance was purchased. The bill of sale or receipt must be produced when making any claim under the terms of this guarantee.
This product conforms to the EMC-Requirements as laid down by the Council Directive 89/336/EEC and to the Law Voltage Regulation (73/23 EEC)
13
9.indd 13 |
02.06.2006 16:59:37 |
DEUTSCH
EINLEITUNG
Wir gratulieren Ihnen zum Kauf dieser Wetterstation.
Im Lieferumfang ist der Hauptblock enthalten, der eine Wettervorhersagestation ist, und ein Fernblock, der ein thermisches Feuchtigkeitsmessgerät ist.
Das Hauptgerät kann die Maximalund Minimaltemperatur an verschiedenen Stellen verfolgen.
Es müssen keine Kabel verlegt werden. Das Gerät arbeitet auf der Frequenz 433 MHz. Außer der Temperatur zeigt die Wetterstation die relative Feuchtigkeit im Raum und im Freien an und bewertet das Komfortniveau.
Es speichert auch die Maximalund die Minimalwerte der relativen Feuchtigkeit. Das thermische Feuchtigkeitsfernmessgerät wird zusammen mit der Wetterstation geliefert. Die Wetterstation kann Angaben von bis zu 3 Fernsensoren erhalten und anzeigen.
Das eingebaute Barometer erlaubt es den atmosphärischen Luftdruck mit Höhenregelung anzuzeigen. Auf dem Balkendiagramm wird die Dynamik der Luftdruckänderung innerhalb der letzten 24 Stunden angezeigt.
Außerdem ist das Gerät mit einem Mondphasenscanner ausgestattet, der es erlaubt die Mondphasen um 39 Tage zurück oder vorwärts zu prüfen.
BESCHREIBUNG
14
9.indd 14 |
02.06.2006 16:59:37 |

DEUTSCH
A. DISPLAY
Auf dem Display kann man bequem die Wettervorhersage ansehen, die Feuchtigkeit im Raum und im Freien, eine Uhr mit Kalender, ein Diagramm mit der Dynamik der Luftdruckänderung, sowie die Mondphasen.
B. SPEICHERTASTE [MEM]
Dient zur Anzeige der Maximalund Minimalwerte für Temperatur und Feuchtigkeit vom Hauptund Fernblock.
C. BETRIEBSWAHLTASTE
Dient zum Umschalten der Datenanzeigebetriebe und zur Bestätigung der einzugebenden Werte bei der Einstellung der Displayparameter.
D. WECKERTASTE
Dient zur Anzeige der Alarmzeit des Weckers oder zur Einstellung des Wetterbetriebs.
E. TEMPERATURSIGNALTASTE
Dient zur Anzeige des Temperatursignals oder zur Einstellung der oberen und unteren Temperaturgrenzwerte.
F.TASTE HOCH (+)
Steigert den Parameterwert.
G.TASTE RUNTER (-)
Senkt den Parameterwert.
H.TASTE ZUM UMSCHALTEN DER KANÄLE
Zeigt die Temperatur und die Feuchtigkeit von verschiedenen Sensoren an.
I. DATENARCHIVTASTE
Zeigt die Luftdruckwerte für die vorangegangenen Stunden an.
J. TASTE RUNTER ( ) AUF DER HINTERTAFEL
Zeigt die Mondphasen für die vorangegangenen Tage an oder stellt die Höhe oder den Luftdruck auf dem Meeresspiegel ein.
K. TASTE HOCH ( ) AUF DER HINTERTAFEL
Zeigt die Mondphasen für die kommenden Tage an oder stellt die Höhe oder den Luftdruck auf dem Meeresspiegel ein.
L.WAHLTASTE DER MESSEINHEIT AUF DER HINTERTAFEL
Stellt die Messeinheit für Höhe oder Luftdruck ein.
M.ANZEIGETASTE FÜR LUFTDRUCK / HÖHE AUF DER HINTERTAFEL
Dient zum Umschalten des Betriebs der lokalen Luftdruckanzeige, des atmosphärischen Luftdrucks auf dem Meeresspiegel und der Höhe.
N.TASTE SNOOZE/LIGHT
Dient zum Einschalten der Funktion der wiederholten Alarmeinschaltung des Weckers und der Beleuchtung (für LCD/EL Beleuchtungsvarianten)
O.ÖFFNUNG MIT EINSCHUB FÜR DIE WANDMONTAGE
Dient zum Befestigen des Hauptblocks an die Wand.
P.BATTERIEFACH
Dient zum Platzieren von zwei Speiseelementen UM-3 oder 1,5 V Größe „AA“.
Q. BEWEGBARES TISCHSTATIV
Dient zum Aufstellen des Hauptblocks auf einer ebenen Oberfläche.
15
9.indd 15 |
02.06.2006 16:59:38 |
DEUTSCH
HAUPTFUNKTIONEN: FERNBLOCK
A. LCD-INDIKATOR
Blinkt einmal bei der Datenübertragung vom Fernblock.
Blinkt zweimal, wenn sich die Speiseelemente im Sensor entladen haben.
B. BATTERIEFACH
Fasst zwei Alkalibatterien Größe AA.
C. LÖSCHTASTE
Dient zum Löschen aller Einstellungsparameter bei der Wahl von einem anderen Kanal.
D. KANALUMSCHALTER
Dient zur Wahl des Kanals vor dem Einlegen der Speiseelemente.
E. ÖFFNUNG MIT EINSCHUB FÜR DIE WANDMONTAGE
Dient zum Befestigen des Fernblocks an die Wand.
EINLEITENDE ANGABEN
Damit die Wetterstation mit maximaler Wirkungskraft funktioniert, führen Sie die folgenden Handlungen aus:
1.Legen Sie die Speiseelemente zuerst in die Fernblocks, und danach in den Hauptblock ein.
2.Platzieren Sie die Fernblocks und den Hauptblock so, dass sie sich im Bereich der Signalreichweite befinden.
16
9.indd 16 |
02.06.2006 16:59:38 |

DEUTSCH
Beachten Sie, dass die Signalreichweite vom Baumaterial abhängt, durch das das Signal durchgeht, und davon, wo der Hauptblock und die Fernblocks platziert wurden.
Versuchen Sie verschiedene Varianten der Platzierung dieser Blocks, um ein optimales Ergebnis zu erhalten.
Obwohl die Fernblocks wetterfest sind, sollten sie nicht direkter Sonneneinstrahlung, Regen oder Schnee ausgesetzt werden.
EINLEGEN DER SPEISEELEMENTE: FERNBLOCK
1.Drehen Sie die Schrauben aus dem Deckel des Batteriefachs aus.
2.Wählen Sie den Kanal.
3.Legen Sie zwei Speiseelemente (UM-3 oder 1,5 V Größe AA) ein, beachten Sie dabei die Polarität.
4.Setzen Sie den Deckel des Batteriefachs wieder auf und schrauben Sie ihn fest.
EINLEGEN DER SPEISEELEMENTE: HAUPTBLOCK
1.Öffnen Sie den Batteriefachdeckel.
2.Legen Sie zwei Speiseelemente (UM-3 oder 1,5 V Größe AA) ein, beachten Sie dabei die Polarität.
3.Setzen Sie den Deckel des Batteriefachs wieder auf.
WARNUNG VOR ENTLADENEN SPEISEELEMENTEN
Wenn die Batterien im Fernblock ausgewechselt werden müssen, leuchtet auf dem Temperaturund Feuchtigkeitsdisplay das folgende Symbol auf [ ].
].
WIE BENUTZT MAN DAS TISCHSTATIV ODER DIE WANDHALTERUNG
Der Hauptblock ist mit einem beweglichen Tischstativ ausgestattet, mit dem man den Block auf einer ebenen Oberfläche platzieren kann. Oder man kann das Stativ abnehmen und den Block an die Wand mit Hilfe der speziellen Öffnung mit dem Schraubeneinschub befestigen.
INBETRIEBNAHME
1. EINSTELLUNG DES BAROMETERS
a.Nach dem Einlegen der Speiseelemente erscheinen auf dem Display die Angaben “hPa”, “mBar” und “mmHg”. Pressen Sie die Taste “Unit”, um die gewünschte Druckmesseinheit zu wählen. Auf dem Display erscheint “0” und “meter” („Meter“). Benutzen Sie die Tasten «hoch» oder «runter», um die Angaben auf “feet” (Fuß) umzustellen, oder pressen Sie die Taste “Unit”, um die gewählte Messeinheit zu bestätigen.
b.Nach der Wahl der Messeinheit der Höhe erscheint auf dem Display “10” und “meter” („Meter“) oder “32” und “feet” („Fuß“). Benutzen Sie die Tasten «hoch» oder «runter», um die Höhenangaben dieser Stelle über dem Meeresspiegel
17
9.indd 17 |
02.06.2006 16:59:38 |

DEUTSCH
einzustellen, und pressen Sie die Taste “Unit”, um die gewählte Messeinheit der Höhe zu bestätigen.
Anmerkung: Nach Vorgabe ist die Druckmesseinheit - hPa/mBar, die Höhenmesseinheit – Meter, die Höhe gleicht 10 Meter. Wenn innerhalb von 60 Sekunden keine Taste gepresst wird, werden diese Parameter angewandt.
2. EINSTELLUNG DER TEMPERATUR UND DER UHR AUF DEM FERNBLOCK
a.Nach dem Einlegen der Speiseelemente in den Fernblock beginnt die Übertragung der Temperaturund Feuchtigkeitsangaben etwa alle 45 Sekunden. Der Hauptblock beginnt ebenfalls die Signalsuche innerhalb von etwa zwei Minuten nach dem Einlegen der Speiseelemente. Nach 10 Sekunden nach dem erfolgreichen Empfang des Signals werden auf dem Display die Außentemperatur und die Luftfeuchtigkeit angezeigt. Der Hauptblock wird diese Angaben automatisch etwa alle 45 Sekunden erneuern.
b.Wenn kein Signal empfangen wird, erscheint auf dem Display “--.-”
Pressen und halten Sie die Taste [-] 2 Sekunden lang, um eine neue Suche zu starten, die etwa 2 Minuten dauern wird. Das hilft die Übertragung und den Empfang der Signale von den Fernblocks und vom Hauptblock zu synchronisieren.
c.Nach dem Ende des Signalempfangs vom Fernblock synchronisiert die Wetterstation automatisch die laufende Uhrzeit und das Datum bei Empfang des Radiosignals.
Wiederholen Sie diesen Schritt bei Abweichungen in den Angaben auf dem Hauptblock und dem Fernblock.
WIE PRÜFT MAN DIE TEMPERATUR IM RAUM UND IM FREIEN
Wenn der Sender des Fernblocks korrekt arbeitet, erscheint auf dem Display die Außentemperatur.
Wenn vom Fernblock über zwei Minuten lang keine Angaben erhalten werden, wird auf dem Display “--.-” solange angezeigt, bis die Angaben erhalten werden. Prüfen Sie das Intaktsein und die Sicherheit der Befestigung des Fernblocks. Man kann etwas abwarten oder die Taste [-] 2 Sekunden lang pressen, um die Signalsuche sofort zu beginnen.
Wenn die Temperatur oder die Luftfeuchtigkeit über oder unter den Messbereich des Hauptblocks oder des Fernblocks kommen (der Messbereich ist in den technischen Kenndaten angegeben), wird auf dem Display dementsprechend “--.-” und “HHH” oder “LLL” angezeigt.
WIE LIEST MAN DIE DISPLAYANGABEN DER KINETISCHEN WELLE AB
Auf dem Display der kinetischen Welle wird der Signalempfangsstatus vom Hauptblock angezeigt. Es gibt drei mögliche Zustände:
18
9.indd 18 |
02.06.2006 16:59:38 |
DEUTSCH
Das Gerät befindet sich im Suchbetrieb.
Die Temperaturangaben werden sicher registriert.
Signal fehlt.
MAXIMALUND MINIMALWERTE FÜR TEMPERATUR UND LUFTFEUCHTIGKEIT
Die Maximalund Minimalwerte für die Temperatur im Raum und im Freien, sowie der Luftfeuchtigkeit werden automatisch im Speicher der Wetterstation gespeichert. Zum Ansehen dieser Werte pressen Sie die Taste [MEM] einmal, um die Maximalwerte zu sehen, und ein zweites Mal, um die Minimalwerte zu sehen.
Auf dem Bildschirm erscheinen die entsprechenden Aufschriften - [MAX] oder
[MIN].
Um den Speicher zu löschen, pressen Sie die Taste [MEM] zwei Sekunden lang. Die Maximalund Minimalwerte werden aus dem Speicher gelöscht.
Wenn jetzt die Taste [MEM] gepresst wird, werden der Minimalund der Maximalwert solange gleich sein, bis neue verschiedene Angaben erhalten werden.
ÄNDERUNGSDYNAMIK DER TEMPERATUR UND LUFTFEUCHTIGKEIT
Der Indikator der Änderungsdynamik der Temperatur und Luftfeuchtigkeit zeigt Werte an, die von einem bestimmten Fernblock erhalten wurden.
Es werden drei Typen der Angabenänderung unterschieden: Steigerung, ohne Änderung und Senkung.
Pfeilanzeiger
Änderungsdynamik der |
Steigt |
Ohne Änderung |
Sinkt |
|
Temperatur und Luftfeuchtigkeit |
||||
|
|
|
WETTERVORHERSAGE |
|
|
|
|
||
Angaben des |
|
|
|
|
|
|
Indikators |
|
|
|
|
|
|
Prognose |
Sonnig |
Leicht |
Bewölkt |
Regen |
Schnee |
|
bewölkt |
||||||
|
|
|
|
|
||
|
|
19 |
|
|
|
|
9.indd 19 |
02.06.2006 16:59:38 |
DEUTSCH
Das Gerät kann Änderung des atmosphärischen Luftdrucks feststellen. Unter Berücksichtigung der gesammelten Angaben kann das Gerät das Wetter für die nächsten 12-24 Stunden vorhersagen.
ANMERKUNG:
1.Die Präzision der Prognose aufgrund der Luftdruckänderung beträgt etwa 70%.
2.Wetterprognosen. Müssen nicht unbedingt die aktuelle Situation wiedergeben.
3.Das Symbol „Sonnig“ in der Nacht bedeutet „Klar“.
ATMOSPHÄRISCHER LUFTDRUCK
Der Indikator des atmosphärischen Luftdrucks im Wetterprognosefenster zeigt mit den Pfeilen, ob der Luftdruck steigt, sinkt oder unveränderlich bleibt.
Pfeilanzeiger
Änderung des |
Steigt |
Ohne Änderung |
Sinkt |
|
Luftdrucks |
||||
|
|
|
INDIKATOREN DES KOMFORTNIVEAUS
Die Indikatoren des Komfortniveaus (COM, WET oder DRY) zeigen die Komfortstufe der aktuellen Umwelt an – komfortabel, zu feucht oder zu trocken. Diese Indikatoren werden auf dem Display des Hauptblocks bei den folgenden Bedingungen angezeigt:
Indikatorangaben |
Temperaturbereich |
|
Feuchtigkeitsbereich |
Umwelt |
auf dem Block |
|
bedingungen |
||
|
|
|
||
|
|
|
|
|
|
|
|
|
Idealer Bereich |
COM |
von 20°C bis 25°C |
|
40% - 70% relative |
für die relative |
(von 68°F bis 77°F) |
|
Luftfeuchtigkeit |
Luftfeuchtigkeit |
|
|
|
|||
|
|
|
|
und Temperatur |
|
|
|
|
|
WET |
von -5°C bis + 50°C |
|
über 70% relative |
Zu hohe |
(von 23°F bis 122°F) |
|
Luftfeuchtigkeit |
Feuchtigkeit |
|
|
|
|||
|
|
|
|
|
DRY |
von -5°C bis + 50°C |
|
unter 40% relative |
Zu niedrige |
(von 23°F bis 122°F) |
|
Luftfeuchtigkeit |
Feuchtigkeit |
|
|
|
|||
|
|
|
|
|
Indikator wird |
Unter 20°C (68°F) |
|
40% - 70% relative |
Ohne |
nicht angezeigt |
oder über 25°C (77°F) |
|
Luftfeuchtigkeit |
Anmerkung |
|
|
|
|
|
|
|
20 |
|
|
9.indd 20 |
02.06.2006 16:59:39 |
DEUTSCH
PRÜFUNG DES BAROMETERDRUCKS
Der aktuelle und vergangene Barometerdruck wird im Fenster des atmosphärischen Luftdrucks angezeigt.
Bei der Benutzung der Wetterstation auf einer Höhe – z.B., in den Bergen – muss man die entsprechende Korrektur anwenden. Schalten Sie mit der Taste Pressure/ Altitude (Druck/Höhe) auf die Anzeige des atmosphärischen Luftdrucks auf dem Meeresspiegel um.
Pressen und halten Sie die Taste Pressure/Altitude, um in den Druckregelungsbetrieb auf dem Meeresspiegel umzuschalten.
Geben Sie mit den Tasten HOCH oder RUNTER den Druck auf dem Meeresspiegel ein und pressen Sie die Taste Pressure/Altitude, um den eingegebenen Wert zu bestätigen.
Der atmosphärische Luftdruck wird in den Einheiten mb/hPa (mb/hPa) oder Hg (mm. Hg.) angezeigt
Um die gewünschte Druckmesseinheit zu wählen, pressen und halten Sie die Taste Unit im Druckanzeigebetrieb auf dem Meeresspiegel, und pressen Sie danach die Taste HOCH oder RUNTER, um die gewünschte Messeinheit zu wählen.
Pressen Sie die Taste Unit, um die Änderungen zu speichern.
Wenn das Archiv der Luftdruckangaben für eine bestimmte Stunde innerhalb der letzten 36 Stunden angesehen werden soll, pressen Sie die Taste HISTORY.
Bei jedem Pressen werden auf dem Display die Angaben für die Stunde angezeigt, die vor der angezeigten Stunde kam.
Die gespeicherten Änderungen des Luftdrucks für die letzten 24 Stunden werden in einem Balkendiagramm über dem Fenster des atmosphärischen Luftdrucks angezeigt.
ANWENDUNG UND ÜBERSICHT DER MONDPHASEN
Das Gerät VT-3549SR ist mit einem Mondphasendisplay und einem Scanner ausgestattet, die acht Mondphasen auf dem Bildschirm anzeigen – von Neumond bis zur Abnahme des Mondes. Die aktuelle Mondphase wird auf dem Bildschirm blinken. Wenn zum gegenwärtigen Zeitpunkt Vollmond oder Neumond ist, wird dieses Symbol öfter blinken.
Die acht Mondphasen sind wie folgt:
21
9.indd 21 |
02.06.2006 16:59:39 |
 Loading...