


MULTI-FUNCTION ALARM CLOCK
WITH PROJECTION
MODEL VT-3545 W
INSTRUCTION MANUAL
4
10
17
25
32
www.vitek-aus.com
3545IM.indd 1 |
26.05.2006 12:09:25 |

3545IM.indd 3 |
26.05.2006 12:09:26 |

ENGLISH
MULTI-FUNCTION ALARM CLOCK
1.SNOOZE/ Backlight/ Projection Light key
2.Projector Lens
3.Adjustable projector
4.Up / Down key
5.MODE key
6.WAVE °C/°F key
7.ALARM key
8.Continue projection key
9.Battery cover
10.Adapter socket
11.Battery compartment
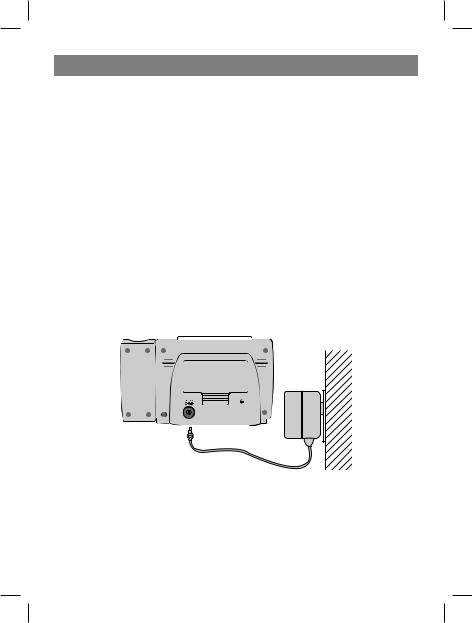
To install the AC-DC adapter for Continue Projection:-
Use 2 X AAA, 1.5V batteries and AC-DC adapter (AC230V, 50Hz-DC3V, 100mA) included.
Important:
Please make sure your household voltage matched with the voltage supported by the adapter, or it will damage your clocks and adapter.
4
3545IM.indd 4 |
26.05.2006 12:09:26 |

|
|
|
ENGLISH |
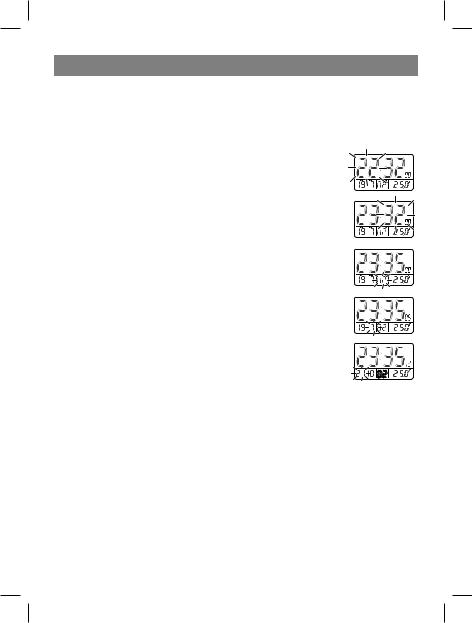
INDICATOR |
STANDING FOR |
INDICATOR |
STANDING FOR |
|
DATE |
|
REPEAT ALARM |
|
|
INDICATION |
|
|
|
|
|
|
FOREIGN TIME INDICATION |
|
MONTH |
|
PM (12 HR Display ONLY) |
|
SUMMER TIME |
|
|
INDICATION |
|
|
|
|
|
|
AM (12 HR DISPLAY ONLY) |
|
DEGREE CELSIUS |
|
ALARM 1 |
|
DEGREE FAHRENHEIT |
|
ALARM 2 |
|
DUAL TIME |
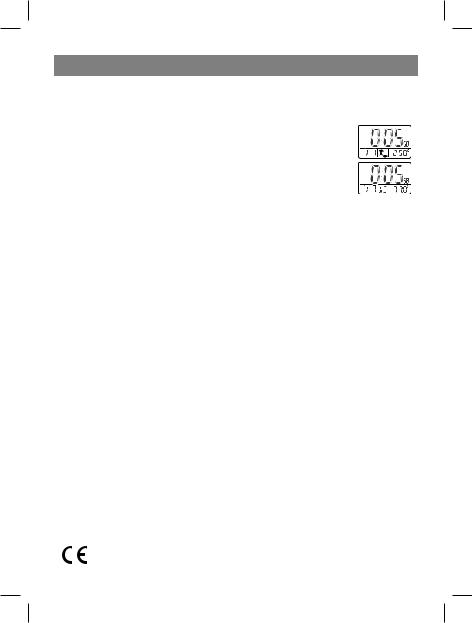
=After the batteries are installed, the LCD will turn on and beep for 2 seconds. The clock will automatically search the radio signal. It takes about 3-5 minutes to finish this process.
Selecting Temperature/Alarm 1/Alarm 2/Dual time Display
= Press MODE will display the ALARM1 time:
Selecting Temperature/Alarm 1/Alarm 2/ Dual time Display
= Press MODE will display the ALARM 1 time:
= Press MODE again will display the Alarm 2 time:
= Press MODE again will display the Dual Time:
= Press MODE again will display the Temperature:
5
3545IM.indd 5 |
26.05.2006 12:09:26 |
ENGLISH
Manual Time Setting
The system date and time can be set by pressing MODE for 3 seconds in Time/ Temperature display.
Setting the Time
= Press MODE: the hour digits are blinking and can be set by pressing UP or DOWN key.
= Press MODE again: the minute digits are blinking and can be set by pressing UP or DOWN key.
= Press MODE again: the year digits are blinking and can be set by pressing UP or DOWN key.
= Press MODE again: the month digits are blinking and can be set by pressing UP or DOWN key._
= Press MODE again: the date digits is blinking and can be set by pressing UP or DOWN key.
= Press MODE one last time: the normal time display appears.
Select 12 hour or 24 hour display format
= Press “+” will toggle the display format between 12 hour and 24 hour. N.B.:
1.If no key is pressed within 30 seconds, it will exit the Manual Time Setting Mode and go back to Time / Temperature Display without the data update.
2.During any setting mode, press and hold UP or DOWN key for 2 seconds for fast setting.
Calendar
To change the weekday display from one language to another language, press DOWN key for 3 seconds - the display will show the current language (GER for German display, ENG for English display).
6
3545IM.indd 6 |
26.05.2006 12:09:26 |

ENGLISH
“EN” for English - “GE” for German - “FN” for French - “IT” for Italian - “SP” for Spanish.
Press & Hold DOWN key for 2 seconds will toggle to the other languages.
Setting the Alarm time
ALARM 1 setting
In the ALARM 1 Display,
=Press MODE for about 3 seconds: the hour digits are blinking and can be set by pressing UP or DOWN key.
=Press MODE again: the minute digits are blinking and can be set by pressing UP or DOWN key.
=Press MODE again, the Alarm time is set and  icon will turn on.
ALARM 2 setting
In the ALARM2 Display,
=Press MODE for about 3 seconds: the hour digits are blinking and can set by pressing UP or DOWN key.
=Press MODE again: the minute digits are blinking and can be set by pressing UP or DOWN key.
=Press MODE again, the Alarm time is set and  icon will turn on.
Enable Alarm 1/Alarm 2:
= Press ALARM ON/OFF will enable ALARM 1 with  icon turns on.
= Press ALARM ON/OFF again will enable ALARM 2 with  icon turns on.
= Press ALARM ON/OFF again will enable both ALARM 1 and ALARM 2 with  and
and  icons to turn on.
= Press ALARM ON/OFF again will disable both ALARM 1 and ALARM 2 with  and
and  icons to turn off.
7
3545IM.indd 7 |
26.05.2006 12:09:26 |

ENGLISH
Deactivating the Alarm
When the ALARM 1/ALARM 2 is ringing, the relative alarm icon  /
/  will be flashing.
=Press ALARM ON/OFF key to turn the alarm off.
=Press button 1 - alarm stops and the backlight will turn on for 5 seconds with deleted, the repeat alarm indicator flashing. The alarm sounds again after 4 minutes.
=If the alarm is not turned off, it will stop automatically after 4 minutes.
Foreign Time Display & setting
= Press and hold UP (+) key for 3 seconds, the icon will turn on.
= Press and hold MODE for 3 seconds in Foreign Time / Temperature display. The Foreign time can be set as described above by pressing UP or DOWN key.
= Press MODE key again to confirm the setting of foreign time.
= Press and hold UP key for 3 seconds to choose between local and foreign time display.
Setting the Dual Time
=The dual time can be set by pressing MODE for 3 seconds in Dual Time Display. The hour will flash for input.
=Press MODE: the hour of dual time display digits are blinking and can be set by pressing UP or DOWN key.
=Press MODE again: the minute of dual time display digits are blinking and can be set by pressing UP or DOWN key.
=Press MODE again to confirm the setting.
Light ON / OFF , LED Backlight ON / OFF
=Press top button 1 [SNOOZE / LIGHT] key -light/EL will come on and turn off automatically after 5 seconds.
Projection Light and its adjustment
=Press button 1 [SNOOZE / LIGHT]- Projection light will come on and turn off automatically after 5 seconds.
8
3545IM.indd 8 |
26.05.2006 12:09:27 |
ENGLISH
=When insert adapter and turn on the “Continue - Projection” button, projection light will turn on continuously until the button is switched off or the AC adapter is pulled off.
Temperature function
Press °C/°F to select the temperature display between Celsius or
Fahrenheit.
Specifications |
|
|
|
|
|
|
|
Indoor Temperature measurement |
|
|
|
Proposed operating range: |
0°C to + 50.0°C (32.0°F to 122.0°F) |
||
Temperature resolution: |
0.1°C (0.2°F) |
||
Temperature sensing cycle: |
approx. 1 minute |
||
Power: |
use 2 ps UM-3 “AA” 1.5 V batteries |
||
Weight: |
155 g |
||
Dimension: |
134 x 73 x 50 mm |
||
Precautions
This product is engineered to give you years of satisfactory service if you handle it carefully. Here a few precautions:
1.Do not immerse the unit in water
2.Do not clean the unit with abrasive or corrosive materials. They may scratch the plastic parts and corrode the electronic circuit.
3.Do not subject the unit to excessive force, shock, dust, temperature or humidity, which may result in malfunction, shorter electronic life span, damaged battery and distorted parts.
4.Do not tamper with the unit’s internal components. Doing so will invalidate the warranty on the unit and may cause unnecessary damage. The unit contains no user-serviceable parts.
5.Only use fresh batteries as specified in the user’s manual. Do not mix new and old batteries as the old ones may leak.
6.Always read the user’s manual thoroughly before operating the unit.
Specifications subject to change without prior notice.
MINIMUM SERVICE LIFE - 3 YEARS Guarantee
Details regarding guarantee conditions can be obtained from the dealer from whom the appliance was purchased. The bill of sale or receipt must be produced when making any claim under the terms of this guarantee.
This product conforms to the EMC-Requirements as laid down by the Council Directive 89/336/EEC and to the Law Voltage Regulation (73/23 EEC)
9
3545IM.indd 9 |
26.05.2006 12:09:27 |
DEUTSCH
MULTIFUNKTIONALER UHRENWECKER
1.Taste SNOOZE/ Displaybeleuchtung/Projektion
2.Projektorobjektiv
3.Regelbarer Projektor
4.Taste UP/DOWN (Hoch/Runter)
5.Taste MODE
6.Taste WAVE °C/°F
7.Taste ALARM
8.Projektionstaste
9.Batteriefachdeckel
10.Verbindungsbüchse
11.Batteriefach
Anschluss des Wechselstrom-/Gleichstromadapters für die ununterbrochene
Projektion
Verwenden Sie 2 Speiseelemente „AAA“ mit Spannung 1,5 V oder den
Wechselstrom-/Gleichstromadapter (230 V im Wechselstromnetz, 50 Hz - 3 V
Gleichstrom, 100 mA), der mitgeliefert wird.
10
3545IM.indd 10 |
26.05.2006 12:09:27 |

DEUTSCH
Wichtige Information
Überzeugen Sie sich, dass die Spannung in Ihrem Haushalt der Spannung entspricht, die der Adapter aufweist. Im Gegenfall können die Uhr und der Adapter beschädigt werden.
INDIKATOR |
BEDEUTUNG |
INDIKATOR |
BEDEUTUNG |
|
|
|
INDIKATOR DER |
|
DATUM |
|
WIEDERHOLTEN |
|
|
EINSCHALTUNG DES |
|
|
|
|
|
|
|
|
ALARMSIGNALS |
|
INDIKATOR DER |
|
|
|
UMSCHALTUNG DER |
|
|
|
UHR AUF DIE UHRZEIT |
|
MONAT |
|
EINER ANDEREN |
|
|
|
ZEITZONE |
|
|
|
PM (NUR FÜR DEN |
|
INDIKATOR DER |
|
12-STUNDEN- |
|
UMSTELLUNG DER UHR |
|
ZEITANZEIGEFORMAT) |
|
AUF SOMMERZEIT |
|
AM (NUR FÜR DEN |
|
|
|
12-STUNDEN- |
|
GRAD CELSIUS |
|
ZEITANZEIGEFORMAT) |
|
|
|
WECKERALARMSIGNAL 1 |
|
GRAD FAHRENHEIT |
|
WECKERALARMSIGNAL 2 |
|
DOPPELTE ZEIT |
Nach dem Einlegen der Akkubatterien leuchtet das LCD-Display auf, und innerhalb von zwei Sekunden wird ein Tonsignal erklingen. Jetzt kann die Zeit selbstständig eingestellt werden.
Wahl der Temperaturanzeige /des Alarmsignals 1/des Alarmsignals 2/ Uhrzeit einer anderen Zeitzone
=Pressen Sie die Taste MODE, damit auf dem Display die Einschaltzeit des Weckeralarmsignals 1 angezeigt wird.
11
3545IM.indd 11 |
26.05.2006 12:09:27 |
DEUTSCH
Wahl der Temperaturanzeige /des Alarmsignals 1/des Alarmsignals 2/ der zusätzlichen Zeit
= Pressen Sie die Taste MODE, damit auf dem Display die Einschaltzeit des Alarmsignals 1 angezeigt wird.
= Pressen Sie die Taste MODE noch einmal, damit auf dem Display die Einschaltzeit des Alarmsignals 2 angezeigt wird.
= Pressen Sie die Taste MODE noch einmal, damit auf dem Display die Uhrzeit der anderen Zeitzone angezeigt wird.
= Pressen Sie die Taste MODE noch einmal, damit auf dem Display die Temperatur angezeigt wird.
Selbstständige Einstellung der Uhrzeit
Das Systemdatum und die Zeit können eingestellt werden, indem Sie die Taste MODE 3 Sekunden lang im Zeit-/Temperaturanzeigebetrieb gepresst halten.
Zeiteinstellung
= Pressen Sie die Taste MODE – der Stundenwert beginnt zu blinken; geben Sie den gewünschten Wert mit der Taste UP oder DOWN ein („hoch“ oder „runter“).
= Pressen Sie die Taste MODE noch einmal – der Minutenwert beginnt zu blinken; geben Sie den gewünschten Wert mit der Taste UP oder DOWN ein.
= Pressen Sie die Taste MODE noch einmal – die Jahresanzeige beginnt zu blinken; geben Sie den gewünschten Wert mit der Taste UP oder DOWN ein.
= Pressen Sie die Taste MODE noch einmal – die Monatsanzeige beginnt zu blinken; geben Sie den gewünschten Wert mit der Taste UP oder DOWN ein.
= Pressen Sie die Taste MODE noch einmal – der Tag fängt zu blinken an; geben Sie den gewünschten Wert mit der Taste UP oder DOWN ein.
12
3545IM.indd 12 |
26.05.2006 12:09:27 |

DEUTSCH
=Pressen Sie die Taste MODE ein letztes Mal – auf dem Display wird die gewöhnliche Uhrzeit angezeigt.
Wahl der Zeitanzeige im 12oder 24-Stunden-Format
=Pressen Sie die Taste „+“, um zwischen dem 12oder 24-Stunden-Format der Zeitanzeige umzuschalten.
Anmerkung
1.Wenn innerhalb von 30 Sekunden keine Taste gepresst wird, verlässt der Wecker den Betrieb der manuellen Uhrzeiteinstellung und schaltet in den gewöhnlichen Zeit-/Temperaturanzeigebetrieb ohne Änderung der laufenden Uhrzeit um.
2.In jedem Änderungsbetrieb pressen und halten Sie die Taste UP oder DOWN zwei Sekunden lang, um den Wert schnell zu ändern.
Kalender
Um die Sprache der Wochentaganzeige zu ändern, pressen Sie die Taste DOWN und halten Sie sie drei Sekunden lang gepresst – auf dem Display wird die Wahlsprache angezeigt: Englisch (EN oder ENG), Deutsch (GE oder GER), Französisch (FR), Italienisch (IT), Spanisch (SP).
Pressen und halten Sie die Taste DOWN zwei Sekunden lang, um auf eine andere Sprache umzuschalten.
Einstellen der Einschaltzeit des Weckeralarmsignals
Einstellen der Einschaltzeit des Weckeralarmsignals 1
Im Betrieb ALARM 1,
=Pressen Sie die Taste MODE und halten Sie sie etwa drei Sekunden lang gepresst
– der Stundenwert beginnt zu blinken; geben Sie den gewünschten Wert mit der Taste UP oder DOWN („hoch“ oder „runter“) ein;
=Pressen Sie die Taste MODE noch einmal – der Minutenwert fängt zu blinken an; geben Sie den gewünschten Wert mit der Taste UP oder DOWN ein;
=Pressen Sie die Taste MODE noch einmal – die Einschaltzeit des Weckersignals ist eingestellt; auf dem Display erscheint das Weckersymbol  .
.
Einstellen der Einschaltzeit des Weckeralarmsignals 2
Im Betrieb ALARM 2,
= Pressen Sie die Taste MODE und halten Sie sie etwa drei Sekunden lang gepresst
13
3545IM.indd 13 |
26.05.2006 12:09:28 |
 Loading...