


АУДИО-ВИДЕО И БЫТОВАЯ ТЕХНИКА
VT-6404 PR
WEATHER STATION
МЕТЕОСТАНЦИЯ
Инструкция по эксплуатации
|
Manual instruction |
4 |
GB |
||
|
|
|
|
Инструкция по эксплуатации |
17 |
RUS |
||
|
|
|
|
Інструкція з експлуатації |
31 |
UA |
||
|
|
|
|
Пайдалану нұсқасы |
44 |
KZ |
||
|
|
|
|
Фойдаланиш қоидалари |
57 |
UZ |
www.vitek.ru
6404IM.indd 1 |
20.08.2008 15:57:03 |
4IM.indd 2 |
20.08.2008 15:57:03 |

 С
С
6404IM.indd 3 |
20.08.2008 15:57:03 |
English
Weather station VT-6404 PR
Please read these instructions carefully before connecting, operating or adjusting the unit. Follow all warnings and operating recommendations in this manual. Keep this manual for future reference.
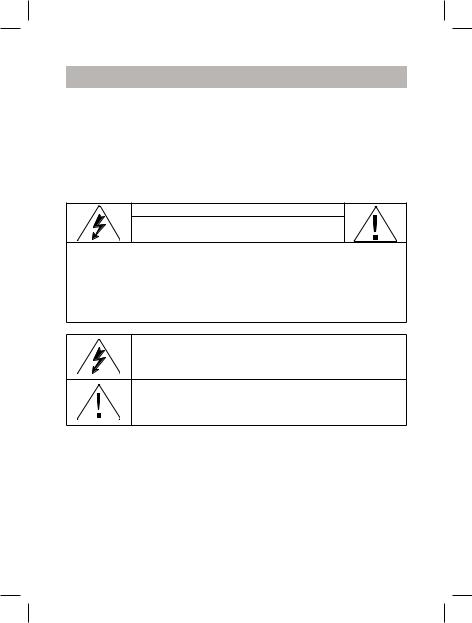
ATTENTION!
Risk of electric shock! DO NOT OPEN!
Warning:
To prevent fire or shock hazard do not expose the appliance to rain or moisture. To prevent shock hazard do not remove the cover yourself.
Apply to a service centre for repair and maintenance.
This lightning flash with arrowhead symbol, within an equilateral triangle, is intended to alert the user to the presence of uninsulated “dangerous voltage” within the product’s enclosure that may be of sufficient magnitude to constitute a risk of electric shock to persons.
The exclamation point within an equilateral triangle is intended to alert the user to the presence of important operating and maintenance(servicing)instructionsinthemanualaccompanying the appliance.
PRECAUTIONS
1.Before operating the units, read the instruction carefully.
2.Do not immerse the units into water.
3.Do not use abrasives or substances causing damages of the body and inner parts to clean the units.
4.Do not apply hard efforts to the units, do not subjects the units to strikes (dust and humidity are also contraindicated), as it can lead to failures and correspondingly to the reduction of life time, damages of the batteries and to the deformation of the body details.
5.If you break the unit; it will lead to the ending of guarantee. There are no details, demanding attention of the user inside it.
6.Use only new and specified in the manual batteries. Do not use old and new batteries together.
7.While long operation of the sensor in the conditions of extreme temperatures, the voltage of its batteries can be lowered, the operation radius of the remote sensor will be reduced.
4IM.indd 4 |
20.08.2008 15:57:03 |
English
DESCRIPTION
BASE UNIT
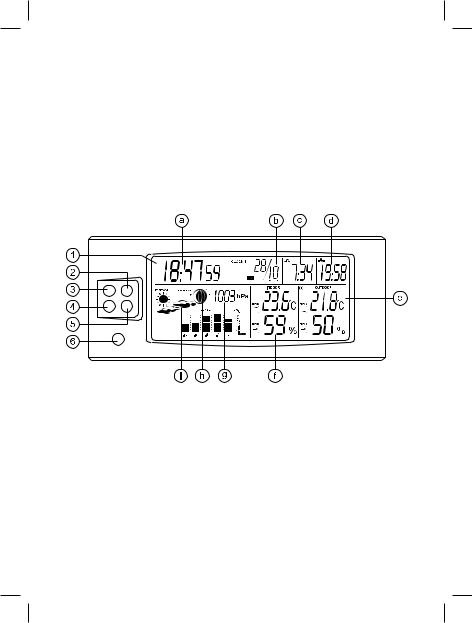
1.Display
Displaying of current time (a), date (b), sunrise (c) and sunset time (d), temperature and humidity values from the remote sensor (e) and inside the room (f), pressure (g), lunar phases (h) and symbolic weather forecast (i).
2.The Max/Min/+ button. Displaying of maximal/minimal temperature, setting of current time, alarm time, date, as well as temperature and humidity value limits.
3.The Mode button
Switching between the current time modes Clock 1/Clock 2, Alarm 1/Alarm 2 modes, entering the set up mode.
4.The Alarm/Channel/°C/°F button Switching on/off of Alarm 1/ Alarm 2 modes, signal switching from the remote sensors (from 1 till 4).
5.The Select/- button
Setting the current time, alarm, date as well as temperature and humidity value limits.
6.The Snooze/Light button Activation of the snooze function and switching of the backlight of the display.
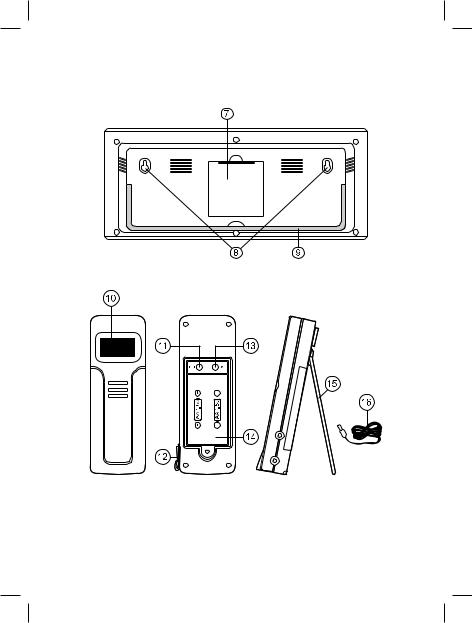
7.Battery compartment (for three “АА” batteries)
8.Wall-mount holder
9.Table stand
REMOTE TEMPERATURE AND HUMIDITY SENSOR
10.LCD-display reflect temperature and humidity values
11.The SET button
Entering of HOUSE CODE, adjusting of channels.
12.External wire sensor jack
13.The °C/°F button
Switching between the Celsius and Fahrenheit scales, change of channels and house code.
14.Battery compartment (for three “АА” batteries)
15.Wall-mount holder/table stand
16.External wire sensor
BEFORE YOU BEGIN
For best operation insert the batteries firstly in the remote sensor and then in the base unit.
Placing batteries in the remote sensor
1.Unscrew the screws on the battery compartment lid. Insert 2 batteries (“АА”, 1.5 V), following the polarity.
2.The HOUSE CODE will start flashing on the LCD-display for 8 seconds. HOUSE CODE – is a frequency signal, sent from the remote sensor to the base unit. All remote sensors in your system should have the same HOUSE CODE.
6404IM.indd 5 |
20.08.2008 15:57:03 |
English
3.Select the HOUSE CODE (from 1 till15) by pressing the °C/°F button. Press the SET button to store it in memory.
4.The number of the channels will start flashing on the LCD-display during 8 minutes.
Select the data transfer channels by pressing the °C/°F button. Press the SET button, to store it in memory. The base unit can receive signals from four sensors, that is why each sensor is given a certain number of channels. Note: for symbol forecast data of the first channels are used, that is why the corresponding remote sensor should be located outside the room.
5.Temperature and humidity values will be displayed by turns.
6.To switch between °C/°F press the °C/°F button.
7.Close the battery compartment lid and tighten up the screws.
Note: if your meteorological station
registers signals from nearby sources, use another HOUSE CODE. Factory settings: HOUSE CODE = 01, channel = 01.
Placing batteries into the base unit
1.Open the battery compartment lid on the base unit.
2.Set 3 batteries (“АА”, 1.5 V), following the polarity.
3.Close the battery compartment lid.
Battery replacement
When the corresponding indication about battery discharge ( ) appears near indication of temperature and humidity you should replace the batteries.
Replace the batteries of the base unit when the indications on the display become faint.
Note: While long operation of the sensor in the conditions of extreme temperatures, the voltage of its batteries can be lowered, the operation radius of the remote sensor will be reduced.
STARTING OPERATION
Automatic synchronization
After inserting of batteries in the base unit automatic synchronization will start automatically, it will last about 3 minutes. During this time the sensor will produce sound signals, receive temperature indications from the remote sensor and display them.
4IM.indd 6 |
20.08.2008 15:57:04 |
Manual synchronization
In case of connection of a new remote sensor or in case of signal loss (on the temperature and humidity display (OUTDOOR) the “----“symbols will be reflected) the set up function should be restarted.
1.Press and hold the Alarm/Channel/ °C/°F button for 3 seconds. You will hear sound signals, which mean start of synchronization.
2.Channel symbol will start flashing. Upon the receipt by the base unit of the signal, you will hear sound signals.
3.Temperatureandhumidityindications fromtheremotesensorwillbe displayed.
Placement of the base unit and the remote sensor
You can place the base unit and the remote sensor either on the wall or on the table, using the wall-mounting holder or the table stand. While placing the units make sure that they are clamped/fixed securely. Do not place the units near metal surfaces. Place the remote sensor within the radius of the effective data transfer, and as close as possible to the base unit. Place the base unit and the remote sensor in places with minimal interferences for best data transfer. Take into
English
account that the data transfer radius of the remote sensor (up to 40 meters in the open territory) depends on the construction material of dividing walls and their number. Try several variants of location and select an optimal one. In spite of the fact that the remote sensor is protected from the influence of weather conditions, it should be located in such a way that direct sunlight, rain or snow could not get on it.
Backlight
To switch on the backlight press the Snooze/Light button. In about 10 seconds the backlight will switch off.
SETUP
To enter the setup mode press and hold the Mode button during 3 seconds. You will hear a sound signal.
Then you can press the Mode button to switch between the settings of different parameters:
•Setting of the current time/date/ city (setup mode 1),
•Pressure units selection/setting altitude (setup mode 2),
•Setting indoor temperature value limits (setup mode 3),
•Setting indoor humidity value limits (setup mode 4),
•Setting outdoor temperature value limits (setup mode 5),
•Setting outdoor humidity value limits (setup mode 6),
•Cancel setup modes.
6404IM.indd 7 |
20.08.2008 15:57:04 |
English
Setting the current time (Clock 1)/date/city (setup mode 1)
1.Press and hold the Mode button during three seconds to enter the current time setup mode (Clock 1). Hour digits will start flashing, set hours using the Max/Min/+ button.
2.Press the Select/- button to confirm the selected value, and then use the Max/Min/+ button to set minutes.
3.Press the Select/- button to confirm the selected value, and then use the Max/Min/+ button to set the day.
4.Press the Select/- button to confirm the selected value, and then use the Max/Min/+ button to set the month.
5.Press the Select/- button to confirm the selected value, and then use the Max/Min/+ button to set the year.
6.Press the Select/- button to confirm the selected value, and then use the Max/Min/+ button to enter the city number (see Application 1), after it the sunrise and sunset time will change automatically.
7.Press the Mode button to
complete settings of the current mode and to transfer to the settings of the next mode.
Note: to switch between the 12-hour and 24-hour time formats press the Snooze/Light button in the Clock 2 mode.
Selecting pressure units/setting altitude (setup mode 2)
1.Press and hold the Mode button during three seconds to enter the setup mode you will hear a sound signal.
2.Then press the Mode button once again, digits, indicating the altitude, will start flashing, the “ALTITUDE” will be displayed.
3.Use the Max/Min/+ or the Select/- buttons to set the required value.
4.Press the Alarm/Channel/°C/°F button to switch between the pressure units: “hPa” or “mmHg”.
5.Press the Mode button to complete settings of the current mode and to transfer to the settings of the next mode.
Setting indoor temperature value limits (setup mode 3)
1.Press and hold the Mode button during three seconds to enter the setup mode you will hear a sound signal.
2.Then press the Mode button twice. Digits, indicating the indoor temperature, will start flashing.
4IM.indd 8 |
20.08.2008 15:57:04 |
3.By pressing the Snooze/Light button, select the upper temperature limit ( ), the lower temperature limit (
 ) or switch off this function.
4.Use the Max/Min/+ or Select/- buttons to set the required value.
5.Press the Mode button to complete settings of the current mode and to transfer to the settings of the next mode.
Setting indoor humidity limits (setup mode 4)
1.Press and hold the Mode button during three seconds to enter the setup mode you will hear a sound signal.
2.Then press the Mode button thrice. Digits, indicating the indoor humidity, will start flashing.
3.By pressing the Snooze/Light button, select the upper humidity limit ( ), the lower humidity limit (
 ) or switch off this function.
4.Use the Max/Min/+ or Select/- buttons to set the required value.
5.Press the Mode button to complete settings of the current mode and to transfer to the settings of the next mode.
English
Setting outdoor temperature value limits (setup mode 5)
1.Press and hold the Mode button during three seconds to enter the setup mode you will hear a sound signal.
2.Then press the Mode button four times. Digits, indicating the outdoor temperature, will start flashing.
3.Select the required remote sensor (1-4) by using the Alarm/ Channel/°C/°F button.
4.By pressing the Snooze/Light button, select the upper temperature limit ( ), the lower temperature limit (
 ) or switch off this function.
5.Use the Max/Min/+ or Select/- buttons to set the required value.
6.Press the Mode button to complete settings of the current mode and to transfer to the settings of the next mode.
Setting outdoor humidity limits (setup mode 6)
1.Press and hold the Mode button during three seconds to enter the setup mode you will hear a sound signal.
2.Then press the Mode button five times. Digits, indicating the outdoor humidity, will start flashing.
6404IM.indd 9 |
20.08.2008 15:57:04 |
English
3.Select the required remote sensor (1-4) by using the Alarm/ Channel/°C/°F button.
4.By pressing the Snooze/Light button, select the upper humidity limit ( ), the lower humidity limit (
 ) or switch off this function.
5.Use the Max/Min/+ or Select/- buttons to set the required value.
6.Press the Mode button to complete settings of the current mode and to transfer to the
settings of the next mode. Note: if temperature/humidity values
fall outside the limits, you will hear sound signals, the values of the corresponding parameters will be flashing. Press any key to switch off sound signals.
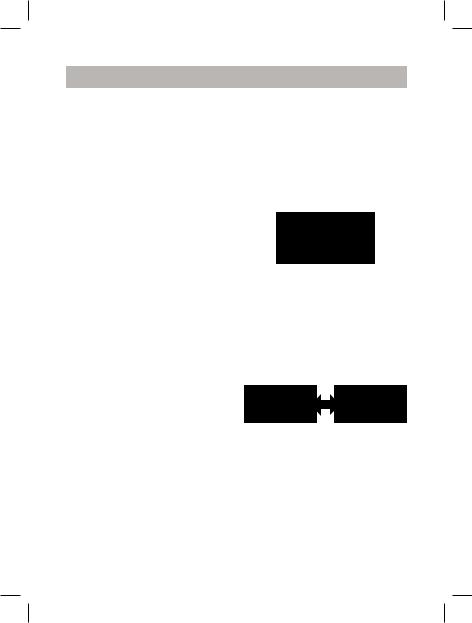
SETTINGS IN THE Clock 2 MODE
1.To enter the Clock 2 mode press the Mode button, the “Clock
2” indication will appear on the display.
CLOCK 2
2.Use the Max/Min/+ or the Select/- button to set the required value (shift against the current time, set in the Clock 1 mode).
Alarms setting
1.To enter the alarm setting mode press the Mode button, the
corresponding indications will appear on the display:  or
or .
.
2.Set the alarm actuation hours by using the Max/Min/+ button.
3.Set the alarm actuation minutes by using the Select/- button.
4.Set the day of the week by using the Snooze/Light button.
5.To switch on the alarm press the Alarm/Channel/°C/°F button, the “on” indication will appear on the display.
To switch off the alarm press the Alarm/Channel/°C/°F button once again, the on indication will go out. Note: when the required time is reached you will hear sound signals, the corresponding symbols ( or
or  ) will be flashing.
You can switch off the alarm for 8 minutes by pressing the Snooze/Light button. To switch off the alarm press any key (in about one minute the alarm will switch off automatically).
10
4IM.indd 10 |
20.08.2008 15:57:05 |

English
Phases of the Moon |
|
New Moon |
Full Moon |
Growing Moon |
Waning Moon |
First Quarter |
Last Quarter |
Young Moon |
Old Moon |
DISPLAYING OF TEMPERATURE AND HUMIDITY VALUES
1 – Indoor temperature
2 – Indoor humidity
3 – Outdoor temperature
4 – Outdoor humidity
11
6404IM.indd 11 |
20.08.2008 15:57:05 |
English
• In the Clock 1 mode press the Alarm/Channel/°C/°F button to switch between the remote sensors ( ), temperature (3) and humidity (4) data will be displayed.
• To view maximal/minimal temperature and humidity values in the Clock 1 mode press the Max/Min/+ button, the corresponding indications “max»/«min” will be displayed.
• The “HI”/”LO” indications will appear on the display if temperature and humidity are out of the limits.
Indoor/Outdoor |
Temperature |
Humidity |
Display |
Indoor |
> +55°C |
> 95% |
HI |
Indoor |
< -20°C |
< 15% |
LO |
Outdoor |
> +70°C |
> 95% |
HI |
Outdoor |
< -30°C |
< 15% |
LO |
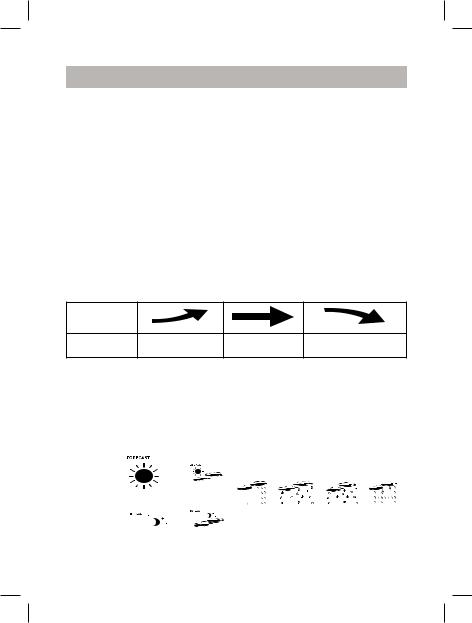
• Near the temperature and humidity data trends of changing of these parameters are reflected (grows, constant, falls) in the form of arrows (TREND).
Arrow |
|
|
|
Trend |
grows |
constant |
falls |
Note: to switch between °C and °F press the Alarm/Channel/°C/°F button in the Clock 2 mode.
Symbolic weather forecast
Weather forecast is built according to the dynamic of atmosphere pressure measuring. According to the collected data, the meteorological station can forecast weather for the next 12-24 hours. Forecast efficiency – 30-50 km.
Symbols |
|
|
|
|
|
|
|
on the |
|
or |
|
|
|
|
|
display |
or |
|
|
|
|
||
|
|
|
|
|
|||
|
|
|
|
|
|
|
|
Forecast |
sunny |
cloudy |
rain |
snow |
frost |
Storm |
|
warning |
|||||||
|
|
|
|
|
|
12
4IM.indd 12 |
20.08.2008 15:57:06 |

English
Note
1.In case of sudden pressure drop, the meteorological station can give a storm warning, storm symbol will be flashing.
2.If the temperature of the remote sensor of channel 1 is within the limits from -1,9°C till +2,9°C, the “snow” symbol will be flashing.
3.If the temperature drops till -1,9 °C, the “snow” symbol will be lighting, meaning frost.
4.For symbolic forecast data from the first channel are used, that is why the corresponding remote sensor should be located outdoors.
5.Weather forecast accuracy of this meteorological station is about 75% after 12-24 hours after inserting of batteries in the unit and performing of settings.
Pressure and temperature histograms
To view temporary histograms of pressure and temperature press the Select/- button in the Clock 1 mode. Sequence of the histogram displaying is the following:
•pressure (the “PRESSURE” indication will be displayed)
•Indoor temperature (the “INDOOR»” and “TEMPERATURE” indications will be displayed)
•Outdoor temperature (the number of the channel and the “TEMPERATURE” indication will be displayed)
13
6404IM.indd 13 |
20.08.2008 15:57:06 |

English
Note: to switch between °C and °F press the Alarm/Channel/°C/°F button in the Clock 2 mode.
Note: animated weather forecast depends on changes of atmosphere pressure. Viewing temporary histograms you can estimate the degree or possibility of weather conditions, forecast by meteorological station. For example if during the last 12 hours pressure has been constantly growing and then decreased a bit during the next 3 hours, the meteorological station can forecast rain, but the possibility of rain is low. On the other part, if there is sudden drop in the atmosphere pressure, there is high possibility of heavy rain.
SPECIFICATIONS
Temperature measuring |
|
Base unit |
|
Operative range |
from-20 till +50°C |
Accuracy |
+/-1°C (from 0 till 40°С) |
Remote sensor |
|
Operative range |
from -30 till +70°C |
Accuracy |
+/-1°C (from 0 till 40°С) |
Relative humidity measuring |
|
Base unit |
|
Operative range |
from 15 till 95% |
Accuracy |
+/-5% at 25°C |
Remote sensor |
|
Operative range |
from 15 till 95% |
Accuracy |
+/-5% at 25°C |
Data transfer from the remote sensor |
|
Frequency |
433,92 MHz |
Number of connected sensors |
Max. 4 |
Operating radius |
Max. 40 m |
Power supply |
|
Base unit |
3 “АА” batteries, 1.5 V |
Remote sensor |
2 “АА” batteries, 1.5 V |
14
4IM.indd 14 |
20.08.2008 15:57:06 |

English
Delivery set
1.Base unit – 1 pc.
2.Remote sensor – 1 pc.
3.Outdoor wire sensor – 1pc.
4.Instruction manual– 1 pc.
Application 1
Number. |
City |
Country |
1 |
Krasnodar |
Russia |
2 |
Moscow |
Russia |
3 |
Novosibirsk |
Russia |
4 |
Samara |
Russia |
5 |
Saint-Petersburg |
Russia |
6 |
Ufa |
Russia |
7 |
Vladivostok |
Russia |
8 |
Yekaterinburg |
Russia |
9 |
Astana |
Kazakhstan |
10 |
Tashkent |
Uzbekistan |
11 |
Ashkhabad |
Turkmenistan |
12 |
Kabul |
Afghanistan |
13 |
Dushanbe |
Tajikistan |
14 |
Prague |
Check Republic |
15 |
Paris |
France |
16 |
Tallinn |
Estonia |
17 |
Minsk |
Belarus |
18 |
Riga |
Latvia |
19 |
Vilnius |
Lithuania |
20 |
Kiev |
Ukraine |
21 |
Warsaw |
Poland |
22 |
Berlin |
Germany |
23 |
Vienna |
Austria |
ATTENTION!
-Due to restriction in the printing process, the display in this instruction can differ from the actual display.
-The manufacturer reserves the right to change design and specifications of the unit without preliminary notice.
Service life of the unit is 3 years.
15
6404IM.indd 15 |
20.08.2008 15:57:07 |
English
The manufacturer reserves the right to change design and specifications of the unit without preliminary notice.
Recycling of electronic and electrical appliances
(Used in the EU countries and other countries in Europe with selective sorting system)
This product is marked by the symbol of the selective sorting, relat-
 ing to the electrical and electronic component scrap. That means that the product must be taken by a selective system of collection in order to reduce any environmental impact. The electronic products not hav-
ing been the subject of a selective sorting are potentially dangerous for the environment and human health because of the potential presence of dangerous substances. For details apply to the service dealing with recycling or to the shop where you bought the product.
Guarantee
Details regarding guarantee conditions can be obtained from the dealer from whom the appliance was purchased. The bill of sale or receipt must be produced when making any claim under the terms of this guarantee.
This product conforms to the EMC-Requirements as |
laid down |
by the Council Directive 89/336/EEC and |
|
to the Low Voltage Regulation (23/73 EEC) |
|
16
4IM.indd 16 |
20.08.2008 15:57:07 |
Русский
Метеостанция VT-6404 PR
Перед подключением, использованием или настройкой устройства внимательно прочитайте инструкцию. Необходимо соблюдать все предупреждения и рекомендации по эксплуатации устройства, приведенные в этой инструкции.
Сохраните инструкцию, используйте ее в дальнейшем в качестве справочного материала.
ВНИМАНИЕ! |
Опасность удара электрическим током! |
НЕ ВСКРЫВАТЬ! |
Предупреждение: во избежание возникновения пожара или поражения электрическим током не подвергайте устройство воздействию дождя или влаги. Чтобы избежать удара электрическим током, не открывайте корпус устройства самостоятельно.
Сервисное обслуживание должно осуществляться только квалифицированными специалистами сервисных центров.
Значок молнии в равностороннем треугольнике указывает пользователю на наличие опасного напряжения внутри корпуса устройства, которое может привести к поражению электрическим током.
Значок восклицательного знака в равностороннем треугольнике предупреждает пользователя о наличии важных рекомендаций по эксплуатации и техническому обслуживанию в инструкции по эксплуатации.
МЕРЫ ПРЕДОСТОРОЖНОСТИ
1.Прежде чем начать работу с устройствами, внимательно прочитайте инструкцию по эксплуатации.
2.Не погружайте устройства в воду.
3.Не чистите устройства абразивными средствами и веществами, вызывающими повреждение корпуса и внутренних частей устройств.
4.Не подвергайте устройства ударам (пыль и влага также противопоказаны), так как это может привести к появлению неисправностей, сокращению срока службы устройств, повреждению батареек и к деформи-
17
6404IM.indd 17 |
20.08.2008 15:57:07 |

Русский
рованию деталей корпуса.
5.Если вы разобьете устройство, это приведет к снятию с гарантии. Внутри устройства нет деталей, требующих внимания пользователя.
6.Используйте только новые батарейки и именно такие, как указано в инструкции по эксплуатации. Не устанавливайте одновременно новую и старую батарейки либо батарейки разных марок.
7.При длительной работе дистанционного датчика в условиях низких или высоких температур напряжение его батареек может снизиться, при этом сокращается радиус действия его передатчика.
ОПИСАНИЕ Базовый блок
1.Дисплей Отображение текущего време-
ни (a), даты (b), времени восхода (c) и заката (d), значения температуры и влажности с дистанционного датчика (e) и внутри помещения (f), давления (g), фазы луны (h) и символьного прогноза погоды (i).
2.Кнопка Max/Min/+.
Отображение максимальной/ минимальной температуры, установка текущего времени, времени срабатывания будильника, даты, а также предельных значений температуры/влажности.
3.Кнопка Mode Переключение между режи-
мами текущего времени Clock 1/Clock 2, режимами будиль-
ника Alarm 1/Alarm 2, входа в режим настроек.
4.Кнопка Alarm/Channel/°C/°F
Включение/выключение режимов будильника Alarm 1/Alarm 2, переключение сигналов с дистанционных датчиков (от 1
до 4).
5.Кнопка Select/-
Установка текущего времени, будильника, даты, а также предельных значений температуры/влажности.
6.Кнопка Snooze/Light
Включение функции повтора звуковых сигналов и включение подсветки дисплея.
7.Батарейный отсек (для трех батареек «АА»)
8.Держатель для крепления на стену
9.Настольная подставка
Дистанционный датчик температуры и влажности
10.ЖК-дисплей отображает показание температуры и влажности
11.Кнопка SET
Ввод кода дома (HOUSE CODE), настройка каналов.
12.Гнездо для подключения внешнего проводного датчика
13.Кнопка °C/°F
Переключение между шкалами Цельсия и Фаренгейта, смена
18
4IM.indd 18 |
20.08.2008 15:57:07 |

|
|
Русский |
|
канала и домашнего кода. |
те кнопку SET, чтобы запомнить |
14. |
Батарейный отсек (для двух |
его. |
|
батареек «АА») |
4. На ЖК-дисплее датчика в те- |
15. |
Держатель для крепления на |
чение восьми секунд начнет |
|
стену/настольная подставка |
мигать номер канала. |
16. |
Внешний проводной датчик |
|
ПЕРЕД НАЧАЛОМ РАБОТЫ |
|
|
Чтобы устройство работало без |
|
|
сбоев, вставьте батарейки сначала |
|
|
в дистанционный датчик, а затем в |
|
|
базовый блок. |
|
|
Установка батареек в дистанци- |
Выберите канал передачи данных |
|
онный датчик |
нажатием кнопки °C/°F. Нажмите |
|
1. |
Открутите винт на крышке ба- |
кнопку SET, чтобы запомнить его. |
|
тарейного отсека. Установите 2 |
Базовый блок может принимать |
|
батарейки («АА», 1.5 В), соблю- |
сигналы от четырех датчиков, поэ- |
|
дая полярность. |
тому каждому датчику присваивает- |
2. |
На ЖК-дисплее датчика в тече- |
ся определенный номер канала. |
|
ние восьми секунд начнет ми- |
Примечание: для символьного про- |
|
гать код дома (HOUSE CODE). |
гноза используются данные с пер- |
|
Код дома (HOUSE CODE) – это |
вого канала, поэтому соответствую- |
|
сигнал с частотным кодирова- |
щий дистанционный датчик следует |
|
нием, посылаемый от дистан- |
разместить снаружи помещения. |
|
ционного датчика базовому |
5. На дисплее попеременно будут |
|
блоку. Все дистанционные дат- |
отображаться показания тем- |
|
чики в вашей системе должны |
пературы и влажности. |
|
иметь один и тот же код дома. |
|
3. Выберите код дома (от 1 до 15) нажатием кнопки °C/°F. Нажми-
19
6404IM.indd 19 |
20.08.2008 15:57:07 |
Русский
6.Для переключения между °C/°F нажмите кнопку °C/°F.
7.Закройте крышку отсека для батареек и закрутите винт. Примечание: если ваша метеостанция регистрирует сигналы от соседних источников, используйте другой код дома. Заводские настройки: код дома
= 01, канал = 01.
Установка батареек в базовый блок
1.Откройте крышку батарейного отсека на базовом блоке.
2.Установите 3 батарейки («АА», 1.5 В), соблюдая полярность.
3.Закройте крышку батарейного отсека.
Замена батареек
Замените батарейки в дистанционном датчике при появлении соответствующей пиктограммы о разрядки батарей (  ) рядом с показаниями температуры и влажности. Замените батарейки базового блока, когда показания на его дисплее станут тусклыми.
Примечание: при длительной работе дистанционного датчика в условиях низких или высоких температур напряжение его батареек может снизиться, сокращая тем самым радиус действия его передатчика.
вый блок автоматически начнется автоматическая синхронизация, которая продолжится приблизительно 3 минуты. В течение этих трех минут приемник будет подавать звуковые сигналы, принимать показания температуры от дистанционного датчика и отображать их.
Ручная синхронизация
В случае подключения нового дистанционного датчика или в случае потери сигнала (на дисплее температуры и влажности (OUTDOOR) отобразятся символы «----») функция настройки должна быть запущена повторно.
1.Нажмите и удерживайте кнопку
Alarm/Channel/°C/°F в течение трех секунд. Вы услышите звуковые сигналы, означающие начало синхронизации.
2.Символ канала начнет мигать. При получении базовым блоком сигнала с дистанционного датчика вы услышите звуковые сигналы.
|
3. На дисплее базового блока |
Начало работы |
отобразятся показания темпе- |
Автоматическая синхронизация |
ратуры и влажности от дистан- |
После установки батареек в базо- |
ционного датчика. |
20
4IM.indd 20 |
20.08.2008 15:57:07 |
|
|
Русский |
Размещение базового блока и дис- |
Настройка |
|
танционного датчика |
Для входа в режим настройки на- |
|
Вы можете разместить базовый |
жмите и удерживайте кнопку Mode |
|
блок и дистанционный датчик как |
в течение трех секунд. Вы услы- |
|
на стене, так и на столе, используя |
шите звуковой сигнал. После чего |
|
держатель для крепления на стену |
нажатием кнопки Mode вы можете |
|
или настольную подставку. При |
переключаться между настройками |
|
размещении устройств убедитесь, |
различных параметров: |
|
что они надежно закреплены/за- |
• |
установкатекущеговремени/ |
фиксированы. Не размещайте ус- |
|
даты/города(режимустановки1), |
тройства рядом с металлическими |
• |
выбор единиц измерения дав- |
поверхностями. Установите дистан- |
|
ления/установка высоты над |
ционный датчик в пределах радиуса |
|
уровнем моря (режим установ- |
эффективной передачи данных, и |
|
ки 2), |
как можно ближе к базовому блоку. |
• |
установка предельных темпе- |
Размещайте базовый блок и дис- |
|
ратурных значений внутри по- |
танционный датчик в местах с ми- |
|
мещения (режим установки 3), |
нимальными помехами для наилуч- |
• |
установка предельных значе- |
шей передачи данных. Примите |
|
ний влажности внутри помеще- |
во внимание, что радиус передачи |
|
ния (режим установки 4), |
данных дистанционного датчика (до |
• |
установка предельных темпе- |
40 метров на открытой местности) |
|
ратурных значений снаружи |
зависит от строительного матери- |
|
помещения (режим установки |
ала перегородок помещения и их |
|
5), |
количества. Попробуйте несколько |
• |
установка предельных значе- |
вариантов размещения и выберите |
|
ний влажности снаружи поме- |
оптимальный. Несмотря на то, что |
|
щения (режим установки 6), |
дистанционный датчик защищен от |
• |
выход из режимов установок. |
воздействия погодных условий, его |
|
|
необходимо установить так, чтобы |
Установка текущего времени |
|
на него не попадали прямые сол- |
(Clock 1)/даты/города (режим |
|
нечные лучи, дождь или снег. |
установки 1) |
|
|
1. |
Нажмите и удерживайте кнопку |
Подсветка |
|
Mode в течение трех секунд для |
Чтобы включить подсветку, нажми- |
|
входа в режим установки теку- |
те кнопку Snooze/Light. Примерно |
|
щего времени (Clock 1). Цифры |
через 10 секунд подсветка выклю- |
|
часов начнут мигать, устано- |
чится. |
|
вите часы при помощи кнопки |
|
|
Max/Min/+. |
|
2. |
Нажмите кнопку Select/- для |
21
6404IM.indd 21 |
20.08.2008 15:57:07 |
Русский
подтверждения установленного значения, затем при помощи кнопки Max/Min/+ установите минуты.
3.Нажмите кнопку Select/- для подтверждения установленного значения, затем при помощи кнопки Max/Min/+ установите день.
4.Нажмите кнопку Select/- для подтверждения установленного значения, затем при помощи кнопки Max/Min/+ установите месяц.
5.Нажмите кнопку Select/- для подтверждения установленного значения, затем при помощи кнопки Max/Min/+ установите год.
6.Нажмите кнопку Select/- для подтверждения установленного значения, затем при помощи кнопки Max/Min/+ введите номер города (см. Приложение 1), после чего время заката и восхода изменятся автоматически.
7.Нажмите кнопку Mode для завершения установок текущего
режима и перехода к установкам следующего режима.
Примечание: для переключения между 12-часовым и 24-ча- совым форматом времени нажмите кнопку Snooze/Light в
режиме Clock 2.
Выбор единиц измерения давления/установка высоты над уровнем моря (режим установки 2)
1.Для входа в режим настройки нажмите и удерживайте кнопку Mode в течение трех секунд, вы услышите звуковой сигнал.
2.После чего нажмите кнопку Mode еще раз, цифры, обозначающие высоту над уровнем моря, начнут мигать, на дисплее появится индикатор
«ALTITUDE».
3.При помощи кнопок Max/Min/+ или Select/- установите нужное значение.
4.Нажатием кнопки Alarm/ Channel/°C/°F вы можете пере-
ключаться между единицами измерения давления: «hPa» или
«mmHg».
5.Нажмите кнопку Mode для завершения установок текущего режима и перехода к установкам следующего режима.
Установка предельных температурных значений внутри помещения (режим установки 3)
1.Для входа в режим настройки нажмите и удерживайте кнопку
22
4IM.indd 22 |
20.08.2008 15:57:07 |
 Loading...