


VT-3524 BK
Clock radio
Радиочасы
3
8
14
20
26
1
VT-3524_IM.indd 1 |
17.01.2013 13:37:36 |

2
VT-3524_IM.indd 2 |
17.01.2013 13:37:36 |
ENGLISH
CLOCK RADIO
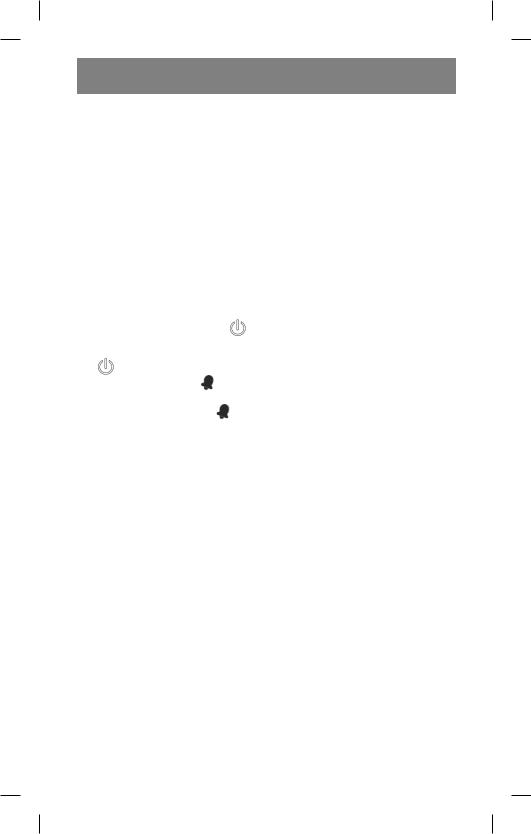
Description
1.Volume down button
2.«DISPLAY» volume up/switching of sequential displaying mode on/off button
3.Frequency down  / current date «Y-M-D» displaying button
4.«SNOOZE/SLEEP/DIMMER» alarm repeating signal/radio sleep timer/ display brightness setup button
5.«DST» frequency up  / summer/ winter time clock setting button
6.«M+/MEM/NAP/DISPLAY AUTO OFF» radio stations recording and switching/countdown timer setting/ display auto switch off button
7. |
Radio/alarm ON/OFF button « » |
||
8. |
«PM» time indicator |
|
|
9. |
Display |
auto switch off |
indicator |
|
« » |
|
|
10.First alarm on indicator |
1 |
||
11. Time indication |
|
||
12.Second alarm on indicator |
2 |
||
13. |
«CLK.ADJ.» date and time setting |
||
|
button |
|
|
14. |
«AL.2» |
second alarm |
on/setup |
|
button |
|
|
15.«AL.1» first alarm on/setup button
16.Power cord
17. FM-antenna cord
18.Battery compartment lid
19.Label
SAFETY MEASURES
Before using the unit, read these instructions carefully. Keep this manual for future reference.
Use the unit for intended purposes only, as specified in this manual. Mishandling the unit can lead to its breakage and cause harm to the user or damage to his/her property.
•Make sure that unit operating voltage corresponds to voltage of your mains.
•To prevent fire or electric shock hazard do not expose the unit to rain or moisture, do not place it in places with high humidity (near bath tubs, containers filled with water, kitchen sinks, washing machines, near a swimming pool, in wet basements,
etc.). Prevent the unit from dripping and splashing.
•To prevent fire or electric shock hazard do not overload sockets or extension cords as this can result in fire or electric shock.
•Place the clock radio in such a way that you can easily pull out the plug from the socket in case of any malfunction.
•For additional unit protection during lightning storm and in cases when you are not going to use it for a long time, unplug it. It will prevent the unit from being damaged by lightning and power surges.
•To unplug the unit, pull the plug, but not the cord.
•To prevent electric shock do not remove the cover by yourself. Do not repair the unit or make any changes in it. If you find any damages, unplug the unit and apply to the authorized service center.
•Install the unit in places with proper ventilation. Do not block the ventilation openings of the unit.
•Place the unit on a flat stable surface, away from devices with strong magnetic field, for example, from video and audio recording units or big speakers, as magnetic electric field of such devices causes interferences while unit operation.
•Do not connect the FM-antenna with the external antenna.
•Do not set clock radio near heat sources such as radiators, electric heaters, stoves, or places exposed to direct sunlight, excessive dust, vibration or mechanical shocks. It is prohibited to place sources of open fire, such as candles on the unit.
•Do not let foreign objects get into unit openings.
•Never allow children to use the unit as a toy.
•This unit is not intended for usage by children or disabled persons unless they are given all the necessary
and understandable instructions by a person who is responsible for their safety on safety measures and information about danger that can
3
VT-3524_IM.indd 3 |
17.01.2013 13:37:36 |

ENGLISH
be caused by improper usage of the unit.
•For children safety reasons do not leave polyethylene bags, used as a packaging, unattended.
•Attention! Do not allow children to play with polyethylene bags or film.
Danger of suffocation!
•Keep the unit out of reach of children.
THE UNIT IS INTENDED FOR HOUSEHOLD USE ONLY
Power connection
In case of unit transportation or storage at low temperature it is necessary to keep it for at least two hours at room temperature before switching on.
–Make sure that unit operating voltage corresponds to voltage of your mains.
–The unit is equipped with an integrated backup battery supply system, that allows to save settings of current time, timer, alarm and recorded radio stations in case of AC supply voltage interruption. Once the voltage gets normal, the unit will be switched to the mains supply.
–Open the battery compartment lid
(18)having preliminary unscrewed the fixing screw. Insert a CR2032 battery (not included), with the “plus” upward.
–Close the battery compartment lid
(18)and tighten up the screw.
–To connect the unit to the mains insert the plug of the power cord
(16)into the socket.
Attention!
Batteries leakage can cause injuries or unit damage. In order to avoid the unit damage, follow the following instructions:
•insert a battery following the polarity (“plus” upward);
•remove the battery if you are not planning to use the unit for a long time;
•do not dismantle the battery, do not subject it to high temperatures;
•replace the batteries in time.
4
Date and time setting
–Plug the unit into the mains.
–Press and hold the «CLK.ADJ.» button (13). The year digits will start flashing on the display.
–Select the necessary year by repeatedly pressing or holding the buttons (3) and (5).
–Press the «CLK.ADJ. » button (13). The month digits will start flashing on the display.
–Use the buttons (3) « » and (5) «
 » to select the necessary month.
–Press the «CLK.ADJ. » button (13). The day digits will start flashing on the display.
–Use the buttons (3) and (5) to select the necessary day.
–Press the «CLK.ADJ. » button (13), time format symbols will start flashing on the display: 24 hours (24 Hr) or 12 hours (12 Hr).
–Use the buttons (3) and (5) to select the time format (12 Нr or 24 Нr).
–Press the «CLK.ADJ.» button (13). The hour digits will start flashing on the display.
–Use the buttons (3) and (5) to select the necessary hour.
Note: To set the afternoon time in 12 hours format (12 Hr) press the buttons
(3) and (5) consequently until the indicator (8) «PM» appears.
–Press the «CLK.ADJ. » button (13). The minute digits will start flashing on the display.
–Use the buttons (3) and (5) to select the necessary minutes.
–To finish the setup procedure press the «CLK.ADJ.» button (13).
Note: If buttons (3) and (5) are not being pressed within 30 seconds while setup process, the unit will be switched to the current time mode.
Current date view
–To view the date in the current time mode (radio is off) press the «Y-M- D» button (3).
–To view the year, current date and time consequently press the «Y-M- D» button (3).
VT-3524_IM.indd 4 |
17.01.2013 13:37:36 |

ENGLISH
Setting the clock to summer/winter time
–Plug the unit into the mains.
–Press and hold the «DST» button (5) until the time digits change.
Alarm setup (AL.1 and AL. 2).
–To view the settings of the first alarm in the current time mode press the «AL.1» button (15).
–In the alarm settings of view mode, press again and hold the «AL.1» button (15). The hour digits will start flashing on the display.
–Use the buttons (3) and (5) to select the necessary hour.
–Press the «AL.1» button (15). The minute digits will start flashing on the display.
–Use the buttons (3) and (5) to select the necessary minutes.
–Press the «AL.1» button (15). Flashing symbols of alarm signal repeating modes will appear on the display. Use the buttons (3) and (5) to select the necessary mode:
–1-1 without repeat,
–1-5 alarm signal repeating from Monday to Friday,
–1-7 alarm signal repeating seven days a week,
–6-7 alarm signal repeating on Saturday and Sunday.
–Press the «AL.1» button (15). If you set the alarm signal without repeat (1-1), the alarm day digits will appear on the display. Using buttons
(3)and (5) set the alarm day (1 - Monday, 2 - Tuesday etc.).
–Press the «AL.1» button (15). The alarm signal symbols will start flashing on the display. Use the buttons (3) and (5) to select the necessary alarm signal: sound signal (symbol «bu») or radio (tuned station frequency appears).
–If you selected radio as alarm signal, press the «AL.1» button (15), the alarm volume level symbol will start flashing on the display (from 1 to 15). Using the buttons (3) and (5) select the desired alarm volume level.
Note: If you want to select the radio as an alarm signal, preliminary tune the required radio station (see “Radio stations reception”).
–To finish the setting of the first alarm, press the «AL.1» button (15).
–Repeat the described steps for the second alarm (14) «AL.2».
Note:
•If buttons (3) and (5) are not being pressed within 30 seconds, the unit will be switched to the current time mode.
•Alarm operation is only possible when the unit is connected to the mains.
Switching the alarm on/off
–To switch the alarm (alarms) on in the current time mode press and hold the «AL.1» button (15) and/ or the «AL.2» button (14) until the
indicators (10) 1 and/or (12)
2 respectively appear on the display.
– To switch the alarm (alarms) off in the current time mode press and hold the corresponding button again. Indicator of the corresponding alarm will switch off.
Alarm snooze
–You can switch off the alarm signal for 9 minutes by pressing the “SNOOZE/SLEEP” button (4). The indicator of the selected alarm will flash; alarm signal will be repeated in 9 minutes.
–To switch the alarm sound signal off
press the button (7) « ».
».
Note: The alarm/radio signal will sound for 30 minutes if you do not press any buttons.
Display brightness setup
Set up the necessary display brightness by pressing the button (4) “DIMMER” repeatedly in the current time mode.
Sequential displaying mode
You can switch sequential displaying function for current time, year and current date.
5
VT-3524_IM.indd 5 |
17.01.2013 13:37:37 |
ENGLISH
–To activate this function in the time mode (radio is off) press and hold the «DISPLAY» button (2) until the symbol «ON» appears on the display.
–To switch the sequential displaying mode off press and hold the «DISPLAY» button (2) until the symbol «OFF» appears on the display.
Display auto switch off
–To activate the mode press and hold the «DISPLAY AUTO OFF» button (6)
until the indicator (9) « » appears. The display will be switched off in 15 seconds after pressing the buttons.
Note: This function is inactive in the radio mode.
–To switch the function off press and hold the «DISPLAY AUTO OFF» button (6), the indicator (9) switches off.
Countdown timer
–Press the «MEM/NAP» button (6) in the current time mode, the symbol «n90» will appear on the display that means countdown timer actuation in 90 minutes.
–Set the time of timer actuation from 10 to 90 minutes with 10 minutes step by pressing the «MEM/NAP» button (6) repeatedly.
–To view the remaining time press the «MEM/NAP» button (6).
–After the set time runs off you will
hear a sound signal, to switch it off press the button (7) « ».
».
–To cancel this function press the «MEM/NAP» button (6) repeatedly until «OFF» symbol appears on
the display or switch the radio on pressing the button (7) « ».
».
Radio stations reception
– Connect the unit to the mains and
press the button (7) « |
». |
–Use the buttons (3)  and (5)
  for tuning to the desired radio station.
Manual tuning: press the buttons
(3) and (5) consequently to select the desired radio station with step 0.1 MHz in FM mode.
6
Auto tuning: press and hold the buttons (3) and (5) for more than 2 seconds. The tuner shall begin scanning and automatically stops after finding the nearest strong signal of radio station.
– Press the button (7) « |
» to switch |
the radio off. |
|
Antenna (18)
Select the wire antenna (18) position for the best reception of radio signal.
Volume level adjusting
Use buttons (1) “-” and (2) “+” to set up the desired volume level.
Radio stations recording
You can set up and save 10 radio stations in FM band.
–Tune to the station you want to record.
–Press and hold the «M+» button
(6)until a flashing symbol of “Р--” appears.
–Use the buttons (3) and (5) repeatedly to select the number of the programming cell.
–Press the «M+» button (6) again to save settings.
–Repeat steps 1 – 4 for all radio stations that you wish to save in the clock radio memory.
–To select the preliminary recorded radio stations press the button (6) consequently in radio mode.
Automatic radio switch off
You can set up the radio switch off time.
–Press the button (4) «SNOOZE/ SLEEP» in radio mode. «90» symbols will appear on the display, that means automatic switching off of the radio in 90 minutes.
–Set up the necessary auto switch
off time (90, 60, 30 or 15 minutes) pressing the «SNOOZE/SLEEP» button (4) repeatedly.
–To cancel this function press the «SNOOZE/SLEEP» button (4) repeatedly until «OFF» symbol appears on the display or switch
the radio off by pressing the button
(7) « ».
».
VT-3524_IM.indd 6 |
17.01.2013 13:37:37 |

ENGLISH
Note: Electromagnetic interferences can influence operation of the unit. In this case disconnect the unit from the power supply, and then connect again. If necessary move or relocate the unit.
CLEANING AND CARE
–Disconnect the unit from the mains before cleaning.
–Use a soft cloth to clean the unit.
–Do not use liquid or aerosol detergents for cleaning.
STORAGE
–Clean the unit before taking it away for storage.
–Keep the unit away from children in a dry cool place.
DELIVERY SET
Clock radio – 1 pc.
Instruction manual – 1 pc.
TECHNICAL SPECIFICTAIONS
Power supply: 230 V ~ 50 Hz
Backup power supply: CR2032 battery, 3 V
FM frequency range: 87.5–108 MHz Maximal power consumption: 5 W
The manufacturer preserves the right to change the specifications of the unit without a preliminary notification.
Unit operating life is 3 years.
Guarantee
Details regarding guarantee conditions can be obtained from the dealer from whom the appliance was purchased. The bill of sale or receipt must be produced when making any claim under the terms of this guarantee.
This product conforms to the EMC-Requirements as laid down by the Council Directive 89/336/EEC and to the Low Voltage Regulation (73/23 EEC)
7
VT-3524_IM.indd 7 |
17.01.2013 13:37:37 |

русский
РАДИОЧАСЫ
Описание
1.Кнопка уменьшения уровня громкости
2.Кнопка увеличения уровня громкости/включения/выключения режима последовательного отображения «DISPLAY»
3.Кнопка уменьшения частоты
настройки радио  /отображения текущей даты «Y-M-D»
4.Кнопка повтора сигнала будильника/автоотключения радио/ регулировки яркости дисплея «SNOOZE/SLEEP/DIMMER»
5.Кнопка увеличения частоты
настройки радио  /перевода часов на летнее/зимнее время «DST»
6.Кнопка программирования и переключения радиостанций / настройки таймера обратного отсчета/автоотключения дисплея «M+/MEM/NAP/DISPLAY AUTO OFF»
7.Кнопка включения/выключения
радио/будильника « |
» |
8.Индикатор отображения времени после полудня «РМ»
9.Индикатор автоотключения дис-
плея « |
» |
10.Индикатор включения первого будильника 1
11.Показания времени
12.Индикатор включения второго будильника 2
13.Кнопка установки даты и времени «CLK.ADJ.»
14.Кнопка включения/настройки второго будильника «AL.2»
15.Кнопка включения/настройки первого будильника «AL.1»
16.Сетевой шнур
17.Провод FM-антенны
18.Крышка батарейного отсека
19.Этикетка
МЕРЫ БЕЗОПАСНОСТИ
Перед началом эксплуатации электроприбора внимательно прочитайте настоящее руководство по эксплуатации и сохраните его для использо-
8
вания в качестве справочного материала.
Используйте устройство только по его прямому назначению, как изложено в данном руководстве. Неправильное обращение с прибором может привести к его поломке, причинению вреда пользователю или его имуществу.
•Убедитесь, что рабочее напряжение прибора соответствует напряжению домашней сети.
•Во избежание возникновения пожара или поражения электрическим током не подвергайте устройство воздействию дождя или влаги, не размещайте это устройство в условиях повышенной влажности (около ванн, емкостей с водой, кухонных раковин, стиральных машин, рядом с плавательным бассейном, в сырых подвалах и т.д.) Не допускайте попадания на устройство капель или брызг.
•Во избежание возникновения пожара или поражения электрическим током не допускайте перегрузки розеток или удлинителей, так как это может привести к пожару или поражению электрическим током.
•Установите это устройство таким
образом, чтобы в случае неисправности вилку сетевого шнура можно было немедленно вынуть из розетки.
• Для дополнительной защиты устройства во время грозы, а также в тех случаях, когда вы не собираетесь использовать его в течение длительного времени, отключите устройство от розетки электросети. Это исключит выход устройства из строя из-за ударов молнии или скачков напряжения в электросети.
•При отключении устройства беритесь непосредственно за вилку сетевого шнура, ни в коем случае не тяните за шнур.
•Во избежание удара электрическим током не открывайте корпус устройства самостоятельно. Не ремонтируйте прибор и не вно-
VT-3524_IM.indd 8 |
17.01.2013 13:37:37 |

|
|
|
|
|
|
|
|
|
|
русский |
||||
|
|
|
|
|
|
|||||||||
|
сите в него изменения. При обна- |
|
тами |
или |
пленкой. Опасность |
|||||||||
|
ружении неисправностей отклю- |
|
удушья! |
|
|
|
|
|||||||
|
чите прибор от сети и обрати- |
• |
Храните прибор в местах недо- |
|||||||||||
|
тесь в авторизованный сервисный |
|
ступных для детей. |
|
|
|||||||||
|
центр. |
|
|
|
|
|
|
|
|
|
|
|
|
|
• |
Установите устройство в местах |
УСТРОЙСТВО |
|
ПРЕДНАЗНАЧЕНО |
||||||||||
|
с достаточной вентиляцией. Не |
ТОЛЬКО |
|
ДЛЯ |
БЫТОВОГО |
|||||||||
|
закрывайте |
вентиляционные |
ИСПОЛЬЗОВАНИЯ |
|
|
|||||||||
|
отверстия прибора. |
|
|
|
|
|
|
|
|
|
|
|||
• |
Устройство |
необходимо |
раз- |
Подключение питания |
|
|
||||||||
|
местить на |
ровной, |
устойчивой |
В |
случае транспортировки или |
|||||||||
|
поверхности, вдали от оборудо- |
хранения устройства при пони- |
||||||||||||
|
вания |
с сильными |
магнитными |
женной температуре необходимо |
||||||||||
|
полями, например от видео - и |
выдержать его при комнатной тем- |
||||||||||||
|
аудиомагнитофонов или больших |
пературе не менее двух часов. |
||||||||||||
|
колонок, т.к. силовые линии маг- |
– |
Убедитесь, что рабочее напря- |
|||||||||||
|
нитного поля от этих устройств |
|
жение устройства соответствует |
|||||||||||
|
могут вызвать помехи в работе |
|
напряжению домашней сети. |
|||||||||||
|
устройства. |
|
|
|
|
|
– |
Прибор оборудован встроенной |
||||||
• |
Не соединяйте FM-антенну с |
|
батарейной |
системой |
резерв- |
|||||||||
|
наружной антенной. |
|
|
|
|
ного питания, которая позволя- |
||||||||
• |
Не размещайте устройство вбли- |
|
ет в случае пропадания напря- |
|||||||||||
|
зи источников тепла, например, |
|
жения в сети переменного тока |
|||||||||||
|
радиаторов, |
электрообогревате- |
|
сохранить |
|
настройки |
текущего |
|||||||
|
лей, духовок, а также в местах, |
|
времени, таймера, |
будильника |
||||||||||
|
подверженных воздействию пря- |
|
и запрограммированные радио- |
|||||||||||
|
мых солнечных лучей, чрезмер- |
|
станции. Как только напряжение в |
|||||||||||
|
ному запылению, вибрации или |
|
сети восстанавливается, устрой- |
|||||||||||
|
механическим ударам. Не ставьте |
|
ство переключается на питание |
|||||||||||
|
на устройство источники открыто- |
|
от сети. |
|
|
|
|
|||||||
|
го пламени такие, как свечи. |
|
– |
Откройте |
|
крышку |
батарейно- |
|||||||
• |
Не допускайте попадание посто- |
|
го отсека (18), предваритель- |
|||||||||||
|
ронних |
предметов |
в |
отверстия |
|
но открутив фиксирующий винт. |
||||||||
|
устройства. |
|
|
|
|
|
|
Установите |
элемент |
питания |
||||
• |
Не разрешайте детям использо- |
|
CR2032 (не входит в комплект |
|||||||||||
|
вать прибор в качестве игрушки. |
|
поставки) «плюсом» вверх. |
|||||||||||
• |
Данное устройство не пред- |
– |
Закройте |
крышку |
батарейного |
|||||||||
|
назначено |
для |
использования |
|
отсека (18) и закрутите винт. |
|||||||||
|
детьми и людьми с ограничен- |
– |
Для |
подключения |
устройства |
|||||||||
|
ными |
возможностями, |
если |
|
к сети вставьте вилку сетевого |
|||||||||
|
только |
лицом, отвечающим за |
|
шнура (16) в розетку. |
|
|
||||||||
|
их безопасность, им не даны |
Внимание! |
|
|
|
|
||||||||
|
соответствующие |
и |
понятные |
Протечка элемента питания может |
||||||||||
|
им инструкции |
о |
безопасном |
стать причиной травм или повреж- |
||||||||||
|
использовании устройства и тех |
дения устройства. Чтобы избежать |
||||||||||||
|
опасностях, которые могут воз- |
повреждения, |
|
следуйте приведен- |
||||||||||
|
никать |
при |
его |
неправильном |
ным ниже инструкциям: |
|
|
|||||||
|
пользовании. |
|
|
|
|
• |
устанавливайте элемент питания, |
|||||||
• |
Из соображений |
безопасности |
|
соблюдая полярность («плюсом» |
||||||||||
|
детей не оставляйте полиэтиле- |
|
вверх); |
|
|
|
|
|||||||
|
новые пакеты, используемые в |
• |
вынимайте |
|
элемент |
питания, |
||||||||
|
качестве упаковки, без надзора. |
|
если устройство не будет исполь- |
|||||||||||
• |
Внимание! Не разрешайте детям |
|
зоваться в течение длительного |
|||||||||||
|
играть с полиэтиленовыми паке- |
|
времени; |
|
|
|
|
|||||||
9
VT-3524_IM.indd 9 |
17.01.2013 13:37:37 |

русский
• |
не разбирайте элемент питания, |
возврат в режим отображения теку- |
||
|
не подвергайте его воздействию |
щего времени. |
|
|
|
высокой температуры; |
|
|
|
• |
своевременно меняйте элемент |
Просмотр текущей даты |
||
|
питания. |
– |
Для просмотра даты в режиме |
|
|
|
|
отображения времени (радио |
|
Настройка даты и времени |
|
выключено) нажмите |
кнопку (3) |
|
– Подключите устройство к сети. |
|
«Y-M-D». |
|
|
– |
Нажмите и удерживайте кнопку |
– |
Последовательно |
нажимайте |
|
(13) «CLK.ADJ.» , на дисплее нач- |
|
кнопку (3) «Y-M-D» для просмотра |
|
|
нет мигать символ года. |
|
года, текущей даты и времени. |
|
– |
Последовательно нажимая или |
|
|
|
|
удерживая кнопки (3) и (5), выбе- |
Перевод часов на летнее/зимнее |
||
|
рите нужный год. |
время |
|
|
– |
Нажмите кнопку (13) «CLK.ADJ.». |
– Подключите устройство к сети. |
||
|
На дисплее начнет мигать число- |
– |
Нажмите и удерживайте кнопку |
|
|
вое обозначение месяца. |
|
(5) «DST» до изменения показа- |
|
– |
Используя кнопки (3) « » и (5) « » |
|
ний времени. |
|
, выберите нужный месяц.
–Нажмите кнопку (13) «CLK.ADJ.». Настройкабудильников(AL.1иAL.2)
На дисплее начнет мигать числовое обозначение дня.
–Используя кнопки (3) и (5), выберите нужный день.
–Нажмите кнопку (13) «CLK.ADJ.», на дисплее начнет мигать символ, обозначающий формат отображения времени: 24 часа (24 Hr) или 12 часов (12 Hr).
–Используя кнопки (3) и (5), выберите формат отображения времени (12Нr или 24Нr).
–Нажмите кнопку (13) «CLK.ADJ.». На дисплее начнут мигать цифры часа.
–Используя кнопки (3) и (5), выберите нужный час.
Примечание: При отображении времени в формате 12 часов (12Hr), для установки времени после полудня последовательно нажимайте кнопку
(3) и (5) до появления индикатора
(8) «PM»
–Нажмите кнопку (13) «CLK.ADJ.». На дисплее начнут мигать показания времени в минутах.
–Используя кнопки (3) и (5), установите время в минутах.
–Для завершения процедуры настройки нажмите кнопку (13) «CLK.ADJ.».
Примечание: Если в течение 30 секунд во время настройки кнопки
(3) и (5) не будут нажаты, произойдет
10
–В режиме отображения времени для просмотра настроек первого будильника нажмите кнопку (15) «AL.1».
–В режиме просмотра настроек будильника, повторно нажмите и удерживайте кнопку (15) «AL.1». На дисплее начнут мигать цифры часа.
–Используя кнопки (3) и (5), выберите требуемый час.
–Нажмите кнопку (15) «AL.1». На дисплее начнут мигать цифры минут.
–Используя кнопки (3) и (5), выберите нужное значение минут.
–Нажмите кнопку (15) «AL.1». На дисплее появятся мигающие символы режимов повтора будильника. Используя кнопки (3) и (5), выберите нужный режим:
1-1 без повтора,
1-5 повтор сигнала будильника с понедельника по пятницу, 1-7 повтор сигнала будильника семь дней в неделю,
6-7 повтор сигнала будильника в субботу и воскресенье.
–Нажмите кнопку (15) «AL.1». Если Вы установили сигнал будильника без повтора (1-1), на дисплее появится числовое обозначение дня недели, в который должен сработать будильник. Используя кнопки
(3) и (5) установите день, в кото-
VT-3524_IM.indd 10 |
17.01.2013 13:37:37 |
 Loading...