


АУДИО-ВИДЕО И БЫТОВАЯ ТЕХНИКА
VT-4002 SR
DVD player
DVD плеер
Инструкция по эксплуатации
GB |
Manual instruction |
2 |
|
|
|
|
Инструкция по эксплуатации |
13 |
RUS |
||
|
|
|
|
Інструкція з експлуатації |
25 |
UA |
||
|
|
|
|
Пайдалану нұсқасы |
37 |
KZ |
||
|
|
|
|
Фойдаланиш қоидалари |
48 |
UZ |
||
|
www.vitek.ru
4002IM_new.indd 1 |
20.08.2009 12:38:52 |
ENGLISH
DVD PLAYER VT4002
IMPORTANT INFORMATION FOR END USERS – WEEE DIRECTIVE
2002/96/CE AND ITS NEXT VERSION 2003/108/CE. ABOUT UTILIZATION OF ELECTRICAL AND ELECTRONIC EQUIPMENT. According to WEEE 2002/96/CE directive and its next version 2003/108/CE, this equipment is marked with the symbol of crossed out waste container.
To utilize this equipment, please follow these instructions:
It is prohibited to utilize this equipment as usual domestic waste. Please apply to one of the authorized WEEE centers (utilization of electrical and electronic
equipment waste). This waste can be returned to the seller for utilization, if you are buying new similar equipment.
The above directive, which we recommend you to study, states that illegal utilization of electrical or electronic equipment waste is subject to penalty.
Precautions
CAUTION! IN ORDER TO AVOID ELECTRICAL SHOCK, FIRST CONNECT THE CORD TO THE PLAYER, AND THEN INSERT PLUG INTO THE ELECTRICAL OUTLET.
Do not place candles or other sources of fire on the unit or near it to avoid fire.
Do not bump the unit, particularly the display.
Install the unit on a flat surface because falling down the unit can cause injuries for people and the unit itself can be damaged.
Do not spill liquids and do not place any water tanks, for example, vases, on the unit.
Switch off the main power and disconnect the power cord when the unit is not in use for a prolonged period of time.
Forbidden
To avoid the unit to be damaged a good air circulation shall be provided.
Forbidden
To avoid fire or shock by electrical current it is forbidden to uncover the unit (or open the back panel). Refer all servicing to qualified service personnel.
Forbidden
Protect the unit from humidity. Do not expose the unit to rain or moisture. Do not place vases or water tanks on the player surface.
Forbidden
Do not expose the unit to heat sources.
CAUTION! DO NOT OPEN THE UPPER HOUSING OF THE DEVICE DUE TO RISK OF ELECTRIC SHOCK. THERE ARE NO USERSERVICEABLE PARTS INSIDE. EMPLOY THE SERVICES OF QUALIFIED PERSONNEL.
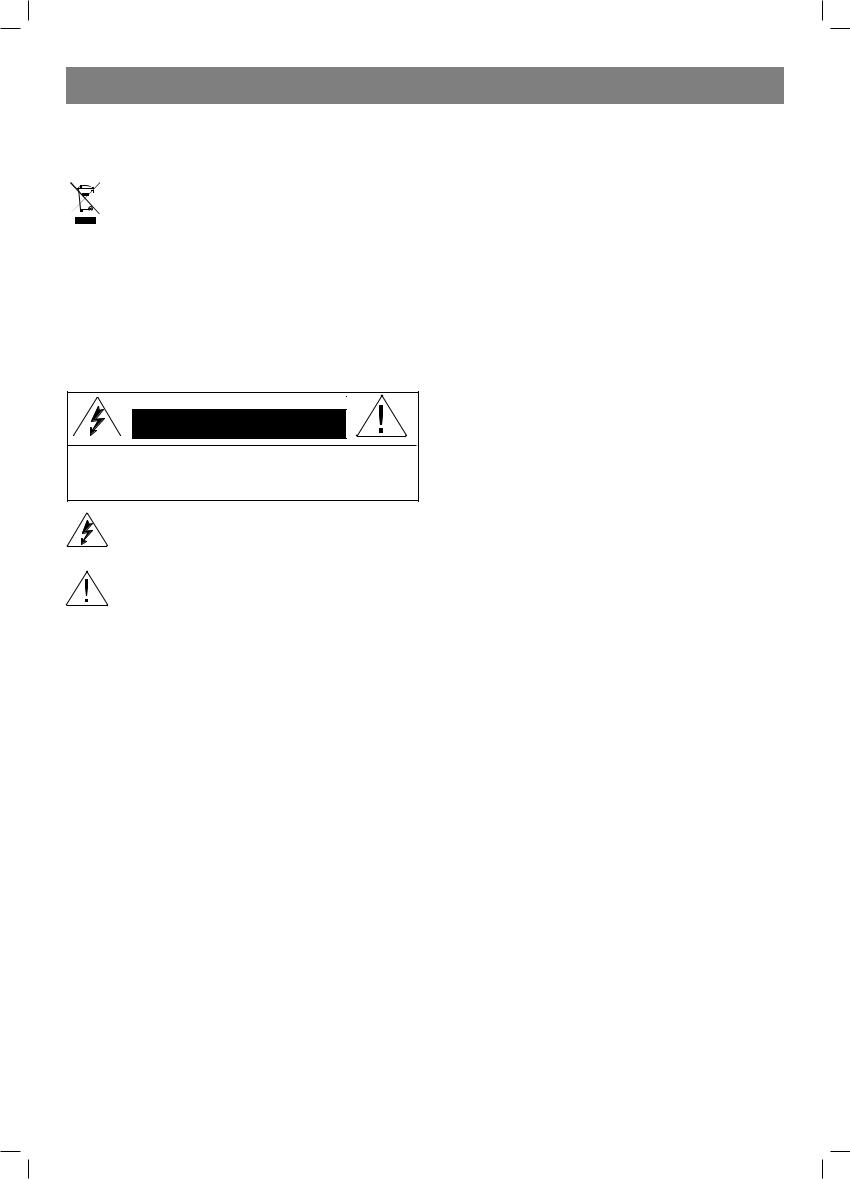
CAUTION |
Risk of electric shock |
DO NOT OPEN |
WARNING: In order to reduce the risk of fire or electrical shock, |
do not remove the device panels. Contact qualified personnel for |
service and repairs. |
The lightning bolt in a triangle symbol indicates to the user that there are dangerous voltages inside the device that can result in electrical shock.
The exclamation point in a triangle symbol indicates to the user important operating instructions and technical service information in the accompanying literature.
If the power plug or the power cord is damaged immediately disconnect the power plug from the power outlet and contact a repair shop.
Do not install or operate the unit to humidity or dusty places to avoid any damage for the player.
Do not install or operate the display of the unit direct exposed to sunlight.
Do not plug in too many appliances to a one power outlet and do not use an extension cord to avoid fire or shock by electrical current. It is forbidden to operate the DVD player near sources of water such as sinks or dish washing machines as well as to install it in basements. Do not open the cover or touch any of the components inside the unit. If after troubleshooting the malfunction is not eliminated, contact a qualified expert.
Do not cover the ventilation openings on the unit by any kind. Use the unit following the manual. Servicing by qualified service
personnel is required when the apparatus has been damaged in any way.
If the unit has been dropped or the front panel has been damaged disconnect the power cord and contact a repair shop.
Do not place the unit on a bed or a sofa and so on because ventilation openings can be blocked.
Disconnect the power cord, the antenna and other cables when you do not intend to use the unit for a long period of time.
Do not insert anything into the case; otherwise it is easy to touch alive parts which can cause fire and shock by electrical current.
Do not install the unit near heaters or other units radiating heat.
If there is abnormal noise or odor switch off the unit, unplug the cord from power outlet and contact a qualified expert.
To avoid fire or shock by electrical current it is forbidden to uncover the unit (or open the back panel). Refer all servicing to qualified service personnel.
Do not install the unit into closed cabinets with no air circulation.
Attention
Wipe the panel and case with soft dry cloth only.
If there are any abnormal effects, such as smoke, unusual noise or smell immediately switch off the unit.
Do not touch the case during lightning storms.
If the unit is unused for a long period of time unplug it. Caution:
The unit uses a laser classified as Class 1. The unit radiates visible laser beams which can cause injuries at direct exposure. Follow the instructions during unit operation.
Important Safety Regulations
1.Read the instructions.
2.Keep the instructions.
3.Heed all warnings.
4.Follow all instructions.
5.Do not use this Player near water.
6.Clean only with dry cloth.
7.Do not block any ventilation openings. Install in accordance with the manufacturer’s instructions.
8.Do not install near any heat sources such as radiators, heat registers, stoves, or other apparatus (including amplifiers) that produce heat.
9.Protect the power cord from being walked on or pinched particularly at plugs, convenience receptacles, and the point where they exit from the apparatus.
10.Only use attachments/accessories specified by the manufacturer.
11.Unplug this apparatus during lightning storms or when unused for a long periods of time.
12.Refer all servicing to qualified service personnel.
Servicing is required when the apparatus has been damaged in any way, such as power supply cord or plug is damaged, liquid has been spilled or objects have fallen into the apparatus, the apparatus has been exposed to rain or moisture, does not operate normally, or has been dropped.
Features
•Full compatibility with DVD, VCD, CD, MP3 and Kodak Picture CD on CD R & CD RW
•Screensaver
•Multiple playback modes: Memory, Program, Search, Repeat
•Audio output: 2 CH output
•Video output: Composite Video, S Video
Disc formats and functions supported by this player
Kodak Picture CDs
МР3 files on CD R/ CD RW
Closed caption
Multi angle
 Auduo CDs
2
4002IM_new.indd 2 |
20.08.2009 12:38:54 |
ENGLISH
Video CDs
Video DVD
Parental control
Subtitle choices
Audio choices
TV aspect ratio modes
Karaoke
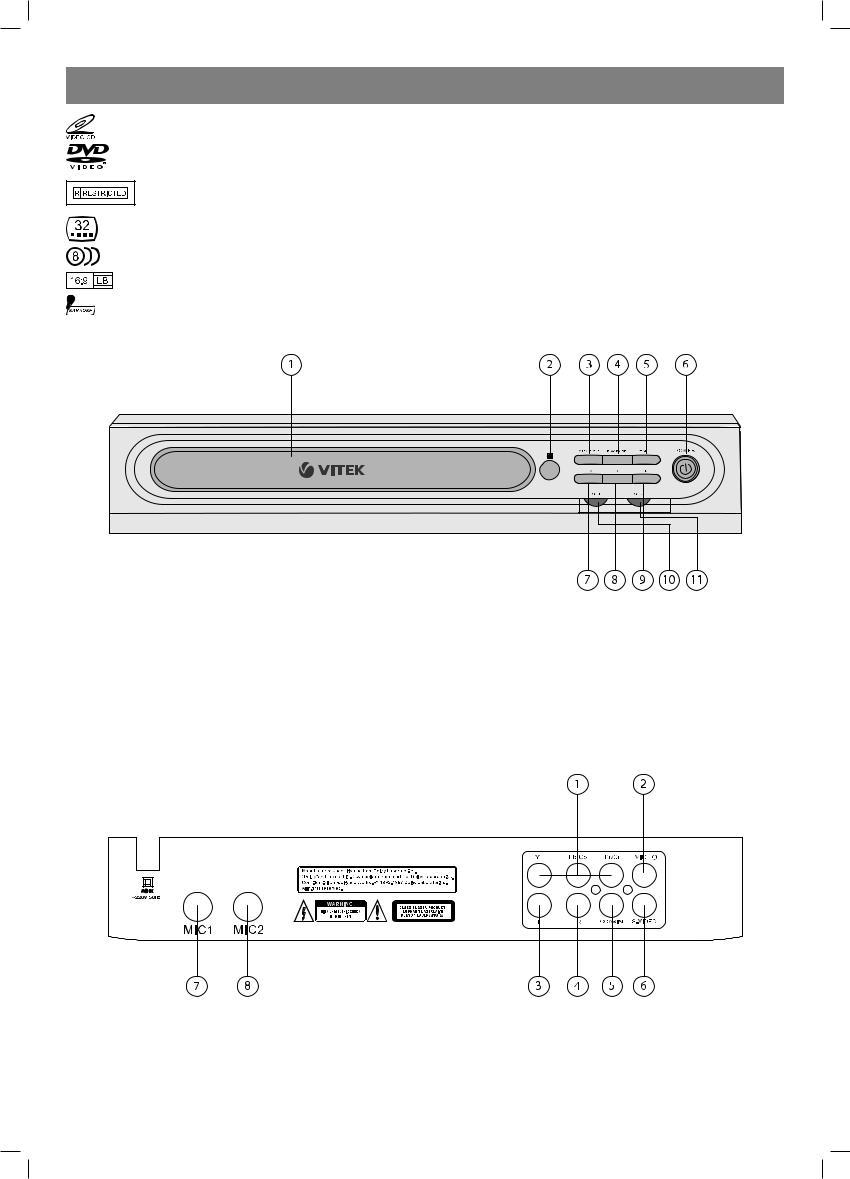
Front panel function:
1.DISC TRAY
2.IR
3.OPEN/CLOSE
4.PLAY/PAUSE
5.STOP
6.POWER
7.PREVIOUS
8.NEXT
9.LEFT/RIGHT
10.VOL1
11.VOL2
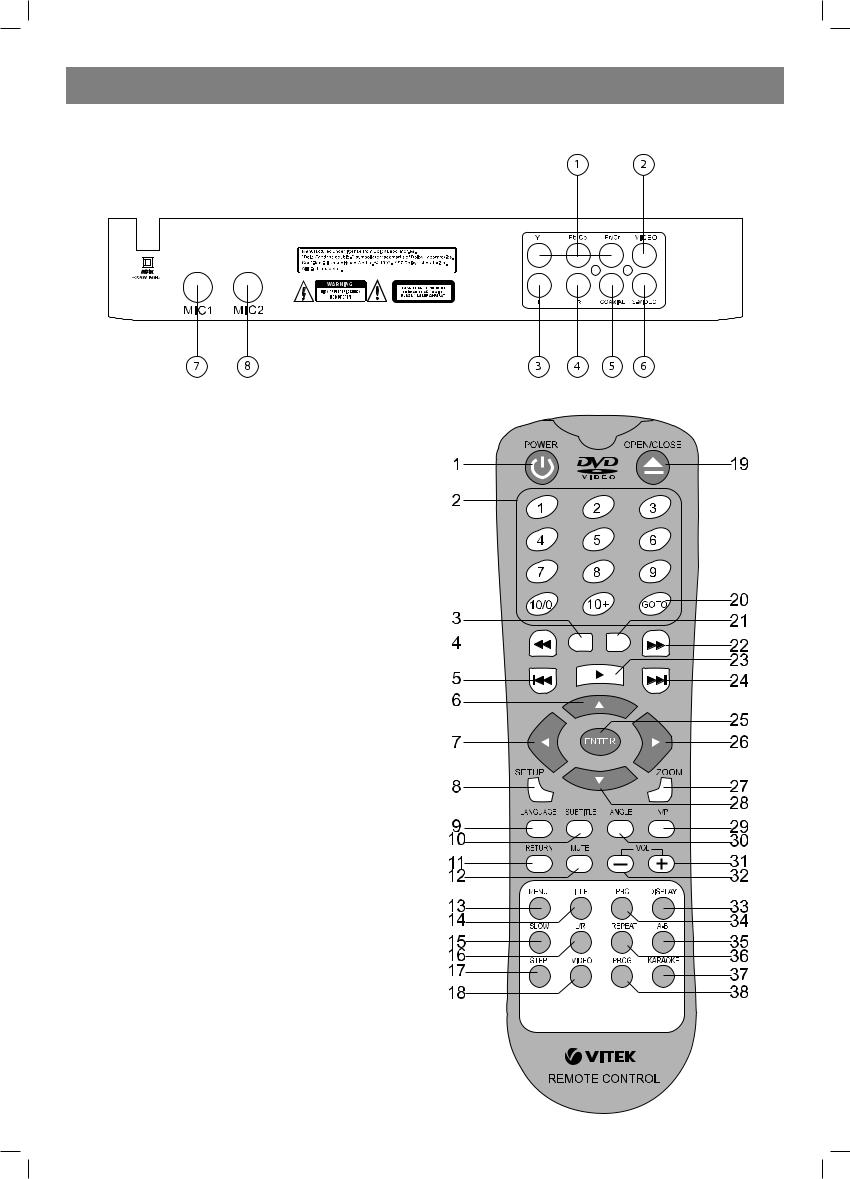
Back panel function:
1.Component output jack
2.Video output jack
3.2.1CH L output jack
4.2.1CH R output jack
5.Digital signal output jack
6.S Video output jack
7.MIC 1
8.MIC 2
3
4002IM_new.indd 3 |
20.08.2009 12:38:54 |

ENGLISH
Remote control
1. POWER
2. 0 9. 10+ NUMBER KEY
3. PAUSE
4. PREV
5. REW
6. UP
7. LEFT
8. SETUP
9. LANGUAGE
10. SUBTITLE
11. RETURN
12. MUTE
13. MENU
14. TITLE
15. SLOW
16. L/R
17. STEP
18. VIDEO
19. OPEN/CLOSE
20. GOTO
21. STOP
22. NEXT
23. PLAY
24. FWD
25. ENTER
26. RIGHT
27. ZOOM
28. DOWN
29. N/P
30. ANGLE
31. VOL+
32. VOL
33. DISPLAY
34. PBC
35. A B
36. REPEAT
37. KARAOKE
38. PROG
Point the remote control directly at the player’s remote sensor.
Do not leave the remote control in an extremely hot or humid place.Do not insert the batteries in the wrong direction.
If the remote control does not function correctly or the operating range becomes reduced, replace all batteries with new ones.
4
4002IM_new.indd 4 |
20.08.2009 12:38:54 |

ENGLISH
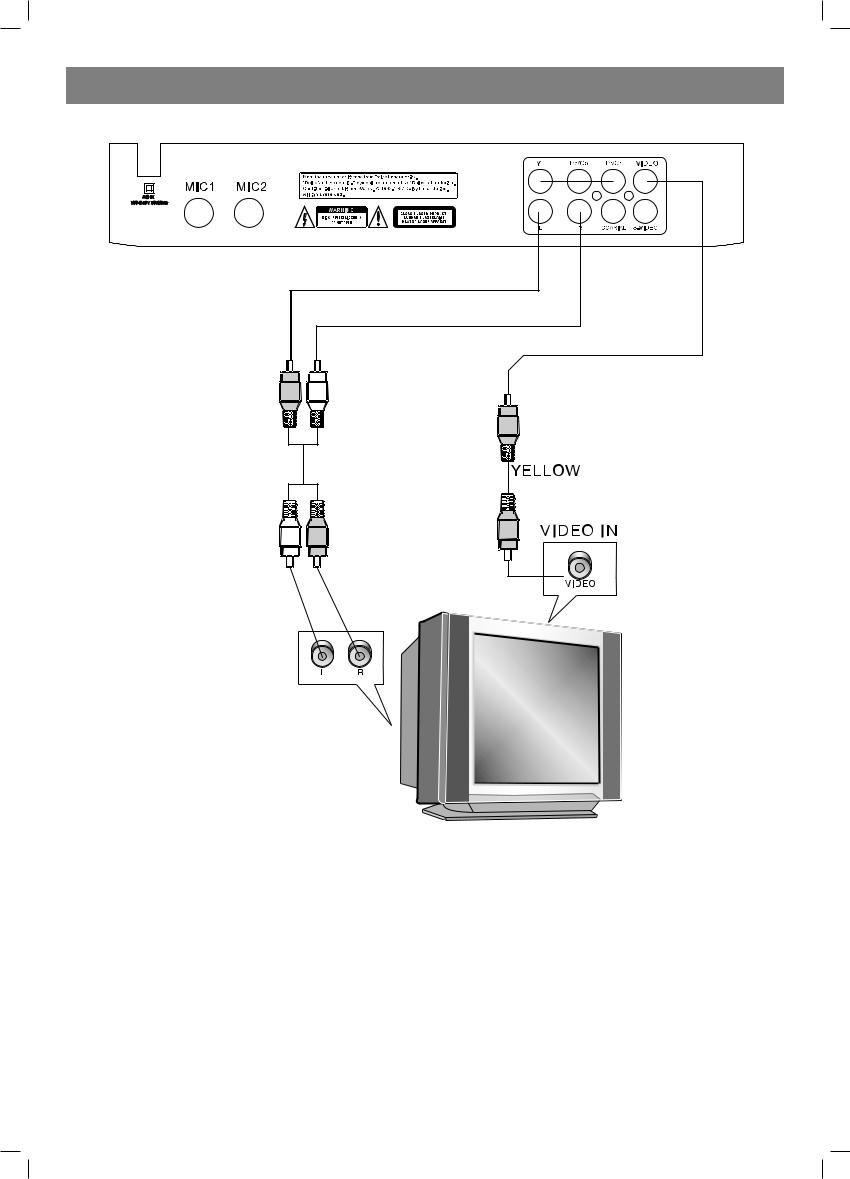
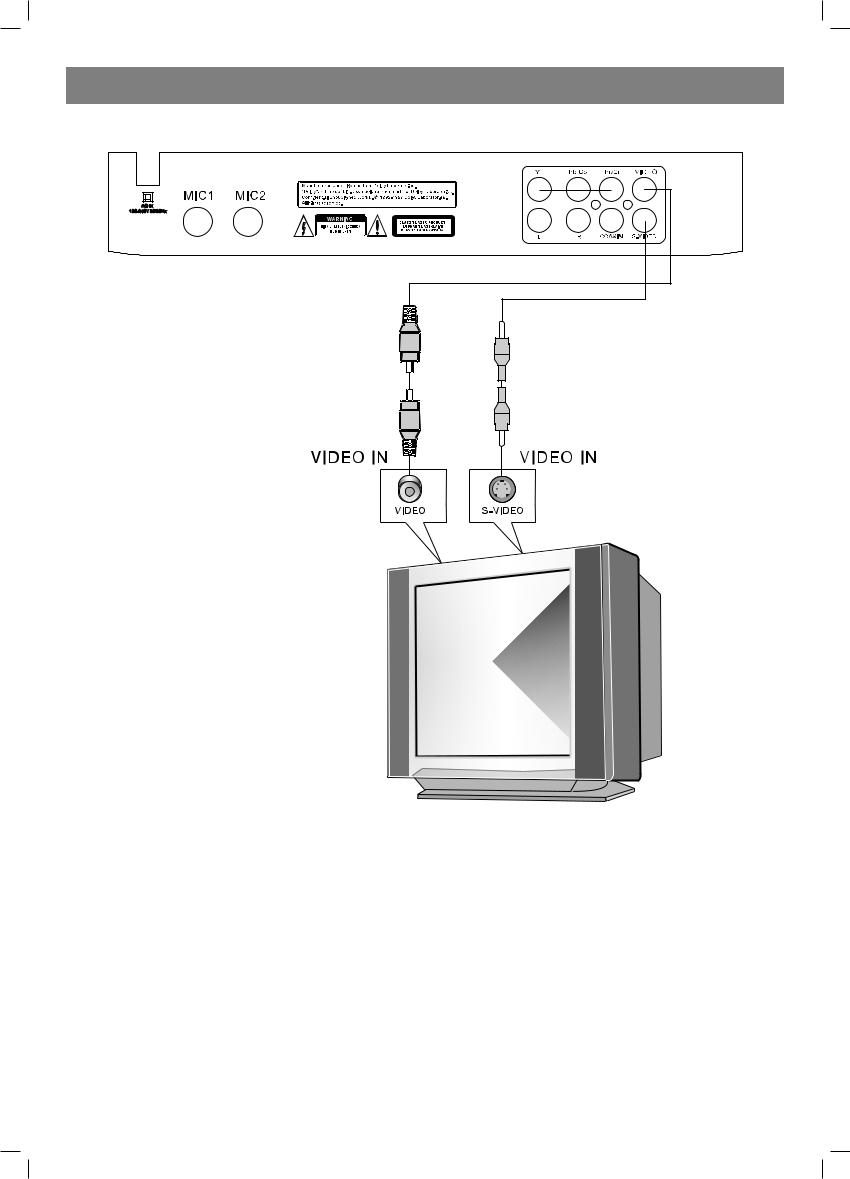
Connections
Connecting to a TV set
Set player’s Digital Out mode to “OFF” in the audio setup page. There are two ways of connecting the player’s AV output to the TV set:
1.S video cable and left/right audio cable. (Set the [Video output] to S Video])
2.Composite video cable and left/right audio cable.
5
4002IM_new.indd 5 |
20.08.2009 12:38:54 |
ENGLISH
Connecting to an AV amplifier with 5.1 channels analog audio input
Notes:
1.Set player’s Digital Out mode to “OFF” in the audio setup page.
2.Set the TV set’s AV input to the channel you have connected.
3.Set the amplifier’s audio input to the channel you have connected.
6
4002IM_new.indd 6 |
20.08.2009 12:38:54 |
ENGLISH
Basic operations
Getting start:
1.Connect the DVD player to a TV set.
2.Switch on the TV set.
3.Select TV set AV input connected to the DVD player.
4.Turn down the amplifier volume and then switch it off.
5.Select the amplifier AV input connected to the DVD player.
6.Press the Open/Close button on the front panel or on the remote control. The display shows “OPEN”.
As soon as the tray is open place your disc labeled side up. Press the Open/Close button once again to close the tray.
Additional features
Setup of Modes and Features
Setup
Stop playback and press the Setup button, the Setup menu appears on the TV set screen as shown right.
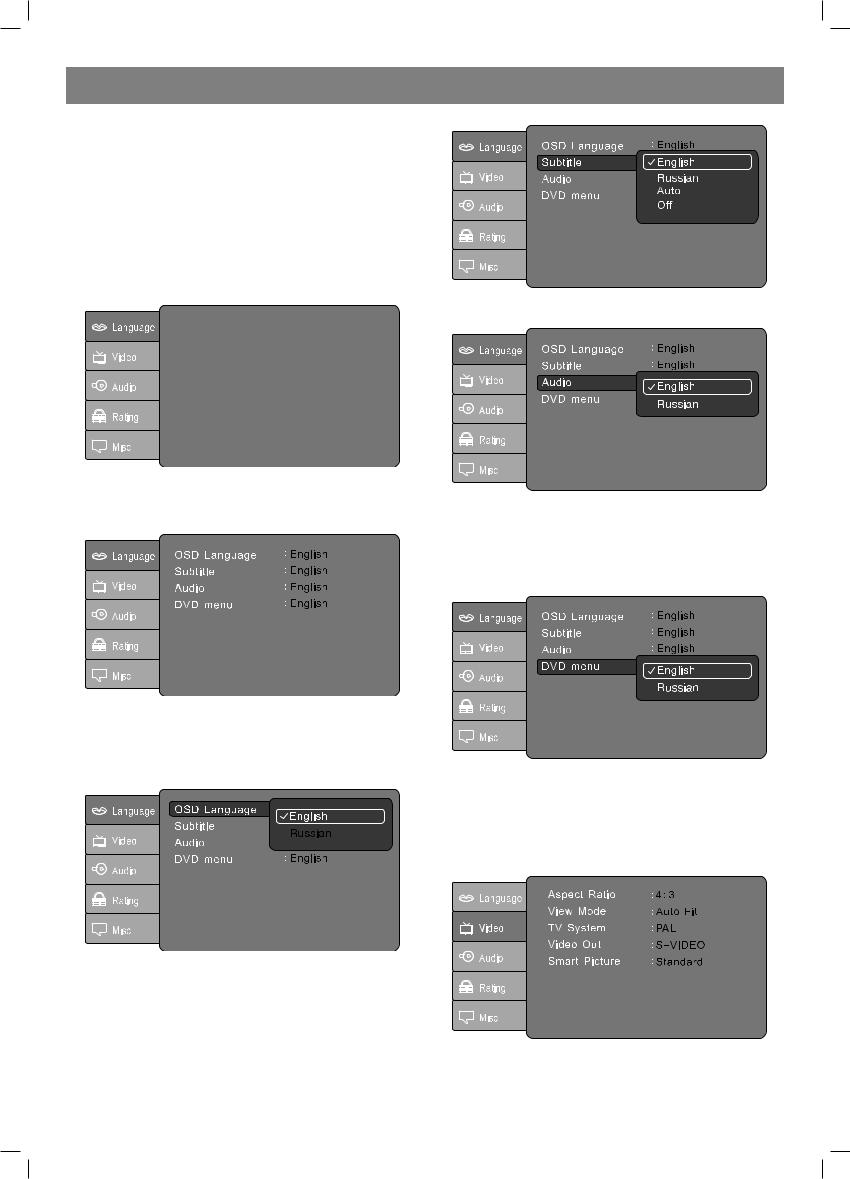
Language Setup
А.
Select the [Language] submenu with the Left/Right buttons. В. Press the Enter button to confirm.
С. Press the Setup button to exit the Setup menu.
Select the [Language of screen menu] and press the Enter button to enter the [Language of screen menu] submenu:
А. Select the required menu item with Up/Down buttons. В. Press the Enter button to confirm.
С. Press the Up button to return to the Setup menu. D. Press the Setup button to exit the Setup menu.
Select the [Subtitle] and press the Enter button to enter the [Subtitle] submenu:
А. Select the required menu item with Up/Down buttons. В. Press the Enter button to confirm.
С. Press the Up button to return to the Setup menu. D. Press the Setup button to exit the Setup menu.
Notes: The number of languages for captions can differ for various
disks.
Select the [Audio] and press the Enter button to enter the [Audio] submenu:
А. Select the required menu item with Up/Down buttons. В. Press the Enter button to confirm.
С. Press the Up button to return to the Setup menu. D. Press the Setup button to exit the Setup menu.
Notes: The languages of sound can differ for various disks.
Select the [DVD Menu] and press the Enter button to enter the [DVD menu] submenu:
А. Select the required menu item with Up/Down buttons. В. Press the Enter button to confirm.
С. Press the Up button to return to the Setup menu. D. Press the Setup button to exit the Setup menu.
Notes: The languages of menus can differ for various disks.
Video Setup
Select the [Video] in the Setup menu and press the Enter button to enter the [Video] submenu:
А. Select the required menu item with Up/Down buttons. В. Press the Enter button to confirm.
С. Press the Up button to return to the Setup menu. D. Press the Setup button to exit the Setup menu.
[4:3 Pan Scan] – There is a length screen picture on standard 4:3 TV set.
7
4002IM_new.indd 7 |
20.08.2009 12:38:54 |

ENGLISH
Normally, left and right edges can not be shown while moving the picture and just the most important scenes are on the screen.
[4:3 Letter box] – There is a wide screen picture on standard 4:3 TV set, but top and bottom black zones.
[16:9] – There is full widescreen picture on the widescreen of the (16:9) TV set.
Notes: Not all DVDs are provided with movies in 4:3 Pan Scan format. In this case disk parameters will affect TV screen settings and the movie will played in the 4:3 Letter Box mode.
Select the [TV System] and press the Enter button to enter the [TV system] submenu:
А. Select the required menu item with Up/Down buttons. В. Press the Enter button to confirm.
С. Press the Up button to return to the Setup menu. D. Press the Setup button to exit the Setup menu.
Notes: The languages of menus can differ for various disks.
Select the [Video output] and press the Enter button to enter the [Video output] submenu:
[S Video] – S Video output;
Notes: Composite video output is always available.
Select the [Smart picture] and press the Enter button to enter the
[Smart picture] submenu:
А. Select the required menu item with Up/Down buttons.
В. Press the Enter button to confirm.
С. Press the Up button to return to the Setup menu. D. Press the Setup button to exit the Setup menu.
Audio Setup
А. Select the [Audio Setup ] submenu with the Left/Right buttons. В. Press the Enter button to confirm.
С. Press the Setup button to exit the Setup menu.
Select the [Digital output] and press the Enter button to enter the
[Digital output] submenu:
А. Select the required menu item with Up/Down/Left/Right buttons. В. Press the Enter button to confirm.
С. Press the Up button to return to the Setup menu. D. Press the Setup button to exit the Setup menu.
Select the [Night mode] and press the Enter button to enter the [Night mode] submenu:
А.
Select the required menu item with Up/Down/Left/Right buttons. В. Press the Enter button to confirm.
С. Press the Up button to return to the Setup menu. D. Press the Setup button to exit the Setup menu.
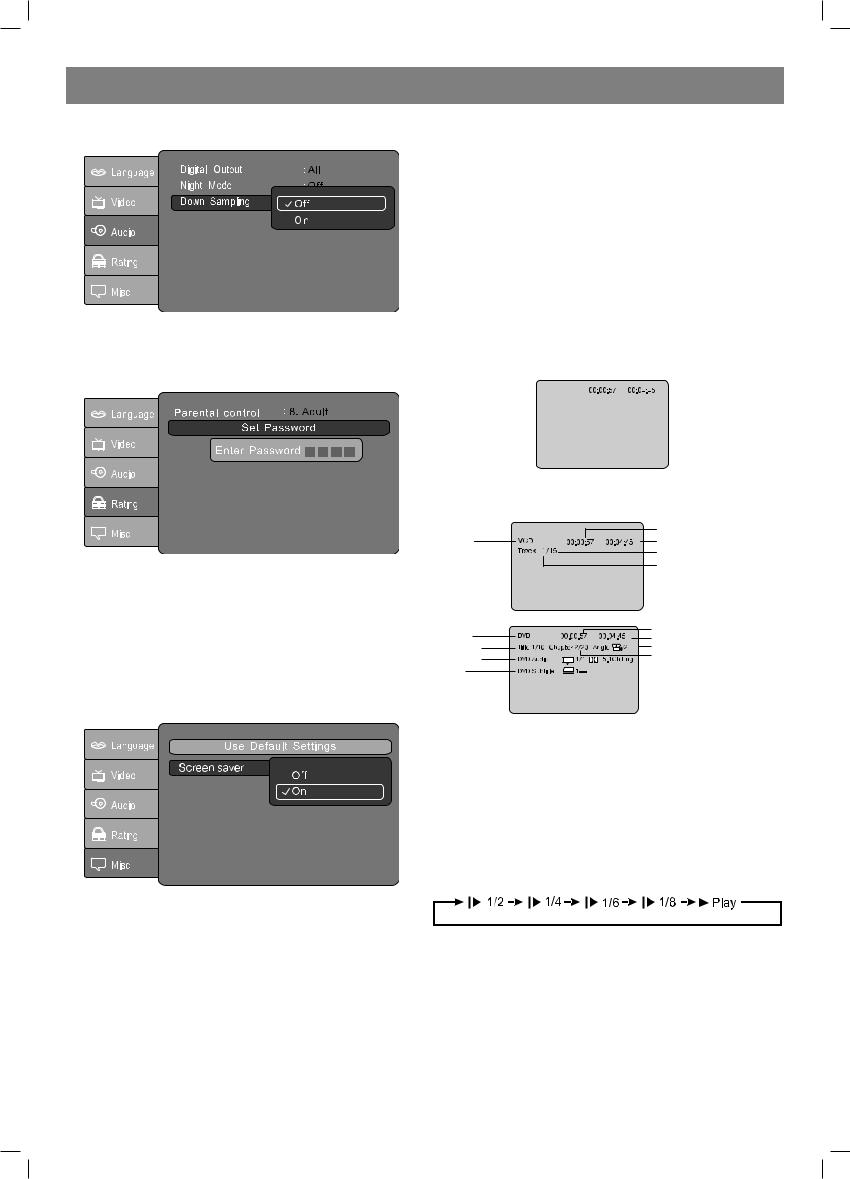
Select the [Down sampling] and press the Enter button to enter the
8
4002IM_new.indd 8 |
20.08.2009 12:38:55 |
ENGLISH
[Down sampling] submenu:
А. Select the required menu item with Up/Down/Left/Right buttons. В. Press the Enter button to confirm.
С. Press the Up button to return to the Setup menu. D. Press the Setup button to exit the Setup menu.
Rating Setup
Select the [Rating] in the Setup menu and press the Enter button to enter the [Rating] submenu:
Enter the password to lock or to open [Rating] submenu:
Enter four digits of the password with number keys 0 9 and then press ENTER to confirm the password.
Notes: If you do not remember the password use default value “8888” to unlock the menu.
Select the [Rating] and press Enter to enter the [Rating] submenu: А. Keep on pressing Enter to select the following modes: 1) Kid Safe, 2) G, 3) PG, 4) PG 13, 5) PG R, 6) R, 7) NC 17, 8) Adult.
В. Press the Setup button to exit the Setup menu. Notes: Enter the password to change [Rating].
Misc setup
А. Select the [Various settings] submenu with the Left/Right buttons. В. Press the Enter button to confirm.
С. Press the Setup button to exit the Setup menu.
Karaoke function
External Karaoke amplified function.
Connect Microphones with the Microphone Jacks MIC1 ,MIC2 which are on the rear panel. Adjust the volume of microphone through the volume knobs which are on the front panel.
Remote Control Operation
POWER
During playback, press POWER to stop the player and return to standby mode.
While the player is in standby, press POWER to resume normal
operation. TITLE
During DVD playback, press TITLE to display the DVD title menu or play the first title.
Notes: This function is subject to the disc.
РВС
During DVD playback, press PBC to display the disc menu of the current title.
During VCD/SVCD playback, press PBC to select the mode of playback: PBC ON or PBC OFF.
Notes: 1) PBC is play back control used to navigate VCDs. 2) The function is subject to the disc.
OPEN/CLOSE
To open the disc tray, press OPEN/CLOSE.
To close the disc tray, press OPEN/CLOSE again.
Display
During DVD playback, press the Display button to display the current status of the time counter.
Elapsed time of the |
|
|
|
Remaining time of the current |
|
|
|||
current track/chapter |
|
|
|
track/chapter |
Press DISPLAY once again to display additional information about the played disk.
Disc type
Disc type
Current title
Audio type
Subtitle
Elapsed time of the current track
Remaining time of the current track
Total track
Current track
Elapsed time of the current chapter
Remaining time of the current chapter
Angle
Current chapter
“0 10+”
The buttons are used to input time and numbers of titles, chapters and trucks.
If the display shows items with digits press 0 9 to select the required item and press Enter to confirm.
During CD or VCD playback (if РВС is switched off) press 0 9 to select the truck directly and then press Enter to confirm.
Slow
During DVD, VCD or SVCD playback press Slow playback to turn down the rate of movie playback.
Due to every next pressing Slow playback the disk will be played with rate equal to 1/2, 1/4, 1/6 and 1/8 of normal rate in the specified order:
Press Play to return to the normal playback rate.
PREV
During DVD, CD or VCD playback press Previous to play previous chapter, title or truck.
NEXT
During DVD, CD or VCD playback press Next to play next chapter, title or truck.
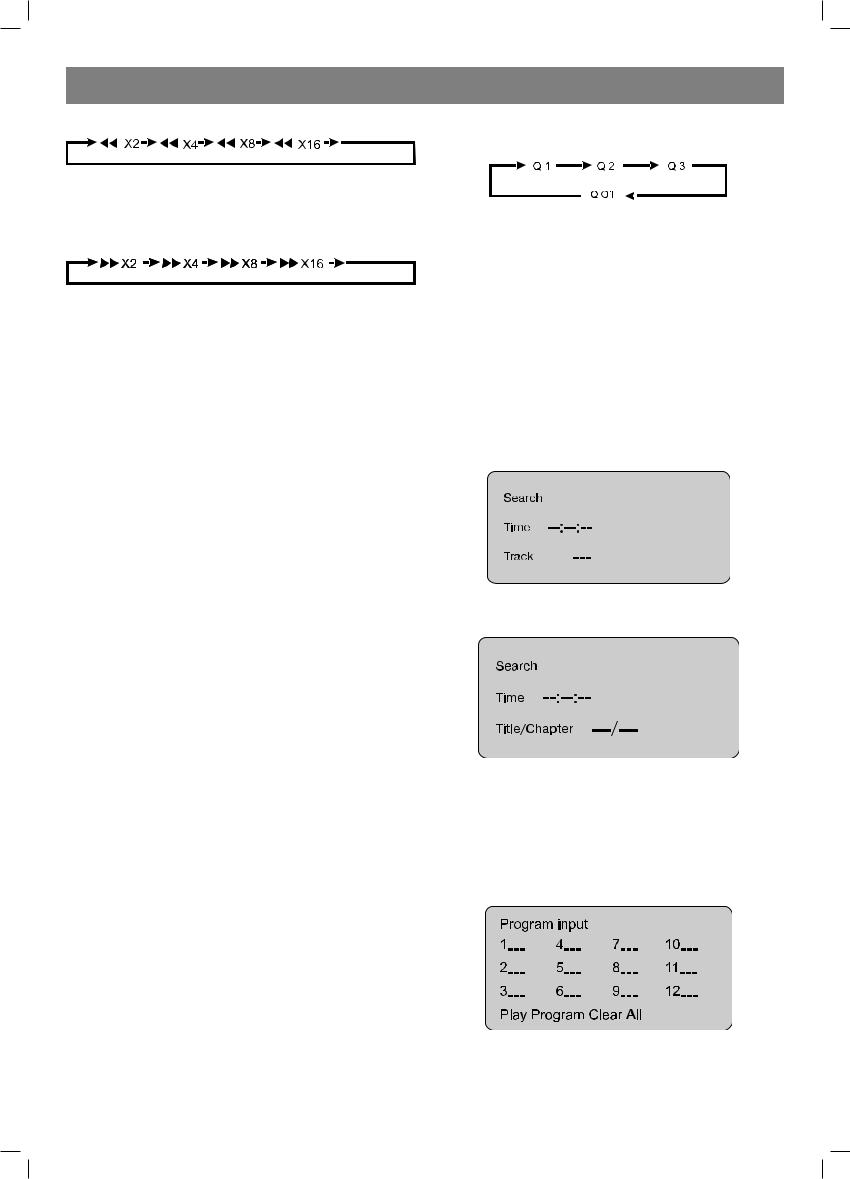
Fast rewind (FW)
During DVD, CD or VCD playback press FW to start fast rewinding. The player will rewind the disk with rate which is 2, 4, 8,16 or 32 times more than normal rate in the specified order:
9
4002IM_new.indd 9 |
20.08.2009 12:38:55 |
ENGLISH
Press Play to return to the normal rate.
Zoom
During VCD/ SVCD/ DVD playback press Zoom to increase the picture as follows:
Fast forward (FF)
During DVD, CD or VCD playback press FF to start fast forward winding. The player will wind the disk with rate which is 2, 4, 8, 16 or 32 times more than normal rate in the specified order:
Press Play to return to the normal rate.
Mute
Press Mute to turn off the sound. Press the button once again to return to the normal volume.
R/L
During VCD/SVCD playback press several times R/L to select audio output channel: Stereo/ Left/ Right.
Repeat
The repeat mode will switch over every time you press Repeat.
There are three repeat modes: repeat chapter, repeat title and return to the normal playback.
А В
During DVD playback, press A B to select A as an initial point. Press the button once again to select B as an end point. The player will repeat the А В length automatically.
Press А В the third time to stop repeating the А В length and erase the initial and the end points.
Notes: During CD/ VCD/ SVCD playback А and В points shall be within one truck. During DVD playback А and В points from different chapters can be selected.
RAN
During the playback of dick containing a lot of trucks press RAN to instruct the player playback them in random but not sequential order.
During playback, press RAN to select the mode of random playback: random playback ON, random playback OFF.
Setup
Press Setup to enter the Setup menu.
Erase
Press Erase to erase the entered digits.
Press the button once to erase one symbol and press the button and hold down to erase all digits.
Pause
During playback press Pause to stop playback.
Press Play to return to the normal playback.
Play
If the player is not stopped press the button to start playback. Stop
During playback press Stop once to stop playback and keep in memory the stop point.
Press Playback to start playing from the stop point.
Press Stop two times to stop playback completely.
Notes: If the playback has been stopped for more then 5 minutes the screensaver will be automatically switched on.
Menu
Press Menu to enter the main menu.
Repeat
Press the button to repeat playing for the selected item. If during the playback of DVD disk press Repeat 1/ all the screen shows the following: Repeat: [Off], Repeat: [Chapter], Repeat [Title].
During SVCD/ VCD/ CD playback the screen shows the following: (The function is available only if РВС is switched off.)
Repeat: [Repeat off], Repeat [Repeat one], Repeat: [Repeat all].
Step
Press STEP to stop normal playback and move the picture one frame forward.
Notes: The step by step playback function is not available for CDs.
N/P
Press the button during stop to switch over the DVD player system (Automatic selection, PAL or NTSC). The system will switch over every time you press the button.
Vol
Press Volume + to reinforce sound.
Press Volume to reduce sound.
Angle
Press Angle to watch the movie from different angles.
Press Angle several times to switch over between cameras. Notes: This function is subject to the disc.
Subt
During DVD playback press Captions to select one of available languages for Captions. The number of languages is up to 32.
Notes: This function is subject to the disc (various languages).
GOTO
During VCD playback press GO to display the following menu:
Select time, a track with Up/Down buttons.
Enter the required time and truck with digit buttons and press Enter to confirm.
During DVD playback press GO to display the following menu:
Select time, a title or a chapter with Up/Down buttons.
Enter the required time, title or chapter with digit buttons and press Enter to confirm.
Notes:
1)If time is entered there will be step to the precise time of the truck.
2)If the truck is entered the required title or chapter will be searched.
3)The function is not available for some DVD disks.
Program
During VCD playback press Program to display the following [Programs] menu:
Enter numbers of trucks in the required order. After all select the [playback the program] item and press Enter to playback trucks in the programmed order. Select [clear all] item and press Enter to erase all entered numbers.
During DVD playback press Program to display the following
10
4002IM_new.indd 10 |
20.08.2009 12:38:55 |
[Programs] menu:
Enter numbers of titles and chapters in the required order. After all select [playback the program] item and press Enter to playback the chapter in the programmed order. Select [clear all] item and press Enter to erase all entered numbers.
МР3 playing Supported formats:
Disk formats: ISO 9600, Joliet
A format of music files: МР3
Bit rate МР3 (speed of data transfer): 32 320 kbit/sec
Total number of music files and albums: about 350 for a disk
Digitizing rate: 32 kHz/44,1 kHz/48 kHz
Notes:
The player will not recognize and play МР3 disks under the following conditions: if the format of truck is not supported, the disk is scratched or deformed, МР3 files are recorded on not closed CD R or CD RW disk, the reading device is dirty.
During МР3 disk loading the screen shows the following menu:
Total tracks
Elapsed time of the current track Сurrent track
File name
File window
The player automatically will start playing the first song (file) in the menu. The number of a song (a file) can be selected by number keys.
Move the cursor with keys with arrows and select the required file, press Enter to confirm and the player will start playing the song highlighted with the cursor in the files screen.
Kodak Picture CDs Playback
The form and size of Kodak Picture CDs are the same as the form and the size of a usual CD disk.
The maximal size of a supported JPEG image: 3840 x 3840 pixels.
JPEG is an abbreviation for Joint Picture Experts Group. It is the first international standard for compression of the joint pictures ISO 10918 1, adopted by Joint Picture Experts Group ISO.
Images on Kodak Picture CD are stored in this format (JPEG). The player can recognize JPEG images on Kodak Picture CD and display them in various modes.
There are 6 various modes of switching over provided for slide show in the player. Press Setup during playback to select the mode of switching over between slides for a slide show in the following order:
1/6 erasing top downwards () 2/6 erasing bottom upwards ()
3/6 Erasing bottom /top to the center ()
4/6 Erasing from the center upwards /downwards () 5/6 vertical shading ()
6/6 random playback
General functions:
Modes of switching over provided for a slide show can be set for any
ENGLISH
images.
Press Playback to continue the slide show.
With number keys it is possible to select the required image.
Press Stop to stop playback, the screen shows the following menu.
Press Pause to suspend playback.
Press Previous or Next to select the corresponding image:
Total pictures Сurrent pictures
Picture name
Directory window
It is possible to select the required image with arrow keys in this screen and then press Playback or Enter to confirm the selection and show the image.
Image rotation
The image can be turned by 90о, 180о and 270о. This operation is available at normal displaying of the image only, and it will be automatically cancelled if the new image is displayed.
Repeatedly press Angle to select various angles for turning: normal, 90о, 180о and 270о clockwise.
Zoom function
Player provides zoom in/zoom out options and also the possibility to look over the segments of zoomed in image.
Press Playback to return to the slide show.
It is possible to move focus across the image with keys with arrows
During scale changing it is not possible to continue the slide show or to turn the image.
Digest Function
Press PBC to show 9 images simultaneously. Select any image with arrowed buttons on the screen and press Playback to increase the selected image and start a slide show with it.
Maintenance
Unplug the DVD player if the power cord or the plug is damaged and contact a repair shop.
Do not plug in too many electrical devices to a one power outlet and do not use an extension cord to avoid fire or shock by electrical current.
Do not put anything on the power cord of the DVD player. Do not connect a plug if you are not sure what device it belongs to as it can cause fire or shock by electric current.
If the DVD player has been dropped or its front panel has been damaged unplug the player from the mains and contact a service centre.
Do not insert foreign matters into the case; otherwise it is easy to touch alive parts which can cause fire and shock by electrical current.
To prevent fire or shock by electrical current it is forbidden to uncover the unit (or open the back panel). Refer any servicing to a qualified expert.
Install the unit on a flat surface because falling down the unit can cause injuries for people and the unit itself can be damaged.
Do not install or operate the unit to humidity or dusty places to avoid any damage for the player.
It is forbidden to operate the DVD player near sources of water such as sinks or dish washing machines as well as to install it in basements.
Do not cover the ventilation openings on the unit by any kind.
Do not place the unit on a bed or a sofa and so on because ventilation openings can be blocked.
Do not install the unit near heaters or other units radiating heat.
Do not install the unit into closed cabinets with no air circulation.
Do not spill liquids and do not place any water tanks on the unit.
Do not open the cover or touch any of the components inside the unit. If after troubleshooting the malfunction is not eliminated, contact a qualified expert.
Use the unit following the manual. Servicing by qualified service personnel is required when the apparatus has been damaged in any
11
4002IM_new.indd 11 |
20.08.2009 12:38:55 |

ENGLISH
way.
Disconnect the power cord, the antenna and other cables when you do not intend to use the unit for a long period of time.
If there is abnormal noise or odor switch off the unit, unplug the cord from power outlet and contact a qualified expert.
Do not place candles or other sources of fire on the unit or near it to avoid fire.
Do not bump the unit, particularly the display.
Switch off the main power and disconnect the power cord when the unit is not in use for a prolonged period of time.
Troubleshooting
Before the use of the DVD player read the instructions manual thoughtfully. If there is any problems during the use of the player try to eliminate them using the following recommendations. If the problem is not eliminated contact the manufacturer or to authorized service centre. In view of your safety do not open the cover and do not try to fix the problem yourself to avoid shock by electrical current.
There is no picture, sound and inscriptions on the display
Make sure that power supply is switched on.
Make sure that the socket is in order.
Make sure that the power cord is not damaged.
Make sure that the plug is tightly inserted into the socket.
There is no sound, but there is the picture
Make sure that the audio output of the player is properly connected to a TV input.
Make sure that the audio cable is not damaged.
Make sure that volume is not turned up to the minimum level.
Make sure that the correct audio settings are selected.
Make sure that the AV input selected on TV set is the same as connected to the player.
Make sure that the sound is not turned off.
There is no picture, but there is a sound
Make sure that the video output of the player is properly connected to a TV input.
Make sure that the AV input selected on TV set is the same as connected to the player.
Make sure that the video cable is not damaged.
Make sure that the correct video settings are selected.
The black and white or unstable picture
Make sure that the correct TV system (for example, PAL, NTSC) is selected.
Noises on the picture or in sound
Make sure that the correct audio settings are selected.
Make sure that the disk is not scratched and not dirty.
Make sure that AV socket and output terminal are not dirty.
The player shows that no disk is available
Make sure that there is a disk in the tray.
Make sure that the disk is installed correctly.
Make sure that the disk is not distorted.
Make sure that the disk is not dirty and not scratched too much.
The player shows that a bad disk is inserted
Make sure that the disk of high quality is used.
Make sure that the disk is not dirty and not scratched too much.
Make sure that the format of the disk is compatible to the player.
Make sure that the disk is not deformed.
The remote control slowly reacts to commands or does not work
Check up batteries of the remote control and make sure that they are charged and have good contact to the board.
Point the remote control directly at the player’s IR sensor.
Make sure that there are no obstacles between the remote control and the IR receiver.
The player works incorrectly
Switch off a power supply of the player and switch it on again.
Open CD R or CD RW disk is blocked in the tray
Open CD R or CD RW disks are not supported by the player. The disk cannot be taken out from the tray of the player during reading. Therefore it is necessary to switch off the power supply of the player, to switch it on again and at once press the button Open/ Close to open the tray.
Technical data
Requirements to the power supply: |
100-240V, 50-60 Hz |
Power consumption: |
25W |
Video standard: |
PAL |
Weight: |
2.0 kg |
Dimensions: |
258 mm (W) х 80 mm |
(H) х 308 mm (L) |
|
Video output: |
1,0В (р р)/ 75 Ohm |
– synchronized, negative polarity |
|
S Video output (output for separate signals Y/C): |
|
Output Y: |
1,0В (р р)/ 75 Ohm |
– synchronized, negative polarity |
|
Output С: |
0,268В (р р)/ 75Ом, |
4 pins mini DIN х 1 |
|
Audio output |
|
Analogue output: |
1,85В (rms)/ 10кОм, |
RCA pin Jack (L,R) x 1 |
|
Coaxial output: |
0,5В (р р)/ 75Ом, |
RCA pin Jack x 1 |
|
Optic output: |
Fiber optic |
transmitter |
|
Frequency response: |
20 Hz 20 kHz |
Signal / noise ratio: |
> 90 dB |
Total nonlinear distortion: |
< 0,05% |
Accessories |
|
Audio / video cable |
1 |
Remote control |
1 |
Instructions manual |
1 |
Warranty certificate |
1 |
Battery |
1 |
The manufacturer reserves the right to make changes to the characteristics of the device without prior notice.
The service life of the device is no less than five years.
Guarantee
Details regarding guarantee conditions can be obtained from the dealer from whom the appliance was purchased. The bill of sale or receipt must be produced when making any claim under the terms of this guarantee.
This product conforms to the EMC-Requirements as laid down by the Council Directive 89/336/EEC and to the Low Voltage Regulation (73/23 EEC)
12
4002IM_new.indd 12 |
20.08.2009 12:38:55 |
|
|
|
РУССКИЙ |
|
DVD-ПЛЕЕР VT-4002 |
|
Для защиты DVD-плеера в случае продолжительного простоя |
||
|
|
выключайте кабель питания, антенну и все остальные кабели. |
||
ВАЖНАЯ ИНФОРМАЦИЯ ДЛЯ КОНЕЧНОГО ПОЛЬЗОВАТЕЛЯ |
|
Не вставляйте ничего в корпус DVD-плеера, вы можете случайно |
||
|
прикоснуться к частям, находящимся под высоким напряжени- |
|||
– ДИРЕКТИВА WEEE 2002/96/CE И ПОСЛЕДУЮЩАЯ ВЕРСИЯ |
|
|||
|
ем, и вызвать возгорание или поражение электрическим током. |
|||
2003/108/CE КАСАТЕЛЬНО ОТХОДОВ ЭЛЕКТРИЧЕСКОГО И |
|
|||
|
|
|
||
ЭЛЕКТРОННОГО ОБОРУДОВАНИЯ. |
|
Не ставьте DVD-плеер рядом с батареями отопления или други- |
||
В соответствии с директивой WEEE 2002/96/CE и ее |
|
ми источниками тепла. |
||
последующей версией 2003/108/CE данное оборудование |
|
При появлении необычного звука или запаха из DVD-плеера |
||
помечено символом перечеркнутого контейнера для |
|
выключите его, выньте вилку шнура питания из розетки и обра- |
||
мусора. |
|
титесь к профессиональному специалисту. |
||
|
Чтобы избежать возгорания или поражения электрическим |
|||
Для дальнейшей утилизации данного оборудования |
|
|||
|
током, запрещается снимать крышку (или заднюю панель) уст- |
|||
необходимо следовать приведенным инструкциям: |
|
|||
|
ройства. Поручайте обслуживание квалифицированным специа- |
|||
|
|
|||
Запрещается утилизировать данное оборудование как обычные бытовые |
|
листам. |
|
|
|
Не ставьте DVD-плеер в закрытые невентилируемые шкафы. Не |
|||
отходы. Необходимо обратиться в один из уполномоченных общественной |
||||
|
ставьте на DVD-плеер или рядом с ним свечи или другие источ- |
|||
администрацией центров WEEE (утилизации отходов производства |
|
|||
|
ники огня, чтобы избежать возгорания. |
|||
электрического и электронного оборудования). Данные отходы можно |
|
|||
|
Избегайте ударов по DVD-плееру, в особенности по его дисп- |
|||
передать продавцу для их утилизации, если вы приобретете новое |
||||
|
лею. |
|
||
аналогичное оборудование. |
|
|
||
|
Не ставьте DVD-плеер на неустойчивые основания, так как в |
|||
В вышеуказанной директиве, которую мы рекомендуем полностью изучить, |
||||
|
случае его падения могут пострадать люди или сам DVD-плеер |
|||
утверждается, что за незаконную утилизацию отходов производства |
|
|||
|
может быть поврежден. |
|||
электрического и электронного оборудования будет взиматься штраф. |
|
|||
|
Не проливайте на DVD-плеер жидкости и не ставьте на него ни- |
|||
|
||||
|
|
какие емкости с жидкостями, например вазы. |
||
ВНИМАНИЕ! |
Важные правила техники безопасности |
|||
Опасность удара электрическим током! |
||||
Запрещается |
|
|||
НЕ ВСКРЫВАТЬ! |
|
Чтобы избежать повреждения плеера, должна обеспечиваться |
||
|
||||
ПРЕДОСТЕРЕЖЕНИЕ: для снижения риска возгорания или |
|
хорошая вентиляция. |
||
|
Чтобы избежать возгорания или поражения электрическим |
|||
поражения электрическим током не снимайте панели устройства. |
|
током, не снимайте крышку (или заднюю панель) устройства. |
||
Для сервисного обслуживания обращайтесь только к |
|
Поручайте обслуживание квалифицированным специалистам. |
||
квалифицированному персоналу |
|
Не подвергайте устройство воздействию дождя или высокой |
||
|
влажности. Не ставьте на плеер вазы или другие емкости с жид- |
|||
|
|
|||
Значок молнии в равностороннем треугольнике указывает |
|
костями. |
Запрещается |
|
пользователю на наличие опасного напряжения внутри |
|
Не подвергайте устройство воздействию источников тепла. |
||
|
|
|
||
корпуса изделия, способного привести к поражению |
Внимание! |
|
||
электрическим током. |
|
|||
|
Очистка устройства должна производиться только сухой тканью. |
|||
|
||||
Значок восклицательного знака в равностороннем |
|
При возникновении странных явлений, таких как появление |
||
|
дыма, необычных звуков или запаха, немедленно отключите |
|||
треугольнике указывает пользователю на наличие важных |
|
|||
|
устройство. |
|
||
инструкций по эксплуатации и техобслуживанию в |
|
Не прикасайтесь к корпусу устройства при грозе. |
||
сопутствующей изделию литературе. |
|
Если устройство не используется в течение продолжительного |
||
|
|
времени, выключайте его из розетки. |
||
ОСТОРОЖНО! ЧТОБЫ ИЗБЕЖАТЬ ПОРАЖЕНИЯ ЭЛЕКТРИЧЕСКИМ |
Проявляйте особое внимание |
|||
|
В данном устройстве используется лазер Класса 1. Он испуска- |
|||
ТОКОМ, СНАЧАЛА ПОДСОЕДИНИТЕ ШНУР К ПРОИГРЫВАТЕЛЮ, И |
||||
|
ет видимые лучи, при прямом попадании которых на тело могут |
|||
ТОЛЬКО ПОТОМ ВСТАВЬТЕ ВИЛКУ В СЕТЕВУЮ РОЗЕТКУ. |
|
|||
|
возникнуть повреждения. Следуйте инструкциям руководства |
|||
|
|
пользователя при эксплуатации устройства. |
||
ОСТОРОЖНО! НЕ ОТКРЫВАЙТЕ КРЫШКУ УСТРОЙСТВА, ЕСТЬ РИСК |
Важные правила техники безопасности |
|||
ПОРАЖЕНИЯ ЭЛЕКТРИЧЕСКИМ ТОКОМ. ВНУТРИ УСТРОЙСТВА |
||||
НЕТ ЧАСТЕЙ, ТРЕБУЮЩИХ ВНИМАНИЯ ПОЛЬЗОВАТЕЛЯ. |
1. |
Внимательно прочитайте эту инструкцию. |
||
2. |
Сохраните эту инструкцию в качестве пособия. |
|||
ПОЛЬЗУЙТЕСЬ УСЛУГАМИ КВАЛИФИЦИРОВАННОГО ПЕРСОНАЛА. |
||||
3. |
Обращайте внимание на все предупреждения. |
|||
|
||||
Эксплуатация и техническое обслуживание |
4. |
Следуйте всем инструкциям. |
||
5. |
Не пользуйтесь проигрывателем рядом с водой. |
|||
При повреждении вилки или кабеля питания DVD-плеера не- |
||||
6. |
Протирайте только сухой тканью. |
|||
медленно выключите вилку из розетки и отдайте устройство в |
||||
7. |
Не загораживайте вентиляционные отверстия. Выполняйте ус- |
|||
ремонт. |
||||
|
тановку в соответствии с руководством изготовителя. |
|||
Не устанавливайте DVD-плеер в слишком пыльные места или |
|
|||
8. |
Не устанавливайте аппаратуру вблизи источников тепла, таких |
|||
в места с очень большой влажностью воздуха, чтобы избежать |
||||
|
как радиаторы, нагреватели, плиты или вблизи других приборов |
|||
повреждения плеера. |
|
|||
|
(включая усилители), отдающих тепло. |
|||
Не допускайте попадания прямых солнечных лучей на дисплей |
|
|||
9. |
Следите за тем, чтобы на шнуры питания невозможно было на- |
|||
DVD-плеера. |
||||
|
ступить, и чтобы они не были натянуты вблизи вилок, розеток |
|||
Не подключайте слишком большое количество устройств к од- |
|
|||
|
или точек, где они выходят из аппаратуры. |
|||
ной розетке и не удлиняйте кабель, чтобы избежать возгорания |
|
|||
10. |
Используйте только рекомендованные изготовителем вспомога- |
|||
или поражения электрическим током. |
||||
|
тельные устройства и принадлежности. |
|||
Запрещается использовать DVD-плеер рядом с источниками |
|
|||
11. |
Вынимайте вилку из розетки во время грозы или в том случае, |
|||
воды, такими как раковины или посудомоечные машины, а так- |
||||
|
если аппаратура не используется в течение длительного перио- |
|||
же устанавливать его в подвалах. |
|
|||
|
да времени. |
|
||
Запрещается самостоятельно вскрывать корпус устройства. |
|
|
||
12. |
Поручайте обслуживание только квалифицированному обслужи- |
|||
Если после выполнения поиска и устранения неисправностей |
||||
|
вающему персоналу. |
|||
DVD-плеер отремонтировать не удалось, обратитесь к квалифи- |
|
|||
|
Обслуживание необходимо в том случае, если аппаратура была |
|||
цированному специалисту. |
|
|||
|
каким-либо образом повреждена, либо был поврежден шнур |
|||
Не ставьте ничего на кабель питания DVD-плеера и не подклю- |
|
|||
|
питания или вилка, на аппаратуру была пролита жидкость или |
|||
чайте вилки, не зная, какому устройству они принадлежат, чтобы |
|
|||
|
внутрь попали посторонние предметы, аппаратура подверглась |
|||
избежать возгорания или поражения электрическим током. |
|
|||
|
воздействию дождя или влаги, не работает нормально или ее |
|||
Не закрывайте ничем вентиляционные отверстия DVD-плеера. |
|
|||
|
уронили. |
|
||
Управляйте DVD-плеером в соответствии с руководством поль- |
|
|
||
Возможности |
|
|||
зователя. При повреждении DVD-плеера вследствие неправиль- |
|
|||
• |
Полная совместимость с DVD, VCD, CD, MP3 и Kodak Picture |
|||
ной эксплуатации обратитесь к квалифицированному специа- |
||||
|
CD на CD-R & CD-RW. |
|||
листу. |
|
|||
• |
Заставка экрана. |
|||
В случае падения DVD-плеера или повреждения его передней |
||||
• |
Несколько режимов воспроизведения: память, программа, по- |
|||
панели выключите вилку шнура питания DVD-плеера и отдайте |
||||
|
иск, повторение. |
|||
шнур в ремонт. |
|
|||
• |
Аудиовыход: 2-канальный выход. |
|||
Не ставьте DVD-плеер на кровати, диваны и т.п., так как можно |
||||
• |
Видеовыход: композитный видеосигнал и S-Video. |
|||
легко заблокировать вентиляционные отверстия. |
||||
|
|
|
||
13
4002IM_new.indd 13 |
20.08.2009 12:38:55 |

РУССКИЙ
Форматы дисков и функции, поддерживаемые данным плеером
Диски Kodak Picture CD
МР3-файлы на CD-R/CD-RW
Возможность показа скрытых субтитров
Разные ракурсы
Аудио CD
Выбор субтитров
Видео CD
Выбор звуковых дорожек
DVD-видео
Различные режимы форматов экрана
Родительский контроль
Караоке
Элементы передней панели
1.ЛОТОК ДЛЯ ДИСКА
2.ОКНО ИНФРАКРАСНОГО ДАТЧИКА ДУ
3.ОТКРЫТЬ/ЗАКРЫТЬ
4.ВОСПРОИЗВЕДЕНИЕ/ПАУЗА
5.ОСТАНОВКА
6.ВКЛЮЧЕНИЕ/ВЫКЛЮЧЕНИЕ ПИТАНИЯ
7.ПРЕДЫДУЩИЙ
8.СЛЕДУЮЩИЙ
9.ЛЕВО/ПРАВО
10.ГРОМКОСТЬ 1
11.ГРОМКОСТЬ 2
14
4002IM_new.indd 14 |
20.08.2009 12:38:55 |
РУССКИЙ
Элементы задней панели
1.Выходной разъем композитного сигнала
2.Выходной разъем видеосигнала
3.Выходной разъем 2.1 левого канала
4.Выходной разъем 2.1 правого канала
5.Выходной разъем цифрового выхода
6. Выходной разъем сигнала S-Video
7. MIC 1
8. MIC 2
Пульт дистанционного управления
1. POWER (КНОПКА ВЫКЛЮЧЕНИЯ)
2. 0 9. 10+ (ЦИФРОВЫЕ КЛАВИШИ)
3.PAUSE (ПАУЗА)
4.PREV (ПРЕДЫДУЩИЙ)
5.REW (ОБРАТНАЯ ПРОКРУТКА)
6.UP (ВВЕРХ)
7. |
LEFT (ВЛЕВО) |
|
||||
8. |
SETUP (НАСТРОЙКА) |
|
||||
9. |
LANGUAGE (ЯЗЫК) |
|
||||
10. |
SUBTITLE (СУБТИТРЫ) |
|
|
|
|
|
|
|
|
|
|||
11.RETURN (ВОЗВРАТ)
12.MUTE (ВЫКЛЮЧИТЬ ЗВУК)
13. MENU (МЕНЮ)
14.TITLE (ИМЯ)
15.SLOW (МЕДЛЕННО)
16. L/R (ЛЕВО/ПРАВО)
17.STEP (ШАГ)
18.VIDEO (ВИДЕО)
19.OPEN/CLOSE (ОТКРЫТЬ/ЗАКРЫТЬ)
20. GOTO (ПЕРЕЙТИ)
21. STOP (ОСТАНОВ)
22. NEXT (СЛЕДУЮЩИЙ)
23. PLAY (ПРОИГРЫВАНИЕ)
24. FWD (ПРОКРУТКА ВПЕРЕД)
25. ENTER (ВВОД)
26. RIGHT (ВПРАВО)
27. ZOOM (УВЕЛИЧИТЬ)
28. DOWN (ВНИЗ)
29.N/P (СЛЕДУЮЩИЙ/ПРЕДЫДУЩИЙ)
30.ANGLE (УГОЛ)
31.VOL+ (УВЕЛИЧИТЬ ГРОМКОСТЬ)
32. VOL (УМЕНЬШИТЬ ГРОМКОСТЬ)
33. DISPLAY
34. PBC (УПРАВЛЕНИЕ ВОСПРОИЗВЕДЕНИЕМ)
35. A B
36. REPEAT (ПОВТОР)
37. KARAOKE
38. PROG (ПРОГРАММА)
-Направляйте пульт дистанционного управления непосредственно на датчик плеера.
-Не оставляйте пульт в очень теплом или влажном месте.
-Соблюдайте полярность при установке батарей.
- Если пульт дистанционного управления работает неправильно или сократился его радиус действия, замените все батареи на новые.
15
4002IM_new.indd 15 |
20.08.2009 12:38:56 |
РУССКИЙ
Соединения
Подключение к телевизору
Установите режим цифрового выхода проигрывателя (Digital Out mode) на «OFF» (ОТКЛ.), (см. страницу аудионастроек). Существуют два способа подключения аудио/видеовыхода проигрывателя к телевизору:
1.Кабель S-Video и левый/правый аудиокабель. (Установите [Видеовыход] на [S-Video]).
2.Кабель композитного видеосигнала и левый/правый аудиокабель.
16
4002IM_new.indd 16 |
20.08.2009 12:38:56 |

РУССКИЙ
Подключение к аудио/видеоусилителю с аналоговым аудиовходом системы объемного звучания 5.1.
Примечания
1.Установите режим цифрового выхода проигрывателя (Digital Out mode) на «OFF» (ОТКЛ.), (см. страницу аудионастроек).
2.Установите аудио/видеовход телевизора на канал, к которому производится подключение.
3.Установите аудиовход усилителя на канал, к которому производится подключение.
Основные операции
Подготовка к воспроизведению
1.Подключите DVD-плеер к телевизору.
2.Включите телевизор.
3.Выберите на телевизоре AV-вход, подключенный к DVD-плееру.
4.Уменьшите громкость усилителя, после чего включите его.
5.Выберите на усилителе звука AV-вход, подключенный к DVD-плееру.
6.Нажмите на кнопку «Открыть/Закрыть» на передней панели или на пульте дистанционного управления. На дисплее плеера появится надпись «OPEN».
После того как откроется лоток, положите в него диск лицевой стороной вверх. Нажмите на кнопку «Открыть/Закрыть» еще раз, чтобы закрыть лоток.
17
4002IM_new.indd 17 |
20.08.2009 12:38:56 |
РУССКИЙ
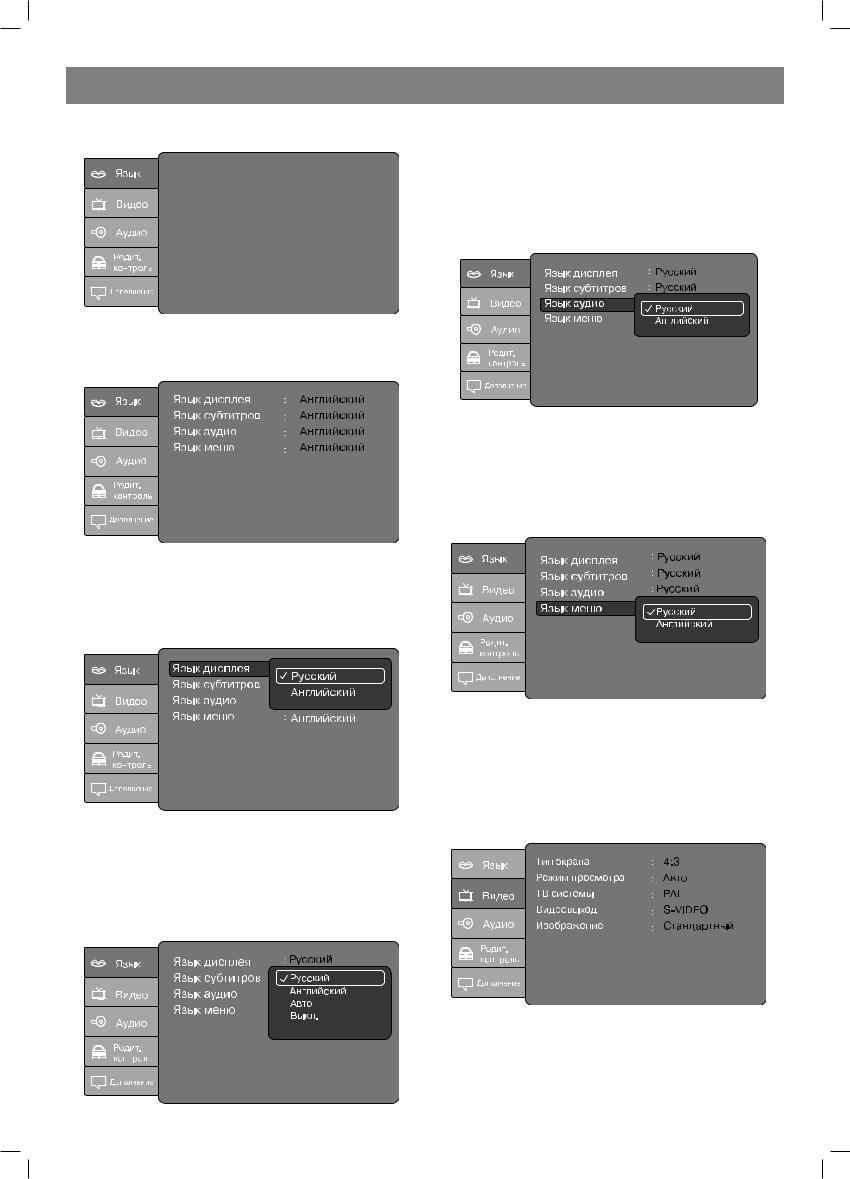
Дополнительные возможности
Настройка режимов и возможностей Настройка
Остановив воспроизведение, нажмите на кнопку «Настройка», после чего справа на экране телевизора появится меню настройки.
Настройка языка
А. |
С |
помощью кнопок «Влево/Вправо» выберите подменю [Язык]. В. Нажмите на кнопку «Ввод» для подтверждения.
С.Нажмите на кнопку «Настройка» для выхода из меню «Настройки».
Выберите [Язык экранного меню] и нажмите на кнопку «Ввод», чтобы войти в подменю [Язык экранного меню]:
А. С помощью кнопок «Вверх/Вниз» выберите нужный пункт меню. В. Нажмите на кнопку «Ввод» для подтверждения.
С.Нажмите на кнопку «Вверх», чтобы вернуться в меню «Настройки».
D. Нажмите на кнопку «Настройка» для выхода из меню «Настройки».
Примечание: на разных дисках количество языков субтитров может быть различным.
Выберите [Звук] и нажмите на кнопку «Ввод», чтобы войти в подменю [Звук]:
А. С помощью кнопок «Вверх/Вниз» выберите нужный пункт меню. В. Нажмите на кнопку «Ввод» для подтверждения.
С. Нажмите на кнопку «Вверх», чтобы вернуться в меню «Настройки».
D. Нажмите на кнопку «Настройка» для выхода из меню «Настройки».
Примечание: языки звука различаются от диска к диску.
Выберите [Меню DVD] и нажмите на кнопку «Ввод», чтобы войти в подменю [Меню DVD]:
А. С помощью кнопок «Вверх/Вниз» выберите нужный пункт меню. В. Нажмите на кнопку «Ввод» для подтверждения.
С.Нажмите на кнопку «Вверх», чтобы вернуться в меню «Настройки».
D. Нажмите на кнопку «Настройка» для выхода из меню «Настройки».
Примечание: языки меню отличаются от диска к диску.
А. С помощью кнопок «Вверх/Вниз» выберите нужный пункт меню.
В. Нажмите на кнопку «Ввод» для подтверждения.
С.Нажмите на кнопку «Вверх», чтобы вернуться в меню «Настройки».
D.Нажмите на кнопку «Настройка» для выхода из меню «Настройки».
Выберите [Субтитры] и нажмите на кнопку «Ввод», чтобы войти в подменю [Субтитры]:
Настройка видео
Выберите [Видео] в меню «Настройки» и нажмите на кнопку «Ввод», чтобы войти в подменю [Видео]:
А. С помощью кнопок «Вверх/Вниз» выберите нужный пункт меню. В. Нажмите на кнопку «Ввод» для подтверждения.
С.Нажмите на кнопку «Вверх», чтобы вернуться в меню «Настройки».
D. Нажмите на кнопку «Настройка» для выхода из меню «Настройки».
[4:3 Pan Scan] – На стандартном телевизоре формата 4:3 видно все изображение по высоте, но некоторые детали, расположенные
18
4002IM_new.indd 18 |
20.08.2009 12:38:56 |
 Loading...