


АУДИО-ВИДЕО И БЫТОВАЯ ТЕХНИКА
VT-3543 BK
Alarm clock
Многофункциональные часы
Инструкция по эксплуатации
|
Manual instruction |
3 |
GB |
||
|
|
|
|
Инструкция по эксплуатации |
8 |
RUS |
||
|
|
|
|
Інструкція з експлуатації |
13 |
UA |
||
|
|
|
|
Пайдалану нұсқасы |
18 |
KZ |
||
|
|
|
|
Фойдаланиш қоидалари |
23 |
UZ |
www.vitek.ru
3543IM_new.indd 1 |
15.07.2008 17:21:2 |

M_new.indd 2 |
15.07.2008 17:21:21 |

ENGLISH
MULTI-FUNCTION ALARM-CLOCK
FEATURES:
•Large LCD display
•Displays Hour, Minute, Second; Month, Date, Day of Week, Alarm Time
•Foreign Time Setting (-9 Hour to +9 Hour)
•Summer Time Indicator
•Dual Alarm with programmable snooze period
•Independent Alarm Time Setting - Crescendo Daily Alarm 1 & Single Alarm 2
•12 Hour or 24 Hour Display Format Selectable
•Weekday Indication in 5 Languages
•battery Low Indicator
•Backlight function
•Single Battery (1.5 V) Operation
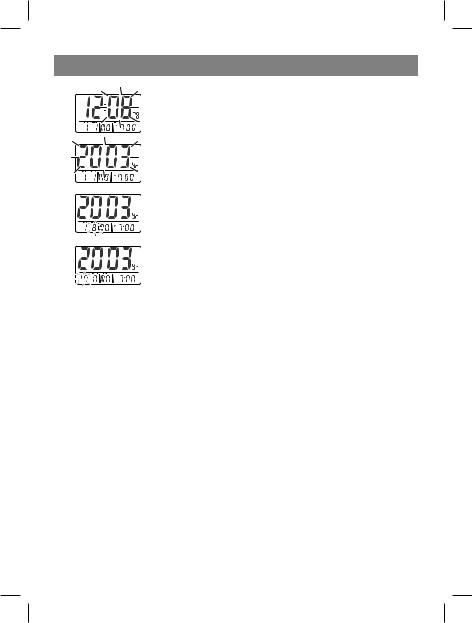
Display features
1.Repeat alarm indicator
2.Time Display
3.Date Display
4.Month Display
5.Weekday Display
6.Daily Alarm 1 Indicator Alarm Time
7.Summer Time Indicator
8.Daily Alarm 1 Enable Indicator
9.Foreign Time Indicator
10.Battery Low Indicator
BATTERY INSERTION/REPLACEMENT
The radio controlled clock uses one AA battery. When the display becomes dim, or the battery low icon turns on, the battery replacement is required. To install and replace the battery, please follow these steps:
1.Use your finger to press the battery cover at the center of the battery compartment on the rear of the case.
2.Follow the arrow mark on the battery cover to remove the cover.
3.Insert one AA size battery into the compartment as indicated by the polarity markings.
4.Replace the battery compartment cover.
3543IM_new.indd 3 |
15.07.2008 17:21:2 |

ENGLISH
FUNCTION KEYS
Your clock has 6 easy to use function keys that control operation:
MODE
•To view alarm 1 time or alarm 2 time
•Choosing the room temperature display mode
•To set the time manually
•To set the foreign time manually.
5
•To increase the hour, minute, year, month, date during time setting
•To switch between 12 hour display format and 24 hour display format.
•To switch between the local time and foreign time
6
•To decrease the hour, minute, year, month, date, during time setting
•To select the language of day of week.
ALARM
•To set the daily alarm 1
•To turn on or turn off the daily alarm 1
•To set the daily alarm 2
•To rum on or turn off the daily alarm 2
°C/°F WAVE
Temperature display format
Press to choose the temperature display format (in Celsius or Farenheit).
SNOOZE/LIGHT
•To turn on the backlight
•To switch to snooze mode when the alarm is activated
TO SET THE TIME AND DATE MANUALLY
Once the battery is installed properly, all the displays on the face of the clock will light up briefly. The time & date will be: 1D 1M WE 0:00 and the alarm 1 time will be 7:00.
Press and hold the MODE button for 3 seconds:
• The hour digit will flash, then press the 5 button or the 6 button to adjust to the correct hour.
• Press the MODE button:
• The minute digit will flash, then press the 5 button or the 6 button to adjust to the correct minute.
M_new.indd 4 |
15.07.2008 17:21:22 |
ENGLISH
• Press the MODE button:
• The year digit will flash, then press the 5 button or the 6 button to adjust to the correct year.
• Press the MODE button:
• The month digit will flash, then press the 5 button or the 6button to adjust to the correct month.
• Press the MODE button:
• The date digit will flash, then press the 5 button or the 6 button to adjust to the correct date.
• Press the MODE button and the time is set.
If no key is pressed for 30 seconds, the clock will revert to normal time display.
TO SET THE LANGUAGE OF WEEKDAYS
•In normal mode, press and hold the 6 button for 3 seconds.
•The language of the current weekdays will be displayed in the LCD: e.g. English (EN), German (GE), Italian (IT), French (FR), Spanish (SP).
•Release the button when the corrected language displayed on LCD to set the language.
TO SET THE FOREIGN TIME
•In normal mode, press and hold the 5 button for 3 seconds. The clock will switch to foreign time with the “F” icon turn on.
•Press and hold the 5 button for 3 seconds in foreign time will switch to normal time with the “F” icon turn off.
•In foreign time, press and hold the MODE button for 3 seconds to set the foreign time with the hour digit flashes.
•Press the 6 button or the 5 button to adjust to the correct hour for the time zone.
•Press the MODE button and the foreign time is set.
•If no key is pressed for 30 seconds, the clock will revert to foreign time display.
3543IM_new.indd 5 |
15.07.2008 17:21:2 |

ENGLISH
ALARM 1 setting
In the ALARM 1 Display,
=Press MODE for about 3 seconds: the hour digits are blinking and can be set by pressing UP or DOWN key.
=Press MODE again: the minute digits are blinking and can be set by pressing UP or DOWN key.
=Press MODE again, the Alarm time is set and  icon will turn on.
ALARM 2 setting
In the ALARM2 Display,
=Press MODE for about 3 seconds: the hour digits are blinking and can set by pressing UP or DOWN key.
=Press MODE again: the minute digits are blinking and can be set by pressing UP or DOWN key.
=Press MODE again, the Alarm time is set and  icon will turn on.
USING THE ALARM AND SNOOZE FOR DAILY ALARM 1 or ALARM 2
•Press the MODE button to turn the alarm 1 on, or the alarm 1 off/ the alarm 2 on, or the alarm 2 off.
•When the current time reaches the alarm time that is enabled, the corresponding alarm is activated.
•Press the MODE button when the alarm is activated will stop the alarm for 24 hours.
•When the alarm is activated, press the SNOOZE/LIGHT button and the alarm stops but sounds again after the snooze period (4 minutes snooze period is pre-pro- grammed).
•The repeat alarm indicator will flash.
•The alarm will stop after 4 minutes if the MODE button or SNOOZE/LIGHT button is not pressed.
TO LIGHT THE CLOCK
Press the SNOOZE/LIGHT button to light up the clock for 3 seconds.
LOW BATTERY LEVEL DETECTION
Should the battery capacity drop to a level that is not sufficient to operate the clock, the low battery indicator will light up. The battery should be replaced as soon as possible
Specifications subject to change without prior notice.
M_new.indd 6 |
15.07.2008 17:21:22 |

ENGLISH
MINIMUM SERVICE LIFE - 3 YEARS
Guarantee
Details regarding guarantee conditions can be obtained from the dealer from whom the appliance was purchased. The bill of sale or receipt must be produced when making any claim under the terms of this guarantee.
ThisproductconformstotheEMC-RequirementsaslaiddownbytheCouncil Directive 89/336/EEC and to the Law Voltage Regulation (73/23 EEC)
3543IM_new.indd 7 |
15.07.2008 17:21:2 |

русский
МНОГОФУНКЦИОНАЛЬНЫЕ ЧАСЫ-БУДИЛЬНИК
ФУНКЦИИ
•Большой ЖК-дисплей.
•Дисплей отображает часы, минуты, секунды; месяц, число, день недели, время включения сигнала будильника.
•Установка времени для другого часового пояса (от -9 часов до +9 часов).
•Перевод часов на летнее время.
•Двойное включение сигнала будильника с программируемым временем повторного включения сигнала.
•Независимая установка времени включения сигнала будильника - нарастающий сигнал 1 и одиночный сигнал 2.
•Время отображается в 12или 24-часовом формате (по выбору).
•День недели отображается на пяти языках.
•Индикатор аккумулятора.
•Подсветка дисплея.
•Работа от одного аккумулятора (1,5 В).
1.Индикатор повторного включения сигнала будильника
2.Индикатор времени
3.Индикатор числа месяца
4.Индикатор месяца
5.Индикатор дня недели
6.Индикатор времени включения ежедневного сигнала будильника 1
7.Индикатор перевода часов на летнее время
8.Индикатор включения ежедневного сигнала будильника 1
9.Индикатор перевода часов на время в другом часовом поясе
10.Индикатор аккумулятора
УСТАНОВКА/ЗАМЕНА АККУМУЛЯТОРА
Будильник работает от одного аккумулятора АА. Аккумулятор необходимо заменить,еслидисплейсталтусклым,либонанемпоявилсязначокразряженного аккумулятора. Для этого выполните следующие шаги:
1.Нажмите пальцем на крышку отделения для аккумулятора на задней стороне корпуса будильника.
2.Сдвиньте крышку в направлении, указанном стрелкой.
3.Вставьте в отделение для аккумулятора один аккумулятор АА, соблюдая полярность.
4.Установите на место крышку отделения для аккумулятора.
ФУНКЦИОНАЛЬНЫЕ КНОПКИ
Часы имеют 6 простых функциональных кнопок для управления будильником:
M_new.indd 8 |
15.07.2008 17:21:22 |

русский
MODE
•Просмотр времени включения сигнала 1 или времени включения сигнала 2.
•Выбор режима отображения комнатной температуры
•Самостоятельная установка времени.
•Самостоятельная установка времени для другого часового пояса.
5
•Увеличить значение часа, минуты, года, месяца, числа месяца во время установки времени.
•Переключиться между 12- и 24-часовым форматом отображения времени.
•Переключиться между местным временем и временем для другого часового пояса.
6
•Уменьшить значение часа, минуты, года, месяца, числа месяца во время установки времени.
•Выбрать язык отображения дня недели.
ALARM
•Установка времени ежедневного включения сигнала 1.
•Включить или выключить ежедневное включение сигнала 1.
•Установка времени ежедневного включения сигнала 2.
•Включить или выключить ежедневное включение сигнала 2.
°C/°F WAVE
Формат отображения температуры Нажмите для выбора формата отбражения температуры на дисплее (по Цельсию или по Фаренгейту)
SNOOZE/LIGHT
•Включить подсветку дисплея.
•Переключиться в режим повторного включения сигнала будильника при включенном будильнике.
САМОСТОЯТЕЛЬНАЯ УСТАНОВКА ВРЕМЕНИ И ДАТЫ
•Если аккумулятор установлен правильно, на дисплее на короткое время включатся все индикаторы. Время и дата будут следующими: 1D 1M WE 0:00, а время включения сигнала будильника 1 будет 7:00.
Нажмите и удерживайте кнопку MODE в течение 3 секунд:
• Значение часа будет мигать, нажмите кнопку 5 или 6, чтобы установить нужное значение.
• Нажмите кнопку MODE.
• Значение минут будет мигать, нажмите кнопку 5 или 6, чтобы установить нужное значение.
3543IM_new.indd 9 |
15.07.2008 17:21:2 |
 Loading...