


VT-2520 BK
Hair clipper
Машинка для стрижки волос
4
9
16
22
|
|
|
|
|
|
|
|
|
|
|
|
|
|
|
|
|
|
-2520.indd 1 |
02.02.2018 17:14:17 |
||||
-2520.indd 2 |
02.02.2018 17:14:19 |

рис. 1 |
рис. 5 |
рис. 2 |
рис. 6 |
рис. 3 |
рис. 7 |
рис. 4 |
рис. 8 |
-2520.indd 3 |
02.02.2018 17:14:20 |

ENGLISH
HAIR CLIPPER VT-2520 BK
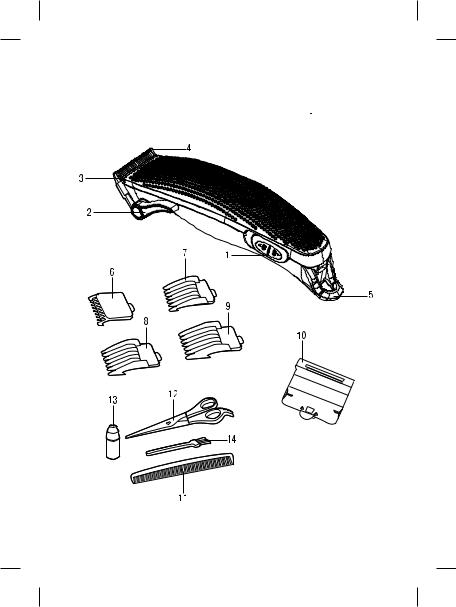
DESCRIPTION
1.Power switch «ON/OFF»
2.Taper lever
3.Lower blade
4.Upper blade
5.Hanging loop
6.3 mm attachment comb
7.6 mm attachment comb
8.9 mm attachment comb
9.12 mm attachment comb
10.Protective blade cover
11.Comb
12.Scissors
13.Lubricating oil
14.Cleaning brush
SAFETY MEASURES
Before using the unit, read this instruction manual carefully and keep it for future reference.
Use the unit for intended purposes only, as specified in this manual. Mishandling the unit can lead to its breakage and cause harm to the user or damage to his/ her property.
•Before using the unit for the first time, make sure that the voltage in your mains corresponds to unit operating voltage.
•Do not use the unit outdoors.
•To avoid fire, do not use adapters for connecting the unit to the mains.
•It is recommended to unwind the power cord to its full length before using the unit.
•The power cord should not:
–touch hot objects,
–be twisted, run over sharp edges;
–be used for carrying the unit.
•Check the power cord and power plug insulation integrity periodically.
•When unplugging the unit, pull the power plug but not the power cord.
•Never insert any foreign objects into the unit body openings.
•Use only the attachment combs supplied.
•Never use the unit if the attachment combs or the blades are damaged.
•Keep the blades clean and lubricated.
•After each usage clean the blades using the brush supplied with the unit.
•Do not leave the operating unit unattended.
•Always switch the hair clipper off during intervals in operation or when you are not using it or before cleaning it.
•Do not place the operating unit on any surface.
•Do not use the hair clipper in places with high temperature and humidity and while taking a bath or a shower.
•Do not keep the unit near a bath or a sink filled with water. Do not immerse the hair clipper, the power cord or the plug into water or other liquids; do not wash it under running water.
•If the unit is dropped into water, unplug it immediately and only then take it out of the water.
•For children safety reasons do not leave polyethylene bags, used as a packaging, unattended.
•During the unit operation do not allow children to touch the unit body, the power cord or the power plug.
•Do not leave children unattended to prevent using the unit as a toy.
•Close supervision is necessary when children or disabled persons are near the operating unit.
•This unit is not intended for usage by children.
•Children and over as well as disabled persons can use this unit only
4
-2520.indd 4 |
02.02.2018 17:14:20 |

ENGLISH
under supervision of a person who is responsible for their safety if they are given all the necessary and understandable instructions concerning the safe usage of the unit and information about danger that can be caused by its improper usage.
•Attention! Do not allow children to play with polyethylene bags or packaging film. Danger of suffocation!
•Do not use the hair clipper if the power cord or the plug is damaged or if the unit works improperly.
•Do not repair the unit by yourself. Do not disassemble the unit by yourself, if any malfunction is detected or after it was dropped, unplug the unit and apply to any authorized service center from the contact address list given in the warranty book and on the website www.vitek.ru.
•Transport the unit in the original package only.
•Keep the unit out of reach of children and disabled persons.
THE UNIT IS INTENDED FOR HOUSEHOLD USE ONLY, ITS COMMERCIAL USAGE AND USAGE IN PRODUCTION AREAS AND WORK SPACES IS PROHIBITED.
BEFORE THE FIRST USE
After unit transportation or storage at low temperature keep it for at least three hours at room temperature before switching on.
USING THE HAIR CLIPPER
–After unit transportation or storage at low temperature keep it for at least three hours at room temperature before switching on.
–Remove all stickers and packaging elements that can prevent unit operation.
Blades
–If the blades have been removed for cleaning or replacement, install them back to their places and tighten the fastening screws. The unit’s design makes it unnecessary to level the blades after installing them.
Lubricating oil
–To maintain the hair clipper in a good condition, you should lubricate the blades regularly. Do not use vegetable oil or oil that includes solvents. Solvents are subjected to evaporation, and the remaining thick oil can slow down the upper blade (4) moving speed.
–For lubricating the blades use only the oil (13), supplied with the unit.
Taper lever (2)
–The taper lever (2), that moves lower blade (3), is located under the thumb (if you are right-handed). When cutting hair you can move the blade, pressing the lever (2), thus adjusting the cutting length without usage of the attachment combs. In upper lever position, haircut will be the shortest one. In down lever position the cutting length is approximately the same as with 3 mm attachment comb (6). By changing the position of the lever while cutting hair, you can select the necessary cutting length.
–If hair is jammed in the blades (3, 4) while cutting, move the lever (2) from the upper position to the down position several times, this will help to release
5
-2520.indd 5 |
02.02.2018 17:14:20 |

ENGLISH
the jammed hair without removing the blades.
–When the hair clipper is switched on, move the lever several times from the upper position to the lower position, this way you can remove the cut-off hair from the blades.
–If the unit pulls hair while cutting, it means that the blades (3, 4) became blunt, replace them with new ones.
Instructions on hair cutting
•Hair should be clean and dry while cutting.
•Insert the power plug into the mains socket.
•Before cutting hair, switch the unit on by moving the power switch (1) to the position «ON» and make sure that the hair clipper operates normally and the blades move smoothly. If there is excess oil on the blades, remove it with a dry cloth.
•Constantly check the power cord, avoid its multiple twisting, regularly switch the unit off and straighten the power cord.
•Seat the person so that his/her head is approximately at your eye level, cover the person’s shoulders with a towel and set hair with the comb (11).
Attention:
–Always cut off a little amount of hair at a time – you can always return to the trimmed area for additional cutting if needed.
–The best haircutting results are reached on dry hair, not wet.
–Set the hair with the comb (11) to reveal uneven locks.
–It is better to leave longer hair after cutting for the first time.
–After learning your clipper better, you will be able to arrange your hair in any style you need.
Attachment combs
The length of hair depends on the attachment comb:
•Attachment comb (6): hair length 3 mm
•Attachment comb (7): hair length 6 mm
•Attachment comb (8): hair length 9 mm
•Attachment comb (9): hair length 12 mm Set the attachment upper part on the blade and press it until the clamp clicks. To remove the attachment comb press the clamp and remove the attachment.
Step one
Set the 3 mm attachment comb (6) or 6 mm attachment comb (7). Switch the unit on using the power switch (1), setting it to position «ON». Hold the unit with the blades pointed upwards. Start haircutting from the beginning of the hair growth. Slowly move the clipper upwards. This way cut the head back area at neck bottom and near the ears (pic. 1, 2, 3)
Step two
Switch the unit off using the power switch (1) by setting it to the “OFF” position, unplug the unit, then set the 9 mm attachment comb (8) or the 12 mm attachment comb (9) for longer hair and continue cutting hair near the top of the head (pic.4).
Step three – cutting temples
Switch the hair clipper off and unplug it, then set the 3 mm attachment comb (6) or 6 mm attachment comb (7) and cut hair in the area of the temples. Then set the 9 mm attachment comb (8) or the 12 mm attachment comb (9) and continue cutting towards the top of the head.
6
-2520.indd 6 |
02.02.2018 17:14:20 |

ENGLISH
Step four – cutting the top of the head
Using the 9 mm attachment comb (8) or the 12 mm attachment comb (9), cut the hair on the top of the head towards the crown against the hair growth direction.
•You can cut hair against and along the direction of hair growth, but keep in mind that the hair cut against the growth will be shorter than the hair cut along the growth.
•Use the 3 mm attachment comb (6) and 6 mm attachment comb (7) for very short haircut. To leave longer hair, use either the 9 mm attachment comb
(8) or the 12 mm attachment comb (9).
•To leave longer hair, take hair locks between your fingers and cut the hair with the clipper (pic. 5).
•You can use the comb (11): lift the hair locks and cut them above the comb (pic. 6).
•Always start cutting from the back of the head.
•Set the hair with the comb (11) to reveal uneven locks.
•Use the scissors (12) to make haircut even
Step five – the final part
–In the final stage of hair cutting, remove the attachment comb from the hair clipper, turn the blades of the clipper towards the hair and trim hair on the temples and neck carefully. Do not press the clipper strongly, there is danger of injuries or cuts when open blades come in contact with the skin (pic. 7).
–Having finished cutting hair, put the protective cover (10) on the blades (3, 4).
Cone-shaped haircut
Set the necessary attachment comb and start cutting from the head back towards the crown. Cut hair against hair growth
from the head front to the crown and on the head sides (pic. 8). To get a flat top haircut, use the comb (11): lift the locks and cut them along the comb. Set the hair with the comb (11) to reveal uneven locks.
Note: Between operations, you can hang the clipper on the hanging loop (5) having preliminarily switched the unit off using the power switch (1).
CLEANING AND CARE Lubricating the blades
Regularly lubricate the blades using the oil (13) supplied with the unit.
–Switch the unit off using the power switch (1) and unplug it.
–Apply one– two drops of oil (13) on the teeth of the blades (3, 4) and the back side of the upper blade (4), switch the unit on and make sure that the blades are moving smoothly.
–Switch the unit off, clean the excess oil with a dry cloth.
Attention! Use only the oil supplied with the unit.
DO NOT USE vegetable oil, fat, oil mixed with any solvents for lubricating. Solvents are subjected to evaporation, leaving thick oil which may slow down the blades motion.
Cleaning the hair clipper
–Switch off and unplug the unit.
–Clean the blades from hair, using the cleaning brush (14).
–Wipe the accessories and the unit body with a slightly wet cloth, and then dry them with a soft cloth.
–Put the protective cover (10) on the blades (3, 4).
–Do not immerse the unit into water or any other liquid.
–Do not use solvents or abrasives for cleaning the unit.
7
-2520.indd 7 |
02.02.2018 17:14:20 |
ENGLISH
STORAGE
–Before taking the unit away for storage, clean and lubricate the blades (3, 4) with lubricating oil (13) and put the protective cover (10) on.
–Keep the unit in a dry cool place, out of reach of children.
DELIVERY SET
1.Hair clipper (with blades) – 1 pc.
2.Attachment comb – 4 pc.
3.Protective cover – 1 pc.
4.Comb – 1 pc.
5.Scissors – 1 pc.
6.Lubricating oil – 1pc.
7.Cleaning brush – 1 pc.
TECHNICAL SPECIFICATIONS
Nominal voltage: 220-240 V ~ 50 Hz Rated input power: 7 W
Do not use the unit while taking a bath. Do not hang or keep the unit in places where it can fall into a bath or a sink filled with water; do not immerse the unit body, power cord or power plug into water or other liquids.
RECYCLING
For environment protection do not throw out the unit and the batteries with usual household waste after its service life expi-
ration; apply to the specialized center for further recycling.
The waste generated during the disposal of the unit is subject to mandatory collection and consequent disposal in the prescribed manner.
For further information about recycling of this product apply to a local municipal administration, a disposal service or to the shop where you purchased this product.
The manufacturer preserves the right to change design, structure and specifications not affecting general principles of the unit operation without a preliminary notification due to which insignificant differences between the manual and product may be observed. If the user reveals such differences, please report them via e-mail info@vitek.ru for receipt of an updated manual.
Unit operating life is 3 years
Guarantee
Details regarding guarantee conditions can be obtained from the dealer from whom the appliance was purchased. The bill of sale or receipt must be produced when making any claim under the terms of this guarantee.
This product conforms to the EMC Directive 2014/30/EU and to the Low Voltage Directive 2014/35/EU.
8
-2520.indd 8 |
02.02.2018 17:14:21 |

русский
МАШИНКА ДЛЯ СТРИЖКИ |
• |
Перед |
эксплуатацией |
прибора |
|||||
ВОЛОС VT-2520 BK |
|
рекомендуется размотать сетевой |
|||||||
|
|
|
шнур на всю длину. |
|
|
||||
ОПИСАНИЕ |
• |
Сетевой шнур не должен: |
|||||||
1. |
Выключатель питания «ON/OFF» |
|
– |
соприкасаться |
с |
горячими |
|||
2. |
Рычаг перемещения нижнего |
|
|
предметами; |
|
|
|
||
|
лезвия |
|
– |
перекручиваться, |
протяги- |
||||
3. |
Нижнее лезвие |
|
|
ваться через острые кромки; |
|||||
4. |
Верхнее лезвие |
|
– |
использоваться для перено- |
|||||
5. |
Петелька для подвешивания |
|
|
ски прибора. |
|
|
|
||
6. |
Насадка-расчёска 3 мм |
• |
Периодически проверяйте состо- |
||||||
7. |
Насадка-расчёска 6 мм |
|
яние изоляции сетевого шнура и |
||||||
8. |
Насадка-расчёска 9 мм |
|
сетевой вилки. |
|
|
|
|||
9. |
Насадка-расчёска 12 мм |
• |
Вынимая вилку сетевого шнура из |
||||||
10. |
Защитная крышка для лезвий |
|
электрической розетки, не тяните |
||||||
11. |
Расчёска |
|
за сетевой шнур, а держитесь за |
||||||
12. |
Ножницы |
|
вилку сетевого шнура. |
|
|||||
13. |
Смазочное масло |
• |
Не вставляйте посторонние пред- |
||||||
14. |
Щёточка для чистки |
|
меты в любые отверстия корпуса. |
||||||
|
|
• |
Используйте только те насадки- |
||||||
МЕРЫ БЕЗОПАСНОСТИ |
|
расчёски, которые входят в ком- |
|||||||
Перед началом эксплуатации элек- |
|
плект поставки. |
|
|
|
||||
троприбора внимательно прочитайте |
• |
Запрещается использовать машин- |
|||||||
настоящее руководство по эксплуа- |
|
ку с |
повреждёнными |
насадками |
|||||
тации и сохраните его для использо- |
|
или лезвиями. |
|
|
|
||||
вания в качестве справочного мате- |
• |
Следите за чистотой лезвий и |
|||||||
риала. |
|
наличием |
на них |
смазочного |
|||||
Используйте устройство только по его |
|
масла. |
|
|
|
|
|
||
прямому назначению, как изложено в |
• |
После |
каждого |
использования |
|||||
данном руководстве. Неправильное |
|
очищайте |
лезвия |
машинки при |
|||||
обращение с прибором может приве- |
|
помощи |
|
щёточки, |
входящей в |
||||
сти к его поломке, причинению вреда |
|
набор. |
|
|
|
|
|
||
пользователю или его имуществу. |
• |
Не оставляйте работающий при- |
|||||||
• Перед первым включением убеди- |
|
бор без присмотра. |
|
|
|||||
|
тесь, что напряжение электриче- |
• |
Машинка должна быть выключена |
||||||
|
ской сети соответствует рабочему |
|
во время перерывов в работе или |
||||||
|
напряжению устройства. |
|
когда не пользуетесь ею, а также |
||||||
• Не используйте устройство вне |
|
перед тем, как провести чистку. |
|||||||
|
помещений. |
• |
Не кладите работающее устрой- |
||||||
• |
Во избежание пожара не исполь- |
|
ство на какую-либо поверхность. |
||||||
|
зуйте переходники при подклю- |
• |
Не используйте машинку в поме- |
||||||
|
чении устройства к электрической |
|
щениях с повышенной влажно- |
||||||
|
розетке. |
|
стью |
и |
|
температурой, нельзя |
|||
9
-2520.indd 9 |
02.02.2018 17:14:21 |
 Loading...