


 Loading...
ML900
Operation Manual
Part Number: 7990 0114 3001 R03
(April 2004)

TRADEMARKS
All brand and product names are trademarks or registered trademarks of their respective companies.
NOTE
Information in this manual is subject to change without notice.

Regulations Information
Class B Regulations
USA
Federal Communications Commission Radio Frequency Interference Statement
NOTE:
This equipment has been tested and found to comply with the limits for a Class B digital device pursuant to Part 15 of the FCC Rules. These limits are designed to provide reasonable protection against harmful interference in a residential installation. This equipment generates, uses, and can radiate radio frequency energy and, if not installed and used in accordance with the instructions, may cause harmful interference to radio communications. However, there is no guarantee that interference will not occur in a particular installation. If this equipment does cause harmful interference to radio or television reception, which can be determined by turning the equipment off and on, the user is encouraged to try to correct the interference by one or more of the following measures:
−Reorient or relocate the receiving antenna.
−Increase the separation between the equipment and receiver.
−Connect the equipment into an outlet on a circuit different from that to which the receiver is connected.
−Consult the dealer or an experienced radio/TV technician for help.
Any changes or modifications not expressly approved by the manufacturer could void the user’s authority to operate the equipment.
Please note:
The use of a non-shielded interface cable with this equipment is prohibited.
Wireless LAN Module Statement
FCC CAUTION:
This device complies with Part 15 of the FCC Rules. Operation is subject to the following two conditions: (1) this device may not cause harmful interference, and (2) this device must accept any interference received, including interference that may cause undesired operation.

FCC RF Radiation Exposure Statement
This equipment complies with FCC RF radiation exposure limits set forth for an uncontrolled environment. This equipment should be installed and operated with a minimum distance of 20 cm between the radiator and your body.
To assure continued compliance (example – use only shielded interface cables when connecting to computer or peripheral devices), any changes or modifications not expressly approved by the party responsible for compliance could void the user's authority to operate this equipment.
Canada
Canadian Department of Communications
Radio Interference Regulations Class B Compliance Notice
This digital apparatus does not exceed the Class B limits for radio noise emissions from digital apparatus set out in the Radio Interference Regulations of the Canadian Department of Communications.
Le présent appareil numérique n’émet pas de bruits radioélectriques dépassant les limites applicables aux appareils numériques de la classe B prescrites dans le Règlement sur le brouillage radioélectrique édicté par le ministère des Communications du Canada.
SAFE USAGE NOTIFICATION:
For reason of personal safety and optimal radio performance, Motorola has designed the ML900 with an intended purpose and position of use either in a secured vehicle docking station or on the top of an office desk.
Motorola strongly recommends using this product in a vehicle only when it is physically-secured in a lock or assured-stationary location as failure to do so may cause the product to cause harm in accidents or other conditions. Similarly, Motorola strongly recommends that the unit not be situated for a prolonged period in a position that places the antennas directly against the human body (for example, by “tucking” an operational, radio-equipped unit under one’ s arm). NOTE: The radio modems in the ML900 may continue to transmit and receive signals even while the laptop is in a closed position. Failure to follow any part of this notification could cause degraded radio performance or harm to the user”.

COMPUTER SOFTWARE COPYRIGHTS
The Motorola products described in this instruction manual may include copyrighted Motorola computer programs stored in semiconductor memories or other media. Laws in the United States and other countries preserve for Motorola certain exclusive rights for copyrighted computer programs, including the exclusive right to copy or reproduce in any form the copyrighted computer program. Accordingly, any copyrighted
Motorola computer programs contained in the Motorola products described in this instruction manual may not be copied or reproduced in any manner without the express written permission of Motorola. Furthermore, the purchase of Motorola products shall not be deemed to grant either directly or by implication, estoppels or otherwise, any license under the copyrights, patents or patent applications of Motorola, except
for the normal non-exclusive, royalty free license to use that arises by operation of law in the sale of a product.
This Warranty applies within the fifty(50) United States' the District of Columbia and Canada.
LIMITED WARRANTY
MOTOROLA COMMUNICATION PRODUCTS
If the affected product is being purchased pursuant to a written
Communications System Agreement signed by Motorola, the warranty contained in that written agreement will apply. Otherwise, the following warranty applies.
I. WHAT THIS WARRANTY COVERS AND FOR HOW LONG:
Motorola Inc. or if applicable, Motorola Canada Limited ("Motorola",) warrants the Motorola manufactured radio communications product, including original equipment crystal devices and channel elements ("Product"), against material defects in material and workmanship under normal use and service for a period of Three (3)Years from the date of shipment.

Motorola, at its option, will at no charge either repair the Product (with new or reconditioned parts), replace it with the same or equivalent Product (using new or reconditioned Product), or refund the purchase price of the product during the warranty period provided purchaser notifies Motorola according to the terms of this warranty. Repaired or replaced Product is warranted for the balance of the original applicable warranty period. All replaced parts of the Product shall become the property of Motorola.
This express limited warranty is extended by Motorola to the original end user purchaser purchasing the Product for purposes of leasing or for commercial, industrial, or governmental use only, and is not assignable or transferable to any other party. This is the complete warranty for the Product manufactured by Motorola. Motorola assumes no obligations or liability for additions or modifications to this warranty unless made in writing and signed by an officer of Motorola. Unless made in a separate written agreement between Motorola and the original end user purchaser, Motorola does not warrant the installation maintenance or service of the Product.
Motorola cannot be responsible in any way for any ancillary equipment not furnished by Motorola which is attached to or used in connection with the product, or for operation of the Product with any ancillary equipment, and all such equipment is expressly excluded from this warranty. Because each system which may use the Product is unique, Motorola disclaims liability for range, coverage, or operation of the system as a whole under this warranty.
II. GENERAL PROVISIONS:
This warranty sets forth the full extent Motorola’s responsibilities regarding the product. Repair replacement or Refund of the purchase price, at Motorola’s option, is the exclusive is the exclusive remedy. THIS WARRANTY IS GIVEN IN LIEU OF ALL OTHER EXPRESS WARRANTIES.

MOTOROLA DISCLAIMS ALL OTHER WARRANTIES OR CONDITIONS, EXPRESS OR IMPLIED INCLUDING THE IMPLIED WARRANTIES OR CONDITIONS OF MERCHANTABILITY AND FITNESS FOR A PARTICULAR PURPOSE. IN NO EVENT SHALL MOTOROLA BE LIABLE FOR DAMAGES IN EXCESS OF THE PURCHASE OF PRICE THE PRODUCT FOR ANY LOSS OF USE LOSS OF TIME, INCONVE-NIENCE, COMMERCIAL LOSS, LOST PROFITS OR SAVINGS OR OTHER INCIDENTAL, SPECIAL INDIRECT OR CONSEQUENTIAL DAMAGES ARISING OUT OF THE USE OR INABILITY TO USE SUCH PRODUCT TO THE FULL EXTENT SUCH MAY BE DISCLAMIED By LAW.
III. How TO GET WARRANTY SERVICE:
Purchaser must notify Motorola’s representative or call Motorola’s Customer Response Center at1.800.247.2346 within the applicable warranty period for information regarding warranty service.
IV. WHAT THIS WARRANTY DOES NOT COVER:
A)Defects or damage resulting from use of the Product in other than its normal and customary manner.
B)Defects or damage from misuse, accident, water, or neglect.
C)Defects or damage from improper testing, operation, maintenance, installation, alteration, modification, or adjustment.
D)Breakage or damage to antennas unless caused directly by defects in material workmanship.
E)A Product subjected to unauthorized Product modifications, disassemblies or repairs (including, without limitation, the addition to the Product of non-Motorola supplied equipment) which adversely affect performance of the Product or interfere with Motorola’s normal warranty inspection and testing of the Product to verify any warranty claim.
F)Product which has had the serial number removed or made illegible.
G)Accessories, including batteries carry their own separate limited One
(1)year warranty.
H)Freight costs to the repair depot.

I)A Product which, due to illegal or unauthorized alteration of the software/firmware in the Product, does not function in accordance with Motorola’s published specifications or with the FCC type acceptance labeling in effect for the Product at the time the Product was initially distributed from Motorola.
J)Scratches or other cosmetic damage to Product surfaces that do not affect the operation of the Product.
K)That the software in the product will meet the purchaser’s requirements or that the operation of the software will be uninterrupted or error-free.
L)Normal and customary wear and tear.
M)Non-Motorola manufactured equipment unless bearing a Motorola Part Number in the form of an alphanumeric number (i.e.,TDE6030B).
V.GOVERNING LAW
In the case of a Product sold in the United States and Canada, this Warranty is governed by the laws of the State of Illinois and the Province of Ontario respectively.
VI. PATENT AND SOFTWARE PROVISIONS:
Motorola will defend, at its own expense, any suit brought against the end user purchaser to the extent that it is based on a claim that the Product or its parts infringe a United States patent, and Motorola will pay those costs and damages finally awarded against the end user purchaser in any such suit which are attributable to any such claim, but such defense and payments are conditioned on the following:
A)That Motorola will be notified promptly in writing by such purchaser of any notice of such claim;
B)That Motorola will have sole control of the defense of such suit
and all negotiations for its settlement or compromise; and

C)Should the Product or its parts become, or in Motorola’s opinion be likely to become, the subject of a claim of infringement of a United States patent, that such purchaser will permit Motorola, at its option and expense, either to procure for such purchaser the right to continue using the product or its parts or to replace or modify the same so that it becomes non-infringing or to grant such purchaser a credit for the Product or its parts as depredated and accept its return. The depreciation will be an equal amount per year over the lifetime of the product or its parts as established by Motorola.
Motorola will have no liability with respect to any claim of patent infringement which is based upon the combination of the Product or its parts furnished hereunder with software, apparatus or devices not furnished by Motorola, nor will Motorola have any liability for the use of ancillary equipment or software not furnished by Motorola which is attached to or used in connection with the Product. The foregoing states the entire liability of Motorola with respect to infringement of patents by the Product or any of its parts thereof.
About the Battery
Caution Texts Concerning Lithium Batteries
DANISH
ADVARSEL!
Lithiumbatteri – Eksplosionsfare ved fejlagtig håndtering. Udskiftning må kun ske med batteri af samme fabrikat og type. Levér det brugte batteri tilbage til leverandøren.
NORWEGIAN
ADVARSEL:
Eksplosjonsfare ved feilaktig skifte av batteri. Benytt samme batteritype eller en tilsvarende type anbefalt av apparatfabrikanten. Brukte batterier kasseres i henhold til fabrikantens instruksjoner.
SWEDISH
VARNING:
Explosionsfara vid felaktigt batteribyte. Använd samma batterityp eller en ekvivalent typ som rekommenderas av apparattillverkaren. Kassera använt batteri enligt fabrikantens instruktion.
FINNISH
VAROITUS:
Paristo voi räjähtää, jos se on virheellisesti asennettu. Vaihda paristo ainoastaan valmistajan suosittelemaan tyyppiin. Hävitä käytetty paristo valmistajan ohjeiden mukaisesti.
ENGLISH
CAUTION:
Danger of explosion if battery is incorrectly replaced. Replace only with the same or equivalent type recommended by the equipment manufacturer. Discard used batteries according to manufacturer's instructions.
DEUTSCH
VORSICHT:
Explosionsgefahr bei unsachgemäßem Austausch der Batterie. Ersatz nur durch denselben oder einen vom Hersteller empfohlenen gleich-wertigen Typ. Entsorgung gebrauchter Batterien nach Angaben des Herstellers.

FRENCH
ATTENTION:
II y a danger d’explosion s’il y a remplacement incorrect de la batterie. Remplacer uniquement avec une batterie du même type ou d’un type équivalent recommandé par le constructeur. Mettre au rebut les batteries usagées conformément aux instructions du fabricant.
Attention (for USA Users)
The product that you have purchased contains a rechargeable battery. The battery is recyclable. At the end of its useful life, under various state and local laws, it may be illegal to dispose of this battery into the municipal waste stream. Check with your local solid waste officials for details in your area for recycling options or proper disposal.
About the Modem
Caution
1.Never install telephone wiring during a lightning storm.
2.Never install telephone jacks in wet locations unless the jack is specifically designed for wet locations.
3.Never touch uninsulated telephone wires or terminals unless the telephone line has been disconnected at the network interface.
4.Use caution when installing or modifying telephone lines.
5.Avoid using the telephone function (other than a cordless-type) during an electrical storm. There may be a remote risk of electric shock from lightning.
6.Do not use the telephone function to report a gas leak in the vicinity of the leak.
Caution (for USA Users)
To reduce the risk of fire, use only No.26 AWG or larger telecommunication line cord.

Table of Contents
Preface........................................................................................ |
v |
Chapter 1 Getting Started ..................................................... |
1-1 |
Getting the Computer Running................................................ |
1-2 |
Unpacking .......................................................................... |
1-2 |
Connecting to AC Power ................................................... |
1-3 |
Opening the Cover ............................................................. |
1-4 |
Turning On and Off the Computer..................................... |
1-5 |
Taking a Look at the Computer ............................................... |
1-6 |
Right-Side Components ..................................................... |
1-6 |
Left-Side Components ....................................................... |
1-7 |
Rear Components............................................................... |
1-8 |
Front Components............................................................ |
1-10 |
Bottom-Side Components ................................................ |
1-11 |
Top-open Components..................................................... |
1-13 |
Where to Go from Here ......................................................... |
1-16 |
Chapter 2 Operating Your Computer ................................... |
2-1 |
Starting and Stopping the Computer........................................ |
2-2 |
Starting the Computer ........................................................ |
2-2 |
Stopping the Computer ...................................................... |
2-2 |
Using the Keyboard ................................................................. |
2-4 |
Typewriter Keys................................................................. |
2-4 |
Cursor-Control Keys.......................................................... |
2-5 |
i

Numeric Keypad ................................................................ |
2-5 |
Euro Symbol ...................................................................... |
2-6 |
Windows Keys ................................................................... |
2-6 |
Function Keys .................................................................... |
2-6 |
Fn Key................................................................................ |
2-7 |
Hot Keys ............................................................................ |
2-7 |
Using the Touchpad ................................................................. |
2-9 |
Configuring the Touchpad ............................................... |
2-11 |
Using the Touchscreen (option)............................................. |
2-12 |
Using the Hard Disk Drive .................................................... |
2-13 |
Using the CD / DVD/Combo Drive....................................... |
2-14 |
Installing the CD / DVD/Combo Drive............................ |
2-15 |
Inserting and Removing a CD.......................................... |
2-16 |
Using the Video Features....................................................... |
2-17 |
Configuring the Display Modes ....................................... |
2-17 |
Using the Audio Features ...................................................... |
2-19 |
Connecting Audio Devices .............................................. |
2-20 |
Using the Communication Features....................................... |
2-21 |
Using the LAN ................................................................. |
2-21 |
Using the Wireless LAN .................................................. |
2-22 |
Using the Wireless Modem .............................................. |
2-23 |
Using the GPS .................................................................. |
2-24 |
Chapter 3 Managing Power .................................................. |
3-1 |
AC Adapter .............................................................................. |
3-2 |
Battery Pack............................................................................. |
3-3 |
Charging the Battery Pack ................................................. |
3-3 |
Initializing the Battery Pack............................................... |
3-4 |
Checking the Battery Level................................................ |
3-4 |
Replacing the Battery Pack ................................................ |
3-5 |
Battery Low Signals and Actions....................................... |
3-6 |
Power Management ................................................................. |
3-7 |
Hibernation......................................................................... |
3-8 |
Power-Saving Tips................................................................... |
3-9 |
ii

Chapter 4 Expanding Your Computer.................................. |
4-1 |
Connecting an External Monitor ............................................. |
4-2 |
Connecting a USB Device ....................................................... |
4-3 |
Connecting a Serial Device- .................................................... |
4-4 |
Connecting an IR Device......................................................... |
4-5 |
Connecting an IR or Bluetooth-compliant Device .................. |
4-7 |
Connecting an IEEE 1394 Device ........................................... |
4-9 |
Connecting a Video Capture Device ..................................... |
4-10 |
System Memory Upgrade ...................................................... |
4-10 |
Chapter 5 Setup Configuration Utility (SCU)....................... |
5-1 |
When and How to Use the SCU Program................................ |
5-2 |
When to Use....................................................................... |
5-2 |
Starting SCU ...................................................................... |
5-2 |
Moving Around and Making Selections ............................ |
5-4 |
Startup Menu ........................................................................... |
5-5 |
Disks Menu.............................................................................. |
5-8 |
Components Menu................................................................... |
5-9 |
Power Menu........................................................................... |
5-13 |
Exit Menu .............................................................................. |
5-14 |
Chapter 6 Installing Software Drivers.................................. |
6-1 |
How to Use the CD.................................................................. |
6-2 |
Installing Drivers for Windows 2000 ...................................... |
6-3 |
Touchscreen Driver............................................................ |
6-6 |
Installing Drivers for Windows XP ......................................... |
6-7 |
Touchscreen Driver.......................................................... |
6-10 |
Touchscreen Utility.......................................................... |
6-16 |
Chapter 7 Caring for the Computer...................................... |
7-1 |
Protecting the Computer.......................................................... |
7-2 |
Using the Password............................................................ |
7-2 |
Using an Anti-Virus Strategy............................................. |
7-2 |
Taking Care of the Computer .................................................. |
7-3 |
General Guidelines............................................................. |
7-3 |
iii

Cleaning Guidelines ........................................................... |
7-4 |
Battery Pack Guidelines..................................................... |
7-4 |
When Traveling ....................................................................... |
7-5 |
Chapter 8 Troubleshooting................................................... |
8-1 |
Preliminary Checklist .............................................................. |
8-2 |
Solving Common Problems ..................................................... |
8-3 |
Battery Problems................................................................ |
8-4 |
CD / DVD/Combo Drive Problems.................................... |
8-4 |
Display Problems ............................................................... |
8-5 |
Fingerprint Recognition Problems ..................................... |
8-7 |
Hardware Device Problems................................................ |
8-7 |
Hard Disk Drive Problems ................................................. |
8-7 |
Infrared Problems............................................................... |
8-8 |
Keyboard, Mouse, and Touchpad Problems ...................... |
8-8 |
LAN Problems ................................................................... |
8-9 |
WLAN Problems................................................................ |
8-9 |
Modem Problems ............................................................... |
8-9 |
Power Management Problems (for Windows) ................. |
8-11 |
Printer Problems............................................................... |
8-12 |
Software Problems ........................................................... |
8-12 |
Sound Problems ............................................................... |
8-13 |
Startup Problems .............................................................. |
8-14 |
Other Problems................................................................. |
8-15 |
Resetting the Computer ......................................................... |
8-16 |
Appendix A Specifications ................................................... |
A-1 |
Appendix B Fingerprint Recognition System ..................... |
B-1 |
Finger Placement .................................................................... |
B-2 |
Using the Fingerprint Recongnition System Utility ............... |
B-3 |
iv

Preface
This manual contains information that will help you operate the computer. It is divided into 8 chapters and an appendix.
Chapter 1, Getting Started, takes you through the process of setting up the computer and identifying its external components.
Chapter 2, Operating Your Computer, tells you how to use the computer’s components and features.
Chapter 3, Managing Power, provides information on power.
Chapter 4, Expanding Your Computer, provides information on installing and using peripheral devices.
Chapter 5, SCU (Setup Configuration Utility), describes the SCU program that configures the computer’s BIOS settings.
Chapter 6, Installing Software Drivers, describes how to install the drivers and utilities supplied with the computer.
Chapter 7, Caring for the Computer, gives you tips in care and maintenance.
Chapter 8, Troubleshooting, gives solutions to common problems you may encounter when using the computer.
Appendix A, Specifications, gives a brief specification of the computer.
v

Appendix B, Fingerprint Recognition System, provides information on using the system’s fingerprint recognition system.
Notational Conventions
Throughout this manual, the following conventions are used to distinguish elements of text.
NOTE: identifies additional information that requires special attention.
CAUTION: identifies important information which, if not followed, may result in loss of data or damage to the computer.
Keyboard keys are shown in a bold typeset. For example:
Press Enter to complete.
When keys are joined by a plus sign (+), press the first key, and, while keeping the first key down, press the remaining keys, finally release all the keys. When necessary, keys are also shown in graphics.
A title, command, setup item, or button that you can see on the screen is shown in boldface. A value or an option that you can select for a setup item is shown in italic. For example:
Select Power Management, set it to Enabled, and then click the OK button.
vi

CHAPTER 1
Getting Started
Congratulations on purchasing this computer.
This high performance notebook computer is especially designed for the practical applications of warehouses, automobiles, vehicles, public security, repairing, assisting the handicapped, and other demanding situations where conventional notebook computers just cannot measure up.
This chapter first tells you step by step how to get the computer up and running. You will find instructions for these procedures:
Unpacking
Connecting to AC power
Opening the cover
Turning on the computer
Turning off the computer
Then, you will find a section briefly introducing the external components of the computer. And the last section navigates you to the information you may need after the computer is ready for use.
Getting the Computer Running
This section guides you through the procedures for getting the computer ready for operation.
Unpacking
After unpacking the shipping carton, you should find these standard items:
Notebook computer
Accessories:
−AC adapter (100~240 VAC, 50/60 Hz)
−AC power cord (US, CE, UK, SA)
−Driver CD
−Fingerprint recognition scanner in main system (includes software)
−This Operation Manual
Inspect all the items. If any item is damaged or missing, notify your dealer immediately.
Keep the shipping carton and packing materials in case you need to ship or store the computer in the future.
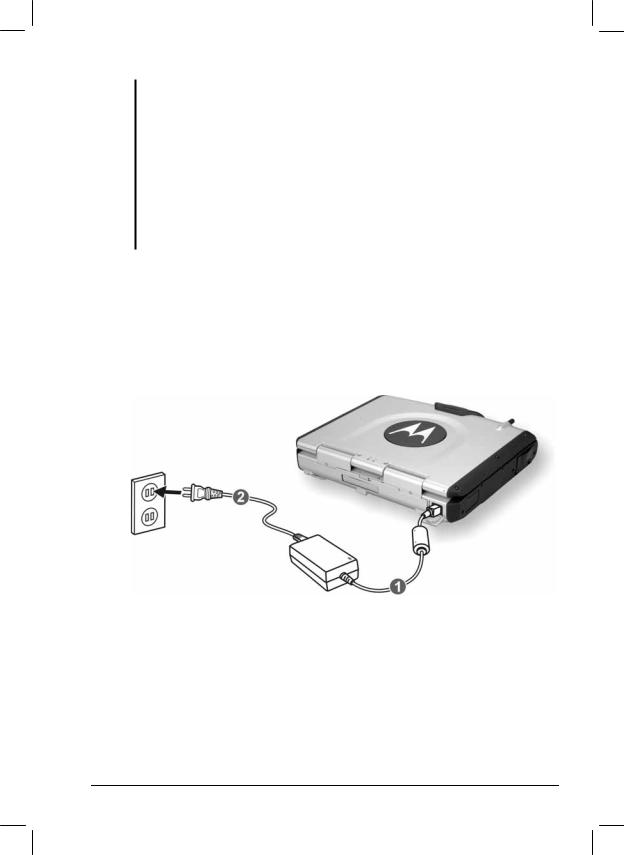
Connecting to AC Power
The computer operates either on the external AC power or internal battery power. It is suggested that you use AC power when you start up the computer for the first time.
CAUTION: Use only the AC adapter included with your computer. Using other AC adapters may damage the computer.
1-2 |
Getting Started |
NOTE:
Power Supply Cord: (optional) Detachable, minimum 1.5 m long. Listed, rated minimum 125 V, 7 A, having a 2/18 AWG, type SVT flexible cord. One end terminates with a parallel blade, molded-on, attachments plug with a 7 A, 125 V (NEMA 1-15P) configuration; other end terminates with a molded-on appliance coupler.
Alternative: (optional) Detachable, maximum 4.5 m (14.76 ft) long. Listed, rated minimum 250 V, 6 A, having a 3/18 AWG, type SVT flexible cord. One end terminates with a Tandem blade, grounding, listed molded-on, attachments plug with a 6 A, 250 V (NEMA 6-15P) configuration; other end terminates with a molded-on appliance coupler.
1.Make sure the computer is turned off.
2.Plug the DC cord of the AC adapter to the power connector on the rear side of the computer.
3.Plug the female end of the AC power cord to the AC adapter and the male end to an electrical outlet.
4.When the AC adapter is connected, the indicator on the AC adapter lights up, indicating that power is being supplied from the electrical outlet to the AC adapter and onto your computer. Now, you are ready to turn on the computer.
Getting Started |
1-3 |

CAUTION:
When you disconnect the AC adapter, disconnect from the electrical outlet first and then from the computer. A reverse procedure may damage the AC adapter or the computer.
When unplugging the connector, always hold the plug head. Never pull on the cord.
NOTE: When the AC adapter is connected, it also charges the battery pack. For information on using battery power, see Chapter 3.
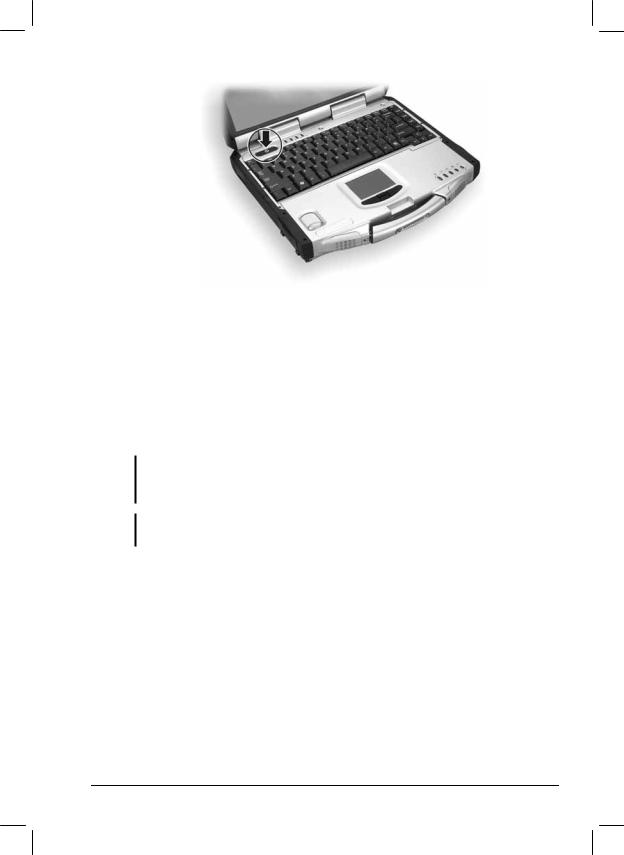
Opening the Cover
CAUTION: Be gentle when opening and closing the cover. Opening it vigorously or slamming it shut could damage the computer.
1.Open the top cover by pulling on the handle, inserting your index finger, and then pulling on the cover latch.
2.Lift up the cover. You can tilt the cover forward or backward for optimal viewing clarity.
Turning On and Off the Computer
Turning On
1.Make sure the computer is connected to AC power.
2.Press the power button.
1-4 |
Getting Started |
3.Each time the computer is turned on, it performs a Power-On Self Test (POST), and the operating system such as Windows should start.
Turning Off
To turn off the computer power, use the “Shut Down” command of your operating system.
NOTE: There are other ways you can stop the computer so that you will be back to where you left off when you next turn on the computer. (See “Stopping the Computer” in Chapter 2 for information.)
CAUTION: If you have to turn the computer on again immediately after turning it off, wait for at least five seconds. Turning the computer off and on rapidly can damage it.
Getting Started |
1-5 |

Taking a Look at the Computer
This section identifies the external components of the computer and briefly describes the function of each component.
NOTE: Depending on the model you purchased, the appearance of your computer may not exactly be the same as those shown in this manual.
Right-Side Components
|
Ref |
Component |
Description |
See Also |
|
|
|
|
|
|
|
|
n IEEE 1394 Port |
Connects a 1394 device, such as a scanner, |
P. 4-7 |
||
|
|
|
printer, digital camera, joystick, and more. |
|
|
|
o USB Ports |
Each of the two ports connects a USB device, |
P. 4-3 |
||
|
|
|
such as a USB floppy drive, printer, digital |
|
|
|
|
|
camera, joystick, and more. |
|
|
|
|
|
|
|
|
|
p |
RJ-45 (LAN) |
Glows green when the system has an available |
P. 2-24 |
|
|
|
Link Indicator |
connection to LAN (Local Area Network). |
|
|
|
q |
RJ-45 |
Connects the LAN cable. |
P. 2-24 |
|
|
|
Connector |
|
|
|
|
r |
RJ-45 Active |
Blinks green when the system is accessing the |
P. 2-24 |
|
|
|
Indicator |
LAN. |
|
|
|
s |
CD R-W/ |
Accepts a compact disc (CD) for installing or |
P. 2-17 |
|
|
|
DVD-Combo |
loading software, accessing data, and playing |
|
|
|
|
|
|
|
|
1-6 |
|
|
Getting Started |
||
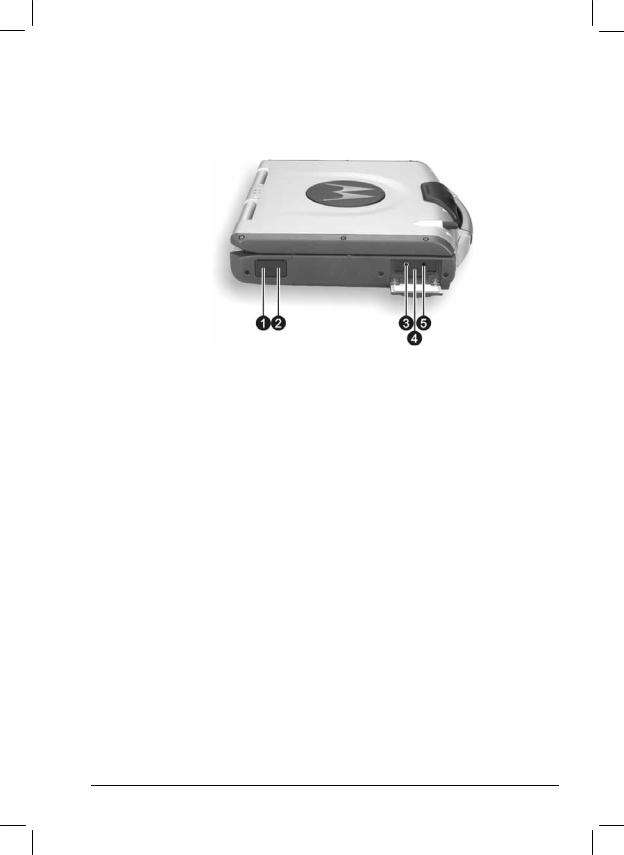
Left-Side Components
Ref |
Component |
Description |
See Also |
|
|
|
|
n IR Port |
Connects an IrDA-compliant device for wireless |
P. 4-5 |
|
|
|
data transfer. |
|
o Bluetooth Port |
Connects a bluetooth-capable device for |
P. 4-5 |
|
|
|
wireless data transfer. |
|
p |
Microphone |
Connects an external microphone. |
P. 2-23 |
|
Connector |
|
|
q |
Keyboard BIOS |
Use this to turn off the system when resetting the |
P. 8-17 |
|
Reset Switch |
system using Ctrl+Alt+Del does not work. |
|
r |
Audio Output |
Connects a set of headphones, external speakers |
P. 2-23 |
|
Connector |
with amplifier, or an audio recording device. |
|
Getting Started |
1-7 |
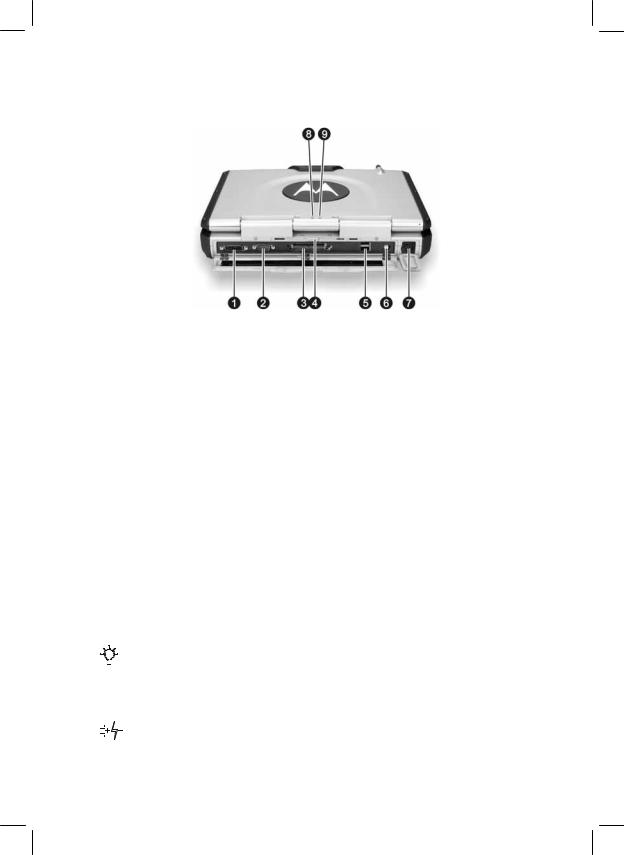
Rear Components
|
Ref |
|
|
|
|
Component |
|
Description |
|
See Also |
|
|
|
|
|
|
|
|
|
|
|
|
|
|
|
|
n DVI-I Port |
|
Connects an external monitor. |
|
P. 4-2 |
|
||||||
|
o Serial Port |
|
Connects a serial device, such as an external |
|
P. 4-4 |
|||||||
|
|
|
|
|
|
|
|
|
modem. |
|
|
|
|
p Docking Port |
|
For connecting to a Port Replicator / car mount. |
|
|
|
||||||
|
q |
Rear Cover |
|
Locks the rear cover. |
|
|
|
|||||
|
|
Latch |
|
|
|
|
|
|||||
|
r USB Ports |
|
Each of the two ports connects a USB device, |
|
P. 4-3 |
|||||||
|
|
|
|
|
|
|
|
|
such as a floppy disk drive, printer, digital |
|
|
|
|
|
|
|
|
|
|
|
|
camera, joystick, and more. |
|
|
|
|
|
|
|
|
|
|
|
|
|
|
|
|
|
s AV Input Port |
|
Connects to a video recording device. |
|
P. 4-8 |
|
||||||
|
t |
Power |
|
Connects the AC adapter. |
|
P. 1-3 |
||||||
|
|
Connector |
|
|
|
|
|
|||||
|
u |
AC Power |
|
Glows green when the computer is using AC |
|
|
|
|||||
|
|
Indicator |
|
power. |
|
|
|
|||||
|
|
|
|
|
|
|
|
|
Blinks amber (orange) when the computer, using |
|
|
|
|
|
|
|
|
|
|
|
|
|
|
|
|
|
|
|
|
|
|
|
|
|
|
|
|
|
|
|
|
|
|
|
|
|
|
AC power, is in Standby mode. |
|
|
|
|
|
|
|
|
|
|
|
|
|
|
||
|
v |
Battery Charge |
|
Glows green when the battery is fully charged |
|
P. 1-4 |
||||||
|
|
Indicator |
|
and connected to AC power. |
|
|
|
|||||
|
|
|
|
|
|
|
|
|
Glows amber (orange) when the battery is being |
|
|
|
|
|
|
|
|
|
|
|
|
|
|
|
|
|
|
|
|
|
|
|
|
|
|
|
|
|
|
|
|
|
|
|
|
|
|
charged. |
|
|
|
|
|
|
|
|
|
|
|
|
|
|
|
|
|
|
|
|
|
|
|
|
|
|
|
|
|
1-8 |
|
|
|
|
|
|
|
Getting Started |
||||
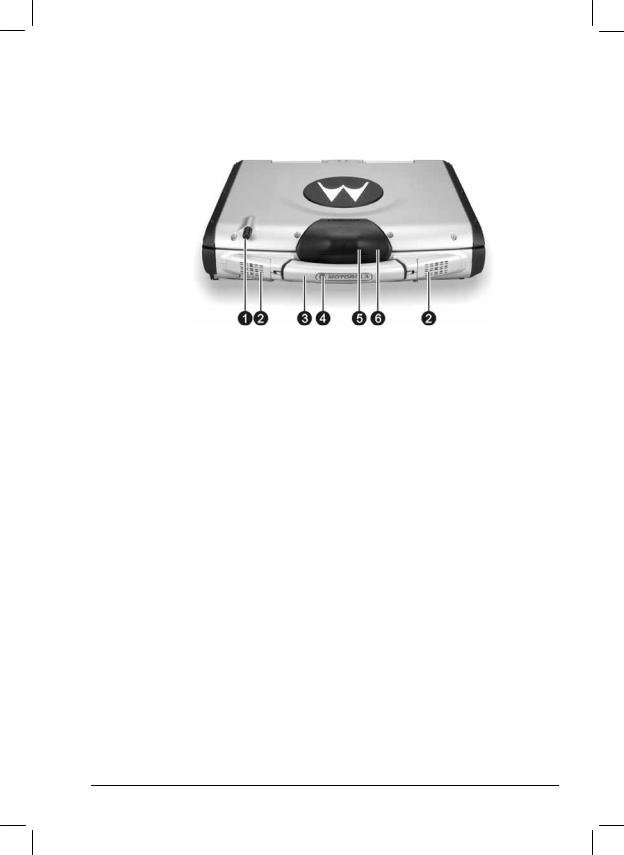
Front Components
Ref |
Component |
Description |
See Also |
|
|
|
|
n |
Wireless |
Serves as the antenna for the wireless modem |
P. 2-27 |
|
Modem |
(RDLAP, GPRS, iDEN, and CDMA). |
|
|
Antenna |
|
|
|
|
|
|
o |
Stereo Speaker |
Sends out sound and voice from the computer. |
P. 2-22 |
|
Set |
|
|
p Handle |
Allows you to carry your computer for an easy |
|
|
|
|
grip. |
|
q |
Wireless LAN |
Serves as the antenna for the WLAN. It is |
P. 2-25 |
|
Antenna |
built-in the handle. |
|
r |
GPS Antenna |
Serves as the antenna for the Global Positioning |
P. 2-27 |
|
(option) |
System (GPS). It is built-in the top cover latch. |
|
s |
Top Cover |
Locks the top cover. |
P. 1-4 |
|
Latch |
|
|
Getting Started |
1-9 |

Bottom-Side Components
Ref |
Component |
Description |
See Also |
|
|
|
|
n |
X-bay Module |
Serves as the interface between the system and |
|
|
Antenna |
antenna of the X-bay module. |
|
|
Connector |
|
|
|
|
|
|
o |
CD Drive |
Allows you to lock the CD drive in place (can |
P. 2-13, |
|
Lock/Unlock |
also contain the floppy disk drive or secondary |
2-17 |
|
Switch |
battery). |
|
|
|
|
|
p |
CD/DVD Drive |
Allows you to remove the CD drive (can also |
P. 2-13 |
|
Eject Latch |
contain the CD R-W or DVD drive). |
|
q GPS Connector |
Serves as the interface between the system and |
|
|
|
|
external GPS antenna. |
|
rCPU Socket and Inside is the CPU of your computer and cooling Sealed CPU fan to protect it from overheating.
Cooling Fan
|
s |
Ventilation |
Do not cover or block the ventilation openings |
|
|
|
Openings |
for air circulation thus preventing overheating. |
|
|
|
|
|
|
1-10 |
|
Getting Started |
||

Ref |
Component |
Description |
See Also |
t |
Primary |
Supplies power to your computer when external |
P. 3-3 |
|
Battery Pack |
power is not connected. |
|
u |
Primary |
Secures the primary battery compartment cover |
P. 3-5 |
|
Battery Release |
in place. |
|
|
Latch |
|
|
|
|
|
|
v |
X-Bay Interface |
Connects additional wireless modem (GPRS/ |
|
|
(top) |
GSM or iDEN). |
|
|
Mini PCI Slot |
Inside is the Mini PCI slot for using an optional |
|
|
(bottom) |
Mini PCI card. |
|
|
|
|
|
w |
Hard Disk |
Contains the hard disk drive of your computer. |
P. 2-15 |
|
Drive |
|
|
|
Compartment |
|
|
|
(top) |
|
|
|
Memory Slot |
Contains the memory slot for expanding the |
P. 4-9 |
|
(bottom) |
memory size of your computer. |
|
Getting Started |
1-11 |
Loading...