


Instrucciones de montaje
Mounting Instructions
LB 302
LB 382
unisección
Single-Section
4/2013
Indice |
Contents |
Página
4 Elementos suministrados
6 Indicaciones para el montaje
Montaje
7Trabajos preparatorios del montaje
8Configuración de la salida del cable
9Posición de la marca de referencia LB 302/LB 382
10Dimensiones
12Tolerancias de montaje
13Sujeción de la regla
14Comprobación de la regla
15Trabajos finales del montaje
16Compensación de errores lineales
17Tensar la cinta de medida
18Medidas de protección
Conexión eléctrica 19 LB 302/LB 302 C 21 LB 382/LB 382 C
Datos eléctricos 20 LB 302/LB 302 C 22 LB 382/LB 382 C
Datos mecánicos 23 LB 302/LB 302 C 23 LB 382/LB 382 C
Page
4 Items Supplied
6 Mounting Configuration
Mounting
7Preparatory Work
8Configuring the Cable Outlet
9Reference Mark Position LB 302/LB 382
10Dimensions
12Mounting Tolerances
13Securing the Encoder
14Checking the Encoder
15Final Steps
16Linear Error Compensation
17Tensioning the Scale Tape
18Protective Measures
Electrical Connection 19 LB 302/LB 302 C 21 LB 382/LB 382 C
Electrical Data
20 LB 302/LB 302 C
22 LB 382/LB 382 C
Mechanical Data 23 LB 302/LB 302 C 23 LB 382/LB 382 C
2
Advertencias |
Warnings |
Atención: El montaje y la puesta en marcha deben ser realizados por un especialista cualificado, observando las prescripciones locales de seguridad.
Conectar o desconectar el conector sólo en ausencia de tensión. El accionamiento no debe estar en marcha durante el montaje.
Note: Mounting and commissioning is to be conducted by a qualified specialist under compliance with local safety regulations. Do not engage or disengage any connections while under power.
The system must be disconnected from power!
Dimensiones en mm
Dimensions in mm
3

Elementos suministrados/Cable de conexión |
Items Supplied/Connecting Cable |
PF (2x) |
IIIIIIIIOIIIIIIOIIIIIIIIIIIIIIII |
IIIIIIIIOIIIIIIOIIIIIIIIIIIIIIII |
IIIIIIIIOIIIIIIOIIIIIIIIIIIIIIII |
IIIIIIIIOIIIIIIOIIIIIIIIIIIIIIII |
IIIIIIIIOIIIIIIOIIIIIIIIIIIIIIII |
IIIIIIIIOIIIIIIOIIIIIIIIIIIIIIII |
IIIIIIIIOIIIIIIOIIIIIIIIIIIIIIII |
IIIIIIIIOIIIIIIOIIIIIIIIIIIIIIII |
IIIIIIIIOIIIIIIOIIIIIIIIIIIIIIII |
IIIIIIIIOIIIIIIOIIIIIIIIIIIIIIII |
IIIIIIIIOIIIIIIOIIIIIIIIIIIIIIII |
IIIIIIIIOIIIIIIOIIIIIIIIIIIIIIII |
IIIIIIIIOIIIIIIOIIIIIIIIIIIIIIII |
Elementos suministrados Carro marca de referencia S1) Pieza de conexión A
Tapón PF (repuesto) 1) en LB 302/LB 382
Items supplied Reference mark slider S1) Connecting piece A Plugs PF (replacement)
1) with LB 302/LB 382
4
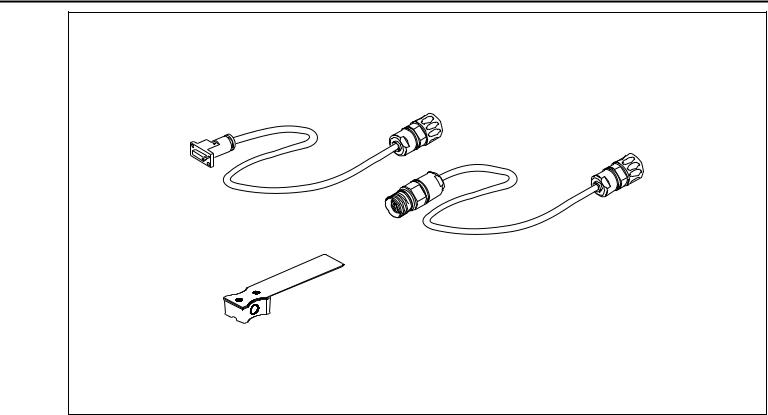
a)
b)
c)


ID 772141-01
Pedir por separado: |
Order separately: |
a) Cable adaptador |
a) Adapter cable |
b) Cable de conexión correspondiente |
b) Matching connecting cable |
c) Galga de montaje |
c) Mounting gauge |
5

Indicaciones para el montaje |
Mounting Procedure |
58 |
216 |
Escoger un lugar de montaje en |
Choose a mounting position to |
el que el cabezal no pueda en |
ensure that the scanning unit |
ningún caso chocar con los |
cannot touch the end sections. |
extremos finales. |
|
En montaje vertical, extraer el tornillo de drenaje si no se usa aire comprimido.
When mounting vertically, remove the drain screw if compressed air is not used.
Escoger una posición de montaje en la que los labios estén protegidos frente a posibles fuentes de contaminación.
Mount with sealing lips facing away from possible sources of contamination.
6
Trabajos preparatorios del montaje |
|
Preparatory Work |
||||||||||
|
|
|
|
|
|
|
|
|
|
|
|
|
|
|
|
|
|
|
|
|
|
|
|
|
|
|
|
|
|
|
|
|
|
|
|
|
|
|
|
|
|
|
|
|
|
|
|
|
|
|
|
|
|
|
|
|
|
|
|
|
|
|
|
|
|
|
|
|
|
|
|
|
|
|
|
|
|
|
|
|
|
|
|
|
|
|
|
|
|
|
|
|
|
|
|
|
|
|
|
|
|
|
|
|
|
|
|
|
|
|
|
|
|
|
|
|
|
|
|
|
|
|
|
|
|
|
|
|
|
|
|
|
|
|
|
|
|
|
|
|
|
|
|
|
|
|
|
|
|
|
|
|
|
|
|
|
|
|
|
|
|
|
|
|
|
|
|
|
|
|
|
|
|
|
|
|
|
|
|
|
|
|
|
|
|
|
|
|
|
|
|
|
|
|
|
|
|
|
|
|
|
|
|
|
|
|
|
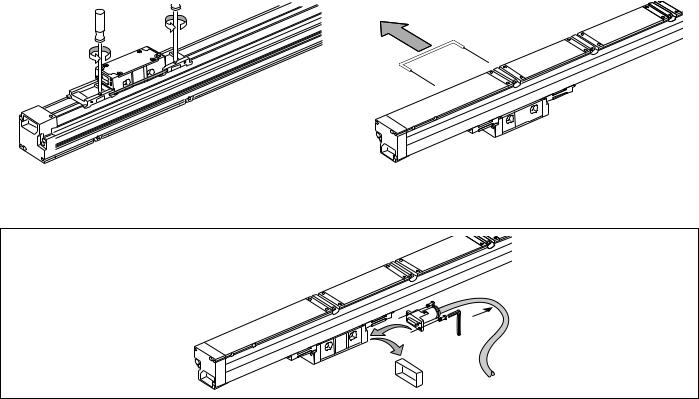
Soltar ligeramente los tornillos de |
Loosen screws on shipping |
Retirar la grapa de transporte. |
Remove the shipping brace clip. |
transporte del cabezal. |
braces slightly. |
|
|
R
2.
Md = 1 Nm
Atornillar el cable adaptador (1 Nm), configurándolo de tal manera que el radio R de curvatura no sea inferior al permitido (ver datos técnicos).
Screw on the adapter cables (1 Nm). Configure the cable such that the bending radius R is not smaller than permissible (see Specifications).
7

Configuración de la salida del cable |
|
Changing the Cable Outlet |
|||||
|
|
|
|
|
|
|
|
|
|
|
|
|
|
|
|
|
|
|
|
|
|
|
|
|
|
|
|
|
|
|
|
|
|
|
|
|
|
|
|
|
|
|
|
|
|
|
|
|
|
|
|
|
|
|
|
|
|
|
|
|
|
|
|
|
|
|
|
|
|
|
|
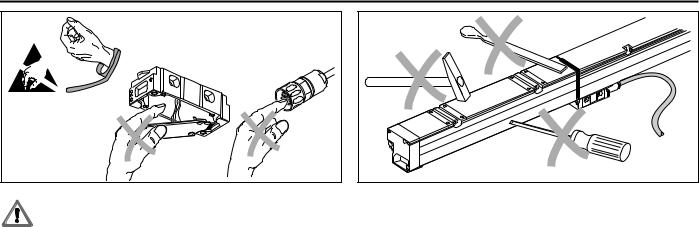
Proteger la electrónica frente a cargas electrostáticas.
Un brazalete puesto a tierra asegurará la protección durante la manipulación.
Protect the electronics from accumulating electrostatic charge.
A grounded bracelet can ensure protection during handling.
Destornillar la tapa y, en caso necesario, el kit del cable.
Detach the cover and (if necessary) the adapter cables.
5. |
1. |
4. |
2. |
3. 180° |
Inclinar la pletina impresa con cuidado hacia abajo, extraerla y girarla 180 grados. Insertar primero la pletina por la parte del conector. ¡No pillar los hilos!
Tilt the printed circuit board down carefully, pull it out and rotate it by 180°. Insert board connector side first. Do not pinch the wires.
3.
2.
Md = 1 Nm
 1.
1.
A continuación atornillar |
Then attach cover and adapter |
nuevamente la tapa y el kit |
cables again (1 Nm). |
del cable (1 Nm). |
|
8
 Loading...