


 Loading...
RSV 1000 R - RSV 1000 R FACTORY


 8104694

© 2003 aprilia s.p.a. - Noale (VE)
First edition: June 2003
Reprint: september 2003
Produced and printed by:
DECA s.r.l.
Via Risorgimento, 23/1 - Lugo (RA) - Italia
Tel. +39 - 0545 35235
Fax +39 - 0545 32844
E-mail: deca@decaweb.it
www.decaweb.it
On behalf of: aprilia s.p.a.
via G. Galilei, 1 - 30033 Noale (VE) - Italia Tel. +39 - 041 58 29 111
Fax +39 - 041 44 10 54 www.aprilia.com
 SAFETY WARNINGS
The following precautionary warnings are used throughout this manual in order to convey the following messages:
Safety warning. When you find this symbol on the vehicle or in the manual, be careful to the potential risk of personal injury. Non-compliance with the indications given in the messages preceded by this symbol may result in major risks for your and other
people’s safety and for the vehicle!
 WARNING
Indicates a potential hazard which may result in serious injury or even death.
 CAUTION
Indicates a potential hazard which may result in minor personal injury or damage to the vehicle.
NOTE The word ≈NOTE∆ in this manual precedes important information or instructions.
TECHNICAL INFORMATION
The operations preceded by this symbol must be repeated also on
the opposite side of the vehicle.
If not expressly indicated otherwise, for the reassembly of the units repeat the disassembly operations in reverse order.
The terms ≈right∆ and ≈left∆ are referred to the rider seated on the vehicle in the normal riding position.
If the glove/tool kit compartment cover has been installed (as an alternative to the passenger seat), the transport of passenger, luggage or objects is forbidden.
 WARNING
The adjustments for the use of the vehicle on racetracks must be carried out exclusively in case of organized races or events that take place on isolated circuits, away from public roads and with the consent of the competent authorities.
It is strictly prohibited to carry out adjustments for the use of the vehicle on racetracks and then ride it on roads or motorways.
WARNINGS - PRECAUTIONS - GENERAL ADVICE
Before starting the engine, carefully read this manual and in particular the section ≈SAFE DRIVE∆.
Your and other people»s safety depends not only on your quickness of reflexes and on your agility, but also on what you know about the vehicle, on its efficiency and on your knowledge of the basic information for ≈SAFE DRIVE∆.
Therefore, get a thorough knowledge of the vehicle, in such a way as to be able to drive in the traffic safely.
2 |
use and maintenance RSV 1000 R - RSV 1000 R FACTORY |
NOTE This manual must be considered as an integral part of the vehicle and must always accompany it, even in case of resale.
aprilia has carried out this manual with the maximum attention, in order to supply the user with correct and updated information. However, since aprilia constantly improves the design of its products, there may be slight discrepancies between the characteristics of your vehicle and those described in this manual.
For any clarification concerning the information contained in this manual, do
not hesitate to contact your aprilia
Official dealer .
For control and repair operations not expressly described in this publication, for the purchase of aprilia genuine spare parts, accessories and other products, as well as for specific advice, contact exclusively aprilia Authorised Dealers and Service Centers, which guarantee prompt and accurate assistance.
Thank you for choosing aprilia. We wish you a nice ride.
All rights as to electronic storage, reproduction and total or partial adaptation, with any means, are reserved for all Countries.
NOTE In some countries the antipollution and noise regulations in force require periodical inspections.
The user of the vehicle in these countries must:
√contact an aprilia Official dealer to have the non-homologated components replaced with others homologated for use in the country in question;
√carry out the required periodical inspections.
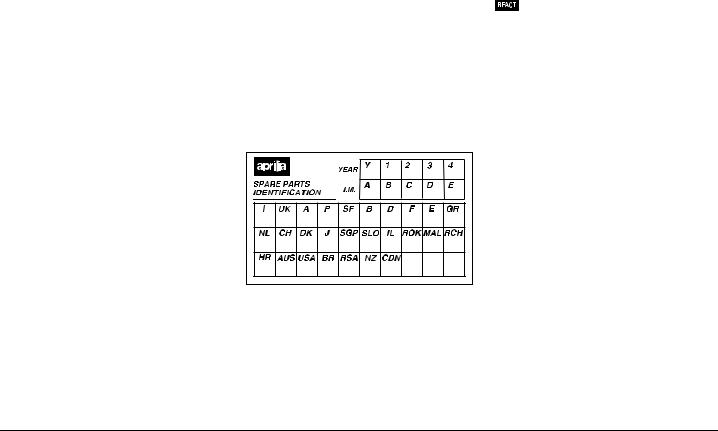
NOTE Soon after purchasing the vehicle, write down the identification data indicated on the SPARE PARTS IDENTIFICATION LABEL in the table here below. This label is positioned on the left side of the frame; to read it, it is necessary to remove the rider seat, see p. 81 (REMOVING THE RIDER SADDLE).
These data indicate:
√year of manufacture (Y, 1, 2, ...);
√modification code (A, B, C, ...);
√homologation country (I, UK, A, ...). and are to be supplied to the aprilia
Official dealer as reference data for the purchase of spare parts or specific accessories of the model you have acquired.
In this manual the various versions are indicated by the following symbols:
T RSV 1000 R
RSV 1000 R FACTORY
J optional
L catalytic
VERSION:
+Italy 2 Singapore
4United P Slovenia
> Austria |
F |
Israel |
M Portugal |
e |
South Korea |
(Finland - Malaysia
$ |
Belgium |
@ |
Chile |
A |
Germany |
* |
Croatia |
CFrance # Australia
'Spain R United States
|
|
|
of America |
) Greece |
g Brazil |
||
/ Holland |
1 |
South Africa |
|
6 |
Switzerland |
K New Zealand |
|
& |
Denmark |
% Canada |
|
,Japan
use and maintenance RSV 1000 R - RSV 1000 R FACTORY |
3 |

GENERAL INDEX |
|
SAFETY WARNINGS................................................. |
2 |
TECHNICAL INFORMATION..................................... |
2 |
WARNINGS - PRECAUTIONS - GENERAL ADVICE |
... 2 |
GENERAL INDEX................................................. |
4 |
BASIC SAFETY RULES ....................................... |
6 |
CLOTHING ........................................................... |
9 |
ACCESSORIES .................................................. |
10 |
LOAD .................................................................. |
10 |
ARRANGEMENT OF THE MAIN ELEMENTS |
. 12 |
ARRANGEMENT OF THE MAIN ELEMENTS |
. 14 |
ARRANGEMENT OF THE |
|
INSTRUMENTS/CONTROLS................................... |
16 |
INSTRUMENTS AND INDICATORS........................ |
17 |
INSTRUMENTS AND INDICATORS TABLE...... |
18 |
MULTIFUNCTION COMPUTER ......................... |
20 |
KEY CONTROLS ..................................................... |
27 |
CONTROLS ON THE RIGHT SIDE OF THE |
|
HANDLEBAR ...................................................... |
27 |
CONTROLS ON THE LEFT SIDE OF THE |
|
HANDLEBAR ...................................................... |
27 |
IGNITION SWITCH............................................. |
28 |
STEERING LOCK............................................... |
29 |
ACCESSORIES........................................................ |
30 |
UNLOCKING/LOCKING THE PASSENGER |
|
SEAT................................................................... |
30 |
UNLOCKING/LOCKING THE GLOVE/TOOL |
|
KIT COMPARTMENT COVER ........................... |
31 |
GLOVE/TOOL KIT COMPARTMENT ................. |
32 |
LUGGAGE FIXING POINTS............................... |
32 |
SPECIAL TOOLS J......................................... |
33 |
ACCESSORIES .................................................. |
33 |
MAIN COMPONENTS.............................................. |
34 |
FUEL................................................................... |
34 |
BRAKE FLUID - recommendations..................... |
35 |
DISK BRAKES .................................................... |
36 |
FRONT BRAKE .................................................. |
37 |
REAR BRAKE..................................................... |
39 |
CLUTCH FLUID - recommendations .................. |
40 |
CLUTCH ............................................................. |
41 |
COOLANT........................................................... |
42 |
TYRES ................................................................ |
45 |
ENGINE OIL ....................................................... |
46 |
ADJUSTING THE FRONT BRAKE LEVER |
|
AND THE CLUTCH LEVER................................ |
47 |
ADJUSTING REAR BRAKE LEVER |
|
CLEARANCE ...................................................... |
47 |
ADJUSTING THE REAR BRAKE LEVER |
|
AND THE GEAR SHIFT LEVER ........................ |
48 |
MUFFLER/EXHAUST SILENCER ..................... |
48 |
INSTRUCTIONS FOR USE ..................................... |
49 |
GETTING ON AND OFF THE VEHICLE ........... |
49 |
PRE-RIDE CHECKS .......................................... |
51 |
PRE-RIDE CHECKS CHART............................. |
52 |
STARTING ......................................................... |
53 |
MOVING OFF - RIDING..................................... |
55 |
RUNNING-IN...................................................... |
58 |
STOPPING......................................................... |
59 |
PARKING ........................................................... |
59 |
PLACING THE VEHICLE ON THE STAND ....... |
60 |
SUGGESTIONS TO PREVENT THEFT ............ |
60 |
MAINTENANCE ...................................................... |
61 |
PERIODIC MAINTENANCE CHART ................. |
63 |
IDENTIFICATION DATA .................................... |
65 |
JOINTS WITH CLICK CLAMPS AND WITH |
|
SCREW CLAMPS .............................................. |
65 |
CHECKING AND TOPPING UP ENGINE OIL |
|
LEVEL ................................................................ |
66 |
CHANGING ENGINE OIL AND THE ENGINE |
|
OIL FILTER ........................................................ |
67 |
AIR CLEANER ................................................... |
69 |
FITTING THE PINS FOR THE REAR WHEEL |
|
STAND J......................................................... |
70 |
PLACING THE VEHICLE ON THE REAR |
|
WHEEL STAND J........................................... |
70 |
PLACING THE VEHICLE ON THE FRONT |
|
WHEEL STAND J........................................... |
71 |
FRONT WHEEL ................................................. |
71 |
FRONT BRAKE CALLIPERS T ..................... |
74 |
FRONT BRAKE CALLIPERS ...................... |
75 |
REAR WHEEL ................................................... |
76 |
DRIVE CHAIN .................................................... |
79 |
REMOVING THE RIDER SADDLE.................... |
81 |
LIFTING THE FUEL TANK ................................ |
81 |
REMOVING THE SIDE FAIRINGS .................... |
82 |
REMOVING THE SIDE PANELS....................... |
82 |
REMOVING THE FAIRING UPPER FRONT |
|
COVERS ............................................................ |
83 |
REMOVING THE REAR-VIEW MIRRORS ........ |
83 |
REMOVING THE FRONT FAIRING .................. |
84 |
REMOVING THE SIDE STAND......................... |
85 |
INSPECTING THE FRONT AND REAR |
|
SUSPENSION.................................................... |
87 |
FRONT SUSPENSION ...................................... |
87 |
≈R FACTORY∆ FORK (T J) ........................ |
89 |
STEERING DAMPER......................................... |
90 |
REAR SUSPENSION......................................... |
91 |
CHECKING THE BRAKE PADS FOR WEAR.... |
93 |
........................................................................... |
94 |
THROTTLE TWISTGRIP ADJUSTMENT .......... |
94 |
SPARK PLUGS .................................................. |
95 |
CHECKING THE SIDE STAND.......................... |
97 |
BATTERY........................................................... |
98 |
CLEANING AND CHECKING BATTERY |
|
TERMINALS AND LEAD CONNECTIONS ........ |
98 |
BATTERY REMOVAL ........................................ |
99 |
CHECKING BATTERY FLUID LEVEL ............. |
100 |
CHARGING THE BATTERY ............................ |
100 |
INSTALLING THE BATTERY........................... |
101 |
LONG INACTIVITY OF THE BATTERY........... |
102 |
CHECKING THE SWITCHES .......................... |
102 |
REPLACING THE FUSES ............................... |
103 |
VERTICAL ADJUSTMENT OF THE |
|
HEADLIGHT BEAM.......................................... |
105 |
BULBS.............................................................. |
106 |
REPLACING THE DASHBOARD BULBS........ |
106 |
REPLACING THE HEADLIGHT BULBS .......... |
107 |
REPLACING THE FRONT AND REAR |
|
DIRECTION INDICATOR BULBS .................... |
108 |
REPLACING THE NUMBER PLATE LIGHT |
|
BULB................................................................ |
109 |
TRANSPORT......................................................... |
110 |
CLEANING ............................................................ |
110 |
LONG PERIODS OF INACTIVITY ................... |
112 |
TECHNICAL DATA ............................................... |
113 |
LUBRICANT CHART........................................ |
117 |
OFFICIAL DEALERS AND SERVICE |
|
CENTRES ........................................................ |
118 |
THE VALUE OF SERVICE .............................. |
118 |
Distributors ....................................................... |
119 |
Distributors ....................................................... |
120 |
Distributors ....................................................... |
121 |
Distributors ....................................................... |
122 |
WIRING DIAGRAMRSV 1000 R - |
|
RSV 1000 R FACTORY ................................... |
123 |
WIRING DIAGRAM KEY - RSV 1000 R - |
|
RSV 1000 R FACTORY ................................... |
124 |
4 use and maintenance RSV mille - RSV mille R

safe drive
BASIC SAFETY RULES
To drive the vehicle it is necessary to be in possession of all the requirements prescribed by law (driving licence, minimum age, psychophysical ability, insurance, state taxes, vehicle registration, number plate, etc.).
Gradually get to know the vehicle by driving it first in areas with low traffic and/or private areas.
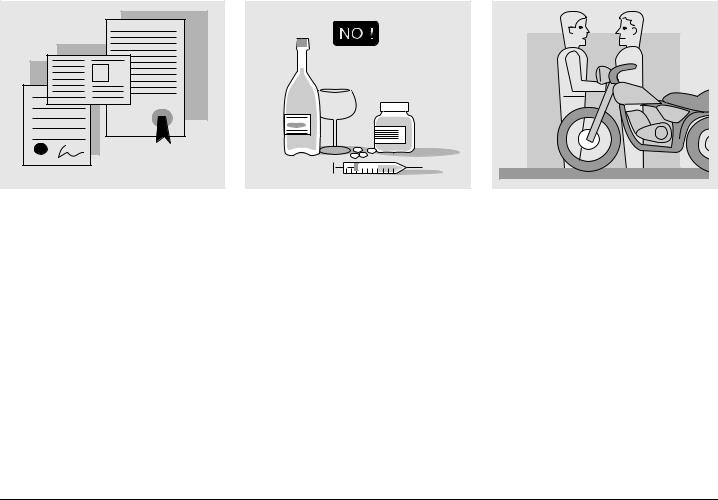
The use of medicins, alcohol and drugs or psychotropic substances notably increases the risk of accidents.
Be sure that you are in good psychophysical conditions and fit for driving and pay particular attention to physical weariness and drowsiness.
Most road accidents are caused by the driver»s lack of experience.
NEVER lend the vehicle to beginners and, in any case, make sure that the driver has all the requirements for driving.
6 |
use and maintenance RSV 1000 R - RSV 1000 R FACTORY |
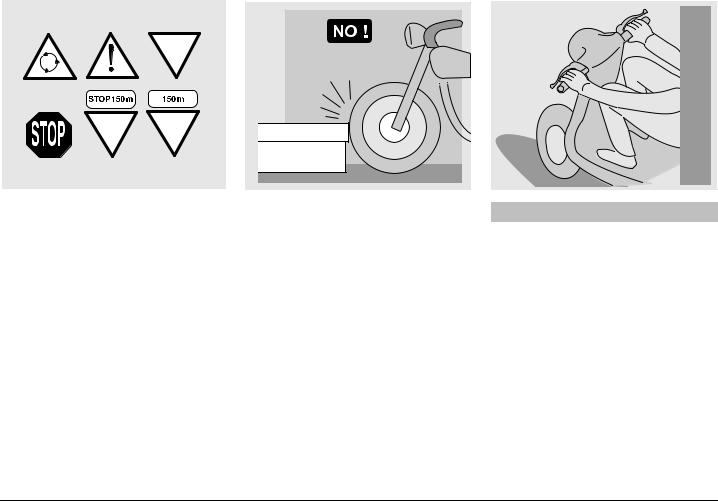
Rigorously observe all road signs and national and local road regulations.
Avoid abrupt movements that can be dangerous for yourself and other people (for example: proceeding on the back wheel, speeding, etc.), and give due consideration to the road surface, visibility and other driving conditions.
Avoid obstacles that could damage the vehicle or make you lose control.
Avoid riding in the slipstream created by preceding vehicles in order to increase your speed.
 WARNING
Always drive with both hands on the handlebars and both feet on the footrests (or on the rider’s footboards), in the correct driving posture.
Avoid standing up or stretching your limbs while driving.
use and maintenance RSV 1000 R - RSV 1000 R FACTORY |
7 |
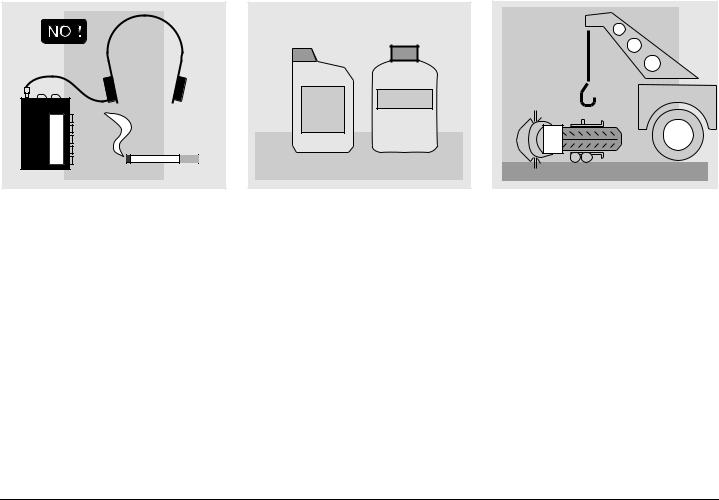
The driver should pay attention and avoid distractions caused by people, things and movements (never smoke, eat, drink, read, etc.) while driving.
COOLER |
OIL |
Use only the vehicle»s specific fuels and lubricants indicated in the "LUBRICANT CHART"; regularly check oil, fuel and coolant levels.
If the vehicle has been involved in an accident, make sure that no damage has occurred to the control levers, pipes, wires, braking system and vital parts.
If necessary, have the vehicle inspected by an aprilia Official dealer who should
carefully check the frame, handlebars, suspensions, safety parts and all the devices that you cannot check by yourself.
Always remember to report any malfunction to the technicians to help them in their work.
Never use the vehicle when the amount of damage it has suffered endangers your safety.
8 |
use and maintenance RSV 1000 R - RSV 1000 R FACTORY |
A12 |
345 |
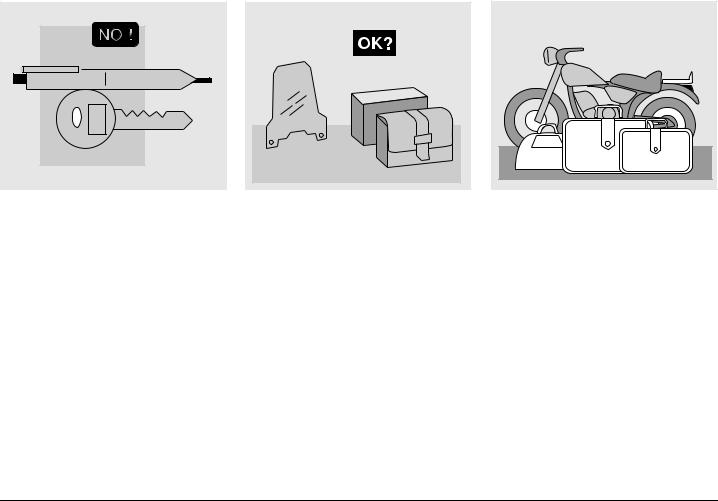
Never change the position, inclination or colour of: number plate, direction indicators, lights and horns.
Any modification of the vehicle will result in the invalidity of the warranty.
ONLY ORIGINALS
Any modification of the vehicle and/or the removal of original components can compromise vehicle performance levels and safety or even make it illegal.
We recommend respecting all regulations and national and local provisions regarding the equipment of the vehicle.
In particular, avoid all modifications that increase the vehicle»s performance levels or alter its original characteristics.
Never race with other vehicles. Avoid off-road driving.
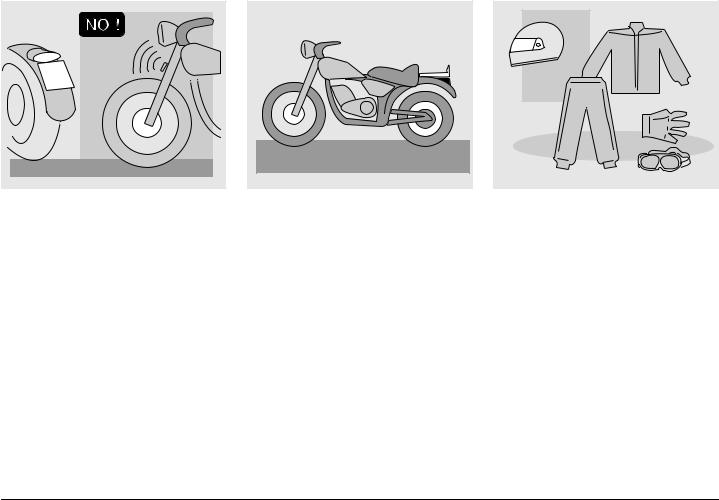
CLOTHING |
Before starting, always wear a correctly fastened crash helmet. Make sure that it is homologated, in good shape, of the right size and that the visor is clean.
Wear protective clothing, preferably in light and/or reflecting colours. In this way you will make yourself more visible to the other drivers, thus notably reducing the risk of being knocked down, and you will be more protected in case of fall.
This clothing should be very tight-fitting and fastened at the wrists and ankles; strings, belts and ties should not be hanging loose; prevent these and other objects from interfering with driving by getting entangled with moving parts or driving mechanisms.
use and maintenance RSV 1000 R - RSV 1000 R FACTORY |
9 |
Do not keep objects that can be dangerous in case of fall, for example pointed objects like keys, pens, glass vials etc. in your pockets (the same recommendations also apply to passenger).
ACCESSORIES
The owner of the vehicle is responsible for the choice, installation and use of any accessory.
Avoid installing accessories that cover horns or lights or that could impair their functions, limit the suspension stroke and the steering angle, hamper the operation of the controls and reduce the distance from the ground and the angle of inclination in turns.
Avoid using accessories that hamper access to the controls, since this can make reaction times longer during an emergency.
Big fairings and windshields installed on the vehicle may produce aerodynamic forces that affect the stability of the vehicle, especially when riding at high speed.
Make sure that the equipment is well fastened to the vehicle and not dangerous when driving.
Do not install electrical devices and do not modify those already existing to avoid electrical overloads, because the vehicle could suddenly stop or there could be a dangerous current shortage in the horn and in the lights.
aprilia recommends the use of genuine accessories (aprilia genuine accessories).
LOAD
Be careful and moderate when loading your luggage. Keep any luggage loaded as close as possible to the center of gravity of the vehicle and distribute the load evenly on both sides, in order to reduce unbalance to the minimum. Furthermore, make sure that the load is firmly secured to the vehicle, especially during long trips.
10 use and maintenance RSV 1000 R - RSV 1000 R FACTORY
KG! |
Avoid hanging bulky, heavy and/or dangerous objects on the handlebars, mudguards and forks, because the vehicle might respond more slowly in turns and its manoeuvrability could be unavoidably impaired.
Do not place bags that are too bulky or the crash helmet on the vehicle sides and do not ride with them on, because they could hit people or obstacles, making you lose control of the vehicle.
Do not carry any bag if it is not tightly secured to the vehicle.
Do not carry bags which protrude too much from the luggage-rack or which cover the lights, horn or indicators.
Do not carry animals or children on the glove compartment or on the luggage rack.
Do not exceed the maximum load allowed for each luggage-rack.
When the vehicle is overloaded, its stability and its manoeuvrability can be compromised.
use and maintenance RSV 1000 R - RSV 1000 R FACTORY 11
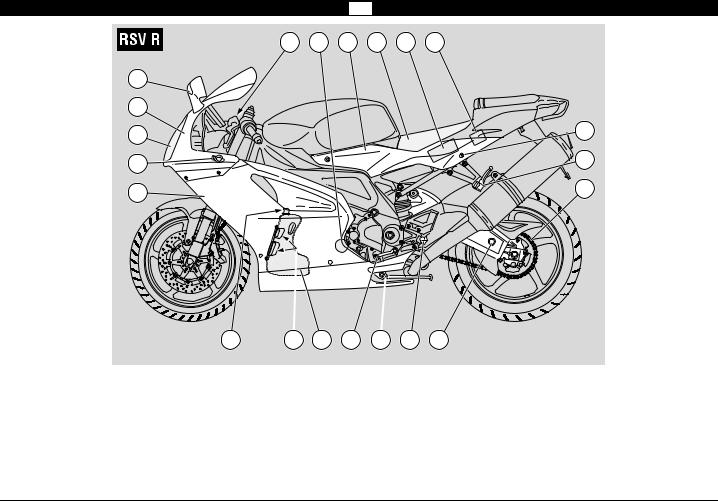
ARRANGEMENT OF THE MAIN ELEMENTS RSV R
6 |
7 |
8 |
9 |
10 |
11 |
5 |
4 |
|
3 |
12 |
|
|
2 |
13 |
|
|
1 |
14 |
|
21 |
20 |
19 |
18 |
17 |
16 |
15 |
KEY |
|
|
|
|
|
|
|
1) |
Left side fairing |
7) |
Engine oil filter |
13) |
Passenger left footrest |
19) |
Engine oil tank |
2) |
Adjustable steering damper |
8) |
Left side panel |
|
(snaps closed/open) |
20) |
Engine oil level |
|
T J |
9) |
Rider seat |
14) |
Drive chain |
21) |
Engine oil tank cap |
3) |
Headlight left lamp |
10) |
Battery |
15) |
Rear swinging arm |
|
|
4) |
Front fairing |
11) |
Main fuse carrier (30 A) |
16) |
Rider left footrest |
|
|
5) |
Left rear-view mirror |
12) |
Passenger seat lock |
17) |
Side stand |
|
|
6) |
Clutch fluid reservoir |
|
glove/tool kit compartment |
18) |
Gear shift lever |
|
|
12 use and maintenance RSV 1000 R - RSV 1000 R FACTORY

4 |
5 |
6 |
7 |
8 |
9 |
10 |
11 |
12 |
13 |
3 |
14 |
2 |
15 |
|
|
1 |
16 |
|
22 |
21 |
20 |
19 |
18 |
17 |
KEY |
|
|
|
|
|
|
|
1) |
Rear shock absorber |
6) |
Passenger grab strap |
13) |
Right rear-view mirror |
20) |
Rear brake master cylinder |
2) |
Passenger right footrest |
7) |
Engine Control Unit |
14) |
Front brake fluid reservoir |
21) |
Rear brake lever |
|
(snaps closed/open) |
8) |
Right side panel |
15) Secondary fuse carrier (15 A) |
22) |
Rider right footrest |
|
3) |
Tail light |
9) |
Fuel tank |
16) |
Horn |
|
|
4) |
Glove/tool kit compartment |
10) Coolant expansion tank cap |
17) |
Right side fairing |
|
|
|
5) |
Passenger seat (glove/tool |
11) |
Fuel tank filler cap |
18) |
Expansion tank |
|
|
|
kit compartment cover) |
12) |
Air cleaner |
19) |
Rear brake fluid reservoir |
|
|
|
|
|
|
|
|
||
13 |
use and maintenance RSV 1000 R - RSV 1000 R FACTORY |
|
|
|
|
||
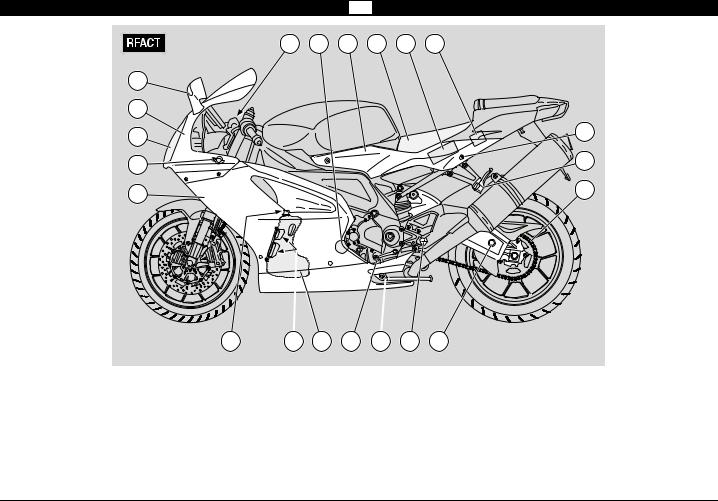
ARRANGEMENT OF THE MAIN ELEMENTS RFACT
6 |
7 |
8 |
9 |
10 |
11 |
5 |
4 |
|
3 |
12 |
|
|
2 |
13 |
|
|
1 |
14 |
|
21 |
20 |
19 |
18 |
17 |
16 |
15 |
KEY |
|
|
|
|
|
|
1) |
Left side fairing |
8) |
Left side panel |
14) |
Drive chain |
21) Engine oil tank cap |
2) |
Adjustable steering damper |
9) |
Rider seat |
15) |
Rear swinging arm |
|
3) |
Headlight left lamp |
10) |
Battery |
16) |
Rider left footrest |
|
4) |
Front fairing |
11) |
Main fuse carrier (30A) |
17) |
Side stand |
|
5) |
Left rear-view mirror |
12) |
Passenger seat-Glove/tool |
18) |
Gear shift lever |
|
6) |
Clutch fluid reservoir |
|
kit compartment lock |
19) |
Engine oil tank |
|
7) |
Engine oil filter |
13) |
Passenger left footrest |
20) |
Engine oil level |
|
14 use and maintenance RSV 1000 R - RSV 1000 R FACTORY

4 |
5 |
6 |
7 |
8 |
9 |
10 |
11 |
12 |
13 |
3 |
14 |
2 |
15 |
|
|
1 |
16 |
|
22 |
21 |
20 |
19 |
18 |
17 |
KEY |
|
|
|
|
|
|
|
|
1) |
Rear shock absorber |
7) |
Engine Control Unit |
14) |
Front brake fluid reservoir |
21) |
Rear brake lever |
|
2) |
Passenger right footrest |
8) |
Right side panel |
15) |
Secondary fuse carrier |
22) |
Rider right footrest |
|
|
(snaps closed/open) |
9) |
Fuel tank |
(15A) |
|
|
||
3) |
Tail light |
10) |
Coolant expansion tank |
16) |
Horn |
|
|
|
4) |
Glove/tool kit compartment |
|
cap |
17) |
Right side fairing |
|
|
|
5) |
Passenger seat (Glove/tool |
11) |
Fuel tank filler cap |
18) |
Coolant expansion tank |
|
|
|
|
kit compartment cover) |
12) |
Air cleaner |
19) |
Rear brake fluid reservoir |
|
|
|
6) |
Passenger grab strap |
13) |
Right rear-view mirror |
20) |
Rear brake master cylinder |
|
|
|
use and maintenance RSV 1000 R - RSV 1000 R FACTORY 15

ARRANGEMENT OF THE INSTRUMENTS/CONTROLS
1 |
2 |
4 |
3 |
5
6 |
9 |
8 |
7 |
KEY
1)Clutch lever
2)Ignition/steering lock switch ( - - )
3)Instruments and indicators
4)Front brake lever
5)Throttle twistgrip
6)High beam flasher ( )/LAP button (multifunction)
10 |
11 |
7)Light dimmer switch ( - )
8)Direction indicator switch ( )
9)Horn button ( )
10)Starter button ( )
11)Engine kill switch ( - )
16 use and maintenance RSV 1000 R - RSV 1000 R FACTORY

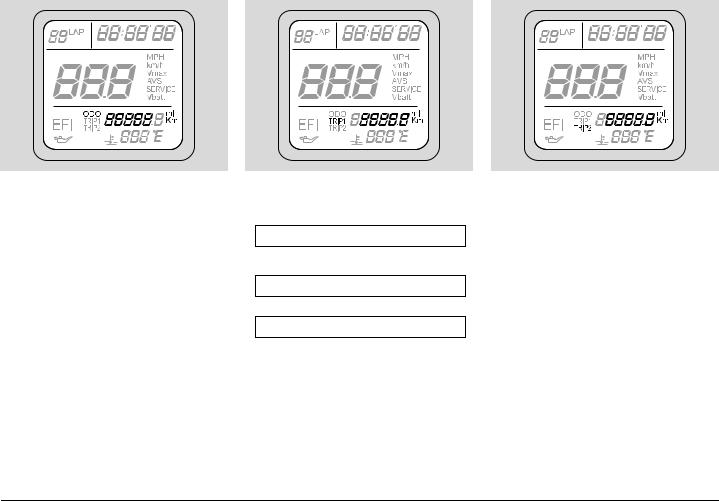
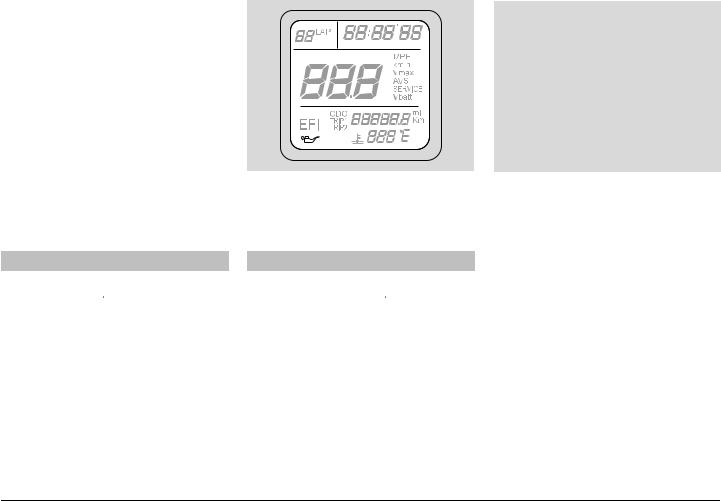
INSTRUMENTS AND INDICATORS
1 |
2 |
3 |
4 |
5 |
6 |
7 |
8 |
11 |
9 |
10
KEY |
|
|
|
1) |
Rev counter |
8) |
Green neutral light ( ) |
2) |
Red line light |
9) |
Multifunction digital display (coolant temperature - clock - |
3) |
Green direction indicator light ( ) |
|
battery voltage - lap timer - engine oil pressure diagnostics |
4) |
Blue high beam light ( ) |
|
( ) |
5) |
Amber "stand down" light (h) |
10) |
Red general warning light ( ) |
6) |
Amber low fuel light ( ) |
11) |
Multifunction computer programming buttons (+, Trip V, -) |
7) |
Red immobilizer light ( ) (where immobilizer system is fitted) |
|
|
use and maintenance RSV 1000 R - RSV 1000 R FACTORY 17
INSTRUMENTS AND INDICATORS TABLE
When the ignition key is turned to " " with the engine stopped, all warning lights come on for a LED check-up and go out after three seconds. If one or more warning lights do not come on at this stage, contact an aprilia Official dealer.
Description |
|
|
|
|
Function |
|
Rev counter (rpm) |
|
|
|
|
Gives engine revolutions per minute. |
|
|
|
|
|
|
Never exceed engine max rpm, see page 58 (RUNNING-IN). |
|
|
|
|
|
CAUTION |
||
|
|
|
|
|
|
|
|
|
|
|
|
|
|
|
|
|
|
|
Blinks when its operating threshold (max rpm, user-selectable) is exceeded, see page 25 |
|
|
|
|
|
|
(SETTING THE RED LINE THRESHOLD (WITH ENGINE OFF ONLY)). |
|
Red line light |
|
|
|
|
Comes on for three seconds when the maximum rpm threshold is confirmed during the |
|
|
|
|
|
setting procedure, see page 25 (SETTING THE RED LINE THRESHOLD (WITH ENGINE OFF |
||
|
|
|
|
|
||
|
|
|
|
|
ONLY)). It also comes on for three seconds each time the ignition key is turned to " ", see |
|
|
|
|
|
|
page 20 (MULTIFUNCTION COMPUTER). |
|
|
|
|
|
|
|
|
Direction indicator light |
|
|
Blinks when the direction indicators are on. |
|||
|
|
|
|
|
|
|
High beam light |
|
|
Comes on when the high beam is on or when you flash the high beam. |
|||
|
|
|
|
|
|
|
Side stand light |
|
|
h |
|
Comes on when the side stand is down |
|
|
|
|
|
|
|
|
Low fuel light |
|
|
Comes on when there are about 4.5 Ø 1 litres of fuel left in the tank. |
|||
|
Refuel as soon as possible, see page 34 (FUEL). |
|||||
|
|
|
|
|
|
|
|
|
|
|
|
Blinks when the engine is off as a deterrent to prevent theft. Indicates that the anti-theft system |
|
Anti-theft device (immobilizer) light |
|
|
|
|
is operating. |
|
|
|
|
|
|
When the engine has not been started during 10 days in a row, the |
|
(where immobilizer system is fitted) |
|
|
|
|
CAUTION |
|
|
|
|
|
energy-saving feature will cause the light to go out, but the |
||
|
|
|
|
|
|
|
|
|
|
|
|
IMMOBILIZER system remains in operation. |
|
|
|
|
|
|
|
|
Neutral light |
|
|
Comes on when the gearbox is in neutral. |
|||
|
|
|
|
|
|
|
|
|
|
|
|
Comes on each time the ignition key is turned to ≈ ∆,with the engine stopped for a light |
|
|
|
|
|
|
operation check-up. |
|
|
|
|
|
|
If the light fails to come on at this stage, contact an aprilia Official dealer |
|
Error light |
|
|
|
|
|
If it stays on , along with any one of the three display symbols |
|
|
|
|
CAUTION |
||
|
|
|
|
|
|
"efi", " " and " ",after engine is fired, it means that a fuel |
|
|
|
|
|
injection system failure (efi) has been detected, engine oil pressure is low ( ) or |
|
|
|
|
|
|
coolant temperature is too high ( ). When this is the case, stop the engine immediately |
|
|
|
|
|
|
and contact an aprilia Official dealer |
|
18 use and maintenance RSV 1000 R - RSV 1000 R FACTORY
Description |
Function |
Speedometer (km/h - MPH) |
Can be set to display current, average or maximum road speed (in kilometres |
or miles) see page 20 (MULTIFUNCTION COMPUTER). |
|
Odometer ( KM - Mi) |
|
Gives total distance covered or distance covered since the trip meter |
|
||
|
|
was last reset (in km or miles). |
|
|
||
|
|
|
|
|
||
|
|
|
|
|
||
|
|
|
Indicates engine coolant temperature, see page 20 (MULTIFUNCTION |
|
||
|
|
|
COMPUTER). |
Do not leave the ignition switch set to " ", as this |
|
|
|
|
|
|
|
||
|
|
|
CAUTION |
|
||
|
|
|
will stop the cooling fans regardless of coolant |
|
||
|
|
|
|
|
||
|
|
|
temperature. Consequently, temperature will rise further. |
|
|
|
|
Coolant temperature |
|
When temperature rises up to the danger zone, stop the engine, turn the |
To cycle |
||
|
ignition key to " " and wait until the cooling fans switch off. |
|
through display |
|||
|
(°C/°F) |
|
Now turn the ignition key to " " and check coolant level, see page 42 |
|||
|
|
|
readouts, see |
|||
|
|
|
(COOLANT). |
|
|
page 20 (MUL- |
|
|
|
Contact an aprilia Official dealer. |
|
TIFUNCTION |
|
Multifunction |
|
|
Exceeding the maximum coolant temperature |
COMPUTER) |
||
|
CAUTION |
|||||
digital display |
|
engine damage. |
allowed (115 °C - 239 °F) may lead to severe |
|
||
|
|
|
|
|
|
|
|
|
|
|
|
||
|
Clock |
|
Gives hours and minutes in accordance with selected settings, see page 20 |
|
||
|
|
(MULTIFUNCTION COMPUTER). |
|
|
||
|
|
|
|
|
||
|
|
|
|
|
|
|
|
Battery voltage |
|
Indicates battery voltage, see page 20 (MULTIFUNCTION COMPUTER). |
|
||
|
V BATT |
|
|
|||
|
|
|
|
|
|
|
|
|
|
|
|
||
|
Lap timer |
|
Indicates the various time measurements in accordance with selected |
|
||
|
|
settings, see page 20 (MULTIFUNCTION COMPUTER). |
|
|
||
|
|
|
|
|
||
|
|
|
|
|
||
|
|
|
Each time the ignition switch is set to position " ", the wording " |
" appears on the right side |
||
|
|
|
of the multifunction display for approximately three seconds. |
|
|
|
|
|
|
|
If the wording " " appears during normal engine operation, it |
||
|
Diagnostics |
|
CAUTION |
|||
|
|
|
|
means that the Engine Control Unit has detected an anomaly. In |
||
|
|
|
most cases, thengine will keep running, although performance will be somewhat |
|||
|
|
|
reduced. Contact an aprilia Official dealer immediately. |
|
|
|
use and maintenance RSV 1000 R - RSV 1000 R FACTORY 19

2 |
1 |
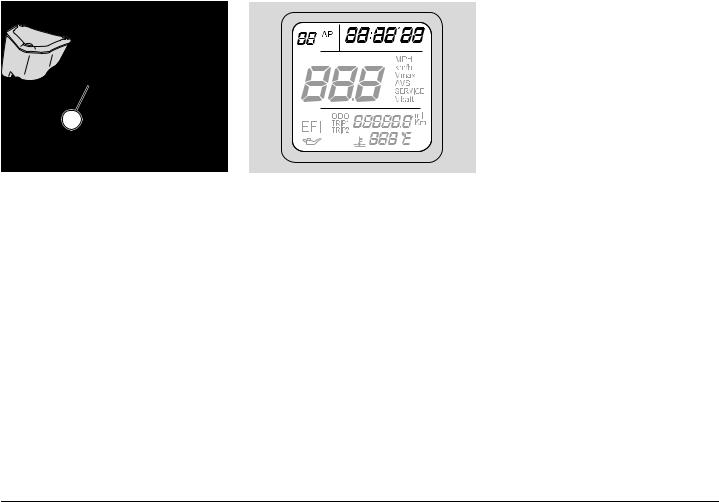
MULTIFUNCTION COMPUTER
When the ignition key is set to position " ", the following dashboard lights come on for three seconds:
-all segments of the multifunction display;
-all warning lights;
-backlighting.
The rev counter pointer (1) moves to the maximum rpm value set by the user. After about three seconds, the red line light (2) goes out and the rev counter pointer (1) returns to its initial position.
During the initial check-up, all instruments will briefly show the current values of the corresponding parameters.
CAUTION
When an "ERR" message flashes on the dashboard instead of the water temperature and the stand and red line lights stay on with a steady light, it means that there is a communication problem on the CAN line between dashboard and Engine Control Unit. Contact a dealer.
 CAUTION
After covering the first 1000 km, the "SERVICE" icon appears on the multifunction display. The icon is displayed again upon reaching 10,000 km and every 10,000 km afterwards. Contact an aprilia Official dealer to have the vehicle serviced as specified in the periodic maintenance chart, see page 63 (PERIODIC MAINTENANCE CHART). To turn off the "SERVICE" warning, hold down the "+" and "-" buttons for at least 15 seconds upon turning the key to on.
With the ignition key in position " ", standard display readouts are as follows:
√current speed
√clock
√coolant temperature
√odometer.
TOGGLING BETWEEN MEASUREMENT UNITS (km-mi, kph-MPH, °C-°F)
Hold down the "TRIP/V" and "-" buttons together for over 15 seconds to toggle between km and mi and between kph and MPH.
Likewise, hold down the "TRIP/V" and "+" buttons together for over 15 seconds to toggle between °C and °F.
20 use and maintenance RSV 1000 R - RSV 1000 R FACTORY
VIEWING CURRENT, MAXIMUM AND AVERAGE SPEEDS AND BATTERY VOLTAGE
NOTE Average and maximum speed and battery voltage are only displayed when the vehicle is stopped. Only current speed may be displayed while riding.
When the ignition key is turned to position " ", current speed appears on the display. Press the "+" button to display maximum speed (V max), average speed (AVS) and battery voltage.
↓ +
Current speed
↓ +
Maximum speed
↓ +
Average speed
↓ +
Battery voltage
↓ +
To reset maximum (V max) and average speed (AVS), select the speed indication you wish to reset and hold down the "-" button for at least 3 seconds.
NOTE Maximum and average speeds are calculated on the distance covered since last resetting.
Battery voltage indication (expressed in Volts) cannot be changed and provides a measure of battery operating conditions.
The charging system is operating correctly when battery voltage at 4000 rpm with the low beam on is between 13 and 15 Volts.
Setting instrument backlighting: instrument backlighting brightness can be set at one of three preset levels (30%, 70%, 100%). To set backlighting, press
the "-" button within 5 seconds of turning the key to " ".
↓ -
30% brightness
↓ -
70% brightness
↓ -
100% brightness
↓ -
use and maintenance RSV 1000 R - RSV 1000 R FACTORY 21
ODOMETER AND TRIP METER DISPLAY (TRIP 1 AND TRIP 2)
Turn the ignition key to " ", to display the odometer. To switch to the trip meter (km/mi) (TRIP 1 and TRIP 2), press the Trip/V button.
↓ TRIP/V
ODOMETER
↓ TRIP/V
TRIP 1
↓ TRIP/V
TRIP 2
↓ TRIP/V
To reset TRIP 1, select Trip 1 display and hold down the "Trip/V" button for at least 3 seconds.
To reset TRIP 2, select Trip 2 display and hold down the "Trip/V" button for at least 3 seconds.
NOTE Trip meter indications reflect the distance covered since last resetting.
Trip 1 and Trip 2 indications are wiped off when the battery is disconnected.
22 use and maintenance RSV 1000 R - RSV 1000 R FACTORY

COOLANT TEMPERATURE DISPLAY
√ The coolant temperature display reads " - - - " when the sensor detects a temperature below 34°C (93°F).
√When the sensor detects a temperature between 35°C (95°F) and 114°C (237°F), the display provides actual temperature indication.
√Temperatures between 115° C (239° F) and 135°C (275°F) are displayed with a flashing indication. In addition, the
warning light  will come on to indicate a dangerous condition.
√The display will flash for temperatures above 135°C (275°F) (again, the warning light comes on).
 CAUTION
The dashboard error light (  ) coming on indicates a damaged or disconnected coolant temperature sensor, resulting in missing temperature reading. When this is the case, contact an aprilia Official dealer.
Display temperature range: 35-135°C (95275 °F).
SETTING THE DIGITAL CLOCK:
The digital clock is displayed in the top area of the screen.
The clock is only displayed when the key is set to ≈  ∆.
∆.
NOTE The clock may only be set when the key is set to "  " and the motorcycle is at standstill.
HOUR SETTING
Hold down the buttons "+" and "-" for at least 3 seconds, until the hour digits begin to flash.
Use the "+" and "-" buttons to set hours as desired.
Hold down either of the buttons and current setting will increase/decrease by one unit per second.
Hold down the "TRIP/V" button for at least three seconds to confirm hour setting. The clock will automatically switch to the minutes setting mode.
MINUTES SETTING
Pressing the "+" and "-" buttons increases/decreases current setting by one minute.
Hold down either of the buttons to increase/decrease current setting by one unit per second.
Hold down the "TRIP/V" button for at least 3 seconds, until the minute digits stop flashing, to confirm your new setting.
Clock setting is lost when the battery is disconnected.
use and maintenance RSV 1000 R - RSV 1000 R FACTORY 23
6 |
LAP TIMER
The lap timer measures and stores lap times while riding on the track for later review.
When the "LAP TIMER" function is selected, the "clock" cannot be displayed:
To turn on the lap timer:
Hold down "TRIP/V" for over 3 seconds while holding down the "LAP" button.
The clock display area will read "01 LAP
00'00"00".
To turn off the lap timer:
Hold down "TRIP/V" for over 3 seconds while holding down the "LAP" button. The display will return to the clock display.
To start the lap timer
Press the "LAP" button (1) and release immediately. At the first press, time count starts.
Pressing the "LAP" button again within 10 seconds of starting the time count will reset and restart the time count
At the next press of the "LAP" button, a new lap time count begins. The previous lap time is stored and displayed for 10 seconds along with lap number (in the top left corner)
After these 10 seconds, lap timer display changes to second lap timing and lap number.
NOTE The lap timer can store up to 40 lap times. When memory is full, pressing the "LAP" button (1) will take no effect and the 40 lap times stored are displayed automatically.
The lap timer is reset by deleting the 40 lap times stored as follows.
Access the lap timer function and hold down the "-" button for at least 3 seconds while holding down the LAP button (1).
When the memory is clear, the lap timer
goes back to the initial display "01 LAP
00'00"00".
Any lap times stored will be lost when the battery is disconnected.
How to view stored lap times:
Access the lap timer function and hold down "TRIP/V" for over 3 seconds. Scroll through lap times using buttons "+" (scroll forward) and "-" (scroll back).
To go back to the lap timer function, hold down "TRIP/V" for over 3 seconds.
24 use and maintenance RSV 1000 R - RSV 1000 R FACTORY
DIAGNOSTICS
1)Each time the ignition key is set to " ", the wording "efi" is displayed for about three seconds.
 CAUTION
When the "efi" wording turns on and the warning light (  ) comes on during normal engine operation, it means that the Engine Control Unit has detected an anomaly.
In most cases the engine will keep running, although with less than ideal performance. However, contact an aprilia Official Dealer without delay.
ENGINE OIL PRESSURE
Each time the ignition key is set to " ", the engine oil pressure light comes on for about three seconds.
 CAUTION
If the engine oil pressure light stays on and the warning light (  ) comes on as well, after engine firing or during normal engine operation, it means that the engine oil pressure is low.
Stop the engine immediately and contact an aprilia Official Dealer.
1 |
2 |
SETTING THE RED LINE THRESHOLD (WITH ENGINE OFF ONLY)
When the maximum rpm set is exceeded, the red line warning light (red) (1) on the dashboard starts blinking.
NOTE The red line threshold, which operates the red line light, can only be set with the engine off and the odometer displayed. Setting range is 2,000 - 12,000 rpm.
Factory setting is 6,000 rpm.
To view red line threshold setting, hold down the "Trip/V" button for at least 3 seconds. The rev counter pointer (2) will point the corresponding rpm for three seconds.
use and maintenance RSV 1000 R - RSV 1000 R FACTORY 25

2 |
2 |
1 |
1
To set the red line threshold:
Turn the ignition key to "  ".
".
Allow some time for the dashboard check-up routine.
Hold down the "Trip/V" button for at least three seconds: the rev counter pointer
(2)will point the current red line setting.
You have three seconds to change setting as desired (as long as the rev counter pointer (2) is pointing current red line setting).
Use the "+" button to change setting. Press briefly to increase setting by 100 rpm. Hold down a little longer to increase by 1000 rpm.
After reaching full scale value (12,000 rpm), the pointer will go back to zero automatically.
Three seconds after last pressing the "+" button, the new red line threshold is stored. This is confirmed by the red line light (1) coming on for three seconds, while the pointer (2) will go back to zero.
If the engine is started during the setting procedure, the last setting is retained. The new threshold setting is also lost if the battery is disconnected during the setting procedure, and the last setting is retained.
26 use and maintenance RSV 1000 R - RSV 1000 R FACTORY

KEY CONTROLS
CONTROLS ON THE RIGHT SIDE OF THE HANDLEBAR
NOTE The electric components will only work when the ignition switch is in position " ".
1) ENGINE KILL SWITCH ( - )
 CAUTION
Do not operate the engine kill switch ( - ) while riding.
This is a safety or emergency switch.
When it is in position " ", the engine can be started. When set to position " ", it will stop the engine.
1 |
2 |
 CAUTION
Leaving the ignition switch in position " " when the engine is stopped may let the battery run flat.
After stopping the vehicle, stop the engine and then turn the ignition switch to position " ".
2)STARTER BUTTON ( )
When pressed, the starter button " ", turns the engine over. See page 53 (STARTING) for starting procedure.
CONTROLS ON THE LEFT SIDE OF THE HANDLEBAR
NOTE The electric components will only work when the ignition switch is in position " ".
3)HORN BUTTON ( )
Press it to operate the horn.
4)DIRECTION INDICATOR SWITCH ( )
Move the switch to the left in order to signal your intention to turn left; move the switch to the right to signal a right turn.
Press the switch to cancel the signal.
5)DIMMER SWITCH ( )
With the dimmer switch set to " ", the parking lights, the dashboard light and the low beam are on.
Push the dimmer switch to position " " to turn on the high beam.
Ensure that the dimmer switch is set to " " before starting the engine.
use and maintenance RSV 1000 R - RSV 1000 R FACTORY 27

3 |
4 |
6 |
5 |
6) HIGH BEAM FLASHER ( ) / LAP |
NOTE Release the button to stop the IGNITION SWITCH |
|
(multifunction) BUTTON |
flasher. |
The ignition switch (1) is positioned on the |
NOTE To set the functions, see page 20 |
|
|
|
steering head. |
|
(MULTIFUNCTION COMPUTER). |
|
NOTE The key operates the ignition |
|
|
|
Press the button to flash the high beam |
|
switch/steering lock, the fuel filler cap lock |
in an emergency. When pressed |
|
and the glove/tool kit compartment cover. |
together with the TRIP/V button, it turns |
Two keys are delivered along with the |
|
on the lap timer. |
||
vehicle (one spare key). |
||
|
||
|
NOTE Do not keep the spare key on the |
|
|
vehicle. |
|
|
NOTE Setting the ignition key to " " |
|
|
automatically turns on the lights. |
|
|
The lights will turn off when the ignition |
|
|
switch is set to " ". |
28 use and maintenance RSV 1000 R - RSV 1000 R FACTORY
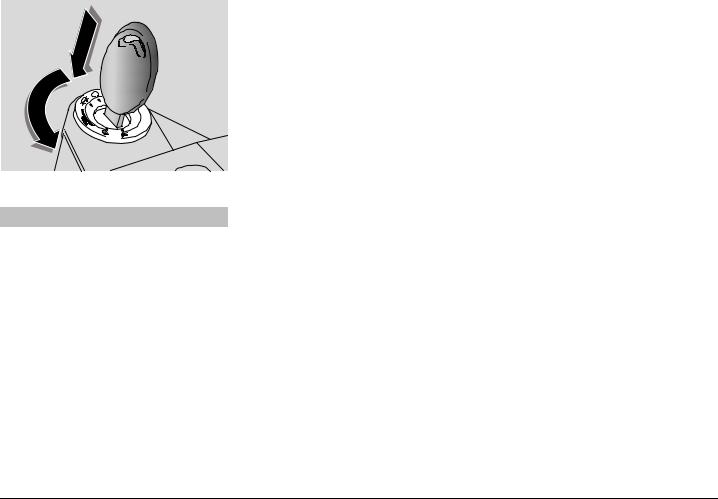
STEERING LOCK
 WARNING
Never turn the key to position " " while riding or you might lose control of the vehicle.
OPERATION
To lock the steering:
Turn the handlebar fully to the left.
Turn the key to position " ".
Push in the key and turn it to " ".
Extract the key.
Position |
Function |
Key removal |
|
|
The steering |
It is possible |
|
The steering |
It is possible |
|
|
is locked. It |
to remove the |
|
|
|
is not |
key. |
||
|
is locked. It |
to remove the |
|
|
||
|
|
|
possible to |
The |
||
|
is not |
key.The |
|
|
||
|
|
|
start the |
immobilizer |
||
|
possible to |
immobilizer |
|
|
engine. |
system is |
system is |
|
|||||
start the |
|
The parking |
activated |
|||
activated |
|
|||||
Steering |
engine or |
|
|
lights of |
after the key |
|
after the key |
|
|
||||
switch on |
|
|
headlight |
is removed. |
||
lock |
is removed. |
|
|
|||
|
|
and tail light |
(where |
|||
|
the lights |
(where |
|
|
||
|
|
|
|
are turned |
immobilizer |
|
|
|
immobilizer |
|
|
||
|
|
|
|
on. |
system is |
|
|
|
system is |
|
|
||
|
|
|
|
fitted) |
||
|
|
fitted) |
|
|
|
|
|
|
|
|
|
|
|
|
|
|
|
|
|
|
|
|
|
|
|
|
|
|
Neither the |
It is possible |
|
|
|
|
|
engine nor |
to remove the |
|
|
|
|
|
the lights |
key. The |
|
|
|
|
|
can be |
immobilizer |
|
|
|
|
|
operated. |
system is |
|
|
|
|
|
activated |
|
|
|
|
|
|
after the key |
|
|
|
|
|
|
|
is removed. |
|
|
|
|
|
|
(where |
|
|
|
|
|
|
immobilizer |
|
|
|
|
|
|
system is |
|
|
|
|
|
|
fitted) |
|
|
|
|
|
|
|
|
|
|
|
|
The engine |
It is not |
|
|
|
|
and the |
possible to |
|
|
|
|
|
lights can be |
remove the |
|
|
|
|
|
|
operated. |
key. |
|
|
|
|
|
|
|
|
|
|
|
use and maintenance RSV 1000 R - RSV 1000 R FACTORY 29

ACCESSORIES
3 |
2 |
1 |
UNLOCKING/LOCKING THE PASSENGER SEAT
Place the vehicle on the stand, see page 60 (PLACING THE VEHICLE ON THE STAND).
Insert the key (1) into the seat lock.
Release the passenger seat (2) from the grab strap (3).
Turn the key (1) anticlockwise.
Raise the front end of the passenger seat (2).
Withdraw the passenger seat (2).
NOTE Before lowering and locking the seat (2), make sure that you have not left the key in the glove/tool kit compartment.
To lock the seat (2), proceed as follows:
Slide the hooks (4) placed at the rear end of the passenger seat underneath the frame tube (5) of the rear subframe.
Push the passenger grab strap (3) forward and lower the front end of the seat. Make sure to set the grab strap in the correct position.
Press down on the front end of the seat so that the lock becomes engaged.
 WARNING
Make sure the seat (2) is locked securely before riding.
NOTE The  version is only approved in the single-seater configuration for the R market. The corresponding market version is not fitted with a passenger seat.
2 |
5 |
3 |
4 |
The tail of the vehicle accommodates a convenient glove / tool kit compartment, which is accessed by removing the compartment cover.
NOTE The glove/tool kit compartment cover can only be used when the passenger seat (2) is removed and vice versa.
To use the vehicle with the glove/tool kit compartment cover it is necessary to remove the passenger seat as previously described.
See page 31 (UNLOCKING/LOCKING THE GLOVE/TOOL KIT COMPARTMENT COVER) for installation instructions.
30 use and maintenance RSV 1000 R - RSV 1000 R FACTORY
Loading...