


#(%#+).' 4(% 3(/% 7%!2
Carefully read p. 29 (REAR DRUM BRAKE) and p. 43 (MAINTENANCE).
wvCheck the wear of the rear brake shoes after the first 500 km (312 mi) and successively every 4000 km (2500 mi).
xu
Have the rear brake shoe wear checked by an aprilia Official Dealer after the first 1000 km (625 mi) and successively every 6000 km (3750 mi).
In any case:
aWARNING
If the adjuster (1) can be screwed completely, this means that the shoes are worn; in this case, contact an APRILIA
Official Dealer.
wv
To verify the wear of the rear brake shoes, proceed as follows:
Pull the rear brake lever (2) completely and keep it pulled.
Check the position of the rear brake shoe wear indicator (3).
Position |
Wear condition |
Indicator between |
Rear brake shoes |
the two reference |
within the wear limit. |
teeth (4) and (5). |
|
|
|
Indicator on or |
Rear brake shoes |
beyond the lower |
worn. |
reference tooth(5). |
To be replaced. |
aWARNING
If the rear brake shoe wear indicator (3) is positioned on or beyond the lower reference tooth (5), contact an APRILIA
Official Dealer, who will provide for replacing the rear brake shoes.
).30%#4).' 4(% &2/.4 !.$ 2%!2 3530%.3)/.3
Carefully read p. 43 (MAINTENANCE).
Check the tightening of all the components and the functionality of the articulations of the front and rear suspensions after the first:
w v 500 km (312 mi) and successively every 4000 km (2500 mi);
x u1000 km (625 mi) and successively every 6000 km (3750 mi).
aCAUTION
If you notice irregularities in the operation or if the help of a qualified technician is necessary, contact your APRILIA
Official Dealer.
use and maintenance Habana 50/125 - Habana Custom 50/125 51

#(%#+).' 4(% 34%%2).'
Carefully read p. 43 (MAINTENANCE).
Occasionally check the steering slack.
To check the steering it is necessary to:Position the vehicle on the centre stand.
NOTE Prepare a 185 mm high support, the base of which must measure 200 x 200 mm.
Place the support under the vehicle and a spongy cloth between them, so that the front wheel can move freely and the vehicle cannot fall down.
aWARNING
Make sure that the vehicle is stable.
Shake the fork in the direction of travel.
NOTE Do not shake the fork excesively, otherwise you may take in consideration the movement of the stand, thus observing an incorrect slack.
Repeat the previous operation more than once.
If you find that there is a considerable slack, contact your aprilia Official Dealer to restore the optimal steering conditions.
#(%#+).' 4(% %.').% &5,#25- !8)3
Carefully read p. 43 (MAINTENANCE).
Periodically check the slack existing between the engine pin bushings.
To carry out this operation, proceed as follows:
Position the vehicle on the centre stand.
Shake the wheel transversally with respect to the riding direction.
If any slack should be noticed, contact your aprilia Official Dealer, to restore the optimal operating conditions.
52 use and maintenance Habana 50/125 - Habana Custom 50/125

2%-/6).' 4(% &2/.4 #/6%2
Carefully read p. 43 (MAINTENANCE).
Position the vehicle on the centre stand.
Unscrew and remove the screw (1).
Unscrew and remove the screw (2).
aCAUTION
Proceed with care.
Do not damage the tangs and/or their seats.
Handle the plastic and painted components with care and avoid scraping or damaging them.
Release the couplings (3) and (4) from their seats and remove the two collars
(5) and (6).
Unscrew and remove the two lower screws (7).
vuRemove the grille (8).
Unscrew and remove the upper screw (9), taking the washer.
NOTE To release the front cover (10) from the side couplings, carry out the following operations simultaneously:
Press “A” and pull “B”.
Press “A” and pull “C”.
use and maintenance Habana 50/125 - Habana Custom 50/125 53

2%-/6).' 4(% ,/7%2 (!.$,%"!2 #/6%2 wx
Carefully read p. 43 (MAINTENANCE).
Position the vehicle on the centre stand.
Unscrew and remove the headlight metal ring screw (1).
Remove the headlight metal ring (2).
Unscrew and remove the screw (3).
Unscrew and remove the three screws
(4).
Unscrew and remove the screw (5).
aCAUTION
Proceed with care.
Do not damage the tangs and/or their seats.
Handle the plastic and painted components with care and avoid scraping or damaging them.
Move the lower handlebar cover (6) carefully downwards.
Unscrew and remove the screw (7).
aCAUTION
Proceed with care. Do not force the electric wires.
Partially remove the reflector (8), releasing the seat (9) from the pin (10).
NOTE Upon reassembly, make sure that the reflector (8), the seat (9) and the pin (10) are in the correct position.
2%-/6).' 4(% (%!$,)'(4 -%4!, 2).' v u
Carefully read p. 43 (MAINTENANCE).
Position the vehicle on the centre stand.
Unscrew and remove the screw (11).
Remove the headlight metal ring (12).
NOTE Upon reassembly, insert the tang (13) correctly in the appropriate seat.
54 use and maintenance Habana 50/125 - Habana Custom 50/125
0!24)!, 2%-/6!, /& 4(% 500%2 (!.$,%"!2 #/6%2 wx
Carefully read p. 43 (MAINTENANCE).
aCAUTION
The operations necessary for the partial removal of the upper handlebar cover may be difficult or complex for unskilled operators.
If necessary, contact an APRILIA Official
Dealer.
If you want to carry out these operations personally, keep to the following instructions:
Remove the lower handlebar cover, see
p. 54 (REMOVING THE LOWER HANDLEBAR COVER wx).
Remove the rear-view mirrors, see p. 56 (REMOVING THE REAR-VIEW MIRRORS).
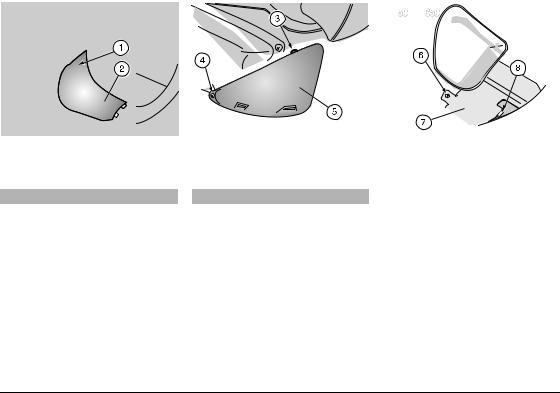
Raise the rubber ring (1), releasing it from the odometer control coupling (2).
aCAUTION
Proceed with care. Do not damage the tangs and/or their seats.
Release the odometer control coupling
(2)from its seat on the dashboard by means of a spanner.
aCAUTION
The upper handlebar cover (3) (complete with switches, instruments and indicators) remains connected to the electric wires and therefore cannot be completely removed.
Proceed with care, in order not to damage the components.
Do not force the electric wires.
Raise the upper handlebar cover (3) moderately and rotate it towards the saddle.
use and maintenance Habana 50/125 - Habana Custom 50/125 55
2%-/6).' 4(% 2%!2 6)%7 -)22/23
Carefully read p. 43 (MAINTENANCE).
The following information refers to one rear-view mirror only, but is valid for both (w in the countries where the second rear-view mirror is required).
Position the vehicle on the centre stand.
Lift the protection element (1).
Loosen the nut (2) completely.
Unscrew and remove the rear-view mirror (3).
wxTake the plastic washer (4).
0!24)!, 2%-/6!, /& 4(% $!3("/!2$ v u
Carefully read p. 43 (MAINTENANCE).
Unscrew and remove the three nuts (5).
aCAUTION
Proceed with care.
Do not force the electric wires.
Handle the plastic and painted components with care and avoid scraping or damaging them.
Partially remove the dashboard (6).
At this point, proceed as follows to reach the dashboard bulbs:
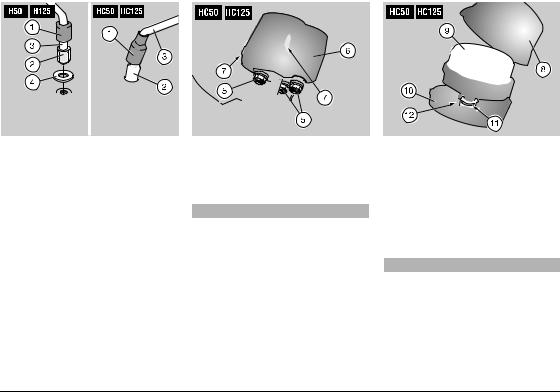
Unscrew and remove the two screws
(7).
Remove the upper cover (8).
Remove the glass element (9) with its support.
Lower the cover (10).
Raise the rubber ring (11), releasing it from the odometer control coupling (12).
aCAUTION
Proceed with care. Do not damage the tangs and/or their seats.
Release the odometer control coupling (12) from its seat on the dashboard by means of a spanner.
56 use and maintenance Habana 50/125 - Habana Custom 50/125
2%-/6).' 4(% #%.42!, ).30%#4)/. #/6%2
Carefully read p. 43 (MAINTENANCE).
aCAUTION
Handle the painted components with care and avoid scraping or damaging them.
Position the vehicle on the centre stand.
Unscrew and remove the screw (1).
Remove the central inspection cover (2).
NOTE Upon reassembly, fit the tangs correctly in the appropriate seats.
|
|
|
|
|
|
|
|
|
|
|
|
|
|
|
|
|
|
|
|
|
|
|
|
|
|
|
|
2%-/6).' 4(% 2)'(4 !.$ ,%&4 |
2%-/6).' |
|||||
).30%#4)/. #/6%23 |
4(% "!44%29 #/6%2 wv |
|||||
Carefully read p. 43 (MAINTENANCE).
aCAUTION
Handle the plastic and painted components with care and avoid scraping or damaging them.
Lift the saddle, see p. 23 (UNLOCKING / LOCKING THE SADDLE).
Unscrew and remove the upper screw
(3).
Unscrew and remove the side screw (4).
Remove the side inspection cover (5).
NOTE Upon reassemby, correctly fit the seats in the appropriate tangs.
NOTE Position the vehicle on firm and flat ground.
Position the vehicle on the centre stand.
Make sure that the ignition switch is in position “m”.
Raise the saddle, see p. 23 (UNLOCKING / LOCKING THE SADDLE).
Unscrew and remove the screw (6).
Remove the battery cover (7).
NOTE Upon reassembly, correctly insert the tang (8) in the appropriate seat.
use and maintenance Habana 50/125 - Habana Custom 50/125 57
#(%#().' 4(% 34!.$
Carefully read p. 43 (MAINTENANCE).
aWARNING
FOR THE SIDE STAND ONLY &.
Danger of fall or overturning.
When the vehicle is straightened from the parking position to the driving position, the stand goes automatically up.
NOTE The following information refers to one stand only, but is valid for both.
The stand (1) must rotate without hindrances.
Carry out the following checks:
The springs (2) must not be damaged, worn, rusty or weakened.
The stand must rotate freely, if neces-
sary grease the joint, see p. 84 (LUBRICANT CHART w v) or p. 85 (LUBRICANT CHART xu).
#(%#+).' 4(% 37)4#(%3
Carefully read p. 43 (MAINTENANCE)
The vehicle is provided with two switches:
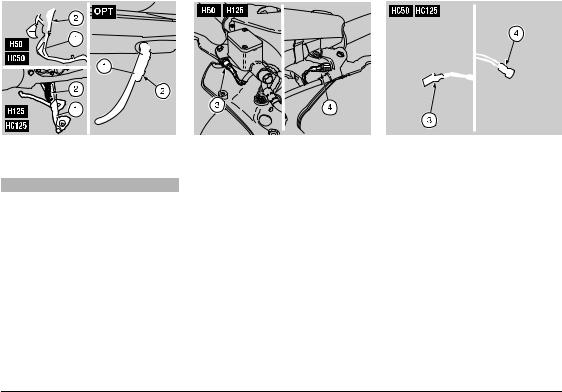
–Stoplight switch on the rear brake control lever (3);
–Stoplight switch on the front brake control lever (4).
To reach the switches, proceed as follows:
wxPartially remove the upper handlebar cover, see p. 55 (PARTIAL REMOVAL OF THE UPPER HANDLEBAR COVER wx).
Periodically carry out the following checks:
Make sure that there are no dirt or mud deposits on the switch; the pin must be able to move without interferences, returning automatically to its initial position.
Make sure that the cables are connected correctly.
58 use and maintenance Habana 50/125 - Habana Custom 50/125
)$,).' !$*534-%.4
Carefully read p. 43 (MAINTENANCE).
wvAdjust the idling after the first 500 km (312 mi) and every time it is irregular.
xuAdjust the idling after the first 1000 km (625 mi) and every time it is irregular.
To carry out this operation, proceed as follows:
Drive for a few miles until the engine reaches the normal running temperature, then stop the engine.
w v Remove the central inspection cover, see p. 57 (REMOVING THE CENTRAL INSPECTION COVER).
x u Remove the right inspection cover, see p. 57 (REMOVING THE RIGHT AND LEFT INSPECTION COVERS).
Connect an electronic revolution counter to the spark plug cable.
aWARNING
Before proceeding, make sure that the room in which you are working is properly ventilated.
Start the engine.
The minimum speed of the engine (idling) must be about 1600 ± 200 rpm; in this case the engine does not make the rear wheel rotate.
If necessary:
Remove the left inspection cover, see p. 57 (REMOVING THE RIGHT AND LEFT INSPECTION COVERS).
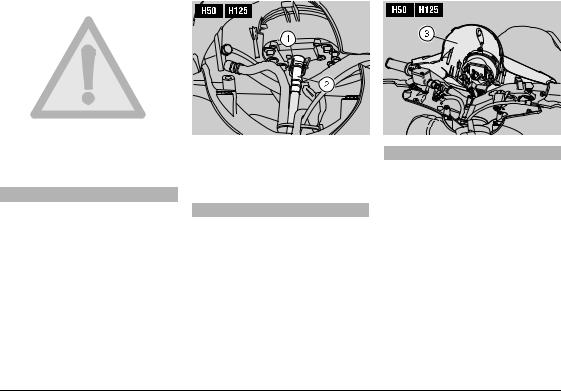
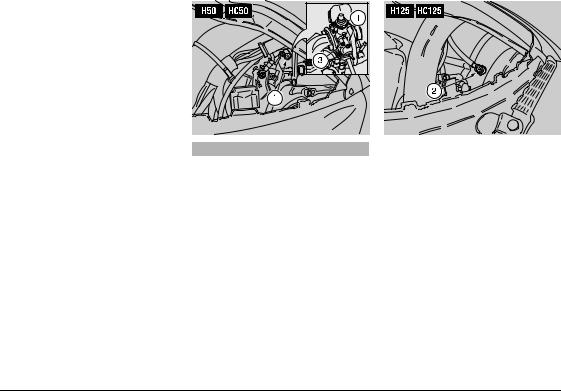
w v Act on the adjusting screw (1) positioned on the carburettor.
wvNOTE Do not act on the air adjusting screw (3), to avoid variations of the carburation setting.
xuAct on the adjusting knob (2).
BY ROTATING CLOCKWISE the rpm increase;
BY ROTATING ANTICLOCKWISE the rpm decrease.
Twist the throttle grip, accelerating and decelerating a few times to make sure that it functions correctly and to check if the idling speed is constant.
NOTE If necessary, contact your aprilia Official Dealer.
use and maintenance Habana 50/125 - Habana Custom 50/125 59
!$*534).' 4(% !##%,%2!4/2 #/.42/,
Carefully read p. 43 (MAINTENANCE).
The ideal slack of the accelerator control should be about 2-3 mm.
To adjust the slack, proceed as follows:
Position the vehicle on the centre stand.
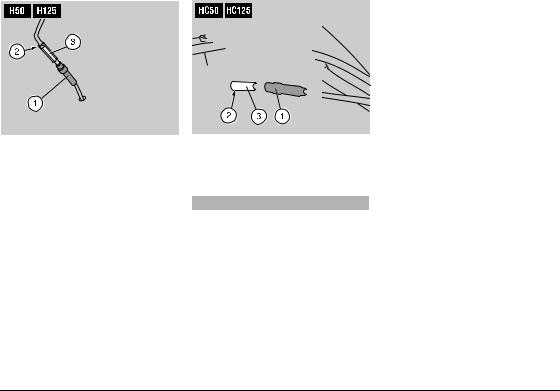
Remove the protection element (1).
Loosen the nut (2).
Act on the adjuster (3), positioned at the beginning of the accelerator control cable.
After the adjustment:
Tighten the nut (2), thus locking the adjuster (3) and put back the protection element (1).
aWARNING
After the adjustment, make sure that the rotation of the handlebar does not modify the engine idling rpm and that the throttle grip returns smoothly and automatically to its original position after being released.
30!2+ 0,5'
Carefully read p. 43 (MAINTENANCE).
w v Check the spark plug after the first 500 km (312 mi); change it every 4000 km (2500 mi).
x u Check the spark plug after the first 1000 km (625 mi); successively every 6000 km (3750 mi) and change it every 12000 km (7500 mi).
Periodically remove the spark plug and clean it carefully, removing carbon deposits; change it if necessary.
To reach the spark plug:
w v Remove the central inspection cover, see p. 57 (REMOVING THE CENTRAL INSPECTION COVER).
x u Remove the right inspection cover, see p. 57 (REMOVING THE RIGHT AND LEFT INSPECTION COVERS).
60 use and maintenance Habana 50/125 - Habana Custom 50/125
To remove and clean the spark plug:
Take off the spark plug cap (1).
Remove all the dirt from the base of the spark plug, then unscrew it with the spanner you will find in the tool kit and extract it from its seat, taking care that neither dust nor other substances enter the cylinder.
Make sure that there are neither carbon deposits, nor corrosion marks on the electrode and on the central porcelain part; if necessary, clean them with the special cleaners for spark plugs, with an iron wire and/ or a metal brush.
Energetically blow some air, in order to prevent the removed residues from getting into the engine.
If the spark plug has crackings on the insulating material, corroded electrodes or excessive deposits, it must be changed.
Check the spark plug gap with a thickness gauge.
The gap must be:
–wv0,6 - 0,7 mm;
–xu0,7 - 0,8 mm;
if necessary adjust it, carefully bending the earth electrode.
Make sure that the washer is in good conditions. With the washer on, screw the spark plug by hand in order not to damage the thread.
Tighten the spark plug by means of the spanner you will find in the tool kit, giving it half a turn to compress the washer.
Spark plug driving torque:
–wv20 Nm (2 kgm);
–xu12-14 Nm (1,2-1,4 kgm).
aCAUTION
The spark plug must be well tightened, otherwise the engine may overheat and be seriously damaged.
Use the recommended type of spark plug only, see p. 80 (TECHNICAL DATA), in order not to compromise the life and performance of the engine.
Position the spark plug cap (1).
Put back the inspection cover.
use and maintenance Habana 50/125 - Habana Custom 50/125 61

"!44%29
Carefully read p. 43 (MAINTENANCE).
aWARNING
Risk of fire.
Keep fuel and other flammable substances away from the electrical components.
aCAUTION
Never invert the connection of the battery cables.
Connect and disconnect the battery with the ignition switch in position “m”, otherwise some components may be damaged.
Connect first the positive cable (+) and then the negative cable (–).
Disconnect following the reverse order.
wv
Check the electrolyte level and the tightening of the terminals after the first 500 km (312 mi) and then every 4000 km (2500 mi).
aWARNING
The electrolyte in the battery is toxic and caustic and if it gets in contact with the skin it can cause burns, since it contains sulphuric acid.
Wear protection clothes, a face mask and/or goggles during maintenance operations.
In case of contact with the skin, rinse with plenty of water.
In case of contact with the eyes, rinse with plenty of water for fifteen minutes, then consult an oculist without delay.
If the electrolyte is accidentally swallowed, drink a lot of water or milk, then continue drinking milk of magnesia or vegetable oil and consult a doctor without delay.
The battery gives off explosive gases; keep it away from flames, sparks, cigarettes and any other source of heat.
During the recharging or the use, make sure that the room is properly ventilated and avoid inhaling the gases released during the recharging.
KEEP AWAY FROM CHILDREN.
Do not incline the vehicle too much, in order to avoid dangerous leaks of the battery fluid.
The electrolyte is corrosive.
Do not pour or spill it, especially on the plastic parts.
xu
aCAUTION
his vehicle is provided with a mainte- nance-free battery and no operation is necessary, excepting occasional checks and the recharge when required.
NOTE If you need assistance or technical advice, consult your aprilia Official Dealer, who can ensure you prompt and accurate servicing.
,/.' ).!#4)6)49 /& 4(% "!44%29
If the vehicle remains unused for more than fifteen days, it is necessary to recharge the battery, in order to prevent its sulphation, see p. 65 (RECHARGING THE BATTERY).
It is important to check the charge periodically (about once a month), during the winter or when the vehicle remains unused, in order to prevent the deterioration of the battery.
Recharge it completely with a normal charge, see p. 65 (RECHARGING THE BATTERY).
wvIf the battery remains on the vehicle, disconnect the cables from the terminals.
62 use and maintenance Habana 50/125 - Habana Custom 50/125
#(%#+).' !.$ #,%!.).' 4(% 4%2-).!,3
Carefully read p. 62 (BATTERY).
wvRemove the battery cover, see p. 57 (REMOVING THE BATTERY COVER wv).
xuRemove the battery (partial removal), see p. 64 (REMOVING THE BATTERY xu).
Make sure that the cable terminals (1) and the battery terminals (2) are:
–in good conditions (and not corroded or covered with deposits);
–covered with special grease or Vaseline.
If necessary:
Make sure that the ignition switch is in position “m”.
Disconnect first the negative (–) and then the positive cable (red) (+).
Brush with a wire brush to eliminate any sign of corrosion.
Reconnect first the positive (red) (+) and then the negative cable (–).
Cover the terminals with special grease or Vaseline.
After these operations:
wvPut back the battery cover, see p. 57 (REMOVING THE BATTERY COVER wv).
xuPut back the battery, see p. 65 (INSTALLING THE BATTERY xu).
2%-/6).' 4(% "!44%29 wv
Carefully read p. 62 (BATTERY).
Remove the battery cover, see p. 57 (REMOVING THE BATTERY COVER
wv).
Make sure that the ignition switch is in position “m”.
Disconnect first the negative (–) and then the positive cable (red) (+).
Remove the battery breather pipe.
Remove the battery from its compartment and put it on a flat surface, in a cool and dry place.
aWARNING
Once it has been removed, the battery must be stored in a safe place and kept away from children.
Put back the battery cover, see p. 57
(REMOVING THE BATTERY COVER
wv).
use and maintenance Habana 50/125 - Habana Custom 50/125 63

2%-/6).' 4(% "!44%29
Carefully read p. 62 (BATTERY).
PARTIAL REMOVAL
Position the vehicle on the centre stand.
aWARNING
Wait until the engine and the exhaust silencer have completely cooled down.
Make sure that the ignition switch is in position “m”.
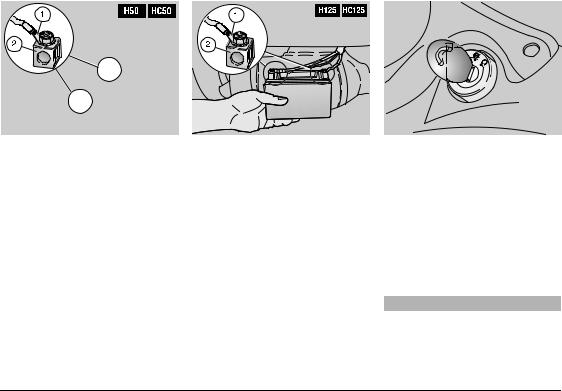
Working on the right side of the vehicle, introduce your left hand under the fairing.
Release the belt (1) that holds the battery.
Move the belt (1) sidewards.
aCAUTION
The battery is connected with the electric cables. Do not force the cables while removing it.
Grasp the battery (2) and remove it from its compartment by withdrawing it from behind.
COMPLETE REMOVAL
Disconnect first the negative cable (–) and then the positive cable (red) (+).
Position the battery (2) on a flat surface, in a cool and dry place.
aWARNING
After removal, the battery must be stored in a safe place and kept away from children.
#(%#+).' 4(% %,%#42/,94% ,%6%, wv
Carefully read p. 62 (BATTERY).
Remove the battery from its compart-
ment, see beside (REMOVING THE BATTERY wv).
Make sure that the fluid level is included between the two “MIN” and “MAX” notches stamped on the battery side.
Otherwise:
Unscrew and remove the element plugs.
aCAUTION
Top up with distilled water only. Do not exceed the “MAX” mark, since the electrolyte level increases during the recharge.
Top up by adding distilled water.
aCAUTION
After topping up, put back the element plugs in the correct position.
Put back the element plugs.
64 use and maintenance Habana 50/125 - Habana Custom 50/125

2%#(!2').' 4(% "!44%29
Carefully read p. 62 (BATTERY).
wv
Remove the battery from its compart-
ment, see p. 63 (REMOVING THE BATTERY wv).
Unscrew and remove the element plugs.
Check the electrolyte level, see p. 64
(CHECKING THE ELECTROLYTE LEVEL wv).
xu
Remove the battery (complete removal),
see p. 64 (REMOVING THE BATTERY)
xu).
NOTE Do not remove the battery plugs; without plugs the battery may be damaged.
Connect the battery with a battery charger.
A recharge with an amperage equal to 1/10th of the battery capacity is recommended.
wv
After the recharging operation, check the electrolyte level again and if necessary top up with distilled water.
Replace the element plugs.
aCAUTION
Reassemble the battery only 5-10 minutes after disconnecting the recharger, since the battery continues to produce gas for a short lapse of time.
).34!,,).' 4(% "!44%29 wv
Carefully read p. 62 (BATTERY).
Remove the battery cover, see seep. 57 (REMOVING THE BATTERY COVER
wv).
Put the battery in its container.
Connect the breather pipe.
aCAUTION
Always connect the battery breather pipe, to prevent the sulphuric acid vapours from corroding the electric system, painted parts, rubber elements or gaskets when they exit the breather pipe itself.
Connect, in order, the positive (red) (+) and negative (–) cable.
Cover the terminals with special grease or Vaseline.
Put back the battery cover, see p. 57
(REMOVING THE BATTERY COVER
wv).
).34!,,).' 4(% "!44%29 xu
Carefully read p. 62 (BATTERY).
Connect, in order, the positive (red) (+) and negative (–) cable.
Cover the terminals with special grease or Vaseline.
aCAUTION
Upon reassembly the electric cables must be guided in the correct position, in such a way as not to crush them.
Position the battery in its compartment.
Put back the belt (1) that holds the battery (2).
use and maintenance Habana 50/125 - Habana Custom 50/125 65
 Loading...