


VT-1520
Coffee maker
Кофеварка
3
9
16
23
29
1
IM VT-1520.indd 1 |
8/23/19 5:00 PM |
IM VT-1520.indd 2 |
8/23/19 5:00 PM |

ENGLISH
COFFEE MAKER VT-1520
The coffee maker is intended for making “ESPRESSO” and “CAPPUCCINO” coffee.
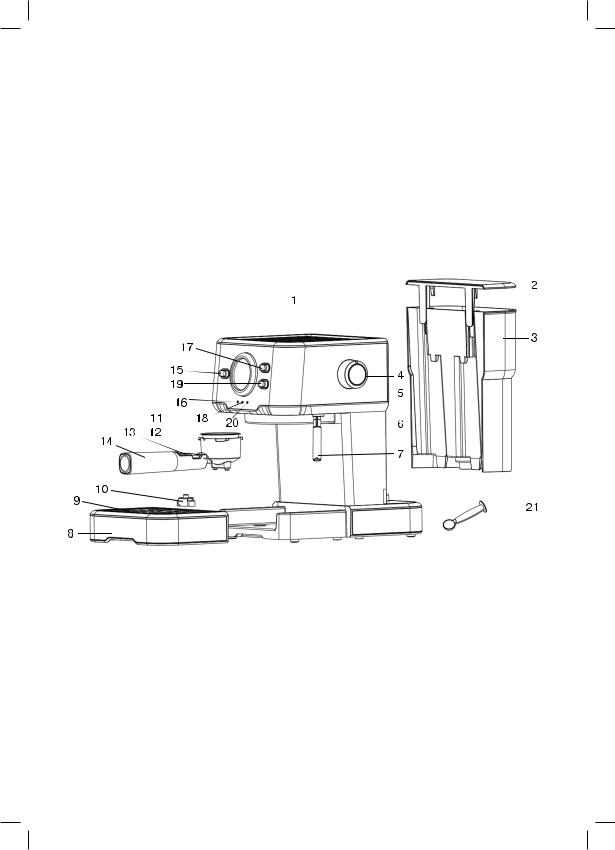
DESCRIPTION
1.Cup warming tray
2.Water tank lid
3.Removable water tank
4.Steam supply control knob « /
/
 »
»
5.Coffee maker body
6.Cappuccinator pipe
7.Cappuccinator pipe tip
8.Drip tray
9.Drip tray grid
10.Tray filling pop-up indicator
11.Coffee filter
12.Filter holder
13.Filter retainer
14.Filter holder handle
15.On/Off button « »
»
16.Power indicator « »
»
17.Water supply button « »
»
18.Ready indicator « »
»
19.Steam supply on button « »
»
20.Steam supply readiness indicator « »
»
21.Measuring spoon with ground coffee tamper
ATTENTION!
For additional protection it is reasonable to install a residual current device (RCD) with nominal operation current not exceeding 30 mA. To install an RCD contact a specialist.
USAGE AND SAFETY INSTRUCTIONS
••Read these instructions carefully before
••using the unit. Keep this instruction during the whole operation period.
••Mishandling the unit can lead to its breakage and cause harm to the user or damage to his/ her property.
••Before the first use make sure that the operating voltage of the coffee maker corresponds to the voltage of your mains.
••The power cord is equipped with a europlug; insert it into a socket that has a reliable grounding connection.
••To avoid fire, do not use adapters for connecting the coffee maker to the mains.
••Use the coffee maker according to its intended purpose only.
••Do not use the unit outdoors.
••Never leave or keep the coffee maker in places with the temperature below 0°C.
3
••Place the coffee maker on a dry flat steady surface, do not place the unit on the edge on the table.
••Do not place the coffee maker on hot surfaces.
••Do not use the coffee maker near heat and moisture sources and near open flame.
••Do not let the power cord hang from the edge of the table and make sure it does not touch hot surfaces or sharp edges of furniture.
••Be careful while operating with outgoing steam.
••To avoid electric shock, do not immerse the coffee maker, power cord or power plug into water or other liquids.
••Use only the accessories supplied.
••Do not switch the coffee maker on if the water tank is empty.
••Fill the tank only with clean cold water, it is recommended to use water additionally cleaned with domestic water filters.
••Before switching the coffee maker on, make sure that all removable parts are installed properly.
••Never leave the operating coffee maker unattended.
••Do not touch the power cord, the plug and the coffee maker body with wet hands.
••To avoid burns, do not touch hot surfaces of the coffee maker (the filter holder, the boiler, the cappuccinator pipe) during coffee making and right after switching the unit off.
••Let the unit cool down completely before cleaning it or removing the accessories.
••Do not remove the filter holder during coffee maker operation.
••Unplug the coffee maker before cleaning or when you are not using it.
••When unplugging the unit, pull the plug but not the cord.
••For children safety reasons do not leave polyethylene bags, used as a packaging, unat-
tended.
Attention! Do not allow children to play with polyethylene bags or packaging film. Danger of suffocation!
••Do not leave children unattended to prevent using the unit as a toy.
••This unit is not intended for usage by children.
••The unit is not intended for usage by physically or mentally disabled persons (including children) or by persons lacking experience or knowledge if they are not under supervision of
IM VT-1520.indd 3 |
8/23/19 5:00 PM |

ENGLISH
a person who is responsible for their safety or if they are not instructed by this person on the usage of the unit.
••Do not use the unit if the coffee maker body, the power cord or the power plug is damaged.
••If the power cord is damaged, it should be replaced by the manufacturer, a maintenance service or similar qualified personnel to avoid danger.
••Do not repair the unit by yourself. Do not disassemble the unit by yourself, if any malfunction is detected or after it was dropped, unplug the unit and apply to any authorized service center from the contact address list given in the warranty certificate and on the website www.vitek.ru.
••Transport the unit in the original package only.
••Keep the unit in a dry cool place out of reach of children and disabled persons.
THE UNIT IS INTENDED FOR HOUSEHOLD USE ONLY, ITS COMMERCIAL USAGE AND USAGE IN PRODUCTION AREAS AND WORK SPACES IS PROHIBITED.
BEFORE THE FIRST USE
After unit transportation or storage at low temperature keep it for at least three hours at room temperature before switching on.
–Take the coffee maker out of the package and remove the packaging materials.
–Check the unit for damages; do not use it in case of damages.
–Make sure that operating voltage of the coffee maker corresponds to the voltage of your mains.
BEFORE USING THE UNIT
••Make sure that all the control buttons (15, 17, 19) are in the off position.
••Make sure that the steam supply is closed. To
do this turn the knob (4) « /
/
 » clockwise until bumping « ».
••Before the first use of the coffee maker wash all the removable parts (3, 11, 12, 21) with warm water and dry them.
••Before switching the unit on, make sure that the mains voltage corresponds to the voltage specified on the unit body.
••Remove the water tank (3), fill it with cold water up to the MAX mark and install it back to its place.
4
Notes:
–to fill the water tank (3) with water you can lift the lid (2), fold it back and pour water into the tank (3).
–do not use the lid (2) to carry the water tank
(3).
••Install the coffee filter (11) into the holder (12) having preliminary matched the ledge on the filter (11) with the groove on the holder (12) and turn the filter (11) counter/clockwise to fix the filter.
••Install the filter holder into the coffee maker. The holder (12) ledges should match the
grooves on the boiler «
 », after that turn the filter holder handle (14) to the right until bumping « ».
••Place a suitable cup on the tray (8) grid (9).
••Insert the power plug into the socket.
••Switch the coffee maker on by pressing the
on/off button (15) « », the indicator (16) «
 » will light up.
••To fill the boiler with water press the button
(17)« », wait for 15-20 seconds, or at the first signs of appearance of water in the cup, switch the water supply off by pressing the button (17) «
 » again.
••Wait until the indicator (18) « » lights up, then switch the water supply on by pressing the button (17) «
 ». After the cup is filled with water, press the button (17) «
 » again to switch the water supply off and pour the water out of the cup.
••Depending on the cup capacity repeat this procedure several times until the boiler is clean.
ATTENTION!
–Do not remove the filter holder (12) if the buttons (17), (19) are pressed.
–Do not remove the filter holder (12) immediately after preparing coffee as there is redundant water and steam pressure inside, let the coffee maker cool down completely.
–To remove the filter holder (12) turn the
handle (14) to the left «
 » and remove the filter holder (12).
MAKING ESPRESSO
••Make sure that all the control buttons (15, 17, 19) are in the off position.
••Make sure that the steam supply is closed. To
do this turn the knob (4) « /
/
 » clockwise until bumping « ».
IM VT-1520.indd 4 |
8/23/19 5:00 PM |

ENGLISH
••Remove the water tank (3), fill it with cold water up to the MAX mark and install it back
to its place.
Notes:
–to fill the water tank (3) with water you can lift the lid (2), fold it back and pour water into the tank (3).
–do not use the lid (2) to carry the water tank
(3).
••Install the coffee filter (11) into the holder (12) having preliminary matched the ledge on the filter (11) with the groove on the holder (12) and turn the filter (11) counter/clockwise to fix the filter.
••Put ground coffee in the filter (11), slightly tamp the ground coffee with the back side of the measuring spoon (21).
••Install the filter holder (12) into the coffee maker. The holder (12) ledges should match
the grooves on the boiler «
 », after that turn the filter holder handle (14) to the right until bumping « ».
••Place one or two cups on the tray (8) grid (9).
••Insert the power plug into the socket.
••Switch the coffee maker on by pressing the
on/off button (15) « », the indicator (16) «
 » will light up.
••Wait until the indicator (18) « » lights up, the coffee maker is ready for making coffee.
••Switch the water supply on by pressing the button (17) « », watch the cup filling with the ready coffee, press the button (17) «
 » again to switch the water supply off.
••Switch the coffee maker off by pressing the
on/off button (15) « », the indicator (16) «
 » will go out.
••Wait until the coffee maker cools down and remove the filter holder (12) by turning the
handle (14) to the left «
 ». Remove the ground coffee remnants and wash the filter (11).
••For easy removing of the coffee remnants use
the retainer (13) to prevent the filter (11) from falling off the holder (12).
Notes:
–The cups should be preliminary heated up, when water heats up in the boiler, put the cups on the tray (1).
–If you need to promptly remove the filter holder, you have to reduce the pressure in the boiler, switch the coffee maker off by pressing
the on/off button (15) « », place a suitable cup under the tip (7) and slightly open the
5
steam supply by turning the knob (4) « /
/
 » counterclockwise. After the pressure in the boiler is released, you can remove the filter holder (12).
MAKING CAPPUCCINO
•• Attention! Be careful not to get burns by the outgoing steam.
••Make sure that the steam control knob (4) « /
/
 » is in the position “the steam supply is off « ».
••Make coffee, as described in the chapter
«MAKING ESPRESSO», in the cup with enough capacity to add frothed milk or cream.
••Press the steam supply button (19) « », wait until the indicator (20) «
  » lights up. Place
any suitable bowl under the tip (7) for water. Carefully turn the steam supply knob (4) « /
/
 » counterclockwise for a quarter of a turn to remove the condensed fluid from the pipe (6).
••After removing the condensed fluid close the steam supply by turning the knob (4) « /
/
 »
»
clockwise until bumping « ».
Notes: some water or steam may appear from the filter holder (12) or the steam nozzle, it is normal.
••Put the tip of the cappuccinator pipe (7) into
a glass with cold milk or cream, carefully turn the steam supply control knob (4) « /
/
 » counterclockwise for a quarter of a turn or more. The tip (7) should not touch the bottom of the glass, as this can hinder the steam release; you can make thick frothed milk in
several seconds.
Notes: - to avoid splashing milk always immerse the tip (7) deeper than 1 cm from the milk surface.
••The outgoing steam creates whirls which froths milk; from time to time lift and lower the bowl with milk against the tip (7) to make the milk foam.
••Close the steam supply by turning the knob
(4) « /
/
 » clockwise until bumping « ».
••Switch the steam supply off by pressing the steam supply button (19) « » again.
••Switch the coffee maker off by pressing the on/off button (15) « », the indicator (16) «
 »
»
will go out.
Notes: - making the milk foam is an art. You may not make it at the first try, don’t worry and experiment until you achieve good results.
IM VT-1520.indd 5 |
8/23/19 5:00 PM |

ENGLISH
IMPORTANT:
–It is important that milk for making foam is fresh and without additives, is not so-called long storage milk. Take usual whole milk with fat status from 4% to 6%, cream fat status should be not less than 10%.
–Right after making frothed milk or cream clean the tip (7) – to do this put the tip
(7)into a glass of water, switch the steam supply on by pressing the button (19) « »
»
and turn the steam supply knob (4) « /
/
 » counterclockwise to release some steam. After that close the steam supply by turning the knob (4) «
 /
/
 » clockwise until bumping « » and switch the steam supply off by pressing the steam supply button (19) «
 », switch the coffee maker off.
–Wait until the coffee maker cools down and remove the tip (7) from the cappuccinator pipe (6), wipe the cappuccinator pipe (6) with
a soft damp cloth and wash the tip (7) under a water jet.
Notes:
–Repeated making of coffee should be performed after at least 5 min interval.
WARMING THE DRINKS
You can warm up your drinks by putting the cappuccinator pipe (6) without the tip (7) into the cup with the drink.
••Press the steam supply button (19) « », wait until the indicator (20) «
 » lights up.
••Put the cappuccinator pipe (6) without the tip (7) into the cup with the drink you want to
warm up, carefully turn the steam supply control knob (4) « /
/
 » counterclockwise.
••Close the steam supply by turning the knob
(4) « /
/
 » clockwise until bumping « ».
••Switch the steam supply off by pressing the steam supply button (19) « » again.
••Switch the coffee maker off by pressing the on/off button (15) « », the indicator (16) «
 »
»
will go out.
Notes: some water or steam may appear from the filter holder (12) or the steam nozzle, it is normal.
HOW TO MAKE A GOOD ESPRESSO
–Use fresh ground coffee for “espresso” coffee makers.
–Slightly tamp the ground coffee in the filter (11), you can do it with the back side of the measuring spoon (21).
6
–Coffee strength depends on the quality and grinding degree of coffee beans. If coffee is pouring out too long, this means the coffee powder is too fine or it is tamped too strongly.
DESCALING
For effective operation of the coffee maker we recommend removing scale every 2-3 months and when using “hard” water more often.
1.Make sure that all the control buttons (15, 17, 19) are in the off position.
2.Make sure that the steam supply is closed. To do this turn the knob (4) « /
/
 » clockwise until bumping « ».
3.Make citric acid solution: 2 teaspoons and 1 l of water and pour this solution into the water tank (3). Install the tank (3) back to its place.
4.Install the coffee filter (11) into the holder (12) having preliminary matched the ledge on the filter (11) with the groove on the holder (12) and turn the filter (11) counter/clockwise to fix the filter.
5.Install the filter holder (12) into the coffee maker. The holder (12) ledges should match
the grooves on the boiler «
 », after that turn the filter holder handle (14) to the right until bumping « ».
6.Place a suitable cup on the tray (8) grid (9).
7.Insert the power plug into the socket.
8.Switch the coffee maker on by pressing the
on/off button (15) « », the indicator (16) «
 » will light up.
9.Press the button (17) « » and fill a cup of about 100 ml capacity with water (it is necessary to drain the water from the boiler and fill the boiler with citric acid solution), switch the water supply off by pressing the button (17) «
 » again.
10.Wait until the indicator (18) « » lights up, then switch the water supply on by pressing the button (17) «
 » and fill a cup of about 100 ml capacity, press the button (17) «
 » again to switch the water supply off and pour the water out of the cup.
11.After a while repeat the procedure described in the paragraph 10 and fill the cup of about 100 ml capacity again.
12.Press the steam supply button (19) « », wait until the indicator (20) «
 » lights up. Put a suitable bowl under the tip (7) and slightly
open the steam supply by turning the knob
(4) « /
/
 » counterclockwise. Carefully turn the knob (4) «
 /
/
 » to the maximal steam
IM VT-1520.indd 6 |
8/23/19 5:00 PM |

ENGLISH
release position, release the steam for about 1 minute, then close the steam by turning the knob (4) « /
/
 » clockwise until bumping « » and switch the steam supply off by pressing the button (19) «
  ».
».
13.Switch the coffee maker off by pressing the
on/off button (15) « ». Wait for 10-15 minutes.
14.Perform the steps 10 and 11 at least 3 times.
15.Repeat the cleaning procedure for the steam release channels described in the paragraph 12.
16.With small intervals, repeat the boiler cleaning procedure (paragraph 10) until the citric acid solution dissolves in the tank (3) completely.
17.Switch the coffee maker off by pressing the on/off button (15) « ».
».
18.Fill the tank (3) with clear water up to the maximal mark, and repeat the steps 10, 12 not less than 3 times without the 10-15 minute break.
19.Switch the coffee maker off by pressing the on/off button (15) « ».
».
Notes:
–To remove the scale you can use special descaling agents for coffee makers and coffee machines, strictly following the instructions on their usage.
Troubleshooting
CLEANING
–Cleaning the filter (11): – you can wash the filter in a dishwashing machine. If the openings are blocked with the rest of ground coffee, you can clean them with a small brush. To remove the filter (11) from the holder (12) turn the filter (11) counter/clockwise until the ledge on the filter (11) appears in the groove of the holder (12), remove the filter (11) pulling upwards.
–Clean the coffee maker body (5) with a soft, damp cloth and then wipe it dry. Do not use metal brushes, abrasives and solvents.
–Do not immerse the coffee maker body (5), the power cord and the power plug into water or other liquids.
–Wash the removable parts (3, 11, 12, 21) of the coffee maker with warm water and mild detergent, then rinse them and dry.
Drip tray (8)
–A red pop-up indicator (10) in the tray (8) grid
(9)will show when the tray (8) is full.
–Remove the grid (9) from the tray (8), remove the tray (8) and pour out water, install the tray back to its place, put the grid (9) on the tray (8).
–If necessary, wash the tray (8) and the grid
(9)with water and soft detergent, rinse and dry.
Malfunction |
Cause |
Solution |
|
|
|
The coffee maker |
No voltage in the mains socket. |
Make sure that the mains socket is operat- |
can’t be switched |
The power plug is not completely |
ing. |
on |
inserted into the socket. |
Check whether the plug is completely |
|
|
inserted into the socket. |
|
|
|
Water leaks from |
The water tray is full. |
Pour the water out of the tray |
the lower part |
|
|
of the coffee maker |
|
|
|
|
|
Coffee leak- |
Untight connection of filter and |
Clean the edges of the filter. |
age from the filter |
boiler gasket, ground coffee got |
|
holder |
on the edges of the filter. |
|
|
|
|
Ready coffee has |
Wrong process of scale removal in |
See the chapters «Before using the unit», |
a foreign smell |
the coffee maker boiler |
«Descaling» and repeat them several times. |
|
Improper storage of coffee |
Use fresh ground coffee. Keep coffee in a |
|
|
dry cool place. |
|
|
|
Steam doesn’t froth |
Low temperature of outgoing |
Froth milk only after the indicator (20) lights |
milk |
steam. |
up. |
|
The tank is too big or of improper |
Use narrow high container for frothed milk. |
|
size. |
Use only whole milk with fat content 4-6%. |
|
You used skimmed milk |
|
|
|
|
7
IM VT-1520.indd 7 |
8/23/19 5:00 PM |
ENGLISH
FOR HOUSEHOLD USAGE ONLY
Does not contain spare parts.
DELIVERY SET
Coffee maker – 1 pc.
Filter holder – 1 pc.
Coffee filter – 1 pcs.
Measuring spoon – 1 pc.
Manual – 1 pc.
TECHNICAL SPECIFICATIONS
Power supply: 220-240 V ~ 50-60 Hz
Rated input power: 850 W
Water tank capacity: 1,5 L
RECYCLING
For environment protection do not throw out the unit and the batteries (if included), do not discard the unit and the batteries with usual household waste after the service life expiration; apply to specialized centers for further recycling.
The waste generated during the disposal of the unit is subject to mandatory collection and consequent disposal in the prescribed manner.
8
For further information about recycling of this product apply to a local municipal administration, a disposal service or to the shop where you purchased this product.
The manufacturer preserves the right to change design, structure and specifications not affecting general principles of the unit operation without a preliminary notification due to which insignificant differences between the manual and product may be observed. If the user reveals such differences, please report them via e-mail info@vitek.ru for receipt of an updated manual.
The unit operating life is 3 years
Guarantee
Details regarding guarantee conditions can be obtained from the dealer from whom the appliance was purchased. The bill of sale or receipt must be produced when making any claim under the terms of this guarantee.
This product conforms to the EMC Directive 2014/30/EU and to the Low Voltage Directive 2014/35/EU.
IM VT-1520.indd 8 |
8/23/19 5:00 PM |

РУССКИЙ
КОФЕВАРКА VT-1520
Кофеварка предназначена для варки кофе «ЭСПРЕССО» и приготовления кофе «КАПУЧИНО».
ОПИСАНИЕ
1.Площадка для подогрева чашек
2.Крышка ёмкости для воды
3.Съемная ёмкость для воды
4.Ручка регулятора подачи пара « /
/
 »
»
5.Корпус кофеварки
6.Трубка-капучинатор
7.Наконечник трубки-капучинатора
8.Поддон для капель
9.Решётка поддона для капель
10.Всплывающий индикатор заполнения поддона
11.Фильтр для кофе
12.Держатель фильтра
13.Удерживатель фильтра
14.Ручка держателя фильтра
15.Кнопка включения/выключения « »
»
16.Индикатор включения питания « »
»
17.Кнопка подачи воды « »
»
18.Индикатор готовности « »
»
19.Кнопка подачи пара « »
»
20.Индикатор готовности подачи пара « »
»
21.Мерная ложка с уплотнителем молотого кофе
ВНИМАНИЕ!
Для дополнительной защиты в цепи пита ния целесообразно установить устрой ство защитного отключения (УЗО) с номинальным током срабатывания, не превышающим 30 мА. Для установки УЗО обратитесь к специалисту.
РЕКОМЕНДАЦИИ ПО ЭКСПЛУАТАЦИИ И МЕРАМ БЕЗОПАСНОСТИ
••Перед использованием устройства внимательно ознакомьтесь с руководством по эксплуатации. Сохраняйте данное руководство в течение всего срока эксплуатации.
••Неправильное обращение с устройством может привести к его поломке, причинению вреда пользователю или его имуществу.
••Перед первым включением убедитесь в том, что рабочее напряжение кофеварки
9
соответствует напряжению в электрической сети.
••Сетевой шнур снабжён «евровилкой»; включайте её в электрическую розетку, имеющую надёжный контакт заземления.
••Во избежание риска возникновения пожара не используйте переходники при подключении кофеварки к электрической розетке.
••Используйте кофеварку только по её прямому назначению.
••Не используйте устройство вне помещений.
••Никогда не оставляйте и не храните кофеварку в помещениях с температурой ниже 0°C.
••Устанавливайте кофеварку на сухой ровной устойчивой поверхности, не ставьте устройство на край стола.
••Не ставьте кофеварку на горячие поверхности.
••Не используйте кофеварку в непосредственной близости от источников тепла, влаги или открытого пламени.
••Не допускайте, чтобы сетевой шнур свешивался со стола, а также следите, чтобы
он не касался горячих поверхностей
и острых кромок мебели.
••Соблюдайте осторожность во время работы с выходящим паром.
••Во избежание удара электрическим током не погружайте кофеварку, сетевой шнур или вилку сетевого шнура в воду или в любые другие жидкости.
••Используйте только принадлежности, входящие в комплект поставки.
••Не включайте кофеварку без воды.
••Используйте только чистую холодную воду, рекомендуется использовать воду, прошедшую дополнительную очистку бытовыми фильтрами для воды.
••Перед включением кофеварки убедитесь, что все съемные детали установлены правильно.
••Никогда не оставляйте работающую кофеварку без присмотра.
••Не дотрагивайтесь до сетевого шнура, вилки сетевого шнура, корпуса кофеварки мокрыми руками.
••Во избежание ожога не дотрагивайтесь до горячих поверхностей кофеварки (держатель фильтра, бойлер, трубка-капучи-
IM VT-1520.indd 9 |
8/23/19 5:00 PM |

РУССКИЙ
натор) в процессе приготовления кофе и сразу после выключения устройства.
••Дайте устройству полностью остыть перед снятием принадлежностей или чисткой.
••Запрещается снимать держатель фильтра во время работы кофеварки.
••Отключайте кофеварку от электрической сети перед чисткой или в случае, если вы устройством не пользуетесь.
••Отключая устройство от электрической сети, не тяните за сетевой шнур, а держитесь за вилку сетевого шнура.
••Из соображений безопасности детей
не оставляйте полиэтиленовые пакеты, используемые в качестве упаковки, без присмотра.
Внимание! Не разрешайте детям играть с полиэтиленовыми пакетами или упаковочной плёнкой. Опасность удушья!
•• Осуществляйте надзор за детьми, чтобы не допустить использования прибора
в качестве игрушки.
••Данное устройство не предназначено для использования детьми.
••Данное устройство не предназначено для использования лицами (включая детей) с пониженными физическими, психическими или умственными способностями или при отсутствии у них опыта или знаний, если они не находятся под контролем или не проинструктированы об использовании прибора лицом, ответственным за их безопасность.
••Запрещается пользоваться устройством при наличии каких-либо повреждений корпуса кофеварки, шнура питания или вилки сетевого шнура питания.
••При повреждении шнура питания его замену во избежание опасности должны производить изготовитель, сервисная служба или подобный квалифицированный персонал.
••Запрещается самостоятельно ремонтировать прибор. Не разбирайте прибор самостоятельно, при возникновении любых неисправностей, а также после падения устройства выключите прибор из электрической розетки и обратитесь в любой авторизованный (уполномоченный) сервисный центр по контактным адресам, указанным в гарантийном талоне и на сайте www.vitek.ru.
10
••Перевозите устройство только в заводской упаковке.
••Храните устройство в сухом прохладном месте, недоступном для детей и людей с ограниченными возможностями.
УСТРОЙСТВО ПРЕДНАЗНАЧЕНО ТОЛЬКО ДЛЯ БЫТОВОГО ИСПОЛЬЗОВАНИЯ В ЖИЛЫХ ПОМЕЩЕНИЯХ, ЗАПРЕЩАЕТСЯ КОММЕРЧЕСКОЕ ИСПОЛЬЗОВАНИЕ И ИСПОЛЬЗОВАНИЕ УСТРОЙСТВА В ПРОИЗВОДСТВЕННЫХ ЗОНАХ И РАБОЧИХ ПОМЕЩЕНИЯХ.
ПЕРЕД ПЕРВЫМ ИСПОЛЬЗОВАНИЕМ
После транспортировки или хранения устройства при пониженной температуре необходимо выдержать его при комнат ной температуре не менее трёх часов.
–Извлеките кофеварку из упаковки и удалите упаковочные материалы.
–Проверьте целостность устройства, при наличии повреждений не пользуйтесь
–устройством.
–Убедитесь в том, что рабочее напряжение кофеварки соответствует напряжению в электрической сети.
ПОДГОТОВКА К РАБОТЕ
••Убедитесь, что все кнопки управления (15, 17, 19) находятся в выключенном положении.
••Убедитесь, что подача пара закрыта, для
этого поверните ручку (4) « /
/
 » по часовой стрелке до упора « ».
••Перед первым использованием кофеварки промойте все съемные детали (3, 11, 12, 21) теплой водой и просушите.
••Перед включением убедитесь, что напряжение электрической сети соответствует напряжению, указанному на корпусе устройства.
••Снимите ёмкость (3), наполните ее холодной водой до отметки MAX и установите
на место.
Примечания:
–для наполнения ёмкости (3) можно приподнять крышку (2), откинуть её и налить в ёмкость (3) воду.
–запрещается использовать крышку (2) для переноски ёмкости (3).
IM VT-1520.indd 10 |
8/23/19 5:00 PM |
РУССКИЙ
••Вставьте фильтр для кофе (11) в держатель (12), предварительно совместите выступ на фильтре (11) с пазом на держателе фильтра (12) и поверните фильтр
(11)по или против часовой стрелке для фиксации.
••Установите держатель фильтра в кофеварку. Выступы держателя (12) должны
совпасть с пазами на бойлере «
 », после чего поверните ручку держателя фильтра (14) в правую сторону до упора « ».
••Поставьте подходящую чашку на решётку (9) поддона (8).
••Вставьте вилку сетевого шнура в розетку.
••Включите кофеварку нажатием кнопки
включения/выключения (15) « », при этом загорится индикатор (16) «
 ».
».
••Для заполнения водой бойлера нажмите кнопку (17) « » через 15-20 секунд или при первых признаках появления воды в чашке, выключите подачу воды, еще раз нажав на кнопку (17) «
 ».
».
••Дождитесь, когда загорится индикатор (18) « », после этого включите подачу воды, нажав кнопку (17) «
 », после заполнения чашки водой, еще раз нажмите кнопку (17) «
 » для выключения подачи воды, слейте воду из чашки.
••В зависимости от объёма чашки проведите эту процедура несколько раз, после этого бойлер будет промыт.
ВНИМАНИЕ!
–Запрещается снимать держатель фильтра (12) при нажатых кнопках (17), (19)
–Не снимайте держатель фильтра (12) сразу же после приготовления кофе, так как внутри фильтра может быть избыточное давление воды и пара, дождитесь остывания кофеварки.
–Для снятия держателя фильтра (12) повер-
ните ручку (14) в левую сторону «
 » и снимите держатель фильтра (12).
ПРИГОТОВЛЕНИЕ КОФЕ ЭСПРЕССО
••Убедитесь, что все кнопки управления (15, 17, 19) находятся в выключенном положении.
••Убедитесь, что подача пара закрыта, для этого поверните ручку (4) « /
/
 » по часовой стрелке до упора « ».
11
••Снимите ёмкость (3), наполните ее холодной водой до отметки MAX и установите на место.
Примечания:
–для наполнения ёмкости (3) можно приподнять крышку (2), откинуть её и налить в ёмкость (3) воду.
–запрещается использовать крышку (2) для
переноски ёмкости (3).
••Вставьте фильтр для кофе (11) в держатель (12), предварительно совместите выступ на фильтре (11) с пазом на держателе фильтра (12) и поверните фильтр (11) по/против часовой стрелке для фиксации.
••Насыпьте молотый кофе в фильтр (11), слегка утрамбуйте молотый кофе обратной стороной мерной ложки (21).
••Установите держатель фильтра (12) в кофеварку. Выступы держателя (12) должны совпасть с пазами на бойлере
«
 », после чего поверните ручку держателя фильтра (14) в правую сторону до упора « ».
••Поставьте одну или две чашки на решётку (9) поддона (8).
••Вставьте вилку сетевого шнура в розетку.
••Включите кофеварку нажатием кнопки
включения/выключения (15) « », при этом загорится индикатор (16) «
 ».
».
••Дождитесь, когда загорится индикатор (18) « », кофеварка готова для варки кофе.
••Включите подачу воды, нажав кнопку (17) « », следите за процессом наполнения чашки приготовленным кофе, еще раз нажмите кнопку (17) «
 » для выключения подачи воды.
••Отключите кофеварку, нажав кнопку
включения/выключения (15) « », индикатор (16) «
 » погаснет.
••Дождитесь остывания кофеварки и снимите держатель фильтра (12), повернув
ручку (14) в левую сторону «
 ». Удалите остатки молотого кофе и промойте фильтр (11).
••Для удобства при удалении остатков
кофе используйте удерживатель (13), с помощью которого можно зафиксировать фильтр (11) от выпадения из держателя (12).
IM VT-1520.indd 11 |
8/23/19 5:00 PM |
 Loading...