


Installation Guide
Beverage Faucet and Optional Water Filtration
System
K-6665, K-6665-F |
|
K-6666, K-6666-F |
M product numbers are for Mexico (i.e. K-12345M)
Los números de productos seguidos de
M corresponden a México (Ej.
K-12345M)
Français, page “Français-1”
Español, página “Español-1”
1015061-2-G

Thank You For Choosing Kohler Company
We appreciate your commitment to Kohler quality. Please take a few minutes to review this manual before you start installation. If you encounter any installation or performance problems, please don’t hesitate to contact us. Our phone numbers and website are listed on the back cover. Thanks again for choosing Kohler Company.
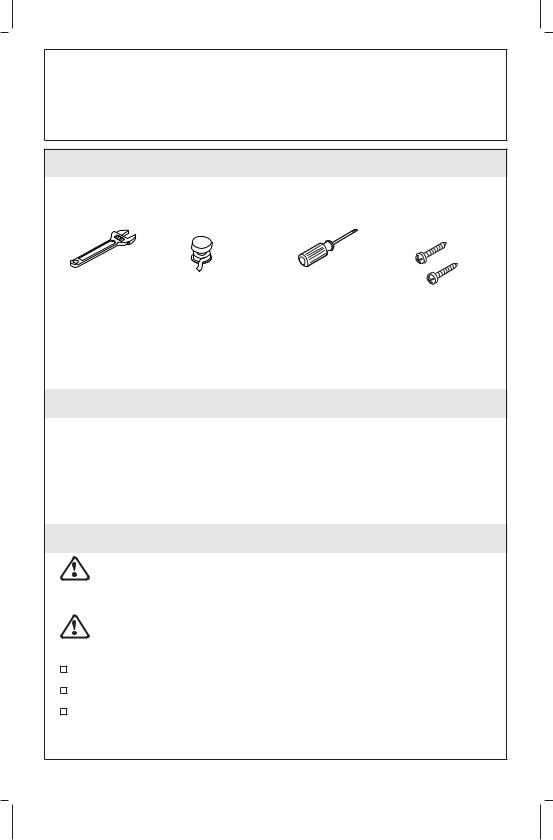
Tools and Materials
Adjustable |
Thread |
Phillips |
|
Wrench |
Sealant Tape |
Screwdriver |
Screws |
Before You Begin
CAUTION: Risk of property damage. Do not install the unit where the temperature may drop below freezing, may be exposed to direct sunlight, or may be exposed to heat.
CAUTION: Risk of personal injury or property damage. Use caution when installing near water pipes or electrical lines.
Observe all local plumbing and building codes.
Shut off the main water supply.
If possible, install the faucet before installing the sink.
Inspect the hoses for any sign of damage. Replace if necessary.
Install the water filtration system to a cold water supply only. Do not install the water filtration system to a hot water supply.
If needed, clean the exterior of the unit with mild soap and water.
Do not use chemical cleaners.
The water filtration system must be mounted vertically.
Do not use this water filter system with a standard faucet that uses hot and cold inlets. A single inlet faucet, such as a Kohler beverage faucet, must be used.
1015061-2-G |
2 |
Kohler Co. |

Before You Begin (cont.)
The water filtration system is designed to be installed under a sink. Make sure that the bottom of the filter cartridge is at least 2″ (5.1 cm) from the floor of the cabinet.
Do not connect the water filtration system to a dishwasher.
Do not install the water filtration system to a water line with more than 125 psi (862 kPa).
To ensure that this equipment is functioning properly and effectively, replace the filter components after 10 years. Replacement date:___________
Retain this installation guide for future use.
Kohler Co. reserves the right to make revisions in the design of faucets without notice, as specified in the Price Book.
Kohler Co. |
3 |
1015061-2-G |
|
|
Faucet |
|
|
|
Hose |
Stud |
Faucet |
|
|
|
Stud |
|
|
|
Bottom |
|
|
|
|
|
|
|
Hose |
Escutcheon |
|
Sink Hole |
|
|
|
|
|
(Contemporary |
Bracket |
Nut |
O-Ring |
Only) |
|
|
|
|
||
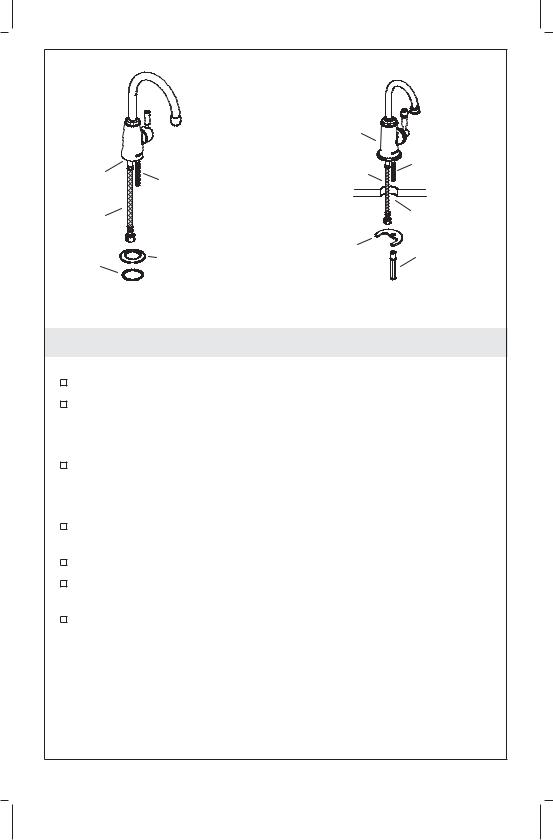
Contemporary Faucet |
Traditional Faucet |
||
1. Install the Faucet Body
Contemporary Faucet
Install the O-ring into the groove in the bottom of the escutcheon.
Slide the escutcheon over the hose and stud so it rests against the faucet bottom.
Traditional Faucet
Install the O-ring into the groove in the bottom of the faucet body.
All Installations
Position the hose and stud through the sink hole and position the faucet over the sink hole.
From under the sink, slide the hole in the bracket onto the stud.
Tighten the nut against the bracket to secure the faucet body to the sink.
If you are not installing the optional water filtration system, proceed to the ″Connect the Supply″ section of this guide.
1015061-2-G |
4 |
Kohler Co. |

Screws |
Hoses |
Hex
Nipples
Inlet |
Mounting |
Bracket |
Filter
Head  Outlet Apply thread sealant tape.
Filter Head
2. Assemble the Water Filtration System
Inspect the plumbing and supplies for damage. Replace or repair as needed.
Write the system replacement date on the filter head label. This is the installation date plus ten years.
Place the mounting bracket over the port marked ″OUTLET″ on the filter head.
Attach the mounting bracket to the filter head using the screws provided. Do not overtighten.
NOTE: Apply four layers (four turns) of thread sealant tape to the threads of each nipple to ensure a tight seal.
Apply four layers of thread sealant to the threads below each nipple hex.
NOTE: Do not overtighten the nipple hex. The nipple hex should not make contact with the filter head.
Thread the taped end of each nipple into the inlet and outlet port of the filter head until finger tight plus one turn maximum. The nipple hex should not make contact with the filter head.
Kohler Co. |
5 |
1015061-2-G |

Screws
(Not Supplied)
Mounting
Bracket
3. Mounting the Water Filtration System
CAUTION: Risk of property damage. Do not install the unit where the temperature may drop below freezing, may be exposed to direct sunlight, or may be exposed to heat.
CAUTION: Risk of personal injury or property damage. Use caution when installing near water pipes or electrical lines.
IMPORTANT! The unit must be mounted vertically.
IMPORTANT! The mounting location of the water filtration system is critical. Verify the following before mounting: the bottom of the filter cartridge will be at least 2″ (5.1 cm) from the floor of the cabinet, the system will not interfere with other items under the counter, and the hoses will not be under tension when installed to the ports on the filter head.
Align the mounting holes of the mounting bracket at the determined location.
Mark the mounting hole locations with a pencil. Set the unit aside.
Pre-drill the holes, if necessary.
Partially thread the screws into the cabinet wall and slide the mounting bracket over the screws.
Secure the screws into the cabinet wall.
1015061-2-G |
6 |
Kohler Co. |

Cap
O-Rings
Write the date on the cartridge label.
Filter Head
Groove |
Cartridge |
4. Install the Water Filtration Cartridge
Write the installation date on the new filter cartridge label.
Remove and discard the cap from the cartridge.
Inspect the cartridge for damage.
Verify both O-rings are present and positioned correctly in the grooves.
Moisten the O-rings with water. Do not use petroleum products to lubricate the O-rings.
Align the groove in the top of the cartridge with the word ″OFF″ on the filter head.
Insert the top of the cartridge into the filter head and turn the cartridge counterclockwise 90° until hand-tight.
Kohler Co. |
7 |
1015061-2-G |

Adapter |
|
Inlet Hose |
|
|
Faucet |
Cold |
Inlet Hose |
|
|
Water |
Outlet |
Supply |
|
|
Hose |
|
Cartridge |
5. Connect the Supply
For installations using the water filtration system:
NOTE: The hoses must be connected as directed. Do not reverse the connections.
Using the provided adapter, connect the outlet hose from the outlet port on the filter head to the faucet inlet.
Connect the inlet hose from the inlet port on the filter head to the cold water supply.
For installations not using the water filtration system:
NOTE: The faucet inlet hose will connect directly to a 3/8″ male compression fitting.
Connect the faucet inlet hose to the cold water supply.
6. Installation Checkout
Turn on the main water supply and check for leaks. Repair as needed.
1015061-2-G |
8 |
Kohler Co. |
Installation Checkout (cont.)
If the optional water filtration system has been installed using the K-203 filter, run the faucet for ten minutes to remove any air in the system. For all other filters, run the faucet for two minutes. Any air left in the system may temporarily cause the water to be cloudy. If the optional water filtration system has not been installed, run water through the faucet for one minute to remove any debris.
Kohler Co. |
9 |
1015061-2-G |
Guide d’installation
Robinet de fontaine et système optionnel de filtration d’eau
Outils et matériels
|
Ruban d'étanchéité |
Tournevis |
|
Clé à molette |
pour tige filetée |
cruciforme |
Vis |
Merci d’avoir choisi la compagnie Kohler
Nous apprécions votre engagement envers la qualité Kohler. Veuillez prendre s’il vous plaît quelques minutes pour lire ce manuel avant de commencer l’installation. Ne pas hésiter à nous contacter en cas de problème d’installation ou de fonctionnement. Nos numéros de téléphone et notre adresse du site internet sont au verso. Merci encore d’avoir choisi la compagnie Kohler.
Avant de commencer
ATTENTION : Risque d’endommagement du matériel. Ne pas installer l’unité où la température pourrait baisser en dessous du seuil du gel, peut être exposée à la lumière du soleil, ou à la chaleur.
ATTENTION : Risque de blessures ou d’endommagement du produit. Porter une attention particulière lors de l’installation près de conduites d’eau et de câbles électriques.
Respecter tous les codes de plomberie et de bâtiment locaux.
Couper l’alimentation d’eau principale.
Si possible, installer le robinet avant d’installer l’évier.
Kohler Co. |
Français-1 |
1015061-2-G |
 Loading...