


Installation and Care Guide
Bath/Deck-Mount Valve
K-300
M product numbers are for Mexico (i.e. K-12345M) Los números de productos seguidos de
M corresponden a México (Ej. K-12345M)
Français, page “Français-1” Español, página “Español-1”
1275145-2-A
Before You Begin
These instructions detail both finished deck or rim, and rough deck installations. Follow only the instructions for your particular installation.
Observe all local plumbing and building codes.
Supply 1/2″ nominal (5/8″ OD) copper tubing.
Shut off the water supply.
Provide an access panel for servicing the valves.
Instructions are given for installations with 8″ (203 mm) centers. For wider installations, adjust all roughing-in dimensions and copper tube lengths accordingly. If the spout is to be installed more than 24″ (610 mm) from the valves, Kohler Co. recommends installing a Sioux Chief 652-AD vacuum breaker arrestor. Install the vacuum breaker arrestor close to the outlet ports of the valves. For more information, contact Sioux Chief at www.siouxchief.com.
Products purchased separately may change the valve placement and alignment.
Leave the protective guard on the spout supply tube until the spout installation. This is an O-ring sealing surface which may be damaged if left unprotected.
Plaster guard diameters are approximately 1-5/8″ (41 mm) for the valve bodies, and 7/8″ (22 mm) for the spout.
The installed finished deck material must fit closely to the plaster guard diameters.
1275145-2-A |
2 |
Kohler Co. |

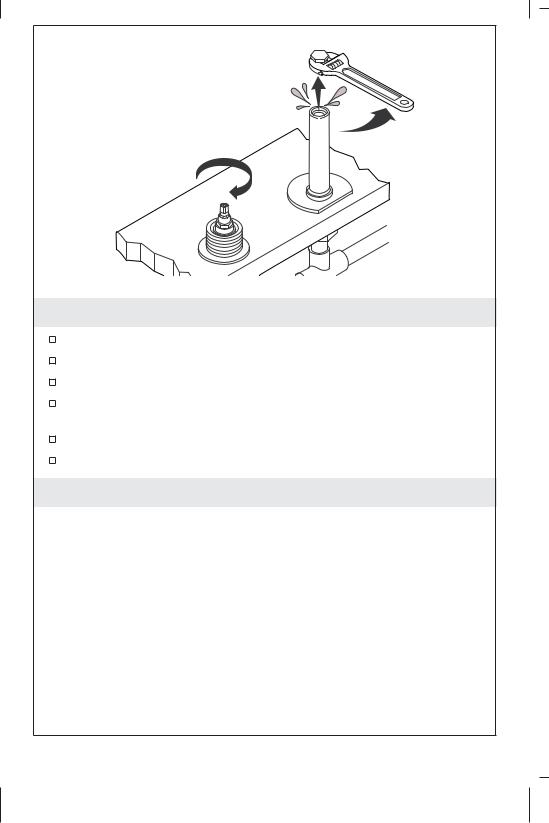
Tools and Materials
|
|
Plus: |
|
|
|
• Drill and Bits |
|
|
|
• Hole Saw |
|
|
|
• 1/2" Exterior Grade Plywood |
|
|
|
(Rim-Mount Installations) |
|
|
|
• 1/2" Nominal (5/8" OD) Copper |
|
Propane Torch Solder |
Rags |
Tubing |
|
• Common Tools and Materials |
|||
|
|
Kohler Co. |
3 |
1275145-2-A |
4" (102 mm) |
1/2" |
|||
(13 mm) |
||||
|
|
|
|
|
|
Spout |
|
Finished |
Supply Tube |
|
Centerline |
||
Material |
||
|
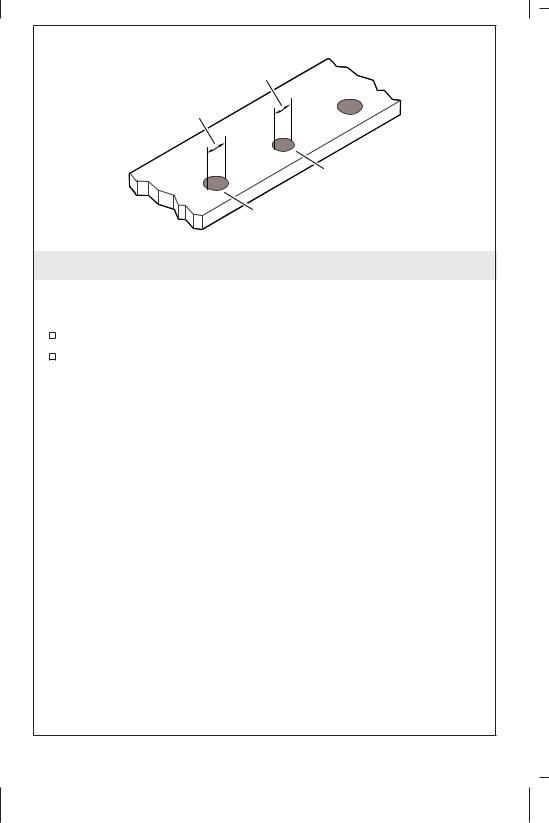
1. Prepare the Site
IMPORTANT! Verify that the hole locations will not interfere with drain connections or other accessories.
Plan for one spout supply hole and two valve body holes.
Locate the valve body holes 4″ (102 mm) away from the spout supply tube centerline. For wider installations, adjust this measurement accordingly.
1275145-2-A |
4 |
Kohler Co. |
2-1/16" (52 mm) Max - |
Finished Material |
|
1-13/16" (46 mm) Min |
||
1-1/8" (29 mm) Max |
||
|
 Rough Deck
2-1/8" (54 mm) Max -  1/2" (13 mm) Min
 Rough Deck
|
|
|
|
|
|
|
1-15/16" |
(49 mm) Max - |
|
|
|
|
Finished |
||||||||||
Rim |
1-13/16" |
(46 mm) Min |
|
|
|
|
Deck |
||||||||||||||||
|
|
|
|
|
|
|
|
|
|
|
|
|
|
|
|
|
|
|
|
|
|
|
|
|
|
|
|
|
|
|
|
|
|
|
|
|
|
|
|
|
|
|
|
|
|
|
|
|
|
|
|
|
|
|
|
|
|
|
|
|
|
|
|
|
|
|
|
|
|
|
|
|
|
|
|
|
|
|
|
|
|
|
|
|
|
|
|
|
|
|
|
|
|
|
|
|
|
|
|
|
|
|
|
|
|
|
|
|
|
|
|
|
|
|
|
|
|
|
|
|
|
|
|
|
|
|
|
|
|
|
|
|
|
|
|
|
|
|
|
|
|
|
|
|
|
|
|
|
|
|
|
|
|
|
|
|
|
|
|
|
|
|
|
|
|
|
|
|
|
|
|
|
|
|
|
|
|
|
|
|
|
|
|
|
|
|
|
|
|
|
|
|
|
|
|
|
|
|
|
|
|
|
|
|
|
|
|
|
|
|
|
|
|
|
|
|
3-3/8" |
1/2" (13 mm) |
(86 mm) Max - |
Plywood Reinforcement |
1/4" (6 mm) Min |
Rim Mount |
Finished Deck |
|
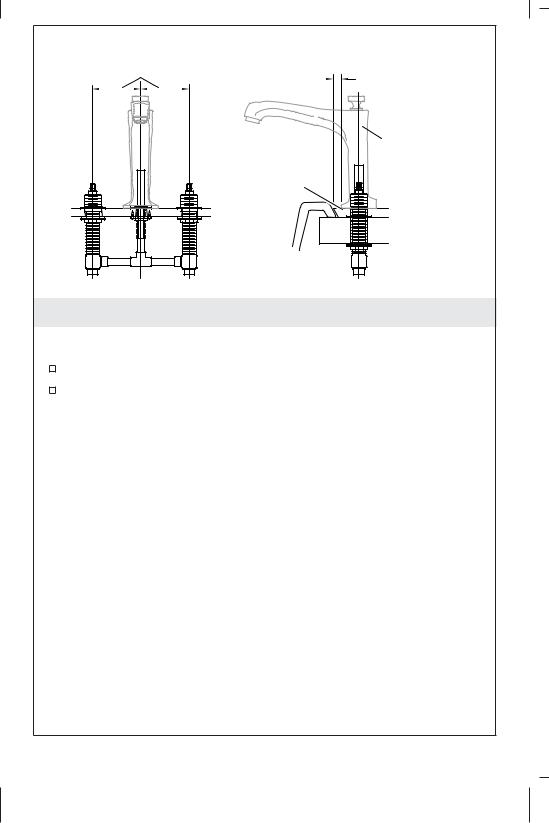
2. Determine the Valve Height
Plan for the required valve height according to your installation.
Kohler Co. |
5 |
1275145-2-A |

|
Finished |
Rim |
Deck |
|
|
1/4" (6 mm) |
1/4" (6 mm) |
Min |
Min |
1/2" (13 mm) Exterior Grade Plywood
3. Add Reinforcement (If Applicable)
Finished-Deck or Rim-Mount Installation
NOTICE: Plywood is required for rim-mount installations to secure the spout supply tube. Follow the bath instructions to correctly cut and position the plywood.
NOTICE: Make sure the plywood will not interfere with other plumbing connections or installation of the bath.
Install 1/2″ (13 mm) exterior grade plywood if the finished deck or rim is less than 1/2″ (13 mm) thick, or if the faucet will be installed directly to the bath rim.
1275145-2-A |
6 |
Kohler Co. |
Ø 1-1/8"
(29 mm) Max
Ø 1-1/2"
(38 mm) Max
Spout Hole
Valve Hole
4. Drill the Holes
NOTE: Ensure that the holes are not oversized. The spout and valve bodies require adequate base material strength and maximum contact area with the deck.
Drill a 1-1/8″ (29 mm) spout hole. Do not exceed this hole size.
Drill two 1-1/2″ (38 mm) valve body holes, one on either side of the spout hole. Do not exceed this hole size.
Kohler Co. |
7 |
1275145-2-A |

3/8" Pipe Plug
Plaster
Guard
Supply
Tube
Washer
Washer
Nut
Plate
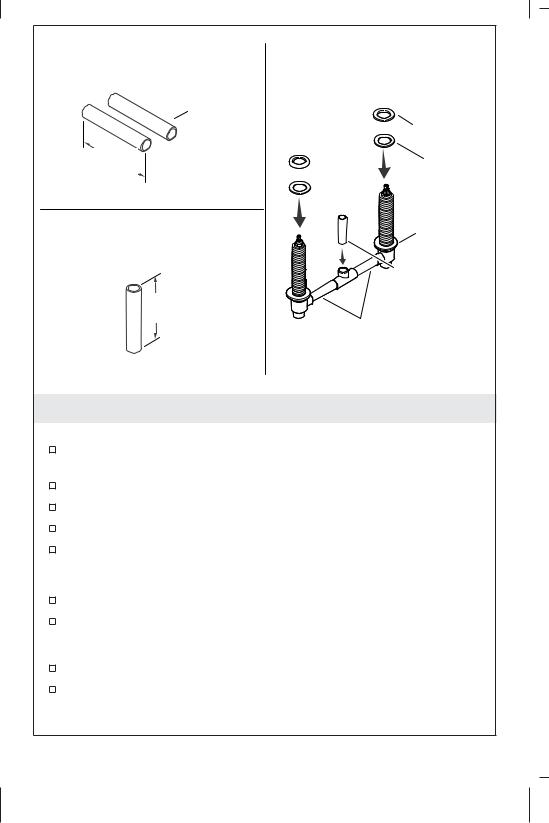
5. Install the Supply Tube
NOTE: Do not remove the plaster guard from the supply tube. Install a 3/8″ pipe plug into the supply tube, and wrench tighten.
Insert the supply tube through the washer, with the flat portion of the washer facing the bath interior.
Insert the supply tube through the spout hole.
From underneath, slide the plate (oriented with the tabs up) onto the supply tube.
Secure the plate with the screws.
Thread the washer and nut onto the supply tube.
Wrench tighten the nut.
1275145-2-A |
8 |
Kohler Co. |
Copper
Tubing
Rubber
Washer
2-7/8"
(73 mm) 
 Fiber Washer
|
Mounting |
For Finished-Deck or |
Nut |
Rim-Mount Only |
|
|
2-3/8" (60 mm) |
2-3/8" |
Copper Tubing |
|
|
(60 mm) |
2-7/8" (73 mm) |
|
|
|
Copper Tubing |
6. Install the Valve Bodies
NOTE: Do not solder the connections at this time.
Cut two 2-7/8″ (73 mm) pieces of copper tubing. For wider installations, adjust this length accordingly.
Connect the copper tubing and tee to the valve body assembly.
Thread a mounting nut all the way down each valve body.
Slide a fiber washer, then a rubber washer down each valve body.
Insert the valve bodies up through the mounting holes so the valve body marked ″COLD″ is on the right when facing the faucet.
Temporarily hold the valve bodies in place.
For rough-deck installation proceed to ″Install the Tubing.″
Finished-Deck or Rim-Mount Only
Cut one 2-3/8″ (60 mm) piece of copper tubing.
Insert the copper tubing into the tee and the supply tube.
Kohler Co. |
9 |
1275145-2-A |
Sleeve
Collar
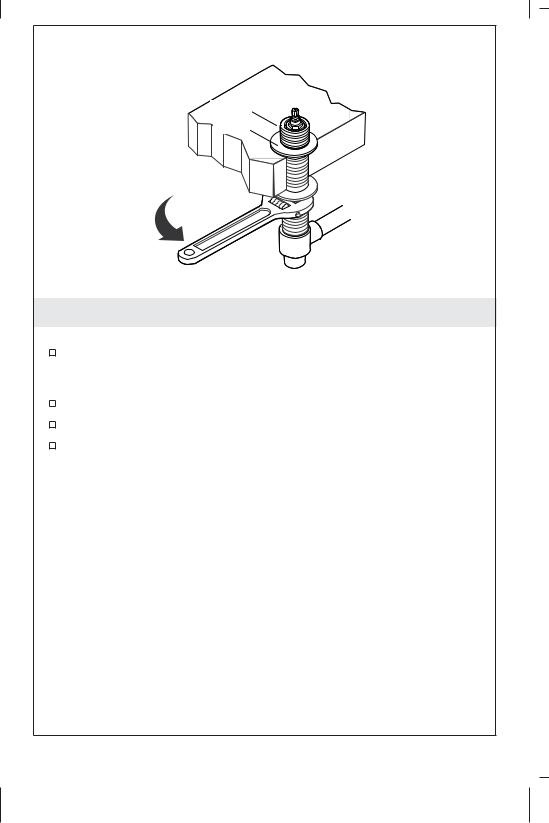
7. Secure the Valve Bodies
Finished-Deck or Rim-Mount Installation
Thread the collars down the valve bodies so the exposed valve height is correct for your installation. Refer to the ″Determine the Valve Height″ section.
Wrench tighten the mounting nuts to secure the valve bodies.
Thread the sleeves down the valve bodies.
Proceed to ″Solder the Connections.″
1275145-2-A |
10 |
Kohler Co. |
Supply |
Valve Height |
|
2-1/16" |
||
Tube |
||
(52 mm) Max |
||
|
||
|
1-13/16" |
|
Sleeve |
(46 mm) Min |
|
|
||
Collar |
|
|
|
Finished |
|
|
Material |
|
X |
Thickness |
 X +
X +
 1" (25 mm)
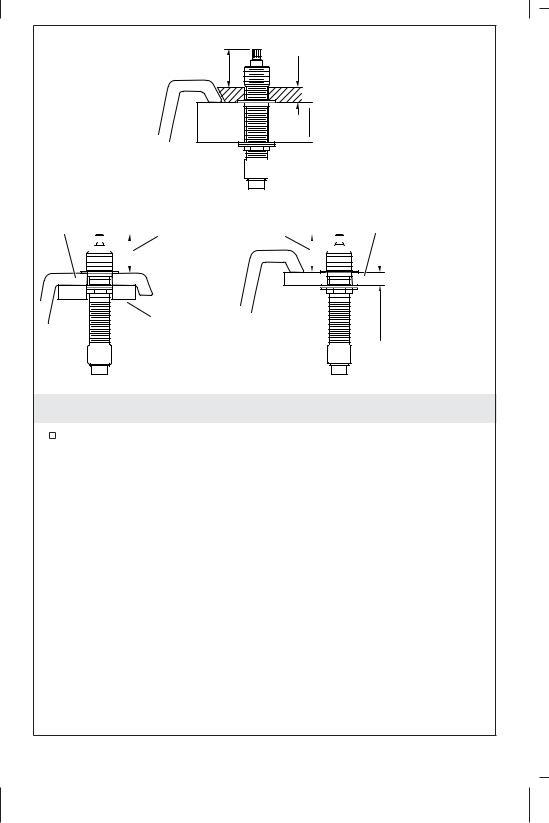
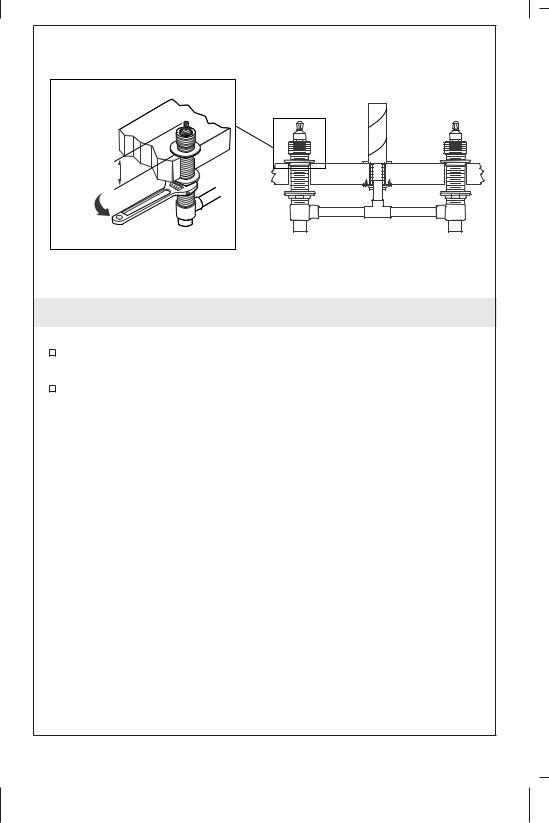
8. Install the Tubing
Rough-Deck Installation Only
Thread the collars down the valve bodies so the exposed valve height is correct for your installation.
Measure gap ″X″ as shown above.
Cut a copper tube to a length of X plus 1″ (25 mm).
Insert the copper tube into the supply tube and tee.
Kohler Co. |
11 |
1275145-2-A |
Valve
Height
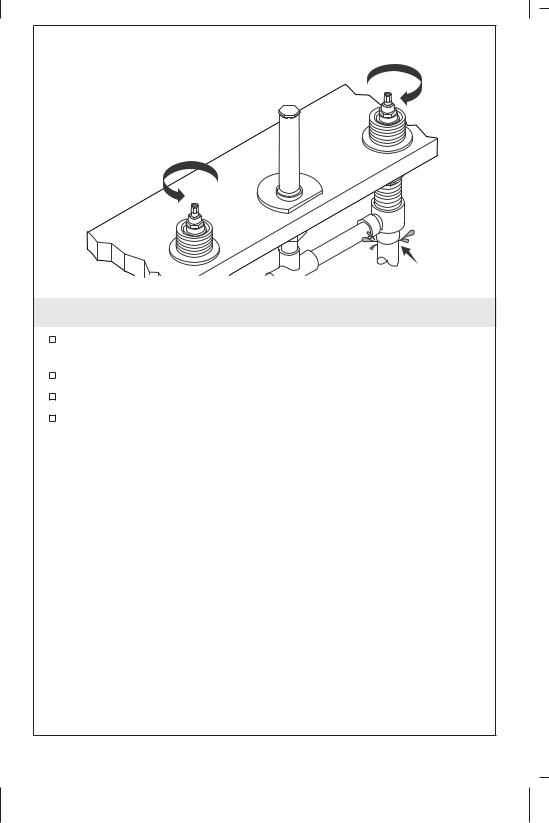
9. Secure the Valve Bodies
Rough-Deck Installation Only
Verify the required valve height determined earlier. Refer to the ″Install the Tubing″ section.
Tighten the mounting nuts to secure the valve bodies.
1275145-2-A |
12 |
Kohler Co. |

Cold Supply
Hot Supply
Solder
10. Solder the Connections
All Installations
Ensure that the cold supply is on the right side when facing the front of the faucet.
Solder the copper tubing connections.
Finished-Deck or Rim-Mount Installation
Remove and discard the plaster guard.
Proceed to ″Check the Installation″ to complete the installation.
Kohler Co. |
13 |
1275145-2-A |

11. Install Tile (If Applicable)
Rough-Deck Installation Only
Install the plaster guards over both valves.
Install the tile up to the plaster guards.
Remove and discard the plaster guards.
1275145-2-A |
14 |
Kohler Co. |

Cold
Supply
Hot
Supply
12. Check the Installation
Close the hot valve by turning it clockwise.
Close the cold valve by turning it counterclockwise.
Turn on the water supplies, and check for leaks.
Kohler Co. |
15 |
1275145-2-A |
13. Check for Leaks
Make sure a 3/8″ pipe plug is securely installed in the supply tube.
Open the hot valve by turning it fully counterclockwise.
Open the cold valve by turning it fully clockwise.
Check the complete installation for any leaks. Repair as needed.
1275145-2-A |
16 |
Kohler Co. |
Cover the pipe plug with a rag before loosening.
14. Complete the Installation
Close the hot valve.
Close the cold valve.
Turn off the water supplies.
Position a rag over the pipe plug, and carefully loosen it to release water pressure.
Remove the pipe plug.
Install the faucet trim according to the faucet trim instructions.
Warranty
KOHLER® Faucet Lifetime Limited Warranty
Kohler Co. warrants its Faucets* manufactured after January 1, 1997, to be leak and drip free during normal residential use for as long as the original consumer purchaser owns his or her home. If the Faucet should leak or drip during normal use, Kohler Co. will, free of charge, mail to the purchaser the cartridge necessary to put the Faucet in good working condition. This warranty applies only to Kohler Faucets installed in the United States of America, Canada or Mexico (″North America″).
Kohler Co. also warrants all other aspects of the faucet or accessories (″Faucet″)*, (except gold, non-Vibrant®, non-chrome finishes) to be free of defects in material and workmanship during normal residential use for as long as the original consumer purchaser owns his or her home. This warranty applies only to Kohler Faucets installed in North
Kohler Co. |
17 |
1275145-2-A |

Warranty (cont.)
America. If a defect is found in normal residential use, Kohler Co. will, at its election, repair, provide a replacement part or product, or make appropriate adjustment. Damage to a product caused by accident, misuse, or abuse is not covered by this warranty. Improper care and cleaning will void the warranty**. Proof of purchase (original sales receipt) must be provided to Kohler Co. with all warranty claims. Kohler Co. is not responsible for labor charges, installation, or other incidental or consequential costs. In no event shall the liability of Kohler Co. exceed the purchase price of the Faucet.
If the Faucet is used commercially or is installed outside of North America, or if the finish is gold, non-Vibrant or a painted or powder coated color finish, Kohler Co. warrants the Faucet to be free from defects in material and workmanship for one (1) year from the date the product is installed, under Kohler Co.’s standard one-year limited warranty.
If you believe that you have a warranty claim, contact Kohler Co., either through your Dealer, Plumbing Contractor, Home Center or E-tailer, or by writing Kohler Co., Attn.: Customer Care Center, 444 Highland Drive, Kohler, WI 53044, USA. Please be sure to provide all pertinent information regarding your claim, including a complete description of the problem, the product, model number, color, finish, the date the product was purchased and from whom the product was purchased. Also include your original invoice. For other information, or to obtain the name and address of the service and repair facility nearest you, call 1-800-4-KOHLER (1-800-456-4537) from within the USA and Canada, and 001-800-456-4537 from within Mexico, or visit www.kohler.com within the USA, www.ca.kohler.com from within Canada, or www.mx.kohler.com in Mexico.
KOHLER CO. AND/OR SELLER ARE PROVIDING THESE WARRANTIES IN LIEU OF ALL OTHER WARRANTIES, EXPRESSED OR IMPLIED, INCLUDING BUT NOT LIMITED TO THE IMPLIED WARRANTIES OF MERCHANTABILITY AND FITNESS FOR A PARTICULAR PURPOSE. KOHLER CO. AND/OR SELLER DISCLAIM ALL LIABILITY FOR SPECIAL, INCIDENTAL OR CONSEQUENTIAL DAMAGES. Some states/provinces do not allow limitations of how long an implied warranty lasts or the exclusion or limitation of such damages, so these limitations and exclusions may not apply to you. This warranty gives the consumer specific legal rights. You may also have other rights that vary from state/province to state/province.
This is Kohler Co.’s exclusive written warranty.
*Trend® faucets, MasterShower® tower, BodySpa systems and
1275145-2-A |
18 |
Kohler Co. |
 Loading...