


KOHLER K-2184, K-2199, K-2217, K-2220, K-2264 Installation Manual
...R
COUNTERTOP LAVATORIES WITHOUT FAUCET DECK
BEFORE YOU BEGIN
Carefully read these instructions before you attempt to remove your old lavatory. Before installing your new lavatory, make sure you have the proper materials necessary to complete the job. This will help you avoid costly mistakes.
Do not install this lavatory on a glass countertop. The weight of the lavatory may damage the glass.
Your new Kohler fixture has been designed for installation using common tools.
K-2184 . . . . . . . . . . . . . . . . . . . . . . . . . . . . . . . . . Chenillet K-2199 . . . . . . . . . . . . . . . . . . . . . . . . . . . . . . . . . Cantatat K-2217 . . . . . . . . . . . . . . . . . . . . . . . . . . . . . . . . . . . . Liniat K-2220 . . . . . . . . . . . . . . . . . . . . . . . . . . . . . . . . . Vintaget K-2264 . . . . . . . . . . . . . . . . . . . . . . . . . . . . . Centerpiecet K-2292 . . . . . . . . . . . . . . . . . . . . . . . . . . . . . . . . . . Intaglior K-2298 . . . . . . . . . . . . . . . . . . . . . . . . . . . . . . . Compasst K-2332 . . . . . . . . . . . . . . . . . . . . . . . . . . . . . . WaterCovet K-14156 . . . . . . . . . . . . . . . . . . . . . . . . . . . . . . . . Garlandt K-14170-RB . . . . . . . . . . . . . . . . . . . . . . . . . . . Provincialt K-14173 . . . . . . . . . . . . . . . . . . . . . . Fables and Flowerst K-14234-BT . . . . . . . . . . . . . . . . . . . . . . Botanical Studyt K-14234-SP . . . . . . . . . . . . . . . . . . . . Serpentine Bronzet K-14246-AC . . . . . . . . . . . . . . . . . . . . . . . Ocellus Citront K-14246-AS . . . . . . . . . . . . . . . . . . . . . . Ocellus Skylightt K-14270-PS . . . . . . . . . . . . . . . . . . . . . . Peonies and Ivyt
K-14271-WF . . . . . . . . . . . . . . . . . . . . . . . Prairie Flowerst K-14272-BR . . . . . . . . . . . . . . . . . . . . . . . Briar Rose Floral
K-14272-P . . . . . . . . . . . . . . . . . . . . . . . . . . . . . Pheasantt K-14272-TF . . . . . . . . . . . . . . . . . . . . . . . . . . . . . Ankarast
Materials required:
D PLUMBERS PUTTY
D NEW FAUCET(OPTIONAL)
D SHUT-OFF VALVES(OPTIONAL)
D SAFETY GLASSES
Before you remove your old fixture, unpack the new lavatory and carefully inspect it for any damage that may have occured. Vitreous china and enameled cast iron may chip, and you do not want to discover damage after the unit has been installed. Until you are ready to begin installation, set the lavatory back in the original packing carton to prevent damage.
Make sure you have a cut-out template to aid you in locating your faucet centerline on the countertop, and in cutting out your countertop.
Tools required:
D |
PUTTY KNIFE |
D |
ADJUSTABLE WRENCH |
D SABER OR KEYHOLE SAW |
|
D |
PIPE WRENCH |
D |
TUBING CUTTER |
D |
SCREWDRIVER |
D |
HACKSAW |
D |
RULER |
D |
PENCIL |
D |
DRILL |
D |
1/2” DRILL BIT |
D |
1-3/16” HOLE SAW |
D 1-3/8” HOLE SAW (FOR WIDESPREAD FAUCETS) D CUT-OUT TEMPLATE (FURNISHED WITH FIXTURE)
1007251-2-B
Français, Page 6 |
E2003 Kohler Co. |
|
Español, Página 11 |
||
|
LOCATING THE FAUCET CENTERLINE
This lavatory is a unique installation with the faucet fittings mounted on the countertop rather than on the lavatory itself.
The best location of the faucet centerline is determined by three items: the size of the fitting or faucet spout escutcheons, length of faucet spout, and clearance between the faucet spout and lavatory rim.
FAUCET LOCATION
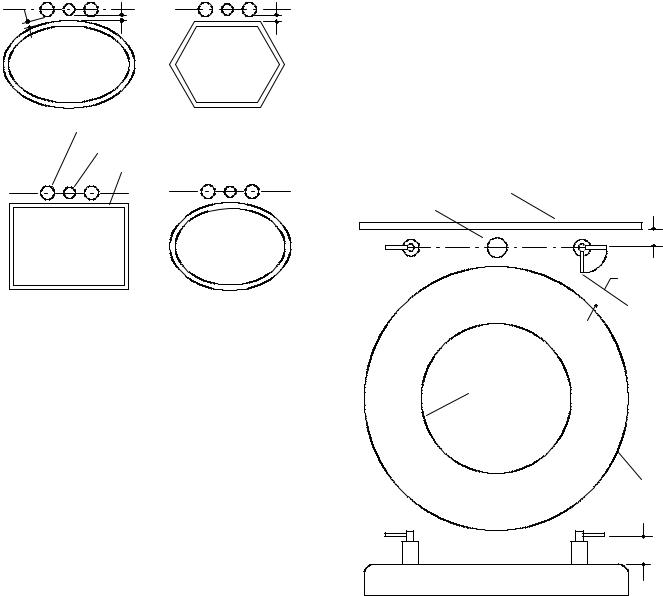
1.Refer to Fig. #1 . Determine if the faucet spout escutcheon or
faucet handle escutcheon will be closer to the lavatory rim when installed. Items to consider are the sizes of the different faucet components and the lavatory shape. The escutcheon found to be closest to the lavatory rim will be used in step 2.
X |
X |
X |
Faucet Handle Escutcheon
Faucet Spout Escutcheon
Lavatory Rim
Fig. #1
2. Measure the escutcheon, front-to-back, that was found to be
closest to the rim in step 1. This escutcheon measurement may also be found on the faucet roughing-in page.
3. Divide the front-to-back dimension in half, and add 1/4”.
Standard sizes are shown in the chart on the next page. The distance found will be used to draw the preliminary faucet centerline.
NOTE: For all front to back dimensions, round up to the nearest 1/16” (2mm) if required.
FRONT TO |
DISTANCE TO DRAW CENTERLINE |
BACK DIMENSION |
BEHIND REFERENCE LINE |
|
|
2” (5cm) |
1-1/4” (3.2cm) |
|
|
2-1/8” (5.4cm) |
1-5/16” (3.3cm) |
|
|
2-1/4” (5.7cm) |
1-3/8” (3.5cm) |
|
|
2-3/8” (6cm) |
1-7/16” (3.7cm) |
|
|
2-1/2” (6.4cm) |
1-1/2” (3.8cm) |
|
|
DRAW PRELIMINARY FAUCET CENTERLINE
NOTE: The following instructions refer to the installation of Model K ---2332, in an above counter installation.
NOTE: Wall-mount faucet installations: Be sure to provide sufficient spout overhang into the lavatory basin. Make sure that the water stream is directed to the center of the lavatory and there is sufficient hand washing clearance.
NOTE: Countertop faucet installations: Pay special attention to the spout and handle fit clearance when locating the faucet, as noted below.
Countertop faucet installations: Use the template to locate the faucet spout hole centerline to provide adequate clearance between the edge of the lavatory and the spout.
Refer to Fig. #2 . Check for adequate clearance between the backsplash, faucet spout and handles and lavatory. Kohler recommends clearance of at least 1” (2.5cm) between:
D the installed lavatory and the faucet spout;
D the installed lavatory and the end of the faucet handles; D the faucet spout and handles, and the backsplash.
Refer to the faucet installation instructions for the required clearance, and mark the preferred faucet hole locations.
Spout Backsplash
Centerline
1”(2.5cm) Minimum  Clearance
Cut-out
Line
Outside Edge
of Lavatory
|
1-1/4”(3.2cm) |
|
Minimum |
Fig. #2 |
Clearance |
1007251-2-B |
2 |
Kohler Co. |

DRAW PRELIMINARY FAUCET CENTERLINE
1. Draw the distance determined in FAUCET LOCATION as the
preliminary centerline on the cut-out template. It should be parallel and behind the cut-out template reference line (located on the cut-out template).
NOTE: On the full-size rim section found on the cut-out template, mark the preliminary faucet centerline dimension. This will be used to DETERMINE FINAL FAUCET CENTER-
LINE.
DETERMINE FINAL FAUCET CENTERLINE
2” (5cm) |
Air |
|
Gap |
||
Min. |
||
|
Fig. #4
FAUCET CLEARANCE WITH BACKSPLASH
NOTE: If you are installing a tiled-in lavatory, proceed to Step 1B. The preliminary faucet line from DRAW PRELIMINARY FAUCET LINE is the final faucet line in this case.
1. When this preliminary faucet centerline has been drawn the spout must be checked for three items:
A. Refer to Fig. #2. For low profile faucet spouts, the
distance between the faucet spout and the lavatory rim must be a minimum of 1/4” (6mm). Use the faucet spout, the preliminary faucet centerline, and the full size rim section on the cut-out template to check this. If there is not 1/4” (6mm) clearance, move the preliminary faucet centerline back. Recheck the clearance until you have 1/4” (6mm). Measure the distance of the new faucet centerline. Redraw the new faucet centerline behind the reference line on the cut-out template. Remark this dimension on the full size rim section. This is the final faucet centerline.
1/4” (6mm)Min.
2” (5cm) Min.
Fig. #3
B. Refer to Fig. #3. Check to be sure the water stream will
project 2” (5cm) minimum into the lavatory basin to allow adequate area for hand washing. Use the approximate faucet spout angle, the final faucet centerline and the full-size rim section from the cut-out template to ensure this clearance. If this cannot be accomplished, the faucet is not optimally matched for this lavatory and may not operate on this lavatory to the owner’s satisfaction. You may wish to consider an alternate faucet.
C. Refer to Fig. #3. Check for compliance with all state and local plumbing codes, including air gap standards.
NOTE: 2-1/2” (6,4cm) of space is required for the Kohler Bravura widespread and Cirrus Sheetflow faucet spouts.
1. Refer to Fig. #4. Draw a line 2” (5cm) behind the final faucet
centerline on the cut-out template. This is the minimum backsplash locator line. It is drawn to ensure adequate clearance behind the faucet for proper installation. It will also help position the lavatory on the countertop. Cut along this backsplash locator line. Save the section of the cut-out template with the lavatory rim and cut-out lines.
Countertop Backsplash |
Backsplash Locator Line |
2” |
|
(5cm) |
C |
|
L of Fitting |
Cut-Out Template |
|
On Countertop |
|
Countertop |
|
Fig. #5
INSTALLATION
1. To remove old lavatory, turn off water supplies. Turn the lavatory faucet on to drain water from the lines. Disconnect and remove water supply tubes. Disconnect drain and remove trap.


 CAUTION: To remove steel frame lavatories, remove clips or fasteners under lavatory that hold lavatory to counter. Do not remove clips that hold frame to fixture.
1007251-2-B |
3 |
Kohler Co. |

2. Lift lavatory out of countertop with fitting and drain attached, if applicable.
3. Refer to Fig. #6 . Cut out inside of cut-out template with scissors on the inside line.
Fig. #6
4. Refer to Fig. #7 . Set the cut-out template on the countertop so the backsplash locator line is touching the countertop backsplash. The cut-out template can be moved forward from this position to get the best placement of the lavatory on the countertop. Trace the cut-out opening on the countertop using a soft lead pencil. Centerlines are provided to help align opening. Mark the final centerline on the countertop using the cut-out template. Drill the faucet holes using the following chart to determine their size.
NOTE: If there is not enough room at the front of the counter for the lavatory rim, a larger countertop is needed.
Dimensions Are For Kohler Faucets Only. When Using Other Faucets, Contact Supplier For Installation Instructions And Dimensions.
FAUCET CENTERS |
VALVE HOLES |
SPOUT HOLE |
||
4” (10.2cm) |
1-3/16” (3cm) |
1-3/16” (3cm) |
||
6” (15.2cm) |
1-3/8” (3.5cm) |
1-3/16” (3cm) |
||
8” (20.3cm) |
|
|
|
|
12” (30.5cm) |
|
|
|
|
16” |
(40.6cm) |
|
|
|
|
Faucet Escutcheon |
Handle Escutcheon |
||
Backsplash |
|
|
Centerline |
|
|
1/4” (6mm) Min. |
|||
|
|
|
||
Countertop
Fig. #7
5. Refer to Fig. #8 . Drill a pilot hole into the countertop using a
1/2” drill. Use a saber or keyhole saw to cut out opening by carefully following the pencil line traced from cut-out template. Temporarily position lavatory into counter, and trace a light pencil line around the outside edge. This will serve as a guideline for applying sealant. Remove fixture from countertop.
NOTE: The rim must be traced so the sealant will cover and conceal the pencil line.
Fig. #8
6. Install faucet to countertop and drain to lavatory following manufacturer’s instructions.
7. Refer to Fig. #9 . Apply two ribbons of plumbers putty or other sealant on the counter from the edge of the opening to edge of rim as measured in Step 5 according to the putty manufacturer’ s instructions. Quickly spread putty or sealant with a putty knife.
Plumbers Putty
Lavatory
Countertop
Fig. #9
8. Set lavatory into position. Immediately wipe away any excess putty or sealant with a damp cloth. Fill in any voids between rim and countertop.
9. Allow putty or sealant to set for 30 minutes. Connect supply
lines at supply valves and fitting. Assemble adjustable drain pop-up linkage. Connect drain, trap, and outlet. Turn tailpiece into drain body. Align trap inlet with tailpiece. Insert trap nut and gasket onto tailpiece, and insert into trap. Tailpiece must extend 1” to 2” into trap. Tailpiece may have to be cut to fit. Turn on water and check for leaks.
10. CARE AND CLEANING. DO NOT USE ABRASIVE
CLEANSERS as they may scratch the surface of this fixture. Clean up with a non-abrasive cleaner. Stubborn stains, paint, or tar may be removed with turpentine or paint thinner.
1007251-2-B |
4 |
Kohler Co. |

CALL US FOR HELP
Here’s what you need to do if you require service:
First review the installation instructions to ensure correct installation. For additional assistance in the USA, call our Customer Service Department for direct help. You may also contact us at our web site listed below.
Call 1-800-4-KOHLER within the U.S. Call 1-800-964-5590 within Canada Call 001-877-680-1310 within Mexico kohler.com
E2003 Kohler Co.
1007251-2-B |
5 |
Kohler Co. |
 Loading...