


KOHLER K-706000, K-706001, K-706002, K-706003, K-706004 Installation Manual
...Installation and Care Guide
Sliding Shower and Bath Doors
K-706000, K-706001, K-706002,
K-706003, K-706004, K-706005,
K-706006, K-706007, K-706008,
K-706009, K-706010, K-706011,
K-706012, K-706013, K-706014,
K-706015, K-706016, K-706017,
K-706018, K-706019, K-706163,
K-706164, K-706165, K-706166,
K-706167, K-706168, K-706169,
K-R706000, K-R706008, K-R706009,
K-R706012
Sliding Bath Doors |
Sliding Shower Doors |
M product numbers are for Mexico (i.e. K-12345M)
Los números de productos seguidos de M corresponden a México (Ej. K-12345M)
Français, page “Français-1” Español, página“ Español-1”
1279162-2-A
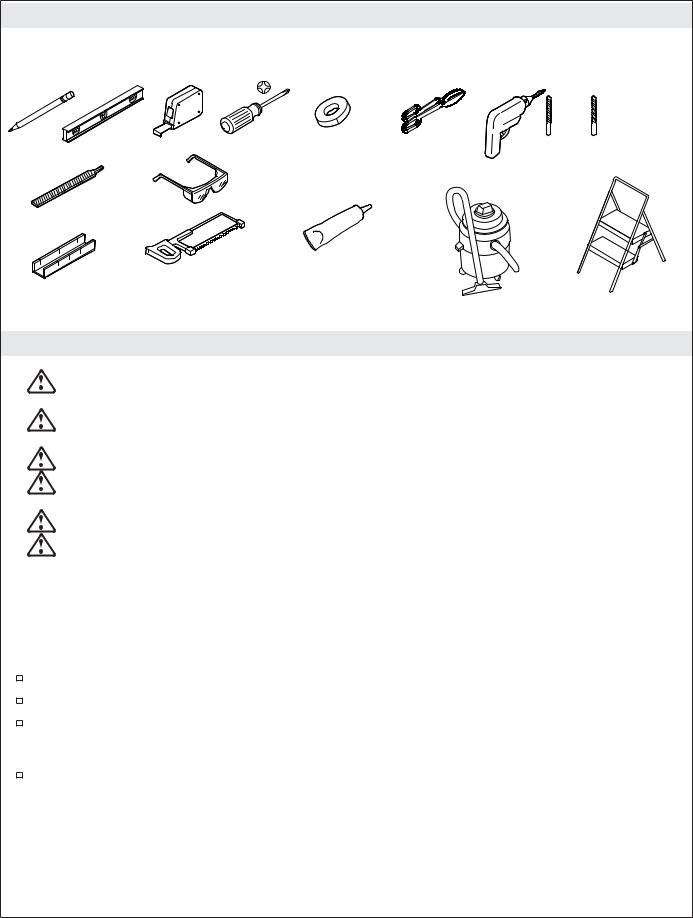
Tools and Materials
Masking Tape |
Tin Snips |
1/4" 1/4" Masonry |
|
|
Bit for Tile |
|
|
100% Silicone |
|
32 Teeth |
Sealant |
|
|
|
Miter Box |
Per Inch Blade |
Step Stool |
Before You Begin
WARNING: Risk of serious injury. Damage prior to installation can result in glass shattering. Inspect the glass and all parts for damage before installation.
WARNING: Risk of serious injury. Improper installation can result in glass shattering. Follow all installation instructions.
WARNING: Risk of serious injury. Do not cut tempered glass. Tempered glass will shatter if cut.
WARNING: Risk of serious injury. Shower door and side panels can shatter. Regularly inspect the glass and all parts for damage, missing or loose parts.
WARNING: Risk of serious injury. Always wear safety glasses while cutting and drilling.
CAUTION: Risk of personal injury. Tempered glass should not contact hard surfaces or it may shatter. Do not touch the edge of the tempered glass panel with tools or any hard objects.
IMPORTANT! Leave this manual for the end user. Read these instruction before installing or using this product.
IMPORTANT! This door is designed to accommodate walls that are less than 3/8″ (10 mm) out of plumb. Verify the area the door will be attached to is within 3/8″ (10 mm) of plumb. The door may not function properly if the wall is more than 3/8″ (10 mm) out of plumb.
Cover the drain with tape to avoid loss of small parts.
Identify all parts prior to installation.
Identify the inside and outside panels by comparing the distance between the top edge of the glass and the roller mounting hole. The rollers on the inside panel are mounted lower than the outside panel.
Follow the silicone sealant manufacturer’s instructions for application and curing time.
1279162-2-A |
2 |
Kohler Co. |

|
|
|
RIGHT |
|
|
|
|
|
|
RIGHT |
|
|
|
|
|
|
|
|
|
|
|
|
|
|
|
WALL JAMB CAP (2) |
|
|
|
|
|
|
|
|
1278340-** |
|
|
ANCHOR (4) |
|
|
SCREW, |
|
CENTER GUIDE |
|
|
|
1260672 |
RIGHT TOP BUMPER (1) |
#10-24 X 1-1/4" (2) |
INSIDE ROLLERS (2) |
ASSEMBLY (1) |
|
|
ANCHOR (6) |
RIGHT CLEAT ASSEMBLY (1) |
1198328-A |
1262336 |
1277291-** |
|
|||
|
1262376 |
|
||||||
1260672 |
1278116-** |
|
|
|
|
|
|
|
|
LEFT |
SCREW, |
|
|
|
|
||
|
|
|
#8-18 X 3/8" (4) |
|
|
|
|
|
|
|
|
|
1042520-G |
|
|
|
|
|
|
SCREW, |
|
|
|
|
|
|
|
|
#8-18 X 1-1/2" (4) |
|
|
|
|
|
|
|
LEFT |
1048208-C |
|
|
|
|
|
|
|
|
|
|
|
|
|
|
|
SCREW, |
|
|
|
|
SCREW, |
|
|
ROLLER CAP (4) |
#8-18 X 1-1/2" (6) LEFT CLEAT ASSEMBLY (1) |
|
LEFT TOP BUMPER (1) |
#10-24 X 1-1/4" (2) |
OUTSIDE ROLLERS (2) |
CLIP ASSEMBLY (2) |
|||
1048208-C |
1278115-** |
|
|
1262375 |
1198328-A |
1262337 |
1260035-** |
1187908-** |
1281033-** |
Parts shown in order of use |
|
|
|
|
|
Skin Pack |
|
|
1265261-01** |
1042520-G |
|
|
|
|
|
|
|||
|
|
|
[60" (1524 mm)] |
(#8-18 x 3/8") Screw |
||
|
|
|
1265261-02** |
1262376 |
|
|
|
|
|
[48" (1219 mm)] |
|
||
|
|
|
Right Top Bumper |
|
||
|
|
|
Header |
|
|
|
|
|
|
|
|
1278116* |
|
|
|
|
|
|
|
|
|
|
|
|
|
|
Right Cleat |
|
1262375 |
|
|
|
|
1278340* |
|
Left Top |
|
|
|
|
|
|
|
|
|
1198328-A |
Wall Jamb |
|
|
Bumper |
|
|
|
||
|
|
|
|
(#10-24 x 1-1/4") |
Cap |
|
|
|
|
|
|
||
|
|
|
|
|
Screw |
|
1278115* Left Cleat |
|
|
|
|
|
|
|
|
1048208-C |
|
|
|
Wall |
|
|
(#8-18 x 1-1/2") Screw |
1187908** |
|||
|
|
Jamb |
||||
|
|
|
|
|||
|
|
1260672 |
|
Roller |
|
|
|
|
|
|
|
||
|
|
Wall Anchor |
|
Cap |
1262336 |
|
|
|
1260035** |
|
Inside |
|
|
|
|
|
Roller |
|
||
|
|
Clip |
|
|
|
|
|
|
|
|
|
|
|
1048208-C |
|
Assembly |
|
|
Wall |
|
|
|
|
|
|
||
(#8-18 x 1-1/2") |
|
|
|
|
||
|
|
|
|
Jamb |
||
Screw |
|
|
|
|
|
|
|
|
|
|
|
Cover |
|
|
|
|
|
|
|
|
|
|
1262337 |
|
|
1198328-A |
|
1260672 |
|
Outside |
|
|
(#10-24 x 1-1/4") |
|
|
Roller |
|
|
Screw |
|
|
Wall Anchor |
|
|
|
|
||
|
|
|
|
|
|
|
|
|
1187908** |
|
|
|
|
1277178-01** |
|
Roller |
|
|
|
|
|
Cap |
|
|
|
|
|
[55-1/2" (1410 mm)] |
|
|
|
Inside Door |
|
|
1277178-02** |
|
|
|
|
Panel* |
|
[67-1/2" (1715 mm)] |
|
|
|
|
|
|
1277178-03** |
|
1277180-01** |
|
|
|
|
[53-1/4" (1353 mm)] |
|
|
|
|
||
[58-1/8" (1476 mm)] |
|
|
|
|||
1277178-04** |
|
|
|
|
||
|
1277180-02** |
|
|
|
|
|
[75-5/8" (1921 mm)] |
|
|
1277291** |
|
||
[70-1/8" (1781 mm)] |
|
|
||||
Wall Jamb |
|
|
Center Guide |
|
||
|
1277180-03** |
|
|
|
||
|
|
|
|
Assembly |
|
|
|
|
[56" (1422 mm)] |
Outside Door |
|
||
|
|
|
|
|||
|
|
1277180-04** |
Panel* |
1272244 |
|
|
|
|
[78-1/4" (1988 mm)] |
|
Bottom |
|
|
|
|
Wall Jamb Cover |
|
|
Bumper |
1277188-01** |
|
|
|
|
|
|
[60" (1524 mm)] |
|
|
|
|
|
|
1277188-02** |
|
|
|
|
|
|
[48" (1219 mm)] |
|
|
|
|
|
|
Threshold |
|
|
|
|
|
|
See service parts page |
|
|
|
|
|
|
for towel bar and |
|
|
|
|
|
|
handle information. |
Parts Identification
Kohler Co. |
3 |
1279162-2-A |
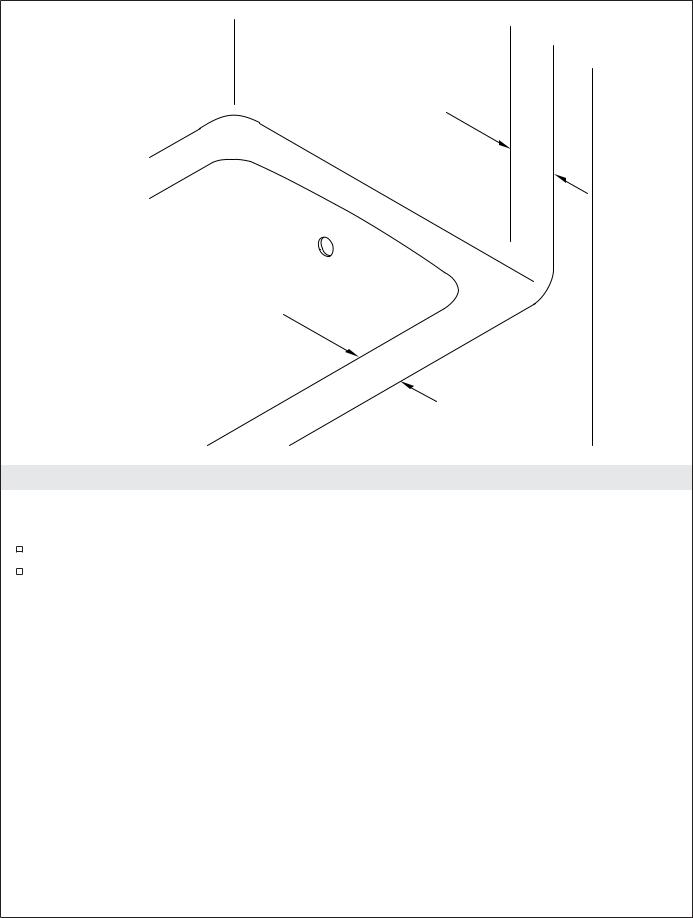
2-1/2"
(64 mm) Min
2-1/2"
(64 mm) Min
1. Confirm Ledge and Wall Compatibility
IMPORTANT! Confirm that the shower base/bath ledge and walls meet the following requirements: 
 There must be at least 2-1/2” (64 mm) of flat surface on the shower base/bath ledge and walls.
Walls must be within 3/8” (10 mm) of plumb.
The shower base/bath ledge must be within 3/8″ (10 mm) of level.
Do not install the door if these requirements are not met.
1279162-2-A |
4 |
Kohler Co. |

A |
|
Cut |
A |
|
3/4" |
here. |
||
|
|||
|
|
||
(19 mm) |
|
|
3/4"
(19 mm)
Threshold
 A
A
2. Measure and Cut the Threshold
Cover the drain with tape to avoid the loss of small parts.
Use a drop cloth to protect the shower surface.
Measure distance “A” between the shower walls and mark it on the threshold. Measure 3/4” (19 mm) from “A” and make a second mark on the threshold as shown. Cut the threshold at the second mark and file any rough edges.
Kohler Co. |
5 |
1279162-2-A |
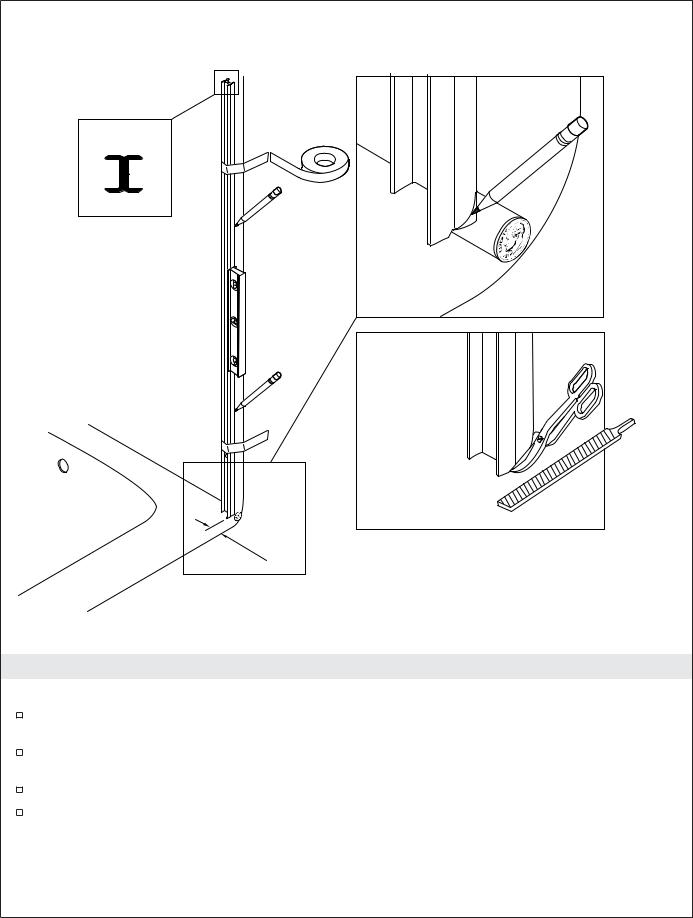
Wall Jamb
1/16" (2 mm)
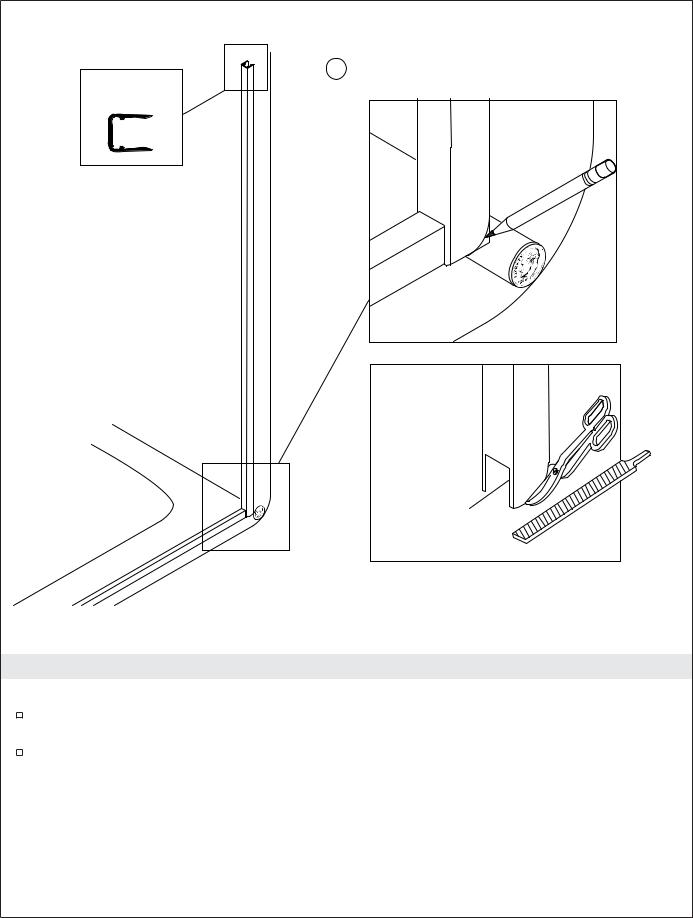
3. Prepare the First Wall Jamb
IMPORTANT! The wall jamb must fit tightly against the shower base/bath ledge and wall.
Position the wall jamb against the wall so that it is 1/16″ from the shower base/bath ledge radius as shown.
If needed, shape and file the bottom corner to fit against the shower wall. Use a coin to match and transfer the corner radius.
Plumb the wall jamb.
Tape the wall jamb securely in place and mark its location.
1279162-2-A |
6 |
Kohler Co. |

Groove
1/8"
(3 mm)
1/8"
(3 mm)
4. Position the Threshold
NOTICE: The threshold must sit on a flat surface.
If needed, file the ends of the threshold to match the corner radius of the shower wall.
Insert the threshold into the wall jamb with the groove down and the short end of the threshold facing the inside of the shower.
Align the threshold so that it is an even distance from the shower base/bath ledge along its entire length.
Tape the threshold securely in place and mark its location.
Kohler Co. |
7 |
1279162-2-A |
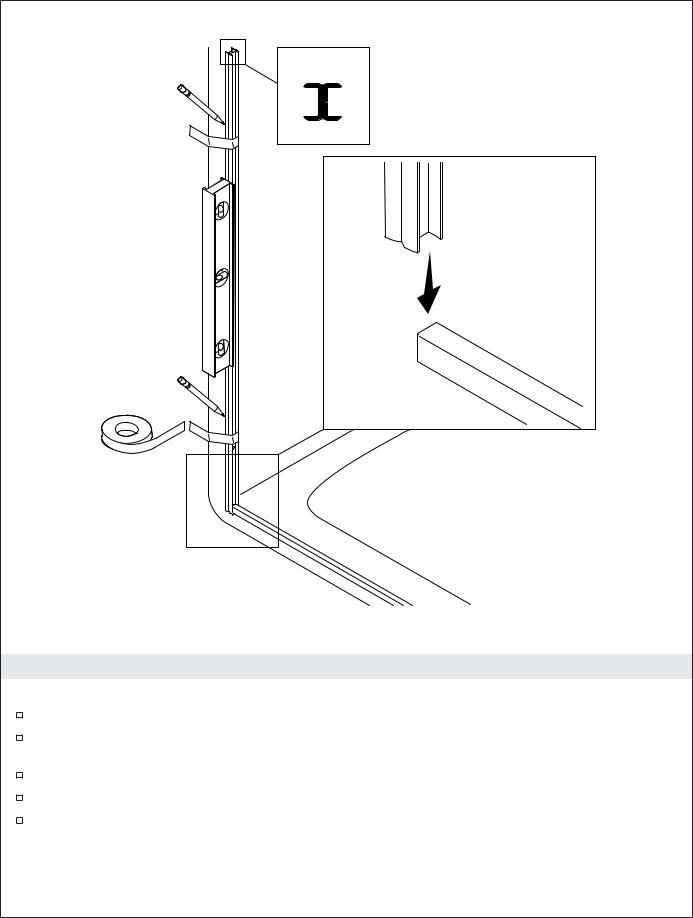
Wall Jamb
5. Position the Second Wall Jamb
IMPORTANT! The wall jamb must fit tightly against the shower base/bath ledge and wall.
Position the second wall jamb against the wall and over the threshold on the opposite shower wall.
If needed, shape and file the bottom corner to fit against the shower wall. Use a coin to match and transfer the corner radius.
Plumb the wall jamb.
Tape the wall jamb securely in place and mark its location.
Make sure the threshold is still parallel with the front of the shower base/bath ledge.
1279162-2-A |
8 |
Kohler Co. |

x2
6. Mark the Wall Jamb Anchor Holes
Mark the three wall jamb anchor hole locations with a pencil.
Remove the wall jamb and set it aside.
Repeat for the second wall jamb.
Kohler Co. |
9 |
1279162-2-A |
x2
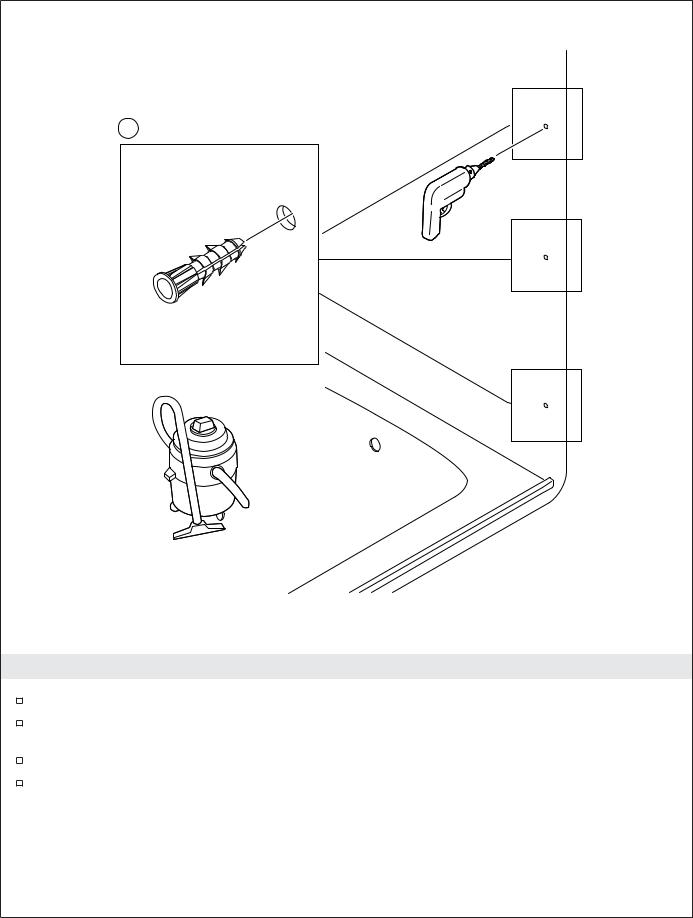
7. Drill Holes and Install Anchors
Drill a 1/4” hole at each marked location. Use a masonry bit for tile walls.
Install the provided wall anchors. If necessary, gently tap the anchors to fully seat them against the wall.
Repeat for the opposite wall.
Thoroughly clean the shower base/bath floor, ledge, and wall.
1279162-2-A |
10 |
Kohler Co. |
x2
#8-18 x 1-1/2"
8. Install the Wall Jambs
Replace the wall jamb, aligning it with the anchor holes.
Secure the wall jamb with three #8-18 x 1-1/2” screws.
Repeat for the second wall jamb.
Kohler Co. |
11 |
1279162-2-A |
x2
Cleat
Wall
Jamb
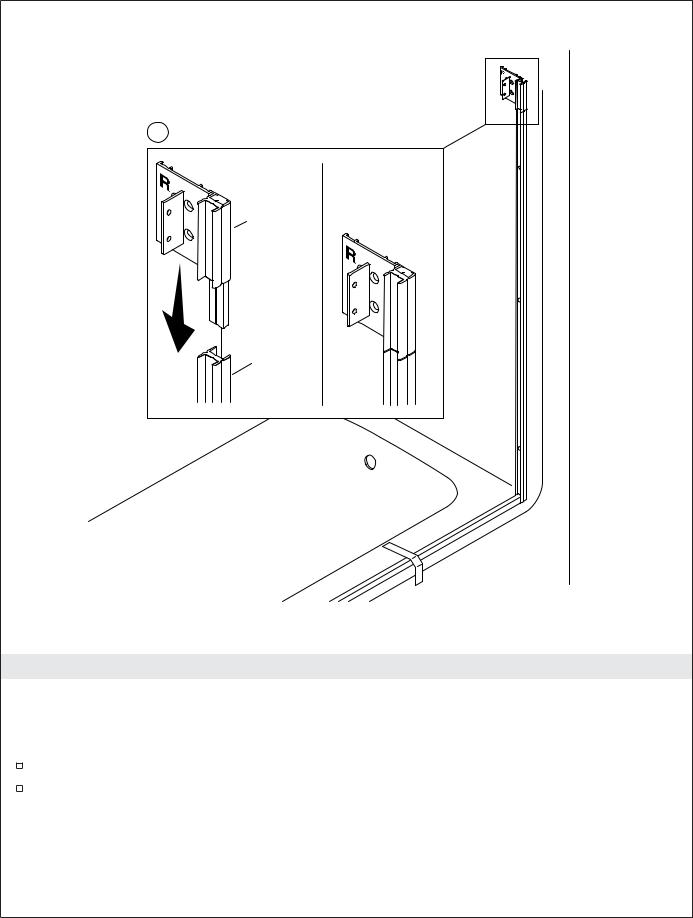
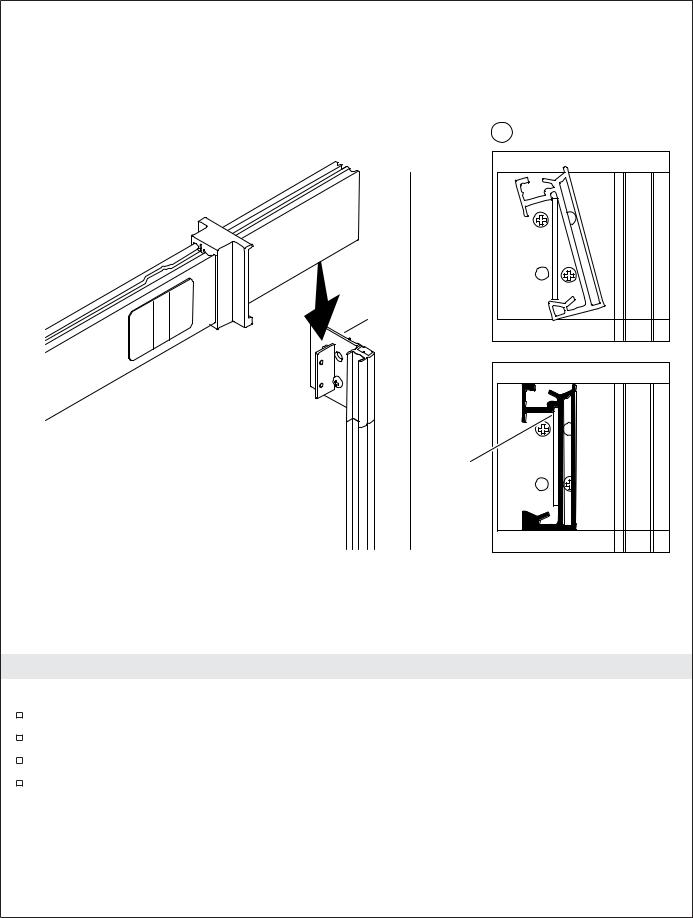
9. Position the Cleats
NOTICE: There is a left (″L″) and right (″R″) cleat. Position them so they are inside the shower area. 
 Slide the cleat into the channel between the wall jamb and the wall.
NOTICE: The cleat should be level and flat against the wall.
Make sure the cleat sits flush against the top of the wall jamb.
Repeat for the second cleat.
1279162-2-A |
12 |
Kohler Co. |
x2
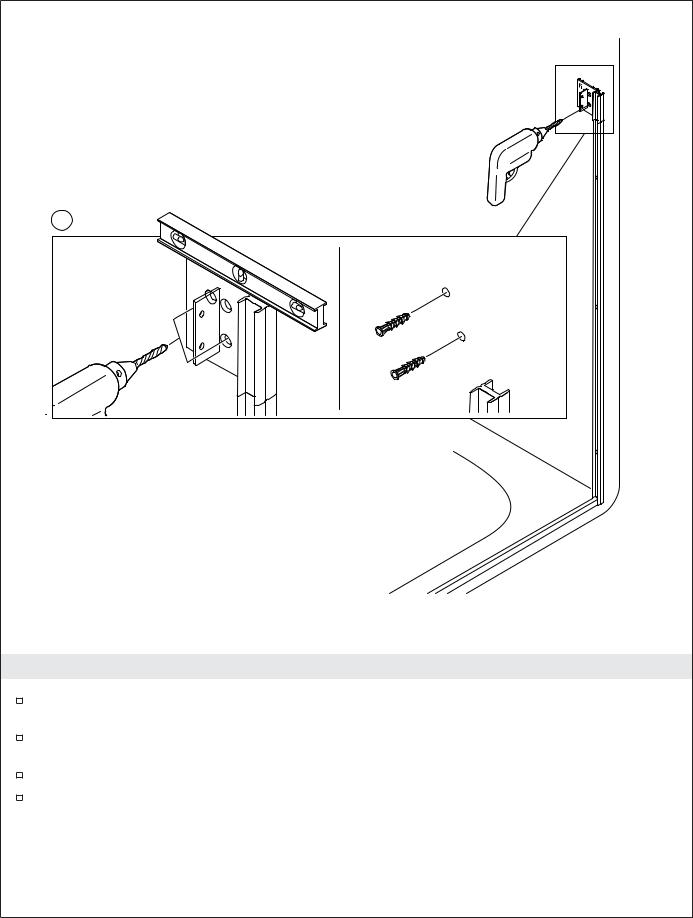
10. Install the Cleat Wall Anchors
Hold the cleat level and firmly in place and use it as a guide to drill two diagonally opposed (For example, top left and bottom right) 1/4” holes in the wall.
Remove the cleat and install the provided wall anchors. If necessary, gently tap the anchors to fully seat them against the wall.
Repeat for the second cleat.
Thoroughly clean the shower base/bath floor, ledge, and wall.
Kohler Co. |
13 |
1279162-2-A |
x2 |
#8-18 x 1-1/2" |
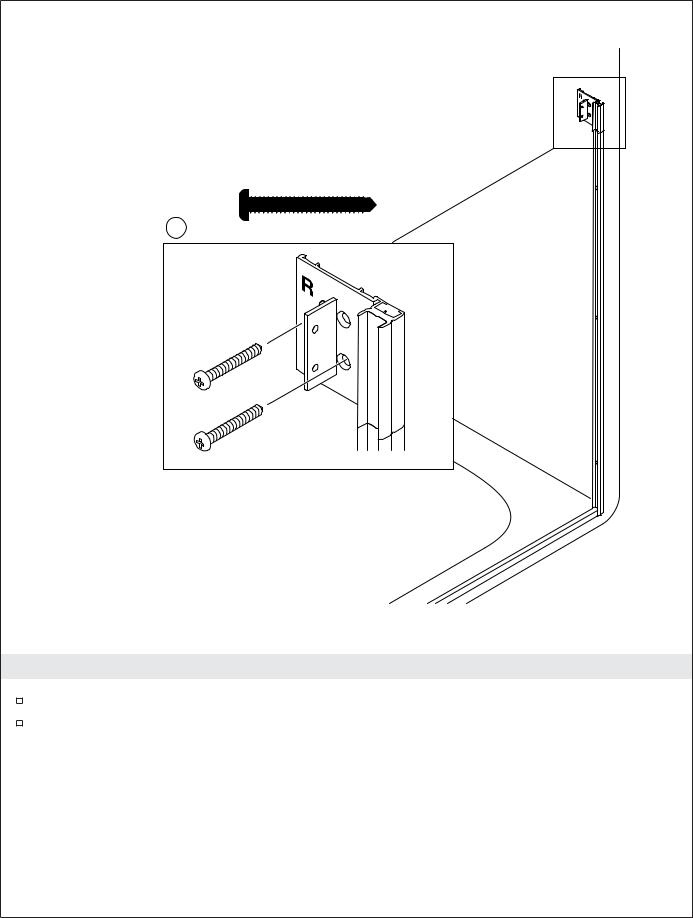
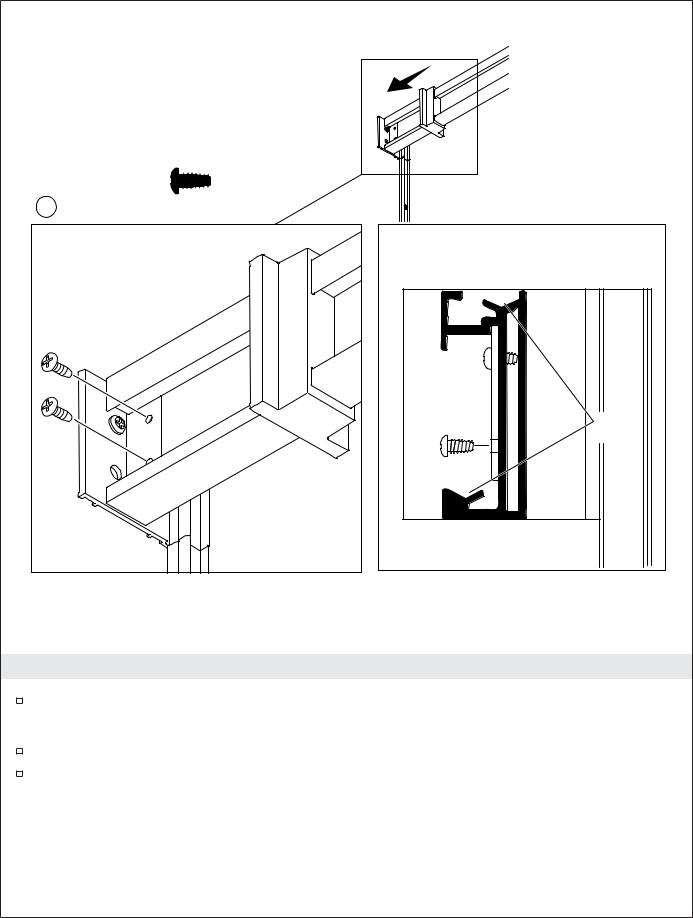
11. Secure the Cleats
Secure each cleat to the wall using two #8-18 x 1-1/2” screws.
Make sure the cleats are still level. Loosen the screws and adjust the cleat position if needed.
NOTICE: The second set of holes can be used if the cleat is not level. Repeat step 10 if needed.
1279162-2-A |
14 |
Kohler Co. |

B |
|
Cut |
1/2" |
here. |
|
|
(13 mm) |
B |
Header |
1/2" |
|
(13 mm) |
|
B |
12. Measure and Cut the Header
IMPORTANT! Confirm your measurements before cutting. Do not cut the header too short.
Measure distance “B” between the walls and mark it on the header.
Measure 1/2″ (13 mm) from “B” and make a second mark on the header as shown.
Cut the header at the second mark.
File any rough edges and clean debris from the roller tracks.
Kohler Co. |
15 |
1279162-2-A |

|
Right |
Notches |
Bumper |
Header
Flat Side
Labels
Left
Bumper
13. Install the Bumpers to the Header
NOTICE: The words “LEFT” and “RIGHT” are molded into the bumpers.
Locate the labels on the header and observe how they align with the notches on top.
With the labels on the header facing you, identify the left and right ends of the header.
Slide the appropriate bumper onto each end of the header and move them towards the center.
1279162-2-A |
16 |
Kohler Co. |
x2
Cleat
Groove
14. Position the Header
NOTICE: The labels on the header must face the outside of the shower.
From inside the shower, raise the header above the cleats.
Tilt the header and lower it onto the cleats as shown.
The tops of the cleats should fit into the top inside groove of the header as shown.
Rotate the header in place until it is flat against the cleats.
Kohler Co. |
17 |
1279162-2-A |
x2 |
#8-18 x 3/8" |
Roller |
Tracks |
15. Secure the Header
From inside the shower, secure the header to each cleat with two #8-18 x 3/8” self-drilling screws.
NOTE: Self-drilling screws do not require pre-drilling.
Carefully and thoroughly clean the header. Make sure there is no debris in the roller tracks.
Slide the bumpers flush against each wall.
1279162-2-A |
18 |
Kohler Co. |
#10-24 x 1-1/4"
x2
Clamp
5"
(127 mm)
Tab Up |
Spacer |
|
Axle
Roller
Brass Insert
16. Assemble the Inside Panel
NOTICE: The inside panel roller mounting holes are 5″ (127 mm) below the top of the panel.
NOTICE: The inside rollers contain a brass insert.
Position each roller on the same side of the panel as the label.
Install each inside roller with the tab on top. This will position the door at its highest setting, allowing for easier adjustment if necessary.
Secure each roller with a #10-24 x 1-1/4” screw.
Using a hand screwdriver only, securely tighten the screws.
Kohler Co. |
19 |
1279162-2-A |
Lower
Track
17. Install the Inside Panel
NOTE: The rollers and the label face the outside of the shower.
With help, move the inside panel completely into the shower area.
With help, from inside the shower, tilt the panel to position the tops of the rollers inside the header. Rest the rollers on the lower track of the header and set the panel in place.
Ensure that the panel can roll back and forth smoothly. If necessary, adjust the rollers according to the instructions in Step 24.
1279162-2-A |
20 |
Kohler Co. |
Centerline
18. Measure and Mark the Threshold Center
Measure and mark the center of the threshold on the outside of the shower base/bath ledge.
Confirm the centerline mark by measuring the distance from the mark to each wall. If the measurements are not the same, adjust the mark as needed.
Remove the tape holding the threshold in place.
Kohler Co. |
21 |
1279162-2-A |
Bottom
Frame
Rail 


Ledge
Connector
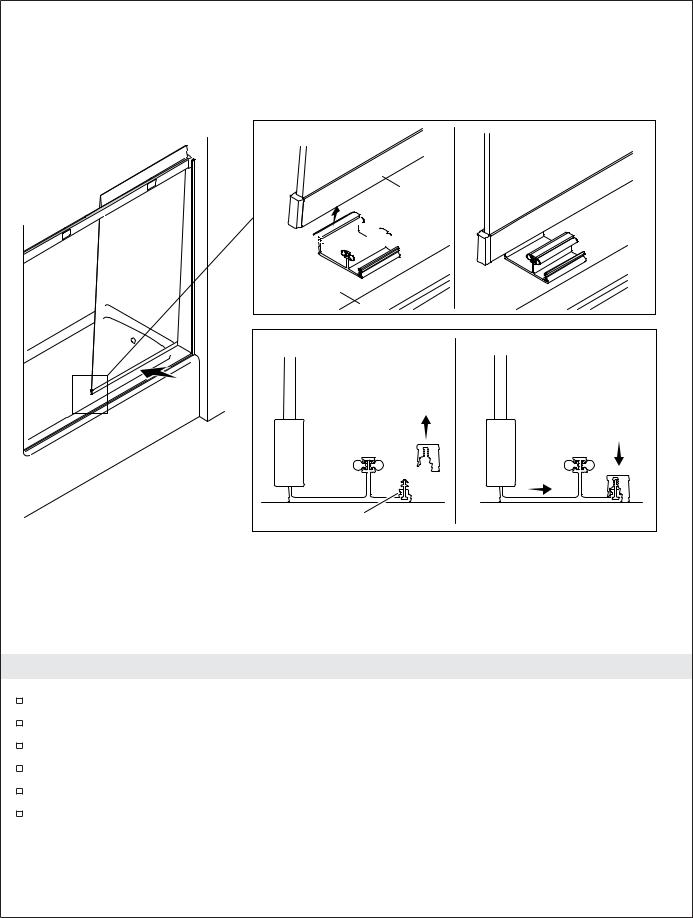
19. Install the Centerguide
From the outside of the shower, slide panel to one side.
Tilt panel approximately 3″ into the shower.
Insert the centerguide rail into the open channel of the bottom frame as shown.
Allow the panel to swing back to its original position.
Center the centerguide on the shower base/bath ledge.
Lift the threshold and push completely down over the centerguide connector. You should hear the connector snap into the threshold groove, and the threshold should sit flat on the shower base/bath ledge.
1279162-2-A |
22 |
Kohler Co. |
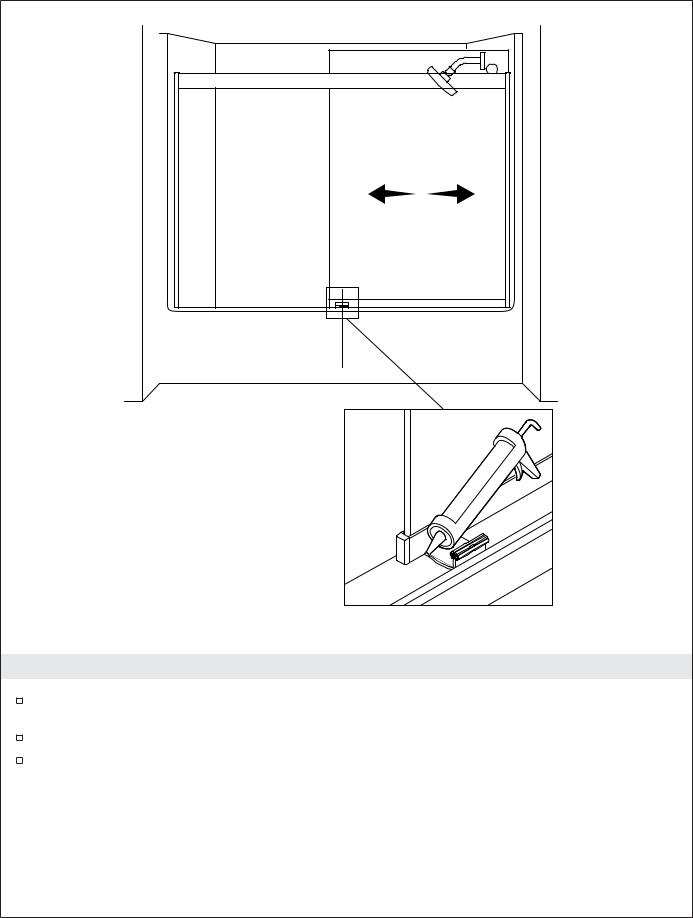
20. Install the Centerguide (Cont.)
Slide the door panel to both walls and make sure the bottom bumpers on the panel do not contact the centerguide.
If needed, adjust the position of the centerguide to avoid contact.
When positioned correctly, tape the threshold in place and apply 100% silicone sealant around the base of the centerguide.
Kohler Co. |
23 |
1279162-2-A |
x2 |
Clip Assembly |
Axle
Roller
Clip
Down
3-1/8"
(79 mm)
Spacer
Clamp
Tab Up
#10-24 x 1-1/4"
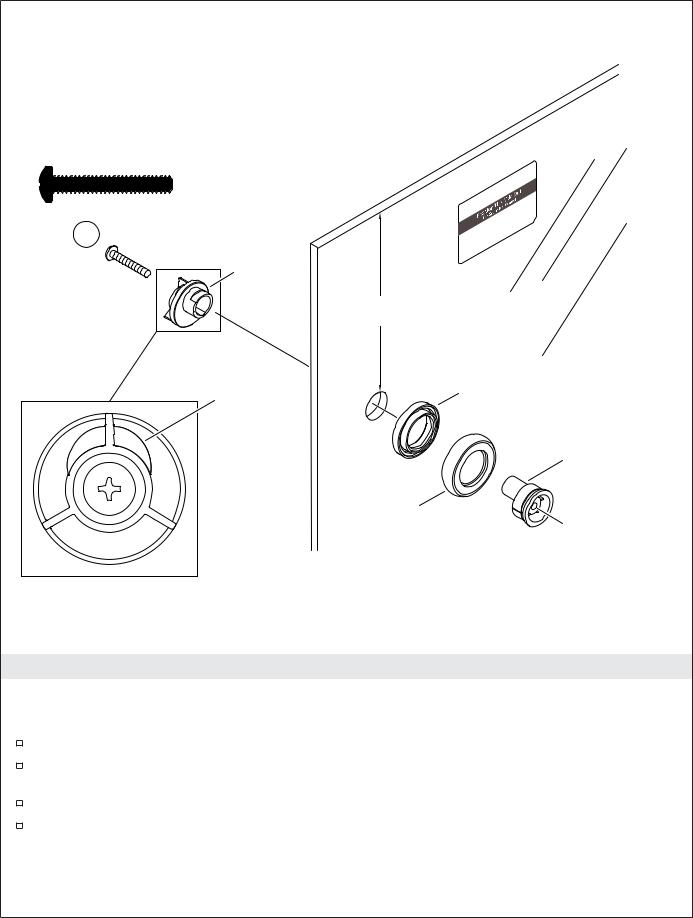
21. Assemble the Outside Panel
NOTICE: The outside panel roller mounting holes are 3-1/8″ (79 mm) below the top of the panel. 
 Position the roller on the opposite side of the panel as the label.
Install the outside rollers with the tab on the clamp on top.
Secure each roller with a #10-24 x 1-1/4” screw.
Hold the clip downwards as the screw is tightened.
Using a hand screwdriver only, tighten the screws securely until the clip cannot be rotated by hand.
1279162-2-A |
24 |
Kohler Co. |
Rail
Label
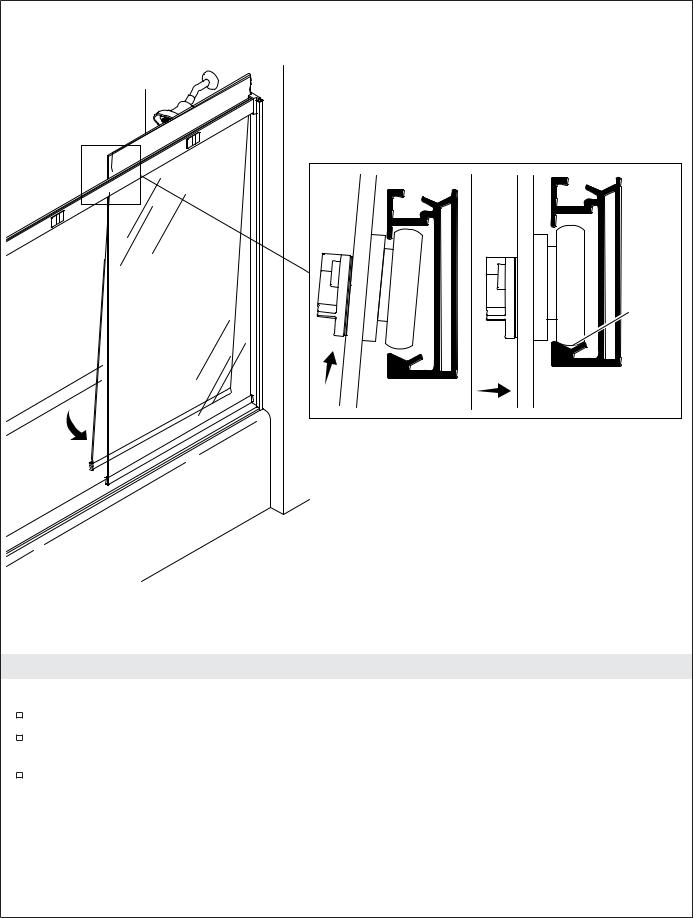
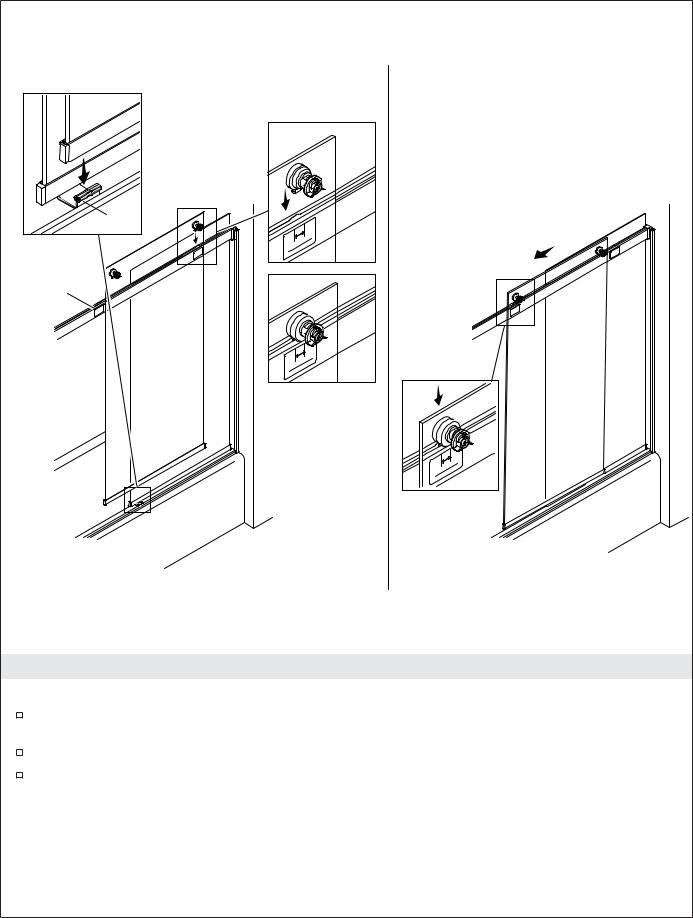
22. Install the Outside Panel
NOTICE: Locate the notches on the header, which are aligned with the ″Panel Installation Area″ labels.
With help, from outside the shower, lift the panel and position the open channel of the bottom frame over the centerguide rail.
With help, lift the panel, align one roller clip with a notch, and set the roller on the roller track.
Lift the opposite end of the panel so the second roller is above the header. Slide the panel to align the second roller clip with the second notch. Set the roller onto the roller track.
Kohler Co. |
25 |
1279162-2-A |
Clip |
Outside |
Roller |
Inside
Roller
Header
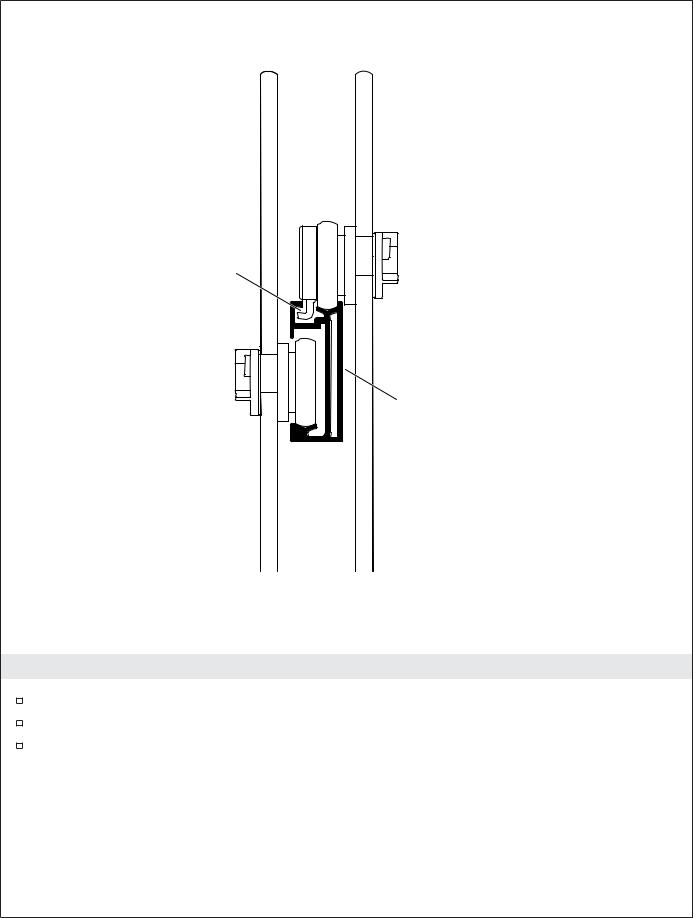
23. Confirm Correct Roller Installation
Confirm all rollers are engaged in the header tracks.
The tops of the inside rollers should be inside the header.
The clips on the outside rollers should be engaged inside the top edge of the header. They should not be visible.
1279162-2-A |
26 |
Kohler Co. |
Clamp
Screw
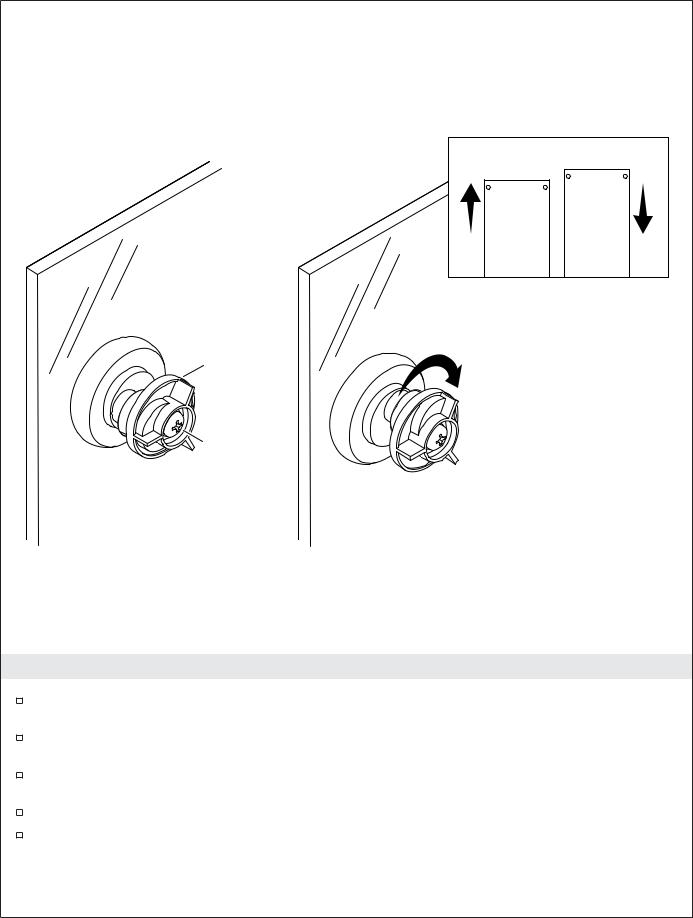
24. Adjust the Rollers
The rollers may require adjustment if a panel does not move, makes a scraping sound when moved, or if an upper or lower bumper does not make contact when closed.
Adjust the alignment of each end of the panel by loosening the screws and turning the adjustment clamp.
When adjusting the outside panel, hold the clip cover straight while securely tightening the screws so the clip does not scrape in its track.
Repeat until the door operates smoothly and aligns evenly with the shower walls.
Confirm the clips are still oriented correctly (see step 23). Securely tighten the screws.
Kohler Co. |
27 |
1279162-2-A |
x2
Wall Jamb
Cover
Notch
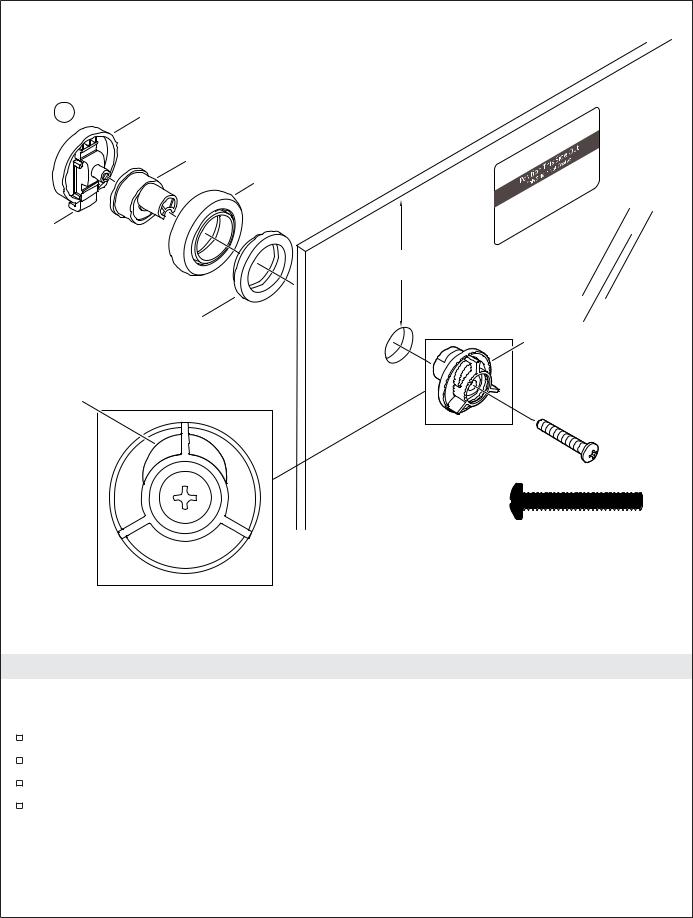
25. Shape the Wall Jamb Covers
IMPORTANT! The wall jamb covers must sit tight on the ledge and be flat against the wall.
If needed, shape and file the bottom corner of the wall jamb cover to match the corner radius of the shower wall.
Repeat for the second wall jamb cover.
1279162-2-A |
28 |
Kohler Co. |
x2
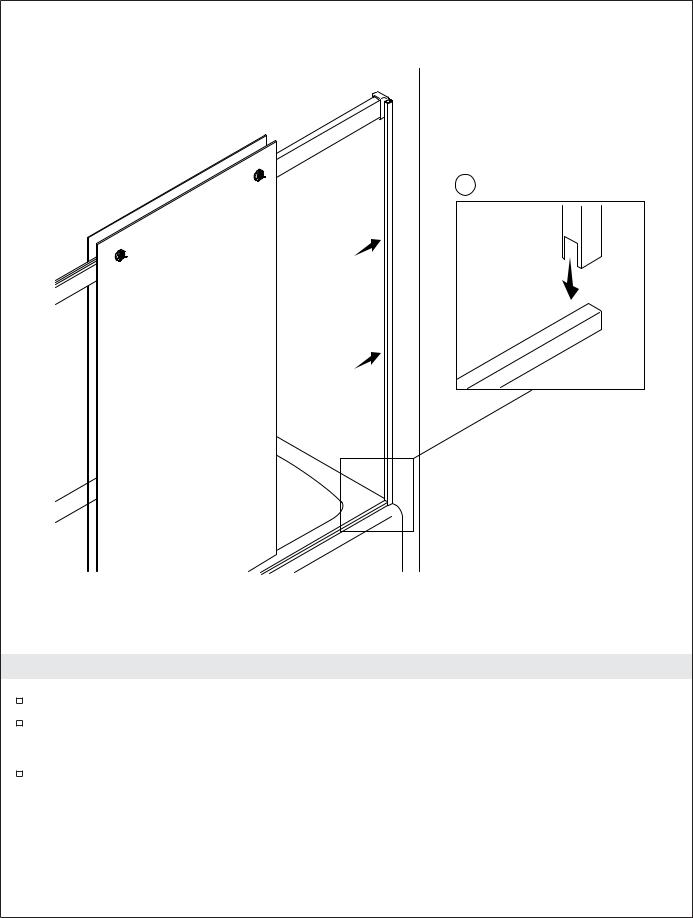
26. Install the Wall Jamb Covers
Position the notch in the wall jamb cover over the threshold.
Press the wall jamb cover onto the wall jamb.
NOTICE: The wall jamb covers will not sit flush against the wall.
Repeat for the second wall jamb cover.
Kohler Co. |
29 |
1279162-2-A |
x2
x4
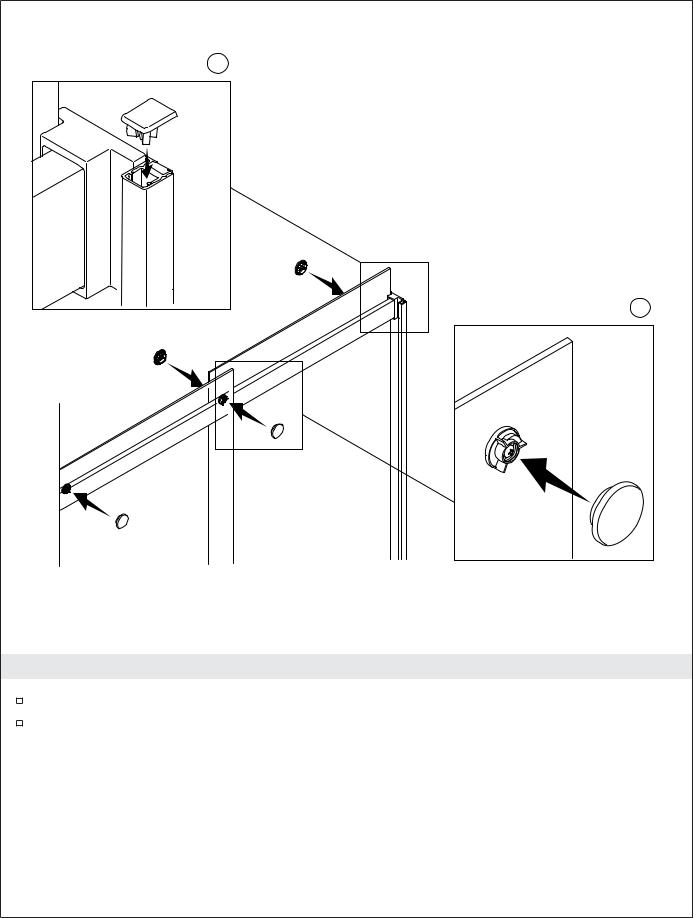
27. Install the Caps
Snap a cap into place on each of the four rollers.
Press a cap into the top of each wall jamb.
1279162-2-A |
30 |
Kohler Co. |
 Loading...