


KOHLER K-3099, K-3146, K-3147, K-3148, K-3150 User Manual
...Installation Guide
Undercounter Stainless Steel Sinks
K-3099, K-3146, K-3147,
K-3148, K-3150, K-3163,
K-3164, K-3165, K-3166,
K-3168, K-3171, K-3174,
K-3177, K-3180, K-3181,
K-3182, K-3183, K-3184,
K-3185, K-3186, K-3197,
K-3325, K-3330, K-3331,
K-3332, K-3333, K-3334,
K-3335, K-3336, K-3337,
K-3338, K-3339, K-3340,
K-3341, K-3343, K-3345,
K-3350, K-3351, K-3352,
K-3353, K-3354, K-3355,
K-3356, K-3359, K-3376
M product numbers are for Mexico (i.e. K-12345M)
Los números de productos seguidos de
M corresponden a México (Ej.
K-12345M)
Français, page ªFrançais-1º
Español, página ªEspañol-1º
1019948-2-D
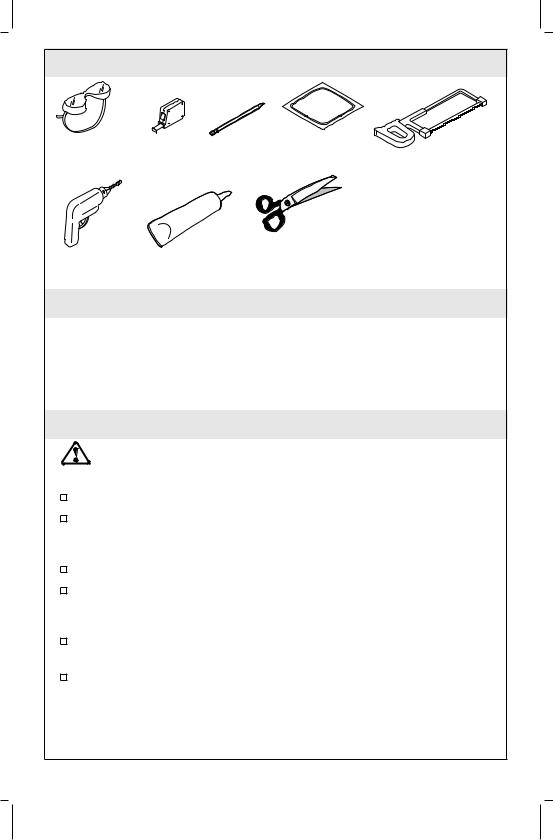
Tools and Materials
Safety Tape
Glasses Measure Pencil
Drill Sealant
Template (supplied)
Scissors
Hacksaw
Plus:
•1/2" or larger drill bit
•Hole saw 1-3/8"
•Gloves
•Jigsaw
Thank You For Choosing Kohler Company
We appreciate your commitment to Kohler quality. Please take a few minutes to review this manual before you start installation. If you encounter any installation or performance problems, please don't hesitate to contact us. Our phone numbers and website are listed on the back cover. Thanks again for choosing Kohler Company.
Before You Begin
WARNING: Risk of personal injury. Metal surfaces are sharp and can cause severe cuts. Use gloves and handle sink edges carefully.
Observe all local plumbing and building codes.
Prior to installation, unpack the new sink and inspect it for damage. Return the sink to its protective carton until you are ready to install it.
Inspect the drain and supply tubing. Replace if necessary.
Due to the nature of undercounter installations, Kohler Co. recommends that undercounter sink installations be performed by trained and experienced installers.
Install so future removal from underneath the countertop is possible without damaging the countertop.
For multiple bowl installations, a minimum distance of 2-3/16² (5.6 cm) is required between the bowls. Any required support should be determined by the countertop supplier.
1019948-2-D |
2 |
Kohler Co. |

Countertop
Sealant (Not
Mounting Furnished)
Bracket
Sink
Fastener (Not Furnished)
No Reveal Mounting
|
Countertop |
|
Sealant (Not |
Mounting |
Furnished) |
|
|
Bracket |
|
Fastener (Not Sink |
|
Furnished) |
|
Reveal Mounting |
|
C
L of the Faucet
Template
"X"
See centerline table.
Cutting Line
1. Preparation
Install the water supplies and drain piping according to the roughing-in information.
NOTE: You may require different, more specialized tools to install this sink to countertop materials other than wood or wood composites.
NOTE: For multiple bowl installations of single basin sinks, a minimum distance of 2-3/16² (5.6 cm) is required between bowls. Any required support should be determined by the countertop supplier.
Cut along the inside of the template line where indicated for the countertop opening.
Position the template on the countertop. Check for adequate clearance between the sink, faucet, backsplash and cabinet.
Trace around the template on the countertop with a pencil. Centerlines are provided to help align the opening.
Locate the faucet hole centerlines on the countertop. Faucet centerline clearance from the top of the cut-out must be 2-3/8² (6 cm) minimum for a No-Reveal sink and 1-3/4² (4.4 cm) minimum for a Reveal sink.
Kohler Co. |
3 |
1019948-2-D |

|
2. Faucet Centerline Table |
|
|
|
||
|
|
|
|
|
|
|
|
|
|
|
|
|
|
|
|
Value for ²X² |
|
|
|
|
|
|
(inches) |
|
|
|
|
|
Model |
Reveal |
No- |
Notes |
|
|
|
|
Cutout |
Reveal |
|
|
|
|
|
|
Cutout |
|
|
|
|
K-3325 |
N/A |
2-3/8² |
|
|
|
|
|
|
(6 cm) |
|
|
|
|
K-3330 |
N/A |
2-3/8² |
|
|
|
|
|
|
(6 cm) |
|
|
|
|
K-3331 |
N/A |
2-3/8² |
|
|
|
|
|
|
(6 cm) |
|
|
|
|
K-3332 |
N/A |
2-3/8² |
|
|
|
|
|
|
(6 cm) |
|
|
|
|
K-3333 |
N/A |
2-3/8² |
|
|
|
|
|
|
(6 cm) |
|
|
|
|
K-3334 |
N/A |
2-3/8² |
|
|
|
|
|
|
(6 cm) |
|
|
|
|
K-3335 |
N/A |
2-3/8² |
|
|
|
|
|
|
(6 cm) |
|
|
|
|
K-3336 |
N/A |
2-3/8² |
|
|
|
|
|
|
(6 cm) |
|
|
|
|
K-3337 |
N/A |
2-3/8² |
|
|
|
|
|
|
(6 cm) |
|
|
|
|
K-3338 |
N/A |
2-3/8² |
|
|
|
|
|
|
(6 cm) |
|
|
|
|
K-3339 |
N/A |
2-3/8² |
|
|
|
|
|
|
(6 cm) |
|
|
|
|
K-3340 |
N/A |
2-3/8² |
|
|
|
|
|
|
(6 cm) |
|
|
|
|
K-3341 |
N/A |
2-3/8² |
|
|
|
|
|
|
(6 cm) |
|
|
|
|
K-3350 |
1-5/8² |
2-3/8² |
|
|
|
|
|
(4.1 cm) |
(6 cm) |
|
|
|
|
K-3351 |
1-5/8² |
2-3/8² |
|
|
|
|
|
(4.1 cm) |
(6 cm) |
|
|
|
|
K-3352 |
1-5/8² |
2-3/8² |
|
|
|
|
|
(4.1 cm) |
(6 cm) |
|
|
|
|
K-3353 |
1-5/8² |
2-3/8² |
Measure from smaller basin |
|
|
|
|
(4.1 cm) |
(6 cm) |
|
|
|
|
K-3354 |
1-5/8² |
2-3/8² |
Measure from smaller basin |
|
|
|
|
(4.1 cm) |
(6 cm) |
|
|
|
|
K-3355 |
1-5/8² |
2-3/8² |
Measure from smaller basin |
|
|
|
|
(4.1 cm) |
(6 cm) |
|
|
|
|
|
|
|
|
|
|
|
|
|
|
|
||
1019948-2-D |
|
|
4 |
Kohler Co. |
||

Faucet Centerline Table (cont.)
|
Value for ²X² |
|
|
|
(inches) |
|
|
Model |
Reveal |
No- |
Notes |
|
Cutout |
Reveal |
|
|
|
Cutout |
|
K-3356 |
1-5/8² |
2-3/8² |
Measure from smaller basin |
|
(4.1 cm) |
(6 cm) |
|
K-3180 |
1-5/8² |
2-3/8² |
|
|
(4.1 cm) |
(6 cm) |
|
K-3181 |
1-5/8² |
2-3/8² |
Measure from smaller basin |
|
(4.1 cm) |
(6 cm) |
|
K-3182 |
1-5/8² |
2-3/8² |
|
|
(4.1 cm) |
(6 cm) |
|
K-3183 |
1-5/8² |
2-3/8² |
|
|
(4.1 cm) |
(6 cm) |
|
K-3184 |
1-5/8² |
2-3/8² |
|
|
(4.1 cm) |
(6 cm) |
|
K-3376 |
1-5/8² |
2-3/8² |
|
|
(4.1 cm) |
(6 cm) |
|
K-3146 |
N/A |
N/A |
Faucet hole location shown on |
|
|
|
cutout template |
K-3147 |
N/A |
N/A |
Faucet hole location shown on |
|
|
|
cutout template |
K-3185 |
N/A |
N/A |
Faucet hole location shown on |
|
|
|
cutout template |
K-3186 |
N/A |
N/A |
Faucet hole location shown on |
|
|
|
cutout template |
K-3148 |
N/A |
N/A |
Faucet hole location shown on |
|
|
|
cutout template |
K-3197 |
N/A |
N/A |
Faucet hole location shown on |
|
|
|
cutout template |
K-3099 |
N/A |
N/A |
Faucet hole location shown on |
|
|
|
cutout template |
K-3099-L |
N/A |
N/A |
Faucet hole location shown on |
|
|
|
cutout template |
K-3359 |
N/A |
N/A |
Faucet hole location shown on |
|
|
|
cutout template |
K-3359-L |
N/A |
N/A |
Faucet hole location shown on |
|
|
|
cutout template |
K-3163 |
N/A |
2-3/8² |
|
|
|
(6 cm) |
|
|
|
|
|
Kohler Co. |
5 |
1019948-2-D |

Faucet Centerline Table (cont.)
|
Value for ²X² |
|
|
|
(inches) |
|
|
Model |
Reveal |
No- |
Notes |
|
Cutout |
Reveal |
|
|
|
Cutout |
|
K-3164 |
N/A |
2-3/8² |
|
|
|
(6 cm) |
|
K-3351-L |
1-5/8² |
2-3/8² |
|
|
(4.1 cm) |
(6 cm) |
|
K-3171 |
1-5/8² |
2-3/8² |
|
|
(4.1 cm) |
(6 cm) |
|
K-3174 |
1-5/8² |
2-3/8² |
|
|
(4.1 cm) |
(6 cm) |
|
K-3174-L |
1-5/8² |
2-3/8² |
|
|
(4.1 cm) |
(6 cm) |
|
K-3352-L |
1-5/8² |
2-3/8² |
|
|
(4.1 cm) |
(6 cm) |
|
K-3177 |
1-5/8² |
2-3/8² |
Measure from smaller basin |
|
(4.1 cm) |
(6 cm) |
|
K-3353-L |
1-5/8² |
2-3/8² |
Measure from smaller basin |
|
(4.1 cm) |
(6 cm) |
|
K-3177-L |
1-5/8² |
2-3/8² |
Measure from smaller basin |
|
(4.1 cm) |
(6 cm) |
|
K-3150 |
1-5/8² |
2-3/8² |
Measure from smaller basin |
|
(4.1 cm) |
(6 cm) |
|
K-3354-L |
1-5/8² |
2-3/8² |
Measure from smaller basin |
|
(4.1 cm) |
(6 cm) |
|
K-3150-L |
1-5/8² |
2-3/8² |
Measure from smaller basin |
|
(4.1 cm) |
(6 cm) |
|
K-3355-L |
1-5/8² |
2-3/8² |
Measure from smaller basin |
|
(4.1 cm) |
(6 cm) |
|
K-3356-L |
1-5/8² |
2-3/8² |
Measure from smaller basin |
|
(4.1 cm) |
(6 cm) |
|
K-3165 |
1-5/8² |
2-3/8² |
Measure from smaller basin |
|
(4.1 cm) |
(6 cm) |
|
K-3166 |
1-5/8² |
2-3/8² |
Measure from smaller basin |
|
(4.1 cm) |
(6 cm) |
|
K-3166-L |
1-5/8² |
2-3/8² |
Measure from smaller basin |
|
(4.1 cm) |
(6 cm) |
|
K-3168 |
1-5/8² |
2-3/8² |
|
|
(4.1 cm) |
(6 cm) |
|
|
|
|
|
1019948-2-D |
6 |
Kohler Co. |

Faucet Centerline Table (cont.)
|
Value for ²X² |
|
|
|
(inches) |
|
|
Model |
Reveal |
No- |
Notes |
|
Cutout |
Reveal |
|
|
|
Cutout |
|
K-3168-L |
1-5/8² |
2-3/8² |
|
|
(4.1 cm) |
(6 cm) |
|
|
|
|
|
Kohler Co. |
7 |
1019948-2-D |
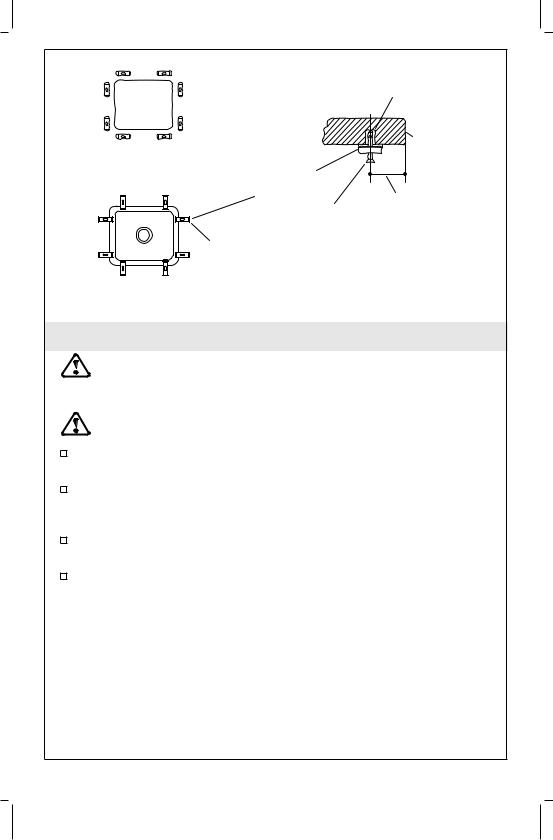
|
Insert (Not Furnished) |
Countertop Opening - Bottom View |
Edge |
Countertop |
|
Mounting |
Opening |
|
|
Bracket |
1-3/8" (3.5 cm) |
|
|
Fastener (Not Furnished) |
|
Turn the brackets so they fit over the sink rim.
Sink - Bottom View
3. Install the Sink
WARNING: Risk of personal injury. Metal surfaces are sharp and can cause severe cuts. Use gloves and handle sink edges carefully.
CAUTION: Risk of product damage. Do not cut, drill, or sand the countertop while it is positioned over the ®xture.
Cut out the opening by carefully following the pencil line traced from the template.
For laminate-type countertops, make sure all exposed non-laminated surfaces located near the cut-out area are ®nished and sealed to prevent damage from water absorption.
Drill the required faucet holes and install the faucet to the countertop according to the manufacturer's instructions.
Equally space the required number of mounting brackets and locate the mounting holes on the underside of the countertop (®nd model number below for required number of brackets).
∙Requires four mounting brackets: K-3339.
∙Requires eight mounting brackets: K-3146, K-3147, K-3164, K-3184, K-3331, K-3333, K-3336, K-3337, K-3338, K-3343, and K-3345.
∙Requires 10 mounting brackets: K-3182, K-3186, K-3163, and K-3334.
∙Requires 12 mounting brackets: K-3325, K-3332, K-3335, and K-3340.
1019948-2-D |
8 |
Kohler Co. |

Install the Sink (cont.)
∙Requires 16 mounting brackets: K-3099, K-3099-L, K-3148, K-3150, K-3150-L, K-3165, K-3166, K-3166-L, K-3168, K-3168-L, K-3171, K-3174, K-3174-L, K-3177, K-3177-L, K-3180, K-3181, K-3183, K-3185, K-3197, K-3350, K-3351, K-3351-L, K-3352, K-3352-L, K-3353, K-3353-L, K-3354, K-3354-L, K-3355, K-3355-L, K-3356, K-3356-L, K-3359 K-3359-L and K-3376.
∙The type of fastener is dependent upon the countertop material and should be recommended by a countertop supplier.
Turn the clamps parallel to the opening to allow for easy installation of the sink.
Clean all residue from the top of the sink rim. Clean the underside of the countertop around the cut-out area, making sure the surface is smooth and free of defects.
Apply a generous bead of silicone or latex sealant to the rim of the sink, near the inside edge.
Position and align the sink with the opening in the countertop.
Rotate the mounting brackets over the sink rim and tighten until snug.
Check the alignment of the sink with the cut-out and tighten the fasteners.
Optional: Apply a bead of high-quality sealant between the countertop and the top of the sink rim.
Immediately wipe away any excess sealant, and ®ll any voids as needed.
Allow the sealant to cure for at least 30 minutes before proceeding.
Install the garbage disposal, if desired. Follow the manufacturer's instructions.
Connect and tighten the trap to the strainer, and complete the water supply connections to the faucet according to the instructions packed with the faucet.
Run water into the sink and check for leaks.
Clean up with a non-abrasive cleaner.
Kohler Co. |
9 |
1019948-2-D |
 Loading...